Translate

Saturday, February 24, 2018

An Amended and Amazing Breakfast.

Back in November I wrote about a breakfast that I had eaten at a small restaurant (Tweets) out in the greater Seattle area. The breakfast was called Poblano Relleno, etc., and it was just the most amazing combination of flavors, presented in such a lovely and engaging manner. In November I tried making it. It was delicious, but not without its pitfalls. (Read about that here.)

Since that time, I have made a couple of other breakfast casseroles, in the same little Pyrex 2-serving sized loaf pan. I've learned a few things along the way. Chief among these things is that covering the casserole during baking makes the baking time decrease, and also the egg puffs beautifully. That first attempt in November was the first time I had ever made a breakfast egg casserole of any kind. 
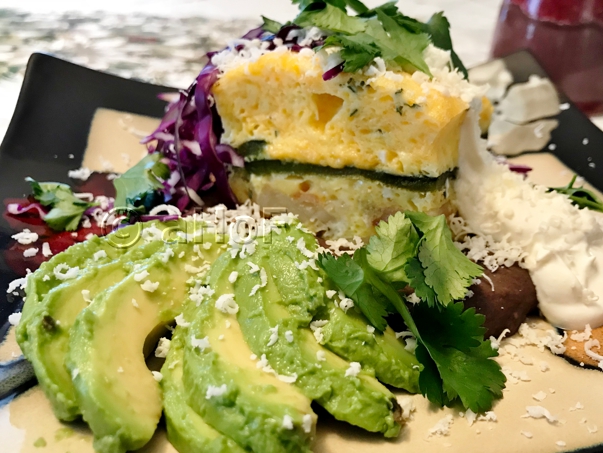
Poblano, pepper, Relleno, Breakfast, Casserole II
Poblano Relleno Breakfast Casserole II

Another idea that came up while making these other casseroles (without the Poblano pepper in the middle) is that adding shredded cheese to the egg that goes atop the Poblano might just help the egg keep the Poblano down, just above the potatoes in the bottom, instead of floating to the top as it did in my first attempt. At Tweets, the Poblano was just perfectly set above the potatoes in the bottom of the casserole, while the top half of the eggs was set nice and high above. In my first attempt in November, I had not added any cheese to the eggs that went over top of the Poblano pepper, and both the potatoes and the Poblano layer just floated up to the surface.

A few years back I had bought some pretty silicone lids by Charles Viancin, in a kitchen store (Amazon carries them, thus the link. i have no affiliation with Amazon or any remuneration for selling them). My first couple were "lily pad" shaped, and then I got a couple of banana leaf types. I love these, either for covering a plate while reheating in the microwave, or while baking things in the oven. I use the larger rectangle banana leaf shape to cover my scalloped potatoes while they bake, and I found that the medium sized lily pad lid covers this little Pyrex loaf pan. And the best part of all is that since the silicone is flexible, it expands as the eggs expand. I haven't tried this with anything else as a cover, since it works so perfectly. And since the eggs tend to puff way up, I would be hesitant to use something like aluminum foil. Just below is a photo of one of my other breakfast casseroles, just baked, with the Lily Pad lid removed.

Bacon, Egg, vegetables, breakfast, Casserole
Bacon and Egg Casserole
At this point in time, I have become quite proficient at making these breakfast casseroles, and they are turning out great every time. I tried making this recipe in two wells of a jumbo muffin tin, and while they came out well, perfectly cooked, I just didn't like it. Why? Because I do not like any brown on my eggs. I cannot tolerate the flavor of browned egg. When I make this casserole in the small loaf pan, once removed from the pan, I trim all the edges so they are perfectly straight, thereby removing any browned sides. In the muffin tin, being round, I did no trimming, and all those browned sides just totally ruined the flavor, for me. 

I realize that while I am not unique in this particular dislike, there are also plenty of people who absolutely prefer their eggs browned, or even slightly burnt. If this is the case, go for the jumbo muffin tins, as they came out great, aside from this one flaw (for me 😀).

Ultimately, here below I am showing a photo of my scrumptious breakfast at Tweets, then my first attempt at recreating this casserole at home, and then my second attempt, recently, where finally I got it just as I wanted it. The cheese was added to the second half of the eggs, and pouring this over the Poblano kept enough bulk in the eggs to hold down the potato and Poblano. Just like at Tweets. Hurray!

restaurant breakfast, first attempt, second attempt
Tweets breakfast                 -                 my first attempt                 -                my second attempt


Poblano Relleno Breakfast Casserole II


Serves 2
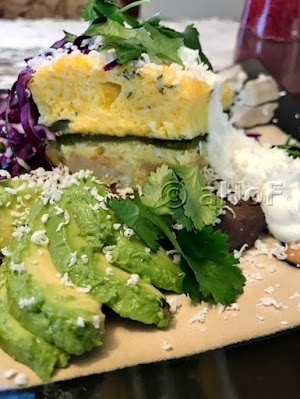
 
Poblano, Relleno, Breakfast, Casserole, recipe
Poblano Relleno Breakfast Casserole II

MAKE AHEAD (one day, at least):
1 Poblano Pepper, blistered, peeled
2 cups black beans (cooked ahead or use one can, divided between plates)

CASSEROLE:
1 medium potato, quartered, sliced thinly
- oil for frying
¼ to ½ teaspoon salt for potatoes
6 eggs, whisked to combine
1 teaspoon fresh thyme leaves
½ teaspoon salt

½ cup shredded Cheddar cheese (or any preferred shredded cheese)

ASSEMBLE GARNISHES:
1 small "salad" portion, per plate (red cabbage, salad greens, arugula, etc)
2 - 4 small cherry tomatoes, or whatever colorful garnish is available
- sour cream, thinned if needed
- scallion greens, sliced or chopped
- cilantro leaves, optional
- Feta Cheese or Queso Fresco (1-ounce per plate)

Fry the potatoes in enough oil so they do not stick, and sprinkle with the ¼ to ½ teaspoon salt. Toss them frequently, until they are nicely browned, crisp and cooked through.

Spray a small loaf pan (4 x 6-inch) with cooking spray. Press the potatoes into the bottom of the casserole. Whisk the fresh thyme leaves and the ½ teaspoon salt into the eggs. Pour half the egg mixture over the potatoes and rap the pan various times to get the egg to penetrate the potatoes. Allow to set for a few minutes, while this occurs. Cut the peeled Poblano in half lengthwise, then set the halves over top of the potatoes so they cover the whole surface. Add the half cup Cheddar cheese to the remaining eggs and pour this over top of the Poblano pepper. Spray a silicone "lid" as explained above and set it over top of the casserole. Alternately, spray a piece of foil and set the sprayed side down over the casserole, but do not crimp it into place. Bake the casserole in a preheated 350 degree oven for about 40 to 45 minutes. Check after 35 minutes, as all ovens are different. 

While the casserole is baking, assemble all the garnish ingredients. Heat the black beans, whether homemade or canned. When the casserole is done, give it a few minutes to set, then run a knife around the edges and remove the casserole from the pan. With a very sharp knife, trim the outer edges straight and cut the casserole in half. Place about 1 cup of black beans into each of two large bowls. Set a slice of the casserole on top of the beans in each plate. Place a portion of salad or slaw on top of the casserole, then "scribble" some sour cream artfully over the whole plate. Set the tomato slices around the casserole, crumble on the cheese and strew with scallion greens and cilantro, if using. Serve immediately.


My passion is teaching people how to create a harmony of flavors with their cooking, and passing along my love and joy of food, both simple or exotic, plain or fancy. I continue my journey in ethnic and domestic cuisines, continuing my journey to explore diverse culinary experiences and hopefully to start you on a journey of your own. Join me also at A Harmony of Flavors on Facebook, and Pinterest.

Friday, February 23, 2018

A Savory Supper Dish

After my last blogs about desserts, I thought it was time to give attention to something savory. Last evening I created a "Stroganoff" of a sort, using turkey breast cutlets. While considering what I would do to create this recipe, I thought about serving it with fettuccine, and then thought about making my own pasta. 

I do not expect that many people will be making their own noodles or fettuccine for dinner, so please feel free to cook some boxed pasta to serve with the "Stroganoff." But just on the off-chance that you are interested in making your own pasta, I will give you the recipe for what I did. I have been measuring things in grams more and more often. I have a scale, and grams are nicely small, so with tiny amounts of things, grams come in handy. If you do not have a scale, so sorry, because I never gave thought to how much the measurements would have been in either ounces or by volume measure.
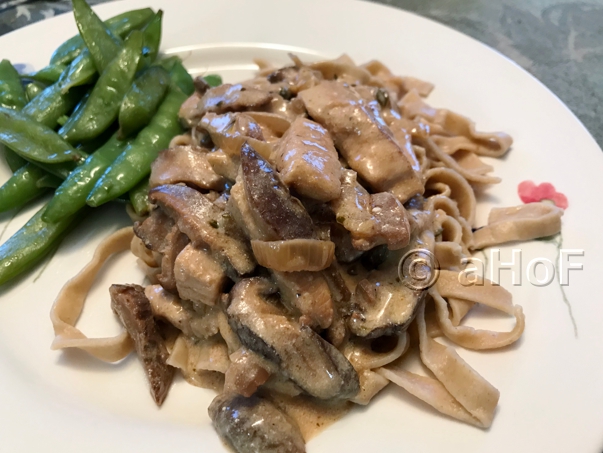
Turkey, Stroganoff, Kamut, Mushroom, Fettuccine
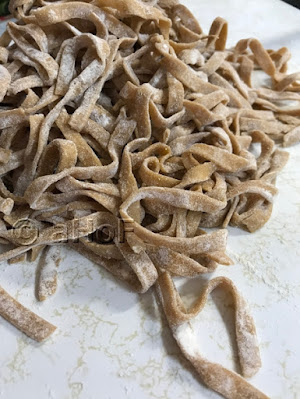
Turkey Stroganoff over Kamut Mushroom Fettuccine

Just to make all this even more complex, I wanted to give my bag of "00" Pasta flour a go, so I used some of that. Also, I have recently made pasta twice in my pasta making machine and used freshly ground Kamut® Khorasan grain (ground using my electric grain mill). I had read that Kamut® Khorasan is a more "relaxed" grain, and tends not to try and pull back quite so much when rolling it out. This is very handy when making pasta. As it happens, Kamut® Khorasan grain is a pale golden color, so the pasta is a pretty light gold, instead of brown, like with whole wheat. It also produced beautiful spaghetti, which held together nicely and did not become brittle. It was beautiful pasta! So I truly had no other reason to use the "00" flour, aside from that I had it and had not yet tried it out.

Then, to add to the whole thing, since I was making Stroganoff, with lots of mushrooms, I thought I would make the pasta mushroom flavored. I have a quantity of dried Shiitake mushrooms, so I took a couple of hands full and smashed them into smaller bits, then removed stems, since the stems are so hard. Then I put the pieces of dried mushroom into my coffee/spice grinder (used only to grind spices) and ground them fine. I passed the powder through a fine sieve, and then weighed out the 14 grams I had decided on. None of this is strictly necessary. The pasta can be made without the mushroom powder. Simply add 14 grams more of either the "00" pasta flour, or 14 grams more of the Kamut® Khorasan flour. As it turned out, the mushroom powder made the pasta as dark as it would have been with whole wheat flour. Oh well.


Kamut Mushroom Fettuccine
Kamut, Mushroom, Fettuccine, recipe, pasta
Kamut Mushroom Fettuccine


Makes just over a pound

180 grams Kamut® Khorasan flour
170 grams "00" pasta flour, or all-purpose flour
14 grams dried mushroom powder
3 large eggs
3 to 4 tablespoons water

Place the dry ingredients into a large mixing bowl and make a well in the center. Whisk the eggs slightly and pour them into the well and add in 3 of the tablespoons of water. Using your hands, begin stirring in the middle, slowly incorporating more and more of the dry mixture. The goal is for all the dry mixture to be moistened, so the dough comes together. If it does not, drizzle in a little of the remaining tablespoon of water at a time until it does come together. Turn the dough out onto a surface and begin kneading. The dough should be quite stiff. Knead for at least 5 minutes. At this point, you can either roll the dough out by hand, making it quite thin, then rolling the 
flour-dusted dough into a cigar and slicing across in ¼-inch increments, to make fettuccine, or, if you happen to have a Kitchen Aid mixer, with a pasta roller and linguine and fettuccine cutters, you can roll out the dough using the pasta roller, then cutting with the fettuccine cutter. If not ready to cook right away, toss with a little flour so the individual strands do not stick together. Cook in a good quantity of salted water until al dente.
~~~~~~~~~~~~~~~~~~~~~~~

Back to the Entree! 

As I mentioned above, I have a quantity of dried Shiitake mushrooms. When we lived in the greater Chicago area, back in the late '90s, we visited Chinatown there. Someone was selling huge bags of these dried shiitake mushrooms, for a very inexpensive price. We bought a bag, and After all these years, I still have a gallon sized container left. My husband and I both love mushrooms, and these dried ones, once soaked, are a very "meaty" type of addition to a dish. Far more so than freshly cooked mushrooms. Since I had not yet gone grocery shopping for the week, I did not have any fresh mushrooms, so I just grabbed a couple of large hands full of these dried shiitakes and poured boiling water over them. After the time it took me to make the fettuccine, I got back to the mushrooms, which were ready to use. I removed stems and sliced each one, then weighed them, out of curiosity. They were almost exactly 8 ounces. 

Had I bought a pound of cremini mushrooms, sliced and cooked them, I doubt that the cooked mushrooms would have been even 8 ounces, since they let out an amazing amount of liquid when cooking. In that case I might have added in more, but you can decide how much you love mushrooms when you make this dish. I would start with a pound.

I have a lot of dry thyme, still in the pot it grew in during last summer. The tiny, dried leaves are perfectly useful, so I snipped a few sprigs and stripped the leaves to use in this dish. However fresh thyme would be perfect, in which case double the amount. Or if using dried thyme leaves in little spice jars, use as much as you prefer. My amount of thyme leaves were quite fluffy, not having been broken up at all, so start with a half teaspoon, if that is the case.

The use of Sherry or dry white wine is something I love to do when cooking mushrooms. Adding in the wine and letting it cook out completely just adds a dimension of flavor that I love. It is not absolutely necessary. The same goes with the Chicken marinade by Lea & Perrins. Regular Worcestershire would be just perfect as well, and most people have that in their array of pantry items.

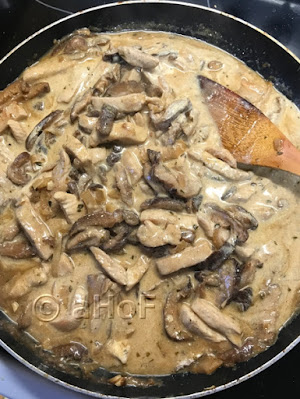
Turkey Stroganoff


Serves 4 - 6

Turkey, Stroganoff, sauce, mushrooms
Turkey Stroganoff
1 pound mushrooms, sliced
1 tablespoon olive oil, more, if needed
1 tablespoon butter, more if needed
1 pound turkey breast cutlets, sliced into ½-inch wide strips
1½ teaspoons salt, divided
1 onion, roughly chopped
2 - 4 cloves garlic, minced
1 teaspoon dried thyme leaves
½ cup dry Sherry or other dry white wine
2 tablespoons all-purpose flour
a few grinds of black pepper
2 teaspoons paprika, preferably Hungarian
2 teaspoons of Lea & Perrins "Rooster Booster" or Chicken Marinade (or just use regular Worcestershire sauce)
2 teaspoons Dijon mustard
¾ to 1 cup of sour cream

Melt the butter and olive oil in a large skillet and sautĂ© the mushrooms with ½ teaspoon of the salt until all the liquids have cooked out and evaporated and the mushrooms are browned. This takes a while; be patient. Turn the mushrooms out into a bowl and set aside.

In the same skillet, adding more oil and butter if necessary, fry the turkey and another ½ teaspoon salt until the turkey begins to brown in spots. Turn the turkey out into the bowl with the mushrooms.

In the same skillet, add more oil and butter if needed and turn the heat to low. Add in the onions and the last ½ teaspoon of salt and cook slowly, stirring often, until lightly golden. Add in the garlic and continue to sautĂ© until the onions are golden. Add in 2 teaspoons dried thyme leaves and the Sherry and raise the heat to cook out the Sherry until almost dry. Sprinkle on the flour, pepper & paprika and stir until no white flour shows. Lower heat and add in 2 cups of water (or unsalted stock) and allow the mixture to come to a boil, stirring often. Add in the chicken marinade (or Worcestershire) and Dijon and cook until the mixture has boiled for at least 10 minutes to cook out the flour. Check for seasoning and correct, if needed. Return the mushrooms and turkey to the skillet and stir in, reheating. Off the heat, stir in the sour cream to combine.

Serve over rice or noodles.


My passion is teaching people how to create a harmony of flavors with their cooking, and passing along my love and joy of food, both simple or exotic, plain or fancy. I continue my journey in ethnic and domestic cuisines, continuing my journey to explore diverse culinary experiences and hopefully to start you on a journey of your own. Join me also at A Harmony of Flavors on Facebook, and Pinterest.
Tuesday, February 20, 2018

Method to my Gelatin Madness

I wrote my previous blog after using sheet gelatin for the first time, with its attendant "how to substitute" problems popping up like moles in the "Whac-a-Mole" arcade game! I tell you, it was no easy task to calculate. I could wish, fervently, that it would be more standardized. But alas...

The reason for all this gelatin frenzy

I got an idea into my head. I wanted to try making a White Chocolate Mousse that was easy. My Chocolate Mousse recipe is as easy as recipes come, and it is the creamiest mousse, ever. If you love chocolate and a good, creamy mouthfeel, then look no further. But since white chocolate does not come in an equivalent unsweetened powder like unsweetened cocoa powder, there comes the consideration of having to melt the white chocolate. When to add it in? And how much gelatin to use? 
White Chocolate, Mousse, Tarts, dessert
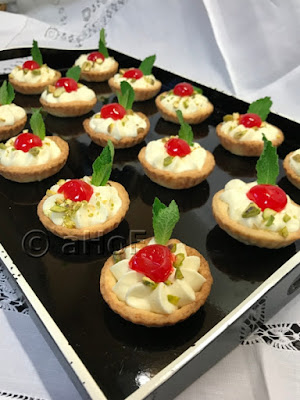
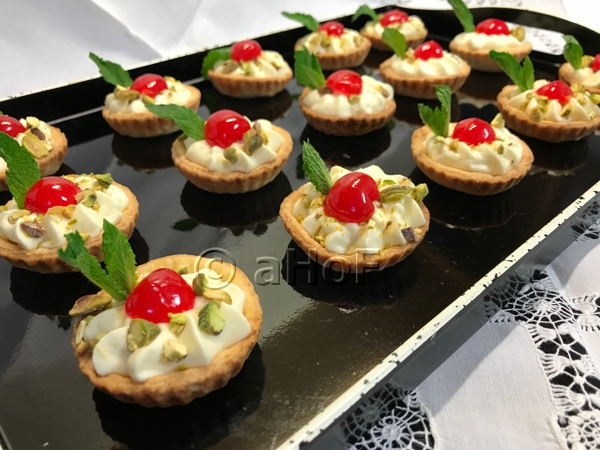
White Chocolate Mousse Tarts

And then, I remembered that I had bought sheet gelatin, and that is when all my gelatin questions arose. Believe you me, it was a real process, and this old brain of mine was stumped for quite a while, trying to figure out the equivalent for powdered gelatin. Since there is no straight and direct substitute, being that there are four grades of gelatin (see my "All You Need to Know About Gelatin" blog), with similar, but not exact gelling power, none of these are a direct swap for a packet of powdered gelatin. Woe is me!😧 And even after all my calculations and cogitations, I still am having fits with adjusting a recipe.

However, I will gamely forge ahead with the two recipes I made, and hope you might be able to have yours come out at least as well as mine did. Which was pretty near perfect. 

A note on using Frangelico. I chose Frangelico to give flavor to the mousse. I intended to use Grand Marnier, but had none in my cabinet. Any light colored liqueur will work fine. Just do not use too much liqueur in the recipe, as alcohol can inhibit gelling properties of the gelatin.

Recipe One

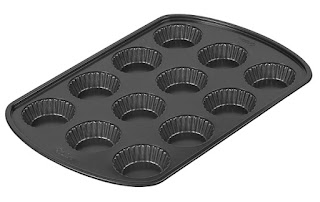
Wilton, 12-cavity, nonstick, mini tart pan
Wilton 12-cavity nonstick mini tart pan

My first recipe came after having made some individual Cherry Custard Tarts for a Valentine treat. They came out very nicely, except that the custard was just not totally set. Fine for individual tarts, but if you were to substitute the individual tart tins for one larger tin, the custard would just have oozed all over. A slice would not have worked. What could I make as a substitute?

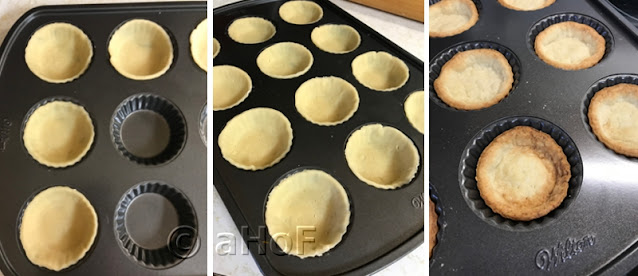
Here is where I thought of a White Chocolate Mousse, and where all the gelatin frenzy began. First though, I opted to make little tart shells to fill with the White Chocolate Mousse. I had just bought a couple of fluted tart tins. I made a pastry and lined the tins, blind baking them.
 
pie dough, tart wells, prick dough, blind bake
Line tart wells - prick dough all over - blind bake shells

Ultimately, it must have been dumb luck, because my first recipe for White Chocolate Mousse came out so perfectly that I could have cried. And I almost did! It was excellent. Perfect flavor. Perfect texture. However, my calculations for the amounts were off, and I had about ⅓ more mousse than I needed. Still, the mousse would have been just perfect set into a 9-inch tart shell and topped with fruit.

My first White Chocolate Mousse recipe:


(Would probably have filled 36 mini tart wells) 
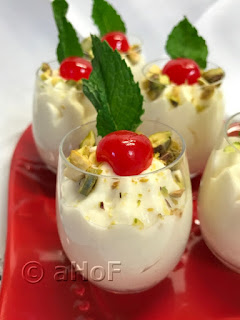
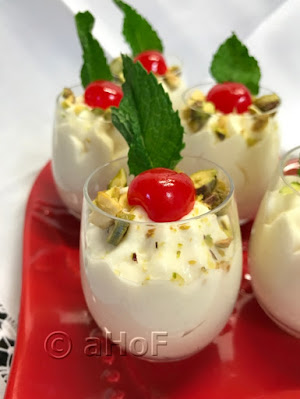
leftover mousse, shot glasses, tiny dessert
The extra mousse in little shot glasses

1½ sheets Platinum gelatin (2.55 grams)
3 tablespoons cold water
3 tablespoons Frangelico liqueur (or use cold water)
8 ounces white chocolate, in small chunks
1¼ cups heavy whipping cream
1¼ teaspoons vanilla extract
¼ cup mascarpone cream

Soak the gelatin sheets in cold water to completely cover and allow to "bloom" for 7 to 10 minutes. Meanwhile, place the white chocolate pieces into the top pan of a double boiler set over (not touching) simmering water. Allow the chocolate to melt, slowly, stirring often. In a small saucepan, heat the 3 tablespoons of water and the 3 tablespoons of Frangelico (or just use 6 tablespoons water) and bring to a simmer. Lift out the gelatin sheets from their water and gently squeeze off any excess water, then add these sheets to the small saucepan, stirring, off the heat, until totally dissolved. Pour this gelatin mixture into the melted white chocolate. Stir or whisk, combining the two mixtures, then once all is incorporated, set the pan aside to come to room temperature. 

In a large mixing bowl, Beat the heavy cream with the vanilla, until soft peaks form. Add in the mascarpone, then beat to evenly distribute, and until the mixture holds stiff peaks. Pour the white chocolate mixture all around the outer edge of the whipped cream, then fold it in, until no streaks remain. At this point, the mixture is of soft piping consistency. Pipe into little tart shells or small glasses or bowls. Refrigerate for 5 to 8 hours.

I topped the tarts (and these little shot glasses full) with a half maraschino cherry and crushed pistachios.
~~~~~~~~~~~~~~~~~~~~~~~~~~~~~~~

A couple of days passed. I sat with my recipe and tried to come up with a recipe that would be approximately ⅓ less the amount of this first recipe. Many of the ingredients immediately lent themselves to ⅓-less, such as 3 tablespoons Frangelico to 2 tablespoons. One and one-half Platinum gelatin sheets were reduced to 1 Platinum sheet. I went from 8 ounces white chocolate to 6 ounces. Not quite ⅓ less, but close. I dropped the 1¼ cups of heavy cream to ¾ cup, but kept the mascarpone amount the same. This reduced the initial 1½ cups of cream (1¼ cups heavy cream + ¼ cup mascarpone) down to 1 cup (¾ cup heavy cream + ¼ cup mascarpone). All in all, it seemed great.

I went about making it the same as before. But this time, once I added the Frangelico/gelatin mixture to the white chocolate, it started trying to thicken immediately. I was afraid to leave it to cool down for long, so I immediately began whipping the heavy cream, then added in the mascarpone and then folded in the white chocolate and gelatin mixture. It was already setting. I did pipe it into cups again, but it was visibly not the simple, creamy mixture the first recipe yielded. Not to say it was set and rubbery. It was still smooth and creamy. It just didn't have the lovely smooth LOOK of the first one. Flavor? The same. Texture while eating? Smooth and silky. Ultimately? No big deal. Just work quickly!

White Chocolate Mini Tarts 

Makes 24 fluted 2-inch tarts, or one 9-inch tart*
White Chocolate, Mini Tarts, dessert, recipe
White Chocolate Mini Tarts


PASTRY:
½ cup unsalted butter (1 stick / 4 ounces)
6 ounces cream cheese 
2 cups all-purpose flour

MOUSSE:
1 sheet (1.7 grams) Platinum gelatin
2 tablespoons water
2 tablespoons Frangelico 
6 ounces white chocolate, in chunks
¾ cup heavy cream
1 teaspoon vanilla extract
¼ cup mascarpone cheese

Preheat oven to375 degrees. Cut together the first three ingredients for the pastry, until it comes together in a ball. Roll and cut out 3-inch rounds and fit them into the wells of mini tart tins. Alternately, fit the pastry into a 9-inch tart pan with removable bottom. Prick the shells all over with a fork. Bake the shell(s) for about 10 to 12 minutes, or until nicely golden. *If using a larger tart tin, Line the shell with foil, then with some beans or rice. Bake initially for 12 minutes, then remove the foil and beans and bake for another 12 to 15 minutes, until the bottom in nicely golden. Set aside to cool completely.

Place the gelatin sheet into a bowl. Break in half if needed. Pour about 1 to 1½ cups of cold water over the sheets and allow to fully hydrate, or "bloom," for at least 7 to 10 minutes.

Bring a pan of water to a simmer and place another pan over this hot water (a double boiler, or makeshift, using a bowl over hot water). Add the white chocolate bits to the upper pan and allow to melt.
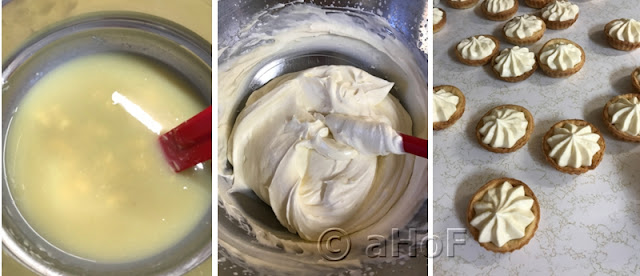
White chocolate, folding, whipped cream, piping in shells
White chocolate mixture - folding into whipped cream - piped into shells

Set the 2 tablespoons water and two tablespoons Frangelico into a small saucepan and bring to a simmer. Lift the gelatin sheets out of the soaking water, squeeze gently to remove excess water, then add them to the hot liquids in the saucepan. Stir to completely dissolve. Add this mixture to the melted white chocolate and stir to completely combine, using a whisk if needed. Remove the pan from the heat and set aside.

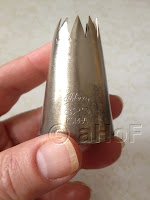
Ateco, large open star tip, 829
Ateco large open star
 tip 829
In a large bowl, beat the heavy cream and vanilla extract with a hand mixer until soft peaks form. Add in the mascarpone, beating until the mixture is combines and holds stiff peaks. Pour the white chocolate mixture all around the edges of the whipped cream. Gently fold the mixtures together until no streaks remain. Pipe into the mini tart shells using a star tip (I used Ateco 829), or just spoon in small amounts. 

If filling a 9-inch tart shell, pour in the mixture and smooth the top.

Adorn with fresh fruit, or maraschino cherries, and chopped nuts if desired. 


My passion is teaching people how to create a harmony of flavors with their cooking, and passing along my love and joy of food, both simple or exotic, plain or fancy. I continue my journey in ethnic and domestic cuisines, continuing my journey to explore diverse culinary experiences and hopefully to start you on a journey of your own. Join me also at A Harmony of Flavors on Facebook, and Pinterest.
Thursday, February 15, 2018

All You Need to Know about Sheet Gelatin

Soft Custard, too soft, small tarts
Very Soft Custard, unsuitable for a large tart
In my last post, I had created some lovely 4-inch individual tarts filled with a soft custard. This custard was far softer than I had hoped, and would not have been usable for a larger tart. And this got me thinking about what filling I would use if making a larger tart.

I have a most excellent Chocolate Mousse recipe that could not be any more simple. No cooking involved and it takes only minutes. Granted, it uses unsweetened cocoa powder. White chocolate doesn't come in "cocoa powder" form, so how then would I accomplish it? Could there be an easy and simple method for white chocolate mousse? I read through a dozen or so "easy" white chocolate mousse recipes. My regular chocolate mousse uses gelatin, and it sets just nicely so that it is creamy in the mouth, and without the feel of a gelled substance. I wanted to accomplish this, and wanted to err on the side of caution in how much gelatin was used. It needed to be just enough to make it hold its shape when piped; nothing more.

One of the recipes I read used sheet gelatin. Which got me thinking.

Sheet Gelatin

I bought some sheet gelatin about a year ago, but never got around to trying it out. I do not make gelatin based desserts or gelled anything, very often. I had seen sheet gelatin used in TV programs. I had seen it called for in some few recipes. Due to all these programs, finding sheet gelatin is now far easier than in the past. But in all my years, I had never once seen it or tried it, so I did some research. 

Sheet Gelatin, leaf gelatin
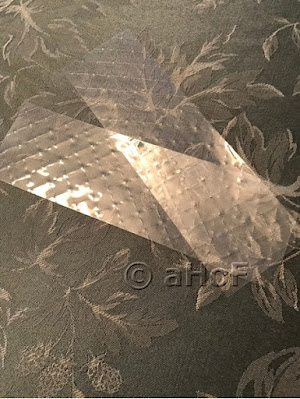
Two Sheets of Gelatin
Sheet gelatin comes in - well - sheets, or leaves. They are crisp and thin and just like with powdered gelatin, need to be "bloomed" (hydrated in cold liquid for about 10 minutes) before using. Once bloomed, they need to be dissolved in hot liquid before using, yet not boiled. In using powdered gelatin, when blooming in liquid, this liquid (now absorbed in the powdered gelatin granules) must be taken into account along with the whole amount of liquid in the recipe. Using sheet gelatin, it must be bloomed in cold liquid also, but it is them removed from the cold liquid and added to the hot liquid to dissolve. Therefore, the cold soaking liquid gets tossed away and is not counted in with the whole recipe's liquid amount.

The biggest difference is that sheet gelatin comes in differing strengths, requiring more, or less, sheets to accomplish the same thing. The four strengths are Bronze, Silver, Gold and Platinum. Bronze has the least gelling power and platinum has the most gelling power, per sheet. However, you must really use the sheets by weight, to calculate the amount of any of the sheets to use in substitution for powdered gelatin. Some recipes will specifically tell you which strength to use, but many will not. If there is no suggestion, then opt for Silver, which is possibly the most commonly used. 

There are also guidelines to each category's bloom strength and weight per sheet. 
  • Bronze: 125 - 135  /  3.3 grams by weight
  • Silver: 160  /  2.5 grams by weight
  • Gold: 190 - 220  /  2.0 grams by weight
  • Platinum: 235 - 265  /  1.7 grams by weight

Granted, this seems useless information, without anything to compare it with. Then I read somewhere that a packet (about 2½ teaspoon worth) of Knox gelatin weighs 7 grams. And then I got it. I got how I could compare what a particular sheet or sheets would do in comparison. Now this information made sense. One envelope of powdered gelatin will softly set 3 cups of liquid, medium set 2 cups of liquid or very firmly set 1 cup of liquid. One Platinum sheet, according to my package will set ½ cup liquid. Use more, or less, to accomplish your goal.

How Can I Substitute Powdered Gelatin with Sheet Gelatin?

Ultimately, it doesn't matter which grade of gelatin sheet you acquire, all that is needed is an adjustment in how many sheets to use, by weight. If a recipe calls for one whole packet of powdered gelatin (which is 7 grams total), then I can substitute:
  • 2¼ sheets Bronze to equal 7.4 grams
  • sheets Silver to equal 6.9 grams
  • 3½ sheets Gold to equal 7 grams
  • 4 sheets Platinum to equal 6.8 grams

At least, this is my own, personal calculation by gram weight. It is not 100% accurate, but should be quite close. Err on the higher side for more firm setting, or lower side for softer setting.
White Chocolate, Mousse, soft set
White Chocolate Mousse, soft set
When calculating the amount of gelatin for my white chocolate mousse, knowing I wanted the mousse to set and hold its shape, once piped into little shells, yet not have the completely firm "set" and mouthfeel of "Jello," I calculated on the low side. I wanted to give the whipped cream element a boost, so to speak, not to make it unmovable. My white chocolate mousse recipe uses approximately 1½ cups liquid, and uses 1¼ teaspoon powdered gelatin, or 3.5 grams. I would need to approximate that using the sheets. Considering that my Platinum sheet package states that each sheet will set ½ cup of liquid, I would look for a very soft set for a little over 3 times that much liquid and use half the 3+ sheets, going for lower setting power. I used 2 sheets (total 3.4 grams).

Why Use Gelatin Sheets at All?

Gelatin sheets have been mainly used in the domain of the professional kitchen. Until more recently, with all the wonderful TV programs out there, with their attendant cookbooks, and calling for sheet gelatin, it has become much more widely available. The main difference between sheet gelatin and gelatin powder is that the sheets have far less of a flavor and gelatin made with them comes out far more clear. If your goal is perfect clarity in your gelled substance, without any off flavor interfering, then sheets are what you want. Powdered gelatin has a definite flavor and does not yield such a perfectly clear outcome. 

If what you want to set is opaque and highly flavored, then it makes little difference which type of gelatin is used.

What is Gelatin?

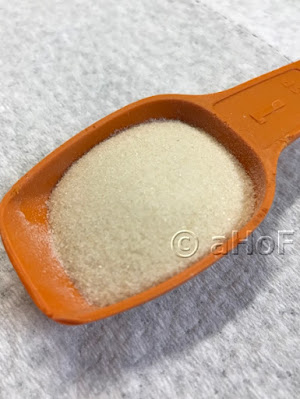
Packet amount, Powdered Gelatin
One Packet of Powdered Gelatin
 in a tablespoon measure
Gelatin comes from collagen, found in animals. Most commonly, gelatin is extracted from pig skin, though bovine gelatin (from skin or hooves) is also widely available. There is no true "gelatin" other than what comes from animals, although there are good vegan gelling agents, such as agar. This means that anything made with gelatin is unsuitable for vegetarians or vegans. Knowing dietary restrictions will also determine the type of gelatin to be used, whether porcine or bovine.  

As mentioned above, gelatin must be bloomed before using. This means it needs to be soaked in a cold liquid to hydrate, or "bloom" and then dissolved and melted into a hot liquid. Under no circumstances should the hot mixture be boiled once the gelatin has been added, as this can result in unreliable setting ability.


Gelatin Inhibitors

Knowing about how to use gelatin does not mean it is going to work like magic on any liquid. There are various things that can cause the gelling action to fail.

Many fresh fruits have an enzyme that inhibits gelatin's ability to set. These fresh fruits include pineapple, papaya, kiwi, peach, mango, guava and fig. Once cooked though, these fruits cause no more problems, as you may have seen if you've ever been exposed to Jello made with a can of fruit cocktail in it. Other things can also inhibit gelatin from setting: 
  • too high a temperature and prolonged heating (as noted previously), 
  • too high an alcohol concentration (above 40%), 
  • too high an acid content to the liquids to set, or 
  • too high a salt content.

Gelatin will set if the liquid is within a pH range of 4 to 10 (7 is neutral pH). Citrus is acidic and if the citrus content is too high, your gelatin will not set. The same goes with too alkaline a liquid.

One last thing of importance is that gelatin needs to be chilled to set completely, preferably 6 to 12 hours or more at below 59 degrees F.

Gelatin Strengtheners

Sugar and cream help gelatin to firm up. Sugar pulls liquid out of the gelatin and cream is thicker on its own, aiding the thickening process. There is also a commercial setting promoter called transglutamase.

I hope this article is not too confusing, and that it may help you tread these strange waters with more ease and confidence. My White Chocolate Mousse recipe, coming soon, will be using gelatin sheets, so this article may help prepare for it. 


My passion is teaching people how to create a harmony of flavors with their cooking, and passing along my love and joy of food, both simple or exotic, plain or fancy. I continue my journey in ethnic and domestic cuisines, continuing my journey to explore diverse culinary experiences and hopefully to start you on a journey of your own. Join me also at A Harmony of Flavors on Facebook, and Pinterest.
Monday, February 12, 2018

A Beautiful and Delicious Valentine Treat

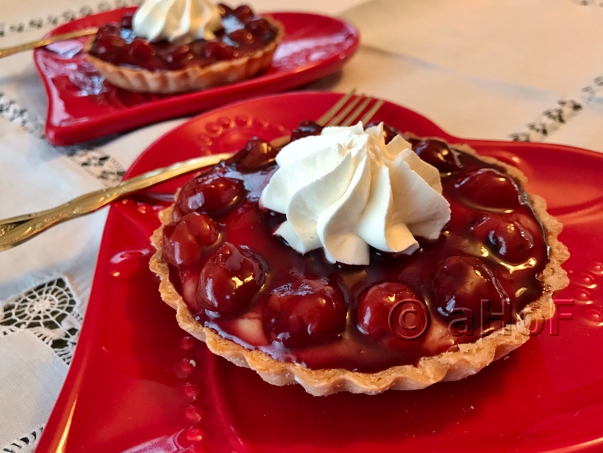
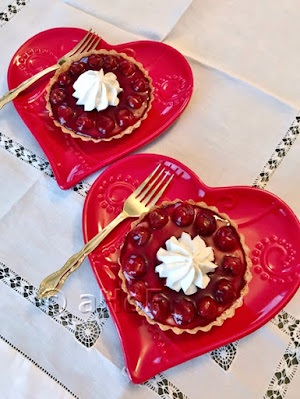
Okay, so I made these way prior to Valentine's Day, in order to be able to put the recipe here. But these were truly delightful, no matter when. And I had to make something beautiful to put on the pretty heart shaped plates I had just bought. And so these Cherry Custard Tarts were born.

Cherry, Custard, Tarts, dessert, pie, individual
Cherry Custard Tarts


I had also bought individual tart pans with removable bottoms, and wanted to use those, for ease of removal from the pans. As it happens, while it might seem like a lot of work, it isn't as bad as all that, and if you are making these for your beloved, it is worth a little bit of effort. 

Cherry, Custard, Tarts, dessert, recipe
Cherry Custard Tarts
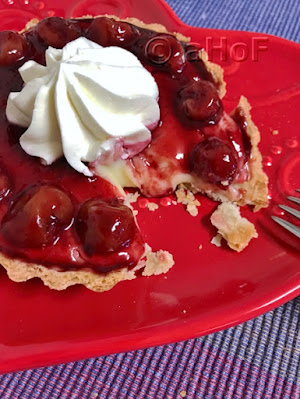
My one and only complaint is that the custard wasn't quite as firm as I had hoped, but it was certainly firm enough to do what it needed to do - stay inside the shell. All the flavors were just perfect. Sweet, but not too sweet. The Kirsch in the custard and in the strained preserves gave just that hint of something more, without jumping out and screaming, "Taste me!" And they were pretty. They were so very pretty setting on the heart shaped plates. And I was so pleased to serve these to my husband, albeit a little prior to Valentine's Day.

I made little tart shells using my usual Never Fail Pie Pastry, but any favorite pie pastry for a 9 or 10-inch pie will work. Whenever I make this pie pastry, as it makes enough for 3 or 4 pies, I always freeze extra individual portions, so they are available whenever needed. I made these as individual tarts with a 4-inch base, but if making it in a larger, single 9 or 10-inch tart pan, you might want to use a different filling, as this one worked fine in small tarts, but would not hold to slice and serve a larger slice. 

I would have preferred to use a can of cherries in syrup, but this was not available, so instead I used a can of cherry pie filling and fished out the cherries. Looking back, this might have been for the best, as the cherries were very small, and looked much nicer on these small tarts than would larger cherries. I wanted to "glaze" the tart with strained cherry preserves with a little Kirsch, so once the cherries were in place it was drizzled over top. Once cooled, this glaze holds everything in place. And then of course, I put a pretty piped dollop of Mascarpone Whipped Cream to top it all off. 

I tried something I had never done before, when baking the tart shells. I truly hate blind baking shells, as they always shrink so much. I line the shells, fill them with beans or rice or what-have-you, and they still shrink. And they still bubble up once the foil is removed and the final baking is done. So, while watching "The Great British Baking Show," I noticed that they never trim a crust before baking. I gathered it was to prevent this kind of shrinkage, and then they trim the shell once it is finished baking. I tried this out. But, I do not believe it really prevented shrinkage. The pastry shrinks a bit, regardless of how it is placed in the pan, and if it can't shrink downwards, then the bottom shrinks upwards. This is what happened, and once I trimmed the baked shells, they all sat themselves well down, at least ⅛-inch. With little tarts, this is a significant amount. So, I am not sure it made any real difference at all.

Cherry Custard Tarts
Cherry, Custard, Tarts, dessert, recipe
Cherry Custard Tarts

Makes four (4-inch) tarts 

Pastry for one 9 - 10-inch pie

CUSTARD:
¼ cup granulated sugar
1 tablespoon cornstarch
1 tablespoon all-purpose flour
pinch salt
1 cup whole milk
2 large egg yolks
1 teaspoon vanilla extract
1½ teaspoons Kirsch (cherry liqueur), optional
1½ tablespoons unsalted butter in small cubes
2 ounces good quality white chocolate, chopped

FOR TOPPINGS:
1 can cherries in syrup, or cherry pie filling
1 jar cherry preserves
1 tablespoon Kirsch, optional

MASCARPONE WHIPPED CREAM:
¼ cup whipping or heavy cream
1 tablespoon confectioners' sugar
2 ounces mascarpone (about ¼ cup)
1 teaspoon Kirsch, optional


Milk mixture, egg yolks, cooking, boiling,
Milk mixture; egg yolks; cooking milk mixture; boiling the mixture

MAKE CUSTARD: In a mixing bowl, combine the butter and white chocolate; set aside. In a small mixing bowl, whisk together the egg yolks; set aside, but keep nearby. In a medium saucepan, whisk together the sugar, cornstarch, all-purpose flour and salt. Whisk in the milk until smooth and set on the stove on medium heat. Whisking constantly, allow the mixture to come to a boil, about 5 minutes. Reduce heat to medium low and continue whisking for 3 minutes more. Leave burner on and remove the pan from the burner. 

tempering eggs, milk into egg, whisk, repeat
milk into egg - whisk and repeat - egg mixture into pan - whisk thoroughly

Off the heat, add a small ladle of the hot liquid into the whisked eggs, then whisk briskly to incorporate. Repeat this twice more, then pour all the egg mixture back into the hot saucepan. Whisk, then return to the burner, whisking for about 1 to 2 minutes. Do not allow the mixture to boil. Remove from the burner and immediately empty the saucepan into the bowl with the butter and white chocolate. Add the vanilla and Kirsch and stir, until the chocolate is completely melted. Cover the custard with a piece of plastic wrap, pressing it directly onto the surface of the custard, to prevent a skin forming. Set aside to cool completely. If not using once cooled, refrigerate until needed.

white chocolate, butter, bow, hot mixture, whisk, cover
white chocolate and butter in bowl - pour in hot mixture - add flavors - whisk and cover

MAKE TART SHELLS: Preheat oven to 400 degrees. Divide the pastry into 4 equal pieces. Roll each into an 8 or 9-inch diameter circle. Fit gently into the tart pans, pressing into all the ridges and corners without stretching and leave the overhang in place. Cut four pieces of aluminum foil and gently press into the pastry, fitting into the corners. Fill with dried beans, or rice, or other pie weights. Set the tart shells onto a baking sheet with rim and bake them for 12 to 15 minutes, until the edges begin to turn golden. Remove from oven, leaving oven on. Remove the foil and beans (rice, weights) from each shell and prick the bottoms of each tart shell, then return to the oven for 6 to 8 minutes more, until the bottoms are also golden. Remove from oven.
 
pastry circles; line pans, fit foil, add beans
cut pastry circles - line tart pans - fit foil - add beans and bake

As soon as the shells are cool enough, with a knife trim the edges flush with the top of the tart pans. Discard the trimmings. Allow the shells to cool completely. Once cooled, divide the cooled custard between each of the shells. 
Tart shells, baked, filled, custard, cherries, preserves, mascarpone whipped cream
Tart shells baked; filled with custard; cherries and preserves; mascarpone whipped cream

TOPPINGS: If using cherry pie filling, remove at least 12 cherries for each of the tarts, placing the cherries all around the edges. In a small saucepan, heat about ½-cup of the cherry preserves with the tablespoon of Kirsch until just boiling. Strain the preserves through a strainer, pressing to extract as much as possible. Drizzle this heated mixture over the cherries at the edges of the tarts, then into the center, smoothing gently to cover evenly. Chill the tarts for at least an hour or two.

MASCARPONE WHIPPED CREAM: In a small mixing bowl, with a hand mixer, beat the whipping cream until just set. Add the confectioners' sugar and the mascarpone cheese and beat just until all incorporated, and the mixture holds shape. Place a dollop onto each tart before serving, or pipe on with a large star tip.

Remove the rims of the tart pans, then gently slide the tart off the base and onto a plate, to serve.


My passion is teaching people how to create a harmony of flavors with their cooking, and passing along my love and joy of food, both simple or exotic, plain or fancy. I continue my journey in ethnic and domestic cuisines, continuing my journey to explore diverse culinary experiences and hopefully to start you on a journey of your own. Join me also at A Harmony of Flavors on Facebook, and Pinterest.
Friday, February 9, 2018

Sometimes a Great Thing Just Happens

Sometimes I sit and think, "What in the world am I going to make for dinner?" And sometimes I sit thinking like this all the day long and nothing at all to show for all that rigorous thinking.

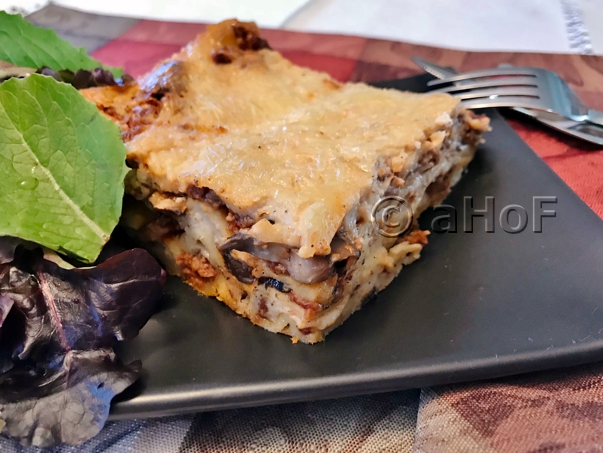
But then sometimes, I just kind of flow with it and something great occurs. This happened yesterday. I looked in the freezer yesterday morning and my eyes wandered around a while, finally settling on ground lamb. I had nothing particular in mind, but it was a start.
 
Lamb, Mushroom, Lasagna, entree, recipe
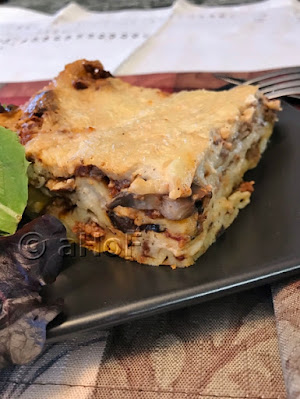
Lamb & Mushroom Lasagna

Then I went grocery shopping, since the fridge was looking pretty bleak. Nothing green in sight and not much of anything fresh left. Okay, so while shopping, I looked at a pound box of mushrooms and just got a craving. Okay, so what do I do with mushrooms and ground lamb?

I kept those ingredients in the back of my mind, and as I often do, I Googled those two ingredients and there were all sorts of recipes out there, of course. I always say that there is no new combination on the face of the earth. Someone, somewhere, has thought of a recipe. I have had times where I never looked up a single thing, made a dish I created in my own mind, and only later discovered that it was almost ingredient for ingredient in someone else's blog. đŸ˜Č

There were many different recipes for ground lamb and mushrooms, mixed with pasta of one kind or another, but I didn't want to use penne, or elbow, or any of those. And then I thought about lasagna. I am not the world's greatest lasagna maker. I am a really good cook, and often exceptional. But lasagna does not figure in the great successes. I guess I am a glutton for punishment, because somehow I keep trying. And my efforts are sometimes pitiful, sometimes good, but not great. Yet I keep trying. I figured I would give the pasta maker some use. I hadn't used it since last June when my husband and I started a diet. Mainly I was avoiding refined carbs. We eat lots of carbs: lentils, beans, whole grains, squash, etc, but very little of white flour. Except for the holidays; don't even want to think about all that!

Okay, so lasagna.

I'd just come home from grocery shopping when I came up with this idea. I did not buy any mozzarella or ricotta. I wasn't going back out. It was about 4 degrees when I went shopping. More of that deep-freeze I didn't particularly want. And then I was thinking about the lasagna with short rib meat I made nearly a year ago when my daughter-in-law told me about a short rib lasagna she'd eaten. In that one I used a béchamel with cheese melted in it, instead of the mozzarella and/or ricotta. I had other cheese in the fridge. I had some Fontina (which is not sold here where I live, but I'd happened to find some on one of our trips to Sioux Falls recently), and I did have things like Romano and Parmesan. In a pinch, Cheddar, though that wasn't the flavor I wanted. If you do not have access to Fontina, substitute Ementhal, Gruyere or even Provolone.

in my mind, I began assembling ingredients, and writing down my recipe plan. Then I started assembling and cooking. I got the lamb and mushroom part finished, and then the béchamel sauce. In the end I used the Fontina and Romano cheese in the bechamel. I used some "sweet" spices (cinnamon, allspice, cloves and even mastik - a new one!) in the lamb mixture. They were not readily apparent in the final dish, though it did have an intriguing flavor. Since I was using fresh rosemary and thyme, the use of mastik, which has a slightly pine-like flavor, seemed like it would pair well with the resinous flavor of rosemary. And all that remained was the pasta. I did use my pasta machine and made lasagna sheets. And yes I used white semolina flour - oh well. If you do not have a pasta machine, you will need 6-8 lasagna sheets (enough to cover the pan three times), pre-cooked.

Lamb and Mushroom Lasagna


Lamb, Mushrooms, Lasagna, entree
Lamb & Mushroom Lasagna
Makes one 13 x 9-inch pan

MUSHROOM MIXTURE:
1 large onion, chopped
2 tablespoons olive oil
½ teaspoon salt
1 pound cremini mushrooms, sliced
2 - 3 teaspoons fresh thyme leaves
¼ cup dry sherry or other dry white wine, optional

MEAT MIXTURE:
1 pound ground lamb (or substitute beef)
3 cloves fresh garlic, minced
1 tablespoon fresh rosemary leaves, minced
1 teaspoon salt
1 teaspoon ground cinnamon
½ teaspoon ground allspice
½ teaspoon black pepper
¼ teaspoon mastik gum, ground finely, optional
⅛ teaspoon ground cloves
1 can (14.5 ounces) tomato sauce

BÉCHAMEL SAUCE:
5 tablespoons unsalted butter
5 tablespoons all-purpose flour
4 cups milk
1 teaspoon salt
1 teaspoon ground nutmeg
½ teaspoon ground white pepper, optional
1 cup shredded Fontina Cheese
1 cup shredded Romano cheese

6 - 8 lasagna sheets, pre-cooked

MUSHROOM MIXTURE: Heat a large skillet over medium heat. Add in the olive oil, onions and the ½ teaspoon of salt. Toss well, then lower the heat to medium low and cook slowly for about 10 minutes, tossing occasionally. Add in the mushrooms and raise the heat to medium. Cook, tossing the mixture occasionally, until the mushrooms have released their liquid and begin to brown. Add in the fresh thyme leaves and the sherry. Cook until all the liquid has evaporated, then turn the mixture out into a bowl and set aside.

how to, Lamb, Mushroom, seasonings
Making Lamb and Mushroom Mixture

MEAT MIXTURE: To the same skillet, add the ground lamb and cook, breaking apart evenly. Add in the salt, garlic, rosemary and other spices. Toss well and cook for a couple of minutes before adding in the tomato sauce. Cook for a minute or so to meld the flavors. Return the mushroom mixture to the pan and mix well. Set aside, off the heat.

Making Bechamel, Sauce, milk, flour, butter
Making Bechamel Sauce

BÉCHAMEL SAUCE: Heat a 4 to 6-quart saucepan over medium heat and add in the butter to melt. Once melted, add in the flour and mix well, stirring for about 3 minutes. Off the heat, whisk in the milk slowly, until the mixture is smooth. Return to the heat and add in the salt, nutmeg and white pepper and whisk constantly, scraping the pan evenly, until the mixture thickens. Once boiling, continue to whisk for another 3 minutes. Set aside about ¼ of the cheese mixture, then add the rest to the bĂ©chamel and whisk until completely melted. Remove from heat and set aside.

Assembling, layering, lasagna, bechamel, lamb, mushrooms
Assembling layers then baked

Preheat oven to 350 degrees. Spray a 13 x 9-inch oven proof casserole lightly with cooking spray. put a small amount of the meat mixture in the bottom of the casserole. Place two (or three if needed) lasagna sheets to cover the bottom, without overlapping. Spoon on ⅓ of the remaining meat mixture and spread it evenly over the noodles. Ladle on ⅓ of the bĂ©chamel sauce. Top with another single layer of the lasagna sheets, another ⅓ of the meat mixture and another ⅓ of the bĂ©chamel sauce. Repeat these layers once more, then sprinkle the top with the reserved cheese. Bake the casserole for about 45 to 50 minutes, until the mixture is bubbling. Allow to cool for about ½-hour before serving. This allows for neater slices.


My passion is teaching people how to create a harmony of flavors with their cooking, and passing along my love and joy of food, both simple or exotic, plain or fancy. I continue my journey in ethnic and domestic cuisines, continuing my journey to explore diverse culinary experiences and hopefully to start you on a journey of your own. Join me also at A Harmony of Flavors on Facebook, and Pinterest.
Disqus