Translate

Friday, October 26, 2018

Pain de Campagne

Pain de Campagne is French for a "Country Loaf." It was made in days past with sourdough or other type of starter, lacking commercial yeast, but these days can be made any which way you prefer. Often, this bread is made with a Pâte Fermentée, or pre-ferment (a dough stirred up and pre-fermented before actually making up the final dough). A sourdough starter could also be used, though sourdough starters, at least in home use, are often much thinner mixtures. This would require that the sourdough be mixed up into a dough-like consistency as the pre-ferment.

The other defining characteristic of a Pain de Campagne is that it uses at least a small amount of whole wheat and/or rye flour along with the white flour. I chose to use rye.
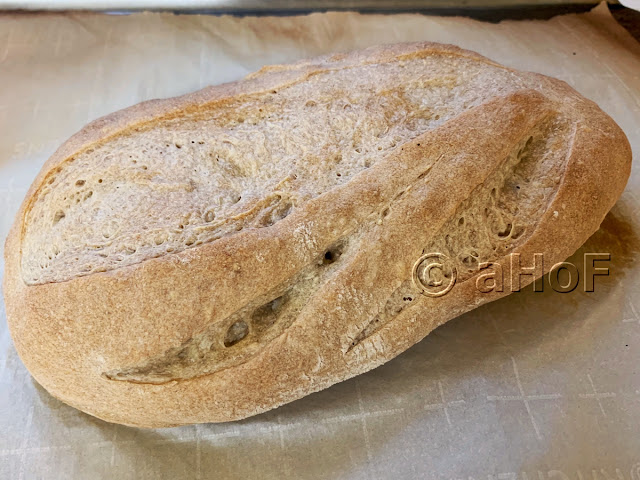
 
Pain de Campagne, country loaf, starter, ferment
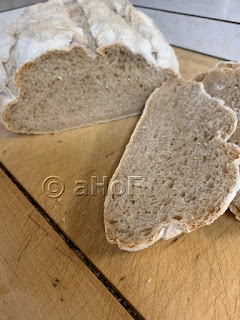
My Pain de Campagne, in loaf form

What is Pâte Fermentée?

Pâte Fermentée is nothing more than a bread dough, usually a French Bread dough using simply flour, yeast, water and sometimes salt. The mixture can be fermented, then used whole or in part. Part can be made into French bread, and some held back to use as the Pâte Fermentée for another batch of bread, as its starter, or pre-ferment. This can be continued for future loaves, keeping back a piece to be used in the next batch of bread, and so on.
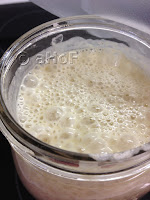
Active starter, Sourdough Starter, fermented starter
Active Sourdough Starter
Since I have a sourdough starter that I fermented naturally some years back, I thought that I would try making my Pain de Campagne using my sourdough starter, rather than using a Pâte Fermentée. I had just re-activated my sourdough starter, which had been idle and dormant for a few months in the fridge. I wanted to make a sourdough rye bread from Peter Reinhart's "The Baker's Apprentice." We had guests arriving, so I wanted to stock up on breads, and one of the guests is hugely partial to rye breads with plenty of caraway. Once that bread was made with the newly refreshed starter, I had some pretty fantastically active starter going, and started thinking about what else I could make with it. 

Paul Hollywood, Pain de Campagne
Paul Hollywood Pain de Campagne, crust white
The recipes I was reading were from Paul Hollywood and from Peter Reinhart. I am not totally positive what goes wrong in some recipes, but I believe it is possible I am over proofing the dough, particularly after the shaping of the loaves. Whatever it is, they often start out looking great, then once in the oven, shrink and tighten. While the flavor is great, the look and texture is not. Another problem I have been having with Paul Hollywood's breads is that many of them come out of the oven nearly white in color, even after 40 or more minutes in a very hot oven. This is what happened with his Pain de Campagne. Having made Peter Reinhart's version previously, this was not the case, so I'm not sure why this occurs.

A possibility, something I just read today in a new book (for me) by Peter Reinhart, called "Whole Grain Breads," is the use of a small amount of ascorbic acid in the problems of no rise at the end of the cycle, or using a bit of diastatic malt powder to help with the not-browning dilemma.
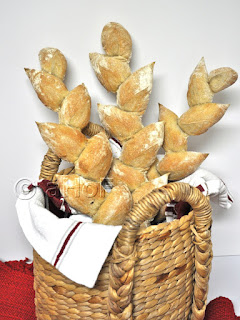
Peter Reinhart, Pain de Campagne, Epi
Peter Reinhart Pain de Campagne made as Epi
In Paul Hollywood's Pain de Campagne recipe, he uses sourdough starter, without making it into a firm starter consistency, so while the starter is active, it is not enough to give the finished bread the complexity looked for in a bread that uses a pre-ferment. Instead, what Hollywood does is make the final rise into a very long and slow one, about 13 hours. Either way, the final result gives a wonderful complexity of flavors.

Back to my sourdough. Peter Reinhart uses a Pâte Fermentée to make his Pain de Campagne. The issue at hand was to make my sourdough similar in texture to the Pâte Fermentée, which is like an already formed French Bread Dough. It took me a while to calculate what I would do with my starter, as I am not at all conversant with the "Baker's Percentage Formula" Reinhart uses. I do know, however, what a French Bread Dough feels and looks like, so I proceeded. 

All in all, my version of a nice, firm starter (simulating a French bread dough) worked perfectly. Once the starter rises, it is placed in the fridge overnight before proceeding, despite having grown. This is so that the starter has a long, chilled rest to develop flavors, which will give the final bread its wonderful flavor. The following day, the firm starter is cut into pieces and set on a surface, covered, to come to room temperature before proceeding with the recipe. 

I chose to make half the final dough into a loaf and the other half into the shape of an Épi, which is cut and pulled in opposite directions to simulate wheat. Both the loaf and the Épi came out perfectly, and the flavors are most excellent. 


Pain de Campagne
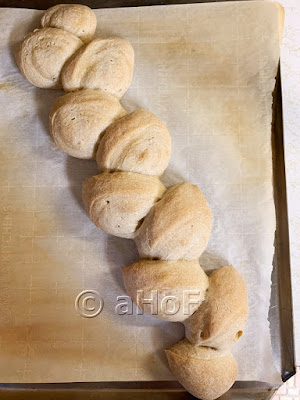
Pain de Campagne, Epi
Pain de Campagne as Epi

Makes 2 loaves

FIRM STARTER:
6 ounces / 171 grams active sourdough starter
4 ounces / 113.5 grams bread flour
4 ounces / 113.5 grams all-purpose flour
¾ teaspoon / 0.15 gram salt
3 ounces / 89 grams water

BREAD DOUGH:
Firm Starter, above - use all
8 ounces / 227 grams bread flour
1.5 ounces / 42 grams whole wheat or rye flour
¾ teaspoon / 0.15 gram salt
¾ teaspoon / 0.11 grams instant yeast
6 ounces / 178 grams water

FIRM STARTER: Make one day ahead. Stir together the active starter and water, then add in the bread flour, all-purpose flour and salt. Stir, then turn out onto a clean surface, oiled with olive oil or cooking spray. Knead the mixture for about 6 minutes, adding more water by very small amounts only if needed to make a firm dough, tacky but not sticky. Place the starter into a greased container, cover and let rise to double, then refrigerate until next day.

BREAD DOUGH: Remove the firm starter from the refrigerator at least one hour before using. Oil a surface and cut the starter into about 10 to 12 pieces, setting on the oiled surface. Cover with plastic film and allow to come to room temperature.

In a large bowl, combine the starter pieces with the flours, salt and yeast. Add in the water, mixing with a spoon or with a heavy duty mixer to bring together. Add a few more drops of water only if needed to make the dough firm but not hard. If kneading by machine, do so for about 8 minutes. If kneading by hand, do this for 8 to 10 minutes, until the dough is smooth and pliable, firm but not hard, and just tacky to the touch.

Place the dough into an oiled bowl, turning once to coat all sides. Cover with plastic film or a towel and proof at room temperature for about 2 hours, or until doubled. Briefly knead the dough right in the bowl, cover and let rise once more until doubled.

Turn the dough out onto a clean, oiled surface and gently cut into two pieces, disturbing as little as possible. Form the pieces into any shape you prefer: a round boule (round loaf) or a bâtard (long loaf), a couronne (crown shape), an épi (sheaf of wheat: see below), or baguette, as desired. Set each loaf onto a baking sheet lined with parchment and strewn with cornmeal.

To make the épi, form the dough into a long and narrow loaf similar to a baguette. Set the loaf onto a baking sheet lined with parchment, then strewn with cornmeal. Using kitchen scissors, snip in at one end, about 2 - 4 inches from the end of the loaf, at an angle, almost, but not quite all the way through. Twist this nearly severed piece to one side. Another 2 to 4 inches along the loaf, snip again at an angle, almost, but not quite all the way through. Twist this piece outwards in the opposite direction. Continue to snip and twist in opposite directions all the length of the loaf.
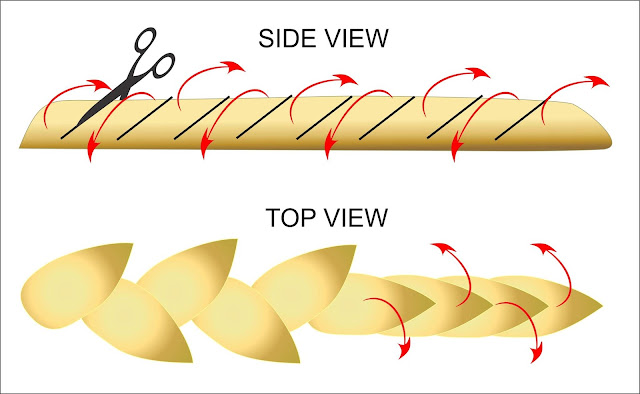
How to, Epi, shaping bread
How to Make an Épi

Mist the tops of the loaves with spray oil, then cover and let rise for about an hour, just to about half again their size, or 1½ times.

Preheat the oven to 500 degrees. Have a rack on the highest shelf with an oven safe low pan in place (for hot water). Have the other rack at the second level up from bottom. Have ready one cup of boiling water and a spray bottle of water. Wrap a towel around the spray bottle in case of drips. Cold water dripped onto a screaming hot oven door could possibly crack the glass.

Once the oven is heated, place one of the loaves on its baking sheet on the lower rack, then immediately pour the cup of boiling water into the pan on the top shelf. Close the door quickly, then count 30 seconds. Quickly open the oven door and spritz the inside sides of the oven with the spray bottle. Close the door, time for 30 seconds and again spritz the inside of the oven with water. Repeat a third time and once the door is closed, reduce the heat to 450 degrees.

Bake the loaves for 10 minutes, then turn the pan 180 degrees and time for 5 to 15 minutes more, as needed, or until the internal temperature reaches 200 to 205 degrees on an instant read thermometer. The loaves should be browned and have a hollow sound when thumped on the bottom.

Allow the loaves to cool completely before slicing. The baking process continues for a time beyond the final baking time in the oven. Be patient; let the bread cool.


My passion is teaching people how to create a harmony of flavors with their cooking, and passing along my love and joy of food, both simple or exotic, plain or fancy. I continue my journey in ethnic and domestic cuisines, continuing my journey to explore diverse culinary experiences and hopefully to start you on a journey of your own. Join me also at A Harmony of Flavors on Facebook, and Pinterest. 

Wednesday, October 17, 2018

With a Little Time and Patience

After yesterday's post on making Puffed Pastry, this post will be a snap.

But you'll need yesterday's recipe before starting this one today, so get started!

Pic TV screen savory pies
Pic of my TV screen - the savory pies
This recipe idea started when I was watching a show called "City Bakes," where Paul Hollywood visits various cities around the world and samples their pastries and breads. In the episode where he visits St. Petersburg, Russia, Paul visits a little pastry shop with an impressive array of abundantly decorated savory pies. These just blew me away. They were so beautiful, they took my breath away. Watching with my sister-in-law, who was manning the remote, I had to ask her to STOP, PAUSE, so I could take pics of the TV screen. I wanted to be able to refer to something, when I attempted to recreate one of these pies. And I absolutely planned to recreate one! 
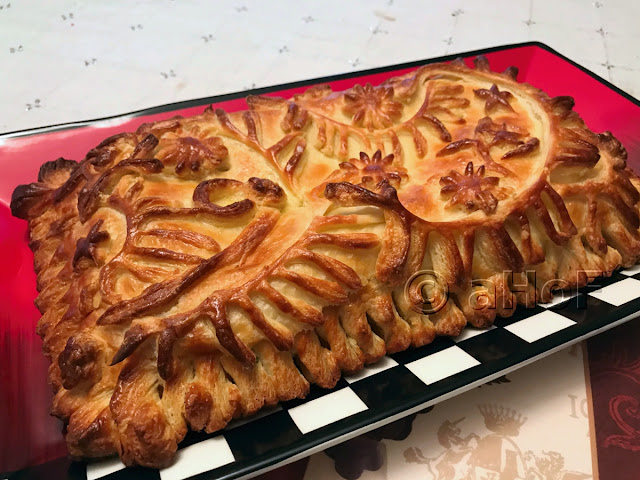
Free Form, Puff Pastry, Turkey Pie
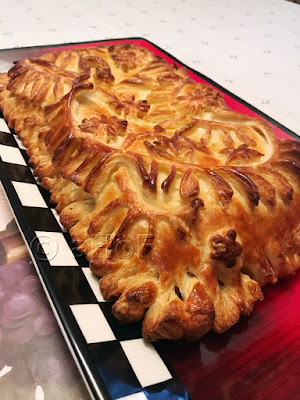
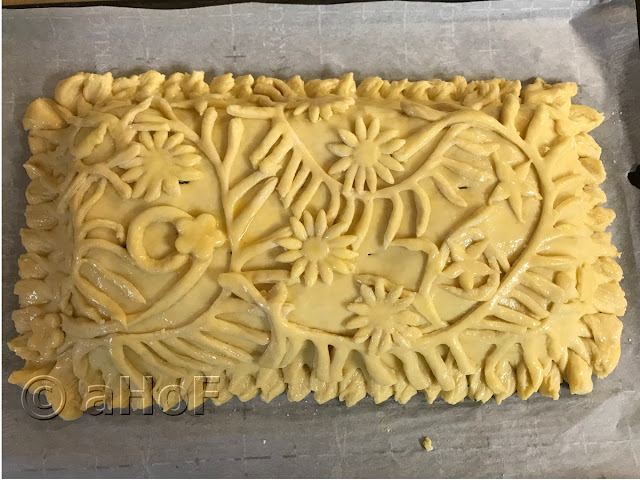
Free Form Puff Pastry Turkey Pie

The first part was making a puffed pastry (see yesterday's blog post for that recipe). While the recipe on the TV show did not absolutely specify a puffed pastry, it certainly looked like it had many hallmarks of one. So, my plan was to make a slightly enriched version of a puffed pastry. I made that and got it in the fridge to rest for the night.
 
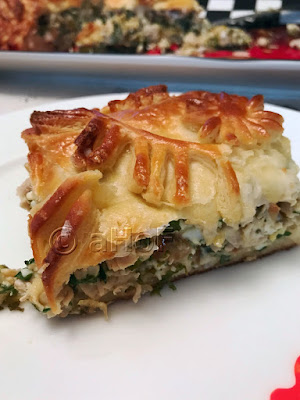
Slice of Pie
Slice of the Pie

What struck me the most about the pies on "City Bakes" was their ornateness. They were so overwhelmingly beautiful. That said, it is in no way necessary to spend time in that much decoration. The pie could easily be made using a good pie pastry, either in the same manner as with this recipe (below) or as a rustic Galette. But, having made a puffed pastry for croissants a few months back, I felt a little more prepared to attempt something like this, in all its ornate glory.

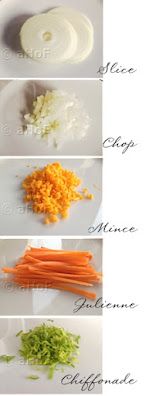
chiffonade, julienne, mince, chop, sliceAnd "glory," it certainly was. In every way, this pie was just stellar. The ornate decorations came out beautifully, over top of the pastry case itself, which was also stellar; the bottom just as nicely browned and as crispy as the top, puffed beautifully and with such an enchantingly lovely golden brown. 

The next part was the filling for this pie. The filling came out just an absolute delight of flavors. I used leftover turkey breast for the filling meat, but in this recipe, chicken - even just a rotisserie chicken from the supermarket - would do. My mixture was inspired, if I do say so myself, because it had all the flavor I had hoped for.

I have been trying to get some good greens and other vegetables into our food, things my husband has never been wont to eat in past. Kale, not having huge flavor, per se, is easy to cut into a very fine chiffonade and slip into soups or other foods such as this turkey mixture. A chiffonade is easily accomplished by stacking leaves and rolling them, cigar-like, then slicing across the "cigar" very finely. Basil in chiffonade is lovely over a tomato salad or tomato soup. Kale, while usually found curly, is a little more challenging to roll and slice this way, but it can still be accomplished, and the little "threads" of kale all but disappear in the mix.

Hot Pepper, Mustard, Relish
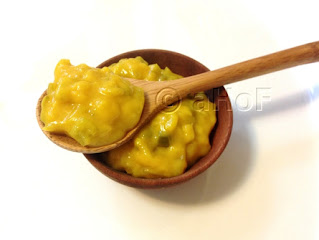
Hot Pepper Mustard Relish
Since I have many jars of my Hot Pepper Mustard Relish on my pantry shelf, and since it tastes so wonderfully good, I have been using it in recipes, to marked success. While not noticeable as such, it does lend a great under-note. I know not everyone will have this amazing condiment on their shelves, so I will say that if you are one of those who has not yet had the pleasure of trying this mustard relish, I would substitute about 2 tablespoons of honey mustard mixed with 4 tablespoons of sweet pickle relish, or even Chow Chow, if you have it. The piquancy of the mustard, along with the sweetness of the pickle relish, should approximate the type of flavors very well. Let me say that if I had no Hot Pepper Mustard Relish at hand, this is what I would use to substitute.

Free-Form Puff Pastry Turkey Pie


Free Form, Puff Pastry, Turkey Pie
Free Form Puff Pastry Turkey Pie
One 8 x 12-inch pie

1 recipe Puffed Pastry Dough

FILLING:
2 tablespoons butter
1 tablespoon olive oil
1 onion, chopped
½ teaspoon salt
2 cloves garlic, finely minced
3 cups finely chopped leftover turkey 
     or chicken
2 hard-boiled eggs, finely chopped
4 ounces Chevre goat cheese, crumbled
2 cups kale in fine chiffonade, no stems
¼ cup minced parsley
2 tablespoons fresh rosemary leaves, 
     minced
½ teaspoon salt
½ teaspoon white pepper
⅓ cup Hot Pepper Mustard Relish
1 egg + 1 tablespoon water, 
    for egg wash

The day before, make the Puffed Pastry recipe. You will need about half the recipe, so use the other half of the dough and make some croissants - you won't be sorry. If not making your own Puffed Pastry, simply thaw a box of store-bought puff pastry sheets. 

MAKE THE FILLING:  Heat a skillet over low heat and add in the butter and olive oil. Once butter is melted, add the chopped onion and the first ½-teaspoon salt. Stir to coat the onion pieces and allow the onion to cook, very slowly, stirring occasionally, until beautifully golden brown and caramelized. This can take nearly an hour, depending on how low your burner will go. Add in the garlic and stir for 3 minutes more. 

While onion is caramelizing, place the chopped turkey in a mixing bowl, along with the hard boiled eggs. Add in the onion and garlic, once done, and add in all the remaining ingredients except the egg wash. Stir the mixture to evenly distribute the ingredients. Set aside.
 
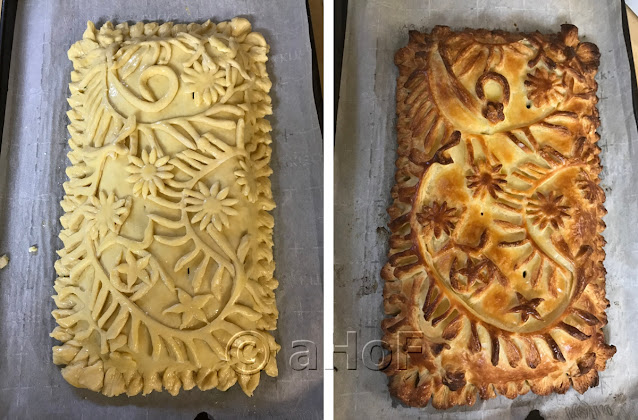
Free Form, Puff Pastry, Turkey Pie, unbaked, baked
Free Form Puff Pastry Turkey Pie. Before and after baking.

MAKE THE PIE: Preheat oven to 400 degrees. Line a baking sheet with parchment and set aside. Cut off about half of the Puffed Pastry and roll out to fairly thin, about one-sixteenth of an inch. Cut a piece for the base of the pie about 8 x 12-inches. Set this onto the baking sheet lined with parchment. Cut another rectangle, just slightly larger, about 9 x 13-inches. Pour the filling mixture onto the base piece of pastry, pressing into a mound down the middle of the pastry, leaving plenty of edge space clear. Brush the free edges with some of the egg wash. Place the larger rectangle over top of the filling, smoothing the edges to match with the bottom crust and pressing any air out of the center. Press down on the edges to seal them together. Brush the entire top of the crust with egg wash.

Free Form, Puff Pastry, Turkey Pie, unbaked, decorated
Free Form Puff Pastry Turkey Pie - before baking


Cutting dough, decorative strips
Cutting decorative strips
With any scraps from the pastry, cut out the decorations. For flowers, if you have small flower shaped cutters, use those, or other small shapes, such as leaves, etc. For the jagged edged designs, use oddly shaped bits, up to 8 inches long and up to an inch wide and slice into the sides at about ¼-inch intervals. Set the jagged edged pieces here and there, curling them or just curving them, overlapping them where needed. Set flower pieces wherever desired. Decorate as much or as little as desired. For the edges around the pie, slice inwards at ½- to ¾-inch intervals. With the tip of a knife and a finger, give each "tab" a twist so the top of the tab is now the bottom. This is entirely free-form design. There is no right or wrong way. When satisfied, brush the top with egg wash again.

Bake the pie in the center of the oven for about 30 to 35 minutes, until nicely golden brown. Using a spatula (or two) slide the pie onto a decorative plate or tray to serve.


My passion is teaching people how to create a harmony of flavors with their cooking, and passing along my love and joy of food, both simple or exotic, plain or fancy. I continue my journey in ethnic and domestic cuisines, continuing my journey to explore diverse culinary experiences and hopefully to start you on a journey of your own. Join me also at A Harmony of Flavors on Facebook, and Pinterest.

Tuesday, October 16, 2018

Getting Familiar with Puffed Pastry

Apparently, Puff Pastry and Croissant Dough are two slightly different things. 😲

Who knew?

After watching both of these being made at different times on The Great British Baking Show, it all looked so simple and straightforward. I had to give it a try. One of them, at least. I opted for Croissant Pastry. So, what's the difference?

While both these pastries rely heavily on the proper encasement of the butter rolled and folded multiple times, creating steam while baking to make the pastry rise, Paul Hollywood's recipes indicate that Croissant Pastry uses sugar and a little yeast, while Puff Pastry uses eggs, but no sugar and no yeast, relying on the  lamination of butter, properly folded to create the lovely rise we expect from this type of pastry dough.
 
Croissants, Paul Hollywood, Recipe
Croissants using Paul's Recipe

That said, I tried Paul's Croissant Pastry (click on the link for his recipe) as my first attempt. For one, I really wanted to try a homemade all-butter croissant, and for another, I wanted to be pretty sure my efforts would not be wasted, so I used croissant pastry with its little bit of yeast to give the rise a boost, just in case I should not be able to execute all that rolling and folding quite expertly enough. Either dough gains its beautifully puffed layers from properly rolling and folding the butter within the dough. And so, I call my recipe "Puffed Pastry."

A (Very) Young and Intrepid Baker

As of this writing, I am more than halfway through my 68th year of life. I state this to give some perspective. I attempted making a puff pastry a very, very long time ago. When I was in Guatemala, and still in my 20s, I was an intrepid baker. Not everything came out well, for sure. Still, I had no one to say to me that something was a difficult thing to do, or that I should be fearful of outcomes. I had my trusty Joy of Cooking, and armed with that book and its well-explained, instructional recipes, I forged ahead and made things like Choux Paste, with never a thought to anything other than a belief that I could follow directions with the best of them.

When it came to trying out a Puff Pastry recipe, well, I will say it did not have a great outcome. Looking back on that time, I am pretty sure that I would have used margarine in the recipe, and that would certainly be mistake number one! I can still recall to this day how much difficulty I had with the rolling and folding, and most particularly with keeping the margarine encased in the dough. I can still see, in my mind's eye, how it leaked at the edges or worked its way through the dough to spurt out in spots. These are definitely no-no's, when making a puffed pastry. The most important rule, outside of using a really high-quality butter, is to keep that butter well chilled and encased in the pastry at all times. 

Back to Current Day

I attempted to make Paul Hollywood's Croissants back in February of this year. I felt that at this time in my life, I certainly have had a lot more experience under my belt and surely I should be able to make this pastry turn out. I certainly know better than to use margarine! As it happens, it worked wonderfully well. 

Masking Tape and Rolling Pins

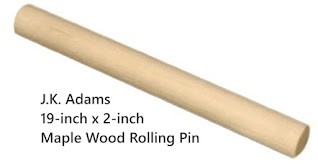
rolling pin, straight sided
I will say up front, getting the pastry rolled into a fairly strict rectangular shape took a whole lot more work than initially anticipated. Lots more. This is of utmost importance, because it makes the folding come out neat and tidy, and getting all those flaky layers later on depends on this neat, tidy rolling and folding, a process called "lamination." What I did was to measure out the size on my countertop using masking tape at the corners of the rectangle sized areas (one for the butter and one for the pastry itself). This gave me the guide I needed; just keep rolling, neatening and tugging until it reached those corners I had marked out. Having those marks on the counter helped immensely.

I had also invested in a good maple wood, straight, 19-inch long rolling pin. I had never used any rolling pin but the one with handles on the ends, given me by my Mom for my Bridal Shower back in 1970. Getting used to a rolling pin without handles was interesting, for sure. The one really good thing was having a pin long enough so I didn't leave marks in the dough, as would have happened with my golden-oldie of a rolling pin. I will not say it would be impossible to make puffed pastry dough without that 19-inch straight rolling pin, but it wouldn't have been quite as neat. Maybe. I think. 

My Pastry, Second Time Around😚

Croissant Pastry, Rolling Pin
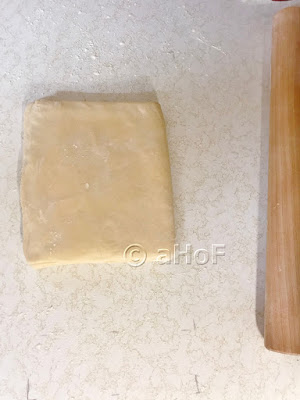
My Croissant Pastry and Rolling Pin
When I opted to try out Paul's Croissant dough, I did so because I really wanted to try making croissants first. I had never had, outside of buying some at a local "patisserie," croissants made with butter. I had rolled some Pepperidge Farms Puff Pastry into croissant shapes, and used that commercial puff pastry dough for innumerable applications. But that being the ONLY puff pastry available where I live, and it being made with shortening or some such, while delicious, I wanted to know what the "real thing" might be like. 

I will say it right now. THERE IS NO COMPARISON. The butter makes such a huge difference in flavor, it's hard to credit. 

I used a couple of Paul's suggestions for making filled croissants, half of them using bacon and cheese and half using almond paste. Both of these were excellent. Would I use fillings again? Maybe. Not sure. They tasted most wonderful. But, I think in the end, I am just a purist. I would have preferred to have just the croissant to eat.

That said, Paul's recipe called for a fair amount of sugar in the dough itself. I wondered about that at the time, but just went with his recipe. The time for experimentation would likely come, but not at my first attempt. As it turned out, I felt that the croissants were just too sweet. I had never eaten a croissant whose pastry was sweet on its own. I cannot say I have such widespread experience of croissants to say that they should not be sweet like these, but to me (and me with a serious sweet tooth, mind), they were just too sweet. Duly noted, for next time.

I haven't yet gotten around to trying Paul's Puff Pastry recipe. But, in the meantime, my sister-in-law and I were watching Paul Hollywood in "City Bakes." In the episode where he is in St. Petersburg, Russia, he goes to a little pastry shop where they have an amazing assortment of savory pies, made free-form with a puffed-pastry of some kind and with a most amazing amount of decoration on them. They were stunning. I took a series of photos of the TV screen, just to have a reference, when I tried.

And, of course, I just had to try it out! 😃

As it happened, I had just made a roasted turkey breast, and we had lots of leftovers. Obviously, this would be a Turkey Pie. What else would go in was yet to be determined. 

But First, the Pastry

Now that I had an application, I had to sit myself down and determine what I wanted to do for the pastry. I definitely wanted a puffed pastry of some kind and not just a yeast dough. The elaborate decorations used on top of the pies in City Bakes would not be possible with just any yeast dough. I thought about making Paul's Puff Pastry recipe, but then got cold feet when thinking about how this would rely solely on the proper rolling and folding of the butter. I felt I would rather add a little yeast, just to be safe. I wanted the dough to be beautifully golden yellow, so I wanted eggs in the dough. And sugar? I opted to use a just a little; just enough to give it great flavor, but not enough to make it taste sweet.

My version came out spectacularly well. I used most of the pastry in the creation of the Turkey Pie, what with top and bottom crust and all the decorations. Whatever pastry was left was only bits and scraps, which I carefully piled atop one another and rolled out again, though this will never be as puffed as the first time around. Still, I cut some haphazard croissant shapes from this dough and while they came out all sorts of sizes and odd shapes, they were truly delicious, just what I wanted as a croissant in flavor, and they still puffed beautifully. No complaints.  

I have no beautiful photos of the whole process, but truly, it is a matter of following directions, nothing more. I used grams to weigh my ingredients. I feel it is important to use ingredients by weight, making it so much more fool-proof. And ultimately, working as quickly as possible to keep the dough and butter cold is of the utmost importance.

Puffed Pastry Dough


Makes 12 very large croissants, or use pastry for other applications

500 grams bread flour (about 3¾ cups)
10 grams salt (about 2 teaspoons)
40 grams superfine sugar (about 3 tablespoons)
10 grams instant yeast (about 3 teaspoons)
2 cold eggs plus enough cold water to equal 300 ml., total (10 ounces, total)
300 grams fine quality European butter (about 2½ sticks)

Place the bread flour, salt, sugar and yeast into a mixer bowl. Stir to distribute the ingredients evenly. Whisk together the cold eggs with cold water and pour into the dry ingredients. Mix to bring the dough together, then knead for about 6 minutes, either by machine or by hand, as preferred. Place the dough in a bowl, covered, and refrigerate for 1 hour.

On a counter or other surface, measure out two rectangles, using masking tape at the corners to mark the measurements. One rectangle will be the measurement for the butter; 40 x 19 cm (15¾ x 7½-inches). Another rectangle will be for rolling the dough; 60 x 20 cm (24 x 8-inches).

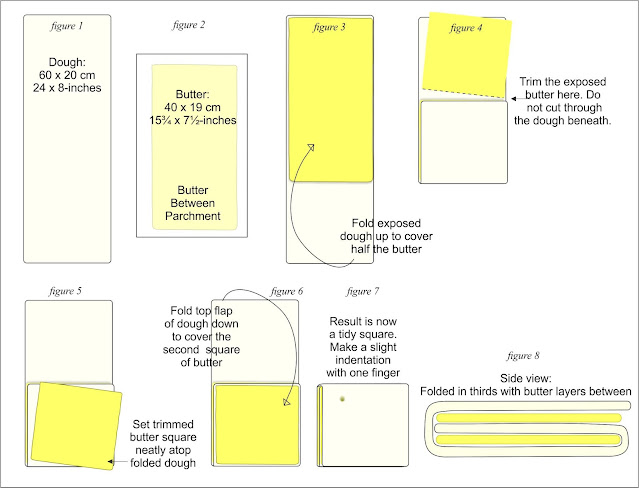
While the dough is in the fridge, get out the cold butter. Use 2 pieces of plastic wrap or two pieces of parchment, large enough to accommodate the measurement of the butter. Place the butter between the plastic wrap or parchment. Bash the butter with your rolling pin to begin flattening it out, then gently press and roll it to fit that smaller measurement of 40 x 19 centimeters. Keep the edges as straight as possible. This may require some work, tidying the edges as the butter is rolled. Keep it to an even thickness. Leave the butter in between the plastic or parchment, figure 2, set it onto a baking sheet and place the sheet into the fridge to chill. 


Once the hour has elapsed on the dough, remove from the fridge, lightly flour the surface you will be working on and quickly shape the dough into a long rectangle, figure 1. Roll the dough, straightening and tidying the sides and corners as needed, until it reaches 60 x 20 centimeters. Take the sheet with the chilled butter rectangle out of the fridge, figure 2, remove the paper or plastic from one side and flip the butter over onto one end of the dough rectangle, figure 3, where it should fit neatly almost to the edges of the top ⅔ of the dough. Remove the remaining parchment or plastic film from the top of the butter. Fold the exposed edge of dough up over half the butter, figure 3. With a knife, trim the butter, just above where the dough has been folded over, being extremely careful not to cut through the dough beneath, figure 4.
Rolling, folding, cold butter, chilled dough
Lamination Sequence: Rolling and folding cold butter into chilled dough

Lift the free square of butter from the top of the dough and place it atop the lower fold of dough, neatening the edges, figure 5. Now, lift the remaining top flap of the dough and fold it down over the newly placed butter square, figure 6. The result is now a tidy square, figure 7. Figure 8 shows how the layers should look from the edges. Very carefully, press the edges of the dough to completely seal in the butter. Make a small indent in one corner of the dough with one finger to mark that this was the first roll and fold sequence. Wrap the dough in plastic film or place into a zip-top bag and into the fridge for 1 hour.
dough, lamination, rolling, folding, chilling
Second and subsequent turns

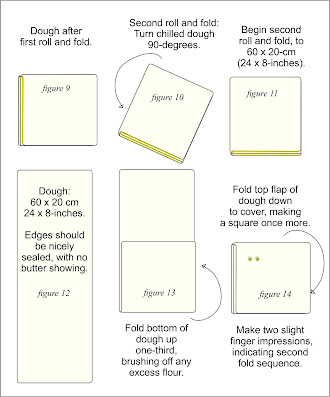
After the hour has elapsed, remove the dough from the fridge to the lightly floured surface, figure 9. Set the dough on the surface at a 90-degree angle from the last roll and fold, figure 10, so that the tri-folded edge is towards you, figure 11. Roll the dough again to a 60 x 20 cm (24 x 8-inch) rectangle, figure 12, then bring the bottom of the long rectangle up one-third, figure 13, then the top down, figure 14, to cover the top fold. Make two small finger indents in the dough to indicate the second "turn" and wrap and refrigerate the dough for one hour.

Repeat this last sequence twice more, resting the dough in the fridge for one hour between folds, then wrap the dough and refrigerate overnight. After its overnight rest, the dough is ready to be used for whatever application you might prefer.


When using puffed pastry, it should be rolled out again before working with it. Never drag a knife or twist a cutter, as this will damage the layers and cause the pastry to rise unevenly. Sharp cuts or straight down pressure from a cutter is best.

Once made, puff pastry can be frozen. Thaw completely in the fridge before using.

This amount of dough will make 12 very large croissants or 18 to 20 smaller ones.


My passion is teaching people how to create a harmony of flavors with their cooking, and passing along my love and joy of food, both simple or exotic, plain or fancy. I continue my journey in ethnic and domestic cuisines, continuing my journey to explore diverse culinary experiences and hopefully to start you on a journey of your own. Join me also at A Harmony of Flavors on Facebook, and Pinterest.
Saturday, October 13, 2018

Tis the Season for Pumpkin

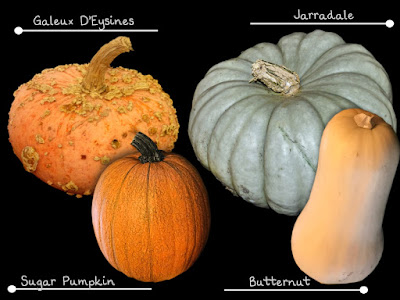
'Tis the season for Pumpkin in all its forms. My favorite of the squash varieties, when it comes to baking, are either butternut squash or one of those big blue-green colored ones, whether called Jarradale, Jamboree or whichever name they come by. They have such lovely smooth flesh, making them ideal for things like pumpkin pie, pumpkin tarts, pumpkin loaves, pumpkin cheesecake, pumpkin cookies and anything else baked with pumpkin. Another reason I love these two types of squash best for baking is that they are less watery. 

squash varieties, butternut, jamboree
Some Squash Varieties
Most every "pumpkin" (those orange ones, be they round, flat or other) I have ever tried is stringy and/or watery, even the sugar pumpkins. I bake my squash, to avoid having any water added to the equation, but even so, the pumpkin varieties give off so much liquid that by the time you've set the cooked flesh into a colander to drain for use in a recipe, there is not much left to use. 

I try to accomplish a nice, thick puree, similar to a can of "pumpkin." Ultimately, I use either the blue Jarradale type or everyday butternut for this purpose. Just my preference. If you have great luck with another variety, then do use whatever works for you. 

And then, there are always cans of "pumpkin," in case you run out during the year!
 
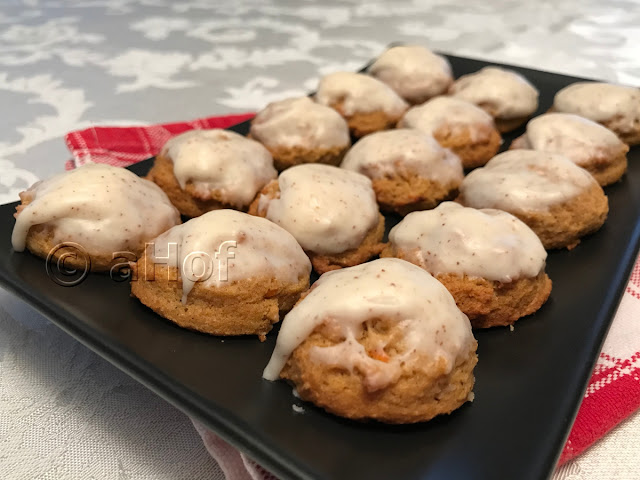
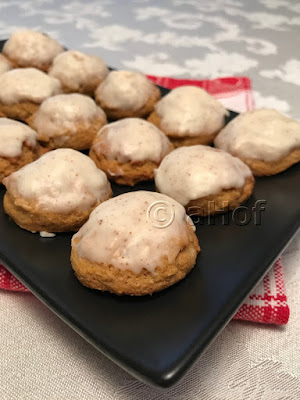
Soft cookie, Pumpkin Cookies, frosted cookies, recipe
Soft Pumpkin Cookies

I started off using some of my stash of already baked and pureed Jarradale squash in the freezer. I do this with the big blue varieties in the fall and portion it into freezer zip-top bags in 2-cup portions, suitable for a pie. If I need less than 2 cups for a recipe, then I use the rest added into soup, which gives a nice body (not to mention great flavor) to any thin soup. This time, I decided to make Soft Pumpkin Cookies.

Lard vs Shortening vs Butter

I want to clarify on my reasons for using lard in this recipe. Firstly, I do not like using shortening, which is an unnatural product, and worse for one by far than lard or butter, which are from natural sources. (My own opinion.) I have made these cookies various times using one of all three fats. Butter tastes great, but leaves a flat cookie, just too soft. Shortening works better, keeping shape a bit more and holding their domed shape a bit better. Lard makes these cookies tender and delicate yet still retaining their pretty dome shape on baking. Ergo; lard it is, for me. Just know if you switch the fat the results will be far different. 

These cookies are, as the name states, "soft." They have a most wonderful flavor, and are as delicate as can be. They have a nice glaze icing using browned butter, making these truly irresistible. Next I want to attempt a Pumpkin Sandwich Cookie. I have the cookie part down, but was unhappy with the filling, which was too soft. Back to the drawing board with the icing part, but for now, here are my Soft Pumpkin Cookies:

Soft Pumpkin Cookies


Made 5½ dozen (2-teaspoon) drop cookies
Soft cookie, Pumpkin Cookies, recipe
Soft Pumpkin Cookies


COOKIES:
½ cup light brown sugar
½ cup granulated sugar
½ cup lard (or shortening)
1 cup pureed pumpkin/squash, or canned pumpkin
zest of one orange
1 teaspoon vanilla extract
2 cups whole grain, ground Kamut Khorasan flour (or half whole wheat and half all-purpose flour)
½ cup all-purpose flour
1 teaspoon baking soda
1 teaspoon baking powder
1 teaspoon cinnamon
¼ teaspoon ground cloves
½ cup ground nuts (walnuts preferred)

ICING:
6 tablespoons unsalted butter (no butter substitutes!)
3 cups confectioners' sugar
1 teaspoon vanilla extract
2 to 3 tablespoons milk, as needed

Preheat oven to 375 degrees. Have ready one or two ungreased baking sheets.

COOKIES: Combine in a mixer bowl the sugars and lard, beating until smooth. Add in the pureed pumpkin, orange zest and vanilla extract and beat to combine. In a separate bowl whisk together the flours, baking soda, baking powder, cinnamon and cloves. Add the dry ingredients in, beating very slowly until moistened, then beat briskly just to combine thoroughly. Add the nuts and stir to distribute.

Drop the cookies onto the baking sheet(s) using a two-teaspoon measure or cookie scoop, keeping them at least 2 inches apart. Try not to make them any larger, as they come out soft already. Bake the cookies for about 9 to 11 minutes, or until just set. Remove the cookies at once to racks to cool completely.

ICING: Heat the butter in a preferably light-colored skillet, so you can keep track of the browning process. Allow the butter to brown nicely, but not burn. Using a non-butter imitation will only burn. Pour the browned butter into the confectioners' sugar in a bowl and stir to combine. Add in the vanilla and a pinch of salt, if desired. Add milk one tablespoon at a time, only if needed to make an icing that the cookies can be dipped into, leaving with a nice coating. If too stiff, add a little more milk. Dip the tops of the cookies in the icing, then turn upright and let the icing set.


My passion is teaching people how to create a harmony of flavors with their cooking, and passing along my love and joy of food, both simple or exotic, plain or fancy. I continue my journey in ethnic and domestic cuisines, continuing my journey to explore diverse culinary experiences and hopefully to start you on a journey of your own. Join me also at A Harmony of Flavors on Facebook, and Pinterest.
Tuesday, October 9, 2018

Lots and Lots of Pork

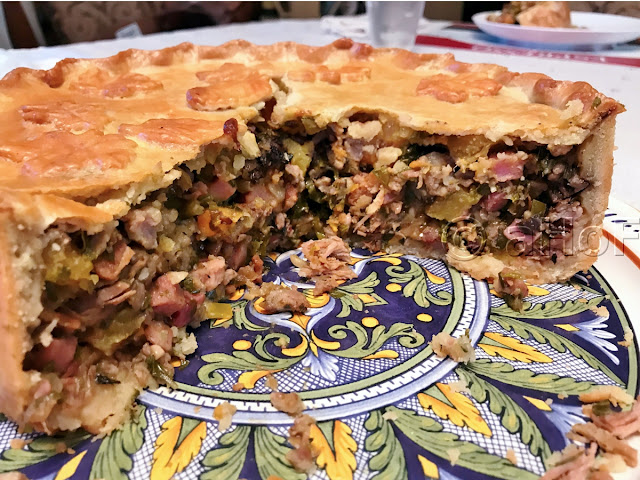
If you like pork, in all its glorious forms, then this savory Four Pork Pie is going to be just what you want to try.

Four Pork, Pie, Hot Water Pastry, Crust
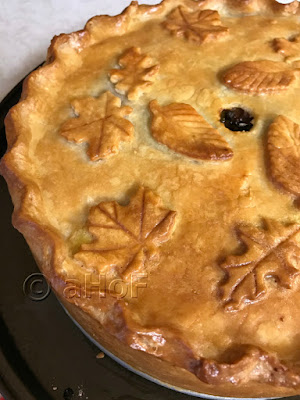
Four Pork Pie in Hot Water Pastry Crust

Yes, it does take a bit of time to prepare and assemble, and quite a long while in the oven, but this is a spectacular event of a dinner. Or, it is just as good cold, or lukewarm, can easily be taken with, whether on a picnic (though no picnics for a long while in our climes), or sliced for a lunch to go with you, or whatever takes your fancy. It is large, so there will be leftovers, unless you have a large family or a few guests.

This one is made in the same manner as my Beef and Pork Pie in Hot Water Pastry, though not packed into layers inside. It will hold together enough to slice when just made, but if you really want to see a lovely slice, wait to cut it chilled, the next day.
Four Pork Pie, Hot Water Pastry, Crust, Day 1, Day 2
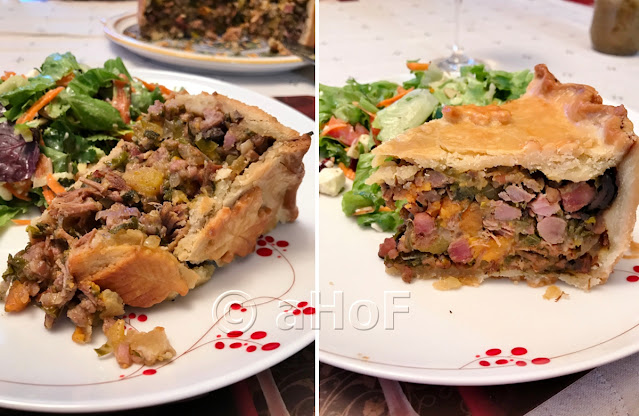
Four Pork Pie in Hot Water Pastry Crust, Day 1 (just baked) and Day 2 (after cooling)
Cutting into the pie, still warm from the oven, made slices that were unable to stand upright. The fillings hold together well enough to place a slice on a plate, but not until the pie has chilled can it actually show the fillings in all their beauty, and stand upright with pride. The flavors are fabulous, either way. It's only a matter of choice.

Have the Filling Pre-Prepared

When making this pie, or any of these types of pie with a Hot Water Pastry Crust, the fillings must be all ready, before starting the pastry. This is because Hot Water Pastry is best worked while it is hot, and if you line your pan with the bottom pastry and do not have the filling ready to go in, then working with the top crust afterwards becomes far more difficult. Hot Water Pastry does not act at all like regular pie pastry crusts. It is quite warm and very soft, but with a slightly spongy feel. It does not lend itself to rolling out large and lifting to the pan as with a regular crust. It is (to me) much simpler to work the pastry up the pan once it is inside the pan. As the pastry cools, it becomes more difficult to work with, tending to tear more easily and stick together less well. Trust me; have your fillings already assembled.

Hot Water Crust Pastry, a la Paul Hollywood

The recipe for the Hot Water Pastry Crust, taken straight from watching The Great British Baking Show, consists of placing 150g lard and 200ml water into a saucepan and heating just to a simmer, when the lard will have melted. Granted, you do need a scale for this, though many measuring cups have milliliters marked on them. In a bowl, combine 450 grams (1 pound) of all-purpose flour and 100 grams of bread flour and rub in or cut in 75 grams of butter (⅓ cup). Once the lard and water are hot and melted, pour this into the flour mixture and mix with a spoon (it will be very hot at first) until most of the flour has been mixed in, then use hands (being careful not to get burned) to bring it all together in a somewhat spongy feeling ball. Use the pastry immediately.


A Part of the Filling You May Not Have on Hand

Hot Pepper, Mustard, Relish
Hot Pepper Mustard Relish
I happened to have some of my Hot Pepper Mustard Relish on hand. I just love this stuff. It's so delicious, it could be eaten as a dip, though it is fantastic on sandwiches and so much more. Since it is so delicious, and a little sweet and a little savory, I felt it would be a match made in heaven for pork. I used a fair amount of it, slathering it over layers of the filling as it went into the crust. I used about ¾ cup of the relish, ¼-cup at a time over three layers. If you do not have this relish on hand, you can just skip it. OR, possibly a substitute could be a mix of honey mustard with sweet pickle relish. To my mind, these flavors would also work. Just as an FYI.

Four Pork Pie in Hot Water Pastry Crust


Fills one 9-inch Spring-form Pan 
Four Pork, Pie, Hot Water, Pastry Crust
Four Pork Pie in Hot Water Pastry

Hot Water Crust Pastry (above)
8-ounces leftover pork roast, rough-chopped
8-ounces diced ham
20-ounces bulk pork sausage, fried
5-ounces bacon, cut in ¼-inch bits, fried
1 large onion, chopped, fried golden
4 cloves garlic, minced
1 medium sweet potato, peeled, cooked, chopped
1 chunk butternut squash (same weight as the sweet potato), cooked, chopped
3 tablespoons minced fresh sage
1 tablespoon minced fresh rosemary leaves
2 large kale leaves, stems discarded, in chiffonade
3 pickled walnuts, chopped, optional
-----
¾ cup Hot Pepper Mustard Relish, optional
1 egg plus 1 tablespoon water, whisked together for egg wash

Have ready a 9-inch spring-form pan.

Prepare all the meats, saute the onion and when nearly golden add the garlic for a few minutes more. Have the squash and sweet potato cooked in salted water and chopped coarsely. Place all these ingredients into a large mixing bowl. Add in the sage, rosemary and kale, along with the pickled walnuts, if available. Toss the mixture together to evenly distribute all the ingredients. Set aside.

Prepare the Hot Water Pastry as above noted. Use ⅔ of the pastry to press into and up the sides of the spring-form pan, ensuring there is an overhang. Work as quickly as possible, as it is easiest while warm, but make sure to patch any holes that may form. Press a third of the filling into the pastry lined pan, making sure it gets into the corners and edges. Spread about ¼-cup of the Hot Pepper Mustard Relish over this layer. Or use the suggested mix of Honey Mustard and sweet pickle relish or omit this step. Add another third of the filling mixture, pressing down evenly over the first layer, and well into the sides. Spread another ¼-cup of the Hot Pepper Mustard Relish over this layer (or one of the options). Press in the remaining filling evenly and spread with the last ¼-cup of the Hot Pepper Mustard Relish, or one of the options. 

Roll out the remaining ⅓ of the Pastry, large enough to hang over the edges of the pan. Brush just the top rim edge of the bottom crust with egg wash, then set the rolled pastry atop the pie, pressing the rim to seal the edges together. Trim away the overhang dough and set it aside to make decorative leaves or other forms  for the pie. Crimp the edges of the crust all around the pan, then make sure the crimped edges are all inside the pan, as later after partway through baking, the spring-form rim will be removed. If the crimped edge covers the top rim of the pan, the sides of the pan will not be easy to remove.

Cut a ½-inch hole in the center of the top crust. Roll out and cut decorative pieces for the top of the pie. Set them in place, then set the pan on a rimmed baking sheet into a preheated 350 degree oven. Bake the pie for about 70 to 75 minutes, and nicely golden. Remove from oven and increase oven temperature to 375 degrees. At this point, the pie should be strong enough to remove the spring-form rim. Unlatch and carefully remove the rim and set aside. Brush all over the top and sides of the pastry thoroughly with the egg wash. Place back into the oven for 10 minutes, then remove once more to apply a second coat of egg wash, then return to oven for 10 more minutes.

Allow the pie to cool for at least 30 minutes before slicing, or if time permits, cool completely. Refrigerate if you prefer to serve it chilled the following day.


My passion is teaching people how to create a harmony of flavors with their cooking, and passing along my love and joy of food, both simple or exotic, plain or fancy. I continue my journey in ethnic and domestic cuisines, continuing my journey to explore diverse culinary experiences and hopefully to start you on a journey of your own. Join me also at A Harmony of Flavors on Facebook, and Pinterest.
Disqus