Translate

Friday, July 20, 2018

Sambar Finally on My Menu

I love Indian food and flavors. I've been making Indian food for a long time now, but mostly northern Indian style, which is all I knew from restaurants. It has been years and years since I found out about idli, a south Indian breakfast / snack food, and more recently, Sambar and other lentil dishes.

Sambar, soup, vegetables, Indian, ethnic, south Indian, recipe
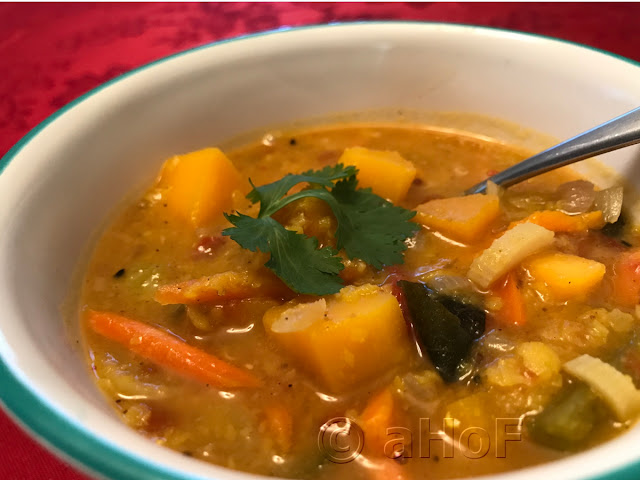
Sambar

First, I need to elaborate on Idli, since this is where all this discovery started. When it comes to south Indian cuisine, lentils are on the menu most of the time. The lentil dishes are invariably very soupy, though they are not called "soup." Many places term these thinned soups as "gravy," which probably sums up how they are used. For me, it still seems like soup! These lentil soups are served often with something called Idli, and often at breakfast.

I discovered idli some many years ago, when searching for something to do with Urad Dal, which I bought at an Indian grocery, then never used. It so happens that one of the uses for Urad dal (also Urid dal) is in making idli. So what is Idli?

Sambar, Idli, breakfast, soup, recipe, south Indian, ethnic
Sambar with Idli
Idli are little puffy, pillow shaped, steamed dumpling-like creations. They are generally made with rice and urad dal, but sometimes other types of rice are used and sometimes millet is also used, millet being a common Indian staple. Idli are served alongside one of these lentil dishes, which are generally made very hot-spicy, particularly in Tamil Nadu. Idli, being very bland, would pair very nicely with such a spicy dish. Once the idli batter is used, if there is any left, it is advised to make Dosas with the leftovers, but that is yet another story.

I learned about idli at least 8 years ago, and while I wanted to make them, just never got around to it. I also had a little anxiety over making them, since it is said they can be tricky. I had no idli mold, so I would have to improvise. And on and on went my excuses why I couldn't make them. Then last September when I visited my son and his significant other in Seattle, I bought an idli mold. I also ate in an Indian restaurant out there that had Dosas on the menu, and so I tried that - and Sambar was served alongside! It is one of the common accompaniments to idli or dosa. I figured that I had to make Sambar, so I could have something to eat with the idli I wanted to make.

Finally we get to the Sambar


I knew about red lentils (masoor), but more recently found out about many others, such as black gram (skinned and split and called urad dal), pigeon peas  (skinned and split and called toor dal; also tuvar dal or archar dal), brown chickpeas (split and skinned and called Bengal gram, Desi chickpeas or kala channa), and many others. Of all of these, Toor dal is one of my favorites. And, it happens to be one of the most common lentils used in making Sambar, also spelled Sambhar. Yippee!
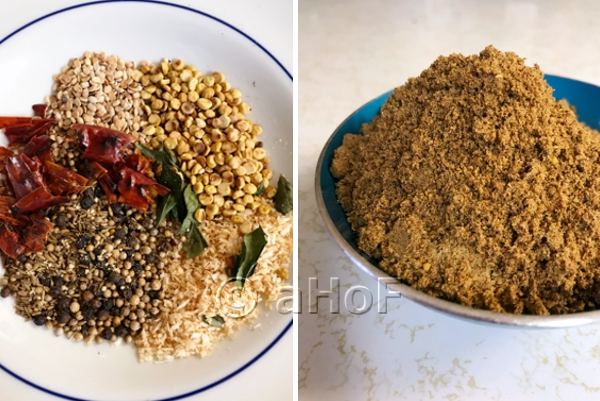
 
Sambar Powder, seasoning, spices, recipe
Sambar Powder


Sambar is easy enough to make, and is absolutely amazingly good. I have to say, I was not highly impressed with the little bowls of sambar served with my mammoth dosa in Redmond, WA, but making it myself, I had opportunity to study many recipes and see what similarities and differences they contained. One of the first things I noted was that most called for Sambar Powder, so that was the first thing to make. Sambar Powder is made using a couple of types of lentils, browned first in a dry skillet, then ground with other toasted spices. I put together the amounts that sounded good to me, and here is my recipe:
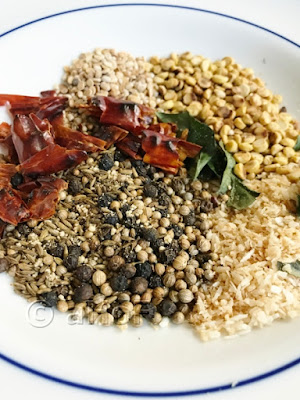
Sambar Powder, Spices, tasted spices, spice mixture, recipe
Sambar Powder Spices

Sambar Powder

Makes about ½ cup 

2 tablespoons dried coconut shreds

2 tablespoons channa dal (split, peeled Bengal gram/Desi chickpeas)
1 tablespoon urad dal (black gram, split, peeled)
1 tablespoon coriander seeds
2 teaspoons black peppercorns
1 teaspoon cumin seed
½ teaspoon fenugreek seeds
10 - 12 fresh curry leaves

3 dried red chilies, or more, to taste
½ teaspoon asafoetida powder (unless pure, then use just a pinch)

Heat a dry skillet over medium heat and toast the coconut until nicely golden, then turn out to a plate to cool. Repeat with the channa dal until golden and fragrant, then the urad dal until golden. Turn these out to the plate with the coconut, to cool. Repeat this process separately for the coriander, peppercorns, cumin and fenugreek, turning each out to the plate to cool before proceeding with the next. Toast the curry leaves until dried and crisp, then add to the plate. Toast the dried chilies (I first broke them into pieces and removed most of the seeds - your choice), then turn them out to the plate. Toast the asafoetida powder (which usually comes diluted with rice flour or other starches) until fragrant, then add to the plate.

Once all the spices are cooled, grind them to a fine powder in a spice grinder or coffee grinder used only for spices. Store in a glass jar with tight fitting lid in a cool, dry, dark place.

~~~~~~~~~~~~~~~~~~~~~~~~

Once the Sambar Powder is made, the Sambar can be made. Making the Sambar is a 3-part recipe, not counting the making of the Sambar Powder. The lentils will need to be cooked until mushy, then pureed. The vegetables will cook in a tamarind based liquid, and an addition of spices and onion are fried towards the end, called "tempering," which simply means "adding flavor." The tamarind used for the recipe can be pre-packaged and diluted or made up from scratch. I have tamarind pods (available at our local grocery, miracle of miracles!) and so peeled the outer shells off and soaked the pulp and seeds, then pressed out the seeds and strained the fruit through a strainer, pressing out as much of the solids as will pass through the strainer while pressing with a spoon. Doing this will amount to a fourth step.
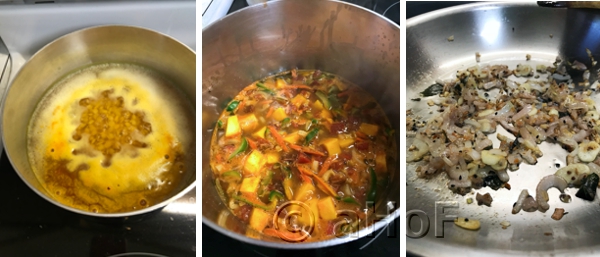
Recipe, Lentils, Vegetables, Tempering
Three-Part Recipe: Lentils - Vegetables - Tempering

Making Sambar calls for vegetables, and there is a list of possible vegetables to use, such as carrot, bell pepper, eggplant, tomato, squash, okra (also called "ladyfingers"), potatoes, green beans, onions, zucchini,  and others; whatever you have on hand. Indian recipes also generally mention "drumsticks" and something called "bottle gourd (lauki)," not available in my part of the world. Any of these can be used, or just one if preferred. They can be changed out to use what is on hand. This recipe is just a guideline for the general flavors. I have small eggplants growing and was hoping there would be some ripe for use, but sadly no. While onion is generally mentioned as part of the vegetables, I chose to use shallot, and used it in the "tempering" step instead of cooking with the other vegetables.

Sambar


Serves about 6 or 8, depending on portion size
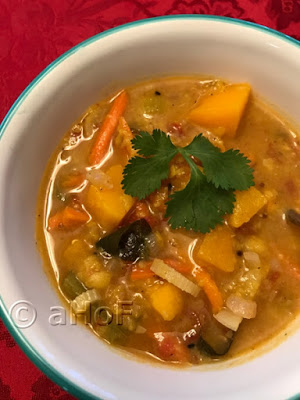
Sambar, soup, vegetables, lentils, spice mixture, recipe
Sambar


LENTILS:
¾ cup toor dal (tuvar/ardhar)
4 cups water
1 teaspoon turmeric

VEGETABLES:
1 cup tamarind puree (from 2 tamarind pods)
½ cup carrot, in matchsticks
1 tomato, chopped
1 cup squash, peeled, cubed
½ green bell pepper, sliced thinly
2 tablespoons Sambar Powder, or to taste

TEMPERING:
2 teaspoons coconut oil
1 teaspoon Panch Phoron
8 - 10 fresh curry leaves
½ teaspoon asafoetida (hing)
1 medium shallot (or small onion), sliced
3 cloves garlic, sliced

If making your own tamarind puree, peel 2 - 3 tamarind pods, pull off long veins and set to soak in 1 cup hot water for at least ½ hour. Once soft, squeeze out the seeds and discard, breaking up the fibrous fruit. Pass this softened fruit through a strainer, pressing through with the back of a spoon. Pour the puree into a saucepan.

Place the lentils into a bowl and wash repeatedly until the water comes out almost clear. Drain and place into a saucepan with the water and turmeric and bring to boil. Lower heat and simmer for about 45 minutes, until softened and mushy. Puree the lentils until smooth.

Add the vegetables to the saucepan with the tamarind puree and cook until softened. Add in the Sambar Powder at the end of cooking time. Add the vegetables to the pureed lentils with about 1 teaspoon salt.


For the "tempering," heat the coconut oil in a skillet and once hot, add the Panch Phoron until it pops and crackles. Add in the curry leaves and stir while they crackle and release their aroma. Add the asafoetida until it releases a lovely oniony aroma and then add in the shallot and garlic. Stir, sauteeing until the shallot and garlic are golden, then pour this mixture into the lentils and vegetables. Garnish the Sambar with cilantro leaves or fresh curry leaves and serve with idli or dosas (though it is an excellent soup all on its own, or with rice).


My passion is teaching people how to create a harmony of flavors with their cooking, and passing along my love and joy of food, both simple or exotic, plain or fancy. I continue my journey in ethnic and domestic cuisines, continuing my journey to explore diverse culinary experiences and hopefully to start you on a journey of your own. Join me also at A Harmony of Flavors on Facebook, and Pinterest.

Sunday, July 15, 2018

Using Raspberries in a Pie

Using raspberries . . . in a Raspberry Cream Pie, that is. I have made a baked Raspberry Pie, albeit only once. Don't know why, since raspberries are a favorite fruit of mine. My husband isn't keen on raspberries, because of the seeds, though he doesn't mind raspberry flavored things, sans seeds. 

Raspberries are all over the place now, and at a relatively decent price, so I opted this time to make a Raspberry Cream Pie, for the first time, ever.
 
Raspberry, Cream, Pie, recipe, dessert
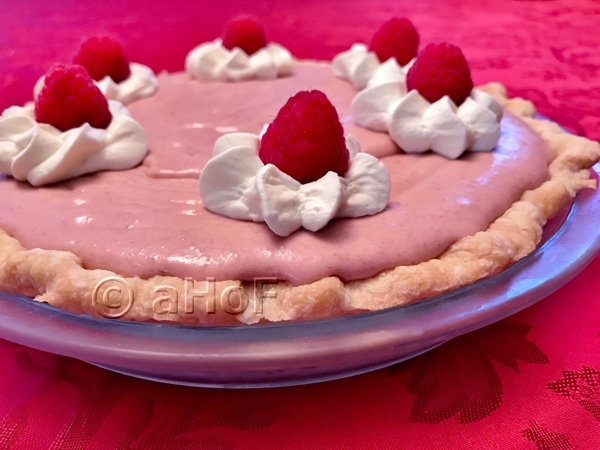
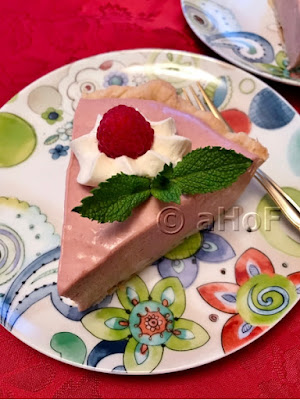
Raspberry Cream Pie

I have not had really great results most times I attempt a "cream" pie. To date, Coconut Cream has been a total disaster. Lemon Meringue Pie as well, the first two times, and though the Lemon part came out well on the third try, the meringue is still not up to my standards. I wasn't sure how this Raspberry Cream Pie would come out, but used the Lemon Curd recipe I have as a template recipe when making the Raspberry Curd part of this recipe. Some slight alterations were in order, since raspberries are nowhere near as tart as lemons, so less sugar, and also, a couple less egg yolks, since I wanted to use gelatin to assure a good texture that would hold its shape.
Raspberry Cream, raspberry curd, mascarpone, whipped cream, dessert,  Pie
Raspberry Cream Pie

Ever since I first mixed whipped cream with Mascarpone cream to make a very stable type of whipped topping, I have just been in love with it; both the flavor itself, and the fact that it will hold without weeping for days in the fridge. I wanted to have a whipped topping for the pie, but also wanted some to fold into the raspberry curd itself, for both lightness and volume. I like a 1:1 ratio of whipping cream and Mascarpone, and for this application, I used 1 cup (8 ounces) of heavy whipping cream and 8 ounces of Mascarpone. About ⅔ of the cream mixture went folded into the raspberry curd, and the remaining third was left to adorn the top of the pie. 

Making these type of pies is always a bit finicky, what with having to make the curd, then mix in the gelatin while it's hot, then that delicate balance of having the resulting mixture cool enough to begin holding shape, not too hot, or the whipped cream would melt, but not set so much that the whipped cream mixture cannot be folded in smoothly. As it is, careful as I was, I still passed that line by a tiny smidgen, so there are a few noticeable streaks of raspberry curd bits that gelled in there. Not much, but just enough to make it imperfect.

There is NOTHING wrong with the flavor though, or the texture. It came out just the consistency I wanted. It held shape perfectly when being cut, came out cleanly and still held just find as the slices of pie sat waiting for us during supper.  
 
Raspberry Cream, raspberry curd, whipped cream, mascarpone, dessert, Pie
Raspberry Cream Pie

One thing that I dislike about making these kind of pies is the crust. Since the crust must be blind baked before filling, the pie shell will tend to shrink and not be nearly as pretty as a pie baked with a filling inside it. Oh well. 

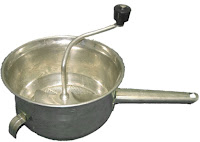
To start with, I wanted this to be a real fresh raspberry pie, and not something with raspberry flavored gelatin to make an artificial color or flavor.  No artificial whipped cream either. In looking to see what others were doing with raspberry cream pies, I cannot begin to say how many started with precisely those two items: Raspberry Jello and Cool Whip! Yikes. That is so not me. So I started with 18 ounces of fresh raspberries and cooked them in a saucepan until very soft. I first put them through a food mill, which removed a lot of the seeds but not all, then passed the resultant puree through a strainer to catch any remaining seeds (as well as any egg that may have cooked beyond smooth thickening of the curd!). I wanted it smooth, and it was. The texture is dreamy!

Raspberry Cream Pie

Makes one 9-inch pie
Raspberry Cream, raspberry curd, dessert, whipped cream, mascarpone, Pie
Raspberry Cream Pie


1 baked, 9-inch pie shell 

RASPBERRY FILLING:
18 ounces fresh raspberries
1 cup granulated sugar
1 stick unsalted butter (4 ounces), at soft room temperature, not melted
8 large egg yolks
Pinch salt
-------
1 packet unflavored gelatin
¼ cup water
-------
1 cup heavy whipping cream, well chilled
1 cup (8-ounces) Mascarpone cream, room temperature
2 - 3 tablespoons confectioner's sugar
-------
fresh raspberries, to decorate

Have the pie shell baked and cooled, then set aside.

Food Mill
Food Mill
Place the raspberries in a saucepan with no water. Turn heat on medium low and cook for about 20 minutes, or until they break down completely. If a food mill is available, pass the cooked berries through this first. If you do not have a food mill, press the berries through a strainer, a little at a time, until all that remains each time is dry seeds. Discard the seeds and continue with remaining raspberries, until all are pureed. Measure the amount of puree. If more than 1 cup, return the puree to a clean pan and cook down, gently, until about 1 cup remains. 

While the berries are cooking, set the gelatin into the water and let bloom for at minimum 10 minutes; longer is fine, if needed while processing berries. 

In a separate saucepan, stir together the egg yolks, granulated sugar, butter and pinch of salt until combined. Turn the burner on to low to medium low heat and whisk or stir constantly until the butter is melted and the yolks are well combined, then add in the raspberry puree. Continue stirring/whisking until the mixture thickens slightly and wisps of steam appear. If at any time it looks like the mixture is starting to simmer, remove from heat and stir briskly. Once slightly thickened, remove from heat and stir in the bloomed gelatin. Mix until gelatin is completely melted and combined. Set the mixture aside, stirring now and again to cool, or set over a bowl of ice cubes, stirring to cool. Do not allow the mixture to set!

Once the mixture is at room temperature, whip the heavy cream until very soft peaks form, then add in the confectioner's sugar and beat to stiff peaks. Add the Mascarpone all at once and beat only just to combine. Pour about ⅔ of the whipped cream mixture into the cooled raspberry mixture. Fold gently until there are no white streaks left. Chill the mixture until it will mound but is not completely set. Pour the mixture into the baked pie shell, mounding slightly in the center. Place the pie in a sealed container and refrigerate at least 4 hours. 

When ready to serve, dollop the remaining whipped cream mixture over top, or pipe with a large open star tip. Decorate with fresh raspberries and a mint sprig, if desired. 


My passion is teaching people how to create a harmony of flavors with their cooking, and passing along my love and joy of food, both simple or exotic, plain or fancy. I continue my journey in ethnic and domestic cuisines, continuing my journey to explore diverse culinary experiences and hopefully to start you on a journey of your own. Join me also at A Harmony of Flavors on Facebook, and Pinterest.
Wednesday, July 11, 2018

Fresh Fruit on a Cake Saga

This post was supposed to come first, but I wanted the better cake (for this recipe) to be available, so I posted my recipe for Borracho Cake first. 

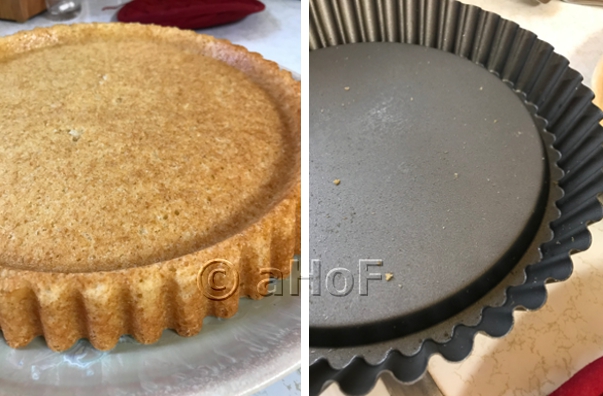
For the 4th of July, I wanted to make a pretty shortcake type cake, using a pan I had never used. The pan is about 11-inches across the top and 10-inches across the bottom. The bottom of the pan is indented upwards, so when the cake is turned out, it forms a bit of a well. 

My plan was to make a spongy cake that would absorb juices nicely, if they should get through, much like those little individual shortbread cakes sold in stores everywhere. I wanted a sponge cake, and while I have made sponge cakes many times over the years, I strayed from the tried and true and looked up cakes similar to a Victoria Sponge. Suffice to say, this is not in any way a sponge cake as I know it. Turns out, what the British call Sponge Cake is what we in the U.S. call Pound Cake. 😮 Read more about all that, here
Fresh Fruit, Shortcake, Mascarpone Cream
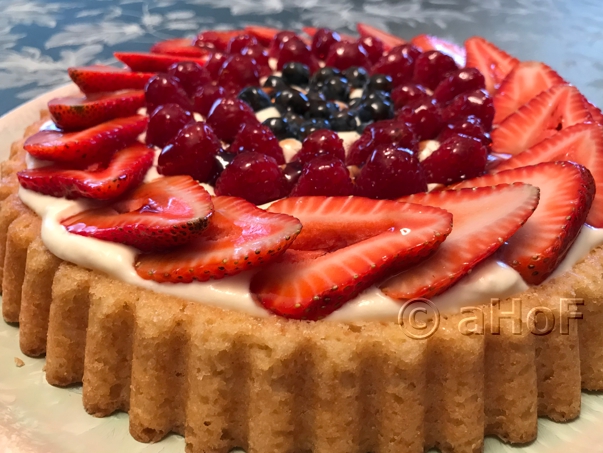
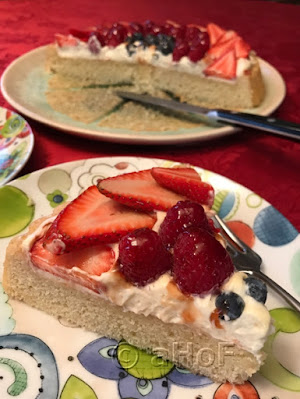
Fresh Fruit Shortcake with Mascarpone Cream

So, I ended up with a pound cake instead of the light and airy cake I had intended. The cake tasted great, so if that is what you would prefer, then just follow this recipe and you're all set. If you want more moisture, make a simple syrup of some kind, add a little liqueur of your choice for flavor, and moisten the cake with this syrup BEFORE topping with the cream and fruit.

If you prefer the soft, airy, absorbent cake I wanted, then make the cake I used for this Borracho Cake.

Cake, Cake Pan, indented well,
Cake and Cake Pan
All in all, the cake came out beautifully, and the cake pan I used has a well in the center, perfect for fillings. In this one, I wanted to make some kind of creamy filling, but absolutely not using something like cream cheese and Cool Whip! My desire, my plan, was to use Mascarpone somehow. Should I just make Mascarpone Whipped Cream? That was my first plan, but then I got thinking. I wanted something more, but I couldn't put my finger on it. Then I thought eggs! I wanted something a bit more cooked in texture, much though I love my Mascarpone Whipped Cream. So I started thinking about what to do.

I wanted to use some sort of liqueur, and finally settled on Limoncello. Lemony flavors go great with fruit. I mixed Limoncello into the Mascarpone cheese and set that aside. I planned to lighten the whole mass with plain whipped cream, and looking for flavors to incorporate, I went with a little Orange Flower Water, for its light, flowery and uplifting scent, and then a few drops of Angostura bitters just to mitigate sweetness levels. This might sound convoluted, but the flavors are stellar!

Mascarpone Cream & Fresh Fruit Cake

Makes one 10-inch, single layer cake
 
Fresh Fruit, Shortcake, Mascarpone Cream
Fresh Fruit Shortcake with Mascarpone Cream

(POUND) CAKE:
1½ sticks (6 ounces) softened unsalted butter
1 cup granulated sugar
1¼ cups all-purpose flour
¼ cup cornstarch
1½ teaspoons baking powder
½ teaspoon salt
3 large eggs
¼ cup boiling water
1½ teaspoons vanilla extract
½ teaspoon almond extract

LIMONCELLO MASCARPONE CREAM:
6 ounces / ¾ cup Mascarpone cream, room temperature
2 tablespoons Limoncello
2 eggs
3 tablespoons granulated sugar
¾ cup chilled heavy whipping cream
1 teaspoon orange flower water
3 drops Angostura bitters

Fresh Fruit for decorating: sliced strawberries, raspberries, blueberries
2 tablespoons red currant jelly, melted

Make the cake: Preheat oven to 350 degrees. Grease a 10-inch baking tin and line with parchment. Grease the parchment. Set aside. 

In a bowl, combine the flour, cornstarch, baking powder and salt and whisk to combine. Set aside. In a stand mixer, beat together the butter and sugar for about 5 minutes, until very light colored and fluffy. Add one egg to the butter mixture along with a tablespoon or so of the dry mixture and beat until incorporated. Add a second egg with another tablespoon or so of the dry ingredients and beat until incorporated. Repeat this with the third egg and another tablespoon of dry ingredients. Add in the extracts, the boiling water and then the remaining dry ingredients and stir to combine. 

Bake the cake for about 25 minutes or until a tester inserted in the center comes out clean. Let rest in pan for about 10 minutes, then turn out to a rack to cool.

Make the Limoncello Mascarpone Cream: Stir the Limoncello into the Mascarpone in a medium bowl. Set aside.

Place the two eggs and 3 tablespoons of sugar into a wide mixing bowl, either glass or metal. Have a large saucepan with about 1 - 2 inches of water in the bottom at a simmer on the stove. The bowl with the eggs should be able to set atop the saucepan without the bottom of the bowl touching the simmering water. Off the heat, whisk the eggs and sugar with a large wire whisk until somewhat foamy. Set the bowl over the simmering water and continue to whisk until the mixture has started to thicken and has fine foamy bubbles.

Mascarpone, Whisking eggs, simmering water, Mascarpone
        Mascarpone   -   Whisking eggs    - over simmering water     -   combined with Mascarpone

Without cooling, dump the egg mixture into the Mascarpone and whisk to combine.

In another large mixing bowl, combine the heavy whipping cream with the orange flower water and Angostura bitters. Beat the mixture until it holds stiff peaks, then fold into the Mascarpone egg mixture. 

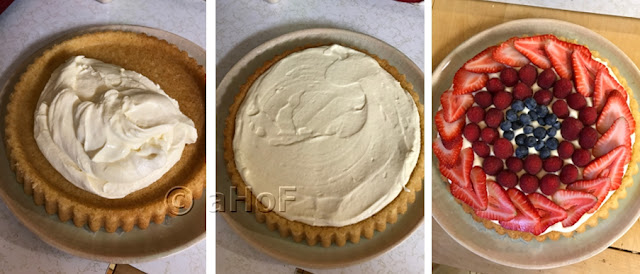
Set the cake onto a serving plate and top with this Mascarpone cream, then set sliced fruit on top, as desired.

Mascarpone Cream, cake, fresh fruit
Mascarpone Cream         -          Spread over cake         -         Fresh fruit to decorate

Once fruit is in place, brush the fruit with the melted Currant Jelly; this helps keep the fruit looking pretty. Chill the cake for 2 to 4 hours before serving. 


My passion is teaching people how to create a harmony of flavors with their cooking, and passing along my love and joy of food, both simple or exotic, plain or fancy. I continue my journey in ethnic and domestic cuisines, continuing my journey to explore diverse culinary experiences and hopefully to start you on a journey of your own. Join me also at A Harmony of Flavors on Facebook, and Pinterest.

Sunday, July 8, 2018

Elegantly Drunken Cake

When I lived in Guatemala, some 17 years ago now, one of my most favorite desserts was Borracho Cake. Funny, but no one I knew EVER made it. The only place I ate it was when my husband (at that time) took me to a bakery.

While I was down there, I learned everything I could about cooking and baking. I watched people prepare a thing, then went about recreating it on my own. Or I tried a recipe (of which there were very few) and then tweaked it to be as I wanted the flavors to taste. When there were no recipes and I loved something, such as Enchiladas, or this Borracho Cake, I set about finding a way to make it. 
Borracho, Cake, Guatemalan, dessert
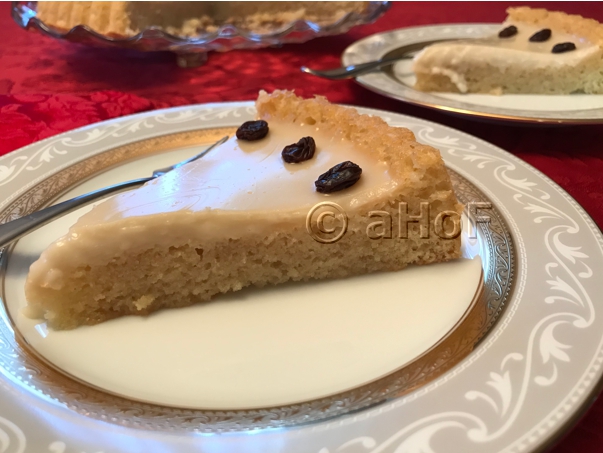
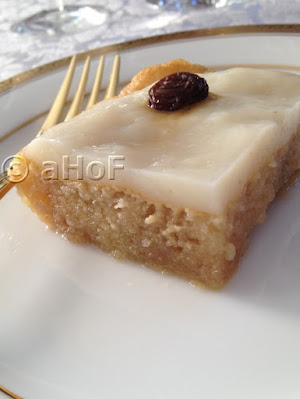
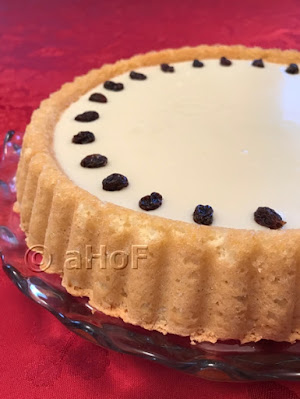
Borracho Cake

What I knew about this cake, from eating it at the pastry shop, was that it had a sponge cake type base, this sponge cake was perfectly saturated with a syrup flavored with cinnamon and rum, and the topping was a cornstarch pudding decorated with raisins. I needed three recipes, then:
  • Sponge cake
  • Syrup
  • Cornstarch pudding

Borracho

If you know nothing about Spanish, you might not know that "borracho" means drunk, or "drunkard," depending on how it is used in a sentence. The fact that there is a fair amount of rum in the syrup is the reason for its name. And it is soooo good.


Borracho, Cake, drunken cake, Guatemalan
Older Style Borracho Cake
I had only 7 cookbooks when I got married that first time, so my sum total of cooking instruction came from those 7 books. My 1966 copy of The Joy of Cooking had the most information, so I went there for ideas. I was no cook at all, when I first got married at just barely age 20. I watched my Mom at home, but never ventured into trying things on my own, outside of a box cake. So, on my own in a foreign country with no one to ask - well, this was long, long before cell phones, internet, or easy long distance calling, I had no place but my books to turn to for advice. In Guatemala, over the course of 12 years and 4 houses, we had a phone in only one of those houses. Phones were not terribly common. Calling my Mom for a quick consult was out of the question, even if we'd had a phone, as it was so costly.  So back to the Borracho...

The Joy of Cooking has a recipe for "sponge cake" that is a flexible recipe. There is a choice of 3 to 6 eggs, choice of flavorings, and so on. Over the years, I tried the recipe with 3, 4 5 or 6 eggs, and my favorite, hands down, was with just the three eggs. More and it just tastes "eggy."  

A Note on Sponge Cake

When watching "The Great British Baking Show," I saw them making a "Victoria Sponge." Watching this intrigued me, because it looked like a regular batter cake, to me. What's the difference, you say?

Well, what I have always known as a "sponge" cake is that is should be like a sponge; lots of nice little holes, light and fluffy. A sponge cake is leavened by beating air into eggs - first the yolks and the whites at the end before folding in. A true sponge cake uses no other leavening like baking powder. (My cake does cheat and uses a little baking powder, just to give it a boost.)
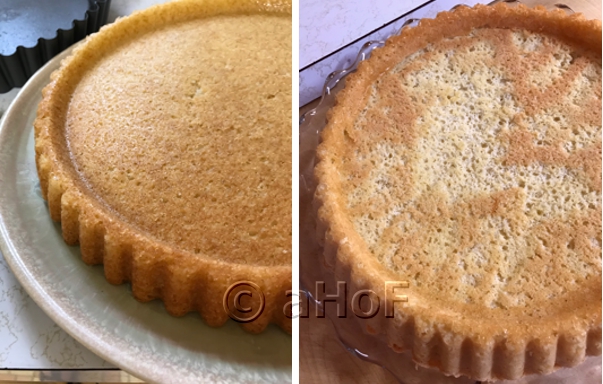
British type Sponge vs American type Sponge
British type Sponge (aka Pound cake)           vs           American type Sponge

Watching The Great British Baking Show, they used both butter and leavening in their "sponge" cake. What???

Come to find out, the British call sponge cake "foam cake." Their "sponge" cake is more like a pound cake. I recently ran into all this when I wanted to make a sponge cake type base for an American shortcake type application with fresh fruit on top. The cake I made, cobbling what I wanted from various (apparently British) "sponge cake" recipes and using the method used by Mary Berry, where she adds some flour along with the eggs as they are added, so the mixture does not look "curdled." This supposedly allows the cake to rise higher. I have no direct experience of this...

What resulted was a beautiful cake - don't get me wrong. It's just that it was in no way the kind of sponge cake I had wanted for my recipe. However, the cake was made, and that was that. And so I continued.

This is when I thought I just had to give my old Joy of Cooking tried and true sponge cake a go. The thing I was doing is using a new pan I had yet to use. I'd had it for years without even giving it a test drive. (So to speak). That first "sponge cake" (read: "pound cake") came out just beautifully in that pan. So now, would the real sponge cake do the same? It did.


A New Cake Pan

Sponge cake in new panSince I was testing cakes in the pan, and now had one pound cake made in it, with absolutely beautiful results, true, and now this lovely sponge cake that was also beautiful, I opted to use it for a new Borracho cake look. 

In Guatemala, at that pastry shop, the Borracho was served in lovely squares, resting in a muffin type paper, but sopping with syrup. This new idea of mine was made in a lovely round pan with fluted edge, that creates an indented top when turned out. It's not very deep, but it does the trick, and it was perfect to hold the Cornstarch Pudding.

Here is what I do to make Borracho Cake:


Borracho Cake

Borracho, drunken cake, Guatemalan Cake
Borracho Cake
Serves 10 to 12

CAKE:
3 large egg yolks
1 cup (6.95 ounces / 197 grams) superfine sugar
¼ cup (60 ml) boiling water
1 teaspoon (5 ml) vanilla
½ teaspoon (2.5 ml) almond extract
2 tablespoons (0.6 ounces / 17 grams) cornstarch
1 cup (4.35 ounces / 124 grams) all-purpose flour
1½ teaspoons (0.2 ounces / 6 grams) baking powder
½ teaspoon (0.1 ounces / 2 grams) sale
3 large egg whites

SYRUP:
1 cup (235 ml) water
½ cup (100 grams) granulated sugar
1 (4-inch) stick true cinnamon
½ cup  (118 ml) white rum

CORNSTARCH PUDDING:
1½ cups (353 ml) milk
1 (4-inch) stick true cinnamon
2 tablespoons (17 grams) cornstarch
6 tablespoons (83 grams) granulated sugar
¼ teaspoon vanilla extract

Raisins, to decorate

Make the cake: Preheat oven to 350 degrees. Lightly grease a 10-inch cake pan and line the bottom with parchment. Grease the parchment. Set aside.

In a mixing bowl, whisk together the cornstarch, flour, baking powder and salt  and set aside.

In another mixing bowl, beat the egg yolks until very light in color, using a hand mixer or whisk. Beat in the sugar gradually; the mixture will become very thick. Beat in the hot water and continue beating until it cools slightly. Mix in the vanilla and almond extracts. Spoon about a third of the dry ingredients into the wet mixture and fold in. Repeat until all the dry ingredients are incorporated.

Separately, in a squeaky-clean bowl, with super clean whisk or beaters, beat the egg whites until stiff, but not dry-looking. Fold a third of the whites into the batter to loosen slightly, then add the remaining whites and gently fold in. Pour into the prepared cake pan and bake for 20 to 25 minutes, or until the cake tests done in the center. Remove from oven and let set for about 10 minutes, then turn the cake onto a rack to cool slightly.

Make the syrup: While the cake is baking, place the water, sugar and cinnamon stick in a saucepan and bring to boil. Simmer gently for about 10 minutes to allow the flavor of cinnamon to permeate the water. Remove from heat, remove and discard the cinnamon stick and add the rum. Once the cake has cooled slightly, set it onto a dish with a rim and begin ladling the syrup over the cake. Use all the syrup. Allow the cake to completely cool.

Make the Cornstarch Pudding: In a saucepan, combine the cornstarch and sugar, then pour in the milk, whisking to combine. Add the cinnamon stick and place over medium heat and whisk until the mixture boils and thickens, then reduce heat and simmer, whisking constantly, for about 5 more minutes. Remove from heat and add the vanilla. Remove the cinnamon stick and discard. Pour the pudding over the cake. If the cake has a well, as mine does, this can be done at once. If the cake has a flat top, cool the pudding slightly, placing a piece of plastic film directly on the surface of the pudding to prevent a skin forming, then spread the pudding on top. Decorate with raisins, as desired.


My passion is teaching people how to create a harmony of flavors with their cooking, and passing along my love and joy of food, both simple or exotic, plain or fancy. I continue my journey in ethnic and domestic cuisines, continuing my journey to explore diverse culinary experiences and hopefully to start you on a journey of your own. Join me also at A Harmony of Flavors on Facebook, and Pinterest.

Friday, July 6, 2018

An Elegant Appetizer fit for Royalty

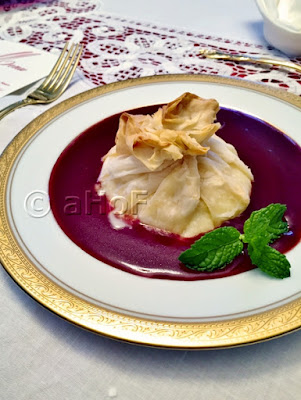
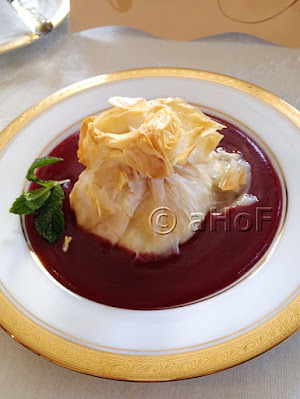
If you love Brie cheese, Phyllo pastry and raspberries, then this is an appetizer for you.
Brie, cheese, Phyllo, Raspberry Sauce, appetizer
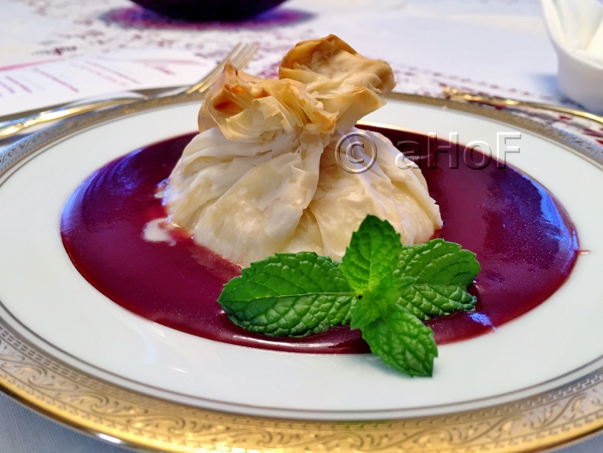
Brie in Phyllo with Raspberry Sauce

Granted, it probably has enough calories to be a meal unto itself, but once in a great while, we all want to splurge . . . just that once. 


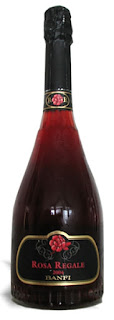
Banfi, Rosa Regale, Italian wine, sparkling wine
Banfi Rosa Regale
I have been making this appetizer, refining as I went along for about 26 years. Countless people have eaten it at our table. It is finicky to make, there are a lot of things that need to be taken into consideration, such as making things ahead and having guests arrive on time! Another, though not 100% necessary, is having a convection oven. There doesn't seem to be any other way to get the phyllo browned before the cheese all melts out. But golden browned or not, it is still absolutely mouth-watering. 
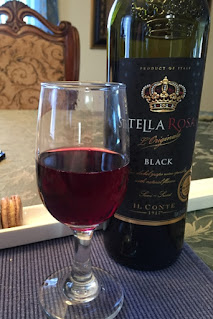
Stella Rosa, Black, wine, sparkling, semi-sweet
Stella Rosa Black

Wine Pairings

Then there is wine to think about, and I have the perfect one - or two! A whole lot of years ago, my husband and I were at a wine tasting, and they served Banfi's Brachetto d'Acqui with a chocolate sorbet and some fresh raspberries. I am not a chocolate ice cream, gelato or sorbet fan in particular, though I love raspberries. While the wine paired most excellently with the dessert as a whole, it truly picked up the raspberry flavor. After that, it became my de facto wine to serve with this signature elegant appetizer. It pairs so perfectly, there has never been need to try something else. Over the years, Banfi changed the name of this wine to "Rosa Regale." Same wine, same perfect flavor. I only realized more recently that Brachetto is the grape type used to make this wine. 

More recently, I tried a far less expensive wine called Stella Rosa Black. When I tasted it, I was struck immediately by how similar it tasted to Banfi's Rosa Regale! I could barely tell a difference. I urge you to try the Banfi version if possible, but if this is not in budget, then go for the Stella Rosa Black, since it is also made with the Brachetto grape.

Both these wines are slightly sparkling and lightly sweet, though not overwhelmingly. Thankfully, not full-out bubbly, but just a little, just enough. (I hate fizzy anything, really - sorry all you champagne lovers out there. I just do not care for too much bubble and fizz.) I have always served them in champagne flutes, regardless, as it shows off the pretty deep rose color far better than the "tasting glass" shown in the photo above.


Back to my Brie Recipe

Brie in Phyllo with Raspberry Sauce
  • Neither my husband nor I particularly care for the rind on the Brie. I cut it all off, but if you are a huge fan of the rind flavor, then leave it on. Being a soft cheese, it is malleable enough to create your own shape, and it will make no difference to the end result. I divide a couple of wedges or so of Brie and cut them to piles of about equal size, then press them into little "pucks." This is the start of things. 
  • The next thing is working with Phyllo (Fillo, Filo) pastry. Phyllo is tricky, because the sheets are so thin. This means they tear easily, and also, they dry out so fast it takes having things completely organized before starting. Make sure you have thawed the phyllo in the fridge overnight, or, if you forgot this step, then have it ion the counter to thaw thoroughly for at least 4 or 5 hours, unopened. Once opened, unroll the sheets and keep them covered with a damp towel. It is easiest to work with 2 sheets at a time. Trying to brush melted butter on one sheet at a time is an exercise in an amount of patience that is not my main virtue.
  • Melted butter must be brushed over as much of the surface as possible without tearing the phyllo sheets, most particularly for this recipe, because you don't want to start out at a disadvantage. The cheese will leak out during baking, no matter what I have tried. Placing the cheese into already torn phyllo is begging trouble. 
  • Long ago, I started out trying to wrap the phyllo around wedges of Brie, but it leaked so badly that I thought I would try instead making little pouches. They still leak, but less so, now. With the pouches, I tie twine around the top opening, then trim the raggedy top edges a little. Once baked, it is easy to take kitchen shears and snip the twine and remove. After baking, the pouches hold their shape perfectly. 
  • The last admonition is to form these pouches a minimum of a day before they will be needed, and up to three weeks. They must be frozen solid before baking, or there will truly be no cheese left inside the pouches. Once the pouches are formed, brush more butter all over the outside, including the bottoms and the ends that stick up above the twine. Then, use cooking spray on a baking sheet and set them onto the sheet. Freeze the pouches uncovered, then as soon as they are frozen stiff, remove them to little sandwich bags, one to a bag. I prefer the old-fashioned flap-fold type, because they are softer and easy to slip over the pouches. Set the wrapped pouches into a container with lid, big enough to avoid crushing the pouches. Replace in the freezer until ready to bake.

On the day you will serve the Brie Pouches, you will make the raspberry sauce. When I made this sauce the first time, I wanted something not so over-the-top-sweet that it would ruin any cheese flavor. What I compromised with is making a cup worth of brown gravy (if you have no beef stock on hand, use a beef bouillon cube or, some beef demi-glace with water) then adding in some raspberry preserves to melt in. I use preserves with the seeds, then strain them out. When the stores started selling raspberry jam with no seeds, I tried using that, but for some reason, the flavor and color are both so off, that I went back to raspberry preserves with the seeds and straining them out. To rescue the sauce the one time I used seedless jam, I added a couple of drops of red food coloring. Another hint is to add in a small amount of red wine to the sauce. This gives a depth to the flavors, and a little color. Dry red wine also brings down the sweetness level just a little bit more.

The recipe:

Brie in Phyllo with Raspberry Sauce
Brie cheese, Phyllo, Raspberry Sauce, appetizer
Brie in Phyllo with Raspberry Sauce

Serves 4

BRIE POUCHES:
12 ounces good quality Brie cheese
8 phyllo sheets
1 stick (4-ounces) unsalted butter, melted
- pastry brush
4 (10-inch) lengths cotton twine

RASPBERRY SAUCE:
1 tablespoon butter
1 tablespoon all-purpose flour
1 cup beef stock
¾ (of a 12-ounce jar) raspberry jam with seeds
2 - 3 tablespoon dry red wine
- few drops red food coloring, optional
- mint sprigs for garnish

At least one day ahead, or up to 3 weeks ahead, prepare the Brie pouches:

Place the box of phyllo in the refrigerator overnight to thaw, or - four to five hours before working with the phyllo, remove from freezer and allow to thaw at room temperature.

Meanwhile, remove the wrappers from the Brie wedges and with a very sharp knife remove as much of the rind as possible. As the cheese is malleable, divide up the wedges into 4 equal portions and mold the portions (even if there are bits of smaller pieces) into round, flat “pucks,” 3 - 4-inches diameter. Cover these and set them aside.

Set the butter to melt over very low heat. Have a baking sheet ready, sprayed with cooking spray. Have the cotton twine at hand. Remove the wrapper from one pouch of the phyllo dough, unroll the dough and cover with a damp kitchen towel. Do not leave uncovered as the pastry will dry out very quickly and be unusable. Clear a surface and remove two sheets of the phyllo and set them on the work space. Re-cover the remainder of the phyllo while working with the two sheets. Trim the phyllo sheets to a square and discard the leftover edge. Quickly, brush melted butter over the surface and set one of the Brie “pucks” into the center of the square. Trim the corners of the square so it is now a circle. Bring up all the edges of the
phyllo to encase the Brie, creating a little pouch. Press the top where it covers the Brie and then tie one of the pieces of twine around this neck (gently, to avoid tearing) to keep it in place. Brush all the outside of the pouch, including the bottom, with the melted butter. Set this pouch on the prepared baking sheet and repeat this whole process with the remaining three pieces of cheese, setting each on the baking sheet when finished. Set the sheet, uncovered, into the freezer.

If keeping the pouches frozen for more than one day, remove each frozen pouch from the sheet and carefully place them into individual sandwich baggies. Set the wrapped pouches into a sealed container, large enough so as not to crush the pouches, in the freezer until needed.

On Serving Day, make the Raspberry Sauce. This can be done earlier in the day.

In a 1-quart saucepan over medium heat, melt the butter and add in the flour. Stir to combine, then add in the beef stock and whisk continuously until the mixture thickens slightly and boils, then whisk occasionally, allowing the mixture to cook out the raw flour taste, 3 to 5 minutes. Add in 1 cup of the raspberry jam and stir until melted. Pour the mixture into a sieve over a bowl and using the back of a spoon, scrape the liquids through until the seeds in the sieve are mainly dry. Discard the seeds. It may seem counter-intuitive to use jam with seeds, but having tried this with seedless jam, I can say the flavor is not the same! Add in the wine and red food coloring, if using. The color is brighter with food coloring, but it is not necessary. Cook the sauce a bit longer to cook out the wine’s alcohol, then set aside. If making earlier in the day, place a piece of plastic wrap directly onto the surface of the sauce, so it will not form a skin.

Before proceeding with baking the Brie pouches, make sure your guests are all present.

Preheat the oven to 375 degrees. It is best if you are using convection heat, as it helps to brown the
phyllo, which can otherwise stay quite white. Some ovens automatically set themselves to 25 degrees less when choosing convection bake, but some require you to set the temperature to 25 degrees less when choosing convection. Remove the plastic wrap from the Raspberry Sauce and reheat while the Brie pouches bake. 
 
Carefully unwrap the Brie pouches and set them onto a rimmed baking sheet. Bake the pouches for 15 to 20 minutes. Do not be too alarmed when one or more of the pouches begin to ooze cheese. Hopefully, most will stay in. I have made these countless times and there always is at least one that leaks, sometimes badly (that one is always mine). They are still good.

Prepare serving plates. Use a salad sized plate, preferably with a little well and rim. Ladle some of the Raspberry Sauce onto the plate, then using a spatula, slide one of the pouches into the center of the sauce. Repeat with the other plates. Garnish each plate with a little mint sprig and serve immediately.


My passion is teaching people how to create a harmony of flavors with their cooking, and passing along my love and joy of food, both simple or exotic, plain or fancy. I continue my journey in ethnic and domestic cuisines, continuing my journey to explore diverse culinary experiences and hopefully to start you on a journey of your own. Join me also at A Harmony of Flavors on Facebook, and Pinterest.
Sunday, July 1, 2018

Kamut Flour in Scones

I have been using a lot of Kamut® Khorasan of late. I ordered a 5-pound bag of the whole grain, since I have an electric grain mill, and it is nearly gone. 

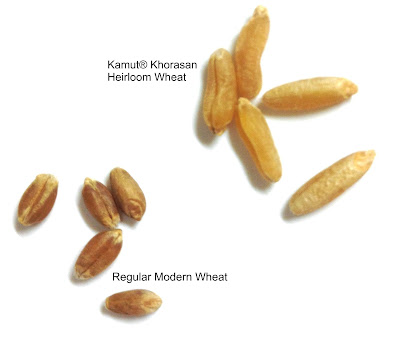
Kamut® Khorasan is an ancient strain of wheat, along with another called "Emmer". These two tetraploid strains have 28 chromosomes instead of the 42 found in our hexaploid strain of the common wheat of today. Kamut® Khorasan grains are nearly twice the size of our modern wheat grains. When I bought Kamut® flour in past, I thought that Kamut® was the name of the type of wheat, but was in error. The name of this grain is actually Khorasan, referring to a historical region in modern Afghanistan and northern Iraq. The title of "Kamut®" Khorasan was given later by two brothers in Montana. Growing this strain of wheat in hopes of preserving the strain cleanly, they registered it with
kamut grain, ancient wheat, modern wheat, size
the name of Kamut.

What really got me interested, besides being an heirloom variety of wheat, with less gluten, and of a totally different size and look than our modern wheat, was when I tried grinding and using it to make pasta. Kamut® Khorasan is a very "blond" grain, and when ground, has a lovely golden color. Using it to make pasta only made the pasta look like it had more eggs in it, with none of the graininess of other whole wheat pasta. It also did not tend to split and break so easily when cooked, as whole grain wheat pastas will. All in all, neither my husband nor I can tell the pasta is made of a whole grain at all. Which is rather wonderful, all in all.

Long ago, nearly 20 years ago now, I discovered Kamut® Khorasan flour and tried it in things like cookies, using about half Kamut® Khorasan to half white all-purpose flour. I added it to some breads and bagels. I liked the flavor and the look, but then didn't continue using it. Until recently. Now, I am finding that it is an excellent substitute, or partial substitute for all-purpose flour in many recipes, giving some added benefits of the whole grain goodness and fiber. 

Whole Grain, Kamut® Khorasan, Maple, Pecan, Scones
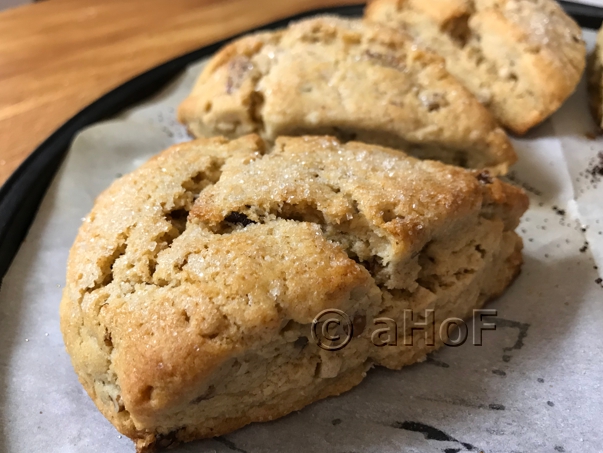
Whole Grain Kamut® Khorasan Maple Pecan Scones

Of late, I have used it almost entirely, with only ½-cup of all-purpose flour added to 1½ cups of Kamut® Khorasan flour, to make a Rhubarb Pecan Coffeecake, Chocolate Beet Cake (revised), Rhubarb Blueberry Bars, pancakes, pasta and scones. Of all these, the only recipe that did not quite turn out well was the Rhubarb Blueberry Bars, and that was due to the fact that I completely screwed up my measuring when I made it and the recipe just was not terribly good. My fault, not the Kamut® Khorasan flour. 

This morning I wanted to make scones. It was getting late, but I went ahead with it anyway, and ground the needed Kamut® Khorasan grain to make the scones. In grinding just enough whole grain to make 2 cups of flour, less than 2 cups of grain is needed, as once ground, it fluffs quite a bit. Once I measured the flour and weighed it, I knew how much I would need in future to make 2 cups. I have gotten used to using grams on my scale, as it will weigh more precisely down to tinier measures than I can get with pounds and ounces. For the 2 cups of flour, it weighed 255 grams. Next time, for 2 cups of flour, I will first weigh out 255 grams of the grain and then grind. For this time, I did it backwards. 

For the recipe itself, I proceeded with the formula that has worked so splendidly for me:

  • 2 cups flour
  • 2 tablespoons sugar
  • 1 tablespoon baking powder
  • 1 teaspoon salt
  • 5 tablespoons cold unsalted butter
  • 1 cup heavy cream
Whole Grain, Kamut® Khorasan, Maple, Pecan, Scones
Whole Grain Kamut® Khorasan Maple Pecan Scones
This mixture makes the basic dough, which turns out perfectly almost all the time. Today, once I mixed the cream into the ingredients, it seemed soupy; too wet to work with. I figured that it was possible that the whole grain flour just didn't absorb the liquid as quickly, but rather than wait, I added ¼-cup of all-purpose flour, which, once stirred in, made the dough just the perfect consistency. I had also added in some Maple Flav'r Bits from King Arthur Flour that were in my freezer for some time and needed to be used up. As it happens, these are no longer available from King Arthur website. For me, this is unfortunate, because I just loved them, as well as the Cinnamon Flav'r Bits, also no longer available. From here on, obviously, I will need to use maple flavoring instead. 

Once baked and sitting down to breakfast, the scones were truly lovely. Such a pretty warm color, puffed just perfectly, baked to perfection. They were so very tender - not something you expect of whole grain pastries. We were both just truly enamored of these scones. I hope you will be, too!


Whole Grain Kamut® Maple Pecan Scones
Whole Grain, Kamut Khorasan, Maple, Pecan, Scones
Whole Grain Kamut® Khorasan Maple Pecan Scones


Makes 8 scones


2 cups whole grain Kamut® Khorasan flour (255 grams, by weight)
¼ cup white, all-purpose flour
2 tablespoons granulated sugar
1 tablespoon baking powder
1 teaspoon salt
5½ tablespoons COLD unsalted butter
½ cup broken pecans
1 cup heavy cream
½ to 1 teaspoon maple flavoring, to taste

Preheat oven to 425 degrees. Line a baking sheet with parchment and set aside.

In a mixing bowl, combine the flours, sugar, baking powder and salt. Cut in the cold butter until in very small bits. Stir in the pecans with a fork. Stir together the cream and maple flavoring and add to the dry ingredients, stirring together quickly with the fork. Once the mass begins to come together, turn out onto a greased surface and bring together into one mass, then pat neatly to an 8-inch circle. With a long kitchen knife, cut across the circle 4 times, creating 8 equal wedges. Lift the wedges to the parchment lined baking sheet, keeping them at least 1-inch distance from each other. If desired, brush the tops of the scone wedges with a little more cream, then sprinkle with granulated sugar. Bake the scones in the lower third of the oven for 15 to 18 minutes, or until they spring back nicely to the touch. Serve warm.


My passion is teaching people how to create a harmony of flavors with their cooking, and passing along my love and joy of food, both simple or exotic, plain or fancy. I continue my journey in ethnic and domestic cuisines, continuing my journey to explore diverse culinary experiences and hopefully to start you on a journey of your own. Join me also at A Harmony of Flavors on Facebook, and Pinterest.
Disqus