Translate

Wednesday, June 24, 2020

Guatemalan Pan Frances

Maybe I should say "Guatemalan Style" Pan Francés. I never actually learned to make this bread in Guatemala, and from this remove of 40 years, it was only after watching a few Guatemalan videos and reading lots of recipes that I went and created my own version. 

Guatemalan bread, Pan Frances, French bread
Guatemalan Pan Frances

Everyone has their own style, their own methods; the things that work best for them, based on how they have done things over time, past experience. This is how it was for me. Making all the various Guatemalan style breads, which I truly only went into with some dedication last November, as I had been craving Shecas for ages! I watched videos to see the various styles for forming the breads, and then I did what worked best for me. My methods may or may not actually be "true," And then again, no two bakers make things exactly the same. While any professional baker will have their methods, tried and true, and teach these methods to students, there will always, always be variations. I say all this, because when anyone reads my methods, but might see something elsewhere that works better, then go for it. Comfort in your own methods is highly important in baking and cooking. This is where enjoyment starts.
Pan Frances, Just Baked, Guatemalan bread
Pan Frances Just Baked

French Bread, and Pan Francés

Okay, so when things actually come down to the fine brass tacks, there are not many ingredients in any French bread. True French bread needs nothing more than flour, yeast, salt and water. Additions, such as lard or shortening, if used, should be kept to a minimum. Sugar truly has no place in French bread, but most recipes I read for Guatemalan Pan Francés has at least a little of both of these latter ingredients.

Forming the Dough

When I lived in Guatemala, I was married to a Guatemalan man, and for a brief moment in time, he owned a bakery. Once, when he took me through it, my memory of what I saw was of a baker forming Pan Francés. He already had a line or "set" of the breads formed, with the deep "dent" down the center. He had a heavily floured baker's "couche" set at one side, with a deep pleat upwards. He flipped the line of formed breads so that the pleat in the couche was poking into the line down the center of the breads and there it would rise. I know the reasoning for this - the bread just wants to rise and fill that deep dent, and if allowed to do this, then the bread no longer looks like the Guatemalan Pan Francés, but instead becomes a single blob. Not Good. And not everyone has a handy baker's couche.
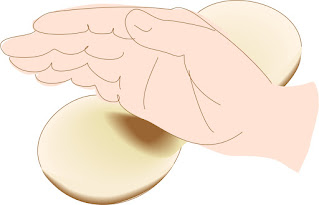
forming large indent, making Pan Frances, Guatemalan bread
Pressing the center of one set

For a home baker, with less experience of making these breads, I was determined to get them right, and after seeing on many videos how very important it was to make that center in the line of breads is deep enough to stay open, I worked at it. Most videos show that once the line of usually 6 "sets" of breads (6 is easier for the home baker to manipulate). Once the set is formed and that center line pressed wide and flat, entire set of breads is lifted and flipped over onto a good bed of flour. The set is flipped back upright to rise, but even then, if the center line starts puffing, flatten it again with the side of the hand or a rolling pin and sprinkle more flour into the crease. This center crease has to be much wider than one would think. Make sure it is at least 1½-inches wide, minimum. 

Pan Francés

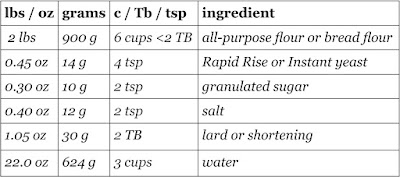
Makes about 4+ "sets" of 6 Pan Francés
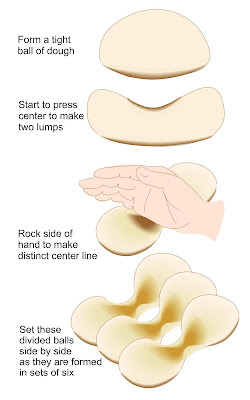
how to, forming Pan Frances, Guatemalan breadIn a bowl, mix flour, yeast, sugar and salt together. Add in the lard and the water, reserving some of the water aside in case it is not needed. Begin stirring with wooden spoon or hands, incorporating the dry ingredients and lard together. Once dough comes together, turn out onto a clean, floured surface and begin kneading. Adjust the dough with more flour or more water if needed. The dough should be tacky, but not outright sticky after a few minutes of kneading. Knead the dough until it forms a windowpane: take a piece of the dough and stretch it wide between the hands. It should be able to hold without tearing and stretch thinly enough to show light through it. For me, this took 16 minutes. 

Grease a clean bowl and set the dough into the bowl, turning over once to grease both sides. Cover the bowl with plastic film and set aside to rise until nearly doubled. This can take 40 minutes to 1+ hours, depending on the ambient temperature. 

Grease two or more baking sheets, or line them with parchment. 

Two sets of 6 breads set to rise
Begin breaking off portions of dough from 1.5 to 1.75 ounces each. Each of these portions will be one "set" of breads. Take one portion and form it into a tight ball, then set on the work space and using the side of your hand, press and roll back and forth in the center, to form two conjoined lumps. Ensure there is plenty of space between the lumps, but without breaking the balls apart. Set aside, then begin again with another piece of dough, form a tight ball and roll with side of hand to make two nicely separate, conjoined lumps. Set this second set against the first. Repeat until you have 6 sets of dough, lined up with the centers aligned. Use a rolling pin and rock it slightly down the center length to ensure good separation. Create a heavily floured area the size of the dough set and lift the entire set of 6 and flip it upside down onto the heavy flour. Flip it back over, right side upwards. press the center again, with hands or rolling pin, and then sprinkle flour down the center line. Place the set of Pan Francés onto one of the prepared pans, to one side.

Repeat this process with the remaining dough balls. There should be a minimum of 4 sets of 6 breads, though there could be an off-number set left. 

Cover the heavily flour dusted breads with plastic film and set aside to rise for about 40 minutes. 

Preheat the oven to 425 degrees. On a rack at the top of the oven, set an oven safe pan for steam-water.

Once oven is ready, have one cup of boiling water ready at hand. Set one tray of bread into the oven on center or lower rack. Quickly, pour the cup of boiling water into the steam pan on upper rack. Close the oven door and bake for 20 to 30 minutes, until golden brown. 

With more trays, repeat adding boiling water to the steam pan on upper rack, then bake additional trays for the same amount of time. 


My passion is teaching people how to create a harmony of flavors with their cooking, and passing along my love and joy of food, both simple or exotic, plain or fancy. I continue my journey in ethnic and domestic cuisines, continuing my journey to explore diverse culinary experiences and hopefully to start you on a journey of your own. Join me also at A Harmony of Flavors on Facebook, and Pinterest.

Tuesday, June 23, 2020

Things to do with Radishes and Dates

. . . . but not together!

Pickled Radishes, radishes, quick pickle
Spicy Pickled Radishes
I have a couple of recipes to share today, completely separate, disparate recipes. The only similarity is that they are both condiment types.

The first one is for quick Pickled Radishes. Radishes have never, ever, been a favorite of mine. Though, made just the right way, I can enjoy them. Those who sprinkle on some salt and crunch into them? Nope, not me. To date, and I say this from the vantage point of 70 years on this planet, there has been only one way I have eaten radishes and enjoyed them, and I discovered these at age 20, in Guatemala. I should say two ways, because the Guatemalan recipe for Picado de Rabano (Chopped Radish Salad) can also be used added in to chopped roast beef and a whole new dish is created, called Salpicon. I love both of these. I have made them a fair number of times over the intervening years. My husband will not eat these dishes, not even after 30 years together. Oh well.

So one day I was perusing the web and came upon this recipe for pickled radishes. The sound of it intrigued me, so I saved the site, waiting until I grocery shopped and came home with a single bunch of radishes. The recipe I found was on this site, and is called "Sweet and Spicy Pickled Radishes." When I came home with one single bunch of radishes, which, once I removed all the greens, weighed in at 5 ounces worth, and the recipe called for a pound of radishes, I had to do some quick recalculating to get the amounts to function. Plus, I added in some shallot and garlic, just because everything is better with garlic, and I love shallots. The amount of salt was too much for my taste, even cutting the amount by a third. So, with my own adjustments, I went ahead and made my own little 12 ounce jar of these and I have to say, they are really good!  So, here is my revised and smaller, version of the recipe:

Radishes, quick pickle
Radish mixture packed in jar

Spicy Pickled Radishes


Makes one 12-ounce jar

5-ish ounces cleaned, de-stemmed radishes
½ - 1 Jalapeno or Serrano pepper
2 tablespoons fresh cilantro, minced
1 small shallot, thinly sliced
1 clove fresh garlic, thinly sliced
⅓ - ½ cup white vinegar
1 tablespoon sugar or honey
1 teaspoon Kosher salt
1½ teaspoons yellow mustard seeds

Once radishes are clean and trimmed, it is best to use a mandoline - very carefully! - to slice the radishes extremely thinly. The same should be done for the shallot and garlic, with even more care. The Serrano (or Jalapeno) pepper can be sliced leaving seeds in or removing seeds and slicing finely. Mix the sliced radishes, shallot, garlic, Serrano and cilantro together in a bowl, then pack the mixture tightly into a jar. I used a jar I'd washed and kept, which has a 12-ounce capacity.

In a small saucepan, heat to boiling the vinegar, sugar, salt and mustard seeds. Once boiling, remove from heat and allow to cool to room temperature, then pour over the radish mixture to cover (the vinegar mixture can be cooled more rapidly in the fridge if needed). Cap the jar tightly and let stand for 24 hours at room temperature before use. Store in the fridge and eat within a week or so.

~~~~~~~~~~~~~~~

The next recipe is a variation on Imli / Tamarind Chutney in my Indian Recipes in the Recipe Index of this blog. Often this Tamarind Chutney has dates added, either as the main event or as half and half. The result, to my taste, is not all that different, but if you happen to have dates around that need to be used, then by all means try this recipe. I had some exceedingly soft Medjool dates given me and they were so very moist they started getting a fermented smell, so I used most of them in this chutney (the cooking time stopped the fermentation!) and refrigerated the remainder, which will soon go into Date Nut Bread!

I have a jar of tamarind concentrate which is like a thick sauce, that has already been strained and is completely smooth. If you have only fresh tamarind pods or a tamarind "block" (which usually has fibers and seeds embedded into it), you will need to take similar steps as with the dates - softening the tamarind in hot water and straining through a coarse strainer. See this blog for some info on Tamarind.

Khajur Imli Chutney, dates, tamarind, chutney Indian recipe
Khajur Imli Chutney

Khajur Imli Chutney or Date Tamarind Chutney


Made three 6-ounce jars

½ cup dates, preferably soft, de-seeded, rough chopped
Khajur Imli Chutney, dates, tamarind, Indian recipe
Khajur Imli Chutney or Tamarind Chutney

1½ cups water
----
½ cup tamarind paste or concentrate (pre-strained)
½ cup water
----
1 tablespoon grated fresh ginger root
1 teaspoon hot Indian chili powder
1 teaspoon cumin, ground
1 teaspoon ground fennel seed
1 teaspoon Garam Masala
1 teaspoon black salt or regular salt
½ cup brown sugar or jaggery

Cook the chopped dates with the 1½ cups water for about 15 minutes or longer, as needed to soften the dates enough to press through a larger sieve. Use the back of a spoon to get as much of the puree as possible. 

Combine the date puree with the tamarind concentrate and the ½-cup of water in the saucepan, adding in all the remaining ingredients and bring to boil. Reduce the mixture to simmer and cook for 15 minutes to meld flavors. Pour into a clean jar with tight fitting lid. Allow to cool, then store in the fridge for up to a month.


My passion is teaching people how to create a harmony of flavors with their cooking, and passing along my love and joy of food, both simple or exotic, plain or fancy. I continue my journey in ethnic and domestic cuisines, continuing my journey to explore diverse culinary experiences and hopefully to start you on a journey of your own. Join me also at A Harmony of Flavors on Facebook, and Pinterest.
Thursday, June 4, 2020

Guatemalan Dessert Favorites

Molletes, Guatemala, bread, enriched bread
Molletes
Guatemalans seem to make the very best use of any ingredient, and that includes using unlikely things to make into desserts. Take Plantains. They are used green as a "vegetable" side dish; medium-ripe, simply cooked, they are perfect as a side with black beans; really ripe and fried are great on their own for dessert and then comes magic. They are used sweet as Plantains in Mole Sauce for an amazing flavor sensation. Or used for Rellenitos de Platano, those amazing little fried ovals of pureed plantain with a surprise inside!

This magic is also done with homely yucca root, or squash (not too surprising as we do have Pumpkin Pie). And then bread. Bread, you ask? Well, I do love bread pudding, so I guess it's no surprise that I have always loved a dessert they call Molletes en Dulce. Molletes (pronounced "moy-YET-ez") are a particular type of bread from the Guatemalan "sweet bread/roll" panoply. An enriched bread, with a little sugar, shortening and eggs, these are delicious all on their own, smeared with a little butter and eaten with coffee or with black beans, or however/whenever you choose. And then as inevitably will happen, if they are somehow left over, rather than let them go stale and thrown out, they are turned into dessert. 
Pan Frances, Guatemalan French Bread
Pan Frances or French Bread

Now, a caveat. In all the 12 years I spent in Guatemala, I never, ever had Molletes en Dulce made with actual Molletes! Instead, and likely because it was more common for the "Pan Frances (their French Breads) to be left over than the Molletes, the cook made this same recipe but using the portions of Pan Frances instead. It was delicious, and a favorite dessert. Just not made with Molletes. Confusing to me at the time. 

Since in the U.S. we do not have this kind of Pan Frances, with its individually marked portions, I have made similar use of a narrow loaf of French bread, cutting it into chunks of like size, about 2 x 2 x 3-inches, approximately. Hollow out a core of the bread and fill with thick cream and raisins and proceed. It works. It's really good. But when I made Molletes last November, I decided at long last to make Molletes en Dulce. WITH Molletes!


Molletes en Dulce, bread dessert, Guatemalan dessert
Molletes en Dulce

Molletes en Dulce


Serves 6

1¾ cups sugar
2½ cups water
1 (4-inch) piece true cinnamon
6 molletes or other breads, about 1 to 2 ounces each, slightly dried
½ cup Mexican cream, or sour cream
18 raisins
2 eggs, separated
1 tablespoon flour
1 - 2 tablespoons oil or shortening for frying
slivered almonds, to adorn

In a large, wide pot, bring the first 3 ingredients to boil, lower to simmer and cook gently for about 20 to 30 minutes.


If actually using molletes, take out a piece from the top of each, creating a little
Cut center, Mollete, preparation
Cutt center from Mollete
lid, and widen the hole inside the bread. Divide cream between the wells, insert 3 raisins in each and then set the lid back on. If using French bread chunks, cut a slice into the bread, widening the hole as needed to insert the cream. Set 3 raisins into the cream.

Whip the egg whites until stiff. Separately, whip the egg yolks until they are pale yellow and drip down in ribbons from the beater or whisk. Fold the yolks into the whites, and then fold in about a tablespoon of flour to give body to the mixture.

Dip each filled piece of bread into the beaten egg mixture, till completely covered, and then fry these on all sides in the shortening in a large frying pan, turning to get the egg done on all sides. When completely fried, and thus sealed, set them gently into the simmering syrup. Gently simmer the molletes in the syrup for 20 - 30 minutes or longer. Serve adorned with almonds.

~~~~~~~~~~~~~~~~

Another use for leftover "sweet (enriched) breads" was called Boca de Reina, or Bocado de Reina. While I never once saw this dessert made anywhere but in a pastry shop, it was still one I completely fell in love with. The name means something like "A Queen's Bite or a Queen's Snack." A snack fit for a Queen would be another way to term this dessert. In the 1970s, when I was in Guatemala, my husband took me to this one pastry shop occasionally for a little sweet bite and often this was my choice. At that time, in that pastry shop, this dessert was a piece of cake that was amazingly good. Moist and tender, subtly flavored. I couldn't put a finger on what might be in it. I asked, and was told it was a cake made from leftover breads, made into crumbs. 

I returned to the U.S. once and for all in the early 1980s. Never once did I have this dessert again, nor ever heard of it anywhere, and pretty soon it was completely gone from memory.

Until.

When my oldest daughter was turning 40, I created a "Cookbook/Memoir" of all things Guatemalan that I could recall. All my children were born there, though the youngest, 3 years old at the time, remembers nothing of it. The oldest, at 10, remembered well. I found photos online of places we'd been and foods she'd known, recipes I had made and some I hadn't but still held on to. It was great. And then my son was turning 40 a few years ago, and while what I made for my daughter was good at the time, I had a LOT of new ideas and recipes I recalled while researching others, many I had actually tried out since that first book came to be. And this Bocado de Reina came into my mind. I searched online for a recipe, at least an idea. The ONLY thing that comes up when searching Guatemalan recipes and Bocado de Reina is some kind of banana bread/pudding.
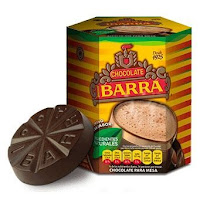
chocolate, sweetened chocolate, Guatemala

I can say with 100% certainty, the Bocado de Reina I ate at that pastry shop, did NOT have bananas in it. 

My memory said that it was a darkish color, but not dark like chocolate cake. The cake had a wonderful, moist crumb. It was served cut into a square and set on a muffin paper to display. As I said, the flavors were elusive. 

Okay, so the one thing I knew was that it was made (at that pastry shop) with crumbs of day-old bread. And if that was the "flour", then I would just have to add in other cake-like ingredients. But what gave it the dark color? I know that chocolate was also not a flavor that I can recall from that cake. Yet. . . I wondered if using a small amount of Guatemalan / Mexican chocolate tablets, such as Ibarra or Abuelita, pre-sweetened and with cinnamon in them, maybe I could get this cake to have more color, while t the same time without it actually tasting of chocolate. I had just been making some of the Guatemalan breads, testing them out to see what I could use for recipes in my son's version of the Guatemalan Cookbook / Memoir. I had some leftover Molletes and Rosquitas. I went to work. 

Bocado de Reina, Guatemalan cake, leftover bread crumbs
Bocado de Reina

At a remove of 32 years from the last possible time I might have eaten this cake, I made my own version. I cannot in any way say for certain that this tastes perfectly of the Bocado de Reina I ate long years ago in Guatemala, but it fit all my remembered criteria, and it truly tastes fabulous. While maybe not 100% Guatemalan, here is my Bocado de Reina:

Bocado de Reina

Bocado de Reina, Guatemalan cake, leftover bread, bread crumbs
Bocado de Reina

Makes one 9 x 9 cake

1½ cups (12 ounces) heavy cream
1 cup (7.3 ounces) sugar
1/3 cup (1.7 ounces) sweetened Mexican or Guatemalan chocolate, finely grated
¼ teaspoon salt
1 teaspoon true cinnamon (Ceylon, or Mexican)
1 teaspoon vanilla extract
2 large eggs
¾ cup (3.5 ounces) raisins
3 cups (8.35 ounces) “day old” enriched bread, made into crumbs
¼ cup (1.16 ounces) all-purpose flour
1 teaspoon (0.18 ounces) baking powder

Make bread crumbs from rich breads such as brioche, molletes, wafer cookies, animal crackers or a combination. They should not all be completely dried out. Preheat oven to 350 degrees. Grease an 8 x 8 or 9 x 9-inch baking dish; set aside.

In a large bowl, whisk together the cream, sugar, chocolate, salt, cinnamon, vanilla and eggs. Add in the raisins and bread crumbs and allow to soak for a few minutes. Stir together the flour and baking powder and stir in. Pour the batter into the baking dish and bake for about 40 to 50 minutes, until a tester inserted in the center comes out almost clean. A few remaining crumbs are okay. Cool completely. Dust the top with confectioners’ sugar if desired. 


My passion is teaching people how to create a harmony of flavors with their cooking, and passing along my love and joy of food, both simple or exotic, plain or fancy. I continue my journey in ethnic and domestic cuisines, continuing my journey to explore diverse culinary experiences and hopefully to start you on a journey of your own. Join me also at A Harmony of Flavors on Facebook, and Pinterest.
Monday, June 1, 2020

Venturing Afield with Indian Recipes

Last year I created for myself a cookbook of Indian recipes I had made, plus adding in some that I wanted to try. Of course, with as much as I love Indian foods and flavors, I am constantly finding new things to try. And so it was that in the course of researching Indian food, or spices or whatever of the moment took my interest, I discovered recipes for Bisi Bele Bath.

You might well be saying "Bisi . . . . .what????" That is pretty much what I did. 

Bisi Bele Bath, Indian food, ethnic
Bisi Bele Bath

Many, many Indian recipes call for a pre-made spice mixture. Of course, many households make up their own, but in this day and age, pre-mixed spices exist in packets, boxes or jars, and many Indians choose to go this route. It certainly would cut down on the amount of different spices one must keep in the home. Making from scratch means a very long list of spices needed to be on hand. As it happens, I have an amazing amount of Indian spices on hand! 

Bisi Bele Bath, Indian food, lentils, rice
Bisi Bele Bath
So when I came upon recipes for Bisi Bele Bath, a vegetarian recipe of rice, lentils and vegetables from the Indian state of Karnataka, of course it called for a spice mixture. Some recipes online had all the spices listed and created the mixture as with any recipe: get out the spices, measure, toast, grind (or not). Other recipes I encountered called for using a Bisi Bele Bath Spice Mix, with their own recipe available on their site. And some few other recipes called for a particular favorite brand of Bisi Bele Bath Spice Mix. Reading all these recipes, it became a personal challenge then, to make up my own spice mix for this dish.

Coming back to the unusual name for this dish, it is explained everywhere online that Bisi = Piping Hot; Bele = Lentils; Bath = Made with Rice. So, in essence, Bisi Bele Bath means "A Piping Hot Lentil and Rice Dish." Paraphrasing. The addition of vegetables to this dish is optional. Vegetables can be added to the meal in other ways, if you choose.

Bisi Bele Bath Spice Mix 


Makes enough for a few recipes of Bisi Bele Bath

4 dried red chilies (with or without seeds)
-----
4 tablespoons coriander seeds
1 teaspoon cumin seeds
¼ teaspoon fenugreek seeds
-----
1½ tablespoons channa dal (Bengal gram/desi chickpea)
2 teaspoons urad dal
-----
4 whole cloves
3 green cardamom pods, lightly crushed
4-inch piece soft (true) cinnamon, or 1-inch piece of cassia bark 
1 - 2 pieces mace blades* (see Note)
1 teaspoon black peppercorns
4 Kapok buds (Marathi moggu)* (see Notes)
-----
1 tablespoon white poppy seeds
-----
4 teaspoons dried unsweetened coconut
-----
1 teaspoon asafetida
-----
10 - 12 fresh curry leaves

Heat a dry skillet over medium to medium high heat. Have a wide plate or bowl ready to hold the hot spices for cooling, after toasting. Each section of the spices will be toasted separately, turning out to the plate to cool. Toast until the spices are fragrant, but in no way burnt.
  1. First, toast the dried chilies. If you wish less heat, break them and remove seeds, along with stems. Toast the chilies until they begin to change color; turn out to the plate to cool.
  2. Add in to the skillet the coriander, cumin and fenugreek seeds and stirring constantly, allow them to change color slightly and smell wonderful, then
    turn out to the plate to cool.
  3.  Now add in the two dals (dry, uncooked) and stirring constantly, allow them to become golden brown, but not burnt. Then,
    turn out to the plate to cool.
  4. Add to the skillet the cloves, cardamom pods, cinnamon pieces, mace blades, black peppercorns and Kapok buds, if using. Toast them until fragrant, how long will depend on how high the heat. Stir constantly until colored, then turn out to the plate to cool.
  5. Pour in the white poppy seeds and keep them moving, just until they start to change color, then turn out to the plate to cool.
  6. Add in the dry coconut and stir quickly, it will go from white to blackened in seconds! Once the coconut turns golden, turn out to the plate to cool.
  7. Add in the asafetida and stir quickly, just until it smells of onions, then turn out to the plate to cool.
  8. Add in the fresh curry leaves and toss, stirring until they are completely dried and crisped, then turn out to the plate to cool.    
Allow the spices to cool to nearly room temperature, then grind them to powder using a spice grinder/coffee grinder used only for spices. This may require grinding in various batches. Once ground, stir well to distribute evenly, then keep stored in a tightly sealed glass jar in a cool, dark place.

NOTES:  If mace blades are not available, substitute by adding in about ¼ teaspoon ground mace at the end, after all spices are ground to powder. Kapok buds, or Marathi moggu, are a new spice for me. I ordered them and used them as the recipes say this is an authentic flavor. If you do not have or cannot get them, just omit.

~~~~~~~~~~~~~~~~~~~~~~

In the U.S., we don't often go for, or even think of, mixing up lentil and rice dishes, unless you are vegetarian, and then it is important because rice and lentils combined make a complete protein. Simply cooked rice and lentils are not much of a draw, as they haven't much flavor. All I can say is that this dish does not lack flavor! It is a thick, soft mixture, which may not seem to appeal. But flavors are wonderful, so despite what your eyes may tell you, it is worthwhile giving this dish a try.

Bisi Bele Bath, Indian food, lentils, rice, spices
Bisi Bele Bath

Bisi Bele Bath


Serves 4 to 6 

¾ cup toor dal (aka ardhar dal)
¾ cup long or short grain rice
5 cups water
-----
¼ tamarind, from a compressed block 
1 cup water, hot
2½ tablespoons Bisi Bele Bath Spice Mix
-----
1 tablespoon ghee or oil
1 medium onion, chopped
1 teaspoon salt
-----
½ cup cubed carrot
½ cup green peas
½ cup potatoes in small cubes
½ cup green beans, cut in little pieces

TEMPERING / FLAVORING:
1 tablespoon ghee or oil
1 teaspoon brown mustard seeds
10 fresh curry leaves  
1 dried red chili, whole
10 cashews
½ teaspoon asafetida/hing 

Before beginning any prep, rinse the toor dal in copious quantities of water, until the water runs mostly clear. Then, cover the dal with water and set aside for ½ hour. At this time also, set the tamarind chunk to soak separately, in the hot water.

Once dal has soaked, combine the dal with the rice in a pot of adequate size, cover with the 5 cups of water and bring to boil. Reduce to simmer and cook until the rice and dal are both very soft, 20 to 30 minutes. Use a spoon or a potato masher to mash up the mixture. Set aside.

In a skillet, heat the ghee and add in the chopped onion and salt to cook until soft. While onion is sauteeing, break apart and strain the tamarind in a strainer over a bowl, to catch all the liquids. Press to get as much from the tamarind as possible, then discard the seeds and fibers. Add the Bisi Bele Bath Spice Mix to the tamarind and stir. Once the onion is nicely soft, add the tamarind liquid into the skillet, along with the carrots, peas, potatoes and green beans, then cook the vegetables until tender, adding water if needed for cooking. Once done, pour the contents of the skillet into the rice and lentil pot.

Set the skillet back on the heat and add in the ghee for tempering. Once ghee is very hot, add the brown mustard, until the seeds begin popping. Quickly add in the curry leaves, dried chili, whole cashews and the asafetida/hing. Cook for just a few minutes, until everything is very fragrant. Pour half of the contents of the skillet into the pot with the lentils and rice, stirring well, then pour the mixture into a serving bowl, garnishing with the reserved tempering mixture for presentation.


My passion is teaching people how to create a harmony of flavors with their cooking, and passing along my love and joy of food, both simple or exotic, plain or fancy. I continue my journey in ethnic and domestic cuisines, continuing my journey to explore diverse culinary experiences and hopefully to start you on a journey of your own. Join me also at A Harmony of Flavors on Facebook, and Pinterest.

Disqus