For Little Princesses
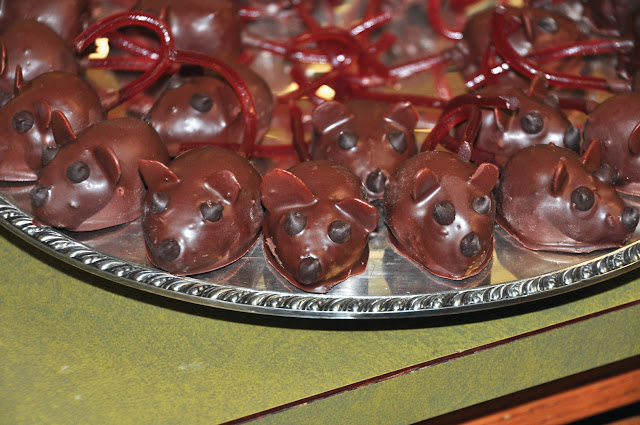
These little chocolate mice are just cute as can be and with school functions, Hallowe'en and other things coming up, these are at least possible to make gluten free. The bodies are made and frozen, so they can be made ahead, to a point. I had to make them gluten free for a museum function called a Princess Party. Little girls were invited to dress as their idea of a "princess," though the purpose of this function was to talk about how actual princesses are to behave, such as how to wave properly, how to sit, and other things. It was such a smash hit as a function, they had to have a second go at it, as so many children applied there wasn't enough room! I made these chocolate mice the first time, more as a decoration to the plates of goodies I had created, but every little girl wanted one, and some were gluten intolerant. For the second Princess Party, I made plenty of these little mice and they all went! |
| Chocolate Mice |
This recipe is a bit more complex, and requires quite a few extras and tools, so have these things handy when starting:
- Chocolate cake and plain white icing, separately (gluten free, if needed)
- Sliced almonds, for ears
- Mini chocolate chips, for eyes and nose
- red licorice for tails (gluten free licorice, if needed)
- 1 or 2 packages of chocolate bark for dipping
- Wooden skewers or two-tined pickle fork
- Waxed paper
- Clean tweezers
If you do not need these to be gluten free, simply use your favorite 2-layer chocolate cake, baked and cooled.
Chocolate Cake (Gluten Free)
 |
| Chocolate Mice |
2 cups Gluten-Free flour (I used Namaste brand)
2 cups sugar
1 teaspoon baking soda
1 teaspoon salt
½ teaspoon baking powder
½ teaspoon Xanthan Gum
¾ cup water
¾ cup buttermilk
½ cup unsalted butter, room temperature
2 eggs
1 teaspoon vanilla
4 ounces unsweetened chocolate, melted and cooled
Heat oven to 350 degrees. Grease two 8-inch round pans. Line the bottom of the pans with parchment. Measure the flour, soda, baking powder, Xanthan Gum and salt into a bowl and whisk to blend. In a standing electric mixer, beat butter and sugar until creamy, then add in the eggs and vanilla and beat well. Pour in the melted chocolate and mix. Combine the buttermilk and water. Add the dry ingredients, alternately with the liquid ingredients, until completely mixed. Pour evenly into prepared pans. Tap pans once or twice sharply on counter top, to release air bubbles. Bake for 30 to 35 minutes, until a toothpick inserted in the center comes out clean. Set aside to cool.
Cream Cheese Icing Binder
3 ounces cream cheese
2 tablespoons unsalted butter, softened
1 cup confectioner's sugar
3½ ounces semisweet chocolate, melted and cooled
Combine the cream cheese and butter in an electric mixer. Add in the confectioner's sugar and the melted chocolate to combine.
Break the two cake layers into pieces and drop them into the bowl with the icing and beat to combine, until the mixture is pliable and works like soft clay.
Chocolate Mice
 |
| Chocolate Mouse |
One recipe chocolate cake, above
one recipe Cream cheese Icing Binder, above
List of ingredients above
With your hands, pull out about ⅓ cup portions of the modeling cake mixture and form into oval shapes, working to form a point at one end (the nose), while rounded at the other. Set two almond slices into the end towards the point, as ears. Cut sections of the licorice about 5 inches long. Push one end of the licorice into the rounded end of the mouse for a tail. Set onto parchment or waxed pper lined baking sheets to freeze.
Once the bodies are frozen, it is easier to work with the dipping. (While it is tempting to want to use chocolate chips to melt for the dipping of the mice bodies, do not do this unless you are very conversant with tempering chocolate. The coating will not set properly otherwise, making them a true mess to handle.)
Melt the chocolate bark in a double boiler set over, not in, simmering water. Once melted, bring out a few of the mice at a time. Stick a long skewer or pickle fork into the back end of the mouse, below the tail. Have a second skewer or other long, thin implement handy. With a small ladle, drizzle the melted chocolate bark over the mouse, turning as necessary to cover all sides, including the almond ears. Using the second skewer, slide the mouse off the skewer onto waxed paper to dry. Using tweezers, while the chocolate bark is still wet, place two mini chocolate chips for eyes, and one for the nose. Makes about 40 to 60, depending on size.
Best if stored in the refrigerator to keep them firm.
My passion is teaching people how to create a harmony of flavors with their cooking, and passing along my love and joy of food, both simple or exotic, plain or fancy. I continue my journey in ethnic and domestic cuisines, continuing my journey to explore diverse culinary experiences and hopefully to start you on a journey of your own. Join me also at A Harmony of Flavors on Facebook, and Pinterest.

No comments:
Post a Comment