Translate

Wednesday, July 15, 2020

Pork and Potatoes Make a Great Dinner

Some years ago, I created a spice mixture I called Sweet Smoky Cocoa Rub. It has the most divine flavors. Originally, I made it to use in a Sweet Cocoa Rubbed Pork Loin Roast, made for a special occasion. Still, more often than not, when I choose pork as a dinner option, I make pork tenderloins. They are usually smaller, far more tender, and just plain delicious. 

One day as I got out pork tenderloin for dinner, I pondered what I could do differently. I often grill it, particularly in my Grilled Pork with Indian Spices recipe, as it can just hardly be beat for flavor. But not that day. I thought of the Sweet Smoky Cocoa Rub, and wondered how that would be, used on the pork tenderloin. I proceeded to clean the tenderloin of any residual fat and silverskin, and then just poured some of the rub onto a longer tray. I rolled the tenderloin in the rub mixture, continuing to pat it on and coat completely. Set on a rack over a foil lined pan and baked? OMG! So good! It is really good with chutney, like a mango chutney, something fruity. It is also great with a nice aioli sauce

Since that day, I have made this recipe repeatedly, yet since my website is now defunct, I hadn't gotten around to re-posting this recipe - remedied here:


Sweet Smoky Pork Tenderloin


Serves 3 to 4
spice rub, Pork Tenderloin
Sweet Smoky Pork Tenderloin

1 (1.25 to 1.5-pound) pork tenderloin(s)
½ cup, more if needed, Sweet Smoky Cocoa Rub
½ - 1 teaspoon chipotle powder, optional, to taste
½ teaspoon salt

Preheat oven to 400 degrees. Line a rimmed baking sheet with foil. Set a rack in the pan. (The rack is not 100% needed, but the roast doesn't set swimming in its juices if up on a rack). Trim fat and silverskin from the tenderloin.

Combine the Sweet Smoky Cocoa Rub, Chipotle powder and salt, mixing well, then pour into a long tray. Set the meat onto the powder and begin turning to coat all sides. Pat the mixture firmly onto the meat, continuing to turn until most of it has adhered to the meat. Set the meat onto the rack and bake the tenderloin for 25 to 30 minutes, to an internal temperature of 145 degrees. Cover the meat with tented foil and let stand for at least 15 minutes. Slice and serve.


~~~~~~~~~~~~~~~~~~~~~~~~~

If you like potatoes, these roasted potatoes are fabulous. They can be baked along with the tenderloins, then when the tenderloins are done they can be taken out and tented for 15 minutes, while these potatoes finish baking. 


Rich Roasted Potatoes


Serves 4 to 6
Roasting, Potatoes, side dish
Rich Roasted Potatoes

3 pounds russet potatoes, peeled, cut into 1¼ to 1½-inch cubes
2 teaspoons salt
1 tablespoon dried onion flakes
½ teaspoon garlic powder
½ teaspoon turmeric
2 teaspoons fresh rosemary leaves, minced finely
few grinds of pepper
½ cup olive oil

Preheat oven to 400 degrees. Mix together all the ingredients except the potatoes in a small bowl. Place the potatoes into a gallon sized zip top bag or a plastic container with a lid. Pour the oil mixture over and seal the container. Toss well to coat all the potatoes. Pour the potatoes into a 13 x 9-inch oven safe casserole. Bake for a total of about 45 minutes, turning them once halfway through the baking time.


My passion is teaching people how to create a harmony of flavors with their cooking, and passing along my love and joy of food, both simple or exotic, plain or fancy. I continue my journey in ethnic and domestic cuisines, continuing my journey to explore diverse culinary experiences and hopefully to start you on a journey of your own. Join me also at A Harmony of Flavors on Facebook, and Pinterest.

Thursday, July 9, 2020

One Nutmeg Fruit and Two Spices

I have written, briefly, before about Mace and Nutmeg. I want to go a little deeper here, since my only previous link is to my Indian Spice Drawer Series. I have seen mace blades in some few Indian recipes, yet rarely nutmeg. 
Mace, Nutmeg, fruit, seed, aril


The Two are One

Both Mace and Nutmeg are found in the same fruit. The tree is Myristica fragrans, an evergreen tree indigenous to the Molucca Spice Islands of Indonesia, and widely grown across the tropics including China, Taiwan, Indonesia, Malaysia, Grenada (in the Caribbean), Kerala (in India), Sri Lanka and in South America. The tree produces smooth yellow ovoid fruit resembling a large apricot, 2½ to 3½ inches long. The fruit has a fleshy husk that when ripe, splits open along a natural ridge and exposes a purple-brown, shiny seed (the nutmeg) with a red lacy covering called an aril (the mace). The fleshy fruit itself is candied or pickled as snacks in Malaysia. The nutmeg tree grew and flourished in Grenada, where it is the national symbol emblazoned on the country's flag.

The seed and aril are removed and allowed to dry until the seed rattles inside the aril "cage," and then the two are split to be used separately. The seed/nutmeg, is still inside a woody shell that will be removed before using. Neither spice is classified as a nut, so are not problematic for those with nut allergies.
Nutmeg, Mace, Aril, seed


Nutmeg, Mace and  Health

I am not endorsing either side of this issue. Just to be clear. I just want to present the current beliefs as found online.

At one time Nutmeg was fashionable as a hallucinogenic, prized for making one feel as if floating; and myristicin and safrole, the main components of nutmeg's essential oil, have psychoactive properties and can cause a "high" feeling. Today, cautions abound, claiming "nutmeg can cause serious symptoms such as rapid heartbeat, nausea, disorientation, vomiting and agitation (from www.healthline.com)." In truth, very large amounts would have to be ingested for these symptoms to become apparent. Using nutmeg in cooking, where the maximum use in one whole recipe is generally not much more than a half-teaspoon, would not be enough to cause problems. In an article from www.bulletproof.com it states one would have to consume 5 grams of nutmeg with 1 - 2 mg of myristicin to be considered toxic. 

5 gram nutmeg,
One 5 g nutmeg equals 4 teaspoons ground

I went straight to the kitchen and weighed the largest of the whole nutmegs I had on hand, each weighing in at 5 grams. I then took one of those two 5 gram nutmegs and grated all of it. Once grated, the single nutmeg yielded 4 whole teaspoons of nutmeg. When a recipe for a cake calls for a half-teaspoon of nutmeg, and the cake is going to serve 10 or more people, the toxicity is so low as to be nonexistent. A small sprinkling on your eggnog at Holiday time is certainly only a fraction of a gram. For me? No worries. 

There are also many claims to health benefits from nutmeg (not much is said of mace). There is a long history of using nutmeg to relieve chronic pain, also praised for its antioxidant, antibacterial, antidiabetic, pain relieving, liver-protecting and cancer-preventing properties (from www.verywellfit.com). 

Peach Crisp, dessert
Best Peach Crisp Ever

I choose not to get too excited, much less fearful, when people use amounts like a half-teaspoon and say that much can be toxic. I repeat: a half teaspoon is generally the amount used in an entire recipe, not what one will consume - by themselves - at one sitting. Who in the world would eat an entire half teaspoon of nutmeg, much less 4 teaspoons of nutmeg in one go? Certainly not me, no matter how much I love the flavor.

The Flavors of Nutmeg and Mace

The flavors are markedly different between nutmeg and mace. Mace is more pungent, a bit "spicier" or sharp. What I most often associate with mace is the strong flavor in store-bought stuffing mixes. For many years I could not stand mace, just because of that flavor. I now make my own stuffing and have even begun to add in a small amount of mace - just never enough to jump out and grab you. 

Apple Fritter Loaf, dessert
Apple Fritter Loaf

Nutmeg has a more warm and piquant flavor and aroma and is most often used in baked goods or over eggnog. The aroma and flavor of freshly ground nutmeg is amazing. Pre-ground nutmeg loses its beautiful flavor and aroma when left for more than three months, and chances are good that it was setting on the store shelf for longer than that. These days, whole nutmegs are available at most grocery stores. There is no longer an excuse to using the best quality. 

Using Nutmeg in the Kitchen

Garam Masala, Ingredients, Nutmeg
Garam Masala Ingredients with Nutmeg
All fearmongering aside, nutmeg plays a large part in my kitchen, and I use it with a fairly free hand, grating the amount I need  from the whole nutmeg on a small spice grater at the moment it is needed. I love nutmeg with peach flavors, as in my Best Peach Crisp, Ever, and certainly with apples, whether in a pie or in my Best Apple Crisp, Ever. I use a pinch in Bread Pudding, the syrup for Apple Dumplings, Apple Fritter Loaf
Pumpkin Nut Loaf, Banana Cake with Broiled Topping, Fresh Apple Cake, and possibly other things that do not come to mind just now. It is a component of my favorite Garam Masala, which does use a whole nutmeg ground into it, but that is a small part of the overall recipe.


Using Mace in the Kitchen

Mace Blades, mace aril, spice
Mace Blades
Mace is used in some Indian masala mixtures, such as Bisi Bele Bath Spice Mix, and as mentioned, I do use it in my Better than Mom's Stuffing recipe.

I hope you will find new ways to use Nutmeg and Mace in your Kitchen!


My passion is teaching people how to create a harmony of flavors with their cooking, and passing along my love and joy of food, both simple or exotic, plain or fancy. I continue my journey in ethnic and domestic cuisines, continuing my journey to explore diverse culinary experiences and hopefully to start you on a journey of your own. Join me also at A Harmony of Flavors on Facebook, and Pinterest.

Wednesday, July 8, 2020

Caraway and Some Ambiguous Notions

Caraway. Wow. 

Most people know what caraway "seed" is, at least in a peripheral sort of way. Anyone who has made their own Caraway Rye Bread, certainly knows what they are, and anyone who loves their sauerkraut with caraway seeds as well.

Caraway
Caraway

And then you come upon those who truly don't know that caraway seeds are that flavor in Caraway Rye Breads, and also that many people claim they don't like "rye bread" because of that "Rye Flavor."

I have written about our friend Rich. He is an old school chum of my husband's and now my friend as well. He has interesting ideas about foods, flavors and such, and we have a great time discussing possible things to cook, together or on our own. He's given me many ideas, some of which have made it into this blog, over the years. Grilled Portobellas 'Richard' was the first we collaborated on, and these are an absolute must-try!!! He hunts pheasants each year, so any pheasant recipe in my blog was made with one he'd shot and cleaned. Delicious, all, whether as soup or casserole. 

One day, chatting over the last of our morning coffee, we talked of rye bread. Rich said that some places had really good rye bread, while others did not. I asked him what, for him, constituted a "really good rye bread"? He replied that it needed to have a good, strong "rye" flavor in a nice light, soft but crusty loaf.

And We Come to the Ambiguity

100% Sourdough, Rye Bread
100% Sourdough Rye Bread, dense and chewy, with no Caraway seeds

Having made many breads over the years, I know that most commercial "rye" breads actually have little rye in them, because rye flour tends to produce an extremely dense bread if used alone. Even if the combination is 50-50 with white bread flour, which most commercial breads do not have unless they are labeled as such because of the loaf's density. Which raised the question: 

"How would one get a good strong rye flavor in a nice light, soft but crusty loaf?" 

And if most commercial breads, even in Deli restaurants, have little of actual rye flour in them, what is this "good strong rye flavor" Rich was describing?

The AHA! Moment

I realized it must be the caraway seeds Rich was confusing with "rye" flavor.

He was quite skeptical about this notion of mine. As it happened, I had just bought a book called The Rye Baker by Stanley Ginsberg, and I set about making a few different breads using 100% rye flour, with NO CARAWAY. Guess what? Rich didn't like them at all. It was the caraway seeds in a mostly white bread flour loaf that constituted "rye flavor," for him.

Noodles, Cabbage, Caraway, side dish
Noodles with Cabbage & Caraway

Back to Caraway

Caraway "seeds" are actually fruits (achenes), along with many other similar looking "seeds," like dill, anise, cumin, fennel and others. Caraway belongs to the family Apiaceae, along with vegetables like celery and carrot. Here in the U.S., caraway is most often associated with rye breadsFor the sake of ease of understanding, I will continue to call these "caraway seeds."

So, what else are caraway seeds good for? Caraway seeds are used in many applications all over Europe, such as flavoring cheeses such as Tilsit or Havarti, or in various alcoholic liquors and liqueurs such as Aquavit and Kummel. It is often added to Polish Bigos Soup and Russian Borsht. And of course, sauerkraut. It is also a flavor component of Harissa, that potent north African spice paste.

Caraway packs quite a punch for such small seeds. If you are not crazy about the flavor of caraway, then it may be hard to find a reason to use them. But if you do like the flavor of most commercial rye breads with their caraway seeds inside, then there may be other things you might find to benefit from the addition of some of these very aromatic seeds. Try adding them to potato salad or coleslaw, as they pair beautifully with potato and/or cabbage dishes. I use them in Noodles with Cabbage & Caraway. Mix caraway into cheese dips or cheese balls. Add caraway to beef goulash or stews with kielbasa to heighten flavor. Add the seeds to pork dishes. Put caraway into pickled carrots or leek soup. In Britain, caraway seeds are the main flavor ingredient for something called "seed cake." Add the seeds to savory scone or biscuit recipes.

Caraway, along with fennel and cumin, aid digestion, which is why they are often used in spiced dishes; think sausages or other spicy or less easy to digest meals. Try out caraway in something other than rye bread!


My passion is teaching people how to create a harmony of flavors with their cooking, and passing along my love and joy of food, both simple or exotic, plain or fancy. I continue my journey in ethnic and domestic cuisines, continuing my journey to explore diverse culinary experiences and hopefully to start you on a journey of your own. Join me also at A Harmony of Flavors on Facebook, and Pinterest.

Tuesday, July 7, 2020

Little Bits of Things on Sticks and other Odds and Ends

I have been trying to clean up this blog site for more than a year. So much maintenance, once I let go of my website. I have worked to get most of the recipes from the website into this blog, so they are still available, but somehow I still find a recipe here and there that is missing. I am updating the Newsletter posts, deleting old ones with too many broken links to the nonexistent website. Maintenance. Tedious, but necessary.

In this process, I ran into quite a few things I never posted in this blog that really really SHOULD have been posted here long ago. Some of these things are party type things, or geared for Thanksgiving or Christmas. Or, Quince Paste, simple to make if you have quinces and excellent on a charcuterie platter, along with some really good Manchego. So many fantastic recipes!

deli meats, cheese cubes, olives, quince paste,
Little Bits of Things on Sticks
One pretty simple idea is for meat and cheese skewers. These can be made any which way you choose, but the presentation of these skewers is what I want to talk about. And, I am calling them "Little Bits of Things on Sticks," after something said on the 1970s British sitcom "Good Neighbors." One of the first times I used this idea was in 2004 for my sister's 50th birthday party. We put lots and lots of sliced things stacked onto smaller toothpicks, and I used a half red cabbage as the display dome. For this party, we used nicer cheeses, including Manchego and Quince Paste (see below) stacked and cut together and some yellow cheddar, pepperjack and such, various salamis and ham in little cubes, olives artistically placed on here and there. Leaving just enough room at the pointy end of the toothpick to poke into the cabbage. Keep making the sticks and poking them into the cabbage, making a lovely domed presentation, very easy to grab and go.

Meat, Cheese, Skewers, Styrofoam Half Dome
Little Bits of Things on Sticks for Princesses
The second time I made Little Bits of Things on Sticks was for a "Princess Party" held by Aberdeen, SD's Dacotah Prairie Museum, in maybe 2012. This time, as the little skewers were for children, the meat and cheese were kept very simple, and I used grape halves as the beginning and ending items. This time, rather than a cabbage (which lots of children look on in horror) I used a half Styrofoam dome and covered it in pretty pink foil. I skewered in place a flat brim, also covered in pink foil and to this I affixed all the Little Bits of Things on Sticks. The flat piece and dome made their own little serving plate.

The third time I made Little Bits of Things on Sticks was for an Open House, this time anticipating the possibility of either adults or children attending, so these had meats, salami and cheeses alternating with grapes, cherry tomatoes and olives, and skewered into a half red cabbage. These were on pretty skewers from a place called Pick on Us, as well as the little pink heart skewers (above) for the Princess Party.

~~~~~~~~~~~~~~~~~~~~~

Veggie Tree on Cheese Mold

Another pretty idea, this time for Christmas, is sprucing up a cheese mold by using veggies and parsley to create a Christmas Tree. Any cheese mold will do, preferably not covered in nuts as this would make it harder to get smooth. Cheese molds are simple to whip together, using any of a whole host of possible ingredients. Choose the ones that suit you and your guests best. I have some ideas here. Once you've created your mixture, line a 7 to 8-inch cake pan with plastic film, and then pack in the cheese mixture. Smooth the top, cover with more plastic film and refrigerate to help the mold keep its shape and to allow flavors to meld. It should refrigerate a few hours.

Veggie Tree, Cheese Mold
Veggie Tree on Cheese Mold

When ready to proceed, you will need some very nice parsley leaves, some carrots, red and/or yellow bell peppers and at least one goodly sized cherry tomato or a wedge shaped piece from a Roma tomato as the tree base. Cut the peppers into different sized stars, either freeform cut or using small star cutters. You can create a template with paper and use it as an outline to cut around with a sharp knife. With a peeler, cut a long, thin strip from a carrot to use as a garland. Assemble all the pieces. Try out your design on a flat surface before attempting it on the mold.

how to, parsley, carrot, tomato, bell pepper

When ready to assemble, have a pretty plate ready to hold the cheese mold. Remove the plastic film from the top of the refrigerated mold and invert it onto the plate. Remove the plastic film from the remainder of the mold. Now, using the parsley leaves, lay out a diamond shape as the "tree." Set on a bell pepper star as tree topper, plus a few scattered on the tree. Use a tomato wedge as the tree stand. Drape the carrot strip artfully zigzagged to be the garland. In this photo I used rosemary sprigs to decorate the edges, and made carrot stars.

~~~~~~~~~~~~~~~~~~~~

Membrillo, or Quince Paste

Quince, Fruit, membrillo, jam, paste
Quince Fruits
Membrillo is the Spanish word for Quince, yet strangely, the word membrillo is used when I have seen this quince paste sold in stores. This is a simple recipe, providing you have access to quinces, often available only in the fall. Quince are a fruit that looks vaguely like a lumpy apple and they are not really tasty when raw. They are extremely tart and have a very high pectin content. They can be cooked to jam stage, or continued to cook down to paste. This paste will set firm enough to slice and set onto a meat and cheese plate or charcuterie plate.

Of course, the quince paste can also be eaten with toast, or on a cheese sandwich. Anything you can think of to use this delicious thickened "jam."

Quince Paste


Makes four (4 x 4 x ½-inch) squares
Quince Paste, Manchego Cheese
Quince Paste with Manchego Cheese
5 cups quince, peeled, cored, sliced
2 cups sugar
½ vanilla bean, optional

Set the quince slices into a 6 quart saucepan with ½ cup water. Bring to a boil, cover and cook for about 20 minutes, or until fruit is tender.  Add in the sugar and the half vanilla bean if using, stirring well to combine. Cook for about 20 more minutes covered, to wash down any sugar crystals.

Uncover the pan, remove the vanilla bean and off the heat, puree the mixture with an immersion blender or pour into other blender or food processor to puree. Return the pan to the heat and cook, stirring often for about 45 minutes to an hour over medium heat, or until the mixture has reduced significantly and can be brought together into a single mass without melting back into the pot.
Cooking, quince paste, molded shape
Cooking the paste and setting into mold

Prepare an 8 x 8-inch square pan by lining it with parchment and then spraying the parchment with cooking spray. Pour the quince mixture into the prepared pan and allow to cool. This should yield a nice piece that will come out of the parchment whole and is able to be sliced into four 4x1-inch squares. Wrap each square well in plastic film and place them into a ziptop bag. Store in the refrigerator if using them within 3 to 4 weeks. Otherwise, place the bag into the freezer and withdraw one square when needed.

NOTE: If, after cooling, the mixture is not solidified, it can be placed into an oven on the lowest setting possible to further dry. Watch very carefully so as not to burn the edges.


My passion is teaching people how to create a harmony of flavors with their cooking, and passing along my love and joy of food, both simple or exotic, plain or fancy. I continue my journey in ethnic and domestic cuisines, continuing my journey to explore diverse culinary experiences and hopefully to start you on a journey of your own. Join me also at A Harmony of Flavors on Facebook, and Pinterest.

Wednesday, June 24, 2020

Guatemalan Pan Frances

Maybe I should say "Guatemalan Style" Pan Francés. I never actually learned to make this bread in Guatemala, and from this remove of 40 years, it was only after watching a few Guatemalan videos and reading lots of recipes that I went and created my own version. 

Guatemalan bread, Pan Frances, French bread
Guatemalan Pan Frances

Everyone has their own style, their own methods; the things that work best for them, based on how they have done things over time, past experience. This is how it was for me. Making all the various Guatemalan style breads, which I truly only went into with some dedication last November, as I had been craving Shecas for ages! I watched videos to see the various styles for forming the breads, and then I did what worked best for me. My methods may or may not actually be "true," And then again, no two bakers make things exactly the same. While any professional baker will have their methods, tried and true, and teach these methods to students, there will always, always be variations. I say all this, because when anyone reads my methods, but might see something elsewhere that works better, then go for it. Comfort in your own methods is highly important in baking and cooking. This is where enjoyment starts.
Pan Frances, Just Baked, Guatemalan bread
Pan Frances Just Baked

French Bread, and Pan Francés

Okay, so when things actually come down to the fine brass tacks, there are not many ingredients in any French bread. True French bread needs nothing more than flour, yeast, salt and water. Additions, such as lard or shortening, if used, should be kept to a minimum. Sugar truly has no place in French bread, but most recipes I read for Guatemalan Pan Francés has at least a little of both of these latter ingredients.

Forming the Dough

When I lived in Guatemala, I was married to a Guatemalan man, and for a brief moment in time, he owned a bakery. Once, when he took me through it, my memory of what I saw was of a baker forming Pan Francés. He already had a line or "set" of the breads formed, with the deep "dent" down the center. He had a heavily floured baker's "couche" set at one side, with a deep pleat upwards. He flipped the line of formed breads so that the pleat in the couche was poking into the line down the center of the breads and there it would rise. I know the reasoning for this - the bread just wants to rise and fill that deep dent, and if allowed to do this, then the bread no longer looks like the Guatemalan Pan Francés, but instead becomes a single blob. Not Good. And not everyone has a handy baker's couche.
forming large indent, making Pan Frances, Guatemalan bread
Pressing the center of one set

For a home baker, with less experience of making these breads, I was determined to get them right, and after seeing on many videos how very important it was to make that center in the line of breads is deep enough to stay open, I worked at it. Most videos show that once the line of usually 6 "sets" of breads (6 is easier for the home baker to manipulate). Once the set is formed and that center line pressed wide and flat, entire set of breads is lifted and flipped over onto a good bed of flour. The set is flipped back upright to rise, but even then, if the center line starts puffing, flatten it again with the side of the hand or a rolling pin and sprinkle more flour into the crease. This center crease has to be much wider than one would think. Make sure it is at least 1½-inches wide, minimum. 

Pan Francés

Makes about 4+ "sets" of 6 Pan Francés

how to, forming Pan Frances, Guatemalan breadIn a bowl, mix flour, yeast, sugar and salt together. Add in the lard and the water, reserving some of the water aside in case it is not needed. Begin stirring with wooden spoon or hands, incorporating the dry ingredients and lard together. Once dough comes together, turn out onto a clean, floured surface and begin kneading. Adjust the dough with more flour or more water if needed. The dough should be tacky, but not outright sticky after a few minutes of kneading. Knead the dough until it forms a windowpane: take a piece of the dough and stretch it wide between the hands. It should be able to hold without tearing and stretch thinly enough to show light through it. For me, this took 16 minutes. 

Grease a clean bowl and set the dough into the bowl, turning over once to grease both sides. Cover the bowl with plastic film and set aside to rise until nearly doubled. This can take 40 minutes to 1+ hours, depending on the ambient temperature. 

Grease two or more baking sheets, or line them with parchment. 

Two sets of 6 breads set to rise
Begin breaking off portions of dough from 1.5 to 1.75 ounces each. Each of these portions will be one "set" of breads. Take one portion and form it into a tight ball, then set on the work space and using the side of your hand, press and roll back and forth in the center, to form two conjoined lumps. Ensure there is plenty of space between the lumps, but without breaking the balls apart. Set aside, then begin again with another piece of dough, form a tight ball and roll with side of hand to make two nicely separate, conjoined lumps. Set this second set against the first. Repeat until you have 6 sets of dough, lined up with the centers aligned. Use a rolling pin and rock it slightly down the center length to ensure good separation. Create a heavily floured area the size of the dough set and lift the entire set of 6 and flip it upside down onto the heavy flour. Flip it back over, right side upwards. press the center again, with hands or rolling pin, and then sprinkle flour down the center line. Place the set of Pan Francés onto one of the prepared pans, to one side.

Repeat this process with the remaining dough balls. There should be a minimum of 4 sets of 6 breads, though there could be an off-number set left. 

Cover the heavily flour dusted breads with plastic film and set aside to rise for about 40 minutes. 

Preheat the oven to 425 degrees. On a rack at the top of the oven, set an oven safe pan for steam-water.

Once oven is ready, have one cup of boiling water ready at hand. Set one tray of bread into the oven on center or lower rack. Quickly, pour the cup of boiling water into the steam pan on upper rack. Close the oven door and bake for 20 to 30 minutes, until golden brown. 

With more trays, repeat adding boiling water to the steam pan on upper rack, then bake additional trays for the same amount of time. 


My passion is teaching people how to create a harmony of flavors with their cooking, and passing along my love and joy of food, both simple or exotic, plain or fancy. I continue my journey in ethnic and domestic cuisines, continuing my journey to explore diverse culinary experiences and hopefully to start you on a journey of your own. Join me also at A Harmony of Flavors on Facebook, and Pinterest.

Tuesday, June 23, 2020

Things to do with Radishes and Dates

. . . . but not together!

Pickled Radishes, radishes, quick pickle
Spicy Pickled Radishes
I have a couple of recipes to share today, completely separate, disparate recipes. The only similarity is that they are both condiment types.

The first one is for quick Pickled Radishes. Radishes have never, ever, been a favorite of mine. Though, made just the right way, I can enjoy them. Those who sprinkle on some salt and crunch into them? Nope, not me. To date, and I say this from the vantage point of 70 years on this planet, there has been only one way I have eaten radishes and enjoyed them, and I discovered these at age 20, in Guatemala. I should say two ways, because the Guatemalan recipe for Picado de Rabano (Chopped Radish Salad) can also be used added in to chopped roast beef and a whole new dish is created, called Salpicon. I love both of these. I have made them a fair number of times over the intervening years. My husband will not eat these dishes, not even after 30 years together. Oh well.

So one day I was perusing the web and came upon this recipe for pickled radishes. The sound of it intrigued me, so I saved the site, waiting until I grocery shopped and came home with a single bunch of radishes. The recipe I found was on this site, and is called "Sweet and Spicy Pickled Radishes." When I came home with one single bunch of radishes, which, once I removed all the greens, weighed in at 5 ounces worth, and the recipe called for a pound of radishes, I had to do some quick recalculating to get the amounts to function. Plus, I added in some shallot and garlic, just because everything is better with garlic, and I love shallots. The amount of salt was too much for my taste, even cutting the amount by a third. So, with my own adjustments, I went ahead and made my own little 12 ounce jar of these and I have to say, they are really good!  So, here is my revised and smaller, version of the recipe:

Radishes, quick pickle
Radish mixture packed in jar

Spicy Pickled Radishes


Makes one 12-ounce jar

5-ish ounces cleaned, de-stemmed radishes
½ - 1 Jalapeno or Serrano pepper
2 tablespoons fresh cilantro, minced
1 small shallot, thinly sliced
1 clove fresh garlic, thinly sliced
⅓ - ½ cup white vinegar
1 tablespoon sugar or honey
1 teaspoon Kosher salt
1½ teaspoons yellow mustard seeds

Once radishes are clean and trimmed, it is best to use a mandoline - very carefully! - to slice the radishes extremely thinly. The same should be done for the shallot and garlic, with even more care. The Serrano (or Jalapeno) pepper can be sliced leaving seeds in or removing seeds and slicing finely. Mix the sliced radishes, shallot, garlic, Serrano and cilantro together in a bowl, then pack the mixture tightly into a jar. I used a jar I'd washed and kept, which has a 12-ounce capacity.

In a small saucepan, heat to boiling the vinegar, sugar, salt and mustard seeds. Once boiling, remove from heat and allow to cool to room temperature, then pour over the radish mixture to cover (the vinegar mixture can be cooled more rapidly in the fridge if needed). Cap the jar tightly and let stand for 24 hours at room temperature before use. Store in the fridge and eat within a week or so.

~~~~~~~~~~~~~~~

The next recipe is a variation on Imli / Tamarind Chutney in my Indian Recipes in the Recipe Index of this blog. Often this Tamarind Chutney has dates added, either as the main event or as half and half. The result, to my taste, is not all that different, but if you happen to have dates around that need to be used, then by all means try this recipe. I had some exceedingly soft Medjool dates given me and they were so very moist they started getting a fermented smell, so I used most of them in this chutney (the cooking time stopped the fermentation!) and refrigerated the remainder, which will soon go into Date Nut Bread!

I have a jar of tamarind concentrate which is like a thick sauce, that has already been strained and is completely smooth. If you have only fresh tamarind pods or a tamarind "block" (which usually has fibers and seeds embedded into it), you will need to take similar steps as with the dates - softening the tamarind in hot water and straining through a coarse strainer. See this blog for some info on Tamarind.

Khajur Imli Chutney, dates, tamarind, chutney Indian recipe
Khajur Imli Chutney

Khajur Imli Chutney or Date Tamarind Chutney


Made three 6-ounce jars

½ cup dates, preferably soft, de-seeded, rough chopped
Khajur Imli Chutney, dates, tamarind, Indian recipe
Khajur Imli Chutney or Tamarind Chutney

1½ cups water
----
½ cup tamarind paste or concentrate (pre-strained)
½ cup water
----
1 tablespoon grated fresh ginger root
1 teaspoon hot Indian chili powder
1 teaspoon cumin, ground
1 teaspoon ground fennel seed
1 teaspoon Garam Masala
1 teaspoon black salt or regular salt
½ cup brown sugar or jaggery

Cook the chopped dates with the 1½ cups water for about 15 minutes or longer, as needed to soften the dates enough to press through a larger sieve. Use the back of a spoon to get as much of the puree as possible. 

Combine the date puree with the tamarind concentrate and the ½-cup of water in the saucepan, adding in all the remaining ingredients and bring to boil. Reduce the mixture to simmer and cook for 15 minutes to meld flavors. Pour into a clean jar with tight fitting lid. Allow to cool, then store in the fridge for up to a month.


My passion is teaching people how to create a harmony of flavors with their cooking, and passing along my love and joy of food, both simple or exotic, plain or fancy. I continue my journey in ethnic and domestic cuisines, continuing my journey to explore diverse culinary experiences and hopefully to start you on a journey of your own. Join me also at A Harmony of Flavors on Facebook, and Pinterest.

Thursday, June 4, 2020

Guatemalan Dessert Favorites

Molletes, Guatemala, bread, enriched bread
Molletes
Guatemalans seem to make the very best use of any ingredient, and that includes using unlikely things to make into desserts. Take Plantains. They are used green as a "vegetable" side dish; medium-ripe, simply cooked, they are perfect as a side with black beans; really ripe and fried are great on their own for dessert and then comes magic. They are used sweet as Plantains in Mole Sauce for an amazing flavor sensation. Or used for Rellenitos de Platano, those amazing little fried ovals of pureed plantain with a surprise inside!

This magic is also done with homely yucca root, or squash (not too surprising as we do have Pumpkin Pie). And then bread. Bread, you ask? Well, I do love bread pudding, so I guess it's no surprise that I have always loved a dessert they call Molletes en Dulce. Molletes (pronounced "moy-YET-ez") are a particular type of bread from the Guatemalan "sweet bread/roll" panoply. An enriched bread, with a little sugar, shortening and eggs, these are delicious all on their own, smeared with a little butter and eaten with coffee or with black beans, or however/whenever you choose. And then as inevitably will happen, if they are somehow left over, rather than let them go stale and thrown out, they are turned into dessert. 
Pan Frances, Guatemalan French Bread
Pan Frances or French Bread

Now, a caveat. In all the 12 years I spent in Guatemala, I never, ever had Molletes en Dulce made with actual Molletes! Instead, and likely because it was more common for the "Pan Frances (their French Breads) to be left over than the Molletes, the cook made this same recipe but using the portions of Pan Frances instead. It was delicious, and a favorite dessert. Just not made with Molletes. Confusing to me at the time. 

Since in the U.S. we do not have this kind of Pan Frances, with its individually marked portions, I have made similar use of a narrow loaf of French bread, cutting it into chunks of like size, about 2 x 2 x 3-inches, approximately. Hollow out a core of the bread and fill with thick cream and raisins and proceed. It works. It's really good. But when I made Molletes last November, I decided at long last to make Molletes en Dulce. WITH Molletes!
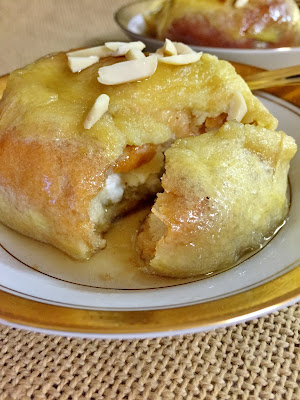

Molletes en Dulce, bread dessert, Guatemalan dessert
Molletes en Dulce

Molletes en Dulce


Serves 6

1¾ cups sugar
2½ cups water
1 (4-inch) piece true cinnamon
6 molletes or other breads, about 1 to 2 ounces each, slightly dried
½ cup Mexican cream, or sour cream
18 raisins
2 eggs, separated
1 tablespoon flour
1 - 2 tablespoons oil or shortening for frying
slivered almonds, to adorn

In a large, wide pot, bring the first 3 ingredients to boil, lower to simmer and cook gently for about 20 to 30 minutes.


If actually using molletes, take out a piece from the top of each, creating a little
Cut center, Mollete, preparation
Cutt center from Mollete
lid, and widen the hole inside the bread. Divide cream between the wells, insert 3 raisins in each and then set the lid back on. If using French bread chunks, cut a slice into the bread, widening the hole as needed to insert the cream. Set 3 raisins into the cream.

Whip the egg whites until stiff. Separately, whip the egg yolks until they are pale yellow and drip down in ribbons from the beater or whisk. Fold the yolks into the whites, and then fold in about a tablespoon of flour to give body to the mixture.

Dip each filled piece of bread into the beaten egg mixture, till completely covered, and then fry these on all sides in the shortening in a large frying pan, turning to get the egg done on all sides. When completely fried, and thus sealed, set them gently into the simmering syrup. Gently simmer the molletes in the syrup for 20 - 30 minutes or longer. Serve adorned with almonds.

~~~~~~~~~~~~~~~~

Another use for leftover "sweet (enriched) breads" was called Boca de Reina, or Bocado de Reina. While I never once saw this dessert made anywhere but in a pastry shop, it was still one I completely fell in love with. The name means something like "A Queen's Bite or a Queen's Snack." A snack fit for a Queen would be another way to term this dessert. In the 1970s, when I was in Guatemala, my husband took me to this one pastry shop occasionally for a little sweet bite and often this was my choice. At that time, in that pastry shop, this dessert was a piece of cake that was amazingly good. Moist and tender, subtly flavored. I couldn't put a finger on what might be in it. I asked, and was told it was a cake made from leftover breads, made into crumbs. 

I returned to the U.S. once and for all in the early 1980s. Never once did I have this dessert again, nor ever heard of it anywhere, and pretty soon it was completely gone from memory.

Until.

When my oldest daughter was turning 40, I created a "Cookbook/Memoir" of all things Guatemalan that I could recall. All my children were born there, though the youngest, 3 years old at the time, remembers nothing of it. The oldest, at 10, remembered well. I found photos online of places we'd been and foods she'd known, recipes I had made and some I hadn't but still held on to. It was great. And then my son was turning 40 a few years ago, and while what I made for my daughter was good at the time, I had a LOT of new ideas and recipes I recalled while researching others, many I had actually tried out since that first book came to be. And this Bocado de Reina came into my mind. I searched online for a recipe, at least an idea. The ONLY thing that comes up when searching Guatemalan recipes and Bocado de Reina is some kind of banana bread/pudding.
chocolate, sweetened chocolate, Guatemala

I can say with 100% certainty, the Bocado de Reina I ate at that pastry shop, did NOT have bananas in it. 

My memory said that it was a darkish color, but not dark like chocolate cake. The cake had a wonderful, moist crumb. It was served cut into a square and set on a muffin paper to display. As I said, the flavors were elusive. 

Okay, so the one thing I knew was that it was made (at that pastry shop) with crumbs of day-old bread. And if that was the "flour", then I would just have to add in other cake-like ingredients. But what gave it the dark color? I know that chocolate was also not a flavor that I can recall from that cake. Yet. . . I wondered if using a small amount of Guatemalan / Mexican chocolate tablets, such as Ibarra or Abuelita, pre-sweetened and with cinnamon in them, maybe I could get this cake to have more color, while t the same time without it actually tasting of chocolate. I had just been making some of the Guatemalan breads, testing them out to see what I could use for recipes in my son's version of the Guatemalan Cookbook / Memoir. I had some leftover Molletes and Rosquitas. I went to work. 

Bocado de Reina, Guatemalan cake, leftover bread crumbs
Bocado de Reina

At a remove of 32 years from the last possible time I might have eaten this cake, I made my own version. I cannot in any way say for certain that this tastes perfectly of the Bocado de Reina I ate long years ago in Guatemala, but it fit all my remembered criteria, and it truly tastes fabulous. While maybe not 100% Guatemalan, here is my Bocado de Reina:

Bocado de Reina

Bocado de Reina, Guatemalan cake, leftover bread, bread crumbs
Bocado de Reina

Makes one 9 x 9 cake

1½ cups (12 ounces) heavy cream
1 cup (7.3 ounces) sugar
1/3 cup (1.7 ounces) sweetened Mexican or Guatemalan chocolate, finely grated
¼ teaspoon salt
1 teaspoon true cinnamon (Ceylon, or Mexican)
1 teaspoon vanilla extract
2 large eggs
¾ cup (3.5 ounces) raisins
3 cups (8.35 ounces) “day old” enriched bread, made into crumbs
¼ cup (1.16 ounces) all-purpose flour
1 teaspoon (0.18 ounces) baking powder

Make bread crumbs from rich breads such as brioche, molletes, wafer cookies, animal crackers or a combination. They should not all be completely dried out. Preheat oven to 350 degrees. Grease an 8 x 8 or 9 x 9-inch baking dish; set aside.

In a large bowl, whisk together the cream, sugar, chocolate, salt, cinnamon, vanilla and eggs. Add in the raisins and bread crumbs and allow to soak for a few minutes. Stir together the flour and baking powder and stir in. Pour the batter into the baking dish and bake for about 40 to 50 minutes, until a tester inserted in the center comes out almost clean. A few remaining crumbs are okay. Cool completely. Dust the top with confectioners’ sugar if desired. 


My passion is teaching people how to create a harmony of flavors with their cooking, and passing along my love and joy of food, both simple or exotic, plain or fancy. I continue my journey in ethnic and domestic cuisines, continuing my journey to explore diverse culinary experiences and hopefully to start you on a journey of your own. Join me also at A Harmony of Flavors on Facebook, and Pinterest.

Disqus