Translate

Showing posts with label gluten free recipes. Show all posts

Friday, July 17, 2020

Really Good Desserts and Gluten Free

I am not gluten intolerant. My kitchen is certainly not set up to be gluten free. On occasion, when I have had to bake something for a general audience, some of whom were definitely gluten intolerant, I spent an inordinate amount of time cleaning every single thing in the kitchen that could have come in contact with the recipe. Depending on the severity of the issue, this all may have been for nothing, but I did my level best to accommodate.

I have found that for someone diabetic, as I am, gluten free baking is perilous, as the carb and calorie count are so much higher in all the alternative flours needed. That didn't stop me from trying things out and taste-testing. And truly a lot of the recipes did come out wonderful. They tasted good. The issue I had, and I didn't find out till later, is that I hate the flavor that xanthan gum imparts to baked goods. Apparently it works, doing its magic of acting as a bit of a binder. The taste was objectionable. To me. 

Gluten Free, Brownies
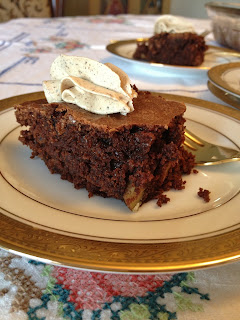
Gluten Free Best Brownies

Once I identified the flavor I objected to as xanthan gum, I quit using it and (as my husband would say) "the world was a safer place." :-)

I settled on a couple of different gluten-free "all-purpose" flour mixtures. One I used was one of Gluten-Free Girl's mixtures, many years ago. Later on I tried to find it again and it seemed to no longer be available on her site. And later still, have found that now one cannot any longer go to her site unless "signing up and joining." I just quit bothering. While I used her mixture, I was less fond of the overall flavors, so I most often used my own mix:


Easy 6 - 2 - 1 Mixture


A great all-purpose gluten free flour mixture is a simple 6-2-1 ratio of:

6 cups brown rice flour
2 cups of potato starch (NOT potato flour!)
1 cup of tapioca starch


~~~~~~~~~~~~~~~~~~~~~~

All that said, I did make many recipes that came out great, or good enough to pass with high marks. Here are three of them that I did make and enjoy. I substituted psyllium husks for the xanthan gum in the recipes and enjoyed the flavor far more. 

I am posting these recipes with the idea that those who might need to eat gluten free also realize that things like sour cream (among many other things) may have wheat in it. Wheat tends to be hidden in the most strange places. 

Keep in mind that gluten free flour mixtures in a batter tend to need a little longer baking time to be done in the center.

Gluten Free, Sour Cream, Coffee Cake
Gluten Free Sour Cream Coffee Cake

Gluten Free Sour Cream Coffee Cake


Makes one 8 x 8-inch cake

⅓ cup unsalted butter, room temperature
1 cup granulated sugar
2 large eggs
1 teaspoon vanilla
1 tablespoon psyllium husks
1½ cups gluten free all-purpose flour of choice
1 teaspoon baking powder
½ teaspoon baking soda
½ teaspoon salt
¾ cup sour cream
⅔ cup pecan pieces
½ teaspoon oil (grapeseed, coconut or whatever you prefer)
1 teaspoon cinnamon
½ teaspoon ground cardamom

STREUSEL:
⅓ cup gluten free all purpose flour of choice
½ cup packed brown sugar
3 tablespoons unsalted butter, room temperature
1 tablespoon psyllium husks
½ teaspoon cinnamon

Preheat oven to 350 degrees. Lightly grease or oil an 8 x 8-inch baking dish and set aside.

Place the pecans in a small bowl and sprinkle on the ½ teaspoon of oil. (I have a baking spray with coconut oil and just used that). Sprinkle on the cinnamon and the cardamom and toss to coat. Set aside.

Cream together the ⅓ cup of butter and the granulated sugar. Add in the eggs one at a time, beating well after each addition. Add in the vanilla and 1 tablespoon of psyllium husks and stir.

Separately, sift or whisk together the flour, baking powder, baking soda and salt. Add this mixture to the creamed mixture in two batches, alternating with the sour cream. Gently fold in the pecans. Pour the batter into the prepared baking pan.

Make the streusel by rubbing together all the streusel ingredients and strew over top of the batter in the pan. Bake for about 40 to 45 minutes, or until a toothpick inserted in the center comes out with a dusting of crumbs.


~~~~~~~~~~~~~~~~~~~~~

Gluten Free, Rhubarb, Coffeecake
Gluten Free Rhubarb Coffeecake

Gluten Free Rhubarb Coffeecake


Makes one 9 x 13 pan

½ cup butter
1½ cups sugar
1 teaspoon vanilla
2 eggs
2 cups gluten-free all-purpose flour mix, of choice
2 teaspoons baking powder
1 teaspoon baking soda
1 teaspoon xanthan gum (or 1½ to 2 tablespoons whole psyllium husks)
½ teaspoon salt
1 cup sour cream
2 cups chopped rhubarb
¾ cup chopped pecans

STREUSEL:
¾ cup gluten-free all-purpose flour mixture of choice
¾ cup brown sugar
4 - 5 tablespoons butter
½ teaspoon xanthan gum (or 1 tablespoon whole psyllium husks)
½ teaspoon cinnamon 


Cake: Preheat oven to 350 degrees. Grease a 9 x 13 inch baking pan and set aside.

Beat together the butter and sugar; beat in the eggs and vanilla. Whisk or sift together the dry ingredients, to combine. Alternately beat in the dry ingredients and the sour cream. Stir in the rhubarb and nuts. 

Streusel: Mix the flour, brown sugar, xanthan gum and cinnamon. Work in the butter until it looks like large crumbs. Sprinkle over the cake. Bake at 350 degrees for 50 to 55 minutes, or until a toothpick inserted in the center comes out clean.

~~~~~~~~~~~~~~~~~~~~~~~~~

Gluten Free, Brownies
Best Gluten Free Brownies

gluten free, brownies, dessert, recipeBest Gluten Free Brownies


Makes one 8 x 8-inch pan

2 ounces unsweetened chocolate
⅓ cup unsalted butter (5⅓ tablespoons)
1 cup granulated sugar
2 eggs
1 teaspoon vanilla extract
¾ cup Gluten-Free all purpose flour mixture of choice
½ teaspoon GF baking powder
½ teaspoon salt
1 tablespoon psyllium husks
½ cup chopped nuts

Place the chocolate and butter into a saucepan on very low heat and melt the two together. Remove from heat and allow to cool to where the pan does not burn the hand. Add the sugar and beat with a wooden spoon until combined. Mixture will be grainy. Add in eggs, one at a time, beating after each until completely incorporated. Add in the vanilla to combine.

Whisk together in a separate bowl the GF flour, baking powder, psyllium and salt, then add to the mixture in the saucepan. Stir until almost combined, then add the nuts and finish mixing. Place mixture into a greased 8 x 8-inch baking pan and bake at 350 degrees for about 25 - 28 minutes. A tester inserted in the center should come out with slightly moist crumbs; not completely dry. Allow to cool completely before cutting.

NOTES: Chocolate Buttercream Icing would be perfect on these brownies, as well as my Cinnamon Ancho Buttercream, below.


~~~~~~~~~~~~~~~~~~~~~~~~~

Cinnamon, Ancho chili powder, Buttercream
Cinnamon Ancho Buttercream 

Cinnamon Ancho Buttercream


Makes about 2 cups frosting

1 stick unsalted butter, at room temperature
1½ cups confectioners' sugar
1 teaspoon cassia cinnamon
1 teaspoon ancho chili powder
1 teaspoon vanilla

The butter must be at room temperature for this. If it is too cold, it will not combine properly. Place the butter, confectioners’ sugar, cinnamon and ancho chili powder in the bowl of a stand mixer. Start on very low to combine, then increase speed to about medium. Continue to beat for about 8 minutes. Add in the vanilla and beat well to combine.


My passion is teaching people how to create a harmony of flavors with their cooking, and passing along my love and joy of food, both simple or exotic, plain or fancy. I continue my journey in ethnic and domestic cuisines, continuing my journey to explore diverse culinary experiences and hopefully to start you on a journey of your own. Join me also at A Harmony of Flavors on Facebook, and Pinterest.

Tuesday, August 26, 2014

Beets in Chocolate Cake Oh My

Chioggia Beets, beets, beet varieties, vegetables
Chioggia Beets, ready to go in the oven
What next? Beets used in chocolate cake may not be a new thing for many people, but for me the first I ever heard of it was last week when I was given many bags of beets from someone's garden. I love beets. Mainly, I would pickle them and either eat them that way or make my Grandmother's Horseradish with beets for Easter (or any time there is ham around the house). There is another way I have eaten beets in recent years, since finding a recipe in an ad in Food and Wine Magazine. It was one of F & W's Grace Parisi recipes called Lemon and Garlic Roasted Beets, and was created to pair with Folie a Deux's "Menage a Trois" red wine. The recipe does pair excellently with the wine, but just the beets alone are just addictive for me; I just can't stop eating them. That recipe is no longer available on Food and Wine's website, but with a few little changes, I have been making them myself for years. I made them a couple of years back using Chioggia Beets from the Farmers' Market. They were the prettiest things you've ever seen. Well, if you like beets. 
Chocolate, Beets, Mini Cupcakes, cake, dessert
Chocolate Beet Mini Cupcakes


So, you must get the idea - I love beets. Yet in all my years, I never heard of or thought of using them in cake. I don't know why, really. After all, we make carrot cakes and zucchini bread. Why not use beets? They would provide the same moistness as these other vegetables. I asked the woman for the recipe she used, as she said it was her family's favorite chocolate cake. 

That day I came home with all those beets, I first washed, trimmed and peeled all the largest beets, wrapped them individually in foil and baked them. Smaller ones were done at 55 minutes; larger ones took up to 75 minutes in a 400-degree oven. I pureed the whole batch and got quite a bit of pureed beets, for use in cake or for anything else. I kept a couple of cups, in separate freezer baggies in the fridge, to use for a cake. I looked up "Chocolate Beet Cake" on the internet and found many recipes, with many variations. As usual, I compared those recipes to my idea of a chocolate cake or another similar type cake using a vegetable and created a recipe of my own.

Chocolate cake, Beet Cake, beet puree, vegetable, ingredients
A Slice of Chocolate Beet Cake
I was going to be making appetizers for the Open House this past Sunday, and thought to add in a few mini cupcakes to the agreed-upon foods. It is often the case that someone requires a special diet. Around here it seems gluten intolerance is one of the biggest difficulties. Since the fillings I created for the cherry tomatoes and endive leaves were both gluten free, I thought to give this cake recipe a try using gluten free flours.  I have found that gluten free cakes and dessert loaves seem to be more moist in general, so I proceeded with this in mind.

The recipe is large enough to make a 2-layer (8-inch) cake or a 9 x 13-inch pan. I used slightly less than half the batter and made 24 mini cupcakes. The rest of the batter I baked in a 9-inch round cake pan. I am sure the batter could be divided into two 9-inch pans, but the cakes would be far thinner; less lofty. The cake and the cupcakes turned out absolutely delicious. Again, as with the Maraschino Cherry Cake I made for my husband's birthday, it seemed the cake was done before I noticed, and it was a little more dry than I wanted. Not as dry as the cherry cake, mind you. This one is really nice. It could, however, have taken a few minutes less in the oven. 

I want to make this cake again, using a few different ideas. I do not keep cooking oil in the house, except for olive oil. I would like to try using melted butter or melted coconut oil instead of creaming the room temperature butter. I would also like to try using more of the beets than I did. I went conservatively for this first cake, using only 1 cup of beets. More would make a moister cake, and as there was absolutely no "beet" flavor in this cake, I have more confidence going with a larger amount. Here is my recipe as it stands today:

Chocolate Beet Cake (Gluten Free optional)


Makes two 8-inch round cakes, or one 9 x 13-inch cake

1 cup cooked, pureed beets (about 2 medium)
2 ounces bittersweet or semi-sweet chocolate
4 tablespoons (1/2 stick) unsalted butter
2 cups "6-2-1 gluten-free all-purpose flour blend" (or use regular all-purpose flour)
Beet Chocolate Cake unbaked and baked
Unbaked batter left                 |                Baked cake on right

½ cup unsweetened cocoa powder
2 teaspoons baking soda
  • (If using a GF flour blend:add 1½ teaspoons guar gum, and 2 tablespoons of powdered egg whites)
½ teaspoon salt
8 tablespoons (1 stick) unsalted butter, room temperature
1½ cup sugar
3 eggs
1 teaspoon vanilla

In a small saucepan over low heat melt together the 4 tablespoons of butter and the 2 ounces of chocolate. Once just melted, remove from heat and set aside to cool to room temperature.

Preheat oven to 350 degrees (325 on Convection). Grease two 8-inch pans and line them with parchment. Grease the parchment. Set aside. IF using a 9 x 13 inch pan where the cake will remain in the pan, it is not necessary to line the pan.

Whisk together the flour, cocoa, baking soda and salt. If making the cake gluten free, ass the guar gum and powdered egg whites to the bowl and whisk well to combine.

In a mixer bowl, cream together the 8 tablespoons butter with the sugar until light and fluffy. Add the eggs one at a time, beating after each addition. Beat in the vanilla. Add in the pureed beets and mix to combine. Add in the dry ingredients and mix just until incorporated. Divide the mixture equally between the two 8-inch pans, or pour all the mixture into the 9 x 13 inch pan.

If making regular cupcakes, I estimate about 1 dozen. If making mini cupcakes, the minimum yield will be 48.

Bake the 8-inch cakes for approximately 20 to 25 minutes, or until a tester inserted in the center comes out with a few fudgy crumbs. The 9 x 13 will take a few minutes more. The mini cupcakes took about 12 minutes.

Allow the 8-inch cakes to rest in the pan for 10 minutes before turning out to cool completely before frosting.
For this cake I made a frosting using 1 part cream cheese to two parts butter and flavored it with green tea powder and a little pistachio flavoring. For this frosting the butter and cream cheese MUST be very soft, at room temperature, or it will not whip properly. The flavors were a wonderful match:

Pistachio Green Tea Icing


Enough to frost top and sides of a two layer 8-inch cake
Pistachio, Green Tea, matcha, Icing
Pistachio Green Tea Icing


2 sticks or 8 ounces unsalted butter, room temperature
4 ounces cream cheese
4 cups confectioners' sugar
½ teaspoon salt
1 - 2 teaspoons Matcha Green Tea Powder, optional
a few drops of pistachio flavoring, optional
1 teaspoon vanilla
1 - 2 tablespoons heavy cream, as needed

In a stand mixer, beat the first two ingredients on medium or medium high for 8 minutes, until nearly white and very soft. Sift together in a separate bowl the confectioners' sugar, salt and green tea powder if using. Stop the mixer and add these dry ingredients all at once. Turn mixer on to very low speed for about one minute, until the dry ingredients are moistened. Add the flavorings. Increase mixer speed to medium or medium high and beat for 6 minutes more, adding the cream if necessary to make it spreading consistency.

This makes a very pale green colored icing. If more color is desired, add in a few drops of green food coloring. I grated a little more of the bittersweet chocolate to sprinkle over the icing.


My passion is teaching people how to create a harmony of flavors with their cooking, and passing along my love and joy of food, both simple or exotic, plain or fancy. I continue my journey in ethnic and domestic cuisines, continuing my journey to explore diverse culinary experiences and hopefully to start you on a journey of your own. Join me also at A Harmony of Flavors on Facebook, and Pinterest.

Monday, August 25, 2014

Lovely Appetizers for an Open House

My husband helps out at ReMax Preferred Choice here in town, as the acting business manager. Through him I am friends with the realtors there; the Broker-Owner Scott Grebner, Tetiana Althoff and David Novstrup. In the past months, twice I have made little appetizers to go with wine and other beverage at an Open House for a particularly higher end property. Yesterday I was again in attendance at an Open House, hosted by Tetiana Althoff, at a wonderful, large home here in Aberdeen, SD. The idea with the open houses is to pair wonderful foods matching the upscale home, making the experience pleasant for potential buyers. 

appetizers, finger foods, small bites, utensil-free
All the foods at the Open House


Of all foods to make, my favorites are perhaps appetizers and desserts. They can be quite time consuming, due to the need for many of a thing, rather than one large dish. Especially for public consumption, I prefer to keep all appetizers to a tiny, bite-size and preferably easy to pick up with fingers; this keeps away irritations like "double-dipping" or the need for utensils. They present such a lovely display. For yesterday's open house I made some Pesto Cream Filled Cherry Tomatoes, Creamy Gorgonzola & Herb Filled Endive leaves, Tomato Mozzarella Tartlets with Pesto, Gluten Free Spiced Sandies and Chocolate Mini Cupcakes (also Gluten Free, by choice). We also had two kinds of sliced cheese and crackers. Wine was available and soft drinks. I will be posting all the recipes I created for this event in the next days. For today I will post the recipes for the fillings used in the Cherry Tomatoes and the Endive Leaves. 
Cherry Tomatoes, Endive leaves, fillings, appetizers
Filled Cherry Tomatoes & Endive leaves

Since it is summer, and fresh produce is everywhere, I felt that using some fresh produce would be wonderful. Though today the weather is barely going to scrape its way up to 70 degrees, it is still summer. My sister in law is growing all my herbs for me this year, and the basil has been abundant. I have a store of fresh pesto in the freezer, for the long winter months to come. One of my recipes for pesto yields about 1½ - 2 cups. Just this past week's harvest alone gave me 2½ recipes worth! Using pesto in foods becomes second nature. I found through experimentation that pesto mixes well with cream cheese and if basil and tomatoes are great together, so is pesto mixed with cheese to fill tomatoes.  I made a pesto cream and filled the little cherry tomatoes, using some tiny basil leaves for a garnish. I also used the pesto in the bottom of my Tomato Mozzarella Tartlets, in a play on the Caprese Salad flavors of tomato, mozarella and basil. But more on that recipe later on.


Two Interchangeable Fillings

I could easily have used this same pesto cream for the endive leaves, but instead used lots of other fresh herbs mixed with a little Gorgonzola and cream cheese. Each of these filling recipes was exceptionally good, and equally interchangeable. Either filling would have been great to top summer squash slices, carrot slices, bell pepper wedges, or any other fresh vegetable desired. 
squash, carrot, celery, green pepper, endive, tomato, fillings
Either filling on squash slices, carrot slices, celery, green pepper, endive leaves and tomato

These two fillings would also be great as a fresh vegetable dip, if thinned down with some cream or milk to a dipping consistency. I kept them thick and piped the fillings into the vegetables with a piping bag and tip. If you are not proficient with a piping bag, simply spooning the filling into the vegetable of choice would work as well. I believe everyone should learn to use a piping bag and tips, even if only in the simplest of ways. Disposable piping bags are available and they serve so many purposes, from piping butter stars for a fancy dinner, to piping dips and fillings, to frosting on little cupcakes. The cherry tomatoes I used were fairly small, about 1-inch in diameter, on average. If using slightly larger cherry tomatoes, you will need fewer. If only very small ones are available, you may use more, though emptying the centers will be far more tedious.

Both these fillings are gluten free!

Pesto Cream Filled Cherry Tomatoes

Pesto, Pesto Cream, Fillings, Cherry Tomatoes
Pesto Cream Filled Cherry Tomatoes

Makes about 45 to 50

45 to 50 (1-inch) cherry tomatoes

FILLING:
4 ounces (1/2 cup / 113 g) Chevre or Montrachet goat cheese
4 ounces (1/2 cup / 113 g) cream cheese
2 ounces (1/4 cup / 60 g) good Pesto
2 tablespoons fresh chives, minced
½ teaspoon salt
fresh ground pepper, to taste
1 - 2 tablespoons olive oil, as needed

fresh, tiny basil leaves for garnish, optional


At least 2 hours before filling and serving, prepare the tomatoes. Set the stem end of the tomato down, as this will give it a more stable base, making it less likely to tip over. Use a very small and sharp knife to cut off the rounded top end, suing finger or other small tool to scrape out all the seeds. Set the tomato with the cut side downwards to drain on a rack or paper toweling (or both). For this task I started using a small tomato corer, though even that was large for the size tomatoes I used. I have a very tiny baby spoon leftover from those days, which worked perfectly for scooping out the seeds. Do this for all the tomatoes used. Set aside to drain.

making appetizers, cherry tomatoes, finger foods, fillings
Stem end down  |  scoop out seeds  |   drain well   |   holding piping bag with filling  |  Filled Tomatoes

DO AHEAD: The filling can easily be made up to 3 days in advance, if time is pressing. Place the first 5 ingredients of the filling into a medium bowl and mix well with a spoon or with a small hand mixer. Taste for flavor, adding in pepper as desired. Use olive oil to thin just enough to be able to spread or pipe, but still keep its shape.

When ready to serve, use either a small spoon to fill the tomatoes, or use a piping bag and tip. I used Ateco tip # 823, as this open star tip fit just inside the little tomatoes. Squeeze the filling inside until the tomato is full, and then a bit more over the top to make a nice presentation. Garnish with little basil leaves, or alternatively, dill sprigs, chopped chives or any herb desired.

Gorgonzola & Herb Filled Endive

Endive, filling, appetizers, finger food, recipes
Endive leaves with filling

Makes about 40 to 45

6 or 7 Belgian Endive

FILLING:
4 ounces (1/2 cup / 113 g) cream cheese
4 ounces (scant 1 cup / 113 g) Gorgonzola crumbles
2 tablespoons fresh chives, minced
2 tablespoons fresh dill, minced
2 1/2 teaspoons Dijon mustard
2 teaspoons Sherry or wine vinegar
1 1/2 teaspoons fresh lemon zest
1 tablespoon lemon juice
1 tablespoon olive oil

more minced chives or dill for garnish

DO AHEAD: The filling may be made up to 3 days in advance, if needed: Place all filling ingredients into a medium bowl and mix completely with either a spoon or a small hand mixer. Store covered in the refrigerator until needed.
Belgian Endive, endive leaves, appetizer, finger food
Belgian Endive (5 - 7 inches in length)

Belgian endive also comes in a red version, not available in every area. Cut off enough of the stem/base of the endive to separate individual leaves. This will likely mean cutting a small slice each time to allow each leaf to come apart. Each endive will yield an average of 6 - 7 usable leaves. Some may give more, and some less. It is best to separate the leaves just before filling, if possible, to prevent any browning.


Pipe or spoon in a walnut sized dab of the filling at the base of the leaf. Garnish with herb of choice.


My passion is teaching people how to create a harmony of flavors with their cooking, and passing along my love and joy of food, both simple or exotic, plain or fancy. I continue my journey in ethnic and domestic cuisines, continuing my journey to explore diverse culinary experiences and hopefully to start you on a journey of your own. Join me also at A Harmony of Flavors on Facebook, and Pinterest.

Sunday, June 29, 2014

Gluten Free Crepes and Ham Bread Pudding

I have recently written about both these foods: Crepes and Ham Bread Pudding. The Dacotah Prairie Museum asked me to put on a cooking presentation, making foods for a "Sunny Summer Patio Brunch". This event took place yesterday at The Granary, a Rural Cultural Center in the nearby town of Groton. The foods demonstrated were a Ham and Feta Bread Pudding, (a variation of the Ham and Blue Cheese Bread Pudding I had created earlier), a Fruit and Vegetable Salad and Crepes with Ricotta Cream Cheese Filling for dessert. To start out the presentation I made the pretty Edible Fruit Centerpiece, also described in a recent blog.

centerpiece, fruit, presentation, pineapple
Edible Fruit Centerpiece
Going back over these recipes, I knew one of the young women working at the Dacotah Prairie Museum has gluten sensitivity, and if something is presented that has gluten, such as the ham bread pudding and the crepes, she would not be able to partake of the food. With her in mind, along with the great possibility of others present with this sensitivity, I had wanted to test making the Ham and Feta Bread Pudding using gluten-free bread. 

I had never used gluten free bread before. I was unsure of the texture and feel of what it would be. Would it absorb the milk and eggs properly? Would it end up too custard-like without regular wheat breads? Though a bread pudding is a custard based food, too much liquid to bread ratio would give too much room for an egg custard rather than the creamy bread texture from a really good bread pudding recipe. I could have made gluten free bread, and i am sure it would have made a wonderful bread pudding. Most people though, would not take the time to make their own bread before attempting a bread pudding. I had to be able to find the ingredients locally. I asked Marianne at the museum which bread she usually used and her first recommendation was Udi's. Available locally, I went and bought a loaf to test this out. 
gluten free, ham, bread, Feta cheese, casserole
Gluten Free Ham and Feta Bread Pudding


I wanted the bread pudding to still be warm when I took it in for the presentation. Though I could have mixed all the ingredients for the recipe the night before, I also wanted there to be some texture to the finished product, so I cut the bread cubes the evening before and covered the bowl on the counter. In a refrigerator container I pre-mixed the ham, Feta, scallions, white raisins, salt, nutmeg & pepper. I pre-mixed the eggs and milk and refrigerated those as well. Yesterday morning when I woke at 6 AM, I went straight to  he kitchen and preheated the oven. I uncovered the bread cubes, added in the two refrigerated containers and mixed it all well. This went into a casserole and into the oven less than 15 minutes later. While I continued on to get myself ready for the day, the casserole baked. It was done by the time I came back into the kitchen for breakfast. It smelled heavenly and looked wonderful. I had high hopes. 

Marianne had not known I planned to make this separate bread pudding, and she came to thank me for thinking of her. As it turned out, the recipe held no glitches. It was perfect and just as good as its wheat-based counterpart.

gluten free, crepes, recipe
Making Gluten-Free Crepes: note the lacy holes
The other thing I had wanted to test was making the crepes gluten free. Using a 1:1 substitution of my 6:2:1 Mixture all-purpose gluten free flour for regular all-purpose flour in the recipe, I made the crepe recipe as it stands, only adding ½ teaspoon of guar gum to the recipe. The only difference I found was that the gluten free crepes took a trifle longer to set completely, and they tended to be more difficult to lift from the pan's surface. The crepe batter in the pan made many little holes, creating a very lacy pattern at the edges. Still, none of these gluten free crepes were torn or otherwise unusable, so I consider that a good recipe. The flavor was great. I know Marianne was not the only one to eat the gluten free version of these crepes. All in all, if anyone would be interested in these two recipes gluten free, I can fairly say that they work excellently.


My passion is teaching people how to create a harmony of flavors with their cooking, and passing along my love and joy of food, both simple or exotic, plain or fancy. I continue my journey in ethnic and domestic cuisines, continuing my journey to explore diverse culinary experiences and hopefully to start you on a journey of your own. Join me also at A Harmony of Flavors on Facebook, and Pinterest.

Saturday, June 14, 2014

Gluten Free and Sugar Free Healthier Choices

GF Pumplin Loaf
I wrote a couple of days ago about how awareness of gluten sensitivity came about in my life. I wrote about this also on my website, when all this first began. I have been "practicing" periodically, testing out recipes that would normally have wheat, barley or rye and seeing if they turn out well using alternate flours. Some of the alternate flour substitutes out there are white rice flour, brown rice flour, sweet white rice flour (yes, all different!), potato flour, potato starch (very different), cornstarch, tapioca flour/starch (same things), sorghum flour, quinoa flour, fava bean flour, garbanzo bean flour, coconut flour, teff and various others. Bob's Red Mill brand carries most if not all of these. In making up various mixtures of these flours and testing them in recipes, I have found that in things like cakes, coffee cake or dessert loaves like banana or zucchini breads, they actually come out more tender and moist than with regular all-purpose (wheat) flour. 

Easy 6 - 2 - 1 Mixture

A great all-purpose gluten free flour mixture is a simple 6-2-1 ratio of:

6 cups brown rice flour
2 cups of potato starch (NOT potato flour!)
1 cup of tapioca starch

Luscious Bundt Coffee Cake

Bundt, cake, Coffee Cake, dessert, recipe
GF version: Luscious Bundt Coffee Cake

Serves about 12 - 16

1 cup unsalted butter
1½ cups sugar
2 eggs
1 cup sour cream
1 teaspoon vanilla
½ teaspoon baking soda
2 cups all-purpose flour
1 teaspoon baking powder
½ teaspoon salt
½ cup chopped nuts; walnuts or pecans are good
2 teaspoons sugar
½ teaspoon cinnamon

Preheat oven to 350 degrees. Cream butter and sugar. Add the eggs, sour cream and vanilla and mix well.

Sift together flour, soda, baking powder and salt. Add the dry ingredients to the wet and mix well. Grease a 10-inch tube or bundt pan.

Mix together the chopped nuts, the 2 teaspoons sugar and the cinnamon. Sprinkle ½ of this topping into the greased pan. (See notes.) Put in half the batter - this requires "plopping" spoonfuls of the batter into the pan as the batter is very thick. Then carefully smooth it to fill in any gaps. Tapping the pan on the countertop helps. Pour on the rest of the "topping" and again plop spoonfuls into the pan till all batter is used. Bake for 1 hour, or until a knife inserted in the center comes out clean. Allow to cool on a rack for 10 minutes before removing from pan. Sprinkle powdered sugar over the cake if desired.


GLUTEN-FREE OPTION: Replace the flour with your preferred gluten-free flour mixture and add in 1 teaspoon xanthan gum. Mix and bake as directed. (Sometimes baking is a little bit longer than normal, but since the texture and moistness is so wonderful, I can wait those few more minutes!) 

~~~~~~~~~~~~~~~~~~~~~~~~~~~~


Just as with anything, some people tolerate certain things better than others, so I used a recipe mixture I found almost 2 years ago on Shauna James Ahern's blog, glutenfreegirl.com, though sadly no link I have works to get to her site anymore: She gave the amounts by grams, the best way to measure. Mix these all together in one container and shake the heck out of it to combine. Her recipe:
 
200 grams brown rice flour
150 grams sorghum flour
50 grams potato flour
250 grams sweet rice flour
150 grams potato starch
100 grams arrowroot
100 grams cornstarch 

I have used both these mixtures, and keep them both mixed up in my gluten free cabinet. When I decided to try my hand at cookies, making the recipe for Green Tea Lime Sables, I looked at a lot of sites online to see what the skinny was on types of flours that would work best for cookies, and any other gluten-free cookie baking tips out there. The recommendations I found suggested mixing "high-protein" flours. I tried researching what constituted a "high-protein" flour, but got no real, definitive answers and I got tired of searching. I found various recipes for cookies though, and ended up cobbling together a mixture to use for the Sables. The mixture amounts are enough for this one recipe, but can easily be doubled or tripled as needed:
gluten free, green tea, lime, sables, cookies, dessert
GF Green Tea Lime Sables


Gluten-Free Cookie Flour


½ cup white rice flour
½ cup tapioca flour/starch
¼ cup quinoa flour
¼ cup sorghum flour
¼ cup brown rice flour


So far, these are the only cookies I have made gluten-free, but the cookies were absolutely indistinguishable from the ones made with all-purpose flour (wheat). I am encouraged to try more sometime soon.

gluten free, crackers, quinoa, garbanzo
GF Garbanzo Brown Rice Crackers front , Quinoa behind
There have been some cakes I have made using only nut "flours"; very finely ground nuts (almond, hazelnut, pecan) and these, while having a different texture, are really moist and delicious; my Hazelnut Sweet Potato Torte or Flourless Chocolate Torte are a couple of these. Other recipes I have created that are gluten free using things other than flours of any kind are the Quinoa Brown Rice Crackers and the Garbanzo Brown Rice Crackers, where I cooked the rice or quinoa and blended them together with drained, canned garbanzo beans and baked them slowly to crisp up. I was given a recipe for some waffles made from soaked buckwheat (not actually wheat or even related) and millet, blended together with a few other ingredients and while dense, they are amazingly good. 
GF Hazelnut Sweet Potato Tortes
GF Hazelnut Sweet Potato tortes

All this info is leading up to the fact that while I am aware of many different alternative ways to get to an end product, I had not really put any thought to extending this knowledge to making these recipes diabetic friendly. I bring this up because I was diagnosed diabetic some years ago. I am not as careful with my diet as I should be, and I am overweight. I know from past diets that once my weight is below a certain point, my glucose seems to have no problems staying very normal, between 90 and 110. When I was eating only RAW foods for nearly a year, my glucose was usually 70 to 90. I felt wonderful, fit, and was able to exercise more just because i felt so good. It was win-win. Except it is nearly impossible to follow on the road. When your only choice for raw food in a restaurant is iceberg lettuce, it was just too much. Once I jumped off the RAW foods, that was it. I haven't been able to get myself back to it, though I wish to.
RAW foods, Marinara, Zucchini "Spaghetti"
RAW Marinara on Zucchini "Spaghetti"

So, wandering around the Amazon.com site a few days ago, I found myself looking at gluten-free baking books. One jumped out at me in particular, after reading the commentary from all the reviews, as being particularly high-end. I have been baking for so long that my standards have gotten quite high, and some recipes just do not live up to them. And then i noticed the author names. The first one is none other than Peter Reinhart! If anyone has been reading my blogs of the last month-and-a-half or so, I have been rhapsodizing over his book The Bread Baker's Apprentice, and making one bread after another from that book. It opened up a whole new outlook for me on making bread, and it is a most wonderful journey I embarked on with his book. Breads in this book are absolutely chock full of gluten. So imagine my surprise at seeing his name on a gluten free baking book! I ordered the book, called The Joy of Gluten-Free Sugar-Free Baking: 80 low carb recipes that offer solutions for Celiac Disease, Diabetes and Weight Loss.
Gluten-Free Sugar Free Orange Spice Cake

One thing I had not done to date is try and bake sugar free. Mainly, I object to some of the sugar alternatives out there. I do use stevia very often. I use it instead of sugar in my oatmeal or my coleslaw and even, on occasion, in my Red Cabbage with Apples and Bacon. 

Red Cabbage with Apples and Bacon

Red Cabbage, Apples, Bacon, spices, wine, red wine vinegar
Red Cabbage with Apples and Bacon
 
Serves 6 to 8

3 slices bacon, ½-inch cubes
1 large red onion, thinly sliced
6 to 7 cups red cabbage, thinly sliced
1 teaspoon allspice
¼ teaspoon nutmeg
¼ teaspoon cloves
¾ teaspoon coarse salt
fresh ground black pepper, to taste
1 large apple, peeled, cored, sliced
1 cup red Zinfandel (Merlot is also good)
  ⅓cup red wine vinegar
½ cup packed brown sugar

In a large fry pan, deep enough to accommodate the cabbage when raw, fry the bacon. When nearly brown, add onion and fry until onion begins to brown, 15 to 20 minutes.

Add cabbage and saute, tossing with tongs until it has collapsed slightly and is no longer stiff, about 2 to 5 minutes. Raise heat to high and add allspice, nutmeg, salt and pepper and stir to coat with the spices. Add apple slices and the wine and cover the pan, reducing to med-low and cook till almost tender; about 30 to 40 minutes or until the wine has cooked down to a glaze on the bottom of the pan. If wine has not reduced, raise heat with lid off and allow to evaporate. Raise heat to medium and add the vinegar, stirring to deglaze the pan. Add the brown sugar, stir and cover again, reducing heat to medium low. Continue to cook until liquid is reduced and cabbage is very tender - about 30 minutes. If cabbage is done, but still has liquid in the pan, raise heat and cook uncovered until liquid has reduced to a glaze.


This book gives the alternatives for using powdered stevia, Splenda or even liquid stevia. Today, I decided to try out a cake recipe from this new book; Orange Spice Cake. This new book uses almost exclusively nut flours as the basis for the recipes. Doing this often can get very expensive. But it also gives that low-glycemic factor that using all the alternative flours listed in the first paragraph above, do not. Adding the no sugar aspect just makes it better still. The cake smells heavenly and grew beautifully. I would expect nothing less of a book with Peter Reinhart as an author (along with Denene Wallace). If this recipe is an indication, I am going to be truly enjoying this book. 


My passion is teaching people how to create a harmony of flavors with their cooking, and passing along my love and joy of food, both simple or exotic, plain or fancy. I continue my journey in ethnic and domestic cuisines, continuing my journey to explore diverse culinary experiences and hopefully to start you on a journey of your own. Join me also at A Harmony of Flavors on Facebook, and Pinterest.

Thursday, June 12, 2014

Making a Recipe Gluten Free

Until moving up to South Dakota, in all my 60+ years I had never met anyone who was gluten intolerant (that I or they knew of) or had Celiac disease. Now it seems every time I turn around I am confronted by another gluten intolerant person. Not having ever considered myself gluten intolerant, now I understand that a good portion of us in the US do have some sort of gluten related allergy whether acknowledged or not. And just as with a new vocabulary word, once learned it seems to pop up everywhere. 

Gluten Free, Caramelized Sugar, Cake, recipe
Gluten Free Caramelized Sugar Cake

I could not say if I have a gluten allergy or not, though it is quite possible. I do not have any crippling ailments or depression or most of the long list of possible symptoms. But, I love breads. And cakes and cookies and pies and scones and on and on and on. In this past month or so I have totally fallen in love with Peter Reinhart's The Bread Baker's Apprentice and have made about 6 different bread products form that book. There is just nothing so wonderful as the smell of baking bread. Having to do without these heavenly products nearly makes it feel like life wouldn't even be bearable without them. And yet the list of people who cannot eat these types of things is growing daily.

When I first came into this town, I found that one of the women working at the museum here is gluten intolerant as are others in her family. When making any food for a museum function, I must be aware that there is one person who cannot have most of the things I would normally make. So, I began experimenting with gluten free flours and baking gluten free. All that said, most of the regular foods we make do not have any gluten in them, naturally. And many have gluten products added just for a particular convenience. So many yogurts have wheat and/or other starches added to make them creamier, as do such simple things as store-bought spaghetti sauces. Who would ever have thought that red licorice has wheat in it? I mean, really?!

When I began testing some recipes, I found a couple of alternate flour mixtures and began there, substituting 1 to 1 for regular flour in a recipe. My first was a chocolate cake. It was not bad at all, though the texture was different. But it was good. I was encouraged. I tried making pancakes, which also turned out really good, though they need to be baked longer than regular wheat flour pancakes. Below is My Favorite Pancake recipe. Substitute Gluten Free all-purpose flour mix for the wheat flour, is making gluten free. Be aware that many GF flour mixes already contain xanthan gum, so be aware before adding a teaspoon more..


My Favorite Pancakes

Gluten Free, pancakes, peach, recipe, breakfast
Gluten Free Peach Pancakes


Makes about 16 (5-inch) pancakes

1 tablespoon lemon juice
2 cups milk
2 cups all-purpose flour
2 teaspoons baking powder
2 tablespoons sugar
½ teaspoon baking soda
½ teaspoon salt
1 large egg
3 tablespoons unsalted butter, melted
Oil, for griddle
Fruit, optional (1 cup blueberries, 1 ripe peach, peeled & chopped, 1 banana, mashed, or 1 apple, peeled, cored and grated)

Mix the lemon juice into the milk and set aside to curdle. Sift together the flour, sugar, soda & salt. Whisk the egg and the melted butter into the milk. Pour into the dry ingredients and whisk gently just until combined.

Pour out ladles-full of batter onto a griddle, and just before flipping, sprinkle on a few blueberries. Flip and finish baking. This prevents the pancakes from turning blue! Yield: 16 pancakes


NOTES: The "milk and lemon" step is to make it easier to have all ingredients on hand, with the belief that it would be more usual for most people to have milk and lemons in their refrigerator than to have buttermilk. If you happen to have buttermilk on hand, substitute 2 cups of buttermilk for the milk and lemon juice. 

GLUTEN-FREE option: Substitute your favorite gluten-free flour for the all-purpose flour, and add in 1 teaspoon xanthan gum with the other dry ingredients. Proceed with directions as above. These are really delicious either way, and I have made these 3 times gluten-free. They require just a bit more monitoring to make sure they are cooked through, but they turned out perfect each time.
 

My first recipes included xanthan gum, to give some of the stability that the gluten in wheat flour would normally give. I was detecting a flavor in the baked goods I made but didn't know what it was from. I had read an article on xanthan gum in a magazine, saying that chefs used it to thicken sauces or dressings without the need for heat. I tried a recipe for a relatively runny salad dressing, adding xanthan gum to thicken it. There was that flavor again, and it completely ruined the flavor of the dressing. Ahhh. Now I knew what that flavor was in the gluten free baked goods.

gluten free, bread, boule, loaf,
Crusty Boule
I had fallen in love with the Gluten Free Girl and the Chef blog, reading how Shauna James Ahern's life changed once diagnosed properly and able to be in control of her life again. Her recipe testing and tasting was interesting and I read avidly, trying to get all the info I could from a site that was intelligently written, by someone who knew the difficulties, pitfalls and hazards. I used one of her bread recipes, a "Crusty Boule", and though the bread loaves were minuscule, were also really tasty. In later posts, Shauna mentioned that xanthan gum seemed to be causing her some new health problems, and that she was trying out using psyllium husks to give the gluten replacement structure in some of her baked goods, with some success. I decided to try that out. 

Psyllium seems to work well in some recipes. I haven't used it enough in baking to really determine where it will or won't work, but at least it is an alternative. Then I read a recipe using guar gum. This stuff is expensive! But I bought a small amount to try. So far, I have not detected that "off" flavor I so object to with the xanthan gum. And then, the other day I made a new recipe called Muhummara. This Middle Eastern dip or spread is thickened with bread crumbs. 

muhummara, Middle Eastern recipe, roasted red pepper, walnuts
Muhummara
The museum holds artist receptions for those artists featured at the museum, and the current one happens to have allergies to gluten and various other things. The museum staff were concerned what to serve at this reception, and so asked my thoughts and opinions on the matter. Hummus was one suggestion. I also thought of the recipe for Muhummara, which I found particularly delicious. While it is normally served with pita breads, it would also be good with vegetables or gluten free crackers, just as would hummus. But there are bread crumbs in the Muhummara recipe, so I wondered if using gluten free bread to make the crumbs would work?

This is What I Did:

I bought a loaf of Udi's gluten free whole grain bread and took out three slices to make the ⅔ cup. I processed the fresh bread to crumbs, then tossed it in a hot pan to evaporate liquid and brown the crumbs. It was a perfect ⅔ cup! The recipe calls for 12 ounces (drained) roasted red peppers. I got two 12 ounce jars of roasted red peppers, which by the time they were drained came to only 2 ounces more than the recipe called for. I used them all. I followed the regular recipe as I added in the ingredients, but after the gluten free bread crumbs, where there should have been a pretty thick mixture, it was still rather thin. And I decided that psyllium husks would be perfect in this application. I added 2 tablespoons and it thickened nicely. This allowed the addition of the olive oil at the end. The dip is delicious, and I cannot tell any difference in flavor. I hope the people attending the reception will enjoy this dip as much as I have. That it is gluten free is unimportant except to those who must have it. The flavor is the same, and that is what counts.


My passion is teaching people how to create a harmony of flavors with their cooking, and passing along my love and joy of food, both simple or exotic, plain or fancy. I continue my journey in ethnic and domestic cuisines, continuing my journey to explore diverse culinary experiences and hopefully to start you on a journey of your own. Join me also at A Harmony of Flavors on Facebook, and Pinterest.

Disqus