Translate

Showing posts with label cookies. Show all posts

Friday, May 9, 2025

No Bake Cookies for Any Time

 . . . but especially for Christmas! I know it is already into May. And I just haven't been blogging, so this never got posted. 

Near Christmas last year I had bought two boxes of Vanilla Wafers. I always make Bourbon Balls for Christmas, partly because they are invariably requested, and partly that I love them. But most importantly, they are no bake. Mix, form and store. What a great invention, no-bake cookies!

rum balls, no bake, dark rum, coconut, apricot
Apricot Coconut Rum Balls (Bourbon Balls top right)

Why I bought two boxes of Vanilla Wafers is beyond me. The recipe for Bourbon Balls calls for one box. That recipe makes plenty. Since Bourbon Balls use cocoa and bourbon, I wanted to find another no-bake recipe that would use the extra box of cookies without using cocoa. Do you know how difficult it was to find one, single recipe that did not use cocoa? Heavens!

I searched. I specifically wrote no cocoa, or no chocolate in my search. All that came up were recipes using cocoa. I searched for no bake cookies with no mention of cocoa or chocolate. Still, all the recipes had cocoa or chocolate in them. 

And then finally, a little Christmas miracle happened. I found this post from Chips and Pepper. Their recipe is, I am sure, perfect. I told my sister about it, noting that the original had no alcohol. She said she would make it that way for her grandkids. It didn't fit all of my criteria, but it was a usable recipe to start. My criteria were:

  • No cocoa or chocolate
  • Use Vanilla Wafers as the base
  • Use dark rum (as opposed to bourbon in the Bourbon Balls) as I have no more small grandchildren ;)
I sat and compared amounts in this recipe to the recipe for Bourbon Balls, to try and formulate a recipe that would accommodate my criteria. I didn't have any orange marmalade or orange juice. Instead I used apricot jam and dark rum. I added cardamom, simply because we all love cardamom in my house. I am sure ginger would be great as a substitute or possibly cinnamon, if one of those spices suit. Or they can be left out entirely. I used dark rum. Other rum can be used interchangeably. Coconut flavor rum would go well with the coconut in the recipe. Spiced rum would enhance the spice aspect. These can be rolled in granulated sugar. I used powdered sugar to distinguish from the Bourbon Balls that I roll in granulated sugar.

I must report that I loved them, as did everyone else who tried them. My husband and I both have loved the Bourbon Balls all through our 35 years together, but we conceded that these might just be a new favorite! So I give all my thanks to Chips and Pepper for the great idea I used!

Apricot Coconut Rum Balls

1  (12-ounce) box Vanilla Wafers, crushed to fine crumbs
3/4  cup powdered sugar
1/2  cup finely ground pecans or walnuts
3/4  cup fine shredded unsweetened coconut
1/2  teaspoon ground cardamom
1/2  cup apricot jam
6  tablespoons dark rum
Powdered sugar, for rolling

Place the first five ingredients into a large bowl and stir to combine all ingredients.

Separately in a small bowl or a large measuring cup, combine the apricot jam and dark rum. If any pieces of apricot are large, cut them very small, else it makes for difficult rolling later.

Pour the wet ingredients into the dry and thoroughly mix until all ingredients are well moistened. Form small balls, rolling them tightly, then roll in the powdered sugar. Store in a container. At room temperature, they will be very soft. They are best kept either refrigerated or frozen. This makes having them done way ahead of time a snap. They that in no time once set out at room temperature. 

NOTES:
  • Nuts used are interchangeable
  • Cardamom can be switched out for another spice, or left out
  • Apricot jam may be substituted with orange marmalade or peach jam
  • Dark rum may be substituted with other flavors of rum or another dry liquor of choice. It may be left out and substituted with orange juice, if preferred.

Tuesday, November 5, 2019

More Cookie Recipes

I have such a variety of cookie recipes, though interestingly, I do not make cookies all that often. Holidays are when I go into high gear on making cookies - and that usually happens last minute, mainly as I am not generally keen on making all these individual things called cookies!! 

I have two more recipes to share here, and these are generally not ones I make for holidays. These first, I came up with the combination on my own, only later to find that indeed they are very similar in style to macarons, those cute little sandwiched meringue type cookies seen all over, now. I had long intended to try making macarons, yet they were just one of those things I couldn't seem to find the time to get around to. And then over time, macarons seemed to take the internet by storm, and suddenly they were everywhere. But long before I seriously got around to making macarons, this recipe just came together.

These macaron-like cookies are also basically egg whites and almond flour, and gluten free. I did add a touch of chocolate, but more as a spice mixture combo than as a chocolate flavoring agent. They are stellar in the flavor department, and at one point, I had a couple of teenage boys visiting, and they just about polished off the whole plate of these cookies.

Cinnamon Spice Macarons


These are single cookies; not the smooth-topped little sandwich types seen everywhere these days. Very similar in style, I made these a bit larger, but they are basically a meringue cookie with finely ground almonds. The spices make for an interesting combination. They disappeared in no time in my house.

Cinnamon, Spice, Macaron, Cookies
Cinnamon Spice Macaron Cookies

Makes about 55 larger single macarons
Cinnamon Spice Macaron Cookies


6 egg whites (about ¾ cup total), room temperature
¼ teaspoon cream of tartar
1¼ cup granulated sugar
¾ cup almond “flour” (very finely ground almonds)
4 teaspoons cornstarch
1 tablespoon cinnamon
1 tablespoon cocoa
½ teaspoon cardamom
¼ to ½ teaspoon ancho chile powder
Pinch of salt

In a small bowl combine the almond flour, cornstarch, cinnamon, cocoa, cardamom, chile powder and salt and whisk to combine. Set aside.

Preheat oven to 300 degrees. Line two cookie sheets with parchment.

In the bowl of a mixer, place the egg whites and cream of tartar and whip until the whites hold soft peaks. Gradually add the sugar, beating until the meringue is smooth and glossy and holds stiff peaks. By hand, fold in the dry ingredients gently. Drop by rounded tablespoons into high mounds onto the parchment, allowing at least 2 inches between cookies, as they will flatten and puff as they bake. Bake the meringues for about 40 minutes on two racks in the oven. Switch the sheets top to bottom and front to back about halfway through the baking time. They should be dried on the outside and slightly soft in the center when done. 


~~~~~~~~~~~~~~~~~~~~~~~~~~~


These next cookies make a gorgeous presentation. They are a bit time consuming to make, as they are tiny and involve a lot of little steps. They are also so fabulously delicious, that I had a very hard time not OD-ing, the first time I encountered them. I got this recipe from a lady named Colleen, about 40 years ago. I have no idea where she got the recipe. She said someone gave it to her, and she wrote it out on a recipe card for me. All I can say is, for some special occasion, these are a must try. As they are so tiny, the recipe makes a slew of the little wafers, and make over 50 little sandwiched cookies. 


Cream Wafers


These are tiny little things (about 1½ inches in diameter) and take a bit of time to make all the little rounds and then assemble. However, they are so flaky and light, the raves you will get will more than offset any time spent on making them. Believe me!

Wafers, sandwich layers
Single Wafers before Filling

Makes a lot of tiny cookies!

WAFERS

1 cup unsalted butter, softened
Cream Wafers, sandwich cookies
Cream Wafers
⅓ cup whipping cream
2 cups all-purpose flour
Granulated sugar

CREAMY FILLING
¼ cup unsalted butter, softened
¾ cup confectioners' sugar
1 teaspoon vanilla extract
Food Coloring, optional

MAKE WAFERS: Mix together thoroughly the butter and flour, as for pie dough. Add the whipping cream and form a ball. Cover and chill.

Heat oven to 375 degrees. On a floured surface, roll out about ⅓ of the dough at a time, to about ⅛-inch thick. Keep the remaining dough refrigerated until ready to use. Cut the rolled dough into 1½-inch diameter circles. Transfer the little rounds with a spatula to a piece of waxed paper heavily covered with the granulated sugar. Turn each round so that both sides are sugar coated. Place on an ungreased cookie sheet. Prick the little dough circles with a fork about 4 times. Very important! Bake for 7 to 9 minutes, or until just set, but not brown. Repeat with the other ⅔ of the dough. Cool the wafers.

MAKE CREAMY FILLING: Cream the butter with the confectioners’ sugar; add vanilla and beat until smooth and fluffy. Tint with food coloring if desired. Put a small amount of filling on the bottom side of one wafer, press another bottom side of a wafer against the filling, to make tiny sandwich cookies.

NOTES: When I made these recently, I used the base of a large star icing tip that measured the right size to cut out the little wafers. A small circle cutter will also work well, if it is not too large. These are too delicate to make them too large.


My passion is teaching people how to create a harmony of flavors with their cooking, and passing along my love and joy of food, both simple or exotic, plain or fancy. I continue my journey in ethnic and domestic cuisines, continuing my journey to explore diverse culinary experiences and hopefully to start you on a journey of your own. Join me also at A Harmony of Flavors on Facebook, and Pinterest.

Saturday, December 1, 2018

Try These Pumpkin Sandwich Cookies

It has been a while since I have managed to get back to my blog. November was an exceedingly busy month, for me. And now we are into December, and it will get even busier, so before things really go crazy, I did want to post this recipe I started back in late October!
 
Pumpkin, Sandwich Cookies, Marshmallow Creme
Pumpkin Sandwich Cookies with Marshmallow Creme

I had a lovely, Soft Pumpkin Cookie recipe I'd been using for years and finally got posted, but then I got thinking, "What about a Pumpkin Sandwich Cookie?" I couldn't recall ever seeing such a thing, so I started thinking about how could I make a slightly more crisp cookie, using a moist vegetable like squash? I did see a lot of recipes for "Pumpkin Spice Cookies," but these were nothing more than spice cookies, using the usual spices used when making a pumpkin pie. Beware, because there is no pumpkin or squash in those recipes at all. They are just spice cookies! 

Next, I went looking for other cookies I had made that would work as a sandwich. Then, comparing and reworking, to try and get the recipe to come out with a cookie at least crisp enough to hold shape when sandwiching. I didn't want domed cookies that would make the final sandwich look like a ball, because I did see some made that way online. They are probably delicious, but not at all what I wanted for my outcome. 

The amount of actual pumpkin/squash in the recipe would have to be fairly low, or else the cookies would be far too soft. Not enough pumpkin/squash and you have no flavor at all. A fine balancing act, to be sure.

And then of course: what to fill the cookies with? How would they stand up to being filled. When you bite, would all the filling just squeeze out? For my first attempt, I used a cream cheese frosting, flavored with pumpkin pie spice. The mixture was far too soft. It did literally flatten, on taking a bite, leaving all the filling falling out around the edges. Not at all good. And then I saw a suggestion somewhere for using Marshmallow Fluff. Hmmm. So then I went hunting for Marshmallow Fluff recipes, and it turned out to be not too difficult at all, so I compared a few recipes and went my own way, slightly on the low side of sweetness levels. The Marshmallow Creme recipe came together easily. The most difficult thing about the recipe was trying to put it into jars or containers once made! It can be made ahead of time, if needed.

Marshmallow Creme, making, recipe
Marshmallow Creme

Marshmallow Creme


Makes about 2 pints

3 large egg whites (4 fl.oz. / 114 grams)
½ teaspoon cream of tartar (0.05 oz./1 gram)
2 tablespoons granulated sugar (1 oz./30 grams)
-----
⅔ cup granulated sugar (5.2 oz./148 grams)
⅓ cup water (3 fl.oz./88 grams)
¾ cup golden syrup (9.3 oz./265 grams)
-----
1 teaspoon vanilla extract
1 teaspoon caramel flavoring, optional

Place the egg whites and cream of tartar into the bowl of a stand mixer and beat until very foamy. Slowly add in the 2 tablespoons of sugar and beat to soft peaks.

In a saucepan over medium heat, combine the ⅔ cup granulated sugar, the water and the golden syrup (or substitute dark corn syrup, honey, or a combination of these two). Stir until the granulated sugar is dissolved, then bring to boil without stirring and using a candy thermometer, bring the syrup to 240 degrees F. 

Immediately remove from heat and re-start the whisking of the egg whites in the mixer bowl on medium high speed. Begin pouring the hot syrup carefully just down the side of the bowl, being very careful not to let the syrup hit the whisk attachment. Beat until all the syrup has been added, then continue to beat for an additional 7 to 8 minutes, until cooled. Beat in the flavorings. The marshmallow creme can be stored at room temperature for three days or in the fridge, well covered.

~~~~~~~~~~~~~~~~~~~~~~~~~

Back to the Cookies. When I made this batch of cookies, it was my second batch, having first made them filled with a cream cheese icing, unsuccessfully. This time, I opted to cut them out with a fluted-edge cutter, and then I poked little holes in the centers using a two-tined pickle fork. Remember when making these, that they will be sandwiched, so there will ultimately be half the amount of finished cookies than the original amount of single wafers.

Pumpkin Sandwich Cookies


Made 94 wafer cookies / 47 sandwich cookies 
Pumpkin, Sandwich Cookies, Marshmallow Creme
Pumpkin Sandwich Cookies with Marshmallow Creme


1 cup butter, at room temperature
½ cup light brown sugar
½ cup granulated sugar
2 egg yolks
1 teaspoon vanilla extract
½ cup pumpkin puree
3 cups all-purpose flour
1 tablespoon Pumpkin Pie Spice 
½ teaspoon salt

Preheat oven to 350 degrees. In a mixing bowl in a stand mixer or with a hand mixer, cream together the butter, brown sugar and granulated sugar. Add in the yolks and beat until incorporated. Add the vanilla extract and pumpkin puree and beat in. Combine the dry ingredients, then on very low speed, add to the creamed mixture, slowly, until all the flour is well mixed in. Flour a surface and roll out the dough rather thinly, about ⅛-inch thick. Cut out 2 or 2½-inch diameter cookies and bake them on ungreased cookie sheets for 14 to 16 minutes, or until set and just barely golden. Remove from cookie sheets immediately, to a rack or clean surface to cool completely before filling.  

Baked cookies, Cookies, filling cookies, sandwich
Baked Cookies and Filling them
Set one cookie top side down and pipe or spoon on the filling, then top with another wafer right side up.


My passion is teaching people how to create a harmony of flavors with their cooking, and passing along my love and joy of food, both simple or exotic, plain or fancy. I continue my journey in ethnic and domestic cuisines, continuing my journey to explore diverse culinary experiences and hopefully to start you on a journey of your own. Join me also at A Harmony of Flavors on Facebook, and Pinterest.

Saturday, December 30, 2017

Some Cookie Recipes that Fell by the Wayside

I know I have been writing blogs about healthier eating. Let's face it though, one cannot eat healthy all the time. A little indulgence here or there is just fine. 

In actuality, I meant to have these cookie recipes out on this blog before Christmas, so everyone might be able to use them for the holidays. Very obviously, that did not happen. With a Wine Tasting and Food Pairing event just before Christmas, and with guests arriving, blogging just did not happen. But, maybe these recipes can stay on the back burner until later on, or next Christmas.

One cookie recipe I had been wanting to try for years was Speculaas, sometimes also spelled Speculoos. Where they originate from is up for grabs, as far as I can tell: Dutch, Flemish, Belgian, German, French. The reason I had wanted to try making these cookies is because of the Biscoff Cookies I had tried. Mine came out more highly spiced and far less sweet than these commercially made cookies, but the recipe is delicious, and the cookies are great with a cup of coffee.

Springerle, Rolling Pin, Speculaas, cookies, roll cookies
My Springerle Rolling Pin making Speculaas
Traditionally, the cookies are a highly spiced shortbread type, rolled thin and stamped with a windmill cookie mold. Any cookie mold will work just fine, or you can just roll the dough and cut out shapes. I chose to use my Springerle rolling pin, creating a lot of small cookies stamped with patterns. My Springerle pin has all sorts of animal pictures carved into it. 

The first thing needed before making these cookies was Speculaas Spice Mix. I looked through countless recipes for "traditional" Speculaas Spice Mixes and all had some things in common, while there were those few that had something different or other.  In general, something like a Pumpkin Pie Spice mixture will work, though there are some spices that are almost always a part of Speculaas that are not in Pumpkin Pie spice, namely coriander seed and white pepper.

Speculaas, Spice Mix, recipe
Speculaas Spice Mix

Speculaas Spice Mix


Makes about ½ cup

3 tablespoons Ceylon cinnamon
1 tablespoon ground cloves
1 tablespoon ground nutmeg
1½ teaspoons ground ginger
1½ teaspoons ground coriander seeds
1½ teaspoons ground white pepper
1 teaspoon ground fennel seeds
1 teaspoon ground cardamom seeds

Combine all spices in a glass jar with tight fitting lid and shake well. Store in a cool dark place. Use approximately 1 tablespoon spice mix to 1 cup of flour in your recipe, according to your taste.

Speculaas, Cookies, ready to bake, recipe
Speculaas Cookies, ready to bake


Next, I took a tour of the internet looking at what kind of recipe constituted Speculaas. I read in many places that these were shortbread cookies, which is generally taken to mean there are no eggs to bind the ingredients. Yet for all that, many recipes called for eggs. I opted to keep the recipe without eggs. In most places, Speculaas are described as a thin, hard cookie. To stamp the cookies with shapes, such as windmills or other, there has to be enough thickness to be able to press down on the stamp (or Springerle Rolling Pin). I opted to roll the dough about ¼-inch thick, and then rolled/pressed evenly with the Springerle rolling pin. Many recipes called for a very low oven and very long baking times, to dry out the cookies and make them crisp. Others baked them at high temperatures for shorter periods to achieve the same thing. I took a middle-of-the-road approach here. I used a 325 oven for part of the time, then lowered it even more for the rest of the time. The cookies came out wonderfully well, and very spicy and delicious, so I am quite content with the recipe.
Speculaas, cookies, spice cookies, recipe
Speculaas

Speculaas Cookies 


Made about 60 cookies

12 tablespoons (170 g) unsalted butter, softened
1 cup (213 g) light brown sugar, packed
⅓ cup (80 g) water
1 teaspoon vanilla extract
2 cups (284 g) all-purpose flour
½ cup (44 g) white rye flour
½ cup (40 g) finely ground almond meal
¾ teaspoon (3 g) salt
½ teaspoon (1 g) baking soda
3 tablespoons (11 g) Speculaas Spice Mix

In a stand mixer, beat the butter with the brown sugar until very light and fluffy. Combine the water and vanilla extract, then begin adding to the butter mixture by teaspoonfuls, beating continuously and waiting until the water is completely incorporated before adding more.

Separately, whisk together all the remaining ingredients to combine. Add the dry ingredients into the bowl and mix on low speed until the dough comes together into a mass. Turn out of the bowl and form into a large ball or roll, wrap in plastic wrap and refrigerate the dough for at least 2 hours, or up to 3 days.

Preheat oven to 325 degrees. Line 2 cookie sheets with parchment.

If using a Springerle rolling pin, or other cookie stamps, roll out the dough to about ¼-inch thick with a regular rolling pin. Use the Springerle rolling pin and dust well with flour. Roll the Springerle pin, pressing evenly over the cookie dough and leaving the dough about 1/8 to 3/16-inch thick. Cut out the cookies and set them about an inch apart onto the prepared parchment lined cookie sheets. Gather up the scraps and re-roll them as needed, to use up the dough.

If cutting out the cookies with cookie cutters or just cutting into small rectangles, roll the dough with a regular rolling pin to about 1/8 - 3/16-inch thick and set the cookies an inch apart onto the prepared cookie sheets.

Bake the cookies for 15 minutes. Rotate the cookie sheets and lower the oven temperature to 275 degrees, leaving the cookies in the oven. Bake the cookies for an additional 20 minutes, until very crisp, but not browned.

---------------------------------------------------------------------------------

Another kind of cookies I made for this year's holidays are Chocolate Cherry Cookies. I based these on a recipe I first encountered on Facebook (see that recipe here, called "Maraschino Cherry Almond Chocolate Cookies"). My reasoning was that my husband has had a "favorite" Christmas cookie his Mom always made, and I have been making them each year since I met him, 28 years ago. These were called Cherry Bon Bons, and while tasty, they are a pain to make! The dough was difficult to work with, and it needed to be formed around a well-drained whole Maraschino cherry, then my husband liked them rolled in the little, hard "rainbow nonpareils" that ended up all over the counters and floor before I was done rolling the formed dough in them. 
Chocolate, Cherry, Cookies, chocolate chips, maraschino cherries
Chocolate Cherry Cookies

The recipe I found seemed to have the things my husband likes best all in one cookie: maraschino cherries, cherry juice in the dough, and even better, chocolate chips, too! As I looked at the recipe, the dough part sounded very similar to the dough for the Cherry Bon Bons. Instead of wrapping it around the cherries, the cherries are chopped up instead. So far, I was really happy with this concept. I made the recipe a bit larger and changed some of the amounts by slight bits and the whole thing came out so great that I am hard pressed to think of ever going back to the Cherry Bon Bons again, no matter how cute they are!

Chocolate, Cherry, Cookies, maraschino cherries
Chocolate Cherry Cookies

Chocolate Cherry Cookies 


Makes about 66 cookies

1 (10-ounce) jar maraschino cherries, drained, syrup reserved
3 sticks unsalted butter, softened
½ teaspoon almond extract
½ teaspoon salt
1½ cups confectioners' sugar
3½ cups all-purpose flour
3 - 4 tablespoons maraschino cherry syrup
1½ cups semi-sweet chocolate chips

Preheat oven to 350 degrees. Make sure the cherries are well drained before starting the recipe. Set them into a sieve or colander and drain, then set them on paper toweling to wick out more moisture. If there is too much residual liquid in the cherries, this will add moisture to the cookie dough and they may not set up so nicely in the oven. Once the cherries are well drained, chop them and set them aside.

In the bowl of a stand mixer beat the butter with the almond extract, salt and confectioners' sugar until creamy. With the mixer on low speed, add in the flour until nearly all incorporated, then adding in 3 of the tablespoons of cherry syrup. If the dough is too dry to come together, add the remaining tablespoon of syrup. Add in the cherries and the chocolate chips. Mix just until combined.

Make 1-inch balls, or use a cookie scoop and place the balls about 1½ - 2 inches apart on a parchment lined baking sheet. Bake for approximately 14 minutes, or until set but not browned. When done, slide the whole parchment sheet with the cookies onto a cooling rack. They will easily release once cooled slightly.


My passion is teaching people how to create a harmony of flavors with their cooking, and passing along my love and joy of food, both simple or exotic, plain or fancy. I continue my journey in ethnic and domestic cuisines, continuing my journey to explore diverse culinary experiences and hopefully to start you on a journey of your own. Join me also at A Harmony of Flavors on Facebook, and Pinterest.

Saturday, February 25, 2017

Remembering Some Cookies Called Gauchos

Long ago (in the late 1960s, but don't tell anybody, okay?) I used to love these cookies called "Gauchos." I guess the brand name was "Burry's," though that part didn't stick in my memory. I did remember the elephant on the box, when I saw them online. Gauchos were oatmeal peanut butter cookies with a sweet peanut butter filling.

Oatmeal, Peanut Butter, Sandwich Cookies, recipe
Oatmeal Peanut Butter Sandwich Cookies

Apron Patterns 1950s
I have never, ever been one of those who would eat a teaspoon (or tablespoon) of plain peanut butter from the jar. I don't think I have ever done that, even in childhood. I have lots of vices, but that isn't one. On the contrary, I am most certainly one of those who eat cookie dough, lick the beaters after making cake or cookies, scoop out remains in the bowl. I know this gives some people the shudders, and maybe the "raw egg police" will come after me, but since my earliest childhood, I followed Mom around by her apron strings in the kitchen waiting just for these treats. I never got sick from it, either, not in all these years since. And yes, she wore aprons, mostly those with the bib top like this pattern shown at left.

Somehow though, I just really loved these Gauchos cookies. I love oatmeal cookies, and these had oatmeal in them, too. Maybe that was my tipping point. Or maybe it is just the fact of sweetened peanut butter in the middle? I have a really serious sweet tooth. I love peanut butter cookie dough, but not the cookies once they are baked.

Oatmeal, Peanut Butter, Sandwich Cookies, recipe
Oatmeal Peanut Butter Sandwich Cookies
All these musings, and I still cannot say what specific thing is what made me love these particular cookies, but I recall, as a teen, going through whole boxes all on my own! So this morning, I suddenly remembered these, and wondered if someone had a recipe out there. As it turns out, there are lots of the exact same recipe posted on many blog sites. I made only a minor change in the cookies and one in the filling. Most places show the same recipe whether it is for what used to be Gauchos, or the Girl Scout Cookies called "Do-Si-Dos®," and apparently the same company made both, or so I read somewhere. 

Long and short of it all is that I gave into the temptation this morning, and though the recipe is the same on numerous web or blog sites, I am posting it here one more time, with my own small changes and observations. 


Oatmeal Peanut Butter Sandwich Cookies

Makes about 45 large sandwich cookies or up to 60 smaller ones


Oatmeal, Peanut Butter, Cookies, single cookie
Oatmeal Peanut Butter Cookies before sandwiching
COOKIES:
1 cup peanut butter
1 cup butter, room temperature
1 cup sugar
1 cup brown sugar
2 eggs
2 teaspoons vanilla extract
1½ cups all-purpose flour
1 teaspoon salt
½ teaspoon baking soda
½ teaspoon baking powder
2 cups quick cooking rolled oats

FILLING:
6 tablespoons butter, room temperature
¾ cup peanut butter
2 cups confectioners' sugar
3 tablespoons heavy cream

Preheat oven to 350 degrees. Cut parchment to fit various cookie sheets.

In bowl of a stand mixer, add in the first 4 ingredients for the cookies and start beating slowly, until the mixture is creamy. Add the eggs and vanilla and beat to combine. 

In a separate bowl, sift or whisk together the flour, salt, baking soda and baking powder. Add this to the mixer bowl and starting on low speed, gently mix until there is no fluffy powder left. Increase speed and combine well. Add the oatmeal and mix to just combine. 

I used a 2-teaspoon cookie scoop first, which yielded large cookies almost 3-inches in diameter. A little past halfway scooping the cookies, I switched to a 1-teaspoon scoop. They seem small, but puff and spread when they bake. Allow plenty of room on the parchment lined sheets. Flatten the cookie mounds to about ¼-inch thick. Bake larger cookies for about 9 to 11 minutes, or until lightly golden. Smaller sized cookies bake for about 8 minutes total.

Allow the cookies to cool completely. They will harden enough to handle. Then make the Filling. Place the first three Filling ingredients into the clean mixer bowl and begin beating slowly, until all the confectioners' sugar is moistened. Increase speed slightly to cream. Mixture will be thick. Add in 3 tablespoons of heavy cream and beat to combine. 

If a piping bag is available, it makes quick work of piping the filling onto the cookies. Turn one cookie bottom side up and pipe on the filling (or spread with a knife or icing spatula), then top with another cookie, right side up. Repeat with all pairs of cookies. 


My passion is teaching people how to create a harmony of flavors with their cooking, and passing along my love and joy of food, both simple or exotic, plain or fancy. I continue my journey in ethnic and domestic cuisines, continuing my journey to explore diverse culinary experiences and hopefully to start you on a journey of your own. Join me also at A Harmony of Flavors on Facebook, and Pinterest.

Friday, December 30, 2016

Delightful Linzer Squares

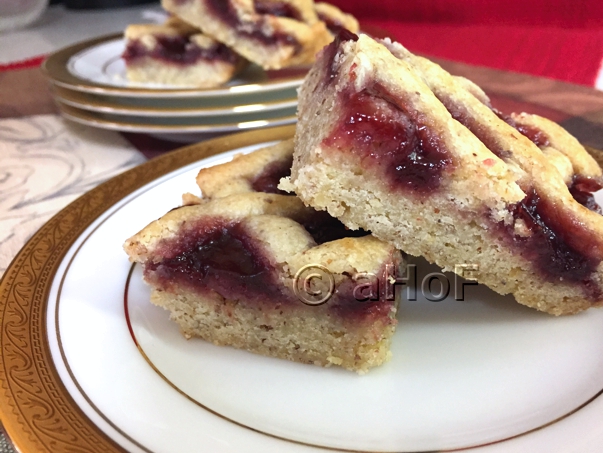
A long time ago, I ate Linzer Squares and was totally enchanted with the flavors. I was given the recipe, so I can truthfully say this recipe is in no way mine, though as it was shared with me, I am now sharing with all my readers. The fact that I really loved these when I first tried them did not, somehow, spur me on to make them right away, and like so many things, out of sight means out of mind, and the recipe has set out there ever since. 

Raspberry, Linzer Squares, Linzer bars, dessert
Raspberry Linzer Squares
This year, I decided enough procrastination is enough and I made them for Christmas Eve dinner. And they are just as wonderful as I recalled. Again, begging the question: Why did I wait so very long to do this? Who knows. But now that I have, I am truly hoping to make them more often.

Raspberry, Linzer Squares, Linzer bars, recipe
Raspberry Linzer Squares just cut
The thing with these squares / bars / cookies is that any flavor of jam can be used, so each time you make them they can have a different flavor. These were made with a seedless raspberry jam as my husband objects to the seeds. Regular raspberry jam, strawberry or apricot are also great. 

I would not mess with the crust part of the recipe, as it is just divine. Looking at the photos, it seems that the crust might be dry, but this is so not the case. It is tender and as it has ground nuts in it, nuts do help with moistness. The kind of nuts to use is entirely up to the individual. I used walnuts as they are my favorites, but pecans, hazelnuts, almonds or even macadamia would also work. The important thing is to have them very finely ground.

One thing the woman who gave me this recipe stated was that normally the lattice top is meant to be rolled out flat and cut into strips to set on top. She felt this was too tedious since the dough is delicate and easily breaks, so she suggested just rolling the  dough into thinner-than-pencil sized strips and setting them on top. It works the same either way and makes life easier.

I am all about making life easier!

Another thing that can be done, but I did not, is to brush the top lattice with an egg wash (1 egg yolk beaten with 1 tablespoon of water) before baking. This would make the lattice shiny and more golden. I meant to try it, but I totally forgot in my rush to bake this dessert! So obviously they came out wonderfully well despite this lapse. The dessert is made in a 9 x 9-inch pan, and the final "bars" can be cut into 12 bar type pieces or 16 squares; your choice. And here is the recipe for these wonderful bar type cookies. 

Raspberry, Linzer Squares, Linzer bars, recipe
Raspberry Linzer Squares

Raspberry Linzer Squares

Makes 12 or 16 squares 

1½ cups all-purpose flour +2 tablespoons
¾ cup sugar
½ teaspoon baking powder
¼ teaspoon salt
½ cup hazelnuts, ground (or almonds, walnuts, pecans or macadamia)
½ cup unsalted butter at room 

    temperature
1 tablespoon grated lemon zest
1 whole egg, beaten
¾ cup thick raspberry Jam
1 egg yolk
1 teaspoon water
 

Preheat oven to 350. Line a 9-inch square pan with parchment for easy removal and cutting later. Spray the parchment with cooking spray and set aside. 

Into a large mixer bowl, measure the 1½ cups of flour. (Reserve the extra 2 tablespoons for later). Add sugar, baking powder, salt, nuts, and butter; mix until well combined. Add lemon zest and egg, stirring with a fork until dry ingredients are moistened. Reserve ½ cup of dough aside. Pat remaining dough evenly into the bottom of the pan. Spread the preserves over dough in pan. To the reserved half-cup of dough, stir in the remaining 2 tablespoons flour. Roll this dough to very thin pencil like strips and place 9 strips in a diagonal over the preserves, about ½" apart. Place the remaining 9 strips crosswise over the first strips, ½” apart, forming a lattice top.

In small bowl, stir the egg yolk and water; brush dough strips. Bake for 30 minutes or until top is golden brown. Cool completely on wire rack in pan. Cut into bars. 


My passion is teaching people how to create a harmony of flavors with their cooking, and passing along my love and joy of food, both simple or exotic, plain or fancy. I continue my journey in ethnic and domestic cuisines, continuing my journey to explore diverse culinary experiences and hopefully to start you on a journey of your own. Join me also at A Harmony of Flavors on Facebook, and Pinterest.

Tuesday, February 10, 2015

Ladyfingers - A Rose by any Other Name

I have been writing a lot lately about Guatemala. My time there was well-spent, learning all sorts of new recipes, trying all sorts of new delights. When I created a Cookbook and Memoir for my oldest daughter when she turned 40, I took a trip down memory lane and tried to recall everything I could. She was born in Guatemala, as were all my children. I hoped to keep the heritage alive for her. She was the oldest, at age 10, when we moved back to the US. The other children were 8, 7 and just turning 3, respectively. The youngest has very little memory of Guatemala, except through the foods I have made.
Ladyfingers, Chiqueadores, Round shapes, Biscoff Spread
Round shapes, filled with Biscoff Spread


When I asked my second daughter if she wanted a copy of this book, she said absolutely! I was thrilled. She was only 7 when we left there, after all. I don't know how much she can recall of the food. Certainly nothing of the cooking of it, except what she learned from me. As I went back over the original book, making changes here and there, I went and dug a bit deeper into my memories, and came up with a lot more recipes, or at least memories of foods eaten. There came a point where I had some questions, so I called my ex-(Guatemalan) husband to consult. He was not too big a help. We all recall things differently, after all. He was not the cook, so his cooking vocabulary in Spanish is perhaps less developed than mine in some cases.

Ladyfingers, Chiqueadores, Biscoff Spread
Ladyfinger Shaped, filled with Biscoff Spread
He offered to loan me a very old Guatemalan cookbook he was given. While perusing this book, I came on a word that positively rang bells in my head, yet I had absolutely no clue what this thing was. I knew, from the ingredients that it was something sweet. It had to be a dessert or cookie of some sort. But what? The word was "Chiqueadores." I phoned my ex again. Again, while he knew what these things were, he was at a loss to describe them. We came up with "wafers" and that was the best he could do. But, the word kept sitting there making nanny-faces in my mind.

Drumroll.....

Finally I spent quite a long while one day online. What I finally found out is that this recipe was for  . . . . .

LADYFINGERS! For goodness sake!

Ladyfingers, called Savoiardi in Italian, and Chiqueadores in Guatemala, are light and airy little puffs. They are most often used in recent years in the making of Tiramisu. They are also used in making a Charlotte. I have not made a Charlotte yet. But now that I knew what Chiqueadores were, I felt it was time to make them; always a first time. I had only ever bought Ladyfingers before. They are easy to make really. Piping them with a piping bag is perhaps the most "difficult" part of the recipe, if making them in classic ladyfinger shapes, though there was really nothing difficult in making them. If making them into little round cookies, they can be piped or just dropped with a spoon and flattened slightly. Either way, they are good. They can be made as little tea cookies and eaten plain or sandwiched and filled. Fillings could be as simple as whipped cream, or something like a buttercream or other icing. I used Biscoff Spread, a Speculoos type mixture. They were just divine this way!

Open Star Tip #172,  piping bag, piping batter
Open Star Tip #172 worked perfectly     piping bag opening cut to 3/4-inch wide
The recipe makes quite a lot of smaller ladyfingers. Quite certainly enough to use in an application such as a tiramisu. I piped them into about 3- or 3½-inch long little bars. I also made some into little rounds, about 1½-inches in diameter. They do grow and expand in the oven. Space them accordingly, with at least an inch between, if not a little more.

Ladyfingers, Savoiardi or Chiqueadores


Ladyfingers, Chiqueadores, cookies
Ladyfingers or Chiqueadores
1 whole egg
3 egg yolks
½ cup confectioners' sugar
1 teaspoon vanilla extract
⅔ cup all-purpose flour
2 tablespoons cornstarch
3 egg whites, at room temperature
¼ teaspoon cream of tartar
2 tablespoons granulated sugar

Preheat oven to 375 degrees. Line two (or more) baking sheets with parchment. To keep the parchment in place while piping, first lightly grease the baking sheet, then set the ungreased parchment on top.

In a large bowl, beat together the first 3 ingredients until very light and lemon colored, then continue to beat until the mixture falls like ribbons back into the bowl, taking a few seconds to disappear on the surface. This took about 6 minutes with a small hand mixer. Add the vanilla to combine.

Sift together the flour and cornstarch, then return the mixture to the sifter (or sieve) and set aside.

Beat the egg whites and cream of tartar until they are at soft peaks. Add the granulated sugar in gradually while beating, until the mixture holds stiff peaks.

making batter, step by step, how to
yolk mixture at point; whites beaten stiff; folding in whites; folding in flour; batter ready to pipe

Scoop about a third of the egg white mixture into the egg yolk mixture and fold in. Add in the remaining whites and fold in gently. Sift the flour mixture over this folded mixture in three parts, each time gently folding the flour in until none remains.

piping ladyfingers, baking ladyfingers
before baking, sprinkled with confectioners' sugar  |  straight our of the oven, right, lightly golden

If using a disposable piping bag or a zip top bag, cut off the tip or a corner until the width of the cut is about 3/4 inch wide, as shown in the photo above the recipe. This will ensure a hole about ½-inch in diameter. If using an icing top, it should have a hole at least ½-inch in diameter. I used the only one I had with a half-inch diameter hole, a #172 Open Star Tip. Fill the bag and pipe straight lengths about 1 inch wide by 3 to 3½-inches long. Dust the tops with confectioners' sugar and let them set for a few minutes, until the sugar has nearly dissolved. Sift a little more sugar over top and bake the ladyfingers for about 10 minutes, rotating the pan once during baking, to ensure even browning. The cookies should come out light golden and puffed.


My passion is teaching people how to create a harmony of flavors with their cooking, and passing along my love and joy of food, both simple or exotic, plain or fancy. I continue my journey in ethnic and domestic cuisines, continuing my journey to explore diverse culinary experiences and hopefully to start you on a journey of your own. Join me also at A Harmony of Flavors on Facebook, and Pinterest.

Tuesday, December 23, 2014

One More Kind of Cookie Before Christmas

As I have mentioned, I got a really late start on my holiday baking. Despite this, I have managed to squeeze in 6 kinds of cookies. I  made some Miracle Peanut Butter Cookies with Hershey's Kisses in the center, Forgotten Cookies, Rolled Butter Cookies, Cherry Bon Bons and Thumbprints. (Click on any of the highlighted recipes to go straight to that recipe page.) Yesterday I also made another kind, which I am calling Almond Meringue Tarts, though they are not in traditional tart shape. 

Almond, Meringue, Tarts, cookies, making cookies
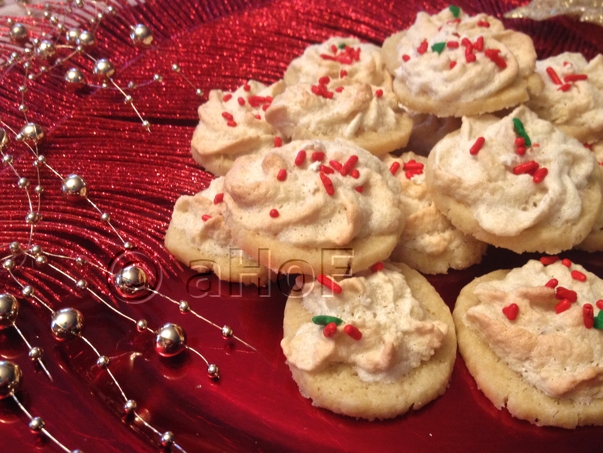
Almond Meringue Tarts


These cookies are easy to make, as with most cookies. The forming takes no time at all; simply slice them and set on the baking sheet. There is a meringue that goes on top before baking, which can either be placed with two spoons, or with a piping bag, as preferred. The meringue contains a lot of ground almonds, hence "almond" in the title, along with almond extract in both the cookie base and the meringue. They are really delightful! I chose to sprinkle some festive jimmies on top before baking, but colored sugars would work as well.

Almond Meringue Tarts


Makes about 6 dozen
Almond, Meringue, Tarts, cookies, Christmas cookies
Almond Meringue Tarts


COOKIE BASE:
2 cups flour
½ cup granulated sugar
½ teaspoon salt
12 tablespoons butter, room temperature
1 egg
1 teaspoon vanilla extract
½ teaspoon almond extract

MERINGUE TOPPING:
6 tablespoons egg whites (from 2 - 3 eggs, depending on size)
¼ teaspoon cream of tartar
¾ cup confectioners' sugar
½ teaspoon almond extract
-------------
2 cups blanched, slivered almonds
¼ cup confectioners' sugar

Make cookie dough: In a bowl, combine the flour, sugar and salt. Cut int he butter as for pie dough, until well blended and crumbly. In a small bowl, whisk together the egg and extracts. Pour this over the blended mixture and toss with a fork to moisten, just as for pie dough. If the dough will not come together as one mass, sprinkle in 2 teaspoons water and mix again. Continue, until the mixture just forms a mass. Divide the dough in two parts. Roll each part into a log about 1½ inches in diameter. Repeat with the second section of dough. Roll each of the logs into waxed paper, twist the ends closed and refrigerate at least 3 hours or overnight.
almonds, meringue, tarts, cookies, almonds, Christmas
Almond Meringue Tarts, cooling
When ready to bake, make the meringue: Place the 2 cups almonds into a food processor with the ¼ cup confectioners' sugar and process until very fine, but not oily. Set aside.

Place the egg whites into a mixer bowl with the cream of tartar and with whisk attachment, beat the egg whites to soft peaks. Begin adding in the ¾ cup confectioners' sugar about 1 tablespoon at a time, until the meringue holds stiff peaks and is smooth and glossy. Add in the almond extract. By hand, fold in the ground almonds gently, until combined.

Preheat oven to 325 degrees. Remove one of the logs of dough from the refrigerator and remove the waxed paper. With a sharp knife, slice the log as thinly as possible; about 3/16-inch thick. Set these little discs onto an ungreased cookie sheet, at least 1 inch apart. Pipe or drop little mounds of the almond meringue on top of each cookie disc. Top with a colored sugar or other festive decorative topping. Bake the cookies for about 16 to 18 minutes, until set and lightly browned.


My passion is teaching people how to create a harmony of flavors with their cooking, and passing along my love and joy of food, both simple or exotic, plain or fancy. I continue my journey in ethnic and domestic cuisines, continuing my journey to explore diverse culinary experiences and hopefully to start you on a journey of your own. Join me also at A Harmony of Flavors on Facebook, and Pinterest.

Disqus