Translate

Showing posts with label dessert. Show all posts

Thursday, July 14, 2022

Individual Cheesecakes Cute as Can Be

These perfect little individual cheesecakes were made to serve at a special dinner for some friends. Every, single thing about them was perfect: flavors, appearance, texture, and the bonus was that they came out of the little ramekins just perfectly. Better results could not be hoped for. 

Matcha green Tea, green tea powder, cheesecake, individual cheesecake
Black Sesame Matcha Individual Cheesecakes

While they were perfect, and have stayed in my mind ever since, I haven't returned to them. Why? Well, there is really no huge valid excuse at all really. The biggest thing was that I ran out of Matcha Green Tea powder and haven't replaced it. 

Even longer ago, I had made Matcha and Black Sesame Muffins, and they were delightful. It was this combination, the green and the black flecks together are quite striking, that made me want to do something else with it. 

Using Matcha Green Tea

green tea, Matcha, higher quality
Matcha Green Tea Powder

Using Matcha green tea powder can be tricky, only in the sense that depending on the quality, the color may be the brightest of lime green (higher quality, more flavor, higher price), or a very dull green, or even a very pale green (lower quality, less flavor, lower price). The dull green was what was used in both the muffins and the cheesecakes.

With less flavor and color, more is needed to achieve even the least bit of color in a baked good. This alters the dry ingredient contents upwards, with the possibility of a dry outcome, whether dry muffins or a very stiff and dry cheesecake. 

Using higher quality Matcha will give a lot of color, but when it comes down to the facts, Matcha is very bitter. Too many people will not automatically love this bitterness, so a fine line is walked when making something like these recipes. Too much of a good thing and they may not be at all well-received. 

Some of this bitterness in a baked item can be mitigated by using more sugar, yet breakfast muffins are not meant to be sweet as a cupcake (though far too many are), and too much sugar will alter a cheesecake's consistency as well. 

An idea on that score is to dissolve the green tea powder in just enough hot water to make a smooth paste. In this way, the texture of either recipe would not be significantly altered. It also would afford the ability of actually seeing how much color is being added. The final baked goods will never be that same color, but it at least gives a clue. 

Aside from the issue of Matcha, having some in the first place, and then all these other considerations, these little cheesecakes are no difficulty to make. The mixture is a straightforward style, black sesame is available in many stores nowadays. While black sesame is not much different in flavor than the white, they do give visual interest. So, on with the recipe:


Black Sesame Matcha Individual Cheesecakes


Makes about 6 (6-ounce) 
or 8 (4-ounce) servings

matcha green tea powder, cheesecake, black sesame
Black Sesame Matcha Individual Cheesecakes
12 ounces cream cheese, room temperature
1 teaspoon lime zest, finely grated
½ cup white sugar
2-3 tablespoons Matcha Green Tea powder
1 pinch salt
1 cup sour cream
3 large eggs, room temperature
1 tablespoon black sesame seeds

- Extra sugar, for dusting
- Butter for greasing

Preheat oven to 325 degrees. Grease six (6-ounce) or eight (4-ounce) ramekins with butter. Dust them with sugar, tapping out excess. Set the ramekins into a roaster pan that can hold water halfway up the sides of the ramekins. Heat a large kettle of water and keep hot.

In a small bowl, whisk together the sugar and green tea powder. In a separate mixing bowl, beat the cream cheese until smooth, then add in the sugar mixture and lime zest and beat gently, just to combine. Add in the eggs, one at a time, beating gently until incorporated, then add in the sour cream and fold in the black sesame seeds.

Fill the ramekins of choice with the mixture. Set the roaster pan into the oven and carefully pour in the hot water around the ramekins to about halfway up their sides. Bake the cheesecakes 20 minutes for the smaller ones or 25 minutes for the larger ones. The centers should be a bit jiggly. Remove the pan from the oven and set the ramekins aside to cool. Chill the cheesecakes completely, refrigerated, before unmolding.

To unmold the cheesecakes, run a knife around the edges. They should start to spin a bit in their molds. Set a plate over top of the mold and invert the ramekin over the plate until the cheesecake comes loose onto the plate. Serve with a twist of lime and/or a dollop of whipped cream.

My passion is teaching people how to create a harmony of flavors with their cooking, and passing along my love and joy of food, both simple or exotic, plain or fancy. I continue my journey in ethnic and domestic cuisines, continuing my journey to explore diverse culinary experiences and hopefully to start you on a journey of your own. Join me also at A Harmony of Flavors on Facebook, and Pinterest.

Friday, January 14, 2022

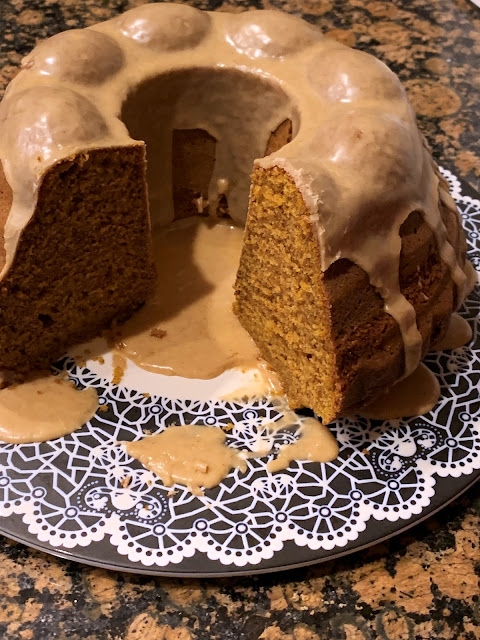
Delightful Bundt Cake with Bourbon Spiked Drizzle

I started out with nothing particular in mind one day, looking at dessert recipes. I think of all desserts to make, cakes are possibly my favorite. Anything from a simple old fashioned coffeecake tosheet cake to decorated cakes and bundt or ring mold cakes. Suddenly I came upon a site with a recipe called Gingerbread Bundt Cake with Cinnamon Rum Icing. I love gingerbread - it is a kind of cake / dessert bread cross, after all. The pictures on the site are just lovely. The mold used for the Bundt cake was exceptionally pretty, though I don't own that particular style. And I thought about it a while and wondered, "The recipe calls for applesauce. I wonder how pumpkin would do in the recipe, instead?

Bundt cake, pumpkin, gingerbread, dessert
Pumpkin Gingerbread Bundt Cake with Bourbon Spice Glaze
As I continued to peruse the recipe, I noticed that it is made a bit differently than any other cake recipe I've ever made. It called for melting butter, setting side to cool slightly, then beating together the sugar and eggs till fluffy and light. What? And then adding in the melted, cooled butter. Okay, so I went ahead with all this and made the cake with my own variations. I made the icing with Bourbon rather than rum as I have become interested in Bourbon of late.

The outcome was the finest grained cake, the most tender, and just flat-out delicious, that I had to share. The link above to the original recipe will show how it was. I loved the mix of Pumpkin and Gingerbread flavors. The drizzle icing was amazing. And here is the recipe, as I made it:


Pumpkin Gingerbread Bundt Cake with Bourbon Spice Glaze


Makes one bundt cake

200 grams unsalted butter, melted and cooled slightly
4 large eggs
360 grams sugar (about 1⅔ cup)
-----
360 grams all-purpose flour (about 2½ cups)
1½ teaspoons baking soda
¼ teaspoon flaky salt
1 tablespoon cinnamon
1 tablespoon ginger
1½ teaspoon cloves
-----
1 cup sour cream
1 cup canned pumpkin (not pumpkin pie filling)

Preheat oven to 350 degrees. Brush a Bundt pan with soft (not melted) butter and dredge with flour. Tap to release excess flour, then set pan aside.

Over low heat, melt the unsalted butter; once melted set aside. In a mixer, beat together the eggs with the sugar until they are light and fluffy, then slowly stir in the slightly cooled butter.

Separately, measure out all the dry ingredients and stir to evenly distribute ingredients. In a measure, stir together the sour cream and pumpkin to combine.

To the egg mixture add about a third of the dry ingredients, mixing on low speed to combine. Add half the pumpkin mixture and mix, then another third dry mixture, the remaining half pumpkin mixture, then the remaining dry ingredients, stirring after each addition. Pour into the prepared Bundt pan, rapping sharply on a hard surface to release bubbles.  

Bake the cake for 50 to 55 minutes, or until a tester inserted in the center comes out clean. Rest on a wire rack to cool for 10 minutes in the pan, turn out onto the rack to cool completely before glazing.

BOURBON SPICE GLAZE:
180 grams / 1¼ cup confectioner's sugar
1 - 2 tablespoons Bourbon
1 - 2 tablespoons milk or water
¼ teaspoon cinnamon
1 teaspoon fresh orange zest

Stir all ingredients until smooth. Pour over completely cooled cake.


My passion is teaching people how to create a harmony of flavors with their cooking, and passing along my love and joy of food, both simple or exotic, plain or fancy. I continue my journey in ethnic and domestic cuisines, trying new things weekly. I would love to hear from you, to help me continue my journey to explore diverse culinary experiences and hopefully to start you on a journey of your own. Join me also at A Harmony of Flavors on Facebook, and Pinterest.

Friday, February 28, 2020

Going Retro for Dessert

Something I used to absolutely love as a child was Chocolate Pudding Cake. I never had anything but chocolate pudding cake, though later on, as a young wife with just a small handful of cookbooks, I went experimenting. My Better Homes and Gardens Pies and Cakes cookbook came with not just one, but FOUR different Pudding Cakes. 

Chocolate, Pudding Cake, dessert, recipe
Fudge Pudding Cake

Aside from the Chocolate recipe, there was a Lemon Pudding Cake that was just delish. That said, I have been dubiously blessed with two husbands that do not care for lemon flavored things. Highly frustrating to me, as I love lemon flavored things, as long as it is made with real lemon or lime and not "candy flavored." I never tried the Peach Pudding Cake, but aside from the chocolate and lemon versions, I did try the Date pudding cake, which had to have been good, I am sure, but somehow didn't leave an impression.

Left with two Pudding Cakes that have remained my favorites over the years, I was sure they had been shared here in past, but I guess I realized that the recipes have been straight from the old cookbook, copyright 1966. That's right: 54 years ago. Apparently, the book is still in demand, probably by other baby boomers like me, who grew up eating these recipes. It is available in many places. And in many price ranges.

I am going to place these two favorite recipes here, with the caveat that they are not my own recipes. They are from this cookbook, though I am updating some of the ingredient names and wording. And there are slews of other great recipes in the book as well, so if anyone wants some really great time tested recipes, you will know what to look for. The photos here are my own!


Fudge Pudding Cake

chocolate, Pudding Cake, dessert, recipe
Fudge Pudding Cake

Makes one 8 x 8-inch pan

1½ cups all-purpose flour
¾ cup granulated sugar
½ teaspoon baking soda
½ teaspoon salt
1 (1-ounce) square unsweetened chocolate
2 tablespoons butter
¾ cup buttermilk
½ teaspoon vanilla
¾ cup coarsely chopped walnuts
--------
¾ cup brown sugar
1½ cups boiling water
2 (1-ounce) squares unsweetened chocolate

Preheat oven to 350 degrees. Grease an 8 x 8-inch baking dish and set aside.

Whisk together the first four ingredients in a mixing bowl. Melt the first 1-ounce square of unsweetened chocolate with the butter, then stir in the buttermilk and vanilla and pour into the dry ingredients; stir until blended. Mix in the walnuts and pour into the prepared baking dish.

Sprinkle the brown sugar evenly over the top of the batter. Combine the boiling water and the 2 squares of unsweetened chocolate and stir until the chocolate is melted. Pour this liquid over top of the brown sugar. Bake the pudding cake for 40 to 45 minutes. Do not over bake; despite the pudding part, the cake can get too dry. It is difficult to test, as the pudding part makes any tester inserted come out wet. 


~~~~~~~~~~~~~~~~~~~~~~

Lemon Pudding Cake


While this is a "lemon" pudding cake, it can as easily be made with limes.

Makes one 8 x 8-inch pan
Lemon Pudding Cake with Blueberries and Whipped Cream
Lemon Pudding Cake
with Blueberries and Whipped Cream

¾ cup granulated sugar
pinch of salt
3 tablespoons butter, melted
¼ cup all-purpose flour
1 teaspoon grated lemon zest
¼ cup lemon juice
--------
1½ cups milk
3 well-beaten egg yolks
3 stiffly beaten egg whites

Preheat oven to 350 degrees. Grease an 8 x 8-inch baking dish and set aside. 

In a mixing bowl combine the sugar, salt and butter. Stir in the flour, then the lemon peel and juice. Whisk together the milk and egg yolks and add to the lemon mixture, stirring well to combine. Fold in the egg whites until no white remains. Pour this mixture into the prepared baking dish.

Bake for about 40 minutes, or until the top is lightly browned. Serve warm or chilled. (Fresh blueberries make a wonderful accompaniment.)


My passion is teaching people how to create a harmony of flavors with their cooking, and passing along my love and joy of food, both simple or exotic, plain or fancy. I continue my journey in ethnic and domestic cuisines, continuing my journey to explore diverse culinary experiences and hopefully to start you on a journey of your own. Join me also at A Harmony of Flavors on Facebook, and Pinterest.

Thursday, October 17, 2019

Dessert Loaves Old and New

Dessert loaves - heavier than a cake, though often sweet enough to be one - are always a nice treat. They can have a glaze or be iced, though they do not need it. They are nice sliced and served with some fruit alongside. They can even be used as a sort of shortcake (think strawberry shortcake), depending on the fruit/vegetable involved. From apples to zucchini, there are all kinds. I am setting three more out here for your perusal.

One of these is an older recipe. Date Loaf, from my mother-in-law's cookbook. Her cookbook wasn't used as a cookbook for the recipes it came with, but instead was used for all of her recipes scribbled in any margin, inside covers, and any open spot. Other recipes, clipped from newspapers or magazines, were stapled in. But nowhere could I see that an actual recipe from the book itself was used, altered or notated in any way. Her Date Loaf, or Date Nut Loaf (just add nuts!) was one of these, noted in a margin somewhere. 

Date Loaf


Makes two 4 x 8 or 5 x 9-inch loaves
Dates, dessert loaf, recipe
Date Loaf


1¼ cups chopped, pitted dates
1½ cups water
1 tablespoon butter
1 teaspoon vanilla
1 egg
1½ cups sugar
2¼ cups all-purpose flour
1 teaspoon baking soda
1 teaspoon baking powder
½ teaspoon salt

In medium saucepan, place dates, water and butter and bring to a boil. Allow to simmer for about 5 minutes, until dates are softened. Remove from heat; stir in vanilla, set aside to cool.

Preheat oven to 350 degrees. Once date mixture has cooled, add in the egg and sugar and stir well to combine. In a mixing bowl, sift or whisk together dry ingredients and then stir into the date mixture until well combined. Do not over beat. Pour into 2 greased and floured loaf pans and bake for approximately 1 hour, or until a toothpick inserted in center comes out clean.

Allow to rest in pans for about 7 - 10 minutes before turning out on racks to cool completely.


NOTE: To add nuts, fold in 1 cup of nuts after combining wet and dry ingredients together. 

~~~~~~~~~~~~~~~~~~~~~ 

The Apple Butter Quick Bread came about as I had made Apple Butter, and then wondered if there was another way to use it. I came up with this recipe and it was truly wonderful. If you end up with a glut of apple butter, here is one way to put some to very good use.


Apple Butter Quick Bread


Makes 1 loaf (about 5 x 9-inches)
Apple Butter, Quick Bread, dessert loaf
Apple Butter Quick Bread


4 tablespoons unsalted butter, melted
1 cup apple butter
2 eggs
1 cup brown sugar
1 teaspoon cinnamon
1 teaspoon allspice
½ teaspoon cloves
2 cups all-purpose flour
1 teaspoon baking soda
½ teaspoon baking powder
½ teaspoon salt
½ cup raisins, optional
1 cup broken walnuts or pecans, optional

Preheat oven to 350 degrees. Line a loaf pan with 2 pieces of parchment paper, crossing them so the paper comes up the sides. Spray the parchment with cooking spray; set aside.

In a mixing bowl pour in the melted butter and apple butter, stirring to combine. Whisk in the eggs, one at a time, until well incorporated.

In a separate bowl whisk together the brown sugar and spices. Whisk this mixture into the apple butter mixture. In the same bowl (now empty) from the brown sugar, whisk together the flour, baking soda, baking powder and salt. Stir into the apple butter mixture until almost completely incorporated. Add the raisins and nuts if using and finish mixing in the flour mixture. Pour the batter into the prepared loaf pan and bake for 55 - 65 minutes, or until a tester inserted in the center comes out clean. Allow to cool 10 minutes, then turn out onto a rack to finish cooling.

NOTES: Due to recent difficulties with getting my dessert loaves to come out of the loaf pans whole (as with the Lavender Nut Tea Bread, or the Zucchini Tea Bread, both below), I am now using parchment lined pans. This loaf came out cleanly and perfectly. 

 
~~~~~~~~~~~~~~~~~~~

This last quick dessert loaf is sweet - sweeter than normal. It is a riff on my Apple Fritter Loaf, but done with peaches. I tried this first with my Spiced Pickled Peaches, but forgot to add the eggs to the recipe. 😒  While it tasted great, it sunk in the center and was anything but pretty as a picture. So, I made it once more, this time using peaches in heavy syrup from a can, being more readily accessible to most people.

Just Peachy Loaf

Peaches, dessert leaf, recipe
Just Peachy Loaf

Makes one 4 x 8 or 5 x 9-inch loaf

CAKE:
1½ cups all-purpose flour
1½ teaspoons baking powder
½ teaspoon baking soda
½ teaspoon salt
½ teaspoon cinnamon
½ teaspoon allspice
½ cup unsalted butter, room temperature
¾ cup sugar
2 large eggs
1 cup sour cream
1½ teaspoons vanilla extract
½ cup pecans, chopped
1½ cups peaches in heavy syrup, drained, chopped

SUGAR TOPPING:
¼ cup brown sugar
½ teaspoon cinnamon
½ teaspoon allspice

GLAZE:
½ cup confectioner's sugar
½ teaspoon vanilla
water, to make glaze consistency

Preheat oven to 350 degrees. Grease and flour a loaf pan, or line it with parchment and spray the parchment. Set aside. In a small bowl, combine the Sugar Topping ingredients and set aside.

Make the Cake: In a bowl, whisk together the first 6 ingredients and set aside. In a mixing bowl, cream together the butter and ¾ cup sugar until light and fluffy. Add in the eggs, one at a time, beating until thoroughly combined before adding the next. Stir together the sour cream and vanilla, then fold in, alternating with the reserved dry ingredients. Once completely combined, pour half the mixture into the prepared loaf pan. Top with half the peaches and nuts, then sprinkle on half the Sugar Topping. Carefully place the remainder of the batter over top, then repeat the topping with remaining nuts and peaches, then the Sugar Topping. Using a knife, run a figure -8 pattern through the loaf, but do not over mix.

While loaf is baking, make the glaze. Combine the confectioner's sugar and vanilla, then drizzle in milk or water to make a medium pouring consistency.

Bake the loaf for 50 to 60 minutes, or until the loaf tests clean when inserting a toothpick down the center. Set the pan to cool on a rack. Pour over top half of the Glaze. Set the loaf aside to cool in the pan for 10 minutes, then remove from the pan and continue to cool on the rack. Once cooled, drizzle on the remaining Glaze and allow to dry.

NOTES: If perchance you have in your kitchen some peach flavoring and / or caramel flavorings, these can be substituted for the vanilla, or use each of the three in equal amounts.


My passion is teaching people how to create a harmony of flavors with their cooking, and passing along my love and joy of food, both simple or exotic, plain or fancy. I continue my journey in ethnic and domestic cuisines, continuing my journey to explore diverse culinary experiences and hopefully to start you on a journey of your own. Join me also at A Harmony of Flavors on Facebook, and Pinterest.

Saturday, September 28, 2019

Hurray for Apple Dumplings

In my family, while growing up, when Mom made Apple Dumplings they were our supper, not a dessert. I guess Mom and Dad felt the sheer volume of calories and such were worthy of consideration as a "meal." For me, that was never enough. I have mentioned my sweet tooth in past, but it is still going as strongly today as I am approaching age 70 as it did at age 10. Mom made enough that we all had one. Possibly, Dad was allowed two, though I am not certain. But I always wished there were more, because they were one of my favorite of many favorite desserts.

These days, I know how much time it takes to prepare them, and just how far they (don't) go. I can certainly sympathize with Mom's efforts to feed a big family. But, I don't think there has ever been a time when I didn't wish for more than there were. These days, if I don't keep a close eye out, my husband will just polish off the whole of the remaining dumplings in the pan. Horrors! Because that means I won't get another one!

Apple Dumplings, dessert, recipe
Apple Dumplings

Okay, I might be exaggerating. A little. Well, a teensy bit, maybe. But I just love Apple Dumplings. 

Rice Pudding

Coconut Milk, Saffron, Rice Pudding, dessert
Coconut Milk and Saffron Rice Pudding
There are other things Mom made for us, that still, to this day, I crave and make. I recall Mom making rice pudding from leftover "Minute Rice." She used tapioca for the thickening. I love rice, and I love rice pudding. I do not use "Minute Rice," but when I have leftover rice (usually made with saffron in it) I make rice pudding. For myself only, as my husband is not at all fond of plain rice, and something about rice pudding (despite the fact that he has a sweet tooth nearly as big as mine) is a no-no for him. So, I do not have to share, when I make rice pudding. I do, however, have to make sure there is something else that he will eat, for dessert. 

To make my version of her rice pudding, Combine about 2½ to 3 cups of milk (or substitute a can of coconut milk, adding enough water to make the amount of liquid needed) in a medium saucepan with 3 tablespoons of minute tapioca and ½ cup of sugar. Let stand for a few minutes, then stir and combine with 2½ cups of leftover rice. Bring the mixture to boil, stirring and once boiling, reduce to simmer and cook for about 5 minutes, stirring constantly. Remove from heat and cool. Optional is adding in raisins, or cinnamon, or cinnamon stick while cooking. Add in vanilla, if desired, once off heat.

Potato Pancakes

Potato Pancakes, snack, lunch
Potato Pancakes
Mom also made what she called "Potato Pancakes," when she had leftover mashed potatoes. They were more like a freshly hand-patted corn tortilla in texture and style. Certainly they bore no resemblance to what is termed "Potato Pancakes" in restaurants. These were made and to me, were a most particularly special treat for lunchtime next day. As we grew older, my sisters and I would beg Mom to make lots of extra mashed potatoes, so we could have Potato Pancakes for lunch next day. And preferably, more than just a couple! She served these to us first just sprinkled with salt. Then as "dessert" a second with jam spread in the center and rolled up. Yum!

But Apple Dumplings? Oh me, oh my!


Apple Dumplings, dessert, recipe
Apple Dumplings

Apple Dumplings


Makes 6 Dumplings

SYRUP:
1½ cups water
1½ cups granulated sugar
1 - 2 teaspoons ground cinnamon
½ teaspoon ground nutmeg (freshly grated is best)
2 tablespoons unsalted butter

DUMPLINGS:
pie dough recipe for double crust pie
6 medium sized baking apples, pared, cored
¼ cup granulated sugar
1 teaspoon cinnamon
½ teaspoon ground nutmeg
1 tablespoon unsalted butter, cut in 6 pieces 


For the syrup: In a medium saucepan, combine the water, sugar, cinnamon and nutmeg and bring to a boil, ensuring the sugar is dissolved completely. Add the butter and set aside.

For the dumplings:
Preheat oven to 350 degrees. Roll out the pie pastry as for pie, keeping it in a relatively rectangular shape. Cut the pastry into six (7 to 8-inch) squares. Set one apple onto each square. 
how to, step by step 
In a small bowl, combine the ¼ cup granulated sugar, teaspoon of cinnamon and ½ teaspoon nutmeg, tossing well to evenly distribute the spices. Using a small spoon, place about 2 to 3 teaspoons of the cinnamon/sugar/nutmeg mixture into each core of the apples. Place one small pat of butter on top of the sugar mixture in each core. Have a small bowl of water at hand. Bring one corner of the pastry to the top of the apple (I usually start with a corner that may not be quite perfect). Dampen the top, then bring up the next corner of the dough and press into place. Repeat with the last two corners of the dough. Repeat this for the remaining 5 apples. If desired, cut little leaves out of the dough scraps and dampen the backs to adhere and decorate the tops of each dumpling. Set the dumplings, preferably not touching, into a 13 x 9 x 2-inch baking dish. Pour the syrup over all. 

Bake the dumplings for approximately 45 minutes, or until the apples are tender and the pastry is golden. Serve the dumplings warm or cold, plain, with milk or cream, or with vanilla ice cream.


My passion is teaching people how to create a harmony of flavors with their cooking, and passing along my love and joy of food, both simple or exotic, plain or fancy. I continue my journey in ethnic and domestic cuisines, continuing my journey to explore diverse culinary experiences and hopefully to start you on a journey of your own. Join me also at A Harmony of Flavors on Facebook, and Pinterest.

Saturday, June 2, 2018

Sweet Potatoes and Cornmeal

I know that these two ingredients sound like there should be a savory outcome, though that wasn't my idea. And, for once, it appeared to be a pretty novel idea. 

Most of the time, when I sit thinking about what I would like to try, despite how unusual the combinations may seem in my mind, I will find on hunting online that it is not a new idea at all, but one that hundreds of people have already done before. This just says to me that the combination is a sound one, and reinforces my belief that there is really nothing new at all. 
Sweet Potato, Cornmeal, Cake, pound cake, dessert
Sweet Potato Cornmeal Cake

Tweaking an existing recipe can result in something totally new. Sometimes new is better, but sometimes not. That is what experimentation is all about. It is rare for me to make a recipe just "as is." I can't help myself. The reason is often simply just that maybe an ingredient doesn't appeal and I take flavors into a different direction. In this particular case, there was only one recipe I could find for a cake made with sweet potato and cornmeal. It seemed unusually long and complex, with too many tiny amounts of things I don't keep on hand, like a tablespoon each of apple juice and orange juice. 

One tablespoon. 

Each. 

Really? 

Anyway, when I first gave thought to sweet potato and cornmeal together in a cake, I knew:
  1. I wanted it to be a tube cake
  2. I wanted about half and half cornmeal and all-purpose flour
  3. It would be a heavy cake, sort of pound cake style
  4. I thought of using a glaze instead of other icing
When looking at ingredients in some other cakes of this type, a lot of oil is used. I know whether it is butter or oil, it is fat. I first went with the idea of using olive oil, but then switched to coconut oil when I thought of using coconut milk for the liquid and orange extract for the flavoring. I felt that orange and coconut would be a nice combo. I did lower the amount of oil and used applesauce for part of it, to conserve a few calories (but who am I kidding?). I thought of whether to use 3 or 4 eggs, finally going with four, since it is a heavy cake. How much sweet potato? I had two of them, and weighed them before peeling. They came to just barely over one pound. I peeled them and cooked them in salted water, drained them and put them through a ricer (though mashed would have been fine), and measured out 1½ cups. There was just a little left, which I ate for lunch.😀 

Sweet Potato Cornmeal Cake
Something else that occurred to me, going with a somewhat tropical theme (coconut oil, coconut milk and orange extract) was using fresh ginger. I've never used fresh ginger in a sweet application, though I use it all the time in savory. Why is that? So I got out my ginger root. 

The idea of a glaze - didn't quite go as well as I had wanted, because I thought the glaze would penetrate the cake more than it did. In the pan, hot from the oven, while some glaze did penetrate, it left the top of the cake so sticky that once it came out of the pan and onto the plate slightly off center - there was no budging it! It was there to stay. Since I had glaze left, I drizzled it over the partially cooled cake, and it looked far prettier.

All in all, the ingredients came together easily, the cake baked perfectly, came out of the pan just right. But then, I had some sort of stomach flu all day yesterday, so I could not even think of tasting it. 😨 My husband was happy though, and that is always good! Today I gave it a taste, and I am happy as well. It has a very pronounced flavor of cornmeal. I love cornmeal, and that is why I wanted to use it half and half with the flour. If you cannot think about "cornmeal" and "sweet," in the same sentence, then this cake would not be for you. For myself, I am very pleased with it.

Sweet Potato Cornmeal Cake


Makes one 10-inch tube cake
Sweet Potato, Cornmeal, Cake, dessert, pound cake
Sweet Potato Cornmeal Cake

¾ - 1 pound sweet potatoes
1½ cups granulated sugar
½ cup coconut oil or vegetable oil
½ cup applesauce (or another half cup of coconut oil)
1 cup unsweetened coconut milk
2 tablespoons finely grated fresh ginger
1½ teaspoons orange extract
1½ teaspoons vanilla extract
4 large eggs
-----
1½ cups yellow cornmeal
1½ cups all-purpose flour
1 teaspoon baking powder
1 teaspoon baking soda
1 teaspoon salt

GLAZE:
¾ cup granulated sugar
2 tablespoons cane or corn syrup
⅓ cup buttermilk
¼ teaspoon baking soda

Peel the sweet potatoes and cut into 1½-inch chunks. Place the sweet potato chunks in a small pan and just barely cover with water. Add a teaspoon of salt and bring to boil. Lower heat and cook until easily pierced with a knife. Drain the sweet potatoes, then mash or rice. Measure out 1½ cups of the puree and place into a mixing bowl. 

Preheat oven to 350 degrees. With cooking spray, grease a 10-inch tube pan, then sprinkle with flour to coat well. Set aside.

In a bowl, combine the cornmeal, flour, baking powder, baking soda and salt. Stir together well and set aside.

To the sweet potatoes, add in the sugar, coconut oil, applesauce, coconut milk, ginger and extracts and stir well to blend. Add in the eggs, one at a time, stirring to completely incorporate before adding the next.

Stir in the dry ingredients a third at a time, allowing all the flour to be mixed in before adding in the next third. Once all the ingredients are mixed, pour the batter into the prepared tube pan. Place the pan in the oven and bake for approximately 55 minutes, or until a tester inserted into the center comes out mostly clean. Let the cake cool in the pan for about 15 minutes, then turn out onto a rack or a plate and drizzle with the glaze. 

GLAZE:  Before the cake is done baking, make the glaze. Stir together the granulated sugar with the cane (or corn) syrup and buttermilk to combine. Bring the mixture to boil, then lower the heat and add the ¼ teaspoon baking soda. Simmer the mixture, stirring occasionally, for about 5 or 6 minutes. Let cool slightly before using to glaze the cake.


My passion is teaching people how to create a harmony of flavors with their cooking, and passing along my love and joy of food, both simple or exotic, plain or fancy. I continue my journey in ethnic and domestic cuisines, continuing my journey to explore diverse culinary experiences and hopefully to start you on a journey of your own. Join me also at A Harmony of Flavors on Facebook, and Pinterest.

Thursday, March 15, 2018

An Amazing Carrot Cake

Carrot Cake,  Recipe, dessert, cake,
Carrot Cake


I have seen many carrot cake recipes quite similar to mine, but I have been making my version of Carrot Cake for about 35 years, so I have had lots of practice, despite forgetting to ever put it here in my blog! What I hadn't done is take proper photos of it. I did get some photos the last time I made it, but I am still not happy with them, though they will have to do.

I have made very simple carrot cakes, which have been very good. And then this one, which ticks everyone's boxes, has all sorts of good things in it. I cannot begin to say how delightful and moist this cake is, so I will just proceed to giving out the recipe, and let things go at that!

Carrot Cake

Carrot Cake, cake, dessert, recipe
Carrot Cake

Makes one 2-layer 9-inch cake, or one 13 x 9-inch cake

2 cups flour
2 teaspoons baking soda
2 teaspoons cinnamon
½ teaspoon salt
¾ cup melted butter or coconut oil
¾ cup buttermilk
3 eggs
2 cups granulated sugar 
2 carrots, finely grated
⅔ cup pecans, chopped
⅔ cup drained, crushed pineapple
⅔ cup shredded coconut

Preheat oven to 350 degrees. Grease two 8 or 9-inch cake pans and line bottoms with parchment. Grease the parchment. (Or, simply grease a 13 x 9-inch baking dish).

Sift together the first four ingredients and set aside. In another bowl, combine the melted butter or oil with the buttermilk, eggs, sugar, grated carrots, pecans, pineapple and coconut. Thoroughly mix together these ingredients and then add in the dry ingredients, stirring until no white remains. Divide the batter evenly between the round tins, or pour all the batter into the 13 x 9-inch pan. Bake the round pans for about 30 to 35 minutes, or until a tester inserted in the center has just a crumb or two clinging to the tester. If baking in a 13 x 9-inch pan, bake for about 40 to 45 minutes. 

This cake is absolutely perfect with Cream Cheese Frosting


My passion is teaching people how to create a harmony of flavors with their cooking, and passing along my love and joy of food, both simple or exotic, plain or fancy. I continue my journey in ethnic and domestic cuisines, continuing my journey to explore diverse culinary experiences and hopefully to start you on a journey of your own. Join me also at A Harmony of Flavors on Facebook, and Pinterest.

Tuesday, February 20, 2018

Method to my Gelatin Madness

I wrote my previous blog after using sheet gelatin for the first time, with its attendant "how to substitute" problems popping up like moles in the "Whac-a-Mole" arcade game! I tell you, it was no easy task to calculate. I could wish, fervently, that it would be more standardized. But alas...

The reason for all this gelatin frenzy

I got an idea into my head. I wanted to try making a White Chocolate Mousse that was easy. My Chocolate Mousse recipe is as easy as recipes come, and it is the creamiest mousse, ever. If you love chocolate and a good, creamy mouthfeel, then look no further. But since white chocolate does not come in an equivalent unsweetened powder like unsweetened cocoa powder, there comes the consideration of having to melt the white chocolate. When to add it in? And how much gelatin to use? 
White Chocolate, Mousse, Tarts, dessert
White Chocolate Mousse Tarts

And then, I remembered that I had bought sheet gelatin, and that is when all my gelatin questions arose. Believe you me, it was a real process, and this old brain of mine was stumped for quite a while, trying to figure out the equivalent for powdered gelatin. Since there is no straight and direct substitute, being that there are four grades of gelatin (see my "All You Need to Know About Gelatin" blog), with similar, but not exact gelling power, none of these are a direct swap for a packet of powdered gelatin. Woe is me!😧 And even after all my calculations and cogitations, I still am having fits with adjusting a recipe.

However, I will gamely forge ahead with the two recipes I made, and hope you might be able to have yours come out at least as well as mine did. Which was pretty near perfect. 

A note on using Frangelico. I chose Frangelico to give flavor to the mousse. I intended to use Grand Marnier, but had none in my cabinet. Any light colored liqueur will work fine. Just do not use too much liqueur in the recipe, as alcohol can inhibit gelling properties of the gelatin.

Recipe One

Wilton, 12-cavity, nonstick, mini tart pan
Wilton 12-cavity nonstick mini tart pan

My first recipe came after having made some individual Cherry Custard Tarts for a Valentine treat. They came out very nicely, except that the custard was just not totally set. Fine for individual tarts, but if you were to substitute the individual tart tins for one larger tin, the custard would just have oozed all over. A slice would not have worked. What could I make as a substitute?

Here is where I thought of a White Chocolate Mousse, and where all the gelatin frenzy began. First though, I opted to make little tart shells to fill with the White Chocolate Mousse. I had just bought a couple of fluted tart tins. I made a pastry and lined the tins, blind baking them.
 
pie dough, tart wells, prick dough, blind bake
Line tart wells - prick dough all over - blind bake shells

Ultimately, it must have been dumb luck, because my first recipe for White Chocolate Mousse came out so perfectly that I could have cried. And I almost did! It was excellent. Perfect flavor. Perfect texture. However, my calculations for the amounts were off, and I had about ⅓ more mousse than I needed. Still, the mousse would have been just perfect set into a 9-inch tart shell and topped with fruit.

My first White Chocolate Mousse recipe:


(Would probably have filled 36 mini tart wells) 
leftover mousse, shot glasses, tiny dessert
The extra mousse in little shot glasses

1½ sheets Platinum gelatin (2.55 grams)
3 tablespoons cold water
3 tablespoons Frangelico liqueur (or use cold water)
8 ounces white chocolate, in small chunks
1¼ cups heavy whipping cream
1¼ teaspoons vanilla extract
¼ cup mascarpone cream

Soak the gelatin sheets in cold water to completely cover and allow to "bloom" for 7 to 10 minutes. Meanwhile, place the white chocolate pieces into the top pan of a double boiler set over (not touching) simmering water. Allow the chocolate to melt, slowly, stirring often. In a small saucepan, heat the 3 tablespoons of water and the 3 tablespoons of Frangelico (or just use 6 tablespoons water) and bring to a simmer. Lift out the gelatin sheets from their water and gently squeeze off any excess water, then add these sheets to the small saucepan, stirring, off the heat, until totally dissolved. Pour this gelatin mixture into the melted white chocolate. Stir or whisk, combining the two mixtures, then once all is incorporated, set the pan aside to come to room temperature. 

In a large mixing bowl, Beat the heavy cream with the vanilla, until soft peaks form. Add in the mascarpone, then beat to evenly distribute, and until the mixture holds stiff peaks. Pour the white chocolate mixture all around the outer edge of the whipped cream, then fold it in, until no streaks remain. At this point, the mixture is of soft piping consistency. Pipe into little tart shells or small glasses or bowls. Refrigerate for 5 to 8 hours.

I topped the tarts (and these little shot glasses full) with a half maraschino cherry and crushed pistachios.
~~~~~~~~~~~~~~~~~~~~~~~~~~~~~~~

A couple of days passed. I sat with my recipe and tried to come up with a recipe that would be approximately ⅓ less the amount of this first recipe. Many of the ingredients immediately lent themselves to ⅓-less, such as 3 tablespoons Frangelico to 2 tablespoons. One and one-half Platinum gelatin sheets were reduced to 1 Platinum sheet. I went from 8 ounces white chocolate to 6 ounces. Not quite ⅓ less, but close. I dropped the 1¼ cups of heavy cream to ¾ cup, but kept the mascarpone amount the same. This reduced the initial 1½ cups of cream (1¼ cups heavy cream + ¼ cup mascarpone) down to 1 cup (¾ cup heavy cream + ¼ cup mascarpone). All in all, it seemed great.

I went about making it the same as before. But this time, once I added the Frangelico/gelatin mixture to the white chocolate, it started trying to thicken immediately. I was afraid to leave it to cool down for long, so I immediately began whipping the heavy cream, then added in the mascarpone and then folded in the white chocolate and gelatin mixture. It was already setting. I did pipe it into cups again, but it was visibly not the simple, creamy mixture the first recipe yielded. Not to say it was set and rubbery. It was still smooth and creamy. It just didn't have the lovely smooth LOOK of the first one. Flavor? The same. Texture while eating? Smooth and silky. Ultimately? No big deal. Just work quickly!

White Chocolate Mini Tarts 

Makes 24 fluted 2-inch tarts, or one 9-inch tart*
White Chocolate, Mini Tarts, dessert, recipe
White Chocolate Mini Tarts


PASTRY:
½ cup unsalted butter (1 stick / 4 ounces)
6 ounces cream cheese 
2 cups all-purpose flour

MOUSSE:
1 sheet (1.7 grams) Platinum gelatin
2 tablespoons water
2 tablespoons Frangelico 
6 ounces white chocolate, in chunks
¾ cup heavy cream
1 teaspoon vanilla extract
¼ cup mascarpone cheese

Preheat oven to375 degrees. Cut together the first three ingredients for the pastry, until it comes together in a ball. Roll and cut out 3-inch rounds and fit them into the wells of mini tart tins. Alternately, fit the pastry into a 9-inch tart pan with removable bottom. Prick the shells all over with a fork. Bake the shell(s) for about 10 to 12 minutes, or until nicely golden. *If using a larger tart tin, Line the shell with foil, then with some beans or rice. Bake initially for 12 minutes, then remove the foil and beans and bake for another 12 to 15 minutes, until the bottom in nicely golden. Set aside to cool completely.

Place the gelatin sheet into a bowl. Break in half if needed. Pour about 1 to 1½ cups of cold water over the sheets and allow to fully hydrate, or "bloom," for at least 7 to 10 minutes.

Bring a pan of water to a simmer and place another pan over this hot water (a double boiler, or makeshift, using a bowl over hot water). Add the white chocolate bits to the upper pan and allow to melt.
White chocolate, folding, whipped cream, piping in shells
White chocolate mixture - folding into whipped cream - piped into shells

Set the 2 tablespoons water and two tablespoons Frangelico into a small saucepan and bring to a simmer. Lift the gelatin sheets out of the soaking water, squeeze gently to remove excess water, then add them to the hot liquids in the saucepan. Stir to completely dissolve. Add this mixture to the melted white chocolate and stir to completely combine, using a whisk if needed. Remove the pan from the heat and set aside.

Ateco, large open star tip, 829
Ateco large open star
 tip 829
In a large bowl, beat the heavy cream and vanilla extract with a hand mixer until soft peaks form. Add in the mascarpone, beating until the mixture is combines and holds stiff peaks. Pour the white chocolate mixture all around the edges of the whipped cream. Gently fold the mixtures together until no streaks remain. Pipe into the mini tart shells using a star tip (I used Ateco 829), or just spoon in small amounts. 

If filling a 9-inch tart shell, pour in the mixture and smooth the top.

Adorn with fresh fruit, or maraschino cherries, and chopped nuts if desired. 


My passion is teaching people how to create a harmony of flavors with their cooking, and passing along my love and joy of food, both simple or exotic, plain or fancy. I continue my journey in ethnic and domestic cuisines, continuing my journey to explore diverse culinary experiences and hopefully to start you on a journey of your own. Join me also at A Harmony of Flavors on Facebook, and Pinterest.

Disqus