Translate

Showing posts with label cake. Show all posts

Friday, January 14, 2022

Delightful Bundt Cake with Bourbon Spiked Drizzle

I started out with nothing particular in mind one day, looking at dessert recipes. I think of all desserts to make, cakes are possibly my favorite. Anything from a simple old fashioned coffeecake tosheet cake to decorated cakes and bundt or ring mold cakes. Suddenly I came upon a site with a recipe called Gingerbread Bundt Cake with Cinnamon Rum Icing. I love gingerbread - it is a kind of cake / dessert bread cross, after all. The pictures on the site are just lovely. The mold used for the Bundt cake was exceptionally pretty, though I don't own that particular style. And I thought about it a while and wondered, "The recipe calls for applesauce. I wonder how pumpkin would do in the recipe, instead?

Bundt cake, pumpkin, gingerbread, dessert
Pumpkin Gingerbread Bundt Cake with Bourbon Spice Glaze
As I continued to peruse the recipe, I noticed that it is made a bit differently than any other cake recipe I've ever made. It called for melting butter, setting side to cool slightly, then beating together the sugar and eggs till fluffy and light. What? And then adding in the melted, cooled butter. Okay, so I went ahead with all this and made the cake with my own variations. I made the icing with Bourbon rather than rum as I have become interested in Bourbon of late.

The outcome was the finest grained cake, the most tender, and just flat-out delicious, that I had to share. The link above to the original recipe will show how it was. I loved the mix of Pumpkin and Gingerbread flavors. The drizzle icing was amazing. And here is the recipe, as I made it:


Pumpkin Gingerbread Bundt Cake with Bourbon Spice Glaze


Makes one bundt cake

200 grams unsalted butter, melted and cooled slightly
4 large eggs
360 grams sugar (about 1⅔ cup)
-----
360 grams all-purpose flour (about 2½ cups)
1½ teaspoons baking soda
¼ teaspoon flaky salt
1 tablespoon cinnamon
1 tablespoon ginger
1½ teaspoon cloves
-----
1 cup sour cream
1 cup canned pumpkin (not pumpkin pie filling)

Preheat oven to 350 degrees. Brush a Bundt pan with soft (not melted) butter and dredge with flour. Tap to release excess flour, then set pan aside.

Over low heat, melt the unsalted butter; once melted set aside. In a mixer, beat together the eggs with the sugar until they are light and fluffy, then slowly stir in the slightly cooled butter.

Separately, measure out all the dry ingredients and stir to evenly distribute ingredients. In a measure, stir together the sour cream and pumpkin to combine.

To the egg mixture add about a third of the dry ingredients, mixing on low speed to combine. Add half the pumpkin mixture and mix, then another third dry mixture, the remaining half pumpkin mixture, then the remaining dry ingredients, stirring after each addition. Pour into the prepared Bundt pan, rapping sharply on a hard surface to release bubbles.  

Bake the cake for 50 to 55 minutes, or until a tester inserted in the center comes out clean. Rest on a wire rack to cool for 10 minutes in the pan, turn out onto the rack to cool completely before glazing.

BOURBON SPICE GLAZE:
180 grams / 1¼ cup confectioner's sugar
1 - 2 tablespoons Bourbon
1 - 2 tablespoons milk or water
¼ teaspoon cinnamon
1 teaspoon fresh orange zest

Stir all ingredients until smooth. Pour over completely cooled cake.


My passion is teaching people how to create a harmony of flavors with their cooking, and passing along my love and joy of food, both simple or exotic, plain or fancy. I continue my journey in ethnic and domestic cuisines, trying new things weekly. I would love to hear from you, to help me continue my journey to explore diverse culinary experiences and hopefully to start you on a journey of your own. Join me also at A Harmony of Flavors on Facebook, and Pinterest.

Tuesday, January 22, 2019

Ideas for that Special Someone

It seems the holidays just passed, and now it's time to gear up for Valentine's Day. If you want to make something really special for your Valentine, or for your family, expressing your love and appreciation, here are a couple of ideas for you. 

Flourless cake, Chocolate, Torte, Strawberry Buttercream
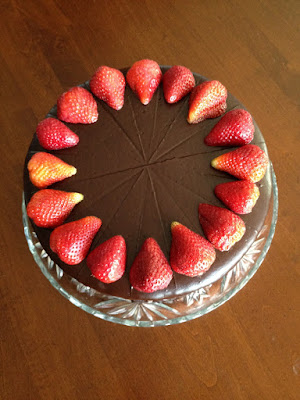
Flourless Chocolate Torte with Strawberry Buttercream

The cake is flourless, and uses finely ground nuts to give it body. I have made this cake many times before, and it is the most decadent cake I have ever had. It may take a little time to make, assemble and chill, but the cake layers can be made ahead of time and refrigerated for a couple of days or frozen for up to 3 weeks if needed, and gotten out when the time comes for assembly. 

Either cake can be made this way. Both are best if kept refrigerated, as slicing is far easier. The first cake is the original I used, and the second is the one I made into the Chocolate Hazelnut Cake with Chocolate Hazelnut Mousse Filling.


Flourless Chocolate Torte with Strawberry Buttercream


Makes one (4-layer) 9-inch torte, about 16 servings
Flourless cake, Chocolate, Torte, Strawberry Buttercream
Flourless Chocolate Torte with Strawberry Buttercream

CAKE:
¾ cup unsalted butter
2 cups granulated sugar
8 eggs
2 teaspoons vanilla
¼ teaspoon salt
12 ounces bittersweet chocolate, melted
3½ cups pecans, finely ground

STRAWBERRY BUTTERCREAM FILLING:
2½ sticks unsalted butter, softened
2 cups confectioners' sugar, sifted
½ cup fresh strawberries, pureed
3 tablespoons strawberry preserves

CHOCOLATE GLAZE:
3 ounces semisweet chocolate
½ cup water
6 tablespoons unsalted butter
3 tablespoons safflower oil
¾ cup cocoa powder, unsweetened
½ cup plus 2 tablespoons granulated sugar

FOR DECORATION:
8 whole strawberries of equal size, cut in half lengthwise
 

Preheat oven to 375 degrees. Butter four 9-inch round pans. Line the bottoms with parchment; butter parchment.

Cream butter till light. Add sugar; beat until light and fluffy. Beat in eggs, one at a time. Add vanilla and salt. Using a rubber spatula, stir in the chocolate and then the pecans. Divide the batter between the four prepared pans. Bake until a tester inserted in the center comes out fudgy, but not wet, about 22 minutes. Tops may crack. (If you do not have four 9-inch pans, bake two layers, turn out onto racks, wash and re-use the pans for the other two layers).

Cool in the pans on a rack for 5 minutes. Run a knife around the edges of the pans. Invert cakes onto a rack to cool. Remove and discard parchment. The cake layers can be made up to 2 days in advance. Wrap each layer separately in plastic wrap and refrigerate.

PREPARE STRAWBERRY BUTTERCREAM: Using an electric mixer, cream butter and confectioner's sugar till light and fluffy. Add in pureed berries and preserves. This can be prepared in advance and covered and refrigerated. To use, soften at room temperature until spreadable.

Arrange 1 cake layer, bottom side up, on a 9-inch cardboard round, if possible. If no cardboard round is available, place cake on a cake plate, sliding strips of waxed paper under the edges of the cake to keep the plate neat while glazing. Spread
cup of the buttercream over the layer. Top with another cake layer and repeat. Do this once more, and then top with the last cake layer, bottom side up. Pat layers to make them even. Cover and refrigerate at least 6 hours. If necessary, cut the edges of the cake with a serrated knife to make them even.

PREPARE CHOCOLATE GLAZE: Heat the chocolate with the water, butter and safflower oil in the top of a double boiler over gently simmering water till chocolate melts. Remove from heat and add the cocoa powder and the ½ cup plus 2 tablespoons sugar and stir until sugar dissolves and the glaze is smooth. Let cool until thickened, but pourable. Can be prepared one day ahead and refrigerated. Bring to room temperature to use.

If the cake was placed on a cardboard cake round, place on a rack with waxed paper beneath to catch drippings. If not on cardboard, place strips of waxed paper under cake edges before glazing. Pour the glaze over the cake, smoothing over sides and top. Discard waxed paper strips, if used.

Cake can be prepared to this point one day in advance and refrigerated. Remove from fridge and let stand at room temperature for one hour before serving. When ready to serve, top the cake with 14 to 16 strawberry halves, placed with pointy ends toward center. Each slice should have one strawberry half on top.
 

~~~~~~~~~~~~~~~~~~~~~~~~~~~~~~~~~~~~

I made this second cake many years ago, for my son and his wife, at that time. The cake was their idea, and I made their idea come to life. They were huge fans of chocolate and hazelnut, so everything was to be chocolate and hazelnut flavors. I already had a most amazing cake recipe, so I adapted it to work with hazelnuts rather than pecans. I made a chocolate and hazelnut mousse to put between the layers, and a chocolate ganache, flavored with Frangelico to pour over the finished cake. 

The one problem I ran into was the assembly. I wanted to assemble the cake in a spring-form pan, while it set, and then remove the rim. However, while I used 8-inch cake pans to make the cake, it is not easy to find an 8-inch spring-form pan. If it says it is 8-inch, in actuality, it is 8½-inch. I had to special order the spring-form. Ultimately though, I feel that the spring-form rather ruined the look, as the mousse ran into the edges anyway. But, it was fabulous. It was beautiful. It was absolutely decadent. It was delicious. What more can one ask?

flourless cake, Chocolate, Hazelnut, Cake, Mousse Filling
Chocolate Hazelnut Cake with Chocolate Hazelnut Mousse Filling

It only made sense to use it for this application. As for the mousse, adding some hazelnut spread and Frangelico to give the right flavor, was simplicity itself. The ganache topping was also simple. 


Chocolate Hazelnut Cake with Chocolate Hazelnut Mousse Filling


Makes one (4-layer) 8-or 9-inch torte, about 12 to 16 servings

flourless cake, torte, Chocolate, Hazelnut, Cake, Mousse Filling
Chocolate Hazelnut Cake with Chocolate Hazelnut Mousse Filling
CAKE:
¾ cup unsalted butter
2 cups granulated sugar
8 eggs
2 teaspoons vanilla
¼ teaspoon salt
12 ounces bittersweet chocolate, melted
3½ cups hazelnut meal


CHOCOLATE HAZELNUT MOUSSE:
1 teaspoon unflavored gelatin
3 tablespoons cold water
½ cup chocolate hazelnut spread (Nutella)
½ cup mascarpone cream (4-ounces)
1½ cup heavy cream, very cold
2 tablespoons unsweetened cocoa powder
3 tablespoons granulated sugar
2 tablespoons Frangelico (hazelnut liqueur)


CHOCOLATE GANACHE:

¼ cup heavy cream or whipping cream

3 ounces bittersweet chocolate or ½ cup bittersweet chocolate chips 
1 tablespoon Frangelico (hazelnut liqueur)
1 tablespoon unsalted butter

CAKE: Preheat oven to 375 degrees. Butter four 8- or 9-inch round pans. Line the bottoms with parchment; butter parchment.

Cream butter till light. Add sugar; beat until light and fluffy. Beat in eggs, one at a time. Add vanilla and salt. Using a rubber spatula, stir in the chocolate and then the hazelnut meal. Divide the batter between the four prepared pans. Bake until a tester inserted in the center comes out fudgy, but not wet, about 22 minutes. Tops may crack. (If you do not have four 8-inch pans, bake two layers, turn out onto racks, wash and re-use the pans for the other two layers).

Cool in the pans on a rack for 5 minutes. Run a knife around the edges of the pans. Invert cakes onto a rack to cool. Remove and discard parchment. The cake layers can be made up to 2 days in advance. Wrap each layer separately in plastic wrap and refrigerate.


CHOCOLATE HAZELNUT MOUSSE: Sprinkle gelatin over the cold water in a small, heavy saucepan and let stand until softened, about 5 minutes. Heat gelatin mixture over low heat, stirring, just until gelatin is melted, about 2 minutes. Do not let the gelatin boil. It must only melt. Whisk in chocolate hazelnut spread until smooth. Remove from heat and set aside.

Place the gelatin and hazelnut mixture into a large bowl. In another bowl, with an electric mixer, beat together the heavy cream, cocoa powder, and sugar at low speed to combine, then increase speed to high and beat until cream just holds soft peaks. Whisk ⅓ of whipped cream into mascarpone mixture to lighten, then fold in remaining whipped cream until well combined and no white remains. Chill the mixture until it starts to hold shape.


Set one of the cake layers bottom side upwards onto a cake plate. Spread ⅓ of the mousse onto this layer evenly to the edges. Set the next layer on top, keeping sides neat and even. Spread a second ⅓ of the mousse evenly on this layer. Repeat with the third layer and the last ⅓ of the mousse and then top the cake with the last cake layer. Cover and refrigerate the cake for at least 6 hours to firm up.

MAKE THE GANACHE: In a medium saucepan, bring the ¼-cup of heavy cream and the Frangelico just to a simmer over medium heat. Do not boil, but it must be hot. Remove from the heat and add in the chocolate, stirring until completely melted and smooth, then add in the butter, in small pieces, stirring until melted. Cool the ganache to a thick but still pour-able consistency and pour over the cake, spreading to cover the top and artfully drizzle down the sides. The cake is best chilled, though the ganache will lose its shine.


My passion is teaching people how to create a harmony of flavors with their cooking, and passing along my love and joy of food, both simple or exotic, plain or fancy. I continue my journey in ethnic and domestic cuisines, continuing my journey to explore diverse culinary experiences and hopefully to start you on a journey of your own. Join me also at A Harmony of Flavors on Facebook, and Pinterest.

Friday, May 11, 2018

A Tipsy Coffee Flavored Pound Cake

Who doesn't love cake? Well, maybe some exist out there, but I certainly don't know anyone that falls into that category. We may not all agree on the flavor of said cake, but certainly there are enough types, flavors and styles to cover most everyone.
 
Coffee, Pound Cake, dessert
Tipsy Coffee Pound Cake

I love cake. I love a whole lot of kinds and flavors of cakes. White cake is very high on my own personal list, but I love so many kinds it's hard to even begin a list. Coffee is a flavor I love. I drink plenty of coffee. Before I was diagnosed with diabetes, I enjoyed coffee liqueur, along with a lot of other kinds of sweet drinks. These are not on my list anymore of things to indulge in. Cake though? I try not to overindulge, nor even make them too often. But when I do, I have a small slice each night for dessert. Just the one. Yum. So, in mentioning the liqueurs and other sweet drinks, we happen to have a cabinet full of them, and I got thinking about what to do with them. I do use things like Grand Marnier often, in recipes. Likewise with Cointreau. Orange flavored liqueurs lend themselves to so many applications. But what about coffee liqueur? I have two different brands and two bottles (how did THAT happen?) of one of them. 

So, with all this in mind, I went about creating a pound cake. I called it "Tipsy," since it does have a half-cup worth of coffee liqueur in it. It is very rich, very sweet, and oh, so delicious. It needs absolutely nothing on it. No icing, glaze, or even confectioners' sugar dusting. It is that good, all by itself. I did put a glaze over top, just so it would look pretty for my photos, but it does not need a single thing to make it the most excellent, moist and flavorful pound cake.

Tipsy Coffee Pound Cake


Serves 12 to 16
Coffee, Pound Cake, dessert, recipe, liqueur
Tipsy Coffee Pound Cake

2 cups (9.35 ounces) all-purpose flour
2 cups (9 ounces) whole grain Kamut or Spelt flour 
1 teaspoon salt
1½ cups (12 ounces) unsalted butter, at room temperature
3 cups (1.6 pounds) sugar
6 large (about 2-ounces each, shell on) whole eggs
¼ cup (2 ounces) hot water  
1½ tablespoons instant espresso powder
½ cup (4 ounces) Coffee Liqueur

Preheat oven to 300 degrees. Grease a bundt pan, or spray with cooking spray; set aside. In a bowl, whisk together the two kinds of flour and the salt; set aside. In a small bowl or measuring cup combine the hot water and espresso powder to dissolve. Once dissolved, add to the coffee liqueur and set aside.

In a stand mixer, beat the soft butter for about 2 minutes, to lighten. Gradually add in the sugar, a little at a time and beat for about 5 to 7 minutes in total, until very fluffy. Add in the eggs, one at a time, beating just until completely combined before adding the next. Add in a third of the dry ingredients on lower speed, until combined. Add in half the liquid ingredients and combine. Repeat with another third of the flour, the remaining liquids and then the last of the flour. Use a spatula to scrape up any unmixed portions in the bottom of the mixer bowl, stirring in well. Pour the batter into the prepared bundt pan, smoothing the top. Run a knife through the batter to release any large bubbles. 

Bake the cake for 1 hour and 40 minutes, or until a cake tester comes out with only a crumb or two. Let stand in the pan for 10 to 15 minutes before turning out onto a rack to cool completely.


My passion is teaching people how to create a harmony of flavors with their cooking, and passing along my love and joy of food, both simple or exotic, plain or fancy. I continue my journey in ethnic and domestic cuisines, continuing my journey to explore diverse culinary experiences and hopefully to start you on a journey of your own. Join me also at A Harmony of Flavors on Facebook, and Pinterest.
Thursday, March 15, 2018

An Amazing Carrot Cake

Carrot Cake,  Recipe, dessert, cake,
Carrot Cake


I have seen many carrot cake recipes quite similar to mine, but I have been making my version of Carrot Cake for about 35 years, so I have had lots of practice, despite forgetting to ever put it here in my blog! What I hadn't done is take proper photos of it. I did get some photos the last time I made it, but I am still not happy with them, though they will have to do.

I have made very simple carrot cakes, which have been very good. And then this one, which ticks everyone's boxes, has all sorts of good things in it. I cannot begin to say how delightful and moist this cake is, so I will just proceed to giving out the recipe, and let things go at that!

Carrot Cake

Carrot Cake, cake, dessert, recipe
Carrot Cake

Makes one 2-layer 9-inch cake, or one 13 x 9-inch cake

2 cups flour
2 teaspoons baking soda
2 teaspoons cinnamon
½ teaspoon salt
¾ cup melted butter or coconut oil
¾ cup buttermilk
3 eggs
2 cups granulated sugar 
2 carrots, finely grated
⅔ cup pecans, chopped
⅔ cup drained, crushed pineapple
⅔ cup shredded coconut

Preheat oven to 350 degrees. Grease two 8 or 9-inch cake pans and line bottoms with parchment. Grease the parchment. (Or, simply grease a 13 x 9-inch baking dish).

Sift together the first four ingredients and set aside. In another bowl, combine the melted butter or oil with the buttermilk, eggs, sugar, grated carrots, pecans, pineapple and coconut. Thoroughly mix together these ingredients and then add in the dry ingredients, stirring until no white remains. Divide the batter evenly between the round tins, or pour all the batter into the 13 x 9-inch pan. Bake the round pans for about 30 to 35 minutes, or until a tester inserted in the center has just a crumb or two clinging to the tester. If baking in a 13 x 9-inch pan, bake for about 40 to 45 minutes. 

This cake is absolutely perfect with Cream Cheese Frosting


My passion is teaching people how to create a harmony of flavors with their cooking, and passing along my love and joy of food, both simple or exotic, plain or fancy. I continue my journey in ethnic and domestic cuisines, continuing my journey to explore diverse culinary experiences and hopefully to start you on a journey of your own. Join me also at A Harmony of Flavors on Facebook, and Pinterest.

Tuesday, August 15, 2017

A Slightly Healthier Birthday Cake

My husband's birthday is actually this coming Friday, but since we had friends visiting, we celebrated it this past Sunday. Hubby's been having some pretty severe health issues of late, and we have been on a healthier eating regimen. My health is not perfect either, so we can both benefit by eating better things. I am not using anything that comes in boxes or jars. Only some few canned goods, and only if they are no-salt. Instead, we are eating lots and lots of vegetables, some of them ones my husband had never eaten, or never eaten willingly. Red meat is in far smaller portions, fish has been added in, and many new and delicious lentils are all part of our new eating plan. Salt is far less, sugar is exceedingly spare. Mainly I use a teaspoon of maple syrup or honey if something needs that little bit of sweetness.
Healthy eating, Hummingbird Cake, healthier cake

Healthier Hummingbird Cake


That also means we are not really eating anything dessert-like, except for fresh fruit. And so when we discussed what he would like for his birthday, he was adamant about wanting a cake, with icing. I hated having to introduce that much sugar and white flour into our diet again, so I started perusing the internet for healthier ways to make a cake. But when it came to the icing part - I just couldn't see any real way to accomplish it without an awful lot of sugar and butter.

The Cake

When I started looking for "healthier" cake recipes, I wasn't sure what I hoped to find. And then I came upon a recipe for Hummingbird Cake. I had never heard of Hummingbird Cake, even though I am old enough to have. It turns out that in fact, it is quite similar to my carrot cake; just substitute over-ripe bananas for the carrots in my carrot cake and the rest is really darned close. As I just looked for my carrot cake recipe, to create a link, I realize that somehow, I have never put my carrot cake recipe out here, neither on my website, nor on my blog! I have now remedied this!

For now though, I will say that my carrot cake has carrots (obviously), pineapple, coconut and nuts. The hummingbird cake is just as variable as carrot cakes, because I have seen recipes for carrot cake that have carrots, but none of the other three ingredients. And there are some that call for nuts and carrots, or pineapple and carrots, etc. It seems to be just the same with the Hummingbird Cake recipes. Some have all four ingredients (bananas, pineapple, coconut, nuts) and some have only one or two of the ingredients. I chose to go the route of all four ingredients, since all those ingredients, in and of themselves, are healthy enough ingredients.

The hard part was then trying to see how to cut back on fats, white flour, eggs, and such. After Googling 'Healthier Cake Recipes,' is when Hummingbird Cake came up, and as I read through at least 6 or 7 versions of "healthier" Hummingbird Cake, I picked and chose and came up with what felt to me the best options. It was for his birthday, after all, so flavor and texture were important. Size was far less important. I did not want a lot of cake left setting around tempting us for the next week, so I made a very small cake in two 7-inch cake pans.

I opted to use applesauce instead of some of the oil, and used coconut oil for the oil I would be using. I substituted coconut palm sugar for cane sugar. It is still sugar, I grant that. But at least it is a different source. Instead of all white all-purpose flour I substituted ⅔ whole grain Kamut flour. I used just one egg.

And guess what? It was one really delicious cake!

Healthier Hummingbird Cake


Serves about 6
Healthier cake, Hummingbird Cake, Chocolate, Sweet Potato, Icing
Healthier Hummingbird Cake
with Chocolate Sweet Potato Icing

1 cup Kamut® Khorasan whole grain flour
½ cup all-purpose flour
¾ cup coconut palm sugar
¾ teaspoon baking soda
½ teaspoon salt
½ teaspoon cinnamon
½ teaspoon nutmeg
⅓ cup chopped pecans
⅓ cup unsweetened coconut
1 egg
¼ cup unsweetened applesauce
3 tablespoons coconut oil, melted
¾ cup + 2 tablespoons mashed banana (about 3 bananas)
½ cup crushed pineapple, undrained
1 teaspoon vanilla extract

Preheat oven to 350°. Spray two 7-inch cake pans with cooking spray, line the bottoms of the pans with parchment, then spray the parchment. Set the pans aside.

In a mixing bowl, combine the first 9 dry ingredients and stir to distribute evenly. In another mixing bowl, mix together the egg, applesauce, coconut oil and banana, stirring vigorously to combine. Stir in the pineapple and vanilla and then add in the bowl of dry ingredients, stirring until no dry ingredients remain. Divide evenly between the cake pans and rap the pans sharply on the counter to settle and release trapped air bubbles. Bake the cakes in the center rack of the oven for about 20 to 22 minutes, or until a toothpick inserted in the center comes out with no more than a crumb or two. 

Let the cakes cool for 10 minutes before turning out to a rack to cool. OR, if making ahead, allow the cakes to cool completely in the pans, then cover tightly with foil or cling film, place the pans into zip-top bags and freeze for up to three weeks. Thaw thoroughly before frosting and decorating. 

The Frosting

Healthier, Hummingbird Cake, Chocolate, Sweet Potato, Icing
Healthier Hummingbird Cake
with Chocolate Sweet Potato Icing
When it came to frosting that could remotely be termed healthy, I had very little hope of something my husband, or our visiting friends would accept as "frosting." I made a test run of some paleo frosting (find the recipe here) that used soaked cashews and coconut cream as its base, with some honey and other things added for sweetness and flavor. While it is absolutely scrumptious, flavor-wise, it was just far too soft to use effectively as a frosting on a stacked cake, plus it needed to stay refrigerated to hold even the little body it had, and I had no room in the fridge for a cake!

Neither my husband nor I are terribly keen on chocolate desserts or frostings, though occasionally I have made brownies. So the next frosting recipe I found was chocolate, and I almost completely dismissed it out of hand. But then I read that it contained sweet potato, so I thought I would read further. This recipe comes straight from the site where I found it (originally from "Better Baking" by Genevieve Ko), on Food 52. I changed nothing, because there are only 2 ingredients. TWO. What?!?! Well, actually I did change one aspect. The recipe (find it here, along with a chocolate zucchini cake recipe) calls for a 15 ounce can of pureed sweet potato and 10 ounces of chocolate. The "recipe" calls for heating the sweet potato puree, removing the puree from the heat and adding in the chopped semisweet or bittersweet chocolate, stirring until the chocolate dissolves, just as for ganache. It makes the prettiest, ganache ever, and I could not detect any flavor of sweet potato, though I love them.

The only thing I did differently was to bake some sweet potatoes in the oven until very soft, removing the skins (then weighing out the 15 ounces worth) and placing them in the food processor to make a fine puree (instead of using a can). Once pureed, I added in the 10 ounces of chopped semi-sweet chocolate and processed briefly, stopping to stir often until totally melted and combined. It needs to come to room temperature before using. 

Had I used the icing right away, it would have been best, because that is when the consistency was completely glossy and ganache-like. But, I was still in the testing mode, wanting to first see how it came out, whether it would be thick enough to use on a stacked cake and of course, would it pass the taste-test!

healthier cake, hummingbird cake, chocolate, sweet potato, icing
The Aftermath
We have a great friend (my husband's best friend from school days) who is a confirmed chocoholic. He is also a confirmed dessert-aholic, and does not easily abide anything that might smack of "healthy." Of course, he also exercises fanatically in order to keep off any weight gain due to his excesses. When our friend arrived for a visit, it was just as I finished stirring together this sweet potato icing. I took a bit on a spoon and popped it into his mouth before even greeting him properly, and his first reaction was all I could have hoped for! He loved it. I asked if it was suitable icing for a birthday cake and he said "Absolutely! Positively!" I figured with that kind of endorsement, it was safe to use. 

So we celebrated my husband's 69th birthday a little early and had a most wonderful time. The cake and the icing were amazing together.  If the icing was just a little too stiff when I frosted the cake, it didn't matter. And it was well worth the little effort it took to make. Our friend's significant other brought along a Malmsey Madeira, something I'd never tried before. It said to serve with dessert, so we opened it to try with the cake. It was an amazingly delicious pairing. All was well with the world!


My passion is teaching people how to create a harmony of flavors with their cooking, and passing along my love and joy of food, both simple or exotic, plain or fancy. I continue my journey in ethnic and domestic cuisines, continuing my journey to explore diverse culinary experiences and hopefully to start you on a journey of your own. Join me also at A Harmony of Flavors on Facebook, and Pinterest.

Wednesday, February 15, 2017

Long Time Favorite Cake is Back

First off, I hope everyone enjoyed a lovely Valentine's Day. It doesn't matter if you sat at home with someone you love doing nothing at all spectacular, or whether you went out and splurged big time, or if you chose to catch up on some "me" time. The idea is that you enjoyed the day, however it was celebrated. 

My husband and I were invited out to dinner at the local Country Club by two people fast becoming very good friends. Since my husband and I generally stay at home rather than try and fight crowds, and I cook something really special for dinner, it has been about 26 years since we last braved a night out on Valentine's Day. That made yesterday's evening a true delight. As much as I love to cook, it is a tremendous joy for the cook to have a night out! I thank Ty and Ann Hanson with all my heart for having us as guests.

A night off was not in the cards for the cook at the country club, Jake Collins. He was on duty manning the kitchen, and produced a most excellent menu for a large crowd. Considering the tremendous amount of dishes that needed to be served at the same time, he made miracles happen. We know Jake from the past four years of Winefest Renaissance, benefiting the Boys and Girls Club of Aberdeen. This year marks the fifth annual Winefest Renaissance (which appears to be called "Renaissance Festival," this year), to be held on April 8th.

Fresh Apple, Pecan, Date, Cake, recipe
Fresh Apple Pecan Date Cake
So, on to the cake. This cake recipe is one that I have been making for about 33 years or so. Originally I cut the recipe out of the "Orlando Sentinal" newspaper's Thursday food edition. It called for using cooking oil in the batter, and raisins. I prefer to use melted butter, for the flavor, and do not care much for cooked raisins, so I switched the raisins out for chopped dates. It was the most amazing cake, outside of a Carrot Cake, for lovely flavors and moistness beyond compare. My version of this cake is called Fresh Apple Pecan Date Cake. The recipe I have used for carrot cake is also, coincidentally, from an Orlando Sentinel newspaper clipping and from around the same general time. I will have to post it!

Fresh Apple, Pecan, Date, Mini Cupcake, recipe
Fresh Apple Pecan Date Mini Cupcake
Interestingly, in all the years I have been making both these cakes, I had never gotten any good photos of them, so last year I made it a point to make the cakes and take photos. Last year, however, was one crazy thing after another, between cataract surgeries for both my husband and me, and then various medical procedures and crises for my husband. It kept us on our toes. I didn't get to write many blogs. I do have a bit of a backlog of recipes to eventually get into this blog. 

I have also made this Fresh Apple Pecan Date Cake recipe to use as mini cupcakes with great success, as seen in this photo left. Tiny little two-or-three-bite mini cakes are cute as can be and delicious when set out on an appetizer type party spread.


Fresh Apple Pecan Date Cake

Serves 12 to 16

2 cups all-purpose flour
1 teaspoon baking soda

Fresh Apple, Pecan, Date, Cake, dessert, recipe
Fresh Apple Pecan Date Cake
½ teaspoon salt
2 teaspoons cinnamon
2 cups sugar
4 cups fresh apples, peeled, grated
2 cups pecans, chopped
1 cup pitted dates, chopped
2 eggs
1 cup butter, melted (or use melted coconut oil or cooking oil)
1 teaspoon vanilla

Combine flour, baking soda, salt, cinnamon, and sugar in a large mixing bowl. Stir in apples, pecans, and dates. Add eggs, melted butter and vanilla. Beat at medium speed with electric mixer for 3 minutes.

Pour mixture into two greased 8 or 9-inch pans, a greased bundt pan or greased muffin pans or papers. If making in an 8-inch round pan, I spray the pan with cooking spray, then trace around the pan onto parchment paper, cut out the parchment rounds and set them into the pans and re-spray the parchment with cooking spray. This ensures that the cake definitely WILL NOT stick to the bottom!

Bake in a preheated 350 oven for 50 - 60 minutes for a bundt pan. For 8-inch cake pans, check at about 35 - 40 minutes and every 5 minutes thereafter, until a toothpick inserted in the middle comes out clean. Let the cake cool for 10 minutes and then invert onto cake plate. For cupcakes, check after 15 to 20 minutes. For mini cupcakes check after 12 minutes.

Ice with Cream Cheese Icing, or sprinkle with powdered sugar and decorate with extra pecans.


Cream Cheese Icing

Icing, Frosting, recipe, cream cheese, butter, confectioners sugar
Cream Cheese Icing
Enough to frost an 8 or 9-inch, or 9 x 13 cake

12 ounces cream cheese, room temperature
1 stick unsalted butter, room temperature
3 - 4 cups confectioners' sugar, sifted
1 teaspoon vanilla
¼ teaspoon salt

Directions: Mix together on low speed of an electric mixer, and once combined increase speed to high and beat until completely smooth.

If the icing is too stiff, beat in one tablespoon of milk or cream at a time, until of spreading consistency.

NOTES: The longer you beat, the fluffier the icing will become, as air is being incorporated into the mixture. This is wonderful for the fluffy icing of a cake, but trying to decorate with too much air in the mixture will give difficulties when trying to get an even extrusion from a decorating tip. The air bubbles will constantly cause breaks in the flow. If using a hand mixer it would take a long while to accomplish this, but with a large heavy-duty mixer, it would be best to keep the speed at medium, thus lessening the quantity of large bubbles forming in the icing.


My passion is teaching people how to create a harmony of flavors with their cooking, and passing along my love and joy of food, both simple or exotic, plain or fancy. I continue my journey in ethnic and domestic cuisines, continuing my journey to explore diverse culinary experiences and hopefully to start you on a journey of your own. Join me also at A Harmony of Flavors on Facebook, and Pinterest.

Disqus