Translate

Showing posts with label entree recipes. Show all posts

Sunday, October 27, 2019

Elegant Wellingtons for Anyone

Most people have at least heard of Beef Wellington. Or maybe not; one never knows. Long ago I was able to partake of individual Beef Wellingtons at a restaurant my husband and I frequented, and later on, I created my own version of what I felt they must have done. I have not ever been disappointed with my recipe.

While I know my version is not necessarily a mini replica of a true Beef Wellington, not using foie gras or chicken liver pate, nor do I make the mushroom/onion mixture called duxelles. Still, it comes out most marvelously flavored and I have always had raves when I make it. 

And then there is the cost of using filet mignons. If the cost of filet mignons is an issue, then why not try making Chicken Wellingtons? All that is really needed is skinless, boneless chicken breasts, mushrooms, onions and cream cheese. And of course, the puff pastry to wrap them.

I use Puff Pastry for many applications, such as these shown below.  In the first of the pictures, I had a piece of leftover puff pastry dough, brushed it with butter and sprinkled with some grated cheese, black pepper and pine nuts. I rolled this up into a log, sliced and set the slices on a baking sheet. The oven was already heated for whatever else I was making with the Puff Pastry, and baked these until golden. They are delightful. In the second picture are Mock Wellington Bites, created for a wine tasting, and they are insanely delicious. A little finicky to make, but well worth it, as like with many of my appetizers, they can be made ahead and frozen until needed. And the third? Smokies in Puff Pastry - probably my husband's most preferred appetizer. I know a lot of people who grab pre-made crescent roll or other dough that comes in a tube and use it to wrap little Smokies. I prefer to use Puff Pastry dough, and I can say with some certainty that there is no going back!

Palmiers, Mock Wellington Bites, Smokies in Puff Pastry
Palmiers with leftover dough, Mock Wellington Bites, Smokies in Puff Pastry

Are you Afraid of Puff Pastry?

If you are, then don't be. Puff pastry, even store bought (and the only brand I have ever found in any supermarket I have ever frequented is Pepperidge Farms), can make anything it is used for come out extra special. Puff pastry (if making it oneself) is made to puff up by repeated rolling and folding the dough with butter inside, creating layer upon layer of butter filled goodness. The butter trapped lovingly in between the pastry layers creates steam when baked, causing the layers to puff. The lovely layers come out lightly crisped and shatteringly good in taste and texture. Pre-made dough, with all the work taken out of it (even without butter, but some other fat), makes it so very easy to use, with only a couple of very simple rules to keep in mind:
Unfolded dough with edges trimmed

  • Allow the pastry to thaw sufficiently before trying to roll it out. The pastry is folded in three and frozen, right out of the box. Trying to open the tri-fold without being thawed means you will have three small, narrow panels, rather than one full sheet.
  • As the dough is formed from layers and layers of dough and butter, this "lamination" must be kept in place or the dough will not puff. Remember that rolling out and cutting the dough is perfectly fine, but do not re-roll the scraps. They won't puff when baking, or at least not enough to make them worth your while.
  • Once you roll out the dough, for whatever application, trim a very narrow rim from the outermost edges, as these may have compressed and cause the dough to rise unevenly. This is only for the outer edges of the sheet of dough as it comes from the package. Once those edges are trimmed, proceed to cut the remainder as needed for your application.
Even if you are one of those people who buy their pie dough, this is not much different. Puff Pastry is a pre-made dough. Period. Thaw, roll, cut and shape or wrap. 

Beef Wellingtons

Now that my little lesson is over, I would like to share my recipes. I will start with Individual Beef Wellingtons, as that is where I started.

Individual Wellingtons, Beef Wellingtons, recipe
Individual Beef Wellington

To make these, rather than create a mushroom and onion mixture called duxelles, I used one large Portobella mushroom cap, approximately the same diameter as the filet mignon it will set upon. Under the mushroom cap I apply a butter mixture with fresh herbs. The filet itself can be 8 ounces, though these get quite large with other things on a plate, but 6 or 8 ounces will work. I use partially fried bacon (to release much of the bacon grease before wrapping inside the puff pastry) to wrap around the meat, which is also seared briefly until brown before wrapping. I grant that it is a bit of a juggling act to assemble all this, but it is so delicious, guests will forgive if it doesn't look like a chef prepared them.

Individual Beef Wellingtons


Makes 4 servings

1 sheet from a box Pepperidge Farm Puff Pastry Sheets
Individual Wellingtons, Beef Wellingtons, recipe
Individual Beef Wellington

4 (6 ounce) filet mignons
4 portobello mushrooms, cap only, each about the diameter of the filet mignons
4 (or up to 8) strips of bacon, depending on length needed
2 tablespoons butter
2 teaspoons each of minced fresh parsley, thyme, chives & tarragon
1 teaspoon Beef & Pork Seasoning
1 egg, for egg wash

Thaw the Puff Pastry sheet, 
at room temperature for about 30 minutes or until pliable. 

Separately, soften the butter, then mix in the fresh herbs and the Beef & Pork Seasoning until completely blended; set aside. Salt and pepper the filets and sear them on high heat - both sides, just till nicely browned; set aside to cool slightly. Partially cook the bacon. It should almost be cooked, but still soft (it will cook more when in the oven, also - this first fry is more to release excess grease).

Preheat oven to 375. Roll out the Puff Pastry sheet to a 14" square. Cut in 4 equal squares of 7 x 7". Divide the herbed butter mixture between the four mushroom caps, spreading into the under side of the cap. Set one of the filets onto each of the Puff Pa
stry squares, setting one of the mushroom caps, dome side up, onto each filet. Wrap bacon around each of the seared filets. This gets tricky! You'll need to hold onto the bacon to keep it in place while wrapping the puff pastry around it! Have a small bowl of water nearby. With one hand, secure the bacon, using one or two slices that will fit all around the perimeter of the meat. With the other, bring one corner of pastry up to the top of the filet. Dab this corner with a bit of water, so the next corner will stick to it. Repeat with the next corners, bringing to the top (as with apple dumplings), affixing each corner with a little dab of water to help adhere and press to keep in place. Place packet onto a rimmed baking sheet and repeat this process with the other three filets.

Brush the Puff Pastry packets with an egg wash (1 egg, lightly beaten with 1 - 2 tablespoons water). Do not allow the egg to drip down the sides or it will glue the pastry to the pan. Bake for about 25 minutes, or till golden.

This timing will give you a filet that is nicely pink in the center. If other stages of doneness are preferred, adjust timing accordingly.

NOTES: When herbs are abundant, I like to make up butter pats with herbs and keep in freezer. I take a goodly amount of an herb (such as chives, tarragon, parsley, thyme, rosemary), chop it very fine and add the most I can get into a stick of softened unsalted butter, so that it is only the butter that holds it together. Cut little pieces of aluminum foil and drop 1 tsp on a bit of foil (about 3 x 3") and fold it to make a little tiny packet. I keep these in the freezer, so that any time I need a little added "flavor burst" it is there, handy. If this is the case, thaw one tiny packet of each of the herbs per filet, plus the Beef and Pork Seasoning to proceed.

~~~~~~~~~~~~~~~~~~~ 

Chicken Wellingtons

My Chicken Wellingtons are made a little differently. For these, I do cook the duxelles mixture of mushrooms and onion, this then gets mixed into cream cheese. The chicken, as chicken breasts are not already shaped like nice little round cylinders, has to have its size and shape taken into account. Here are some ideas.

If you are looking at using either a 6 or 8-ounce piece of chicken, one of two things can be done. 
  • If the skinless, boneless chicken breasts are quite small, simply tuck the long "tail" of the meat underneath, skewering it with a toothpick to make an approximation of a rounded, somewhat rectangular shape. Then proceed to salt and pepper and saute as stated in the recipe. Before wrapping the chicken into the Puff Pastry, remove the toothpick - the chicken will retain its shape nicely.
  • If the skinless, boneless chicken breasts are very large, just cut off the "tail" ends, leaving approximately 6 - 8 ounces worth of the meat, and save the little leftover bits of chicken for another use. Salt and pepper the larger piece of meat and sauté as stated. 

Individual Chicken Wellingtons


Individual Wellingtons, Chicken Wellington
Individual Chicken Wellington
Makes 4 servings

1 pastry sheet from a package frozen Puff Pastry sheets
4 boneless skinless chicken breasts (see above)
Salt & pepper, to taste
2½ tablespoons unsalted butter

½ pound mushrooms, chopped
1 medium onion, chopped finely
½ cup dry Sherry or dry white wine, optional2 teaspoons minced fresh thyme
1 tablespoons parsley, chopped
4 ounces cream cheese
1 tablespoons Dijon mustard
1 egg, for egg wash

Thaw pastry 30 minutes, or until pliable. Read section above about prepping chicken. Sprinkle prepped chicken with salt and pepper. In medium skillet, brown the chicken in 1½ tablespoons butter; set aside.

Add remaining tablespoon of butter to the same skillet. Add mushrooms and saute until all liquid has evaporated and the mushrooms begin to brown in spots. Add in the onions and continue to cook until the onions and mushrooms are golden. Stir in the Sherry or white wine with the fresh thyme and parsley, turn heat to high, cook until all the liquid has evaporated. Set aside to cool.


Preheat oven to 375 degrees. On a lightly floured surface, roll the square of thawed puff pastry to a 14" square; cut into four - 7" squares.

In a small bowl, combine the cream cheese with the mustard and the cooled onion/mushroom mixture. Spread each pastry square with 2 tablespoons of this mixture, leaving at least one inch of the edges bare; top each square with a cooled chicken cutlet. Have a small bowl with water nearby. Bring up one corner of one pastry to the top of the chicken, dab the corner of the pastry with water. Bring up the next corner, dabbing with water, and repeat with remaining two corners. Press to seal. Place packet seam side down on a baking sheet. Repeat with all other cutlets. Brush tops with egg wash (1 egg, lightly beaten with a tablespoon of water), but do not drip the egg down to the baking sheet or it will glue itself in place. Bake 25 minutes or until puffed and brown. Serve immediately.


Individual Vegetarian Wellington

Yes, I did create a vegetarian version, Individual Tempeh Wellingtons, once, using tempeh, a fermented soybean product. To give the tempeh some flavor (similarly to tofu, it picks up flavors from other things with it), I first cut one rectangle piece into two pieces, then immersed them into a very richly seasoned vegetable stock and cooked them for a few minutes. When ready to use, I fried the two pieces until crisp, then stacked them atop the mixture for the Chicken Wellingtons, above , then wrapped as for the Chicken and baked. Truly, this version was so stellar I was hard pressed to say which I liked better. 


My passion is teaching people how to create a harmony of flavors with their cooking, and passing along my love and joy of food, both simple or exotic, plain or fancy. I continue my journey in ethnic and domestic cuisines, continuing my journey to explore diverse culinary experiences and hopefully to start you on a journey of your own. Join me also at A Harmony of Flavors on Facebook, and Pinterest.
Saturday, August 24, 2019

Still Time to Get Out That Grill

Depending on where one lives, grilling time may be all year 'round or it may be confined to a few, all too short months. I know some who say they grill even when there is snow on the ground, though I find it gets harder to get things cooked through with too much cold to combat the heat of the grill. But unless you are in the Southern states, grilling season is starting to wind down. For me, in the American southwest, it has been too hot to even want to grill, so my grilling may only just be starting sometime in the next couple of months. 

However your grill season works out for you, I hope these recipes will give some impetus to getting out there. I have to imagine, though I have never done it, that these recipes can be made in the oven. I have not done it, but it is possible. Flavors will be different, assuredly. 

For the first of these recipes, I am taking one my husband came up with. It is simple as can be. And of course it is a beef roast, because my husband will not touch something like shellfish. This has become a matter of pride at this late age, to say he has never, nor will he ever, eat shellfish. I, on the other hand, love shellfish, but developed an allergy, so now it is off my menu also. The second recipe below, is one I used very often before finding out why I was so swollen so often. 😧  The third recipe is a chicken recipe I have made repeatedly through the years and is also unfailingly good. I make my own Red Curry Paste also, so I will give you that recipe as well, though you can assuredly buy it at the store. Making it at home means I can control the heat, getting all the flavor without killing off taste buds in the process. ;)

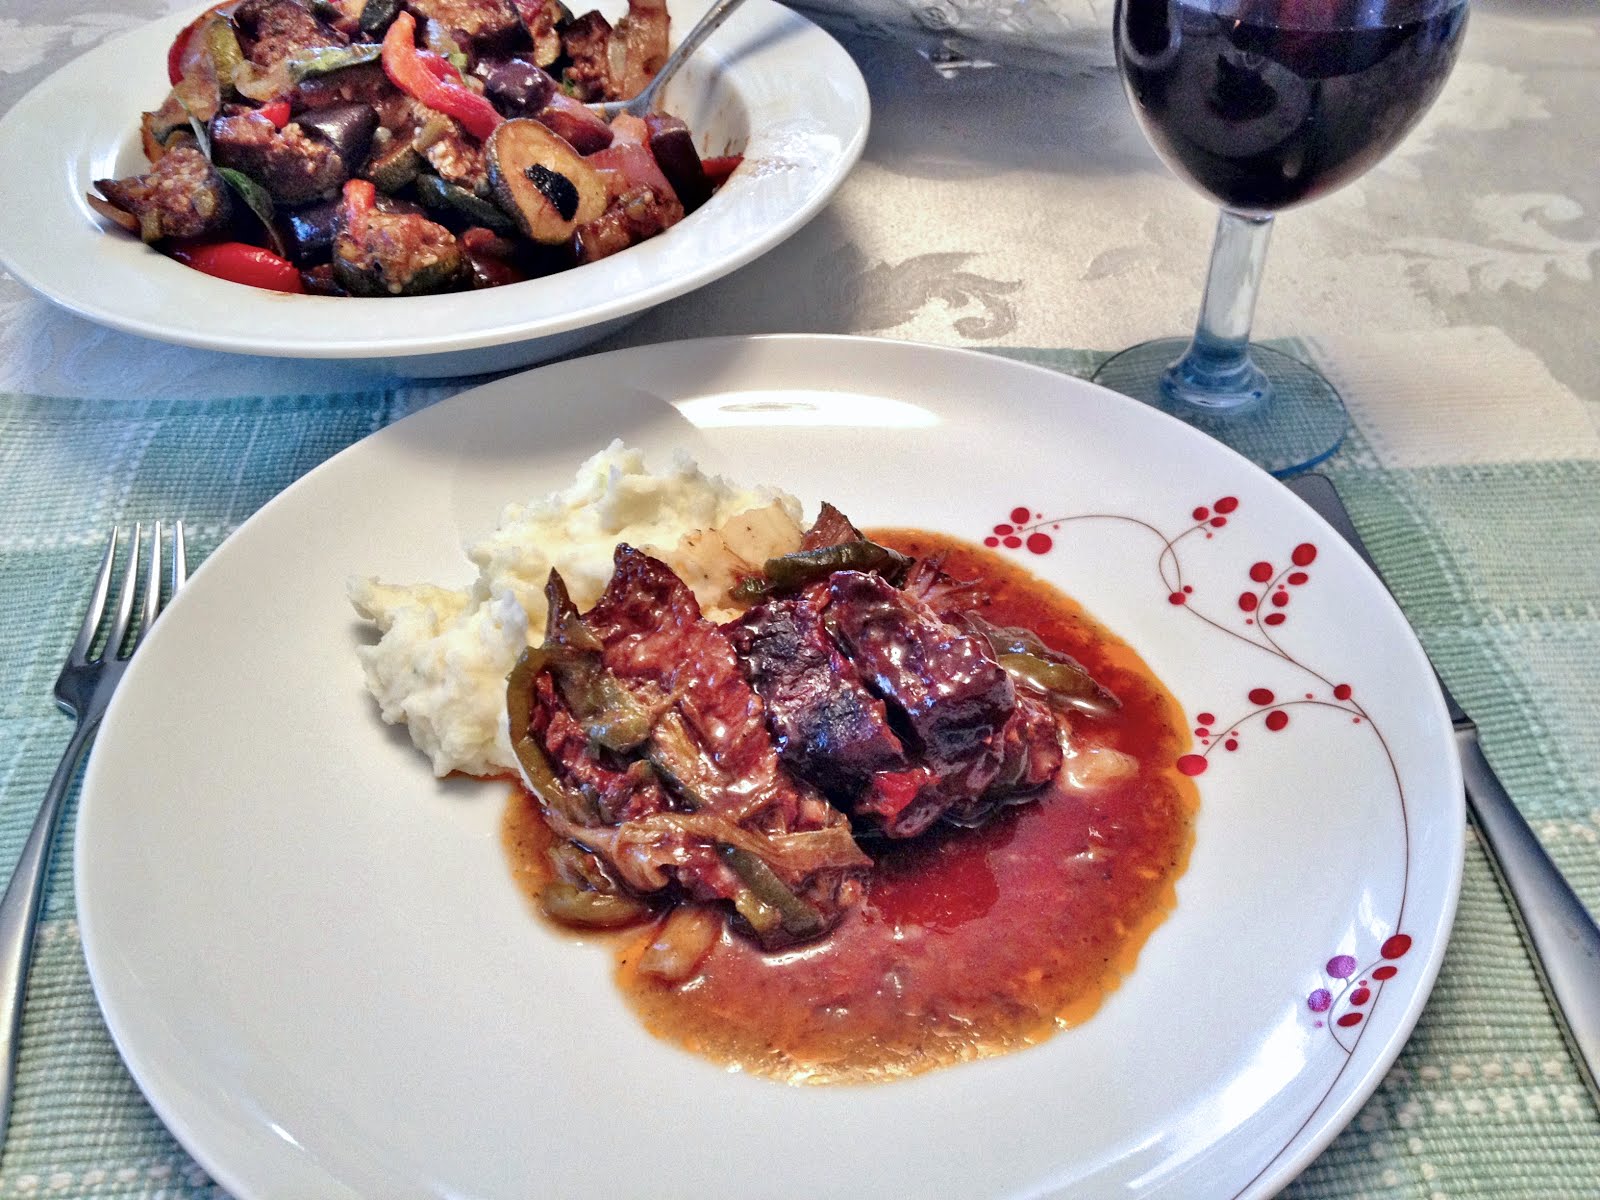
Back to the beef roast. It is started on the grill and seared over high heat for about 15 to 20 minutes per side before removing it to a cutting board and preparing the rest of the recipe. It requires little in the way of prep. It uses only basic ingredients. Nothing fancy. I have yet to even get a photo that is truly worth showing. It looks rather homely. But the flavor? Oh, great heavens, it is magnificent. Serve with some mashed potatoes and you will be happy campers.

BBQ sauce, Roast beef, chuck roast, green peppers, scallions,
Terry's BBQ Roast
BBQ sauce, chuck roast, grill, bake, green peppers, scallions
Terry's BBQ Roast

Terry's BBQ Roast


Serves 6 to 8

1 boneless chuck roast, about 3½ pounds
6 - 8 scallions, as needed
1 green bell pepper, more if needed
1 cup barbecue sauce of choice, more if desired

Heat a grill to high. Set the chuck roast onto the grill until it has a really good sear on one side, about 15 or so minutes. Flip the roast and sear the other side the same way. This gives a nice smoky "grilled" flavor, even though not finished on the grill. Remove the roast from the grill and place on a cutting board. Slice into the roast, not quite all the way through, about every half to ¾-inch apart.

Prepping, how to, BBQ sauce, chuck roast
Prepping Terry's BBQ Roast

Preheat the oven to about 275 degrees. While the roast is grilling, prepare the scallions and green pepper. You will need a good handful of scallions. Some are larger than others so the amount is non-specific. If they are tiny, use an entire bunch; if they are large you might use 6 or so. Cut the scallions into lengths that will fit along the width of the width of the roast, then cut the scallion lengths in halves, lengthwise. Cut the bell pepper into very thin strips along their lengths.

Prepare a piece of foil large enough to fit into a 9 x 13-inch baking dish, ensuring it is long enough to fold and wrap the roast. Use two thicknesses if thin foil, or one if using heavy duty foil. Press the foil into the dish, leaving the rest as overhang until needed. Place the roast carefully into the foil-lined casserole. Stuff lengths of scallion and bell pepper into the cuts in the meat, pressing the vegetables in as much as possible.
Cover the roast with at least 1 cup of barbecue sauce. Close the foil around the roast, completely closing it into a packet. Set the pan into the oven and allow to roast for about 2½ hours. Take care when opening the packet, as there will be copious amounts of steam. The roast will be fork-tender and have plenty of "gravy" around it. Great served with mashed potatoes or rice.

~~~~~~~~~~~~~~~~~~~~

For these shrimp - or scallops - not much time is needed, either for the marinating time or the grilling time. Over-grilled shrimp or scallops become rubbery. This marinade is so easy and delicious and requires so little time to flavor the seafood.

The photo below is of little individually skewered shrimp, along with some red onion and one chunk of pineapple per tiny skewer. These were for a party and I used a half red cabbage as the vehicle to hold all the little skewers, poked into the cabbage "dome" evenly.


Grilled, Marinated Shrimp or Scallops


Individual, skewers, shrimp, pineapple
Individually skewered shrimp and pineapple
Scallops, skewersShrimp, skewerRecipe amount is up to you! The marinade is plenty for a goodly amount.

MARINADE:
1 can (6-ounce) unsweetened pineapple juice
¼ cup (2 ounces) soy sauce
¼ cup (2 ounces) olive oil

Shrimp, or scallops as needed

Mix the marinade ingredients together in a zip top bag. Use individual bags or bowls with tight fitting lids, keeping shrimp and scallops separate.
Either mix marinade and divide between bags or bowls, or if amounts of shrimp and or scallops is large, made 2 recipes of the marinade, placing each amount into a separate bag/bowl.

Allow either shrimp or scallops to marinate up to an hour or so, maximum, then have a preheated grill ready. The shrimp can be skewered onto long skewers. The scallops do better on a grill pan. They tend to fall off individual skewers. If you prefer to have them skewered, use two skewers about ¼ inch apart and skewer them double to keep them in place.

Grill time is short. The shrimp are done as they turn pink, about 3 to 5 minutes per side. The scallops may take just a little longer, depending on their size. Watch for when they begin to show little cracks in the surface. The shrimp are also great if skewered alternately with pieces of onion and chunks of unsweetened pineapple before grilling. 


~~~~~~~~~~~~~~~~~~~~~~~~~

Coming to the third recipe, below, for Thai Red Curry Paste, this is the precursor of the Red Curried Chicken Kebabs recipe. Do not feel you must adhere strictly to this recipe. I realize not everyone has kaffir lime leaves or galangal, and the amount of dried red chilies is totally up to the individual. Use what you have. This makes a delightfully flavored sauce. It is unsalted, so salt must be added into the individual recipe.
 

Thai Red Curry Paste

Thai, Red Curry Paste, condiment
Thai Red Curry Paste
Thai Red Curry Paste, individual packets, freezing
Makes about 8 tablespoons

2 - 6 dried red chilles
2 shallots, cut in small chunks
1 teaspoon black peppercorns
2 teaspoons cumin seeds
1 tablespoon coriander seeds
1 teaspoon salt
2 teaspoons lemon or lime rind, chopped
1 teaspoon galangal powder (or use 1-inch fresh ginger)
3 - 4 cloves garlic
6 - 8 tablespoons oil, as needed
1 teaspoon turmeric
2 teaspoons paprika
1 - 2 Kaffir lime leaves, if available

Blend all ingredients together. This may take a while and a lot of scraping down the blender container, and require more oil (or water) to get it to blend properly. If you want a smoother paste, grind all the dry spices first, then add in the wet ingredients to finish off the process. 


Use what is needed for the recipe, then place individual recipe portions into small sandwich bags with the flap. Tie off the top and freeze until needed, as shown here.


~~~~~~~~~~~~~~~~~~~~~

Red Curried Chicken Kebabs are just flat-out delicious. I have been making these for years and they are a hit each time. I hope they give you the same pleasure!

Red Curried Chicken Kebabs


Red Thai Curry, Chicken, Kebabs, grilling
Red Curried Chicken Kebabs
Serves 8 - 10

2½ tablespoons Thai Red Curry Paste (recipe above, or use store-bought)
½ cup vegetable oil (I use olive oil or coconut oil)
2 teaspoons Kosher salt, or to taste
2½ pounds skinless, boneless chicken breasts, cut into 1-inch cubes
½ each of red and green bell peppers, cut into 1-inch squares

1 red onion, cut into 1 inch single squares

Minty Yogurt Sauce
¾ cup plain low-fat yogurt
¼ cup mayonnaise, or low-fat mayonnaise
1 tablespoon honey
1 tablespoon fresh lime juice
1 tablespoon fresh mint, finely chopped

In a large bowl, mix the curry paste with the oil and 2 teaspoons of salt. Add the chicken cubes and toss to coat. Let stand at room temperature for up to 2 hours or cover and

refrigerate overnight.

Light a grill. In a medium bowl, whisk the yogurt with the mayonnaise, honey, lime juice and mint and season with salt. Set aside or refrigerate until needed.

Thread the chicken onto 10 skewers, threading a chunk of red or green bell pepper and/or red onion squares between the cubes. Grill over moderately high heat, turning frequently, until lightly charred and cooked through, about 8 minutes. Serve the kebabs with the minty yogurt sauce on the side. 

 
NOTES: If you like pineapple, this could be another addition to your skewers.

These could be made as whole boneless skinless chicken breast or thigh sections. As the recipe states the chunks should be about 1-inch cubes, it might also be good to cut the chicken breasts in half lengthwise, so they are not so thick, and will get more marinade onto the surface area. The timing for grilling bone-in chicken will be much longer - about 25 minutes, or until an instant thermometer reads 165 degrees in the thickest part of the meat.

Anything that can be grilled, can also be broiled. If the weather is not cooperating, or it's the wrong season, try broiling.


The meal is delicious with a nice white wine, Chardonnay, Pinot Gris or Torrontes would be my first choices. 


My passion is teaching people how to create a harmony of flavors with their cooking, and passing along my love and joy of food, both simple or exotic, plain or fancy. I continue my journey in ethnic and domestic cuisines, continuing my journey to explore diverse culinary experiences and hopefully to start you on a journey of your own. Join me also at A Harmony of Flavors on Facebook, and Pinterest.

Tuesday, June 26, 2018

A Different Kind of Potato Salad

It seems I have barely gotten around to trying anything new on the recipe front. So much stress has been present in other areas of my life, that sometimes it is all I can do to make some old tried and true recipes and have done with it. Not that there is anything wrong with the old tried and true, but it makes for scant blog posts.
Lamb Curry, Indian, Rice, Cabbage, Rhubarb, Pecan, Coffeecake
Lamb Curry - Indian Rice & Cabbage - Rhubarb Pecan Coffeecake


Last week on Monday our friend Rich arrived with two fishing buddies, both of whom have visited in past. They are fun to be around, so that part is good, and they love to eat, so that is also good, for someone who loves to cook to please people. The guys went out at 7 in the morning and returned around 4:30 PM for the first three days. They did catch some fish, and ceviche was planned, in that eventuality. Meanwhile, I had my hands full with cooking dinners to feed three guys and me. Plus desserts. The first night I had made a lamb curry recipe; Curried Lamb with Peas. With the curry, I made Indian Cabbage and Rice, using brown rice to add a little fiber with the cabbage. I had some Naan breads in the freezer and pulled them out and everything went, with the guys practically licking the serving bowls. I had bought rhubarb at the Farmers' Market, so I made Rhubarb Pecan Coffeecake for dessert, and there was very little of that 9 x 13-inch pan of cake left! I had substituted all but ½ cup of whole grain Kamut Khorasan flour for the amount called for in the recipe, and no one noticed, so I got a little extra fiber and whole grain goodness in there without difficulty. 
Gumbo, Chocolate, Beets, Cake, Cream Cheese, Icing
Gumbo - Chocolate Beet Cake - Cream Cheese Icing

On Tuesday morning, I had absolutely nothing at all planned for dinner, and was starting to panic, trying to think of what I could make. I ended up making Chicken & Andouille Gumbo, with white rice on the side. I would  have preferred to make whole brown rice, but didn't have enough and didn't want to take the time out to run to the store. That recipe makes a very large pot, so even with everyone serving themselves second helpings, we had Gumbo leftover. That night I made my Chocolate Beet Cake, revised for dessert, frosting it with Cream Cheese Frosting. I used Kamut Khorasan flour in the Chocolate Beet Cake, revised recipe also, and it was delicious that way. The guys made a very serious dent in that cake too, though there was enough for the next night's dessert.
Lamb, Burgers, Greek Olive, Tapenade
Lamb Burgers with Greek Olive Tapenade

Day Three I made Lamb Burgers, served with my usual Greek Olive Tapenade. The big difference in the burger recipe is that ever since making them in mini size for last year's wine tasting event, I had grated the feta and added it to the burger mixture before grilling. This worked so well that this is how I do it now, and it is so much better and easier. 
 
Sweet Potato, Black Bean, Salad
Sweet Potato Black Bean Salad

For a side dish to go with the Lamb Burgers, I did actually create a new salad side dish. Not a salad in the sense of "greens" but I used roasted sweet potatoes as a base and added in things as I thought of them. I wanted to use some leftover grilled corn kernels, and black beans, since they make a great contrast. I wanted to use a vinaigrette and no mayo. Into the vinaigrette I added some odd mixtures, but it all came out tasting wonderful. For crunch, I went for celery, red bell pepper and scallions. It came out colorful and absolutely delicious, and the guys polished all that off too. And it all happened so fast I totally forget to take any photos! That was no hardship though, so I made another batch that my husband and I have been enjoying for these past couple of days on our own. 

Sweet Potato Black Bean Salad
Sweet Potato, Black Bean, Salad
Sweet Potato Black Bean Salad


Serves 6 

1½ pounds sweet potatoes
1 - 2 tablespoons olive oil
½ teaspoon salt

VINAIGRETTE:
2 tablespoons olive oil
2 tablespoons lime juice
2 tablespoons honey
1 tablespoon Dijon mustard
1 - 2 cloves garlic, minced finely
1 teaspoon Curry powder or Garam Masala
½ teaspoon salt
dash pepper
-----
1 cup roasted/grilled fresh corn kernels
¾ cup red bell pepper, small chunks
1 (15-ounce) can black beans, well rinsed and drained
½ cup chopped scallions
2 stalks celery, thinly sliced
½ cup chopped cilantro (or parsley, if preferred)

Preheat oven to 400 degrees. Peel the sweet potatoes and cut into about 1-inch cubes. Toss the cubed sweet potato with the olive oil and salt, then spread in a single layer on a rimmed baking sheet and bake for 20 to 30 minutes, or until tender. Set aside to cool slightly before combining.

Place all the vinaigrette ingredients into a medium mixing bowl (one that will hold all the salad, ultimately) and whisk until combined.  Add in the slightly cooled sweet potatoes, and all the remaining ingredients and toss well. Garnish with cilantro leaves.


My passion is teaching people how to create a harmony of flavors with their cooking, and passing along my love and joy of food, both simple or exotic, plain or fancy. I continue my journey in ethnic and domestic cuisines, continuing my journey to explore diverse culinary experiences and hopefully to start you on a journey of your own. Join me also at A Harmony of Flavors on Facebook, and Pinterest.

Disqus