Translate

Showing posts with label entrees. Show all posts

Friday, January 14, 2022

Pork and Sauerkraut for New Years

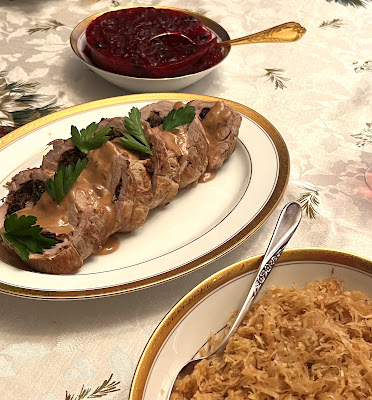
Pork tenderloin, stuffing, pan sauce, Bourbon
Elegant Tenderloin Pinwheels
I grew up with my Mom's traditional pork chops and sauerkraut as our New Year's Day dinner. I just never thought much about it until I started getting objections to this menu. And so it is that although I have tried to just go ahead with making it on a couple of occasions, it was not well received (my husband would just pick off every tiny shred of sauerkraut that clung to the pork or the potatoes), I enjoyed it thoroughly. 

Mom would bake her pork chops in the oven, adding quartered, peeled potatoes to the pan, covered with foil. Once all this was cooked (in the case of the pork chops, way overcooked), she would empty a jar of sauerkraut into a colander, rinse it well, then scatter it over the pork and potatoes, then top with a little brown sugar, cover again and bake. 

So, while my husband has never been keen on the idea of sauerkraut, I know my son and his fiancé do love it. Hence my idea of creating a really stellar pork dish, one that wasn't overcooked, and then making the sauerkraut as a stand-alone dish, so those who do not love it (ahem!) could just skip it, while the rest of us enjoyed. 

My husband's teeth need some work at the moment, so I was looking for something soft; pork tenderloin would be the meat. Then, I recalled a recipe I had made a very long time ago, where the pork was butterflied out flat and filled with a mixture that included prunes (dried plums). I recalled that it was very good, but I wanted to jazz it up some. Recalling another recipe, one for a rolled and stuffed flank steak, where the filling was so amazingly flavorful (from my very old Creme de Colorado cookbook), I got out both these recipes to compare and see what parts of each stuffing recipe I liked best. 

Ingredients I absolutely wanted to include from between the two recipes were: prunes, bacon, spinach, parsley, Romano cheese and mushrooms. White bread crumbs were a part of both recipes, but I had some pumpernickel I wanted to use instead. Nut meal sounded good, and I opted for hazelnut meal. Somewhere I read lemon zest as a possibility for flavor with a pork stuffing. Caramelized onion and garlic were also good additions. For fresh herbs, thyme and sage were added to the list.
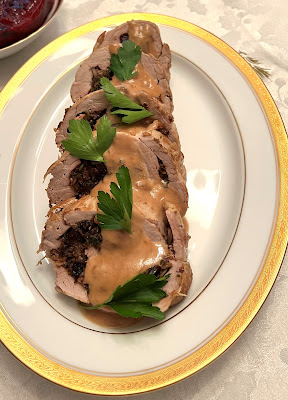
Pork tenderloin, stuffing Bourbon, Pan Sauce
Elegant Tenderloin Pinwheels

I wanted to have the pork look pretty in a spiral when sliced, so it would be best to have both of (a package of) two pork tenderloins cut open and slightly overlapped to fill, roll, then tie them in place. There are different ways of cutting open pork tenderloins. One is to simply cut most of the way into the center, lengthwise, open flat and pound the heck out of them until of an even thickness. I hate this. It makes so very much noise, splatters meat, blood and bits everywhere and takes forever to truly get the meat flat. Somewhere online, someone butterflied this way but instead of pounding, cut into each thick section to create an unfolded piece of tenderloin. I don't see that as any easier. My preferred method is to use small cuts with a very sharp knife parallel to the cutting board, continuing parallel until the meat is mostly all one thickness and laid out flat. There are many, many places online showing this and the other methods in excruciating detail, so I do not believe it is needed to reproduce all that here. Whatever method is used, it is good to have the thickness small, about 1/4 to 5/8-inch thick. 

While this seems an extraordinarily long recipe, if broken up into the do ahead parts and finalized on the day of serving, it is very doable. The final result of this experiment was a chorus of groans of pleasure at the table, so I accomplshed my goal. Here is what I did:


Elegant Tenderloin Pinwheels for Dinner
Elegant Tenderloin Pinwheels


Served 8 - 10

STUFFING:
5 ounces bacon, cut small and fried crisp
-----
1 medium onion, chopped
½ teaspoon salt, divided
1 - 2 tablespoons olive oil or bacon fat
3 tablespoons dry Sherry or Bourbon
6 cloves garlic, minced
-----
¾ pound fresh mushrooms (I used 'Baby Bella'), sliced
1 tablespoon butter
1 tablespoon olive oil
2 - 3 tablespoons Sherry
½ tablespoon fresh thyme leaves½½
-----
¾ cup finely shredded Romano cheese
½ cup chopped Italian (flat-leaf) parsley
1½ cups fresh baby spinach, in fine chiffonade
7 - 8 soft, pitted prunes, cut in small pieces
¾ cup fresh pumpernickel crumbs (or other bread crumbs as preferred)
½ cup hazelnut meal
- zest of one lemon

MEAT:
2 pork tenderloins (about 2.5 lbs. total)
½ teaspoon salt
chicken or beef stock for pan
1 medium onion, sliced

PAN SAUCE:
4 tablespoons Bourbon (or Sherry)
1 clove garlic, finely minced
½ cup red currant jelly
2 tablespoons unsalted butter
½ cup sour cream

Make ahead (1 to 3 days in advance if needed): Begin the stuffing by frying the bacon and draining on paper toweling. Once cooled, place into a medium sized container with lid. Set aside. If using bacon grease, leave a tablespoon worth in the skillet and add in 1 tablespoon olive oil. Add the chopped onion and sauté on medium to medium high, stirring often until the liquid has mostly gone, then add in 1/4 teaspoon of the salt and the minced garlic and stir constantly, lowering the heat if needed so as not to burn, until the onions are nicely browned. Add in the Sherry or Bourbon and cook quickly until completely evaporated. Pour the contents into a bowl to cool, then add to the container with the bacon.

Add to the same skillet the butter and olive oil and add the mushrooms, sautéing until all the liquid has cooked out and evaporated. Add in the remaining quarter teaspoon salt and continue cooking, stirring, until the mushrooms are browned. Do not stop cooking the mushrooms as soon as their liquid evaporates or they will be flabby and still leach liquid into the stuffing mixture.  Add in the thyme leaves and the Sherry and cook until the Sherry is completely evaporated. Add the mushrooms to the same plate where the onions cooled; once cool, add to the bacon and onion mixture and refrigerate.

------------------

Grate the Romano cheese and place in another container with lid. Add to the cheese the chopped parsley, spinach chiffonade, prunes, pumpernickel crumbs, hazelnut meal and lemon zest. Toss to combine, cover and refrigerate if needed for up to 2 days.

--------------------

ON THE DAY:

Remove any silver skin from the tenderloins. Taking one tenderloin at a time, using a very sharp knife with the blade set parallel to the cutting board and about a quarter to a half-inch from the board, begin slicing into the length of the meat.  As it opens, continue to slice in at the same height along the length, using small cuts if needed, until the tenderloin is completely opened flat. Set the tenderloin aside and repeat with the other tenderloin. (Some ideas, with video or pictures, on how to open and flatten the pork tenderloins are here, and here.)

Combine together all of the two containers of prepared stuffing ingredients into one bowl and toss repeatedly until all the ingredients are well and evenly distributed. Set aside.

Preheat oven to 350 degrees. Spray a 9 x 13-inch pan with cooking spray. Measure out 7 or 8 lengths of cotton kitchen twine, long enough to go around the rolled tenderloin and tie, and set them nearby. 

diagram, how to,
Place the two tenderloins spread out, slightly overlapping, with one narrow end pointing the opposite direction from the other. This offsets the fact that each sort of come to a point, and makes the whole a more uniform shape to roll. Place the stuffing mixture onto the meat, spreading and patting evenly, leaving about an inch bare all around the perimeter. Neatly roll the meat, carefully lifting while rolling to keep the stuffing from oozing out. Once rolled, slide one piece of cotton twine under the roll and tie at the center, tightly. Repeat this about every 2 to 3 inches. Trin the ends of the twine to no more than a half inch long. 

diagram, how to

Place a large skillet over medium high heat and add some olive oil to the an. Carefully brown the meat on all sides. Once browned, set the meat into the prepared 9 x 13 pan. (Leave the skillet as is, to deglaze and make a sauce, later.) Pour some stock around the meat, to no more than a third of the way up the sides of the meat. Add in some of the onion, then cover with foil and bake the meat for 50 to 70 minutes, or until a meat thermometer registers 155 to 160 degrees. Remove from oven and leave covered. 

Meanwhile, with the skillet on a burner, deglaze the pan with Bourbon or Sherry, stirring with a plastic spoon or spatula until all the browned bits are mixed in. Add in the garlic and jelly, stirring until dissolved. Stir in the butter until emulsified, then add in the sour cream and mix, off heat, until combined. 

Slice the meat across the roll, into 3/4 to 1-inch thick slices. Leave the twine in place to keep the rolls from unraveling (it is easy to remove at table). Set the slices slightly overlapping on a platter and pour the pan sauce down the center of the meat.


My passion is teaching people how to create a harmony of flavors with their cooking, and passing along my love and joy of food, both simple or exotic, plain or fancy. I continue my journey in ethnic and domestic cuisines, trying new things weekly. I would love to hear from you, to help me continue my journey to explore diverse culinary experiences and hopefully to start you on a journey of your own. Join me also at A Harmony of Flavors on Facebook, and Pinterest.

Wednesday, September 30, 2020

Amazing Short Rib Ragu


For me, beef short ribs are more of a pain than they are worth. Generally speaking. As a child, my Mom made a dish that I loved, called Beef with Sweet Cabbage - - - except for the fact that she used beef short ribs and there was sometimes about one bite of meat to a short rib. The dish is one that I reworked, still called Beef with Sweet Cabbage, using brisket instead, cooking the brisket and then cutting and shredding it into manageable bite sized portions. 

short ribs, tomato sauce, red wine, onions
Short Rib Ragu over Pappardelle Pasta

Aside from the small amount of meat to be had on some short ribs, they are fatty. So fatty in fact, that they will leave a thick layer of fat atop any soup or stew, which then needs to be removed. Eating a "whole" short rib, with the bone and fat and gristle, well, no, that's just not going to happen. Not in my house.

However.

A few years back my ex-daughter-in-law told me about a Short Rib Lasagna, which I went on to recreate as best as I was able. It is delicious, truly. The catch is working with the short ribs.

Okay, I have made that Short Rib Lasagna twice now, and working to get the meat out from all the fat is still a royal pain, but the meat is nice and tender, and already in bite sized morsels, just due to the way the meat is distributed in the short ribs. So, when my son's birthday was coming up and he had a nice Italian Amarone wine he wanted to drink, I said I would work on a dish that would pair with his wine. We discussed what kind of dish to use, what flavors to add, and came up with a Short Rib Ragu. I planned to serve the ragu over homemade pappardelle pasta. In essence, the recipe is not far off from the way I cooked the short ribs for the lasagna recipe, but just a few differences became pertinent to the flavor profile I wanted.

beef short ribs, tomato sauce, red wine
Short Rib Ragu over Pappardelle Pasta

Key flavors I wanted to add in with the short ribs were some Parmigiano-Reggiano rinds or "heels", mushroom powder (from dried shiitakes, ground to powder then sieved), lots of onions (I chose red onions for sweetness), a head of roasted garlic, some finely grated carrot (again, for sweetness), tomato sauce & strong wine (Cabernet). In a departure from my norm, to date, I opted to oven braise the dish, instead of using a slow cooker. Fresh rosemary and thyme with some bay leaves were the main herbal flavors. Something my son wanted in the flavor profile was fennel seeds. In all my planning, I did mean to add a substantial amount of parsley, which I completely forgot, and never once did I think of the fennel seeds, though I did a light smashing of some fennel seeds which we added at the table. These certainly would have been good, added in to cook with the ragu.

MAKE AHEAD

It is good to make things ahead when possible, thereby giving oneself time on the day of serving. I made this dish 4 days ahead of serving. Any longer and it would be preferable to freeze until the day before it is needed. To thaw, allow to thaw in the refrigerator for 1 or 2 days and then return the ragu to a heavy pot with a tight fitting lid and warm gently over very low heat, stirring occasionally, or in the oven. The roasted garlic can be made ahead. (Cut off top quarter inch from the whole garlic head, set into foil, drizzle with olive oil, crimp foil at top and roast in a preheated 400 degree oven for 40 to 45 minutes. Once done and cooled, squeeze out all the soft garlic into a lidded container, drizzle on more olive oil, cover and refrigerate until needed.)

NOTE

Parmesan "heels" are the rind ends of good Parmigiano-Reggiano cheese. These ends are hard and not usable to grate, but are excellent when tossed into a soup or stew to cook, giving flavor, but not leaving sticky cheese to coat everything. Save these rinds in the fridge or freezer, well wrapped. Cook in any soup or stew, then remove them once the meal is ready to serve.


Short Rib Ragu

short ribs, stew, ragu, entree, recipe
Short Rib Ragu over Pappardelle Pasta

Serves 10 (Freezes well)

4 to 5 pounds beef short ribs
Oil, for browning
I head roasted garlic, cloves all squeezed out of their skins
2 large red onions, in thinly sliced quarter-rounds
1 red bell pepper, chopped small
2 carrots, grated very finely on small holed grater
1.5 ounces dried shiitake mushrooms, blitzed to powder, strained
2 cups Cabernet Sauvignon red wine
2 (15 ounce) cans tomato sauce
2 - 3 tablespoons tomato paste
1 - 2 Parmesan "heels" if available
2 tablespoons minced fresh rosemary
1 tablespoon fresh thyme leaves
1 teaspoon salt
1 teaspoon fresh cracked pepper
2 bay leaves
0.5 cup of chopped parsley, optional
2 - 3 teaspoons whole fennel seeds, optional

Heat oven to 250 or 260 degrees, or whatever temperature will maintain a simmer. Have ready a heavy, large, oven safe pot with tight fitting lid, such as an enameled cast iron pot or braiser.

Heat a large skillet over medium to medium-high heat and add in a tablespoon of olive oil. Brown a few short ribs at a time, not overcrowding the pan. Turn them to brown all sides evenly. 

While ribs are browning, slice the onions and place half the onions into the pot or braiser. Add in the red bell pepper and carrots, part of the rosemary and thyme. As the ribs are browned, remove them to the pot. 

Once all the ribs have been browned and added to the pot, pour off all but a tablespoon of grease from the skillet, then add in the red wine and cook quickly to reduce by half. Once reduced, add in the mushroom powder and stir. This will want to thicken. Scrape all the mushroom/wine mixture atop the ribs in the pot, then add in all the remaining ingredients: tomato sauce and paste, remaining rosemary and thyme, bay leaves, salt and pepper, Parmesan heels, parsley and fennel, if using. Set the pot on the heated burner and bring the ingredients to a simmer, then cover with tight fitting lid and set in the oven for about 4 hours, or until the meat is tender and falling off the bones.

Once tender, remove from oven. Remove the ribs, bones, and any pieces that have fallen off bones, to a plate to cool. Use sheets of paper toweling, set briefly on top of the stew in the pot to remove the thick layer of grease. Discard these grease-soaked paper towels. Repeat with more paper towels if needed. 

Once meat is cooled, remove the meat, shredding if needed. Discard all bones and fat or gristle. Return the meat to the pot and stir. The sauce is now ready to eat, but will taste better with at least a day's rest in the fridge, or freeze if preparing ahead. Also, this is a large amount, so it can easily be divided into two portions, freezing one and keeping one out to eat. Serve over any pasta desired.


My passion is teaching people how to create a harmony of flavors with their cooking, and passing along my love and joy of food, both simple or exotic, plain or fancy. I continue my journey in ethnic and domestic cuisines, continuing my journey to explore diverse culinary experiences and hopefully to start you on a journey of your own. Join me also at A Harmony of Flavors on Facebook, and Pinterest.

Saturday, April 4, 2020

A Really Good Curry

Just want to say . . . I am not a huge fan of Thai food. 

WHAT?!?!?!? You may exclaim.

It's true. While I have eaten some things that are tasty, it seems that no two restaurants even come close, for flavor and style, and the inconsistency makes it difficult (for me, anyway) to figure out what I like. I am not fond of peanuts. At all. And many Thai dishes call for peanuts or peanut sauces. I like a little spice, but not overwhelming spice. That is less of an issue for me, but if something is spicy, that leaves my husband out. I am allergic to shellfish, so anything with shrimp or dried shrimp or the like means I swell up like a toad. 

Get my drift?

Thai foor, Red Curry, Ethnic
Thai Red Curry

Okay, so the thing is, I have been making my own version of a Thai Red Curry Paste for years and years and years. And the reason I make it is to use in ONE recipe - one that we dearly love - called Red Curried Chicken Kebabs. I have never ventured out farther than that with my curry paste. I think my curry paste tastes great - at least by the standards of the chicken kebabs, which have excellent flavors. Back in February, my son and his lady came to visit and brought Thai food, from a restaurant they like. I have to admit, most of it was certainly delicious. The one single problem? too much salt. Holy moly, the salt made my mouth and tongue hurt. And that is why I like making my own things from scratch, even the curry paste.

Thai food, ethnic, Red Curry, chicken, vegetables
Thai Red Curry
Granted, my curry paste recipe makes a fair amount. That said, it is not at all hot spicy, so it can really be used as much as wanted in a recipe. And I got thinking, not long after the kids left here and I was eating some leftovers from their largesse that I though about the fact that I really had never used my excellently flavored curry paste for anything else. And so I set about trying to see what I could come up with. I found recipes all over the internet for Thai Red Curry. Most of them called for similar ingredients, like coconut milk. Many called for chicken with little vegetables, some for vegetables and no meat, and some were somewhere in between. I opted for in between, using one huge chicken breast and a lot of vegetables. 

First though, I had to make a batch of my curry paste. When we moved to Arizona, I had my little frozen packets of my curry paste in my cooler with all the other cold foods, but with the extreme heat in the southwest in late June, the curry paste leaked out everywhere, staining my cooler forevermore. So a new batch was the first priority. Then, since it was just made and not frozen, I went ahead and created my own recipe for Thai Red Curry, and ended up using fully half of the curry paste in one recipe. It was so delicious, and my husband said this recipe was a real "keeper" (his way of saying, "Please make this often!"), so I went ahead a few days later and used up the remaining curry paste in a second round of Thai Red Curry. I don't have any idea how authentic this may be, but it certainly bears repeating. Yum!


Thai Red Curry

Thai food, ethnic flavors, Red Curry, chicken
Thai Red Curry

Serves 4

¾ - 1 lb boneless, skinless chicken (dark or white as preferred)
oil for frying
4 - 6 dried shiitake mushrooms (or fresh if available)
1 - 2 shallots, sliced lengthwise
2 tablespoons fresh ginger, grated
2 cloves garlic, finely minced
1 - 3 green Thai chilies, or Serrano, minced (seeds left in or out as preferred)
1 can (14-ounces, approximately)
2 - 4 tablespoons Thai Red Curry Paste (if store bought, use discretion with the amount, if heat is an issue)
1 tablespoon Fish Sauce, optional
2 tablespoons palm sugar or brown sugar
1 cup snow peas (or snap peas, sliced across diagonally)
1 cup red bell pepper, in thin strips
1 cup butternut squash, small cubes
1 - 2 teaspoons tamarind concentrate
------
½ cup cilantro, chopped
¼ cup scallions, sliced thinly

If using dried shiitake mushrooms, set them into boiled water and top with a bowl to keep them submerged for at least 20 minutes.

Cut the chicken into smaller cubes and brown them in the oil, then set them aside. 

In the same pan the chicken was browned in, adding more oil if needed, lightly saute the shallot, then add in the ginger and garlic with the green chilies. Saute for another 3 minutes. (If a lot of heat is preferred, simply slice the chilies across and toss them in. I prefer to keep the heat low, so I remove seeds and mince the chilies.) Pour in the can of coconut milk and stir in the Thai Red Curry Paste to combine. Add the brown sugar and fish sauce and all the veggies. Cook until the vegetables are tender, then add in the chicken and cook for just a few minutes longer. Sprinkle on the cilantro and scallions and serve over rice.


My passion is teaching people how to create a harmony of flavors with their cooking, and passing along my love and joy of food, both simple or exotic, plain or fancy. I continue my journey in ethnic and domestic cuisines, continuing my journey to explore diverse culinary experiences and hopefully to start you on a journey of your own. Join me also at A Harmony of Flavors on Facebook, and Pinterest.

Tuesday, October 8, 2019

Great Guatemalan Food

I get caught up with Indian foods so often, that I forget to go back to some wonderful Guatemalan foods. Having actually lived in Guatemala, and for long enough to get a really good feel for the flavors there, I should have far more recipes here than I do. But. Mea culpa!

So, to remedy that, I am going to put two recipes here that, while they do take some effort, are truly well worth the time. One of these is a meatloaf of a sort, called Carne Fria, which translates to "Cold Meat," because of its use on many party platters. It tastes as good cold as warm. It is different from our American meatloaves in that it is wrapped in a thin towel (not terrycloth, please!) or cheesecloth, tied at the ends like a sausage and submerged into a large pot of boiling salted water to cook. Another way it is different is that it has hard-boiled eggs lined up along the center, so when it is sliced, there is a (hopefully centered, but not always) slice of egg. Pretty as a picture. 
carne fria, Guatemalan food, meatloaf
Carne Fria


Carne Fria (Guatemalan Meatloaf)


Makes one large meatloaf
Carne Fria
Carne Fria

1 pound ground beef
1 pound ground pork
3 strips bacon, fried (leave fat in pan) & crumbled
1 onion, chopped fine
2 cloves garlic, minced
3 bay leaves, finely ground, veins removed
1 sprig thyme (1 tsp fresh leaves or ¼ tsp dry)
1/8 teaspoon cloves
2 teaspoons salt
¼ teaspoon ground black pepper
2 shots cognac or brandy
2 carrots, finely shredded
2 tablespoons pickle relish
1 slice bread, soaked in milk and squeezed dry
6 hard-boiled eggs, peeled
½ gallon water, + 2 tbsp salt for cooking
- Cheesecloth & Kitchen Twine

Place both meats in a large mixing bowl. Fry the bacon in a large skillet till done, and remove to paper towels to drain. Add the chopped onion and minced garlic to the bacon fat in the pan and saute until golden. Add to the meats, along with the bacon. Add all the rest of the ingredients, except the hard boiled eggs, and mix well; set aside. (This part can be done a day ahead of time. Store the mixed meat in a container or zip-top bag in the refrigerator.)

On a large flat surface, place a large piece of cheesecloth, folded double. On a cutting board or other surface, place the meat and create a sort of cradle. Take the hard-boiled eggs and cut the ends off to expose the yolk at either end, then set the eggs end-to-end down the center of the cradle in the meat. Begin forming the meat up and around, enclosing the eggs completely, until you have a nice cylinder formed from the meat. Place the cylinder onto one edge of the cheesecloth and roll it, making a nice tight enclosure. Taking kitchen twine, lay out strips, sliding them underneath the roll, using about 3 for the body of the roll, and one at each end. Tie them snugly; trim ends.

Have a large pot or Dutch oven ready with boiling water with about 2 tablespoons salt. Gently lower the meat roll into the water and reduce heat to maintain a simmer for 1 hour. Pour off water, cut twine, and unroll the packet. Slice in about ½-inch slices. Makes about 10 slices, plus the ends. Serve with a Tomato Sauce. 


Steps to Making Carne Fria:


  1. Take prepared meat and make a “cradle.” Place the trimmed eggs end-to-end down the center of the cradle.
  2. Form the meat up to completely surround the eggs, making a neat cylinder.
  3. Lay out cheesecloth or old kitchen towel or flour sack towel, and onto this, place the cylinder.
  4. Roll up the towel around the meat tightly, to keep its shape.
  5. Cut kitchen twine long enough to tie. Three pieces around the center part of the cylinder, and one at each end work well.
  6. Once tied, trim the ends of the twine to short pieces.
  7. Have a pot with the half-gallon of water at a boil. Add in the 2-tablespoons salt.
  8. Holding each end of the packet, very gently lower the whole meatloaf into the boiling water. Bring back to a boil.
  9. Lower the heat until it maintains a simmer; cover and set a timer for 1 hour.

Tomato Sauce For Serving Carne Fria


3 - 4 Roma tomatoes
1 medium onion
1 clove fresh garlic
1 red bell pepper
salt and pepper, to taste
1 tablespoon olive oil for frying

Heat a broiler. Line a rimmed baking sheet with foil. Spray the foil with cooking spray. Set the red bell pepper and tomatoes on the sheet and broil. Turn the pepper as it becomes blackened, until it is blackened evenly, then remove to a zip top bag, closing so it steams. Turn the tomatoes as they blacken in spots, then remove them to a blender container.

Cut the onion into chunks, separating the layers. Set the pieces onto the baking sheet, along with the clove of garlic off to one side for easy removal. Turn the garlic when it browns, and then remove to the blender container. Using tongs, turn/toss the onion pieces until they begin to blacken in spots and smell very appetizing. Once dine, remove to the blender container.

Once the pepper is cool enough to handle, remove all the skins, then remove the stem, seeds and membranes. Place the cleaned pepper into the blender container, then blend until the sauce is mostly smooth. Pour into a heated skillet with the tablespoon of oil and bring to boil. Lower to simmer, add in salt and pepper to your taste and simmer for 5 to 10 minutes to meld flavors. This sauce is great with this Carne Fria as well as with Guatemalan Chiles Rellenos.

A bit of cilantro may be added to the blender with the rest of the ingredients. This will, however, leave little flecks of color. Your choice.
 

~~~~~~~~~~~~~~~

The other dish is called Pepian, and can be made with beef or chicken, as you choose. The sauce, as with many sauces both sweet and savory, contains sesame seeds, pumpkin seeds and various spices that we in the US do not think of as savory spices: allspice and cinnamon. Thickening for this stew, again as with many other recipes, is soaked and blended tortillas, or the use of some corn tortilla masa or flour for corn tortillas. This stew is supposed to be rather runny, but somehow mine generally comes out thick. More water and salt can be added. Since my husband does not like anything runny, my version comes out perfect for him!

Pepian 

Pepian with Beef
Pepian with Beef

Serves 6 - 8

2½ pounds beef stew meat, in 2-inch cubes OR 1 whole chicken, cut into pieces
1 - 2 tablespoons olive oil, for browning
2 dried ancho or pasa chiles
1 chile guaque or guajillo
2 cups water, boiling in small saucepan
4 Roma tomatoes (tomates)
4 tomatillos (miltomates), husks removed
1 large onion (cebolla), peeled, cut in quarters
2 - 3 cloves garlic (ajo)
¼ cup unhulled sesame seeds (ajonjoli)
¼ cup pumpkin seeds (pepitoria)
½ teaspoon black peppercorns (pimienta negra)
2 allspice berries (pimienta gorda)
3-inches true cinnamon stick (canela)
½ - 1 cup cilantro
1½ tablespoons annatto seeds (achiote), or 1 - 2 teaspoons powdered annato/achiote
1½ teaspoons salt (sal)
1 pound potatoes (papas), peeled, in large cubes
2 soaked corn tortillas (tortillas de maiz), or 2 soaked slices bread (pan), or 2 - 3 tablespoons of masa harina - for thickening 


Place the pieces of meat or chicken into a large Dutch oven and just barely cover with water to cook. Add the salt and cook until done, at least an hour for chicken. Beef stew meat, being a tougher cut, will take longer, about 2 to 2½ hours. About a half-hour before the cooking is done, add the potatoes and stir. Other vegetables may be added if desired, such as chayote squash or carrots.

In a saucepan of boiling water, place the 2 ancho or pasa chilies and the chili guaque (or other dried red hot chili pepper such as guajillo) and simmer for 10 - 15 minutes, until soft. Set pan aside.

Preheat the broiler with a rack about 4 inches from the heat. On a baking sheet set the whole tomatoes, tomatillos, garlic and onion quarters. Allow the skins to blacken or blister a bit, turning as necessary. Allow the onions to separate and blacken the edges and soften and smell aromatic, and then removing all the vegetables to a blender container
as they are done.

In a dry skillet over high heat, toast the sesame and pumpkin seeds, with the cinnamon, broken into bits, the peppercorns and allspice berries until the sesame and pumpkin seeds begin to pop. Do not burn the seeds or you will ave to start over. Pour the seeds into the blender container with the tomato mixture. Remove the dried and soaked chilies from their liquid, reserving the liquid aside. Remove and discard stems and seeds and add the chilies to the blender container. Add in the cilantro and blend the mixture until fine. If liquid is needed to blend, use small amounts of the chilie's soaking water.


Once the meat and vegetables are cooked, if there is too much liquid still in the pot, remove some of it to the side to use only if needed. Pour the blender contents into the pot and stir. Bring to simmer.

Place the annatto seeds into the remaining chili soaking liquid and allow them to soak in the hot liquid for a few minutes. Pour the seeds and liquid into the same blender container and blend on the very lowest speed. The goal is to rattle them around and remove as much of the orange outsides of the seed as possible for coloring and flavoring purposes, without actually blending the seeds to powder as the seeds are bitter. You want the color and flavor of the seeds only. Strain the liquid into the pot and discard the remaining spent seeds. Stir well, then cover the pot and cook for 15 minutes to meld flavors.

While the pot simmers, if using corn tortillas to thicken, soak them in some of the reserved meat cooking liquid, then put the mixture into the blender and blend fine and add to the pot. If using corn masa harina, dissolve in a bit of the meat cooking liquid, then add it to the pot. If using bread, soak it in some of the meat cooking liquid and then blend fine before adding to the pot. With any of these methods, once in the pot, stir well and allow to simmer again for 15 minutes before serving. Serve the stew over rice.


My passion is teaching people how to create a harmony of flavors with their cooking, and passing along my love and joy of food, both simple or exotic, plain or fancy. I continue my journey in ethnic and domestic cuisines, continuing my journey to explore diverse culinary experiences and hopefully to start you on a journey of your own. Join me also at A Harmony of Flavors on Facebook, and Pinterest.

Monday, August 11, 2014

Cornbread Taco Casserole - a Fiesta of Flavors

I have been trying to get this recipe out for days, and one thing or another has seemed to prevent me getting it here. First off, when I created it last week, it was a spur-of-the-moment thing. I created it late in the day, tired after standing in the kitchen all day doing other things like making bread, pesto, cake, etc. I was hot and tired. I "knew" I had a Cornbread Taco Casserole recipe somewhere, one I'd made nearly 20 years ago. Do you think I could find it? Of course not. I just didn't know what to do with the hamburger I had thawed. I thought, "I don't need a recipe. How hard could a taco casserole be?"

I thought about what ingredients would be good here: onion and garlic of course. I had fresh thyme in a vase on the windowsill, so I could use that. My husband dislikes meat sauces that are runny, so I would thicken it slightly with flour, though cornstarch would work too. Tomatoes or tomato product of some sort. I had some Tostitos Salsa in the fridge, so I used some of that. Chili Powder would also be a must. I thought corn and kidney beans would be good. I love green chilies in a can, so I would certainly use those.

For the cornbread part, I wanted it to be on top of the casserole. It was already quite late in the day, so I opted for a box of Jiffy Corn Muffin Mix. At some point I do want to make this with my own cornbread recipe, but that was just not the day for it. Then, CHEESE! Oh boy, I had no shredded cheese. Drat. I thought about that and wondered if there was any in the freezer. Sure enough, there was some shredded cheese, a Mexican Blend. It was a bit old, but I wasn't using that much. Perfect.

Cornbread, Taco Casserole, recipe, recipe, supper ideas
Cornbread Taco Casserole, too brown
When I got all the taco casserole ingredients together, it made a lot! I used 2 pounds of hamburger meat, and with everything else going in, it completely filled my large skillet. I would suggest the possibility of using a large pot instead of a skillet, especially if one does not own a really large skillet. The casserole part is already cooked through by the time it goes in the oven, so all the oven accomplishes is baking the cornbread topping.

Okay, so I mentioned how tired I was from all the cooking & baking I had done that day? I had just pulled out a batch of bread from the oven shortly before the casserole was to go in. I had planned to set the oven at 375. Actually, anything I bake that is not covered, I set the oven to Convection Bake. On Convection, the temperature needs to be set 25 degrees lower than the recommended temperature to offset the faster baking and browning time. Meaning, I needed to set the Convection Bake temperature to 350 degrees. What, exactly, I was thinking when I set the oven temperature to 475 on Convection Bake, is beyond me. Obviously, I was not thinking at all by that time. When making a recipe for the first time, I set the timer for a certain amount of time as a baseline, but then check carefully to make sure everything is baking properly, adjusting the time as needed. I set the timer for 25 minutes, figuring it would probably be done at about 25, but it was a large casserole, so it was uncertain.

cornbread, taco casserole, supper, recipeI checked once at about 15 minutes, noting that though not yet browned on top, it was certainly bubbling very furiously. It still did not occur to me that the temperature was ridiculously high. At 23 minutes, I checked again. This time I noticed that the top of the cornbread was now a definite mahogany color. Oops! I pulled it out and went to shut off the oven, finally noticing the temperature I had set. Good heavens. Still, while the top was very dark, it was not actually burnt. We ate the casserole and it was absolutely delicious, browned top notwithstanding. My husband particularly loved it. We polished it off in about 3 days, and I asked him if it would be okay to make it again, since I wanted to get photos of a better looking outcome! He said I could make it 3 times in a row if I wanted, he liked it that much! Alrighty then!

I made the casserole for the second time on Saturday for dinner. I had not spent the whole day in the kitchen. I was well rested. I baked it at the temperature I originally planned and it baked perfectly in the same amount of time as the last one, but this time without over-browning the top. The flavors were the same. I used Chi Chi's Salsa this time. I had bought a new bag of Mexican Blend shredded cheese, so it melted much more nicely. 

Cornbread, Taco Casserole, supper ideas,
Cornbread Taco Casserole; perfectly golden top
In all, it is a really wonderful dinner, ready to eat in right about an hour. Have the meat thawed and cooking while chopping the onion and garlic. Then open all the cans and have them ready. Chop at the meat to make it into small bits. Add in the ingredients as they are needed. The whole thing comes together quickly. Mixing up the Jiffy Cornbread Mix takes seconds. Sprinkle the cheese on top and bake and dinner is served.

Cornbread Taco Casserole

Makes one (very full) 9 x 13-inch casserole;
Cornbread, Taco Casserole, supper ideas
Cornbread Taco Casserole

6 large or 12 small servings

2 pounds ground beef
1 tablespoon olive oil
1 large onion, chopped
1 green bell pepper, chopped
2 - 3 cloves garlic, minced
1½ tablespoons fresh thyme leaves

1½ tablespoons chili powder
1½ teaspoons salt
2 tablespoons all-purpose flour
1 cup water
2 cups Chunky Salsa of choice
1 small can tomato paste
2 (4-ounce) cans diced green chiles
1 can whole kernel corn (no salt added), drained
1 can dark red kidney beans, drained and rinsed

1 box Jiffy Corn Muffin Mix
(1 egg + 1/3 cup milk)
1¼ cup shredded Mexican Blend Cheese

Preheat the oven to 375 (350 on Convection Bake). Spray a 13 x 9-inch oven safe casserole with cooking spray and set aside. 

In a very large skillet, or a wide soup pot, heat the oil and begin browning the meat over medium to medium high heat. While the meat is cooking, chop the onions, mince the garlic, chop the bell pepper and strip the leaves from the thyme stems. Get out the flour, chili powder and salt. Check the meat and break it up periodically so it browns evenly. Open the cans of tomato paste, diced green chilies, corn and kidney beans. Drain the corn. Rinse the kidney beans in a colander under copious quantities of running water. Measure out the salsa.
Assembling Casserole, cornbread, taco, supper idea
finishing in pan      |    Cornbread batter spooned on   |   sprinkled with cheese      |           just baked        |        served     

Once the liquid in the pan is almost evaporated, add in the onion, garlic and bell pepper and continue to toss and cook for about 5 minutes more. Sprinkle in the chili powder, salt and thyme leaves, stirring to combine.

Remove the pan from the heat and add in the flour, stirring until no longer visible. Add in the water, the salsa and the tomato paste and stir carefully, until completely combined. Return the pan to the heat. Stir in the diced green chilies, corn and kidney beans. Once bubbling, very carefully pour or spoon the mixture into the prepared casserole dish.

In a bowl, mix together the Jiffy Corn Muffin Mix, the milk and egg. Drop the mixture from a large spoon evenly all over the surface. About 12 little piles of the mixture works well. Sprinkle the surface evenly with the shredded cheese. Bake the casserole for 20 to 25 minutes, until the casserole is bubbling and the cornbread top is golden.  

Serve with sour cream and sliced avocado, if desired. 


My passion is teaching people how to create a harmony of flavors with their cooking, and passing along my love and joy of food, both simple or exotic, plain or fancy. I continue my journey in ethnic and domestic cuisines, continuing my journey to explore diverse culinary experiences and hopefully to start you on a journey of your own. Join me also at A Harmony of Flavors on Facebook, and Pinterest.

Disqus