Translate

Showing posts with label bacon. Show all posts

Friday, January 14, 2022

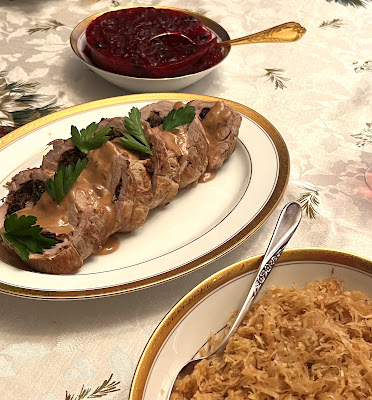
Pork and Sauerkraut for New Years

Pork tenderloin, stuffing, pan sauce, Bourbon
Elegant Tenderloin Pinwheels
I grew up with my Mom's traditional pork chops and sauerkraut as our New Year's Day dinner. I just never thought much about it until I started getting objections to this menu. And so it is that although I have tried to just go ahead with making it on a couple of occasions, it was not well received (my husband would just pick off every tiny shred of sauerkraut that clung to the pork or the potatoes), I enjoyed it thoroughly. 

Mom would bake her pork chops in the oven, adding quartered, peeled potatoes to the pan, covered with foil. Once all this was cooked (in the case of the pork chops, way overcooked), she would empty a jar of sauerkraut into a colander, rinse it well, then scatter it over the pork and potatoes, then top with a little brown sugar, cover again and bake. 

So, while my husband has never been keen on the idea of sauerkraut, I know my son and his fiancé do love it. Hence my idea of creating a really stellar pork dish, one that wasn't overcooked, and then making the sauerkraut as a stand-alone dish, so those who do not love it (ahem!) could just skip it, while the rest of us enjoyed. 

My husband's teeth need some work at the moment, so I was looking for something soft; pork tenderloin would be the meat. Then, I recalled a recipe I had made a very long time ago, where the pork was butterflied out flat and filled with a mixture that included prunes (dried plums). I recalled that it was very good, but I wanted to jazz it up some. Recalling another recipe, one for a rolled and stuffed flank steak, where the filling was so amazingly flavorful (from my very old Creme de Colorado cookbook), I got out both these recipes to compare and see what parts of each stuffing recipe I liked best. 

Ingredients I absolutely wanted to include from between the two recipes were: prunes, bacon, spinach, parsley, Romano cheese and mushrooms. White bread crumbs were a part of both recipes, but I had some pumpernickel I wanted to use instead. Nut meal sounded good, and I opted for hazelnut meal. Somewhere I read lemon zest as a possibility for flavor with a pork stuffing. Caramelized onion and garlic were also good additions. For fresh herbs, thyme and sage were added to the list.
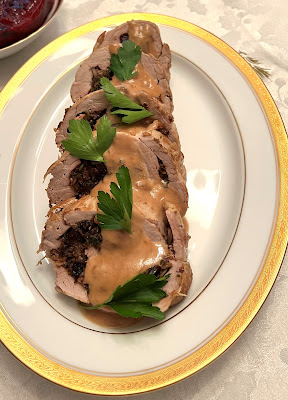
Pork tenderloin, stuffing Bourbon, Pan Sauce
Elegant Tenderloin Pinwheels

I wanted to have the pork look pretty in a spiral when sliced, so it would be best to have both of (a package of) two pork tenderloins cut open and slightly overlapped to fill, roll, then tie them in place. There are different ways of cutting open pork tenderloins. One is to simply cut most of the way into the center, lengthwise, open flat and pound the heck out of them until of an even thickness. I hate this. It makes so very much noise, splatters meat, blood and bits everywhere and takes forever to truly get the meat flat. Somewhere online, someone butterflied this way but instead of pounding, cut into each thick section to create an unfolded piece of tenderloin. I don't see that as any easier. My preferred method is to use small cuts with a very sharp knife parallel to the cutting board, continuing parallel until the meat is mostly all one thickness and laid out flat. There are many, many places online showing this and the other methods in excruciating detail, so I do not believe it is needed to reproduce all that here. Whatever method is used, it is good to have the thickness small, about 1/4 to 5/8-inch thick. 

While this seems an extraordinarily long recipe, if broken up into the do ahead parts and finalized on the day of serving, it is very doable. The final result of this experiment was a chorus of groans of pleasure at the table, so I accomplshed my goal. Here is what I did:


Elegant Tenderloin Pinwheels for Dinner
Elegant Tenderloin Pinwheels


Served 8 - 10

STUFFING:
5 ounces bacon, cut small and fried crisp
-----
1 medium onion, chopped
½ teaspoon salt, divided
1 - 2 tablespoons olive oil or bacon fat
3 tablespoons dry Sherry or Bourbon
6 cloves garlic, minced
-----
¾ pound fresh mushrooms (I used 'Baby Bella'), sliced
1 tablespoon butter
1 tablespoon olive oil
2 - 3 tablespoons Sherry
½ tablespoon fresh thyme leaves½½
-----
¾ cup finely shredded Romano cheese
½ cup chopped Italian (flat-leaf) parsley
1½ cups fresh baby spinach, in fine chiffonade
7 - 8 soft, pitted prunes, cut in small pieces
¾ cup fresh pumpernickel crumbs (or other bread crumbs as preferred)
½ cup hazelnut meal
- zest of one lemon

MEAT:
2 pork tenderloins (about 2.5 lbs. total)
½ teaspoon salt
chicken or beef stock for pan
1 medium onion, sliced

PAN SAUCE:
4 tablespoons Bourbon (or Sherry)
1 clove garlic, finely minced
½ cup red currant jelly
2 tablespoons unsalted butter
½ cup sour cream

Make ahead (1 to 3 days in advance if needed): Begin the stuffing by frying the bacon and draining on paper toweling. Once cooled, place into a medium sized container with lid. Set aside. If using bacon grease, leave a tablespoon worth in the skillet and add in 1 tablespoon olive oil. Add the chopped onion and sauté on medium to medium high, stirring often until the liquid has mostly gone, then add in 1/4 teaspoon of the salt and the minced garlic and stir constantly, lowering the heat if needed so as not to burn, until the onions are nicely browned. Add in the Sherry or Bourbon and cook quickly until completely evaporated. Pour the contents into a bowl to cool, then add to the container with the bacon.

Add to the same skillet the butter and olive oil and add the mushrooms, sautéing until all the liquid has cooked out and evaporated. Add in the remaining quarter teaspoon salt and continue cooking, stirring, until the mushrooms are browned. Do not stop cooking the mushrooms as soon as their liquid evaporates or they will be flabby and still leach liquid into the stuffing mixture.  Add in the thyme leaves and the Sherry and cook until the Sherry is completely evaporated. Add the mushrooms to the same plate where the onions cooled; once cool, add to the bacon and onion mixture and refrigerate.

------------------

Grate the Romano cheese and place in another container with lid. Add to the cheese the chopped parsley, spinach chiffonade, prunes, pumpernickel crumbs, hazelnut meal and lemon zest. Toss to combine, cover and refrigerate if needed for up to 2 days.

--------------------

ON THE DAY:

Remove any silver skin from the tenderloins. Taking one tenderloin at a time, using a very sharp knife with the blade set parallel to the cutting board and about a quarter to a half-inch from the board, begin slicing into the length of the meat.  As it opens, continue to slice in at the same height along the length, using small cuts if needed, until the tenderloin is completely opened flat. Set the tenderloin aside and repeat with the other tenderloin. (Some ideas, with video or pictures, on how to open and flatten the pork tenderloins are here, and here.)

Combine together all of the two containers of prepared stuffing ingredients into one bowl and toss repeatedly until all the ingredients are well and evenly distributed. Set aside.

Preheat oven to 350 degrees. Spray a 9 x 13-inch pan with cooking spray. Measure out 7 or 8 lengths of cotton kitchen twine, long enough to go around the rolled tenderloin and tie, and set them nearby. 

diagram, how to,
Place the two tenderloins spread out, slightly overlapping, with one narrow end pointing the opposite direction from the other. This offsets the fact that each sort of come to a point, and makes the whole a more uniform shape to roll. Place the stuffing mixture onto the meat, spreading and patting evenly, leaving about an inch bare all around the perimeter. Neatly roll the meat, carefully lifting while rolling to keep the stuffing from oozing out. Once rolled, slide one piece of cotton twine under the roll and tie at the center, tightly. Repeat this about every 2 to 3 inches. Trin the ends of the twine to no more than a half inch long. 

diagram, how to

Place a large skillet over medium high heat and add some olive oil to the an. Carefully brown the meat on all sides. Once browned, set the meat into the prepared 9 x 13 pan. (Leave the skillet as is, to deglaze and make a sauce, later.) Pour some stock around the meat, to no more than a third of the way up the sides of the meat. Add in some of the onion, then cover with foil and bake the meat for 50 to 70 minutes, or until a meat thermometer registers 155 to 160 degrees. Remove from oven and leave covered. 

Meanwhile, with the skillet on a burner, deglaze the pan with Bourbon or Sherry, stirring with a plastic spoon or spatula until all the browned bits are mixed in. Add in the garlic and jelly, stirring until dissolved. Stir in the butter until emulsified, then add in the sour cream and mix, off heat, until combined. 

Slice the meat across the roll, into 3/4 to 1-inch thick slices. Leave the twine in place to keep the rolls from unraveling (it is easy to remove at table). Set the slices slightly overlapping on a platter and pour the pan sauce down the center of the meat.


My passion is teaching people how to create a harmony of flavors with their cooking, and passing along my love and joy of food, both simple or exotic, plain or fancy. I continue my journey in ethnic and domestic cuisines, trying new things weekly. I would love to hear from you, to help me continue my journey to explore diverse culinary experiences and hopefully to start you on a journey of your own. Join me also at A Harmony of Flavors on Facebook, and Pinterest.

Wednesday, November 4, 2020

Great Dinner for Any Night or Any Occasion

 A few months back, I was looking for something to do with white beans. I use white beans when I make my Mom & Dad's Bean Soup/Ham Bone Soup, yet I rarely use them otherwise. No particular reason for this, just that the Bean Soup recipe is the only one I had growing up that used white beans. 

white beans, bacon, thyme, onion, garlic
White Beans with Bacon & Thyme

Wandering around the internet in search of ideas, I came on one that sounded promising, called White Beans with Bacon and Herbs on "Jo Cooks." I printed it off, then started to plan what I would do differently. Not that there was anything wrong with how the recipe sounded, as is. Just that I always tinker. Even with my own recipes, I go back and just have to do something different. Maybe I don't have some ingredients and have to substitute. Maybe I just have a hankering for something different than the original flavor profile. Whatever it is, I just seem to have a need to change things.

For starters, I had started cooking a pound of beans from scratch earlier in the day. I tucked in a couple of bay leaves while the beans cooked. Once I found this recipe, I realized that it sounded splendid with the fresh herbs, but I didn't have any! I did, however, have some pesto in the fridge, from my latest batch, and opted to use some of that for flavors instead. I only buy thick-sliced bacon, so I lowered the amount of bacon to 4 slices. There were no onions in the original recipe, so I caramelized a chopped onion, then added in 4 fresh minced cloves of garlic to the mix. I needed more salt, since I was using fresh cooked beans. I always cook my beans or lentils with no salt at all so they cook a bit more quickly, more tender. I add salt once they are already tender.  And that was my plan.

The beans came out so amazingly flavorful. Oh my! And I never once thought of taking photos.

pork, thyme, sage, garlic, rosemary, fennel
Pork Tenderloin with Italian Flavors

So a couple of weeks back, I wanted to repeat this recipe, since it was so very tasty. And then I wondered what to pair with them as a main course? If it was just me in the house, I would have had a salad alongside these scrumptious beans and called it a night. My husband, however, would not be so easily placated. I got out some pork tenderloin and started thinking about what to do with that. 

As it turned out, I created a mix of "Italian" flavors, rubbed the mixture all over the tenderloins and baked them. The mixture is somewhat akin to what I do for things like steaks or lamb chops; a green mixture of garlic, rosemary, olive oil, pepper, salt, and other things that may differ depending on the meat involved. Since this was pork, I used sage and fennel. My preference would have been fresh sage, but again, I had none on hand. Oh, how I do miss having my own herb garden! The whole thing came out so good we both spent the entire meal moaning in pleasure.

White Beans with Bacon and Thyme


Serves 10 or more
white beans, thyme, pesto, onion, garlic
White Beans with Bacon & Thyme

1 pound white dried beans, soaked overnight (OR - Pour boiling water over them and let set for one hour)
2 bay leaves
-----
4 slices thick-sliced bacon, cut in 1/4" bits
2 tablespoons reserved bacon fat from pan
1 large onion, chopped
1 1/2 teaspoons salt, or to taste
4 fresh cloves garlic, minced finely
3 tablespoons fresh thyme leaves (no stems)
1 - 3 tablespoons fresh basil pesto
2 tablespoons red wine vinegar

If soaking beans overnight, in the morning, drain, then place beans in a large pot with tight fitting lid. Cover the beans with water by at least 1 inch above beans, add in the bay leaves, bring to boil, cover, reduce heat to a simmer and let cook for 2 to 3 hours, or until tender, but not mushy.

ALTERNATELY: If, like me, you don't remember to soak overnight, in the morning place the beans in a large bowl and cover with boiling water. Soak then 1 hour, drain, place beans in pot and cover with water by an inch, add the bay leaves and cook 2 to 3 hours, until tender but not mushy.

Once beans are nearly ready, remove lid and let the liquid cook down until there is only about 1 1/2 to 2 cups of liquid left. Leave on very low heat to keep warm.

In a skillet, fry the bacon to your desired doneness. Remove the bacon to paper toweling and reserve about 2 tablespoons of bacon drippings in the pan. Add in the onion with the salt and cook, stirring occasionally at first, then nearly constantly once they start to go golden. Continue cooking and stirring until they are deep golden brown and add in the garlic, cooking another 3 to 5 minutes, until the raw garlic smell is gone. Add in the thyme leaves, pesto and red wine vinegar and stir, then pour all this mixture into the beans and mix well. Cover and let flavors meld for at least 15 minutes before serving.

~~~~~~~~~~~~~~~~~

For this next dish, use the pork tenderloins and not pork loin. Tenderloins are far thinner and will cook more quickly. Pork loins are a thicker cut and will be less tender.

Pork Tenderloin with Italian Flavors


Serves 4 to 6
pork tenderloins, garlic, fennel, rosemary
Pork Tenderloin with Italian Flavors

2 pork tenderloins, about 1.25 pounds each
4 cloves fresh garlic, smashed and minced
2 teaspoons fresh thyme leaves, minced finely
2 teaspoons dried sage leaves, crumbled (or use fresh sage and mince, measuring out at least 1 tablespoon)
1 teaspoon fennel seeds, crushed
1/2 teaspoon dried rosemary leaves, minced, OR use 2 - 3 teaspoons fresh rosemary leaves, minced
1 to 1 1/2 teaspoons salt
1/2 teaspoon freshly ground black pepper
2 tablespoons olive oil

Trim the tenderloins of fat and silverskin. Set aside.

Mix all the remaining ingredients together and rub the mixture over the meat, coating all sides. Set the tenderloins in their coating into a zip top bag or into a container with lid and set aside for at least a half hour, though overnight in the fridge would be best.

Preheat oven to 400 degrees and set the tenderloins on a rack in a foil lined rimmed baking sheet. Pour some water into the baking sheet, otherwise the drippings will cause a LOT of smoke. Roast the tenderloins for about 50 to 55 minutes, or to an internal temperature of at least 165. Remove from oven and tent with foil for 10 to 15 minutes before slicing - across the grain and on a diagonal.


My passion is teaching people how to create a harmony of flavors with their cooking, and passing along my love and joy of food, both simple or exotic, plain or fancy. I continue my journey in ethnic and domestic cuisines, continuing my journey to explore diverse culinary experiences and hopefully to start you on a journey of your own. Join me also at A Harmony of Flavors on Facebook, and Pinterest.

Thursday, August 29, 2019

On a Theme of Threes

As I am bringing in recipes from my website (which I am giving up soon, for many complicated reasons), I have been adding in recipes, here to my blog, for ease of access, ones that had previously been only in the website. 
 
Szechuan style,  Cabbage, side dish, recipe
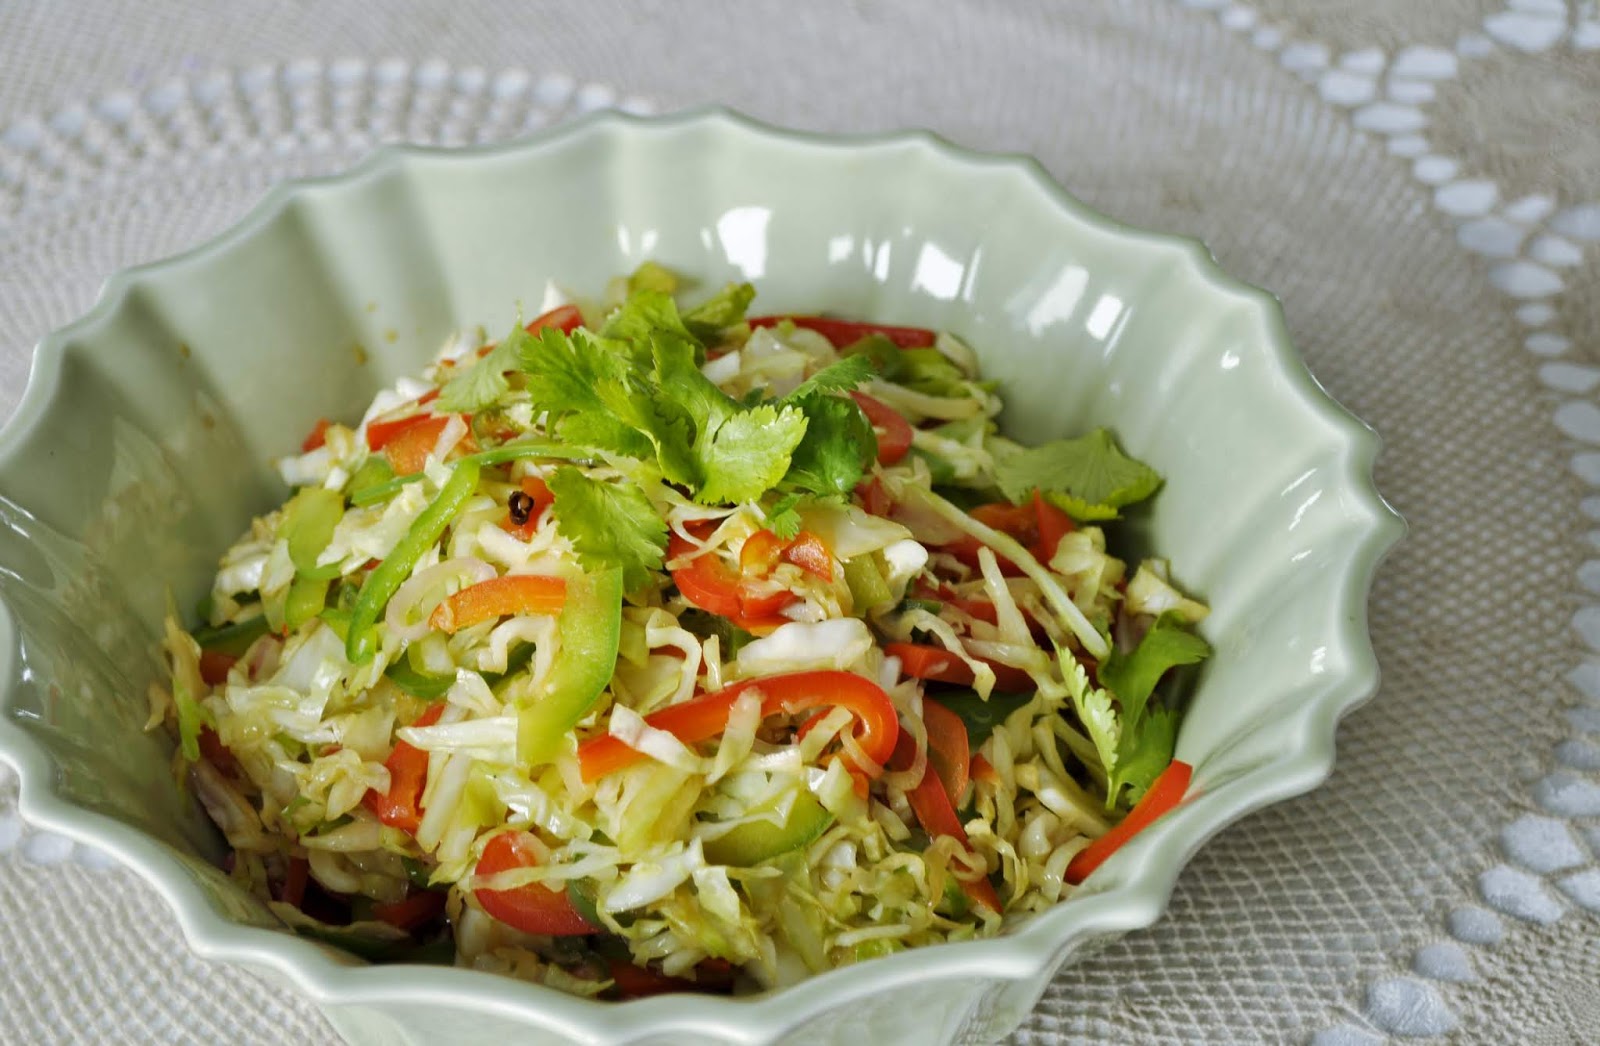
Szechuan Hot Sour Cabbage

It has worked well in sets of threes, with recipes in a single theme. Today, I am adding in three side dishes that have long been favorites. One of these is grilled, and I call it Grilled Portobellas 'Richard," after our friend Richard. Another is a truly delicious way to make green beans, especially for a special occasion. I made a slew of these for a birthday dinner, and the bowl was scraped clean at end of meal. The third recipe is a cabbage dish (above) that is one my husband will actually eat. It has enough great flavors that he will tolerate the fact that it is cabbage.

What to do With Huge Portobello Mushrooms?

Our friend Rich thought up this idea, and had some very definite ideas on how it should be made, ideas that I implemented with my own knowledge and expertise. I have to say, these turned out with absolutely exquisite flavors, and truly are satisfying enough as a main dish, should you be vegetarian (or even if you're not!). As a matter of fact, they can be used in place of a hamburger on a bun, which I did for a vegetarian friend who came to dinner.
 

His idea started out like this:
Rich: How about if we grill some big portobello mushrooms to top our burgers for supper?

Me: Sure, lets go get some at the store.

Rich: I think if we season them and let them set all afternoon before grilling, they will taste great on the grill.

Me: That would certainly make them tasty.

Rich: Let's grill some slices of onion to set on top!

Me: That sounds good, too!

Rich: Then we could set some smoked provolone to
melt on top of  them.

Me: Yep, sounding better and better.

Rich: So, I think if we mashed up a LOT of garlic with some olive oil and spread that all over the inside of the mushroom, that would taste really great.

Me: We can do that, plus, I think some smoked salt would add to the flavors. Maybe some minced rosemary? Or maybe some smoked paprika?


Grilling, Portobellas, mushrooms, side dish, vegetarian
Grilled Portobellas Richard

And thus went the day. We went and bought the foods we needed, and proceeded with the marinade and the grilling later on. And the recipe came out so far better than even expected. Don't be afraid of the garlic - these are great just as the recipe stands. Totally unbelievable.


Grilled Portobellos 'Richard'

How to, Grilling, Portobellas, Onion, Cheese
Stacking Grilled Portobellas with Onion and Cheese

Serves 4

4 very large Portobello mushrooms
1 large onion
3 tablespoons olive oil
3 tablespoons butter, melted
6 to 8 garlic cloves, minced (Richard loves garlic)
1 teaspoon salt, preferably Hickory Smoked

½ teaspoon smoked paprika, optional
½ teaspoon finely minced fresh rosemary leaves, optional
Black pepper, freshly ground, to taste
4 slices smoked Provolone cheese


Early in the day, or even the day before, mix together the olive oil, melted butter and garlic. Add in the smoked paprika and minced rosemary, if using. Remove the stems from the portobellas. Brush the oil and garlic mixture all over the mushroom, first on the outside of the cap, and then leaving the mushroom cupped upwards, make sure there is a lot of the garlic mixture inside. Sprinkle with some of the salt. The hickory smoked salt can be found in some specialty stores, but regular salt will do. Sprinkle on some pepper, as desired. Wrap in plastic wrap, or place in a sealed container until needed.

When ready to cook, light a grill. This works better if you have a grill pan, so the mushrooms and the onions don’t slip through the grate. Slice an onion into thick slices, about ¼-inch thick or more. Grill the onion slices on both sides, until well done and a little bit charred. Have the mushrooms grilling alongside; first grill the outside of the cap downwards and then turn them over. Be prepared! This will flare the flame, as the butter and oil will come running out. Once the mushrooms and the onion slices are cooked through, flip the mushroom cup side upwards and place one slice of the grilled onion onto the cup side of the mushroom. Top with a slice of Provolone cheese and allow the cheese to melt slightly.

Prepare for some of the best mushrooms, ever!


~~~~~~~~~~~~~~~~~~~~~~~

A Delicious Preparation for Green Beans

Creamed Green Beans with Bacon
I remember, as a kid, my Mom making something similar to this recipe, without the bacon. Without the fresh green beans, for that matter. She would make a roux with butter or bacon grease and flour, then drain the can of green bean liquid into the mix and cook till thickened, then add the can of green beans in to heat through. They were good. But, it's been a long time since then, and my body does not tolerate that much salt anymore.

I love green beans now - the fresh kind. I make them "French-cut" all the time. I guess I like that they seem easier to eat, easier to chew than blunt cut green beans, less "squeaky" between the teeth. My husband also loves my green beans, so for one of his birthdays he was quite specific what he wanted for his birthday and green beans were part of the requested meal. Since it was his birthday, I opted to make them a bit fancier than normal. I made the roux, just like Mom made, but as I fried minced bacon to add to the dish, I used the resultant bacon grease in the pan for the roux, and water for the liquid - there were plenty of other flavors going on. These came out with such stellar flavor. At the table, it was close to a fight over the last bits of beans in the bowl.


Creamed Green Beans with Bacon

Cream sauce, roux, Green Beans, Bacon, side dish
Creamed Green Beans with Bacon
Serves 6 - 8

1 pound green beans, stem end removed, cut as desired
6 slices thick-sliced bacon (about 4 - 5 ounces)
2 tablespoons reserved bacon grease
1 tablespoon butter
2 cloves garlic, finely minced
2 tablespoons all-purpose flour
1 teaspoon fresh thyme leaves, stripped from stems
1 cup water
salt and pepper, to taste

Cut the bacon strips across the grain into ¼-inch pieces. Fry the bacon until almost crisp. Remove the bacon pieces to paper toweling to drain and set aside. Remove all but 2 tablespoons of the bacon grease for another use. Add the butter and garlic to the pan and saute the garlic gently for 2 minutes. Add the flour and thyme leaves and stir to combine. Add in the water and stir. Bring the mixture to a boil stirring for about 5 minutes until the mixture is like a gravy. Set aside and keep warm.

Prepare a steamer and set the green beans into the steamer basket. Sprinkle Kosher salt all over the green beans. Bring water to a boil and steam the green beans for about 8 to 12 minutes, or until the green beans are just barely tender. Drain well and add the green beans to the sauce in the skillet. Add in the bacon, reserving 1 tablespoon for garnish. Stir together and bring the mixture back to full heat. Taste for seasoning, adding salt and pepper as desired. Garnish with reserved bacon pieces. Serve immediately.


~~~~~~~~~~~~~~~~~~~

Taking Cabbage to New Heights

Cabbage is one of those love or hate type of vegetables. It can certainly be made badly and tasteless. This recipe is not one of those. While my recipe is quite similar to one I found in a book somewhere long ago, it is the first time I came across reference to Szechuan "peppercorns." And, after hunting them down and making the recipe, I found that while the peppercorns did have a particular flavor, there just aren't that many in the recipe to really gauge how the overall recipe tasted with or without them. While I would urge you to try and find some to try in this recipe, I believe there are enough other much more easy to find ingredients that make the recipe taste so great.

What Are Szechuan "Peppercorns"?

Szechuan, spice, Asian spice
Szechuan Peppercorns
Just to be clear, Szechuan "peppercorns" are not pepper at all. Unrelated to pepper, these little pinkish, petal-like pods are extensively used in Southeast Asian cuisines. An essential component of Chinese Five-Spice Powder, they are also used on their own in many dishes. Their flavor is unlike pepper or chilies and has no heat but instead a slightly lemon or citrus flavor. They are said to cause a slight numbness or tingling in the mouth when eaten. The pods are used whole or slightly crushed, unless ground into a spice mixture. Avoid them if too many of the inner black seeds are present, as they are gritty to chew. The name is also found spelled as Szechuan, Sichuan or Szechwan.

Szechuan Hot Sour Cabbage

Szechuan, Cabbage, side dish, recipe
Szechuan Hot Sour Cabbage

Serves 6 - 8

1 pound cabbage
1 green bell pepper
1 red bell pepper
2 tablespoons soy sauce
2 tablespoons vinegar
2 tablespoons sugar
1 teaspoon salt
3 tablespoons vegetable oil, I use olive oil
4 dried hot chilies, optional
12 Szechuan peppercorns, or black peppercorns if preferred
1 tablespoon Asian dark sesame oil

Thinly shred cabbage and green and red peppers. For sauce, in a small bowl, combine soy, vinegar, sugar and salt; set aside.

Preheat a wok or a large skillet over high heat. Add vegetable oil. When oil is hot, add chilies and peppercorns and stir-fry a few seconds. Add shredded cabbage and bell peppers and stir-fry for 1 - 1½ minutes, or until slightly wilted. Add sauce mixture and stir until blended. Place cabbage mixture in a serving dish. Discard chilies and peppercorns if desired. Sprinkle cabbage mixture with sesame oil and serve either hot or cold.


My passion is teaching people how to create a harmony of flavors with their cooking, and passing along my love and joy of food, both simple or exotic, plain or fancy. I continue my journey in ethnic and domestic cuisines, continuing my journey to explore diverse culinary experiences and hopefully to start you on a journey of your own. Join me also at A Harmony of Flavors on Facebook, and Pinterest.

Tuesday, October 9, 2018

Lots and Lots of Pork

If you like pork, in all its glorious forms, then this savory Four Pork Pie is going to be just what you want to try.

Four Pork, Pie, Hot Water Pastry, Crust
Four Pork Pie in Hot Water Pastry Crust

Yes, it does take a bit of time to prepare and assemble, and quite a long while in the oven, but this is a spectacular event of a dinner. Or, it is just as good cold, or lukewarm, can easily be taken with, whether on a picnic (though no picnics for a long while in our climes), or sliced for a lunch to go with you, or whatever takes your fancy. It is large, so there will be leftovers, unless you have a large family or a few guests.

This one is made in the same manner as my Beef and Pork Pie in Hot Water Pastry, though not packed into layers inside. It will hold together enough to slice when just made, but if you really want to see a lovely slice, wait to cut it chilled, the next day.
Four Pork Pie, Hot Water Pastry, Crust, Day 1, Day 2
Four Pork Pie in Hot Water Pastry Crust, Day 1 (just baked) and Day 2 (after cooling)
Cutting into the pie, still warm from the oven, made slices that were unable to stand upright. The fillings hold together well enough to place a slice on a plate, but not until the pie has chilled can it actually show the fillings in all their beauty, and stand upright with pride. The flavors are fabulous, either way. It's only a matter of choice.

Have the Filling Pre-Prepared

When making this pie, or any of these types of pie with a Hot Water Pastry Crust, the fillings must be all ready, before starting the pastry. This is because Hot Water Pastry is best worked while it is hot, and if you line your pan with the bottom pastry and do not have the filling ready to go in, then working with the top crust afterwards becomes far more difficult. Hot Water Pastry does not act at all like regular pie pastry crusts. It is quite warm and very soft, but with a slightly spongy feel. It does not lend itself to rolling out large and lifting to the pan as with a regular crust. It is (to me) much simpler to work the pastry up the pan once it is inside the pan. As the pastry cools, it becomes more difficult to work with, tending to tear more easily and stick together less well. Trust me; have your fillings already assembled.

Hot Water Crust Pastry, a la Paul Hollywood

The recipe for the Hot Water Pastry Crust, taken straight from watching The Great British Baking Show, consists of placing 150g lard and 200ml water into a saucepan and heating just to a simmer, when the lard will have melted. Granted, you do need a scale for this, though many measuring cups have milliliters marked on them. In a bowl, combine 450 grams (1 pound) of all-purpose flour and 100 grams of bread flour and rub in or cut in 75 grams of butter (⅓ cup). Once the lard and water are hot and melted, pour this into the flour mixture and mix with a spoon (it will be very hot at first) until most of the flour has been mixed in, then use hands (being careful not to get burned) to bring it all together in a somewhat spongy feeling ball. Use the pastry immediately.


A Part of the Filling You May Not Have on Hand

Hot Pepper, Mustard, Relish
Hot Pepper Mustard Relish
I happened to have some of my Hot Pepper Mustard Relish on hand. I just love this stuff. It's so delicious, it could be eaten as a dip, though it is fantastic on sandwiches and so much more. Since it is so delicious, and a little sweet and a little savory, I felt it would be a match made in heaven for pork. I used a fair amount of it, slathering it over layers of the filling as it went into the crust. I used about ¾ cup of the relish, ¼-cup at a time over three layers. If you do not have this relish on hand, you can just skip it. OR, possibly a substitute could be a mix of honey mustard with sweet pickle relish. To my mind, these flavors would also work. Just as an FYI.

Four Pork Pie in Hot Water Pastry Crust


Fills one 9-inch Spring-form Pan 
Four Pork, Pie, Hot Water, Pastry Crust
Four Pork Pie in Hot Water Pastry

Hot Water Crust Pastry (above)
8-ounces leftover pork roast, rough-chopped
8-ounces diced ham
20-ounces bulk pork sausage, fried
5-ounces bacon, cut in ¼-inch bits, fried
1 large onion, chopped, fried golden
4 cloves garlic, minced
1 medium sweet potato, peeled, cooked, chopped
1 chunk butternut squash (same weight as the sweet potato), cooked, chopped
3 tablespoons minced fresh sage
1 tablespoon minced fresh rosemary leaves
2 large kale leaves, stems discarded, in chiffonade
3 pickled walnuts, chopped, optional
-----
¾ cup Hot Pepper Mustard Relish, optional
1 egg plus 1 tablespoon water, whisked together for egg wash

Have ready a 9-inch spring-form pan.

Prepare all the meats, saute the onion and when nearly golden add the garlic for a few minutes more. Have the squash and sweet potato cooked in salted water and chopped coarsely. Place all these ingredients into a large mixing bowl. Add in the sage, rosemary and kale, along with the pickled walnuts, if available. Toss the mixture together to evenly distribute all the ingredients. Set aside.

Prepare the Hot Water Pastry as above noted. Use ⅔ of the pastry to press into and up the sides of the spring-form pan, ensuring there is an overhang. Work as quickly as possible, as it is easiest while warm, but make sure to patch any holes that may form. Press a third of the filling into the pastry lined pan, making sure it gets into the corners and edges. Spread about ¼-cup of the Hot Pepper Mustard Relish over this layer. Or use the suggested mix of Honey Mustard and sweet pickle relish or omit this step. Add another third of the filling mixture, pressing down evenly over the first layer, and well into the sides. Spread another ¼-cup of the Hot Pepper Mustard Relish over this layer (or one of the options). Press in the remaining filling evenly and spread with the last ¼-cup of the Hot Pepper Mustard Relish, or one of the options. 

Roll out the remaining ⅓ of the Pastry, large enough to hang over the edges of the pan. Brush just the top rim edge of the bottom crust with egg wash, then set the rolled pastry atop the pie, pressing the rim to seal the edges together. Trim away the overhang dough and set it aside to make decorative leaves or other forms  for the pie. Crimp the edges of the crust all around the pan, then make sure the crimped edges are all inside the pan, as later after partway through baking, the spring-form rim will be removed. If the crimped edge covers the top rim of the pan, the sides of the pan will not be easy to remove.

Cut a ½-inch hole in the center of the top crust. Roll out and cut decorative pieces for the top of the pie. Set them in place, then set the pan on a rimmed baking sheet into a preheated 350 degree oven. Bake the pie for about 70 to 75 minutes, and nicely golden. Remove from oven and increase oven temperature to 375 degrees. At this point, the pie should be strong enough to remove the spring-form rim. Unlatch and carefully remove the rim and set aside. Brush all over the top and sides of the pastry thoroughly with the egg wash. Place back into the oven for 10 minutes, then remove once more to apply a second coat of egg wash, then return to oven for 10 more minutes.

Allow the pie to cool for at least 30 minutes before slicing, or if time permits, cool completely. Refrigerate if you prefer to serve it chilled the following day.


My passion is teaching people how to create a harmony of flavors with their cooking, and passing along my love and joy of food, both simple or exotic, plain or fancy. I continue my journey in ethnic and domestic cuisines, continuing my journey to explore diverse culinary experiences and hopefully to start you on a journey of your own. Join me also at A Harmony of Flavors on Facebook, and Pinterest.

Sunday, December 3, 2017

Another Stab at a Breakfast Casserole

Not quite a month ago I made a delicious breakfast casserole to mimic one I had eaten out in Washington at Tweets Cafe. It was really the first breakfast casserole of any kind I had made and while it was completely delicious, it did have some technical issues. I have no problem with posting the recipe, because it came out absolutely wonderful both in flavor and in appearance.

Christmas Tree, decorations
My Christmas Tree
As is usually the case with such things, the thoughts keep percolating somewhere in the back of my mind, and in the last couple of days, things got insistent, so I made a decision last evening that I would give it another try. Not the exact same recipe, because I was missing some key elements, most notably Poblano peppers. But, I did have eggs, and cheese and bacon. And that's where my mind shut off for the night last night. I did go so far as contemplate getting out of bed and putting some black beans to slow cook in the Crock Pot overnight, but nixed that idea. I was too tired from getting my Christmas tree together yesterday!

I got up this morning prepared to get into the kitchen and try out all the ideas I'd had since making that last casserole. Again, I was making this just for my husband and myself, so I was going to once more attempt the use of that same tiny Pyrex loaf pan I'd used last time, despite the difficulties I had then with it sticking. I cleaned that Pyrex and scrubbed it well, in hopes that this would help mitigate sticking. Instead of foil, I opted to use parchment to line the pan, but this time only lining it across the wide sides, with overhang, on the off-chance it would come out easily. I did not allow any parchment to go up the narrow sides. I greased the pan, but not the parchment once it was in place. I set the oven to 350 degrees.

Then the decision of what to put into this casserole. I liked the potatoes in the bottom, so once again I used potato, but a half of one larger potato. I fried it the same as last time, using my method for Pan Potatoes. Once done, those went into the bottom of the prepared casserole. Meanwhile, I fried up some bacon, diced small. After setting the crisp bacon aside to drain, I fried a half of a smaller onion (a larger shallot would also work) until translucent, then added in some garlic, some chopped fresh asparagus and red bell pepper, just until slightly softened, but still retaining their color.
 
Bacon, Egg, Casserole, breakfast
Bacon & Egg Casserole

While that was in progress, I whisked together 5 eggs and added in some fresh thyme leaves, which are still alive in a pot in my sun room, despite pretty chilly temperatures. I added in about 3 tablespoons of cream (milk would do) to the eggs and whisked well. A small amount of the eggs got poured over the potatoes in the little pan, and I rapped the pan several times, coaxing the eggs into and around the potatoes. To the remaining eggs I added the drained bacon, all the vegetables in the pan, along with some cheddar cheese, stirred well and poured this over top of the potato-egg mixture already in the pan. 

Bacon, Egg, Casserole, breakfast, recipe
Bacon & Egg Casserole
This time, I opted to cover the pan while it baked, hoping that the stored heat would help with getting the eggs set. It certainly worked. The last time, it took a solid hour and a bit of finagling to get the eggs set all the way through, but this time it took not quite 45 minutes and the top of the little casserole was beautifully puffed and rounded. I was so very pleased! Now the remaining question was, would it come out of the pan without such a struggle as last time? Why yes, it certainly did. No only did I not have to run a knife around the edges, but by lifting the ends of parchment, it lifted cleanly out, and once I set it on the cutting board, the parchment simply fell away to the sides. I was so happy, and so amazed.
 
One thing I did, because I have seen others do it, is to top the finished casserole with more cheese and pop it back in the oven to melt. I found this completely superfluous, redundant even, especially with all the garnishes that went on top, as well as an extra sprinkling of cheese. I would stick with just the half cup of cheese that went into the casserole.

Now I really want to go back to remake the first casserole, because the Poblanos in that one were just scrumptious. But for now, I could not have asked for a better turnout. And, although I am calling this casserole "Bacon and Egg Casserole," that is so inadequate, with all the great things in it!

Bacon & Egg Casserole

(with potatoes, asparagus, red bell pepper, onion, garlic and cheese 😉)
Bacon, Egg, Casserole, breakfast, recipe
Bacon & Egg Casserole
(with Sweety Drop Peppers)

Serves 2

4 strips thick sliced bacon, diced
½ large potato, or one small
2 teaspoons olive oil
½ medium onion, or 1 large shallot, finely chopped
1 clove garlic, minced 
½ red bell pepper, chopped
3 - 4 asparagus spears, chopped (about ¾ cup)
5 eggs, whisked
1½ teaspoons fresh thyme leaves
3 tablespoons cream or milk
½ cup shredded cheddar cheese
salt, to taste

GARNISHES:
  • A small "salad" portion per plate: choose from: lettuce, arugula, spinach, baby greens, cabbage, red cabbage, cilantro, etc. 
  • scallions, sliced diagonally
  • cilantro or parsley for sprinkling
  • Feta or more cheddar cheese for sprinkling over top.
  • sour cream or Greek yogurt
  • "Sweety Drop Peppers," optional (find them on Amazon), or cherry tomatoes
casserole, egg casserole, bacon, vegetables, breakfast
Fresh from the oven

Prepare a very small loaf pan, 3.5 x 6 x 2.5-inches, approximately: Spray the pan with nonstick cooking spray. Cut a piece of parchment to fit in and across the widest sides of the pan, with at least an inch of overhang. Set aside. Preheat oven to 350 degrees.

Heat a skillet and add olive oil. Add in the potatoes and fry them on medium heat until crisp and browned, keeping a lid on and only occasionally removing the lid to stir until done, about 15 minutes. Sprinkle with salt. Remove the potatoes to the prepared loaf pan.

Place the diced bacon into a skillet and fry until crisp. Remove to paper toweling to drain; set aside. In the same pan, with the bacon grease (remove some, if it is too much), saute the onion until translucent and soft. Add in the garlic, red bell pepper and asparagus, sprinkle with salt to taste and saute quickly just to soften, but still retain vibrant color. Remove from heat to cool slightly.

In a bowl, whisk together the eggs and add in the cream and thyme leaves. Pour a small amount over the potatoes in the loaf pan. Rap the pan a few times on the counter to settle some of the egg in and around the potatoes. To the remaining eggs in the bowl, add the reserved bacon, the cheese and the onion mixture from the skillet. Stir to combine the ingredients, then pour all of the mixture over the potatoes in the loaf pan. Keeping the parchment overhang on the outside of the pan, cover the pan with foil or a silicone topper. If foil, spray the side of the foil that will touch the eggs. 

Bake the casserole for 40 to 45 minutes, or until it has puffed and is completely set in the center. 

To garnish the plate as I've done, make a small salad portion using greens of your choosing for each plate. Smear a bit of sour cream or Greek yogurt alongside the salad. Once the casserole is done, remove from the pan by using the ends of parchment and set the casserole on a cutting board. With a very sharp knife, trim the edges of the egg straight and cut the casserole in half. Set one half (should be a nice square) onto the sour cream. Sprinkle with more cheddar or with Feta or any cheese preferred. Sprinkle with scallions and cilantro and if available, the Sweety Drop Peppers or halved cherry tomatoes for color.


My passion is teaching people how to create a harmony of flavors with their cooking, and passing along my love and joy of food, both simple or exotic, plain or fancy. I continue my journey in ethnic and domestic cuisines, continuing my journey to explore diverse culinary experiences and hopefully to start you on a journey of your own. Join me also at A Harmony of Flavors on Facebook, and Pinterest.
Sunday, February 26, 2017

Great Muffins from Rye Flour and Rye Bran

The Rye Baker, Stanley Ginsberg, bread, cookbook
The Rye Baker by Stanley Ginsberg
I had been busily making rye breads before Christmas, particularly having just received my latest bread cookbook, "The Rye Baker," by Stanley Ginsberg. Between the two new bread baking books, I made a lot of breads of many varieties, to be covered when guests were here over the holidays. I have my own electric grain mill, making quick work of grinding most things into flour; wheat berries, rye berries, Kamut Khorasan, red rice, dried garbanzo beans and more. The difficulty lies in that with rye, most breads call for at least medium rye, which is rye flour with the bran sifted out. Let me say, I spent a lot of time sifting the rye flour. That I need a better, faster way to accomplish that is a no-brainer. Since the holidays, however, I have still been noshing on the already made breads I have in the freezer.


Maple, Bacon, Rye, Muffins
Maple Bacon Rye Muffins

That comes back to the fact of all the leftover rye bran that I had sifted out. I have lots and lots. I made some muffins a few weeks ago, using mainly the rye bran, and while they were good, they were not exciting. In the meantime, I had been reading about the whole grains and the problem with phytic acid, after talking with a friend whose doctor warned her against whole grains. This is a quote from one website:
"High-phytate foods, such as grains, nuts, and legumes, can raise the risk of iron and zinc deficiency. As a countermeasure, strategies such as soaking, sprouting and fermentation are often employed. For those who eat meat regularly, deficiencies caused by phytic acid are not a concern."

Another site, precisionnutrition.com, and another quote:
"Some experts even suggest that it’s the phytic acid in whole grains and beans that lends them their apparent protective properties against cardiovascular disease, cancer, and diabetes."

Most all of the whole grain breads I've been making call for very long, slow fermentation periods, some including overnight cold rising in the fridge. This slow fermentation mitigates phytic acid binding the minerals. Many of the newer bread recipes call for soaking and sprouting the grain, then drying and grinding, so that long soak also balances out any harm. But when it comes to the rye bran, which is culled from just plain rye berries not previously soaked, sprouted or other, the bran is then high in phytic acid. 

As one of the things to do is soak, I thought I would soak some of the rye bran in buttermilk (double whammy, as an acidic environment is also supposed to help, along with soaking in general). Then I read more and found that the soaking medium should be hot. And, that it requires a long soak. 

I mean, REALLY! What's a girl supposed to do to have a healthy breakfast anymore???

Maple, Bacon, Rye, Muffin, recipe
Maple Bacon Rye Muffin texture
Long and short, a few days back I thought I would heat some buttermilk and soak the rye bran while prepping the rest of the ingredients to make some more muffins, and have done with it. I am not vegetarian, so I shouldn't fall into the risk of iron and zinc deficiency. All this aside, most readers will not own their own electric grain mill, grind their own rye berries to make bread, and sift out rye bran. And if this is the case, oat bran would work just as well in these muffins. Rye flour is easily found these days. Bob's Red Mill carries at least 3 different grinds: Light Rye (the rye equivalent of white all-purpose flour, but with less gluten), Medium Rye (what I approximate when sifting out the bran), and Pumpernickel Rye (more coarsely ground and with all the bran and germ), plus all the organic options. There are other types and grinds, but these are the most easily available. I happened to have some of my sifted "medium rye flour" in a baggie I found pushed back behind some things, so decided also to use this in the recipe. 

Okay, so I knew what I was doing with the rye part of the recipe. I happened to have some bacon in the fridge. I don't eat it often, so I thought I would use some in the muffins. Maple is always an excellent flavor combination with bacon, so I used maple syrup as the sweetener. 

This time, the muffins were fantastic. Oh my! The texture was light and just perfect. Even my husband, generally not one to actually eat anything whole grain if he can help it, actually asked if he could have a couple! They must have smelled really good to him, too! He said they were great, and that is just about the biggest endorsement I could possibly give to a whole grained food! 


Maple Bacon Rye Muffins
Maple, Bacon, Rye, Muffins, recipe, breakfast
Maple Bacon Rye Muffins


Makes 12 regular sized muffins

1 cup buttermilk, heated
½ cup rye bran (or oat bran)
5 strips thick sliced bacon
¾ cup medium rye flour
¾ cup all-purpose flour
2 teaspoons baking powder
½ teaspoon baking soda
½ teaspoon salt
2 large eggs
¼ cup real maple syrup
½ teaspoon maple flavor
4 tablespoons unsalted butter, melted


Preheat oven to 350 degrees. Mix the bran into the heated buttermilk in a medium bowl, stir, and set aside.

Cut the bacon across into ¼-inch pieces and fry until just crisped. Drain on paper toweling. Set aside.

In a mixing bowl, whisk or sift together the rye and all-purpose flours, baking powder, baking soda and salt.

Add the eggs, maple syrup and melted butter to the bowl with the buttermilk and bran. Stir to mix well. Pour this mixture into the dry ingredients and stir to combine, then add in the Maple Flav-r-Bites and stir in.

Grease the wells of a 12-count muffin tin, using cooking spray. Divide the batter evenly between the 12 wells and bake the muffins for about 20 minutes, or until a toothpick inserted in the centers comes out with only a crumb or two. 


My passion is teaching people how to create a harmony of flavors with their cooking, and passing along my love and joy of food, both simple or exotic, plain or fancy. I continue my journey in ethnic and domestic cuisines, continuing my journey to explore diverse culinary experiences and hopefully to start you on a journey of your own. Join me also at A Harmony of Flavors on Facebook, and Pinterest.

Disqus