Translate

Showing posts with label rhubarb recipe. Show all posts

Wednesday, September 20, 2017

Remembering Mom with a Pie

When I was 4 years old, we moved to the house where my family would live until I was 17 years old. When I look back to that house and its fantastic yard, I can only marvel, because it was a little piece of paradise. Someone, prior to our family, took the time to really plant the yard with an eye to beauty and bounty. Some plants I grew up with are ones I have never seen again, anywhere I have been. Some, I am still discovering what they were, or might have been. The lot was large, and sloped dramatically down to a huge back yard (huge, to me). My Dad grew up on a farm, and had farming blood, so he took fully half that big back yard and turned it into a garden. He planted vegetables, and tried all sorts of things, but we always had corn, spring onions, tomatoes, green beans, beets and other of the usual veggies. And he would try out things we'd never had. He had a huge strawberry patch. But that is only the merest beginning of all that yard had to offer. 
Dad, Tilling, Garden, 1955
Dad Tilling his Garden 1955

Aside from the amazing array of flowers and flowering bushes, the back yard had fruit. Lots of it. There was a Rainier cherry tree and a Montmorency cherry tree, two Bartlett pear trees that ripened just as school started and a plum tree with green plums that were so sweet it was amazing. Dad would store baskets and baskets of them, carefully packed, to last into Fall and Winter. There was a peach tree and three different apple trees, a quince tree, elderberry bushes, concord grapes and some green grapes, blackberries, black raspberries and an absolutely huge red raspberry stand. And there was rhubarb.

My Mom was kept busy all summer long canning, making jams and jellies, preserving fruits and vegetables. Quince and elderberry jams were common, among all the others: raspberry, black raspberry, strawberry, cherry. When my parents finally bought a large standing freezer, Mom started freezing some of the fruits and vegetables, too. And yet with all the activity around all the fruits and vegetables, the one and only thing I recall my Mom using the rhubarb for was a Rhubarb Pineapple Pie (with raisins). Since the rhubarb stand was sizeable, this is rather surprising, but I was certainly old enough to recall another kind of use for rhubarb, had there been one.
 
Rhubarb, Pineapple, Pie, recipe
Rhubarb Pineapple Pie

But regardless, this pie was always a hit at our house. Of course, Mom used canned pineapple back in those days, when having every kind of fruit or vegetable from anywhere in the world was not always the case. I do not believe my Mom ever bought or used a fresh pineapple in her life. But, when I moved to Guatemala, I had the exact opposite experience. Fresh pineapples abounded. Canned pineapple was terribly, prohibitively, expensive. I had one "Fresh Pineapple Pie" recipe, and at age 20 I really was barely starting out on my cooking and baking journey. 

Rhubarb, Pineapple, Pie, baked, recipe
Rhubarb Pineapple Pie, just baked
I was asked to make a couple of pies to donate to the Dacotah Prairie Museum's Fall Festival this coming Saturday, for their "Pie Social." I will be out of town, visiting my son that day, so they said to just freeze them. I have never, in all my years, frozen a pie, so I have no idea how they will be once thawed, but I decided to make a Rhubarb Pineapple Pie as one of my pies. Looking back through my blog and website, I realized that despite having made this pie myself, many times, somehow I had never gotten it into blog or website, so I am rectifying that right now! 

I had plenty of pineapple, after cutting up a whole, fresh pineapple, and I had plenty of rhubarb, so I made two Rhubarb Pineapple Pies; one to donate and one to take photos of and eat. It really is the most amazingly good pie, and canned pineapple is perfectly fine to use. Just drain a can of pineapple chunks; you will need 2 cups worth.

I don't know why some pies are generally made with flour or cornstarch as the thickener, and some are made using tapioca as the thickener, but this Rhubarb Pineapple Pie was one of the tapioca thickened variety, always. The colors are so pretty with the bright yellow pineapple and pink rhubarb, and then punctuated with a dot of a raisin here and there. I am not generally a fan of raisins cooked in things (I like them fine straight from the box or bag), but this pie just seems great with the addition of raisins. You can leave them out, if preferred. 

Most everyone I talk to about rhubarb pies will say that they have always made or eaten Rhubarb Strawberry Pie. I had never heard of this phenomenon before, and to this day I have yet to try it! Plus, I am not overly keen on strawberries. I know, call me weird and strange! But still, somehow that combination has never crossed my path.

Rhubarb Pineapple Pie
Rhubarb, Pineapple, Pie, recipe, dessert
Rhubarb Pineapple Pie


Makes one 9-inch pie

2 cups pineapple (fresh or canned, drained), diced
2 cups rhubarb, sliced ¼ to ½-inch
¾ cup raisins
3 tablespoons quick-cooking tapioca
1¼ cups sugar
Dash of salt
2 tablespoons butter to dot top of pie
2 crust pie pastry for 9-inch pie
Milk or cream, for brushing
Sugar, for sprinkling

Combine the cut fruits in a large bowl and add in the tapioca, sugar and salt. Stir well and set aside to rest for 15 to 30 minutes.

Roll out half the pie pastry ⅛-inch thick and fit it into a 9-inch pie plate, easing the pastry well down into the plate, and leaving at least ½-inch of overhang. Preheat oven to 400 degrees.

Roll out the second pastry to ⅛-inch thick and begin cutting long strips (width is optional - I cut one-inch wide strips for the rhubarb pineapple pie) from the rolled dough. Pour the fruit filling and all the juices accumulated into the pie shell. Cut the 2 tablespoons of butter into small chunks or slivers and dot the top of the filling.

Begin making the lattice top by setting the strips in one direction across the filling, leaving enough overhang to set to the outer rim of the pie plate, as shown below.
Making a lattice top pie crust
Lift back past halfway every other of the strips, then set one long strip perpendicular to the others, right across the center. Pull back into place the strips that were lifted, then pull back all the strips that were not lifted initially, and lay a second strip parallel to the last one. Return the lifted strips into place and repeat until strips reach the end, then begin again on the opposite side, to fill in the lattice. See this blog to view the remainder of the instructional photos on lattice top pie.
Filling, Lattice Top, Baked Pie
Filling - Lattice Top in place - Baked Pie
Once all the strips are in place, have a small bowl of water handy and using fingers or a pastry brush, dampen underneath each of the strip's edges, so they adhere to the bottom pastry around the rim. Now flip up the bottom pastry's overhang, to cover the strip edges. Flute the edges, pressing firmly so the fluting holds all the edges securely.

Optional: Brush all the lattice strips with the milk or cream, then sprinkle sugar over the lattices. Bake the pie in the center of the oven for 45 to 50 minutes, until browned and bubbling.


My passion is teaching people how to create a harmony of flavors with their cooking, and passing along my love and joy of food, both simple or exotic, plain or fancy. I continue my journey in ethnic and domestic cuisines, continuing my journey to explore diverse culinary experiences and hopefully to start you on a journey of your own. Join me also at A Harmony of Flavors on Facebook, and Pinterest.

Thursday, July 2, 2015

Finally Made the Rhubarb Bars

My Painting of Sunflower
It's been a few days since I last posted. I have suddenly gotten into painting. This new interest has been taking up a bit of my time. Last Saturday, the Dacotah Prairie Museum held a "learn to paint" day, called The Great Art Escape. Lora Schaunaman, an artist herself, is the Curator of Exhibits at the museum. This painting day was held at The Granary, and was a great lot of fun. We were all taught to use acrylic paint, make a background in greens and yellows, and then a large sunflower that takes up a large portion of the (11 x 14) canvas. Twenty people (approximately) painted this same image, and there were twenty different interpretations. It is a style of painting I had not really explored before. 

My 2nd Painting
When in high school, MANY long years ago, I did paint two acrylic pictures, both with water and trees. I believe as a younger child I was once given some oil paints to dabble with, but nothing came of that either. I have sketched with pencil, charcoal and pastels and spent most of my time on this, until I was married. At that point, having moved to Guatemala, I had other things to absorb my interests and my artistic ability was expressed in many other ways. I made macrame fast and furiously for a time. I grew plants to pot and put into the macrame holders I'd made. I learned to cook
My 3rd Painting
and expressed myself there. I sewed. I learned to crochet. I learned to paint on ceramics. Back in the US, I continued with ceramics for a time. When I met my current husband, who was well into computers at a time when they were really just coming into being, and the internet as we know it did not yet exist, he taught me to use a computer. Once Windows came into being, it was not too long after that I got my first Corel Graphics Suite, and the rest is history. This has occupied my time for these many years since. 


Parchmen, lining pan, dessert, removing from pan
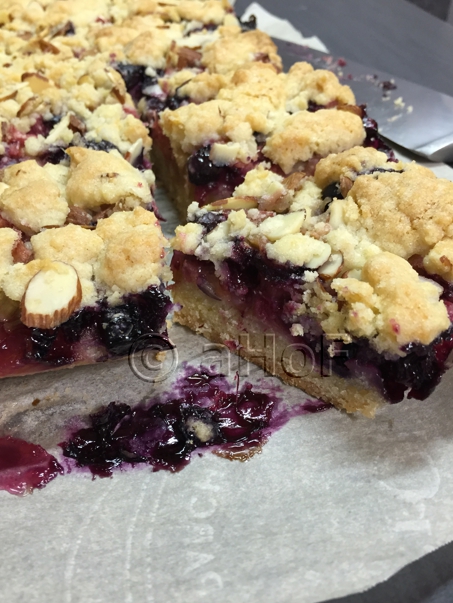
Rhubarb Blueberry Bars
Since I knew I "could" paint. I figured going to the Granary would be interesting. It certainly taught me a few things, one of which is that this form of artistic expression is far from over, for me! I turned around on Monday and went to buy a few paints and canvases and got to work, turning out two more small paintings in two days. I have another in the works, but was busy elsewhere yesterday. Hopefully today I can get back to it!

Meanwhile, I had bought some rhubarb for a second week in a row at the Farmers' Market, and had some of it left in the fridge. With my blood glucose numbers soaring, I had been avoiding desserts, but I had so wanted to make the rhubarb into bars, as I did with the Raspberry Bars, a month ago. In examining the recipe as I had made it, I felt that I could cut back some of the butter and the one egg yolk. I feared to cut back on sugar - rhubarb is tart. As it turns out, the amount of rhubarb I had was less than I imagined, so I added in some blueberries to the fruit mixture. My preference would have been all rhubarb, just to see how it tasted. I had only 3 cups of rhubarb, once cut, instead of the 4 cups I'd hoped for. It was certainly yummy, no matter which fruit goes into it!


Rhubarb, Blueberry, Bars, dessert, crust
Rhubarb Blueberry Bars
One thing I am really enjoying at the moment is lining the 13 x 9-inch pan with parchment. It takes a little tiny bit of time to do, but then completely allows for lifting out the entire dessert. It certainly makes for some great photos! It also means nice, neat slices, with no having to "dig" to get that first, stubborn slice to come out cleanly. The parchment has to be cut so there is a small bit of overhang (it doesn't really "hang" but only stick up above the edge of the pan slightly). This allows the whole dessert, once cooled, to be lifted via this parchment overhang and set on a flat surface. Whether to leave it on the parchment is then up to you. It does not keep the pan clean, so that is not the purpose. Still, I have been doing this now, and like the result. 


Rhubarb, Blueberry, Bars, sliced, dessert
Rhubarb Blueberry Bars, sliced

Rhubarb Blueberry Bars

Makes one 13 x 9-inch pan

FRUIT MIXTURE:
3 cups rhubarb, sliced thinly
½ cup granulated sugar
3 tablespoons cornstarch
pinch of salt 
1/2 teaspoon blackberry flavoring (or vanilla extract)
1 cup blueberries 


CRUST and TOPPING:
2¼ cups all-purpose flour
1 cup granulated sugar
1½ teaspoons baking powder
½ teaspoon salt
2 sticks (1 cup/8 ounces) cold, unsalted butter
2 whole eggs

½ cup sliced almonds

If using parchment to line the pan: cut the parchment so there will be at least ½-inch of overhang. Cut diagonally into the corners of the parchment so it can overlap and lay smoothly into the corners. I also trim the points of the parchment at the corners so the points don't blacken too much in the oven. Lightly spray the parchment with nonstick spray and set aside. If not using parchment, spray the pan with the nonstick spray. Preheat oven to 375 degrees (350 on Convection). 

Place the sliced rhubarb into a bowl and press or crush it before adding the sugar, cornstarch, salt and flavoring. Mix well and allow to macerate while preparing the crust and topping mixture.

In a large mixing bowl, combine the all-purpose flour, sugar, baking powder and salt and stir together. Using a large holed grater, grate the cold butter into the dry ingredients. If you do not have a large holed grater, simply cut the cold butter into very small pieces. Using either a pastry cutter or hands, cut the butter into the flour mixture until it will hold small clumps. If using hands, rub the mixture between palms repeatedly until this result is achieved. Whisk the two eggs together in a small bowl, and then pour all at once into the crumbly mixture. Use a fork to quickly toss and dampen most of the crumb mixture. It will not be perfectly wet through.  Some dry will remain.

Divide about 2/3 of this mixture into the parchment lined pan and gently spread to the edges, pressing only very gently. Bake this bottom crust for 12 to 15 minutes, or until it has just begun to turn golden on the higher spots. Remove from oven. Gently mix the blueberries into the rhubarb mixture, which should now be quite juicy.  Pour the whole fruit mixture over the partially baked crust, gently easing the fruit evenly over the crust. Mix the sliced almonds into the remaining crust mixture and sprinkle this (now topping) mixture over top of the fruit. Bake the bars for about 20 to 25 minutes, then reduce heat and bake for 13 to 15 minutes more, or until nicely browned on top and the fruit is bubbly and thick.


My passion is teaching people how to create a harmony of flavors with their cooking, and passing along my love and joy of food, both simple or exotic, plain or fancy. I continue my journey in ethnic and domestic cuisines, continuing my journey to explore diverse culinary experiences and hopefully to start you on a journey of your own. Join me also at A Harmony of Flavors on Facebook, and Pinterest.

Disqus