Translate

Tuesday, December 23, 2014

A Couple of Treats to take to the Festivities

I mentioned a day or two ago that we are going to one of my sisters-in law's house for Christmas Day. They do a big "dinner" at noon, open gifts all afternoon, and then have snack foods for the evening. I was asked to bring something to contribute to the snack portion of the evening. The request was completely open-ended: no guidance as to what to make or how much, it was all up to me. 

Sugared Pecans, coated pecans, sweets, treats
Diana's Sugared Pecans
After talking it over a bit, I came up with two things; one sweet and one savory. For the sweet portion, I made some of Diana's Sugared Pecans, which are so delicious it is very hard to move away from the bowl when they are out! These are very sweet pecans, with a thick, coating and they are dreamy good! In case you are in need of something to make, these are certainly an option. They don't take long to make, either, though you will need a candy thermometer. 

I will say, I got this recipe many years ago from my sister, who found it on the internet. I looked and looked yesterday and cannot find that recipe out there, though it must be. Regardless, in the original recipe I believe it said to spread the finished nuts onto waxed paper to separate, and then cool. I have done this in past, but the nuts are exceedingly hot when they go onto the waxed paper. Inevitably, some of the hot nuts will stick to the paper. Not a really big deal, but this time I used Silpats to spread them to cool. Worked most wonderfully! Just FYI.


Sugared Pecans, coated pecans, sweet treat
Diana's Sugared Pecans

Diana's Sugared Pecans


Makes about 4+ cups

3¾ cups pecan halves
2¼ cups granulated sugar
3 tablespoons butter
¾ cup sour cream
1 teaspoon cinnamon
1½ teaspoons vanilla extract

Preheat oven to 275 degrees. Place the pecans onto a rimmed baking sheet in one layer. Bake the pecans for about 20 minutes, then set them aside to cool. Have ready either waxed paper or Silpat/silicone sheets.

Place the sugar, butter and sour cream into a saucepan and stir well. Bring the mixture to a boil, then cover the pan for 2 minutes, so the steam washes down any sugar crystals lurking on the sides of the pan. Insert the candy thermometer and cook the mixture on medium heat to soft-ball stage, or 235 to 240 degrees. Remove from heat, add in the cinnamon, vanilla and the pecans and stir well. Pour the mixture onto the prepared waxed paper or silicone sheets and with two forks, separate the nuts into single pieces. Allow to cool and then store in an airtight container until needed.

The second part of the snack treats are Cheese Twists. These were sort of a riff on a recipe on the 'net from Emeril. I started with that recipe and altered it to fit my taste. I used fresh rosemary and then added in some Grains of Paradise. If you are so fortunate as to have these little gems in your spice cabinet, I highly recommend them. If not, use about half the amount of freshly ground black pepper. 

Cheese Twists, recipe, puff pastry, Parmesan cheese
Cheese Twists

Cheese Twists


Makes about 32

2 sheets Puff Pastry
1 egg, lightly beaten
⅔ cup freshly grated Parmesan Cheese
¼ cup olive oil
2 to 4 cloves garlic, finely minced
1 tablespoon fresh rosemary, minced finely
2 teaspoons Grains of Paradise, ground
1 teaspoon salt
dash of cayenne, optional

Thaw the puff pastry sheets until they unfold easily, about 30 to 40 minutes. In the meantime, in a bowl, combine the Parmesan, olive oil, garlic, rosemary, Grains of Paradise, salt and cayenne, if using. Preheat oven to 400 degrees.

Once pastry sheets are thawed, sprinkle a surface with flour and roll out one of the sheets in only one direction, keeping the corners squared. The sheet length should be about doubled the width. With a pastry brush, brush the lightly beaten egg onto the entire sheet. Using one half of the filling mixture, spread this over one half of the pastry sheet. Fold the unused side over the filled side. With the rolling pin, press the top down to seal the mixture in. Use a long, sharp knife, or pastry or pizza cutter to slice narrow pieces, about 3/8-inch wide. Twist these long strips a few times, and set them, well apart, onto a baking sheet.
Rolling pastry, Filling Pastry, step by step
Roll pastry              |       brush with egg         |      spread half mixture      |     on half the sheet

 
Cutting pastry, Twisting, pastry, Baking
Fold opposite side over filling      |    slice into long strips     |    twist the strips     |    bake


Repeat this with the second puff pastry sheet. Bake each sheet of Cheese Twists for about 10 minutes, until puffed and golden.

I hope everyone celebrating Christmas has a most wonderful holiday, filled with love and happiness. If you are not celebrating Christmas, I hope you find some entertaining recipes herein. I will be absent for a few days  with my own celebrations. 


My passion is teaching people how to create a harmony of flavors with their cooking, and passing along my love and joy of food, both simple or exotic, plain or fancy. I continue my journey in ethnic and domestic cuisines, continuing my journey to explore diverse culinary experiences and hopefully to start you on a journey of your own. Join me also at A Harmony of Flavors on Facebook, and Pinterest.

One More Kind of Cookie Before Christmas

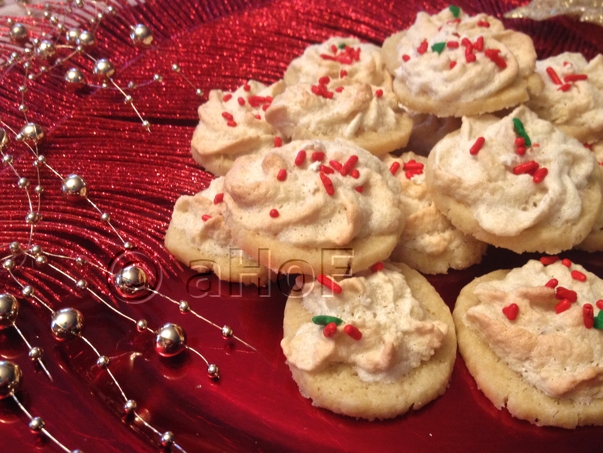
As I have mentioned, I got a really late start on my holiday baking. Despite this, I have managed to squeeze in 6 kinds of cookies. I  made some Miracle Peanut Butter Cookies with Hershey's Kisses in the center, Forgotten Cookies, Rolled Butter Cookies, Cherry Bon Bons and Thumbprints. (Click on any of the highlighted recipes to go straight to that recipe page.) Yesterday I also made another kind, which I am calling Almond Meringue Tarts, though they are not in traditional tart shape. 

Almond, Meringue, Tarts, cookies, making cookies
Almond Meringue Tarts


These cookies are easy to make, as with most cookies. The forming takes no time at all; simply slice them and set on the baking sheet. There is a meringue that goes on top before baking, which can either be placed with two spoons, or with a piping bag, as preferred. The meringue contains a lot of ground almonds, hence "almond" in the title, along with almond extract in both the cookie base and the meringue. They are really delightful! I chose to sprinkle some festive jimmies on top before baking, but colored sugars would work as well.

Almond Meringue Tarts


Makes about 6 dozen
Almond, Meringue, Tarts, cookies, Christmas cookies
Almond Meringue Tarts


COOKIE BASE:
2 cups flour
½ cup granulated sugar
½ teaspoon salt
12 tablespoons butter, room temperature
1 egg
1 teaspoon vanilla extract
½ teaspoon almond extract

MERINGUE TOPPING:
6 tablespoons egg whites (from 2 - 3 eggs, depending on size)
¼ teaspoon cream of tartar
¾ cup confectioners' sugar
½ teaspoon almond extract
-------------
2 cups blanched, slivered almonds
¼ cup confectioners' sugar

Make cookie dough: In a bowl, combine the flour, sugar and salt. Cut int he butter as for pie dough, until well blended and crumbly. In a small bowl, whisk together the egg and extracts. Pour this over the blended mixture and toss with a fork to moisten, just as for pie dough. If the dough will not come together as one mass, sprinkle in 2 teaspoons water and mix again. Continue, until the mixture just forms a mass. Divide the dough in two parts. Roll each part into a log about 1½ inches in diameter. Repeat with the second section of dough. Roll each of the logs into waxed paper, twist the ends closed and refrigerate at least 3 hours or overnight.
almonds, meringue, tarts, cookies, almonds, Christmas
Almond Meringue Tarts, cooling
When ready to bake, make the meringue: Place the 2 cups almonds into a food processor with the ¼ cup confectioners' sugar and process until very fine, but not oily. Set aside.

Place the egg whites into a mixer bowl with the cream of tartar and with whisk attachment, beat the egg whites to soft peaks. Begin adding in the ¾ cup confectioners' sugar about 1 tablespoon at a time, until the meringue holds stiff peaks and is smooth and glossy. Add in the almond extract. By hand, fold in the ground almonds gently, until combined.

Preheat oven to 325 degrees. Remove one of the logs of dough from the refrigerator and remove the waxed paper. With a sharp knife, slice the log as thinly as possible; about 3/16-inch thick. Set these little discs onto an ungreased cookie sheet, at least 1 inch apart. Pipe or drop little mounds of the almond meringue on top of each cookie disc. Top with a colored sugar or other festive decorative topping. Bake the cookies for about 16 to 18 minutes, until set and lightly browned.


My passion is teaching people how to create a harmony of flavors with their cooking, and passing along my love and joy of food, both simple or exotic, plain or fancy. I continue my journey in ethnic and domestic cuisines, continuing my journey to explore diverse culinary experiences and hopefully to start you on a journey of your own. Join me also at A Harmony of Flavors on Facebook, and Pinterest.
Sunday, December 21, 2014

More Cookies and Ever Closer to the Holiday

I am really late with cookie making this year, but I am valiantly working on them, amidst other holiday food prep. I made my Cranberry Orange Relish, at my sister-in-law's request, to bring to her house Christmas Day. I made some Sugared Pecans and will be making some Cheese Twists also to take. They have a big dinner at noon, and then spend the afternoon with the whole family opening gifts, and then set out snack-type things in the evening. Those last two things are my contribution to that latter portion of the day.
 
Thumbprint Cookies, Jewel Cookies, glace cherries,
Thumbprint Cookies

I know everyone is exceedingly busy at this point in time, but yesterday afternoon I made Thumbprint Cookies. Instead of my thumb to make the hole in the center, I used the pestle from my marble mortar and pestle set. The smaller end was the perfect size to make a nice, neat little well in the dough. The size was perfect for the glaceed cherries I set into them before baking. 

I have the dough made and chilled to make my Rolled Butter Cookies tomorrow as well as a new recipe I am calling Almond Meringue Tarts. I was absolutely positive i had almond flour in my freezer, but cannot find it, so back to the store tomorrow, briefly for that. I am making my husband's favorite Cherry Bon Bons also. Since Christmas Eve is all little snack/appetizer type foods at our house, I also have various standard recipes I will make, plus a couple of new ones. I am making my Green Pea, Feta and Mint Spread, Bean and Cheese Dip, and Bacon-Wrapped Dates, as well as a new recipe i am creating for a hot Artichoke Dip. Those things along with cheese slices, salami, grapes and crackers will be our feast for the evening.
 
Thumbprint Cookies, Jewel Cookies, Christmas
Thumbprint Cookies

This blog is being done hurriedly, so I will get right to the recipe:

Thumbprint Cookies


Makes about 40 to 45

1 cup butter, at room temperature
⅔ cup granulated sugar
1 egg, lightly beaten
1 teaspoon vanilla
¼ teaspoon Boyajian Lemon Oil or slightly more of lemon extract
2½ cups all-purpose flour
½ teaspoon salt
about 45 glaceed cherries

Cream together the butter and sugar. Beat in the egg and the extract and lemon oil. Add the flour and salt and combine gently, to form a dough. Chill the dough for at least 2 hours.
 
Making Thumbprint Cookies, forming cookies
Make balls of the dough, press in a deep well, insert a cherry and set on cookie sheet


Preheat oven to 350. Form the dough into small balls as shown. Use thumb or other implement to make a deep well in the ball of dough. Insert a glaceed cherry and set on an ungreased cookie sheet. Set the cookies about 1½ inches apart. While the dough has no leavening, they do inflate and spread just a little. Bake the cookies for about 12 to 14 minutes, or until they are set and beginning to color at the edges.


My passion is teaching people how to create a harmony of flavors with their cooking, and passing along my love and joy of food, both simple or exotic, plain or fancy. I continue my journey in ethnic and domestic cuisines, continuing my journey to explore diverse culinary experiences and hopefully to start you on a journey of your own. Join me also at A Harmony of Flavors on Facebook, and Pinterest.

Saturday, December 20, 2014

On a Roll - With Cookies

I am finally getting into the cookie spirit. As usually happens with me, once I start, no matter how innocently, no matter that I intended to make about 4 kinds of cookies total, I get carried away. Right now I have 3 kinds of cookies made, and only one of these three is one I intended to make. I mentioned at the end of my blog yesterday that I was going to make Forgotten Cookies next. And so it was. I did, however, already have a dough made for another kind, which I made this morning. For now though, the Forgotten Cookies.
 
Forgotten Cookies, meringue cookies, chocolate chips, gluten free
Forgotten Cookies

I first learned of these cookies when I was 17 years old (a L-O-N-G time ago, in 1967). My boyfriend at the time, Dick McKinney, took me to his parents' house. We watched Charlie Brown's Christmas on TV and his Mom had cookies out as refreshments. I tasted one of these cookies and went into raptures. I had a very hard time remembering any kind of manners, as I sort of ate my way through the plate of them! I asked his Mom what kind of cookies they were, and she said "Forgotten Cookies, because you 'forget' them in the oven overnight." The cookies themselves are just simple meringues, with chocolate chips and nuts in them.
 
Forgotten Cookies, meringue cookies, chocolate chips, gluten free
Forgotten Cookies

While it was a very long time before I ever found a recipe, sometime in the 1990s (I married - someone else - moved to Guatemala for 12 years, came back, got settled in the US, divorced, remarried....), I did always remember the name of the cookies. I do not recall where exactly I found it, finally, but when I made them, I remembered well why I loved them so much. Yesterday I spent some time online, just looking around, and found that Forgotten Cookie recipes are pretty much identical, no matter where one looks. It is not my original recipe. Why change a good thing? But here is the recipe anyway, just in case someone out there has missed these little gems, somehow.

Forgotten Cookies


Makes about 40 to 45

2 egg whites
pinch salt
⅔ cup sugar, processed to fine powder
½ teaspoon vanilla extract
1 cup chocolate chips
1 cup chopped nuts

Preheat oven to 350 degrees.

Beat egg whites with salt, until they hold soft peaks. Beat in the sugar until the meringue holds stiff peaks. Add in the vanilla, then fold in the chocolate chips and nuts. Drop by teaspoonfuls onto aluminum foil or parchment lined cookie sheets. Place in the preheated oven and turn off the heat at once and leave for at least 2 hours, or overnight.

dollops of meringue, parchment sheets
Drop small dollops of the meringue onto parchment sheets

In the morning, they are perfectly dried little meringue cookies that melt in your mouth.


My passion is teaching people how to create a harmony of flavors with their cooking, and passing along my love and joy of food, both simple or exotic, plain or fancy. I continue my journey in ethnic and domestic cuisines, continuing my journey to explore diverse culinary experiences and hopefully to start you on a journey of your own. Join me also at A Harmony of Flavors on Facebook, and Pinterest.

Friday, December 19, 2014

Finally Making Time for Christmas Cookies

Christopsomos, Greek bread, Christmas Bread
Christopsomos, Greek Christmas Bread
I had made a decision to do something different for gifts this year. I have been making (probably literally) thousands of cookies, so I have enough to give away as gifts to all the family, and still have enough to keep for ourselves. Instead, I decided on making another of the wonderful breads from The Bread Baker's Apprentice, by Peter Reinhart. I had originally tried the Christopsomos, a Greek Christmas Bread, but changed my mind. There was absolutely nothing wrong at all with the Christopsomos. It tasted divine. I was just unsure how the family would like it, so I switched gears and went for the Panettone. 

I made 10 loaves of the Panettone, the Italian Christmas Bread, for gifts. As it was taking the entire day long for the bread to rise (2 rises, at 4 hours each!), and then baking and cooling time to factor in, well, those were some long days. As we are now at less than a week from Christmas, I did not opt to make a Panettone for us here at home; at least not at this time. I will say, it smelled most heavenly while baking! 

Panettone, Italian, Christmas, Bread
Panettone, Italian Christmas Bread, right from the oven
Today, finally, I started on my cookies. Not getting too far just yet, with other things to do, I did at least get one batch of cookies made, plus the dough for another kind. The ones I made today were an experiment of sorts. I am not a peanut butter fan. Not - at - all. My husband however, is. The only peanut butter cookies I have made since my kids were little are the ones called "Miracle Cookies". That said, when I look around online, there are so many variations on Miracle Cookies now, that I am standing by the recipe I have had for at least 30 years. I like eating cookie dough. And bread dough, and cake batter, and just about any batter. I know this gives a lot of people the willies, but I have done it since early childhood, at my Mom's apron strings. At almost 65 years old, I am not planning on stopping now! 

I say that because, while I do not like peanut butter, I like the raw dough of these cookies. It may be strange, I know. I ate my fair share of peanut butter and jelly as a kid, and even in early adulthood. But, I have never, ever, in my life, taken a spoonful of peanut butter to eat. I have never liked it enough to do that. I do like the cookie dough! Go figure.

Miracle cookies, Peanut Butter Cookies
Miracle Peanut Butter Cookies, Christmas 2013
Back to the cookies. I have made these - not every year - but often enough, for my husband for Christmas. The recipe is so deceptively simple it is almost unbelievable, with only 4 ingredients. I know that others have made peanut butter cookies with a Hershey's Kiss set in the center. I remember one time seeing these at one of my sisters' houses. I have never done that, so I decided on making that little change to the Miracle Cookies this year. The basic cookie recipe is made entirely without flour, so they are gluten-free. I did not check the Hershey's Kiss bag to see if wheat is an ingredient, but without the Kisses, these cookies are totally gluten free. 

When making the peanut butter cookies without the Kisses, I scoop out and roll the dough into balls, and then use a fork to press the cookie down, making a criss-cross pattern on top (shown above). To make them with the Hershey's Kiss in the center, they are left in a ball, rolled in sugar and baked without flattening them down. They only flatten slightly in the oven, so pressing the Kiss into the center makes the cookie flatten to a normal cookie shape.
 

miracle cookies, peanut butter, cookies, gluten free, kisses
Miracle Peanut Butter Kisses, 2014

Miracle Peanut Butter Kisses

Miracle cookies, Peanut Butter, Kisses, gluten free
Miracle Peanut Butter Kisses

Makes about 24 cookies

1 cup peanut butter, creamy or crunchy as desired
1 cup granulated sugar
1 egg
1 teaspoon vanilla
---------
a bowl with about ½ to ¾ cup sugar, for rolling
24 - 28 Hershey's Kisses, unwrapped

Place all four ingredients into a mixer bowl, or just a mixing bowl. The ingredients can be creamed by hand, but a mixer will made super fast work of the dough. Preheat oven to 350 degrees.

Once the ingredients are well combined, begin rolling balls of the dough - or use a cookie scoop. Normally, I use the smaller of my two cookie scoops to make the plain cookies as I made last year. For these, I wanted enough of the cookie dough to offset the size of the Hershey's Kisses, so I used my larger scoop, measuring about 1 tablespoon. Scoop out a portion of the dough, roll it in a ball and roll in the sugar, to coat. Set the balls on an ungreased cookie sheet about 2 inches apart. Bake them for 10 to 12 minutes. Immediately on removing from the oven, set one of the unwrapped Kisses into the center of each cookie, making the still-soft cookie spread, as shown in the photo. Carefully slide them off the sheet to a counter or rack to cool completely. The chocolate stays soft a long time, so allow sufficient time for the cookies to cool before storing.

My next cookies are going to be "Forgotten Cookies". I will be making those this evening. Happy Baking!


My passion is teaching people how to create a harmony of flavors with their cooking, and passing along my love and joy of food, both simple or exotic, plain or fancy. I continue my journey in ethnic and domestic cuisines, continuing my journey to explore diverse culinary experiences and hopefully to start you on a journey of your own. Join me also at A Harmony of Flavors on Facebook, and Pinterest.

Monday, December 15, 2014

A Guatemalan Dessert with Unusual Name

Chancletas. That is the unusual name.

Chancleta is a rough, slang-like word for something like a slipper, or some type of slip on shoe. I guess I can sort-of see the chancleta reference. Last evening, as we ate this dessert after a lovely dinner of Hilachas, looking at the now-empty shell, there is a vague resemblance to a slipper. 
Chancleta
Chancleta, served

Whatever the word Chancleta means, that is what they called this particular dessert in Guatemala, made with a vegetable called Chayote. Guatemalans seem to make desserts out of the most unlikely things. Squash becomes candy, yuca root becomes a torta-type cake, and these Chayote Squash, called "Güisquil" (wee-SKEEL) in Guatemala, become funny-looking slipper-like desserts. 


Chayote Squash growing on a structure
Chayote Squash growing on a structure.

What is a Chayote?

Chayote Squash are known by many, many other names around the world, some of which are Mirliton, Vegetable Pear and Christophene. The vegetable, Sechium edule, is an edible, vining plant in the gourd family, along with cucumbers, melons and squash. They are extremely easy to grow - just stick one in the soil with the puckered end upwards. As with most vines, it will grow and positively take over an area. With these smaller squash, it is best (and easiest to harvest) if the vine has some sort of structure it can climb. The ripe squash will hang below and are easily seen and harvested. 

When I lived in Guatemala, I grew these Chayote Squash in our backyard, just as shown above. When you suddenly have 15 or 20 of them all ripe and waiting for use, you grasp at any recipe available. I made Chancletas relatively often! Obviously, these squash can be used in many other ways. They are not terribly flavorful, so using them in a dish with other flavors as the main point is great. I have often successfully made a "scalloped potatoes" recipe, using chayote squash instead of the potatoes, for a remarkably good and far less starchy meal or side dish.

How to Work with Chayote

Chayote whole and cut
Lower photo: slightly defined area to cut
There are a few small things to know about chayotes, when working with them. When peeling them, the inner flesh is a little sticky feeling. No big deal, but it is normal. Just an FYI. To take out the seed and the surrounding fibrous mass, lay the vegetable on one side and slice the vegetable across through its width, so the knife passes through and across the puckered end. This is shown in the photo sequence below. That picture shows an already cooked chayote, but the method is the same if it is raw. The reason for this is that the seed is wide and flat, and it is surrounded by a fibrous mass akin to one of those loofah sponges, and totally inedible. You could try, but you would be chewing all day 😂

If you have never worked with a chayote before, it is good to know where, exactly, this fibrous mass is, in order to cut it out effectively. Of course, you will find out soon enough. The knife won't pass through that mass easily, either! In the photo here above, first is a photo of what these vegetables look like. They come in completely smooth skins and some are so spiny they are hard to touch. Most sold in the US are totally smooth. The ones I grew in Guatemala had a few little spines on them. The lower picture in the photo shows a chayote cut open. I drew a faint line that shows where to insert the knife when cutting out the fibrous part. Insert the knife at a flat angle and cut out a very flat cone and discard. At any point, if the knife will not penetrate, this means you've hit the fibrous part; just re-angle the knife until it goes around easily. 

This may all sound difficult. It is not. I just want anyone daring enough to try something new, to know just exactly what to expect. This always helps me want to try something new.

Now that I have it prepped....

At this point, you have the vegetable ready to use. These are not starchy squash. They have a fair amount of water to them. They will cook easily. Add them to any dish where other vegetables are used, such as a stew or a vegetable soup. It can be sliced or cubed, as desired. They are one possible addition to the Hilachas recipe I posted a couple of days ago. To cook a whole chayote, first the timing will depend on the size of the vegetable, but the ones I used for making the Chancletas cooked through in about 45 minutes or so. If cooking them whole to make Chancletas, when piercing to test for doneness, try to keep to the edge where the vegetable will eventually be cut. You will be reusing the skin. Holes all over this skin are not conducive to keeping the skin whole to later fill. Now you are ready to make Chancletas.


Cutting chayote, chayote squash, removing seed,
Slice the squash through the width; inside; take out seed and fibrous mass, the inner meat; ready to bake

The sequence of photos here above show the prep for making Chancletas. 
  1. The vegetables are cooked whole, covered in boiling water. Once cool enough to handle, they are sliced as shown, across the widest part of the vegetable. 
  2. The whitish area surrounding the seed is a good indicator of where to insert the knife to remove the fibrous part surrounding the seed. 
  3. The third photo shows the seed and fibrous mass removed. 
  4. The next step shows the flesh scooped out of the shell. Keep in mind, these "shells are very soft and tear easily, even more than a cooked potato skin. Think of making Twice Baked Potatoes. You will need to leave just enough of the skin to give it a little structure. Not so much that you have nothing to use for the filling.
  5. The fifth photo shows the skins filled with the mixture, which is explained in the recipe below:

Chancletas


Makes 3 or 4 servings
Chancletas, dessert, chayote squash, filled dessert, cookie crumbs
Chancletas


My chayotes had excessive amounts of water to them. They kept leaking out more and more, to the point where I only had enough filling to fill 3 of the 4 chayote shells. This had never happened before, so much of this recipe will depend on how much of the flesh is scooped out to work with. Amounts may need to be adjusted.

2 Chayote squash
3/4 cup Champurrada crumbs or crumbs made from plain wafer cookies
1/2 teaspoon cinnamon
2 tablespoons sugar
4 teaspoons raisins
1 tablespoon butter
pinch salt

Set the chayotes in a pot and cover them with water. Bring to boil, lower heat and simmer until they are cooked through, about 45 minutes to an hour. Drain and set the chayotes aside until cool enough to handle.

Following the photos in the sequence above, first slice the chayotes in half as shown. With a small paring knife cut out a wide flat cone around the seed and fibrous mass. Discard. With a spoon, carefully scoop out the flesh, leaving only enough to give a little structure to the skins, which will be used to hold the filling. Puree the scooped out flesh and then add in the remaining ingredients. Once combined, fill the reserved skins with the mixture, set them on a baking sheet and bake at 350 for about 25 minutes, until set and golden. Serve warm.


My passion is teaching people how to create a harmony of flavors with their cooking, and passing along my love and joy of food, both simple or exotic, plain or fancy. I continue my journey in ethnic and domestic cuisines, continuing my journey to explore diverse culinary experiences and hopefully to start you on a journey of your own. Join me also at A Harmony of Flavors on Facebook, and Pinterest.

Saturday, December 13, 2014

Hilachas - a Delicious Guatemalan Stew

Continuing on with my revision of a cookbook / memoir of Guatemala, which I made for one daughter and am now revising for another one, today I made two Guatemalan dishes. Finally, after so many years I have eaten some these things again, and now have photos. I am truly happy on both counts. The first dish is a Guatemalan Stew, called "Hilachas." The second is a dessert, called Chancletas ("Slippers"), which I will describe in my next blog.

Hilachas?

Hilachas


The word Hilachas, translates to "rags." The dish is common all around Central America, and apparently Cuba and Puerto Rico as well. In the southern US it is more often seen on menus as "Ropa Vieja", which means "old clothes". It is not a far difference from old clothes to rags. Easy to see the similarity. In essence, the dish is the same. It is made with a meat that shreds easily, such as flank steak, and shredded into a sauce that is mildly tomato based. In Guatemala, some places made Hilachas adding in potatoes, some add in Chayote squash (Guisquil, in Guatemala) and some add carrots. Some places add all three. In the Castillo household, made by the wonderful maid named Carmen, it was only potatoes. And, despite the potatoes being a starch, the dish was served with rice. Despite the fact that Hilachas was served very often, being very economical to make, somehow I never made it myself. I had no idea of what went into the dish, beyond the vague notion of something tomato-y as the base, with meat and potatoes. I wasn't even sure what kind of meat they used. I attempted something with no research one time long ago, was completely unhappy with it, and never tried again.
guisquil, chayote squash, vegetable, vine plant
Guisquil or Chayote Squash


Writing about the dish yesterday while working on the cookbook / memoir, I thought I would do some research. Even a few years ago there was very little online about Guatemalan foods. So little that it was almost impossible to find out anything. Following on that, even if one could find a "recipe," it was (and still is, in many places) so badly written, with little or no amounts, it was not an easy task to decipher what should really be done. I set myself the task of thinking about every aspect of Hilachas I could recall. And then I went online once again.

Of course, with a recipe that varies from household to household, it is not easy to pin down how a recipe should be done, but from all the places I read about Hilachas, there was a common thread. They all seemed to use a "sofrito" and the thickening agent is either bread or tortillas.

What is Sofrito?

Tomatillos, miltomates, husked fruit
Tomatillos
While I was familiar with the word "sofrito" I am not sure how or where I first heard it. I know that Puerto Ricans use the term. In essence, a sofrito is the base for many sauces, and it is the base of Hilachas. In this recipe, raw onion, garlic, tomatoes, tomatillos, and a guajillo chile (or two) are the sofrito ingredients. These are blended relatively smooth, or can be done in a food processor. Once pulverized, they are cooked with some oil to remove the raw flavors. In the case of the tomatoes in this recipe: as we are now reduced to flavorless supermarket tomatoes, I used a can of whole San Marzano tomatoes. If anyone is unfamiliar with tomatillos, they add a particular flavor of their own, and are used extensively in Guatemalan cuisine. They are found in far larger sizes here in the US. In Guatemala, they were most often quite small. Maximum, 1 1/2-inches diameter. They are from the ground cherry family and the fruit is encased in a papery husk. The husk is removed before using, and the fruit inside has a sticky residue that needs rinsing.

Creating the Recipe

Once getting the basic ideas together, I set about creating the recipe in a general sense. Flank steak would shred easily, so I would use that for the meat. The sofrito had to have some tomato, but tomato is not remotely the main flavor. This is where I went wrong all those years ago. I would guesstimate that there are about nearly equal parts tomato, tomatillo and onion in the sofrito. Then garlic (just because we must have garlic!) and chilies. Some recipes called for guajillo chilies. In Guatemala, the choice would have been chile guaque, but that is not available here. I had neither! I do, however, have some dried Hatch chilies, so I used that instead. A dried ancho or pasilla chili could be used, or even, in a pinch, a combination of paprika and cayenne. 

Guatemalan bread, Pan Frances French Bread
Guatemalan Pan Frances or French Bread
Once the sofrito is blended together and fried, the main bulk of the recipe is done. The meat is cooked and shredded. The stock leftover from cooking the meat is added into the cooked sofrito. Potatoes are added and cooked. And then it is thickened with bread crumbs. In Guatemala, most often this was accomplished by soaking one of the "Pan Frances" or French bread, in some of the broth, until very soft, then stirred into the soup/broth until it dissolves, accomplishing a thickened mixture. And there it is, the basic recipe idea. Here it is, in its final state:

Guatemalan Hilachas


Serves 6 or more

Hilachas, Guatemala, Rice
Hilachas with Guatemalan Style Rice

COOK THE MEAT:
1½ to 1
¾ pounds flank steak
1 quart beef stock, preferably unsalted (or water)
2 teaspoons salt (if using unsalted stock)
1 bay leaf
½ onion, skin on for good color in the stock

SOFRITO:
1 can (14.5 ounces) peeled, whole tomatoes
6 medium small tomatillos,husks removed
1 whole onion, peeled and coarsely chopped
1 - 4 guajillo chiles, or 1 dried ancho or paasilla
3 - 4 cloves fresh garlic

OTHER INGREDIENTS:
2 tablespoons olive oil
more salt, as needed
½ teaspoon fresh ground black pepper
1 tablespoon Spanish paprika
3 ounces fresh bread crumbs (about 1 cup)
1
½ to 1¾ pounds potatoes, peeled, cubed ½ cup cilantro, finely chopped

Earlier in the day, set the flank steak in a large pot with the stock, salt, bay leaf and onion half. Bring to boil, lower to a simmer, cover and cook for 1 1/2 to 2 hours, or until tender. Remove the meat to a dish to cool, remove the onion and bay leaf, and reserve the stock. Once the meat has cooled, slice it across the grain into 2-inch sections, then shred the meat into thin strips or "rags". Set aside.

While the meat is cooking, place the sofrito ingredients into a blender or food processor and process until relatively smooth. Heat a large saucepan and add in the oil. Being careful, as it will spatter, add the sofrito. Stir and cook, covered, for 15 minutes to cook out the raw taste. Stir occasionally, but be careful of hot liquid splattering. Once the sofrito has cooked, add in the remaining meat cooking liquid to the sofrito, along with the black pepper, paprika and potatoes. Cook this mixture for about 30 minutes, until the potatoes are tender when pierced with the tip of a knife.

Add in the fresh bread crumbs and stir well. Taste for salt, and adjust. Return the meat to the pot and stir in the cilantro. Heat through and serve with rice, Guatemalan Style:

Guatemalan Rice, vegetables, onion, peas, method
Guatemalan Style Rice

Guatemalan Style Rice


Serves 4 to 6

1 cup long grain rice
2 tablespoons oil or butter
½ cup shredded carrot
2 tablespoons thinly sliced onion
¼ small green pepper, sliced thinly
½ cup frozen peas
2 cups water
1 teaspoon salt

Place all the ingredients into a medium saucepan and bring to a boil. Reduce heat to simmer and cover. Cook the rice for 15 minutes. Remove from heat and let stand for 5 to 10 minutes more.


My passion is teaching people how to create a harmony of flavors with their cooking, and passing along my love and joy of food, both simple or exotic, plain or fancy. I continue my journey in ethnic and domestic cuisines, continuing my journey to explore diverse culinary experiences and hopefully to start you on a journey of your own. Join me also at A Harmony of Flavors on Facebook, and Pinterest.

Wednesday, December 10, 2014

Guatemalan Empanadas are a Delightful Dessert

Guatemala, lunch fare
Maya Woman selling lunch from doorstep
Antojitos! That is what little snacks are called in Guatemala. And, boy, they really specialized in Antojitos (ahn-toe-HEE-toes) down there. On any street corner one could find little carts selling something. From the wonderful typical candies, to glaceed fruits or vegetables (They made sweet potatoes and squash into a crystallized candy that was to-die-for!), pan dulce, and lots of other things on that order, to just a Maya woman selling pots of a lunch stew with fresh, hand-made tortillas from her doorstep. While I do not recall ever seeing these empanadas in a cart, there were also pastelerias (pastry shops) or panaderias (bread shops) also found easily. Someplace online I read that these empanadas were mostly seen during Holy Week (Semana Santa). This is not my recollection, and I recall buying them any time I saw them. 

Annatto Seeds, achiote, Guatemala, flavoring, coloring
Annatto Seeds, called Achiote in Spanish
Most empanadas seen either in recipes online, or in books, are of the savory variety. These Guatemalan empanadas I am going to describe are actually a dessert pastry, filled with a cornstarch pudding called Manjar Blanco, strongly flavored with true cinnamon). The pastry dough is quite orange in color due to the addition of annatto coloring. I don't recall when the first time was that I made these myself, but I had made them at least twice in past. I have not, however, made them for over 20 years! And I was having a snack-attack; a real craving; an "antojito"! So I got out my trusty recipe, copied out in Spanish in a little notebook. 

The first thing I realized is that it called for "harina de Salpor" as part of the dry ingredients. What the heck is THAT, I wondered? And if I don't know what that is, what in the world did I use when I made them before? Thus ensued an exhaustive search on the internet, only to find that apparently, while "harina de Salpor" is called for in more than one version of these empanadas, no one really appears to know what, exactly, it is. More than one site had someone speculating that it was a corn flour, but that it had more "fecula." Great! Another word I didn't know! I found that fecula translates to "starch". Could harina de salpor be cornstarch? I didn't think so, as cornstarch was called "maizena". Still, it seemed I was finally getting somewhere. 

Guatemala, Empanadas de Manjar, Pastry, pudding, cornstarch pudding
Guatemalan Empanadas de Manjar
My recollection, such as it is, after more than 20 years, is that I used masa harina, the corn flour used for making corn tortillas. I can remember this flavor in the finished empanadas. In making these again a couple of days ago, I decided on splitting the difference and using half masa harina and half cornstarch for that portion of the recipe, thus upping the starch (fecula) factor. It seemed to work fine, though these have always been really good when I made them. If you would like to try something different for a nice little sweet treat, do give these a try - they are most delightful.

I used the combination of masa harina and cornstarch for my empanadas. I also combined butter and lard as the "manteca" component. Margarine could be used also, and any one of these things (butter, margarine, lard, shortening) could be used on their own. The amount of water needed for the dough will depend on how dry your climate. Start with 3/4 cup and add more to bind, if needed. My method of mixing the dough may not be "typical", but it works just fine. ;-)

Guatemala, Empanadas de Manjar, pastries, filled pastries, cornstarch pudding
Guatemalan Empanadas de Manjar

Empanadas de Manjar


Makes 26 to 30 empanadas

CORNSTARCH FILLING / MANJAR:
2 cups milk
1 (3-inch) stick true (soft-stick) cinnamon
3 tablespoons (1 ounce / 30 g.) cornstarch
½ cup (3.8 ounces / 108 g.) granulated sugar 
½ teaspoon vanilla extract

EMPANADA DOUGH:
1 pound (3 1/2 cups / 453 g.) all-purpose flour
¼ pound (scant 1 cup / 112 g.) Masa Harina
¼ pound (3/4 cup / 112 g.) cornstarch
7.3 ounces (1 cup / 207 g.) granulated sugar
5 ounces (9 tablespoons / 142 g.) unsalted butter
5 ounces (3/4 cup / 142 g.) shortening or lard
1½ teaspoons ground annato powder
2 large eggs, whisked lightly
¾ - 1 cup water

Making Manjar, Pudding, cornstarch pudding
Manjar ingredients mixed, cook & stir until thickened, then strain and cover with plastic film 

MAKE THE MANJAR: In a saucepan combine the milk, cornstarch and sugar until combined. Add in the cinnamon, separated into pieces. Set the pan on medium heat and whisk almost constantly until the mixture comes to a boil and is thickened. Once thick, continue to whisk and cook for about 5 minutes longer, to remove any raw cornstarch taste. Remove from heat, add the vanilla and then strain the mixture through a sieve into a bowl (to remove the cinnamon bits). Immediately set a piece of plastic wrap directly onto the surface of the pudding. This eliminates a skin forming on top of the pudding while it cools. Let cool completely to room temperature before proceeding.

MAKE THE DOUGH: First take a small portion (2 - 3 tablespoons) of lard, shortening or butter and melt it in a small pan, adding in the annatto powder. Once melted, set aside.
Making dough, Empanada Dough, ngredients
Dry ingredients mixed with lard & butter, lard with annatto powder,
eggs & water added and dough is finished
Preheat oven to 350 degrees. In a bowl, whisk together the all-purpose flour, masa harina, cornstarch and sugar. Add the "manteca" of choice: I used butter and lard. Cut in the butter and lard with a pastry cutter, with a fork, or fingers as for pie dough, until the mixture is in crumbs. Whisk the eggs with 3/4 cup of the water, then add to the bowl, moving around gently and quickly with a fork, again, as for pie dough. Add in the melted fat with the annatto powder and stir well. Begin to bring the dough together into one mass. If it will not cooperate, add in a few drops of water at a time, as needed to make the dough come together.

Makng and Folding Empanadas
cut rounds with bowl  |  top with pudding  |  moisten edges and fold to seal  |  crimp with fork  | on sheet

Divide the dough into two parts, working with one at a time. Roll out one section of the dough, slightly thicker than for a pie. Use something round to cut approximately 5-inch circles. I used a dessert bowl. Use a 1 tablespoon measure to portion out the Manjar pudding onto the center of each round piece of dough. Have a cup with water handy and moisten the edges of the circle with a pastry brush or fingers. Fold the dough over and press the edges to seal into half moons. Use the tines of a fork to press the edges, crimping to seal well. With cooking spray, lightly grease a cookie sheet and place the empanadas onto the sheet as they are finished. Poke small vent holes in the top of the pastry using the tip of a knife and bake the empanadas for about 30 minutes, until slightly golden and set. Repeat with the second piece of the dough.


My passion is teaching people how to create a harmony of flavors with their cooking, and passing along my love and joy of food, both simple or exotic, plain or fancy. I continue my journey in ethnic and domestic cuisines, continuing my journey to explore diverse culinary experiences and hopefully to start you on a journey of your own. Join me also at A Harmony of Flavors on Facebook, and Pinterest.

Disqus