Translate

Showing posts with label recipe. Show all posts

Sunday, September 4, 2022

Muffins so Very Delicious and Low Fat

Muffins are really good. Still, I generally prefer biscuits or scones. Once in a while, I see a recipe and think I might try it, then somehow, it just doesn't happen. 

A few nights back, I was looking through Facebook, and came on a recipe for Turmeric Carrot Muffins with Chia & Coconut, from VeganRicha. Just the title alone had me riveted, right there, because each ingredient in the title is one I use regularly, and love. If you are vegan, or must be gluten free, please check out her recipe by clicking on the link to her recipe, above.

muffins, breakfast, bread, carrot, turmeric, ginger, chia, coconut
Turmeric Carrot Gingerbread Muffins

Okay, I looked up the recipe and saved it, and apparently my subconscious mind percolated and filtered through the recipe all night and into next day and finally I sat to think it through with my conscious mind. First off, I am not vegan, or vegetarian. Secondly, I don't have to be gluten free. So, I could make the recipe without those strictures, making it more a regular muffin recipe. I opted to use eggs. If milk was needed I would use it instead of a nut milk or coconut milk (I absolutely love coconut milk, but didn't want to open a can to use only a half cup!).

As it all turned out, I changed a lot of things. I truly didn't deviate much from the spirit of the recipe. I used almost everything in the recipe as stated, but changed amounts. 

  • I used a tiny bit more oil, but added a little snack cup of applesauce. 
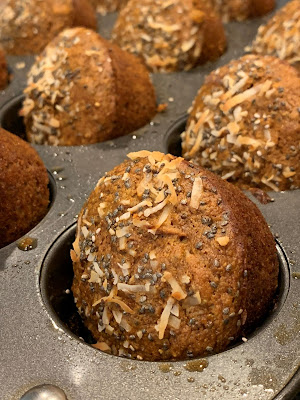
    muffins, breakfast,  bread, ginger, turmeric, coconut, carrot, chia
    Turmeric Carrot Gingerbread Muffins


  • I opted to not use maple syrup, as it is expensive and I can never tell by taste that it is even in a recipe like this. I waffled between using honey or agave syrup, then switched to molasses. 
  • Mixed spices were in the original recipe, and cardamom, cinnamon and nutmeg mentioned as possibilities. I changed this to cardamom and ground ginger. 
  • I used a fair bit more fresh ginger than called for as well, as I truly love ginger. 
  • As the recipe called for coconut milk and lemon juice, I changed that to buttermilk, thereby eliminating the lemon. Lemon would bring acidity up to work with the baking soda, but buttermilk will as well.
  • I used more flour, as I was adding both eggs and applesauce, so it was 2 cups of flour total. I used 1 cup of a mixture of barley and buckwheat flour, and the other cup plain all-purpose flour. If preferred, use all purpose flour for the whole 2-cup amount, or substitute whole wheat or other whole grain flour for part of the whole amount. In another attempt, I may use a bit of wheat bran as a part of the two cups of "flour."
I will caution that this recipe needs initial prep work, in that there are so very many little amounts of things to be measured out. I got out all my little cups I use for measuring out sets of spices and things (I save the little 1/2-cup applesauce snack containers for this type of use) and set out all the individual dry ingredients (mixed spices, raisins, coconut, chia, sugar, and the freshly grated ginger). I set the finely grated carrots in a bowl (Richa's recipe calls for blending carrots and other wet ingredients together, but I see no need for extra dirty utensils).

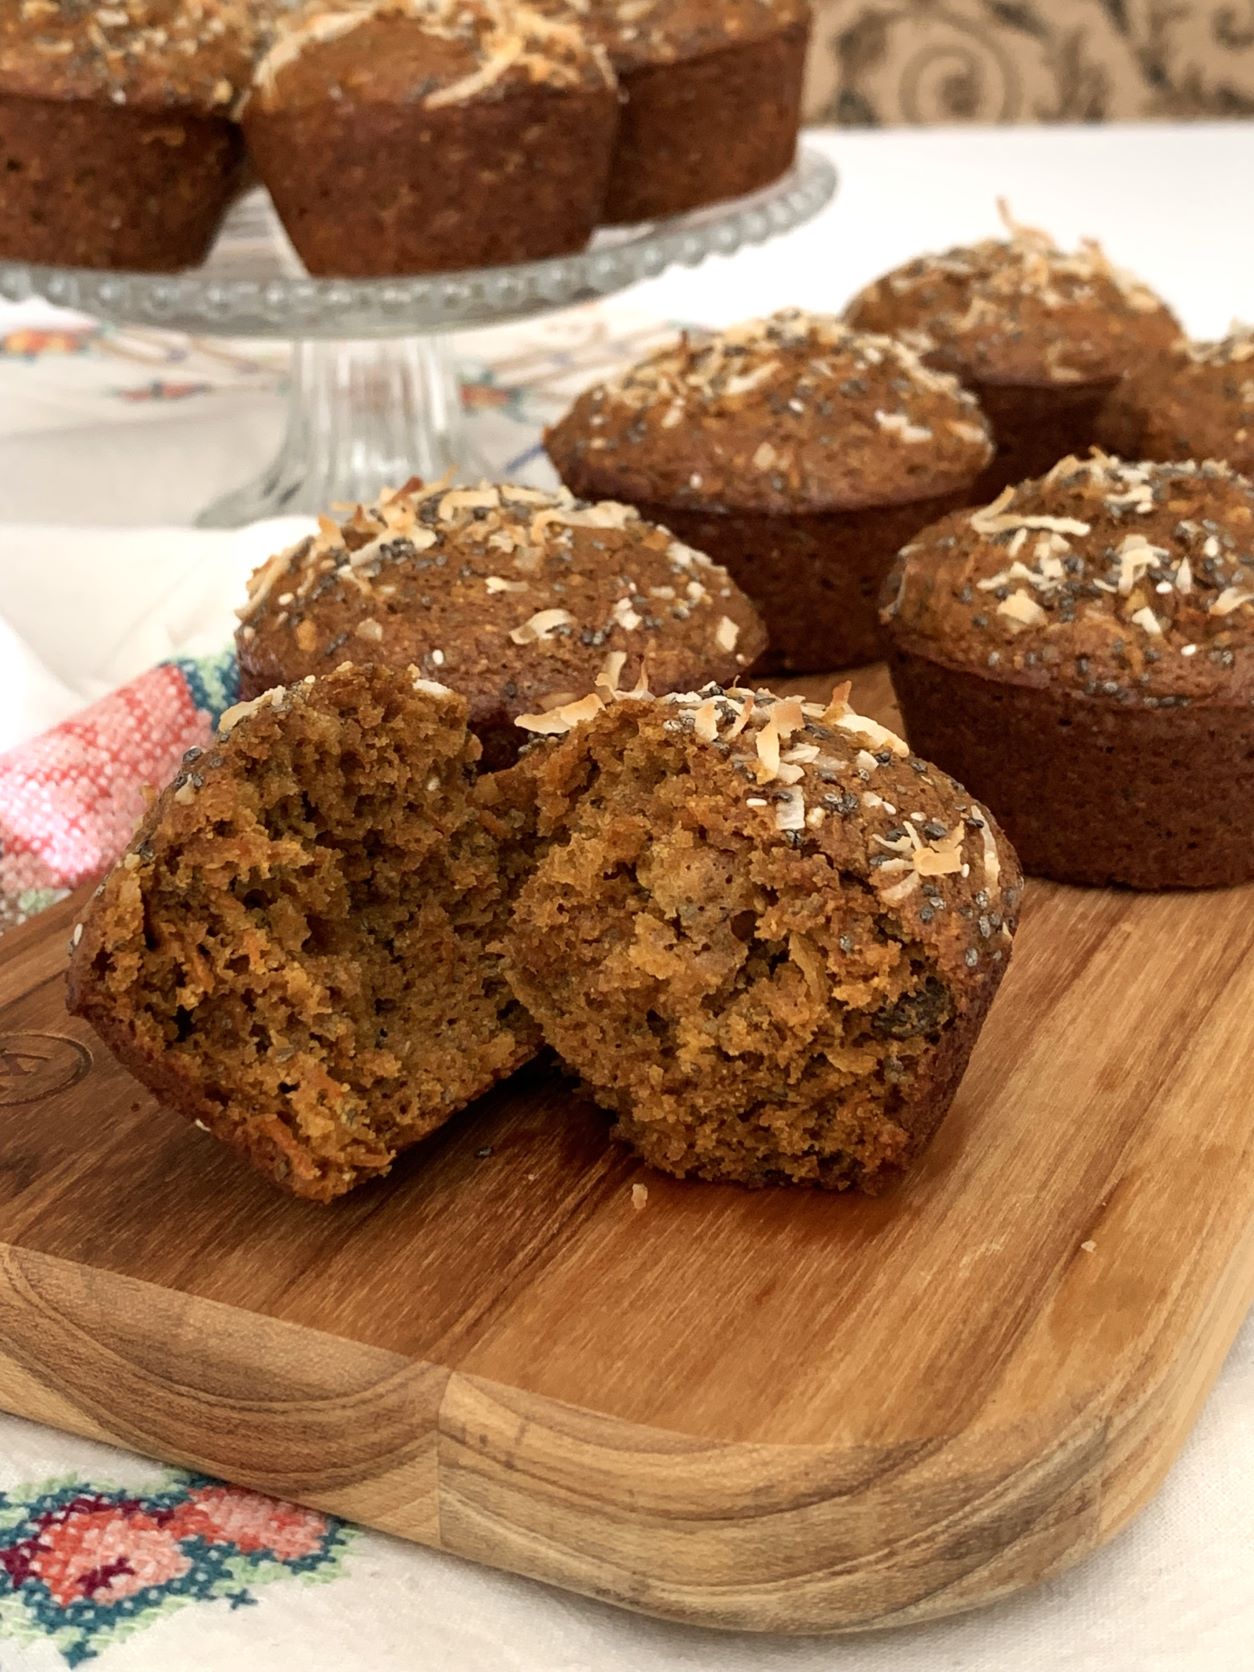
Ultimately, having used extra fresh ginger as well as adding dry ground ginger, along with the molasses, made these smell like the most heavenly gingerbread as they baked. All the extra textures and flavors, while not eclipsed completely, do give great texture. Carrots always make cakes moist, and that works here as well. These are exceptional muffins, and exceptionally good. Thank you Richa, for such an amazing combination!

Turmeric Carrot Gingerbread Muffins


Makes 12 muffins
muffins, breakfast, recipe, carrot, turmeric, coconut, chia, ginger
Turmeric Carrot Gingerbread Muffins


DRY INGREDIENTS:
1 cup all purpose flour (130 grams / 4.6 ounces)
1 cup whole grain or other flour, or simply use all purpose flour
1/2 teaspoon salt
2 teaspoons baking powder
1/2 teaspoon baking soda
3 tablespoons chia seed (32 grams / 1.15 ounce)
1/4 cup sugar or palm sugar (41 grams / 1.4 ounce)
1/4 cup raisins or chopped dates (34 grams / 1.2 ounce)
1/4 cup dry, unsweetened coconut shreds (18 grams / 0.65 ounce)

SPICES:
1 teaspoon ground cardamom seeds
1 teaspoon turmeric powder
1/2 teaspoon dry, ground ginger

WET INGREDIENTS:
2 carrots (155 grams / 5.25 ounces), finely grated
1/3 cup molasses
1/2 cup buttermilk
1/2 cup plain applesauce
2 tablespoons sunflower oil or coconut oil
1-inch fresh ginger, finely grated (15 grams / 0.55 ounce)
2 large eggs
--------
1 1/2 teaspoons each chia seed and shredded coconut for topping, optional
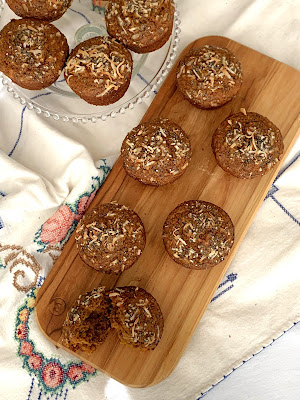
muffins, recipe, breakfast, carrots, chia seed, coconut, turmeric
Turmeric Carrot Gingerbread Muffins


Preheat oven to 400 degrees. Grease, or spray with cooking spray, the wells of a 12-well muffin tin. Set aside.

This is easiest to first measure out all the little ingredients and have at hand, "mise en place." A personal choice, but recommended.

In a medium mixing bowl, place all the dry ingredients together, plus the spices and stir together.

In another bowl, combine all the wet ingredients and stir well to combine, then pour all the wet into the dry ingredients and mix with a spoon or silicone spatula until no dry ingredients remain. Fill the muffin tin wells equally - the mixture is very generous. Separately, sprinkle some of the coconut for topping over each portion of batter, then repeat with chia seed.

Bake the muffins for 12 to 15 minutes. Test with a toothpick, as for cakes, at about 12 minutes. Remove from oven and set aside to cool for 10 minutes before trying to remove from the tins. (Muffin papers may be used, if preferred.) After 10 minutes, the muffins will release from the tins with very little coaxing. Set them aslant in the wells to continue cooling. Store at room temperature for up to 2 days, or freeze some in zip-top freezer bags for another time.


My passion is teaching people how to create a harmony of flavors with their cooking, and passing along my love and joy of food, both simple or exotic, plain or fancy. I continue my journey in ethnic and domestic cuisines, continuing my journey to explore diverse culinary experiences and hopefully to start you on a journey of your own. Join me also at A Harmony of Flavors on Facebook, and Pinterest.

Wednesday, July 6, 2022

No Matter What You Call Them

When I first started my journey into Indian foods, it was a combination of being taken to an Indian Buffet or two, and then venturing into more as my cravings for those flavors expanded. That, along with the first cookbook I received, "The Complete Asian Cookbook" by Charmaine Solomon, with a section on Indian food, later followed by "The Bombay Palace Cookbook" by Stendahl. 

In each Indian Buffet I frequented, there were little lamb meatballs, obviously done on a grill or maybe in a tandoor oven, and definitely with a char-grilled flavor. Prominent enough to notice in these meatballs was the flavor of mint, other spices just making the whole so very delightfully flavored. I looked for these, when I found them, as they quickly became a favorite.

But, what are they called? 

That is something I never found out. 

ground lamb, kebabs, grilling, Middle Eastern, Indian, ethnic
Lamb Kofta or Lamb Seekh Kebabs

Over the many, many years since those early days, I have learned a lot more about Indian cooking, recipes, flavors, flavors divided by areas of India, spices - oh! the spices! - and so very much more. But, I never did find a specific recipe for those little grilled lamb meatballs. On the buffets, they were always in a bin of their own. No sauce, maybe a sprinkling of fresh cilantro. 

Much later, reading about Middle Eastern foods and such, while the flavors in general do not call me the way Indian foods do, there are a lot of great foods I have tried to date, and I also read about how much of the food of Persia and other Middle East countries filtered down into India, and in fact is how Naan bread came to be in northern Indian cuisine. 

And there I discovered Kofta. And then Seekh Kebabs.

Or Kefta, or Kafta, but however the spelling comes out, these are the very closest to the flavors I was looking for. I did a little tweaking, mainly adding in a little more fresh mint, but mostly in keeping with the flavors I recalled. Grilling (or broiling in a pinch) gives them that marvelous added layer of flavor. Obviously in a country that does not, in general, eat beef, if they even eat meat at all, lamb would be the red meat of choice. The closest to these little meatballs I have found in Indian cookbooks is called Seekh Kebab, usually the "seekh" referring to ground or minced meat (but not always!) and can be used for lamb, chicken or whatever meat is being used in the recipe. I have made Seekh Kebabs with chicken meat, and they are good, though I made them in a frypan. These type of kebab are usually formed into long sausage shapes around skewers, more often a flat skewer that helps keep the meat on while rotating on the grill. 

Ultimately, no matter what you call them, these are the closest approximation to those wonderful little grilled meatballs on the Indian Buffets.


Lamb Kofta or Lamb Seekh Kebabs

Makes about 6 to 8 servings

ground lamb, meatball, kebab, grilling, Middle Eastern, Indian, ethnic
Lamb Kofta or Lamb Seekh Kebabs
2 pounds ground lamb, or substitute beef or go half and half
1 medium potato, baked, cooled, peeled, riced
2 shallots, minced finely
3 large cloves garlic, minced finely
½ cup fresh parsley, minced finely
½ cup fresh mint, minced finely
¼ cup fresh cilantro, finely minced
1½ teaspoons salt
1 teaspoon ground sumac, optional
½ teaspoon ground cinnamon
½ teaspoon ground allspice
½ teaspoon ground cumin
½ teaspoon ground cardamom
½ teaspoon ground black pepper
- Pinch ground cloves
 
To be more authentic, finely mince the meats, or briefly pulse them in the food processor. It should not be paste, but much finer than ground meat.

Combine all the ingredients and mix well with clean hands to distribute all the spices evenly. Form the mixture into elongated meatball shapes on pre-soaked bamboo skewers or on metal skewers. Another method is to form the meat into a single-thickness hot-dog shape, evenly along the length of the skewer. To bake the kofta, preheat oven to 425 degrees. Set the skewers on a broiler rack or other rack over a rimmed baking sheet and bake the kofta for 20 to 25 minutes. Thinner meat formed along the length of the skewer will be done in a much shorter time. If grilling, grill as for burgers, turning as needed for even browning. Serve with tzatziki or hummus and flatbreads with a side salad for an amazing meal.


My passion is teaching people how to create a harmony of flavors with their cooking, and passing along my love and joy of food, both simple or exotic, plain or fancy. I continue my journey in ethnic and domestic cuisines, continuing my journey to explore diverse culinary experiences and hopefully to start you on a journey of your own. Join me also at A Harmony of Flavors on Facebook, and Pinterest.

Wednesday, October 9, 2019

Some Soups for Cool Days

When the weather finally cools down, and in some areas it really and truly COOLS DOWN (which, apparently, it is doing up north in the next day or two), it comes time to think of warming foods. In this blog I am revisiting a couple of oldies: Tomato Soup, either chunky or creamy, depending on preference. My preference is always creamy. It is what I grew up with (albeit out of a can), though my sister in law one day requested a chunky version, which I altered to her taste. They are both delightfully good. A third recipe (which, sadly, I have never yet remembered to photograph) is a Vegetarian "Chili" that at times I made adding in a crumbled chunk of tempeh.

The two versions of tomato soup are equally simple to make, and in about 15 to 20 minutes you have something far superior to the canned variety, plus the option to reduce the salt content. These can be made with fresh tomatoes, and the flavor is hard to beat if using heirlooms, but canned petite diced are always available and make the whole process much quicker still.


Chunky Tomato Soup

Chunky soup, Tomato Soup, tomatoes, canned tomatoes
Chunky Tomato Soup

Makes about 4 - 5 cups

2 tablespoons unsalted butter
⅓ cup onion, finely chopped
1 clove garlic, minced
1 (14.5 ounce) can petite diced tomatoes, divided
½ cup water
1 teaspoon chicken bouillon, or chicken "base"
½ teaspoon baking soda
1 small bunch parsley, tied in a bundle
1 cup milk
½ cup whipping cream
pinch black pepper

In a medium pot, melt the butter. Add in the onion and garlic and sauté slowly for about 10 minutes until translucent and soft. Add in half the can of tomatoes plus the half cup water. Using an immersion blender right in the pot (or other blender, returning the mixture to the pot), partially puree the tomatoes, onion and garlic. Add in the rest of the tomatoes along with the chicken bouillon, baking soda, pepper and parsley. Bring to a boil, reduce heat and simmer gently for 10 minutes. Add in the milk and cream and bring mixture just to the boil. Remove parsley and serve.

~~~~~~~~~~~~~~~~~~

In this second, creamy version, I like to add in a roasted, peeled red bell pepper, just because 1) I love the flavor, and 2) it gives great color. If you do not have time to roast, peel and seed a red bell pepper, use one jarred, whole red bell pepper, rinsed well, instead.


Creamy Tomato Soup


Creamy soup, Tomato Soup, tomatoes, roasted red pepper
Creamy Tomato Soup
Makes about 5 cups

1½ pounds fresh tomatoes, Roma preferred, OR
     1 (15-oz.) can chopped tomatoes
1 tablespoon unsalted butter
1 tablespoon olive oil
1 medium onion, chopped
1 medium red bell pepper, seeds and veins removed, chopped
2 - 4 cloves of garlic, to taste
2 teaspoons fresh thyme leaves, lightly chopped
1 to 1½ teaspoons salt, to taste
2 tablespoons concentrated tomato paste (from a tube or a can)
1 cup water
1 tablespoon butter
1 tablespoon flour (for Gluten-Free see "NOTES", below)
1 cup heavy cream, optional

If using fresh tomatoes, scald them for 1 minute in boiling water, peel and chop. Reserve the skins to one side. 


If using a can of chopped tomatoes, disregard the first step.


Over medium heat melt together the first tablespoon of butter and olive oil in the pot. Add in the chopped onions and sweat them, stirring often for about 3 to 5 minutes; do not brown. Add in the red bell pepper, garlic, thyme and salt and allow to cook for 3 to 5 minutes more. If using a can of chopped tomatoes, add them at this time. If using fresh scalded tomatoes add them and then squeeze the skins to get as much pulp as possible into the pot. Discard skins once squeezed dry.

Add in the double concentrated tomato paste and the water. Bring to boil, reduce to a simmer and cook about 10 minutes. Pour the contents of the pot into a blender container and blend until very fine. Meanwhile, wipe out the pot and place it back on the burner on low. Add in the extra tablespoon butter and the flour and blend well. Return the contents of the blender to the pan and stir vigorously to combine the butter and flour with the tomato mixture. Bring back to a boil, stirring. Remove from the heat and add in the cup of heavy cream, stirring to combine. Serve immediately.
 

~~~~~~~~~~~~~~~~~~~~

This Vegetarian Chili is one I haven't made in quite some time. In part, because of all the canned beans and vegetables, with the amount of sodium they contain. I am far more sensitive to sodium as I age than I was 20 or 30 years ago. These days, there are many canned beans and vegetables with 50% less sodium or no sodium, so this is not as big a problem. All that said, I still have no pictures, though this was very good indeed, and with the addition of the Tempeh (or add in some nice chewy cooked grains, such as barley, wheat or rye, to approximate the feel of biting into meat).


Tempeh is something I have not seen now for a lot of years, though I can truthfully say I haven't searched for it. 

TEMPEH:

Like Tofu, Tempeh is a fermented whole soybean product. Also like with tofu, Tempeh absorbs the flavors of the dish in which it is being used. In the case of tempeh, the soybeans are halved or broken, and not smooth as with Tofu. The particular fermentation process of the whole bean gives it a higher content of protein, fiber and vitamins than tofu. It has a firm texture and a slightly nutty flavor. It generally is sold in vacuum sealed plastic pouches. It can be broken up into bits into such things as this chili recipe, below. Its texture puts one in mind of the feel of meat, without having meat.

Using Tempeh is easy. It can be boiled, fried or steamed, then added to any dish. I have in past made a Mock Individual "Chicken" Wellington at a fancy dinner I made, where one of the guests was vegetarian. I first boiled a nice square of the tempeh in a vegetable stock to begin giving flavor. Then I fried it in oil, until it had a pretty golden color, then added the same mushroom and seasonings as I would for the  Chicken Wellingtons, and wrapped it in puff pastry. I got such raves from the lady! And as she did not finish eating all her food (something I can never understand 😕, as when I enjoy food I just cannot stop till it is gone), after the guests left, I took a tiny bite, to find that I nearly liked that version more than the chicken version.

The brand I had most often seen is "Lightlife". This brand also carries a flax tempeh and a three grain tempeh (made with rice, flax and soy). I used to keep the vacuum pouches in the freezer for whenever I needed.


Easy Vegetarian Chili


Makes 4 - 6 servings

1½ tablespoons olive oil
2 onions, chopped
1 green pepper, chopped
½ red bell pepper, chopped
2 stalks celery, chopped
4 cloves garlic, minced
2 (15-ounce) cans tomato sauce
1 large tomato, diced
2 small cans mushrooms
1 can red kidney beans, drained and rinsed
1 can garbanzo beans, drained and rinsed
1 can corn, drained
1 (4-ounce) can chopped green chilies
½ to 1 package of Tempeh, crumbled, optional
1 teaspoon fennel seed, crushed
1 teaspoon ground cumin
1 tablespoon chili powder
salt, to taste
freshly ground pepper, to taste

In a large soup pot heat the olive oil until shimmering. Add in the first 5 ingredients and sauté for about 7 - 10 minutes. Add in the tomato sauce, diced tomato, all the canned items and the fennel, cumin and chili powder. If using tempeh, add this now, also. Bring the pot to a boil, reduce heat, cover and simmer for at least a half hour, until the fresh vegetables are soft.


My passion is teaching people how to create a harmony of flavors with their cooking, and passing along my love and joy of food, both simple or exotic, plain or fancy. I continue my journey in ethnic and domestic cuisines, continuing my journey to explore diverse culinary experiences and hopefully to start you on a journey of your own. Join me also at A Harmony of Flavors on Facebook, and Pinterest.

Thursday, September 20, 2018

Chow Chow aka Cha Cha aka Green Relish

Whatever you choose to call it, and whatever choice of ingredients and spices you use, this relish is delicious and just delightful with burgers or brats (among other things). The first time I heard of this relish was in a recipe from my mother-in-law, now deceased. She called it Green Tomato Relish, and I never knew it had another name, or more than one other name. I assumed at the time that it was called "Green" Relish because it used green tomatoes, green cabbage and  green peppers, ergo "green relish."
Chow Chow, green relish, green vegetables
Chow Chow

Earlier this year, when our friend Rich arrived with a couple of fishing buddies to stay for 5 days, one of the buddies had been here once before, a few years back. When he returned home both that time years ago and this time, he sent a gift in thanks for our hospitality. This time, based on a recipe we were talking about, it was a jar of Chow Chow, made by his wife from an old family recipe. They are from Mississippi, originally. The jar of Chow Chow arrived along with the recipe, and the suggestion that it is wonderful eaten with Black-Eyed Peas, for New Years. While I have yet to ever eat black eyed peas, much less for New Years, I was interested in the Chow Chow recipe. 

Chow Chow, relish,  just canned
Chow Chow just canned
When reading the recipe through, I was struck by the thought that this sounded a LOT like my mother-in-law's Green Relish! I got the recipe out to check, side by side. There were definitely similarities; parallels. There were a few differences. Then, shortly after that, I received my issue of Saveur magazine, and in an article on Blacks in Nova Scotia was a recipe for Chow Chow, a recipe that came to Nova Scotia via the Blacks in the Caribbean, via the deep South and slavery and on up to freedom in Nova Scotia. This recipe also had a lot of similarities to the other two, and again, some differences. Okay, then! Apparently with this recipe came just one too many coincidences.

I first sat down to compare the three recipes in three columns, to see who used what and how much. I did not place amounts in this table, because the amounts were for different sizes of recipe. My mother-in-law used green tomatoes and cabbage in large amounts, and onion and green peppers only in small amount. She used pickling spice, probably to cover some of the other spices in a bulk application. She seemed partial to cider vinegar in general and used very small amounts of celery and mustard seeds. The recipe from the fishing buddy's wife used no green tomatoes at all, and large amounts of celery seeds and mustard seeds, as well as a large amount of mustard powder. The recipe from Saveur magazine used green tomatoes, onion and green and red bell pepper, but no cabbage. They used brown mustard seeds instead of yellow, and a lot of other spices not called for in the first two recipes. 
 
Comparison, recipes, chow chow, green relish
Comparison of three recipes

True to form, I also went online and perused a multitude of recipes for Chow Chow, noting similarities and differences. Some used cucumbers and some used corn as either additions or substitutions for some other vegetables. The few ingredients that seemed ubiquitous to all recipes in some form were:
  • onions
  • bell peppers
  • mustard seeds
  • sugar
  • vinegar
Beyond those, there was a whole lot of variation!  

So, what is Chow Chow? 

Chow Chow is a relish; a sweet, spiced pickled relish, sometimes with addition of hot peppers and/or cayenne for spice. What to use it for is totally up to you. Most often online, it was pictured served over hot dogs or hamburgers, but obviously, from the fishing buddy's recipe's advice to use it with black eyed peas, there are far more uses for it than are immediately apparent. 

Prepping the vegetables for making Chow Chow is a snap using a food processor. My mother-in-law's recipe called for grinding all the vegetables in an old-fashioned meat grinder. Since I happen to have one, I used it the first time around, when making her Green Tomato Relish. This time around, I used my food processor. While the grind is more coarse than when using the meat grinder, it is perfectly acceptable. However you choose to prep the vegetables, they will need to be mixed with salt and placed in the fridge overnight. Next day, before proceeding with the recipe, the vegetables will need to be well drained in a colander before proceeding with the recipe.

When I finally sat down to decide on what ingredients I wanted to use to make my own Chow Chow, I was certain I wanted to use green tomatoes, green and red bell peppers, some Anaheim peppers and onions. I wanted to use brown mustard seeds because they are supposedly hotter, and I wanted a tiny bit of heat. I used a good amount of mustard powder also, and celery seed in larger amount rather than smaller. I used turmeric, as I wanted the yellow color, and some sweet spices. Here is what I did:

Chow Chow

Chow Chow, relish, recipe, green tomatoes, peppers
Chow Chow

Makes 8½ pints

(Takes 2 days)

DAY 1:
3¼ pounds green Roma tomatoes (22 - 24 tomatoes / 8 cups chopped)
2 pounds assorted peppers (I used 2 green and 2 red bell peppers plus 3 Anaheim chilies / 4 cups chopped in total)
3½ pounds sweet onions (4 large / 10 cups ground)
¼ cup Canning Salt or Kosher Salt
------------

DAY 2:
1 quart cider vinegar
3 cups granulated sugar
2 cinnamon sticks (4-inches each)
3 tablespoons brown mustard seeds
2 tablespoons celery seed
1 tablespoon ground mustard powder
1 teaspoon turmeric
1 teaspoon ground allspice
1 teaspoon ground ginger
½ teaspoon ground cloves

DAY 1: Have a large nonreactive bowl ready. Cut vegetables into like-sized chunks and process, pulsing, until they are of a relatively uniform, small size, but not too fine. Add them to the bowl as they are ready. Once all the vegetables are chopped, add in the salt and with clean hands, mix the vegetables well, to evenly distribute the salt all through. Cover the bowl and refrigerate until the next day.

DAY 2: Have a large canning pot ready with already simmering water to cover 8 or 9 pint canning jars. Drain the vegetables in one or two large colanders. While the vegetables are draining, set a large pot on the stove with the vinegar and sugar, stirring to mix and dissolve sugar. Add in all the spices and bring to a boil, then reduce to a simmer for 10 minutes.

Gently press out any liquid from the vegetables, then add them to the simmering vinegar, sugar and spice mixture. Raise heat and bring to boil, then reduce to maintain a strong simmer and time for 30 minutes.

When done, have ready to hand:
  • tongs (for lifting hot jars from the water bath)
  • a clean wet cloth (for wiping down rims and threads of the jars),
  • a wide mouth funnel (for filling the jars),
  • a ladle (for ladling the mixture into the jars),
  • a butter knife (to run through the jars, removing air bubbles before sealing),
  • a jar lifter (for lifting jars without disturbing the seals)
  • and hot pads.
Using the tongs, lift one hot jar from its simmering water, draining well. Place near the pot of Chow Chow and set the funnel into the jar mouth. Fill the jar to within ¼ to ½-inch from the top, making sure there is enough liquid to cover the vegetables to that level. Lift another jar from the boiling water and set it near the first. Remove the funnel from jar 1 and set onto jar 2. Wipe the rim and thread of jar 1 with the wet cloth. Using the tongs, lift one lid and run it through the hot water briefly, then set it in place on jar 1. Screw a ring over the lid just gently snug. Set that jar aside, then repeat this process with all the remaining jars and Chow Chow mixture.

Once all jars are removed from the canning pot, insert the canning rack, ensuring there is still plenty of simmering water in the pot. Set the sealed jars into the rack and lower the rack into the pot. The water should come to between 1 to 2 inches above the tops of the jars. If not, have a pot of water at a simmer and add the hot water until it reaches this level. Bring to a boil. Once it reaches boiling, cover and reduce heat slightly, just enough so that it maintains boiling point. Time the jars according to this table:

1 - 1,000 feet above sea level - 10 minutes
1,001 - 6,000 feet above sea level - 15 minutes
Above 6,001 feet above sea level - 20 minutes

Once this time has elapsed, lift the canning rack up to the edges of the pot and using a jar lifter, lift the jars to a towel covered and draft-free counter. They should seal with a hearteningly loud POP. Sometimes this occurs almost immediately upon lifting the jar out of its boiling water. 


https://aharmonyofflavors.blogspot.com/2019/08/the-season-for-canning-and-preserving.html

Thursday, April 20, 2017

Roasted Tomato Condiment Packed with Flavor

First off, I have to tell a bit of a story. The morning after the Renaissance Festival fundraiser on April 8th, benefiting the Boys and Girls Club of Aberdeen, I was just worn out. My feet hurt, and I had a lot of cooking still to do, with guests at the house. I'd gotten plenty of sleep, but I was on my feet a lot, in heels (which I rarely wear), and a great night's sleep aside, my feet still hurt. So, as head cook and bottle washer in the house, I made an executive decision: "We are going out for breakfast!"

Heidi and Rich
Heidi and Rich
Our guests, Heidi and Rich were here over that Renaissance Festival weekend, and I do a lot of cooking for any guests. I think we may have gone out to eat only once in these years and many many visits we've made between us all. Being a small town, there aren't a huge amount of options for breakfast, so we went to Perkins®. My husband and I went to Perkins® for dinner one evening a few weeks back, and as we often do, we had breakfast. They had some specials going, and I had some sort of "Eggs Benedict," with bacon, avocado and some "slow-roasted" tomatoes, with the usual English Muffin, poached eggs and Hollandaise. Oh, wow, was that ever good. While everything on the plate was fantastic, what really made the dish stand out was those tomatoes. They had some real zip in their flavor, and were almost, but not quite, sweet. 

So, back to our breakfast with friends. I had been really busy these few weeks, so I had forgotten all about that wonderful version of Eggs Benedict, until perusing the specials menu again. When I spotted that dish, I had to have it. Heidi had something called the "Mediterranean". This was an omelet with spinach, "slow-roasted tomatoes" and Feta cheese, topped with Hollandaise. 
Roasted Tomatoes, Pickle, tomatoes, condiment
Roasted Tomato Pickle


While eating, I mentioned how much I loved the tomatoes in my dish, only then noticing that Heidi also had them in her dish. I asked what she thought of them, for flavor, and also started looking at them in light of how could I duplicate these, flavor-wise. Rich mentioned that a friend of his makes some roasted tomatoes with red wine vinegar and garlic (for Rich, there is no other main condiment but garlic!). Heidi and I compared pieces of the tomatoes. I was trying to determine if they were sun-dried and then made into this condiment, or were they roasted. I had come to the conclusion they were roasted, because some parts of the tomato still looked like moist tomato, unlike any sun-dried variety I'd ever seen. I set these mental findings aside for the day, but after the guests had left for home, I started thinking again.

Roasted Tomato, Pickle, condiment, recipe
Roasted Tomato Pickle, just jarred

I started planning what I wanted to do: first, roast the tomatoes. But then what? Garlic...hmmm. When I steam vegetables, I usually pass a few fresh garlic cloves through my Zyliss garlic press and into a small saucepan. I add in olive oil and a little butter and set the pan on a warming burner, to steep for a minimum of 20 minutes, and up to a couple of hours, depending on the urgency, then pour this over the steamed veggies. I opted to do this same thing, leaving the butter out. This way, the garlic flavor would be there, but not "in-your-face." Also, I didn't want butter in the mixture at all. 

I thought about the red wine vinegar that Rich had mentioned. But there was also that element of sweetness. I thought of Balsamic vinegar. The tomatoes in the dishes at Perkins® had no other clinging condiments - they were just the pretty red tomato halves. Still, I thought I might add some shallot. And last minute I opted for a few capers, also. My first attempt turned out really good. Tasting the mixture freshly made, it still seemed not quite as I remembered, and definitely lacking sweetness, so I added a teaspoon of honey. That was better. I put them in a jar and in the fridge.
 
Garlic in Oil, Roasted Tomatoes, Sauce
Garlic in Oil - Roasted Tomatoes - Sauce

When I pulled them out a few days later to try, they were SOOOOO good. They may not be a perfect match for those from the restaurant, but they are darned close, and absolutely heavenly. I used some on a grilled cheese sandwich and they took that sandwich to heights heretofore unknown!

Roasted Tomato, Pickle, condiment, recipe, shallot, garlic
Roasted Tomato Pickle

Roasted Tomato Pickle


Makes about 1½ cups

TOMATOES:
1 pound Roma tomatoes
salt, for sprinkling
fresh ground pepper, for sprinkling
1 - 2 teaspoons fresh thyme leaves
olive oil, for sprinkling 

GARLIC OIL:
3 tablespoons olive oil
2 - 3 cloves garlic, through garlic press or minced

SAUCE:
3 tablespoons red wine vinegar
1 medium shallot, thinly sliced
1 tablespoon white balsamic vinegar
1 teaspoon nonpareil capers
1 teaspoon honey

Preheat oven to 350 degrees. Line a large baking sheet with foil, spray the foil with cooking spray and set aside.
Score tomatoes, remove seeds
Score tomatoes and remove seeds

Cut the tomatoes lengthwise in half, then each half lengthwise into halves, making four long pieces from each tomato. Over the sink or over a bowl, using fingers, remove all the seeds and wetter parts of the tomatoes and discard. Using a sharp, serrated knife, score the tomato skins twice on each segment of tomato. Place them skin side upwards on the foil lines baking sheet. Sprinkle each tomato segment with a little salt, a little pepper, a drizzle of olive oil and some of the thyme leaves. Set the pan in the oven and time it for 1 hour. 

Check the tomatoes about halfway through the baking period, and turn the pieces over with tongs. At near the hour, check the tomatoes and remove any that are getting too dark, or are apparently dried and a bit leathery. Continue baking, keeping watch. They may need more than an hour. Some of my tomatoes were very large and took a total of 1 hour 20 minutes.

While the tomatoes are roasting, set a small saucepan on a warming burner or over a small burner at lowest possible temperature. Add in the garlic and allow to steep. If the oil starts to simmer, remove the pan from the heat, or set the pan only partially on the burner. The mixture should steep in hot oil, but not boil or burn the garlic.

In a bowl, combine the ingredients for the sauce and stir to dissolve honey. 

Once the tomatoes are done, add them to the sauce and pour the garlic and oil over top. Stir, then pour into a glass jar with lid. Refrigerate for up to 2 weeks.


My passion is teaching people how to create a harmony of flavors with their cooking, and passing along my love and joy of food, both simple or exotic, plain or fancy. I continue my journey in ethnic and domestic cuisines, continuing my journey to explore diverse culinary experiences and hopefully to start you on a journey of your own. Join me also at A Harmony of Flavors on Facebook, and Pinterest.
Disqus