Translate

Showing posts with label flank steak. Show all posts

Thursday, July 25, 2019

Fajitas on the Grill

When it comes down to summer grilling fun, fajitas are an excellent choice. The word fajita is the diminutive form of the Spanish word "Faja," meaning belt, or cinch; in this case a "little belt," as in using skirt steak, which comes in narrow bands, like a belt or cinch. Skirt steak is often confused with flank steak, partly (I think) due to the amount of visible one-directional grain of the meat. Here below are photos grabbed online to demonstrate the differences. 

flank steak, skirt steak, meat fibers, comparison

Flank Steak

In the top picture of a Flank Steak (from Pinterest), the fibers run along the length of the meat. Flank steaks are often found rolled up in a package, as the meat is usually no more than an inch thick and its total area takes up too much precious real estate in the meat aisle to be left open to display. Flank steak is a tough cut, made worse by the absence of fatty tissues to lend tenderness. It benefits from marinating to give it flavor and tenderness. The most important rule of all is the meat must be grilled or broiled to medium rare at best, then sliced thinly, across the grain, for serving. This cutting across makes the fibers of the muscle thinner and easier to chew. Trying to chew a slice that runs lengthwise with the fibers would be like trying to chew a rope. Not good.


Skirt Steak

In the bottom picture of a Skirt Steak (from this website), you will note the presence of the same kind of ropy grain to the meat, but this time, the fiber runs perpendicular to the length of the meat, or across its narrow length. The fibers are far more loosely arranged in the meat than in the Flank Steak, where generally the grain is tightly woven. This cut also needs marinating to bring out its flavor and likewise needs to be sliced across the grain. Once grilled, it is good to cut the long length into smaller pieces for ease in cutting across the grain. The skirt steak has lots of fatty tissues in between, helping out with keeping the meat more moist overall, but it should still be just grilled to medium rare at most. It is too easy to get the meat over done, making it far too chewy to eat. 

~~~~~~~~~~~~~~~~~~~~

After that little demonstration of the differences between these two cuts of meat, let it be understood that either of these may be used to make fajitas. Just ensure that the meat is sliced as thinly across the grain as possible with either one. That said, my preference for fajitas style meat is the skirt steak, for its flavor.

My favorite marinade for my fajitas is a Guatemalan style of Chimichurri. It is not the kind of green chimichurri used as a sauce over the finished meat like from Argentina or other countries. This is definitely a marinade only, or a cooking base for other types of stewed meat. It has terrific flavor and while it has quite a few ingredients, it can also be packaged into 5 or 6 portions and frozen. Bring out and thaw a portion when you want to use it for a marinade and it is all ready to use. 

Guatemalan Chimichurri

Guatemala, Chimichurri, meat marinade, how to
Guatemalan Chimichurri

Makes about 5 to 6 cups

5 ripe Roma tomatoes
5 tomatillos
1 onion
6 cloves garlic
1 red bell pepper
2 sprigs fresh thyme, leaves stripped, stems discarded
1 teaspoon dried oregano
1½ teaspoons paprika
1½ teaspoons black peppercorns
2 - 3 bay leaves, crumbled, stems discarded
¼ cup yellow mustard
½ cup olive oil
1 beer (Guatemalan style, or German)
1½ teaspoons sugar
1 cup cilantro leaves
Salt, to taste

Cut up vegetables as needed and place all in a blender to puree. Use a cup or cup and a half size portion for a marinade or cooking liquid for a roast. Divide the rest into containers to freeze until needed.

NOTES: Use to marinate skirt steak for grilling, or equally at home as a savory stewing liquid for a roast beef.


FOR GLUTEN FREE: Substitute the beer with a gluten free variety. 

~~~~~~~~~~~~~~~~~

Chimichurri Marinated Fajita Meat


Once you've gotten the marinade made and portioned in the freezer, make sure to keep a portion out for your meat marinade.  As mentioned above, skirt steak is the best for flavor in making these grilled fajitas. 
Chimichurri, Marinade, Fajitas, skirt steak, recipe
Chimichurri Marinated Fajitas

Serves about 6 to 8

2 pounds skirt steak
1 - 2 cups chimichurri marinade, above
Extra salt, for sprinkling

Skirt steak may have lots of fat over the meat, but the meat is thin and fats grill out easily so do not be too concerned with getting it all trimmed off. This cut of meat can be a little tough, so it needs all the help it can get to tenderize, including slicing it thinly across the grain to serve.

Marinate the skirt steak for at least 24 hours before grilling. Grill (or broil) over high heat for short periods on each side for best results. Overcooking this cut will toughen it even more. Four to 6 minutes per side is long enough. Remove from grill to a plate and tent with foil for 10 to 15 minutes. Since this cut of meat is exceedingly long and thin and the grain of the meat (the direction in which the fibers of the meat run) goes across the meat and not lengthwise, you will need to cut the long piece into sections you can easily slice with a nice long, sharp chef's knife. To serve, sprinkle with a little more salt, then slice the meat at a slant across the grain, as thinly as possible.

If serving the meat for fajitas, set out large tortillas, saute some onion and bell peppers and add in any other side dish desired, such as grated cheese, sour cream, salsa, guacamole, shredded lettuce and refried beans.


My passion is teaching people how to create a harmony of flavors with their cooking, and passing along my love and joy of food, both simple or exotic, plain or fancy. I continue my journey in ethnic and domestic cuisines, continuing my journey to explore diverse culinary experiences and hopefully to start you on a journey of your own. Join me also at A Harmony of Flavors on Facebook, and Pinterest.

Friday, February 24, 2017

Mini Cheesecakes are Cute as Buttons

I will admit right up front, I saw this pattern being made on top of something that looked like little cheesecakes in photos on someone's blog site. The fact that I had no clue what language this blog was written in is immaterial. The design is adorable. I decided to try out some little cheesecakes with other ideas I got while perusing various web and blog-sites, and they are just so cute. Apart from being really tasty, they really are "cute as buttons."


Lemon, Blueberry, Mini Cheesecakes, recipe
Lemon Blueberry Mini Cheesecakes


Appetizers, finger foods, recipes, easy to eat
Five Appetizers Served at CorTrust Bank
I was helping to coordinate an event at CorTrust Bank yesterday. My husband and I had met with Northern Area Market President, and the Mortgage Loan Specialist, having done some other design work with them. At the last minute, there were dire blizzard warnings for that area around Sioux Falls, where some out-of-towners would be coming from, with the possibility that the whole event would be called off. Still, some brave souls ventured up here to Aberdeen and the event took place. The appetizers served at the event last evening were Green Pea Pancakes with Smoked Salmon Mousse, Flank Steak Rolls with Asiago and Arugula, Spanakopita Cups, Buffalo Chicken Wraps and Lemon Blueberry Mini Cheesecakes. 

The little cheesecakes, shown bottom right in the photo above, were made in mini muffin tins, making them about 1½ inch in diameter, or just about 2 - 3 bites worth. Tiny and adorable. Which makes them so irresistible.

The flank rolls have been made with many fillings and various marinades in past, but this marinade (below) is my favorite. Cutting thin logs (about ¼-inch diameter) of Asiago cheese, about 1½ to 2-inches long and tucking in a couple of peppery baby arugula leaves make these a hit at any party or get together. The Asiago and arugula combo makes this appetizer so easy to make.

Flank Rolls with Asiago and Arugula

Amount will depend on size of flank steak
Flank steak, Rolled flank steak, Asiago, Arugula
Flank Rolls with Asiago and Arugula

About 30 to 65 rolls

½ cup olive oil
2 tablespoons pomegranate molasses or concentrate
3 cloves garlic, finely minced
1-inch piece fresh ginger, finely grated
1 to 1½ teaspoon salt
2 teaspoons chipotle chili powder

1 to 2½ pound flank steak


Asiago wedge, cut in ¼ x 1½-inch pieces
Baby Arugula leaves

Combine the first 6 ingredients in a zip-top bag and place the flank steak in the bag to marinate for at least 12 and up to 24 hours, turning occasionally so the marinade coats the steak evenly.

To broil, either grill on a very hot grill for 6 minutes per side (slightly more or less, depending on size and thickness of steak), or set the steak on a rack on a rimmed baking sheet and broil about 4-inches from the heat for 6 minutes per side. Tent the meat once done grilling/broiling for about 10 to 15 minutes before slicing very thinly, preferably at a bias, to achieve wider pieces. Using a length of about 4-inches, set a piece of the Asiago and 2 baby arugula leaves on one end. Roll the steak around these filings and skewer with a toothpick to keep closed. 

Back to the little Cheesecakes 

I thought about placing a fresh blueberry in the bottom of the tart shells, but for practice purposes, I had none available. I did, however, have a jar of Polaner All Fruit Blueberry Spread. I wanted something not terribly sweet, and this was as good as I could come up with quickly. I used a slightly rounded ¼-teaspoon of the fruit spread in each of the little pie shells, and then filled them with about 2 teaspoons of the lemony cheesecake mixture.

When I made the Mini Strawberry Cheesecakes recently, with a chocolate shell, I did not bake the chocolate pie shell first. I liked the soft texture of the shell with the strawberry cheesecake filling as it made the shell almost brownie-like in texture. For the new mini cheesecake recipe, I tried them without baking the shell first, and they were (to my own personal taste) good, but I felt that others would prefer a more crispy textured shell. Of course, once the mini shells are baked blind, they do shrink. It turned out that this way I could only use a level ¼-teaspoon of the fruit spread and possibly about 1½-teaspoons of the cheesecake filling. Altogether, somewhat smaller versions, but no less delicious.

Keep in mind that these were made in the tiny wells of mini-muffin tins and not regular muffin tins!

And then the Little Designs

As I mentioned at the beginning of this blog, I saw this idea on a blogsite that was written in another language. Not a language I recognized, either! but a picture is worth a thousand words, they say, and this picture was too good to pass up. The photos showed what appeared to be a sort of cheesecake-like batter in a small tart shell. Five, straight <¼-inch lines were drawn onto the batter. I used gel food color to make the lines, using a toothpick. Once the five lines are drawn, you draw the toothpick down through the center of the five lines in one smooth flow, and then out the bottom and curling out a bit (shown on the top three in the diagram below). This gives the appearance or suggestion of something like lavender flowers. I used "violet" food color, yet the designs came out looking deep blue. 

Creating the patterns

As I got familiar with the feel of using the toothpicks and gel food colors, I decided to try something new. I used a pink gel food color and sketched 5 "petals" moving upwards from the base of each "petal" and curving slightly. Next, using green gel food color, I drew a stem downwards, and then a leaf, also dragging downwards toward the stem. Trying to draw the leaf from the stem up and out, created a break in the pattern of the stem. This process is shown in the bottom three in the diagram above. All in all, this was one really easy way to make these tiny gems even more adorably irresistible.

Making Designs on Cheesecakes


Lemon Blueberry Mini Cheesecakes

Makes 30
Lemon, Blueberry, Mini Cheesecakes, recipe, design
Lemon Blueberry Mini Cheesecakes


SHELL:
1 cup all purpose flour
3 ounces cream cheese
4 tablespoons unsalted butter

FILLING:
8 ounces cream cheese, room temperature
⅓ cup granulated sugar
1 teaspoon cornstarch
2 tablespoons sour cream
1 egg
2 tablespoons lemon juice
2 teaspoons lemon zest

Polaner Blueberry Fruit Spread 
Gel Food Colors: Purple, Pink, Green

Make the shells: Preheat oven to 375 degrees. Place the flour into a bowl. Add in the 3 ounces of cream cheese and the butter and cut in as for pie pastry. Once the ingredients start to form larger bits, begin working with fingers, bringing it all together in one solid mass. It takes a minute or so, but will come together completely. Break off or cut 30 equal sized bits of the dough. Flatten or roll the dough pieces into about 3-inch pieces and fit them into the mini muffin tin wells, pressing so they stick up above the well slightly. They will shrink in the oven! Bake the shells for 9 minutes, until they begin to turn golden. Reduce oven to 350 degrees.

Allow the little shells to cool for about 10 minutes. Use a ¼-teaspoon measuring spoon to scoop a level amount into each of the little baked shells. Set aside.

MAKE the filling: In a small bowl, stir together the granulated sugar and the cornstarch to combine. Set aside. In a mixing bowl, using a hand mixer, beat the 8-ounces of cream cheese until softened. Add the sugar mixture and beat to just combine. Add in the sour cream, then the egg, beating just to combine. Add the lemon juice and zest until mixed.  

Scoop about 1½ teaspoons of cheesecake filling into each of the little wells with blueberry spread. The filling should cover the blueberry completely, leaving a little surprise when they are bitten into. Before baking, scoop out a small dot of each of the food colors onto a plate. Use toothpicks (a separate one for each color) and create patterns as shown in the diagrams above. Once all are decorated, bake the cheesecakes for 8 minutes, or until set.  Cool completely, then refrigerate for at least an hour before serving. 


My passion is teaching people how to create a harmony of flavors with their cooking, and passing along my love and joy of food, both simple or exotic, plain or fancy. I continue my journey in ethnic and domestic cuisines, continuing my journey to explore diverse culinary experiences and hopefully to start you on a journey of your own. Join me also at A Harmony of Flavors on Facebook, and Pinterest.

Thursday, February 19, 2015

Flank Steak Rolls a Hit at Wine Tasting

host, gathering, foods, wine and food pairing
Host, Ty, at left: gathering around the foods
Last evening an informal wine tasting was held at the lovely home of Ty and Ann Hanson. I made a few appetizers to contribute to the foods. I have to say I had more fun last evening than I have in a long while. The circle of friends attending were all lovely and convivial. I had a few people who love cooking, and with whom to bounce ideas back and forth. My husband had someone to talk computer geek stuff. We both came away from the evening happy and grateful for such lovely people and such a lovely time. 

wines, wine tasting, wine selection
Michelle Podoll setting out the wines
I wrote about this upcoming event about 10 days ago, when I was doing a trial run of a couple of the recipes I was planning. My goal is always to pair foods with wines in a way that brings out the best in both. I had created the Lemon Thyme Chicken Fillo Cups to pair with a Ferarri Carano Chardonnay and also with a Pinot Noir. I am happy to report, after last evening's event, that this appetizer paired well with both these wines. The wines presented ranged from about $13 to $73 in price. There was a Cabernet Sauvignon from Spain, a Cabernet Sauvignon, Pinot Noir, two Zinfandels, a Rhone varietal blend and a Chardonnay from California, an Italian Chianti and a Sauvignon Blanc from New Zealand. 

Asiago, cream cheese, log shapes, filling
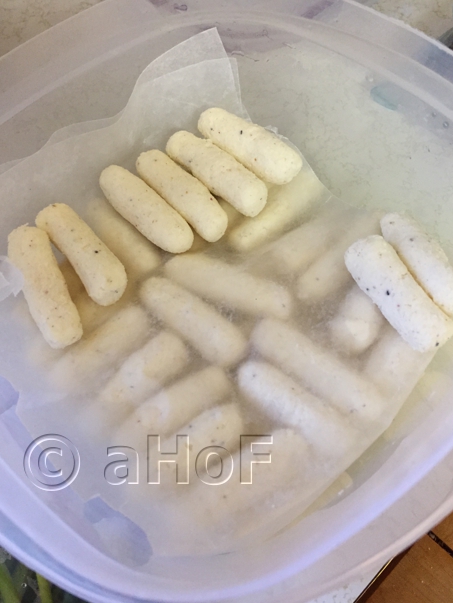
Asiago/cream cheese logs
The other appetizer I had made as a trial run on that same day needed a little modification. This second appetizer was Flank and Asiago Rolls. In the trial run I rolled a narrow rectangle of Asiago cheese with a sliver of scallion in the individual flank steak bites. The fact that Asiago will tend to crumble a bit meant that in some of the rolls, sticking the toothpick through the roll meant the cheese broke in half. Plus, the cheese was a bit overwhelming this way. My sister-in-law, who was there to taste these trial runs, suggested maybe grating the cheese and mixing with cream cheese. I thought this was a great idea. I wanted to keep the strength of flavor of the Asiago, being the component that would make it a good pairing with the strength of the Cabernet Sauvignons being served.

While prepping for the event of last evening, I did grate the Asiago cheese finely (using a small-holed grater (rendering thin strings much like the fresh grated Parmesan one finds in the grocery) and mix in just enough cream cheese to make the mixture form-able. I wanted to roll the cheese into narrow logs this time, making it easier to roll in the sliced meat segments. I ended up with 84 little logs, 6 to 7 grams, or .21 to .25 ounces each. I was completely happy because, as it turned out, I had only two thin bits of the flank steak left, after using the entire 84 cheese logs. Great eye for what was needed (as I pat myself on the back!).

Flank steak, Asiago Rolls, appetizer, finger foods
Flank & Asiago Rolls, served

How many appetizers this recipe will yield depends on how one slices the flank steak, and how accurately the little cheese logs are weighed. The cheese logs can easily vary widely, so I used a little scale to ensure they did not vary beyond 6 grams. I have sliced many flank steaks for similar type appetizers, so I have some practice, but it is not a difficult thing to do. There will be waste involved (which we are happy to devour!). Ends that are too thick and not long enough to make into a roll - there is no getting around the waste there. Some slices will end up thicker than others. Just keep slicing and thinking "thin".


Flank & Asiago Rolls


Makes about 80 to 85, approximately
Flank steak, Asiago Rolls, appetizer, finger foods
Flank & Asiago Rolls


MEAT:
2.3 pound flank steak
¼ cup Sweet Smoky Cocoa Rub
¼ cup olive oil
1½ teaspoon salt
1 teaspoon chipotle powder
6 - 8 cloves garlic, minced finely

CHEESE:
12 ounces Asiago cheese, grated finely
8 ounces cream cheese, softened
¼ cup Hoisin Sauce
scallions, slivered for rolling
toothpicks for skewering
Hostess, salad, prep, appetizer feast
The hostess, Ann, prepping salad
One or two days before, Combine the Sweet Smoky Cocoa Rub with the olive oil, salt, chipotle powder and garlic. Place the flank steak into a gallon sized zip-top bag. Take one half of the oil mixture and rub evenly onto the steak in the bag. Flip over the bag, and apply the remaining mixture evenly onto that second side of the steak. Seal the bag and place in the refrigerator for 1 or 2 days.

Up to 3 days in advance, prepare the cheese. Grate the Asiago finely, and using hands or a hand mixer, thoroughly combine with the cream cheese. It is best to use a scale or some implement to make all the cheese logs of equal size. Measure out a small amount. Six grams is plenty. Roll this into a log about 2 inches long. Repeat with the remaining mixture, setting the logs into a container as shown in the photo above. Set waxed paper between layers.

Have ready the scallions. If larger, slice lengthwise down the scallion, then cut this into lengths about 2 or so inches long. Store these in a zip-top baggie in the fridge if making the day before or earlier in the day.

The day before, or early on the day needed, preheat the broiler with the oven rack on the second level from the top. Set a rack onto a low rimmed baking sheet (cover the baking sheet with foil for easy cleanup later), set the steak on the rack and place under the broiler for approximately 6 minutes per side. Remove from oven and tent with foil until cooled. The meat can be sliced at this point, but there will be far more mess. If possible, once the meat is cooled, wrap and store in the refrigerator for at least 2 hours or overnight before slicing; once sliced, the slices can be stored one more night in the fridge.

Once ready to slice, begin at one end, cutting across the long grain of the meat. Set the knife at an angle away from you to get wider strips of meat. All that is vitally important is that all the slices be across the grain, ensuring tender meat. Slice the meat as thinly as possible. Once the meat is too wide for the knife to span easily, slice it into two sections lengthwise. Then, continue to slice off thin pieces until all the meat is used up. I used a 2.3 pound piece of flank to yield the 86 rolls. The slices of meat will need to be long enough to wrap around the cheese log and scallion sliver.

It takes about 40 minutes to make all the rolls. Set the Hoisin Sauce in a small bowl and have a pastry brush ready. Set the flank slices, cheese logs, scallions and toothpicks arrayed near you. Lay out a slice of meat and using the pastry brush, dab a small amount of Hoisin sauce on the slice. Set one cheese log and a sliver of scallion across the width of the meat and roll to encase. Skewer with a toothpick. Repeat with all the remaining meat. These should be eaten the day they are rolled as the scallions become soggy if kept too long.


My passion is teaching people how to create a harmony of flavors with their cooking, and passing along my love and joy of food, both simple or exotic, plain or fancy. I continue my journey in ethnic and domestic cuisines, continuing my journey to explore diverse culinary experiences and hopefully to start you on a journey of your own. Join me also at A Harmony of Flavors on Facebook, and Pinterest.

Saturday, December 13, 2014

Hilachas - a Delicious Guatemalan Stew

Continuing on with my revision of a cookbook / memoir of Guatemala, which I made for one daughter and am now revising for another one, today I made two Guatemalan dishes. Finally, after so many years I have eaten some these things again, and now have photos. I am truly happy on both counts. The first dish is a Guatemalan Stew, called "Hilachas." The second is a dessert, called Chancletas ("Slippers"), which I will describe in my next blog.

Hilachas?

Hilachas


The word Hilachas, translates to "rags." The dish is common all around Central America, and apparently Cuba and Puerto Rico as well. In the southern US it is more often seen on menus as "Ropa Vieja", which means "old clothes". It is not a far difference from old clothes to rags. Easy to see the similarity. In essence, the dish is the same. It is made with a meat that shreds easily, such as flank steak, and shredded into a sauce that is mildly tomato based. In Guatemala, some places made Hilachas adding in potatoes, some add in Chayote squash (Guisquil, in Guatemala) and some add carrots. Some places add all three. In the Castillo household, made by the wonderful maid named Carmen, it was only potatoes. And, despite the potatoes being a starch, the dish was served with rice. Despite the fact that Hilachas was served very often, being very economical to make, somehow I never made it myself. I had no idea of what went into the dish, beyond the vague notion of something tomato-y as the base, with meat and potatoes. I wasn't even sure what kind of meat they used. I attempted something with no research one time long ago, was completely unhappy with it, and never tried again.
guisquil, chayote squash, vegetable, vine plant
Guisquil or Chayote Squash


Writing about the dish yesterday while working on the cookbook / memoir, I thought I would do some research. Even a few years ago there was very little online about Guatemalan foods. So little that it was almost impossible to find out anything. Following on that, even if one could find a "recipe," it was (and still is, in many places) so badly written, with little or no amounts, it was not an easy task to decipher what should really be done. I set myself the task of thinking about every aspect of Hilachas I could recall. And then I went online once again.

Of course, with a recipe that varies from household to household, it is not easy to pin down how a recipe should be done, but from all the places I read about Hilachas, there was a common thread. They all seemed to use a "sofrito" and the thickening agent is either bread or tortillas.

What is Sofrito?

Tomatillos, miltomates, husked fruit
Tomatillos
While I was familiar with the word "sofrito" I am not sure how or where I first heard it. I know that Puerto Ricans use the term. In essence, a sofrito is the base for many sauces, and it is the base of Hilachas. In this recipe, raw onion, garlic, tomatoes, tomatillos, and a guajillo chile (or two) are the sofrito ingredients. These are blended relatively smooth, or can be done in a food processor. Once pulverized, they are cooked with some oil to remove the raw flavors. In the case of the tomatoes in this recipe: as we are now reduced to flavorless supermarket tomatoes, I used a can of whole San Marzano tomatoes. If anyone is unfamiliar with tomatillos, they add a particular flavor of their own, and are used extensively in Guatemalan cuisine. They are found in far larger sizes here in the US. In Guatemala, they were most often quite small. Maximum, 1 1/2-inches diameter. They are from the ground cherry family and the fruit is encased in a papery husk. The husk is removed before using, and the fruit inside has a sticky residue that needs rinsing.

Creating the Recipe

Once getting the basic ideas together, I set about creating the recipe in a general sense. Flank steak would shred easily, so I would use that for the meat. The sofrito had to have some tomato, but tomato is not remotely the main flavor. This is where I went wrong all those years ago. I would guesstimate that there are about nearly equal parts tomato, tomatillo and onion in the sofrito. Then garlic (just because we must have garlic!) and chilies. Some recipes called for guajillo chilies. In Guatemala, the choice would have been chile guaque, but that is not available here. I had neither! I do, however, have some dried Hatch chilies, so I used that instead. A dried ancho or pasilla chili could be used, or even, in a pinch, a combination of paprika and cayenne. 

Guatemalan bread, Pan Frances French Bread
Guatemalan Pan Frances or French Bread
Once the sofrito is blended together and fried, the main bulk of the recipe is done. The meat is cooked and shredded. The stock leftover from cooking the meat is added into the cooked sofrito. Potatoes are added and cooked. And then it is thickened with bread crumbs. In Guatemala, most often this was accomplished by soaking one of the "Pan Frances" or French bread, in some of the broth, until very soft, then stirred into the soup/broth until it dissolves, accomplishing a thickened mixture. And there it is, the basic recipe idea. Here it is, in its final state:

Guatemalan Hilachas


Serves 6 or more

Hilachas, Guatemala, Rice
Hilachas with Guatemalan Style Rice

COOK THE MEAT:
1½ to 1
¾ pounds flank steak
1 quart beef stock, preferably unsalted (or water)
2 teaspoons salt (if using unsalted stock)
1 bay leaf
½ onion, skin on for good color in the stock

SOFRITO:
1 can (14.5 ounces) peeled, whole tomatoes
6 medium small tomatillos,husks removed
1 whole onion, peeled and coarsely chopped
1 - 4 guajillo chiles, or 1 dried ancho or paasilla
3 - 4 cloves fresh garlic

OTHER INGREDIENTS:
2 tablespoons olive oil
more salt, as needed
½ teaspoon fresh ground black pepper
1 tablespoon Spanish paprika
3 ounces fresh bread crumbs (about 1 cup)
1
½ to 1¾ pounds potatoes, peeled, cubed ½ cup cilantro, finely chopped

Earlier in the day, set the flank steak in a large pot with the stock, salt, bay leaf and onion half. Bring to boil, lower to a simmer, cover and cook for 1 1/2 to 2 hours, or until tender. Remove the meat to a dish to cool, remove the onion and bay leaf, and reserve the stock. Once the meat has cooled, slice it across the grain into 2-inch sections, then shred the meat into thin strips or "rags". Set aside.

While the meat is cooking, place the sofrito ingredients into a blender or food processor and process until relatively smooth. Heat a large saucepan and add in the oil. Being careful, as it will spatter, add the sofrito. Stir and cook, covered, for 15 minutes to cook out the raw taste. Stir occasionally, but be careful of hot liquid splattering. Once the sofrito has cooked, add in the remaining meat cooking liquid to the sofrito, along with the black pepper, paprika and potatoes. Cook this mixture for about 30 minutes, until the potatoes are tender when pierced with the tip of a knife.

Add in the fresh bread crumbs and stir well. Taste for salt, and adjust. Return the meat to the pot and stir in the cilantro. Heat through and serve with rice, Guatemalan Style:

Guatemalan Rice, vegetables, onion, peas, method
Guatemalan Style Rice

Guatemalan Style Rice


Serves 4 to 6

1 cup long grain rice
2 tablespoons oil or butter
½ cup shredded carrot
2 tablespoons thinly sliced onion
¼ small green pepper, sliced thinly
½ cup frozen peas
2 cups water
1 teaspoon salt

Place all the ingredients into a medium saucepan and bring to a boil. Reduce heat to simmer and cover. Cook the rice for 15 minutes. Remove from heat and let stand for 5 to 10 minutes more.


My passion is teaching people how to create a harmony of flavors with their cooking, and passing along my love and joy of food, both simple or exotic, plain or fancy. I continue my journey in ethnic and domestic cuisines, continuing my journey to explore diverse culinary experiences and hopefully to start you on a journey of your own. Join me also at A Harmony of Flavors on Facebook, and Pinterest.

Wednesday, March 19, 2014

Sometimes it Works, Sometimes it Doesn't

I have been busy experimenting with recipes for the upcoming April 12th Wine Tasting Event for the benefit of the Boys and Girls Club of Aberdeen. I have 6 wines I will be pairing with appetizers created especially for that particular wine. Learning to rate a wine will be a part of this process of finding out what one likes about a wine, or dislikes. Finding if the wine is great all on its own, or better/worse with a food. 

I go about the pairing of food to a wine by using a list of appropriate foods that are best with a particular varietal or style of wine and selecting items that would pair well to create an appetizer. I wrote a few days back about the empanadas I created. Aside from the mess I made of the edges before getting the crimping and folding right, the flavors were excellent. While I have not tasted the wine that these will pair with, I have tasted this brand of wine in the past and I believe the flavors will be excellent. 

Normally, I create a recipe and the execution is relatively flawless. Last evening I was making an idea of an appetizer to pair with some very high end Italian wines, and the flavors were just perfect. The way it was put together, however, was most definitely not. The Porcini & Coffee Rub made the flank steak just scrumptious. The Garlic Blue Cheese Mashed Potatoes were delicious. But... I used Yukon Gold potatoes and they just came out too soft to work with. I am going to experiment tonight with Russets and see if they work better. Nothing wrong with the flavors though! If you are having a nice strong red wine, such as a Cabernet or a strong Italian wine, these potatoes are the ticket!

Roasted Garlic & Blue Cheese Mashed Potatoes


Serves 3 - 4, for a meal

3 - 6 cloves roasted garlic
2 pounds Yukon Gold potatoes, peeled, diced, cooked in salted water
4 ounces Gorgonzola or Blue Crumbles (1 cup)
2 teaspoons fresh thyme leaves, minced
1 teaspoon Kosher salt
1 tablespoon olive oil

Put the potatoes through a ricer or whip with a mixer, adding the rest of the ingredients to blend well.


food presentation, easy to eat, appetizer
Beautiful presentation, but impractical
My original idea was to see if I could roll the slices of flank steak into a cone shape, pinning the edges with a cocktail toothpick, and then piping the mashed potatoes into the cone. That idea was a complete, total no-go. There was no way to secure the cone so it wouldn't fall open. Instead, I tried rolling the meat slice into a tube and piping the mashed potatoes into the tube, but the mashed potatoes, while delicious, were far too soft. Strike two. I had some fancy cocktail bread in the freezer so I got that out and sliced it very thinly. The bread was about 3-inches in diameter. I brushed the bread with olive oil and toasted both sides under the broiler for a minute to crisp. I cut a piece of the thinly sliced flank steak about 3 x 3-inches, set it on the bread, then topped with a piped rosette of mashed potatoes. This was a beautiful presentation, so I went with that. I invited my sister-in-law, Sherri over and along with my husband, we all ate these appetizers for dinner, discussing flavors, presentation and practicality. 

We all agreed the flavors were perfect. The presentation was lovely. However, the actual eating was a really big problem. Flank steak is a nice cut of meat, if you slice against the grain. Once a piece is as large as the 3 x 3-inch square I set on the toasted bread, there is far too much of the long grain of the meat. It was hard to take a bite. The whole piece of meat wanted to drag along, and with the mashed potatoes so very soft, they tended to want to slide off and make a mess. Not good when one is walking around with a glass of wine in one hand at a party or event.

So, we spent quite a while discussing how to remedy this problem. For one, the slice of
flavor idea, Flank steak, mashed potatoes
New idea: Flank roll atop potatoes
toast was too big. Setting any meat on a toast that size means 2 to 4 bites - large for my purpose. I will make small diameter baguettes to fit my need. (In fact I made a starter batter already to that end.) I will make the baguettes, hopefully, about 1½-inch in diameter, making a tiny bite when sliced. Instead of a flat slice of flank steak, I am planning to use sirloin, cut into cubes. I will pipe the rosette of potatoes onto the bread, and set the cube of meat on top of the potatoes. Hopefully this will make small enough bites to make them easier to eat. 


If you can find dried porcini mushrooms, I would truly recommend making the Porcini & Coffee Rub for Beef (Flank Steak, thick sliced Strip Steak, to coat a Rib Eye Roast, etc). The flavors were stupendous, though I could not truly taste the coffee. I may try this using espresso powder when making again.

Porcini & Coffee Rub for Beef 


Makes enough for 2 flank steaks

1 ounce dried porcini mushrooms
1 - 2 Starbuck's "VIA" instant coffee, French Roast or Bold
2 tablespoons dried onion flakes
1 tablespoon alder-smoked sea salt, or other salt of choice
1 tablespoon black peppercorns 
1 tablespoon sugar
1 teaspoon garlic powder
1 teaspoon ancho chile powder (more if desired)

Grind the mushrooms in a coffee grinder used only for spices. Remove to a clean jar. Place the alder smoked salt (usually in larger crystals), the peppercorns and the onion flakes in the spice grinder until fine. Add these to the porcini powder along with the coffee powder, sugar, garlic powder and ancho powder. Cover the jar and shake to combine the ingredients thoroughly. Sprinkle onto each side of the steak and press in well. Cover tightly and refrigerate overnight before proceeding with your recipe.

For flank steak, I set a rack under the broiler so the meat will be about 4-inches from the element and broil for 6 minutes per side. Tent with foil for 15 minutes before slicing thinly, at a strong diagonal, across the grain of the meat.


My passion is teaching people how to create a harmony of flavors with their cooking, and passing along my love and joy of food, both simple or exotic, plain or fancy. I continue my journey in ethnic and domestic cuisines, continuing my journey to explore diverse culinary experiences and hopefully to start you on a journey of your own. Join me also at A Harmony of Flavors on Facebook, and Pinterest.

Tuesday, February 25, 2014

Another Wine & Food Pairing

garrigue flavor, garrigue spice mix, thyme, sage, fennel, lavender
My Garrigue Seasoning Mixture
Yesterday I wrote about the mini tarts I made to pair with a Pacific Rim Chenin Blanc. Today I am going to describe my thinking on the food pairing I made for the 2003 Domaine du Vieux Telegraphe Chateauneuf du Pape.

As I mentioned in my post on February 18th, I learned a new term when researching the flavors to pair with this Rhone / Southern France wine. While the term "garrigue" has been around for a while, I have not been reading the different wine publications as avidly as I once did, and missed ever hearing about this new descriptor. It is used to describe all the bouquet of aromas from the wild herbs that grow in that region of France. Any time a grape grows in a very specific soil and environment, this affects the grapes' flavor, and therefore the wine made from them. It is said that many Rhone wines retain some of this garrigue aroma. It was a bouquet of scents I was unfamiliar with, as a whole, and so I had never been able to detect this bouquet in a wine.
meat cut, beef, flank steak, lean meat,
Showing long, lengthwise grain of the meat

I had drunk this particular Chateauneuf before; we had various bottles in our cellar. This time would be a brand new tasting, with this new idea in mind. I had created a sort of spice seasoning mixture I creatively called "Garrigue Seasoning." I know - not so creative, but what else could I possibly call this kind of mixture? I intended to use this dry spice mix to flavor a flank steak, with the idea to also marinate the steak in a mixture of currants, balsamic and olive oil. I dry-rubbed the meat with the spices first, then poured over the wet mixture and marinated it a full day. Once I broiled and sliced the meat, it didn't have nearly the flavor I hoped for, though it was very good, and paired well with the wine.  I believe if I were to make this again, I would dry rub the meat, possibly with even more of the rub than I used, and a little olive oil to marinate. 

cheese, cheddar, appetizer
Cheddar Rectangles
Other foods I chose to pair with a wine that is a blend of Grenache, Syrah and Mourvedre (GSM) were sharp cheddar and arugula, with its peppery flavors. I broiled the meat and sliced it very thinly across the grain, at an angle in order to make each slice more than double the width it would be if slicing straight down. If you have never used a flank steak, it is a very thin piece of meat. It can be a little tough because it is very lean, but cutting across the grain of the meat makes all the fibers of the meat very short, and therefore edible.

I looked for the sharpest cheddar I could find, and sliced it into ¼-inch slices. Then I cut those slices to make them ¼-inch widths by about 1¾ to 2-inches long, approximately the width of one of the slices of the steak. I got a box of baby arugula and selected  enough leaves to use 2 per steak roll. 

Garrigue Rubbed Flank Steak Rolls with Cheddar & Arugula


This makes 50 or so rolls
Flank Steak, garrigue flavor, sliced meat, rolled meat
Garrigue Rubbed Flank Steak Rolls with Cheddar & Arugula

1 flank steak, about 2 pounds
4 - 6 tablespoons Garrigue Seasoning (post of February 18)
3 tablespoons olive oil
8 ounces sharp cheddar cheese
baby arugula leaves
 

Rub the flank steak well with the Garrigue Seasoning on both sides. Sprinkle the olive oil over and rub into the seasonings and meat. Wrap well and set in the refrigerator overnight. Prepare the cheddar by making little rectangles 1/4 x 1/4 x 2-inches. These can be cut and stored in the refrigerator until needed. Select nice, small arugula leaves.
 

When ready to prepare the meat, heat the broiler and set the rack on the second level down. Line a rimmed baking sheet with foil, for easy cleanup later. Set a small rack onto the foil and place the meat on the rack. Place under the broiler and broil for 6 to 7 minutes per side, depending on the thickness of the meat. When done, tent with foil for 15 minutes before slicing.

slicing flank steak, thin slices, wide slices


When ready to cut the meat, set the steak with the length of the grain crosswise in front of you (as shown in picture). Hold a sharp chef's knife or carving knife at a 45 degree angle. Slice at this angle, creating thin slices, much wider than if slicing straight down. These lengths of meat will need to be cut into 2 or even 3 pieces each. The length needs to be just wide enough to roll around the cheddar and arugula leaves, crossing enough to insert a toothpick to hold them in shape.

When serving these with a good wine, always try to serve slices of bread along with, as the bread helps to absorb the alcohol. It becomes very difficult to taste and rate a wine when a few sips make you tipsy. I served these flank rolls with little slices of bread, brushed with oil and broiled lightly. The meat went well with the Chateauneuf du Pape. We also smelled the garrigue seasoning and them smelled the wine, and found that these smells were definitely apparent in the wine's bouquet. Hurray!


My passion is teaching people how to create a harmony of flavors with their cooking, and passing along my love and joy of food, both simple or exotic, plain or fancy. I continue my journey in ethnic and domestic cuisines, continuing my journey to explore diverse culinary experiences and hopefully to start you on a journey of your own. Join me also at A Harmony of Flavors on Facebook, and Pinterest.

Tuesday, February 18, 2014

Garrigue - A New Word and a New Spice Blend

I am trying to think up some appetizers for Friday; one is for a Chateauneuf du Pape (Vieux Telegraphe). In all the research while filling in those wine/food pairing sheets I made (see yesterday's blog), I came across the term “garrigue” as in a flavor or aroma and used in reference to Southern Rhone wines such as Chateauneuf or Bandol and others. We have had some bottles of Rhone called Domaine la Garrigue, Vacqueyras, but had not ever seen the word "garrigue" used as a flavor term, so I looked it up.

Turns out it is a term for the combined aromas of all the wild herbs and plants that grow in the chalky soil in that area, such as rosemary, sage, thyme, fennel, juniper, lavender, mint, lemon verbena, marjoram and others. One web site says: The reason we now hear this term in relationship to wine is that it refers to the flavorful, earthy, salty and pungent aromas and flavors often found in garrigue wines.
Garrigue Spices, pink peppercorns, lavender, pepper, sage, thyme
Garrigue Seasoning Spices

So today I got this idea. I was thinking of using a flank steak again, as it is easy to marinate and give all sorts of flavors, then broil and slice. I decided to pick from this palate of flavors and make a dry mix first, them blend that with a combination of balsamic and currants, a touch of honey and olive oil. I went shopping late this afternoon, so I just got the flank steak. I will probably wait till Thursday to open it and start the marinating. This is what I used:

Garrigue Seasoning Blend


Makes ½ cup

1½ tablespoons pink peppercorns (for their floral notes)
1 tablespoon each, dried: lavender flowers, black pepper, sage, thyme, fennel
15 juniper berries
1 tablespoon sea salt
 

All these spices went into a little spice grinder and ground fine. I will probably add in some dried lemon peel instead of lemon verbena (that I don’t have). I added the pink peppercorns to lend their floral notes, though they are not a part of the garrigue herbs. It is a pungent combination of ingredients and it smells really, REALLY good. I put the whole batch into a spice blender and made it into powder. This makes about 1/2 cup in all, so there is plenty left to use for other applications.

Meanwhile, as with everything I make now, I thought I should get some pictures of the herbs and spices, individually, and then mixed the whole batch together and took shots of the whole mélange. The pictures are so pretty I may just make this my wallpaper!
 

I am planning to marinate and broil the steak, slice it and serve it on little toasts with a couple pieces of arugula and a slice of sharp cheddar. Once I have used this and see how it goes, I will report here on the results.


My passion is teaching people how to create a harmony of flavors with their cooking, and passing along my love and joy of food, both simple or exotic, plain or fancy. I continue my journey in ethnic and domestic cuisines, continuing my journey to explore diverse culinary experiences and hopefully to start you on a journey of your own. Join me also at A Harmony of Flavors on Facebook, and Pinterest.

Disqus