Translate

Showing posts with label Asiago cheese. Show all posts

Saturday, August 10, 2019

Revisiting Some Great Foods

Ever since moving to the southwest in late June, I have mostly been occupied with unpacking and finding "homes" for things. I have only really experimented with one new recipe, in these past months. That doesn't mean I haven't cooked, and I have so many great recipes (if I do say so, myself) that I am thoroughly enjoying going back over some of them.

Hamburger, Andouille, Gumbo, soup, stew, easier gumbo
Hamburger Andouille Gumbo

I am planning to let my website lapse this Fall, due to circumstances that are highly frustrating and too numerous to go into, and so any recipes that are in the website but not here in my blog, I will be working to get into the blog soon. Not to the entire detriment of any new recipes I come up with, but just to have old favorites included. Of late, I have been using a lot of hamburger, first in deference to my husband's poor teeth, but also as it is less expensive than some meats, as moving is an expensive undertaking. One of the recipes I have had in my website but not in this blog, is Hamburger Andouille Gumbo. Since I made it originally many years back, I have made it a few other times, and it is always amazingly good, despite not being completely authentic, with hamburger. All the other flavors are totally authentic though, and the flavor is terrific. 

If you are unfamiliar with Andouille sausage, a very Louisiana type sausage (though originating in France), it is a quite highly spiced style. If it is unavailable where you live, substitute with a smoked, spiced (preferably pork) sausage of your own taste.

Hamburger Andouille Gumbo

Hamburger, Andouille, Gumbo, stew, dinner
Hamburger Andouille Gumbo

Makes 8 servings

½ cup shortening or oil
½ cup flour
2 tablespoons oil for cooking vegetables
2 onions, chopped
2 green bell peppers, chopped
6 stalks celery, chopped
3 cloves garlic, minced
1 pound hamburger
2 – 4 andouille sausages (or other spicy sausage)
1 tablespoon fresh thyme leaves
¾ teaspoon dried oregano flakes
¾ teaspoon dried basil
2 bay leaves
½ teaspoon ancho chili powder, or cayenne if heat is tolerated
6 cups stock or water
1 teaspoon salt and a few grinds of pepper, to taste
Filé powder for serving

Make the Roux: Heat a heavy soup pot and melt the shortening or oil. Add in the flour and over relatively high heat, stir briskly with a whisk for about 10 minutes, until the roux has turned a very deep, dark mahogany chocolate color. Remove from heat and whisk a few times, in case the residual heat of the pot continues cooking. If the roux scorches, there is no salvaging; it must be made again.

In a large skillet, heat the 2 tablespoons oil and sauté the onion, bell pepper, celery and garlic until soft, about 10 minutes. Add this to the pot with the roux. In the same pan, brown the hamburger very well. Add to the roux, along with the andouille (pronounced "on-DOO-eee") sausages and the thyme, oregano, basil, bay leaves, ancho powder and stock. Add salt and pepper, and check for seasoning. Bring this mixture to a boil, reduce heat and simmer for at least an hour to meld flavors. Serve the gumbo over white rice and pass the file powder.

NOTES: Filé powder, pronounced "FEE-lay", is powdered sassafras. It is generally found among the spice jars in the supermarket, and adds a bit of  flavor along with the ability to add just a little thickening. It should not be added to a gumbo while cooking, but only in the bowl when ready to eat. If added in to the cooking pot, it may become stringy. Use from one teaspoon to one tablespoon, as per taste, to a bowl of gumbo.


~~~~~~~~~~~~~~~~~~~~ 

Another of the recipes I want to include here in my blog is something I originally created for the very first "Winefest Renaissance" back in 2013, held to raise funds for a new building for the (then - pre-move) local Aberdeen Boys and Girls Club. This building has been long since built and is allowing so many more children a safe place to spend their time. The recipe was for Squash, Apple, Leek and Asiago Triangles. While these require a bit of quick work when wrapping with Phyllo (Fillo, Filo) Pastry, once you get the hang of it, it is quite simple. 

These can be made ahead: roll the filling in the pastry and brush with butter, then set onto parchment lined baking sheets to freeze. Once frozen, carefully set them into containers to keep for up to three weeks. Remove from freezer and set onto baking sheets and bake just before serving. OR, the filling can be made up to a few days in advance and then rolled into the pastry just prior to baking.

Rolling little triangle packets of phyllo


fillo pastry, triangles, flag style fold, diagram, how-toThe rolling process is as for rolling a flag, into a neat triangle. How large or small the triangles will be determined by how wide the lengths of phyllo dough are cut. Two inch widths are great, making a small, easy to pick up and eat little bundle, for a walking-around type cocktail party. If made larger, then they would be perfect to serve as a first course to a larger meal. Either way, these were created specifically to pair with a buttery Chardonnay wine, and made an amazing pairing.

Phyllo dough must be handled with great care, since it is delicate and dry to the touch. Carefully unroll as many sheets as needed and store the remainder immediately. Place sheets not immediately in use between damp towels to prevent drying. If weather is hot and dry, sprinkle a little more water on the towels periodically. The folding process requires starting with two layers of phyllo pastry, then brushing with melted butter. Cut the pastry into two-inch wide strips down the length of the pastry. Placing a small amount (from 1 tablespoon for these tiny pastries to 2 tablespoons or so for larger ones cut three or more inches wide) on one corner of the pastry nearest you (figure a), take the lower right corner and fold it across to the left, making what was the edge nearest you, now touch the left side (figure b). Now take the point nearest you and bring it up vertically (figure c), then flip the bundle to the right (figure d), each time lining up edges neatly into triangles. Continue, repeating this pattern (flip up left, flip up, flip right) until you reach the end of the strip of phyllo. Brush the outside of the little packet with melted butter, then set on a parchment lined baking sheet. Begin again with the next strip. The filling mixture should allow using the entire box of phyllo. 

Squash, Apple, Leek, Asiago, Fillo, Triangles
Squash Apple Leek and Asiago Triangles

Squash, Apple, Leek & Asiago Triangles

Squash, Apple, Leek, Asiago, Fillo, Triangles
Squash Apple Leek and Asiago Triangles

Makes about 50 triangles

FILLING:
2 - 3 leeks, white and light green parts only
1 - 2 tablespoons unsalted butter
2 tablespoons dry sherry or other dry white wine
¾ pounds butternut squash, peeled
2 (6 to 7 ounce) apples (I used Pink Lady)
1 teaspoons salt
1 teaspoon freshly grated nutmeg

A few grinds of black pepper

---
1 cup grated Asiago cheese, about 3 ounces
---
1 box Phyllo sheets
1 stick butter, melted

FILLING: Cut ends off leeks, leaving only the white and lightest sections (about 4 to 6 inches) and slice in half lengthwise. Fan the layers under running water to clean out any mud or grit. Laying flat side down, cut them again lengthwise, then slice across into thin strips, making about 2 cups. Cut off about a 4-inch neck section of the squash, about ¾ pound. Peel and cut in half lengthwise. Laying flat side down, cut each section into three more lengthwise sections. Slice each of these across into thin pieces about 1 x 1½ inches, making approximately 2+ cups. Peel and core the apples and cut into 8 wedges apiece. Slice across the wedges into thin slices, making about 3 cups, total.

In a large skillet over medium to medium-high heat, melt the butter. Add in the leeks and sauté for about 5 minutes to soften, stirring occasionally. Add the Sherry and cook to evaporate, stirring occasionally, about 3 to 5 minutes. Add the squash and toss to combine; cook for another 5 minutes before adding apples. Add in salt and nutmeg and a few grinds of black pepper. Reduce heat, cover and cook for about 10 - 12 minutes or until the squash and apple are very tender. Take off the heat and cool slightly for about 20 minutes. At this point, the recipe can be held in the refrigerator for up to 3 days.


Before using, thaw the box of Phyllo at least 12 hours in the refrigerator, or 4 hours at room temperature before using. Have a stick of butter melted and a pastry brush at the ready. Add the shredded Asiago cheese to the filling mixture. 

ROLLING AND BAKING: Preheat oven to 375 degrees. When ready to make the triangles, unroll the phyllo from one packet (usually 2 packets in a box), covering the sheets completely with a damp towel to prevent undue drying. If the phyllo becomes too dry it will split and break and folding will be impossible. Set the phyllo sheets to one side, then remove two sheets to an open work surface, short end facing you, and quickly brush with melted butter. Slice along the length of the sheets, making approximately 2-inch wide strips. See above for further instructions on rolling the triangles. Once rolled and brushed with more melted butter, the triangles, set on baking sheets, may be well covered and frozen for up to 2 weeks, then removed from the freezer and baked straightaway, or they may be baked immediately after rolling. Bake the triangles for about 20 minutes, or until golden. Serve hot, or at room temperature.


My passion is teaching people how to create a harmony of flavors with their cooking, and passing along my love and joy of food, both simple or exotic, plain or fancy. I continue my journey in ethnic and domestic cuisines, continuing my journey to explore diverse culinary experiences and hopefully to start you on a journey of your own. Join me also at A Harmony of Flavors on Facebook, and Pinterest.

Friday, February 24, 2017

Mini Cheesecakes are Cute as Buttons

I will admit right up front, I saw this pattern being made on top of something that looked like little cheesecakes in photos on someone's blog site. The fact that I had no clue what language this blog was written in is immaterial. The design is adorable. I decided to try out some little cheesecakes with other ideas I got while perusing various web and blog-sites, and they are just so cute. Apart from being really tasty, they really are "cute as buttons."


Lemon, Blueberry, Mini Cheesecakes, recipe
Lemon Blueberry Mini Cheesecakes


Appetizers, finger foods, recipes, easy to eat
Five Appetizers Served at CorTrust Bank
I was helping to coordinate an event at CorTrust Bank yesterday. My husband and I had met with Northern Area Market President, and the Mortgage Loan Specialist, having done some other design work with them. At the last minute, there were dire blizzard warnings for that area around Sioux Falls, where some out-of-towners would be coming from, with the possibility that the whole event would be called off. Still, some brave souls ventured up here to Aberdeen and the event took place. The appetizers served at the event last evening were Green Pea Pancakes with Smoked Salmon Mousse, Flank Steak Rolls with Asiago and Arugula, Spanakopita Cups, Buffalo Chicken Wraps and Lemon Blueberry Mini Cheesecakes. 

The little cheesecakes, shown bottom right in the photo above, were made in mini muffin tins, making them about 1½ inch in diameter, or just about 2 - 3 bites worth. Tiny and adorable. Which makes them so irresistible.

The flank rolls have been made with many fillings and various marinades in past, but this marinade (below) is my favorite. Cutting thin logs (about ¼-inch diameter) of Asiago cheese, about 1½ to 2-inches long and tucking in a couple of peppery baby arugula leaves make these a hit at any party or get together. The Asiago and arugula combo makes this appetizer so easy to make.

Flank Rolls with Asiago and Arugula

Amount will depend on size of flank steak
Flank steak, Rolled flank steak, Asiago, Arugula
Flank Rolls with Asiago and Arugula

About 30 to 65 rolls

½ cup olive oil
2 tablespoons pomegranate molasses or concentrate
3 cloves garlic, finely minced
1-inch piece fresh ginger, finely grated
1 to 1½ teaspoon salt
2 teaspoons chipotle chili powder

1 to 2½ pound flank steak


Asiago wedge, cut in ¼ x 1½-inch pieces
Baby Arugula leaves

Combine the first 6 ingredients in a zip-top bag and place the flank steak in the bag to marinate for at least 12 and up to 24 hours, turning occasionally so the marinade coats the steak evenly.

To broil, either grill on a very hot grill for 6 minutes per side (slightly more or less, depending on size and thickness of steak), or set the steak on a rack on a rimmed baking sheet and broil about 4-inches from the heat for 6 minutes per side. Tent the meat once done grilling/broiling for about 10 to 15 minutes before slicing very thinly, preferably at a bias, to achieve wider pieces. Using a length of about 4-inches, set a piece of the Asiago and 2 baby arugula leaves on one end. Roll the steak around these filings and skewer with a toothpick to keep closed. 

Back to the little Cheesecakes 

I thought about placing a fresh blueberry in the bottom of the tart shells, but for practice purposes, I had none available. I did, however, have a jar of Polaner All Fruit Blueberry Spread. I wanted something not terribly sweet, and this was as good as I could come up with quickly. I used a slightly rounded ¼-teaspoon of the fruit spread in each of the little pie shells, and then filled them with about 2 teaspoons of the lemony cheesecake mixture.

When I made the Mini Strawberry Cheesecakes recently, with a chocolate shell, I did not bake the chocolate pie shell first. I liked the soft texture of the shell with the strawberry cheesecake filling as it made the shell almost brownie-like in texture. For the new mini cheesecake recipe, I tried them without baking the shell first, and they were (to my own personal taste) good, but I felt that others would prefer a more crispy textured shell. Of course, once the mini shells are baked blind, they do shrink. It turned out that this way I could only use a level ¼-teaspoon of the fruit spread and possibly about 1½-teaspoons of the cheesecake filling. Altogether, somewhat smaller versions, but no less delicious.

Keep in mind that these were made in the tiny wells of mini-muffin tins and not regular muffin tins!

And then the Little Designs

As I mentioned at the beginning of this blog, I saw this idea on a blogsite that was written in another language. Not a language I recognized, either! but a picture is worth a thousand words, they say, and this picture was too good to pass up. The photos showed what appeared to be a sort of cheesecake-like batter in a small tart shell. Five, straight <¼-inch lines were drawn onto the batter. I used gel food color to make the lines, using a toothpick. Once the five lines are drawn, you draw the toothpick down through the center of the five lines in one smooth flow, and then out the bottom and curling out a bit (shown on the top three in the diagram below). This gives the appearance or suggestion of something like lavender flowers. I used "violet" food color, yet the designs came out looking deep blue. 

Creating the patterns

As I got familiar with the feel of using the toothpicks and gel food colors, I decided to try something new. I used a pink gel food color and sketched 5 "petals" moving upwards from the base of each "petal" and curving slightly. Next, using green gel food color, I drew a stem downwards, and then a leaf, also dragging downwards toward the stem. Trying to draw the leaf from the stem up and out, created a break in the pattern of the stem. This process is shown in the bottom three in the diagram above. All in all, this was one really easy way to make these tiny gems even more adorably irresistible.

Making Designs on Cheesecakes


Lemon Blueberry Mini Cheesecakes

Makes 30
Lemon, Blueberry, Mini Cheesecakes, recipe, design
Lemon Blueberry Mini Cheesecakes


SHELL:
1 cup all purpose flour
3 ounces cream cheese
4 tablespoons unsalted butter

FILLING:
8 ounces cream cheese, room temperature
⅓ cup granulated sugar
1 teaspoon cornstarch
2 tablespoons sour cream
1 egg
2 tablespoons lemon juice
2 teaspoons lemon zest

Polaner Blueberry Fruit Spread 
Gel Food Colors: Purple, Pink, Green

Make the shells: Preheat oven to 375 degrees. Place the flour into a bowl. Add in the 3 ounces of cream cheese and the butter and cut in as for pie pastry. Once the ingredients start to form larger bits, begin working with fingers, bringing it all together in one solid mass. It takes a minute or so, but will come together completely. Break off or cut 30 equal sized bits of the dough. Flatten or roll the dough pieces into about 3-inch pieces and fit them into the mini muffin tin wells, pressing so they stick up above the well slightly. They will shrink in the oven! Bake the shells for 9 minutes, until they begin to turn golden. Reduce oven to 350 degrees.

Allow the little shells to cool for about 10 minutes. Use a ¼-teaspoon measuring spoon to scoop a level amount into each of the little baked shells. Set aside.

MAKE the filling: In a small bowl, stir together the granulated sugar and the cornstarch to combine. Set aside. In a mixing bowl, using a hand mixer, beat the 8-ounces of cream cheese until softened. Add the sugar mixture and beat to just combine. Add in the sour cream, then the egg, beating just to combine. Add the lemon juice and zest until mixed.  

Scoop about 1½ teaspoons of cheesecake filling into each of the little wells with blueberry spread. The filling should cover the blueberry completely, leaving a little surprise when they are bitten into. Before baking, scoop out a small dot of each of the food colors onto a plate. Use toothpicks (a separate one for each color) and create patterns as shown in the diagrams above. Once all are decorated, bake the cheesecakes for 8 minutes, or until set.  Cool completely, then refrigerate for at least an hour before serving. 


My passion is teaching people how to create a harmony of flavors with their cooking, and passing along my love and joy of food, both simple or exotic, plain or fancy. I continue my journey in ethnic and domestic cuisines, continuing my journey to explore diverse culinary experiences and hopefully to start you on a journey of your own. Join me also at A Harmony of Flavors on Facebook, and Pinterest.

Thursday, February 19, 2015

Flank Steak Rolls a Hit at Wine Tasting

host, gathering, foods, wine and food pairing
Host, Ty, at left: gathering around the foods
Last evening an informal wine tasting was held at the lovely home of Ty and Ann Hanson. I made a few appetizers to contribute to the foods. I have to say I had more fun last evening than I have in a long while. The circle of friends attending were all lovely and convivial. I had a few people who love cooking, and with whom to bounce ideas back and forth. My husband had someone to talk computer geek stuff. We both came away from the evening happy and grateful for such lovely people and such a lovely time. 

wines, wine tasting, wine selection
Michelle Podoll setting out the wines
I wrote about this upcoming event about 10 days ago, when I was doing a trial run of a couple of the recipes I was planning. My goal is always to pair foods with wines in a way that brings out the best in both. I had created the Lemon Thyme Chicken Fillo Cups to pair with a Ferarri Carano Chardonnay and also with a Pinot Noir. I am happy to report, after last evening's event, that this appetizer paired well with both these wines. The wines presented ranged from about $13 to $73 in price. There was a Cabernet Sauvignon from Spain, a Cabernet Sauvignon, Pinot Noir, two Zinfandels, a Rhone varietal blend and a Chardonnay from California, an Italian Chianti and a Sauvignon Blanc from New Zealand. 

Asiago, cream cheese, log shapes, filling
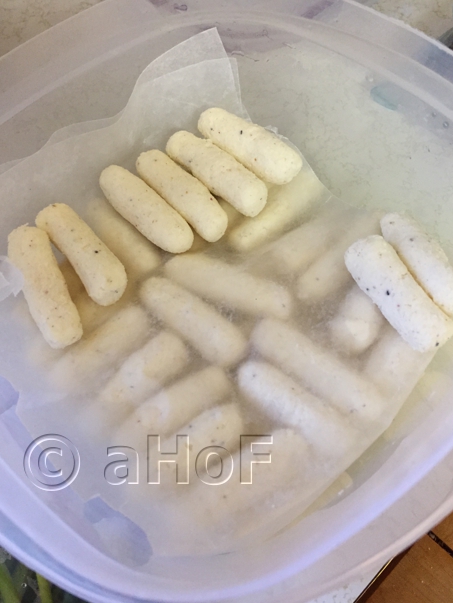
Asiago/cream cheese logs
The other appetizer I had made as a trial run on that same day needed a little modification. This second appetizer was Flank and Asiago Rolls. In the trial run I rolled a narrow rectangle of Asiago cheese with a sliver of scallion in the individual flank steak bites. The fact that Asiago will tend to crumble a bit meant that in some of the rolls, sticking the toothpick through the roll meant the cheese broke in half. Plus, the cheese was a bit overwhelming this way. My sister-in-law, who was there to taste these trial runs, suggested maybe grating the cheese and mixing with cream cheese. I thought this was a great idea. I wanted to keep the strength of flavor of the Asiago, being the component that would make it a good pairing with the strength of the Cabernet Sauvignons being served.

While prepping for the event of last evening, I did grate the Asiago cheese finely (using a small-holed grater (rendering thin strings much like the fresh grated Parmesan one finds in the grocery) and mix in just enough cream cheese to make the mixture form-able. I wanted to roll the cheese into narrow logs this time, making it easier to roll in the sliced meat segments. I ended up with 84 little logs, 6 to 7 grams, or .21 to .25 ounces each. I was completely happy because, as it turned out, I had only two thin bits of the flank steak left, after using the entire 84 cheese logs. Great eye for what was needed (as I pat myself on the back!).

Flank steak, Asiago Rolls, appetizer, finger foods
Flank & Asiago Rolls, served

How many appetizers this recipe will yield depends on how one slices the flank steak, and how accurately the little cheese logs are weighed. The cheese logs can easily vary widely, so I used a little scale to ensure they did not vary beyond 6 grams. I have sliced many flank steaks for similar type appetizers, so I have some practice, but it is not a difficult thing to do. There will be waste involved (which we are happy to devour!). Ends that are too thick and not long enough to make into a roll - there is no getting around the waste there. Some slices will end up thicker than others. Just keep slicing and thinking "thin".


Flank & Asiago Rolls


Makes about 80 to 85, approximately
Flank steak, Asiago Rolls, appetizer, finger foods
Flank & Asiago Rolls


MEAT:
2.3 pound flank steak
¼ cup Sweet Smoky Cocoa Rub
¼ cup olive oil
1½ teaspoon salt
1 teaspoon chipotle powder
6 - 8 cloves garlic, minced finely

CHEESE:
12 ounces Asiago cheese, grated finely
8 ounces cream cheese, softened
¼ cup Hoisin Sauce
scallions, slivered for rolling
toothpicks for skewering
Hostess, salad, prep, appetizer feast
The hostess, Ann, prepping salad
One or two days before, Combine the Sweet Smoky Cocoa Rub with the olive oil, salt, chipotle powder and garlic. Place the flank steak into a gallon sized zip-top bag. Take one half of the oil mixture and rub evenly onto the steak in the bag. Flip over the bag, and apply the remaining mixture evenly onto that second side of the steak. Seal the bag and place in the refrigerator for 1 or 2 days.

Up to 3 days in advance, prepare the cheese. Grate the Asiago finely, and using hands or a hand mixer, thoroughly combine with the cream cheese. It is best to use a scale or some implement to make all the cheese logs of equal size. Measure out a small amount. Six grams is plenty. Roll this into a log about 2 inches long. Repeat with the remaining mixture, setting the logs into a container as shown in the photo above. Set waxed paper between layers.

Have ready the scallions. If larger, slice lengthwise down the scallion, then cut this into lengths about 2 or so inches long. Store these in a zip-top baggie in the fridge if making the day before or earlier in the day.

The day before, or early on the day needed, preheat the broiler with the oven rack on the second level from the top. Set a rack onto a low rimmed baking sheet (cover the baking sheet with foil for easy cleanup later), set the steak on the rack and place under the broiler for approximately 6 minutes per side. Remove from oven and tent with foil until cooled. The meat can be sliced at this point, but there will be far more mess. If possible, once the meat is cooled, wrap and store in the refrigerator for at least 2 hours or overnight before slicing; once sliced, the slices can be stored one more night in the fridge.

Once ready to slice, begin at one end, cutting across the long grain of the meat. Set the knife at an angle away from you to get wider strips of meat. All that is vitally important is that all the slices be across the grain, ensuring tender meat. Slice the meat as thinly as possible. Once the meat is too wide for the knife to span easily, slice it into two sections lengthwise. Then, continue to slice off thin pieces until all the meat is used up. I used a 2.3 pound piece of flank to yield the 86 rolls. The slices of meat will need to be long enough to wrap around the cheese log and scallion sliver.

It takes about 40 minutes to make all the rolls. Set the Hoisin Sauce in a small bowl and have a pastry brush ready. Set the flank slices, cheese logs, scallions and toothpicks arrayed near you. Lay out a slice of meat and using the pastry brush, dab a small amount of Hoisin sauce on the slice. Set one cheese log and a sliver of scallion across the width of the meat and roll to encase. Skewer with a toothpick. Repeat with all the remaining meat. These should be eaten the day they are rolled as the scallions become soggy if kept too long.


My passion is teaching people how to create a harmony of flavors with their cooking, and passing along my love and joy of food, both simple or exotic, plain or fancy. I continue my journey in ethnic and domestic cuisines, continuing my journey to explore diverse culinary experiences and hopefully to start you on a journey of your own. Join me also at A Harmony of Flavors on Facebook, and Pinterest.

Disqus