Translate

Showing posts with label bechamel. Show all posts

Monday, September 24, 2018

An Idea for Leftover Turkey or Chicken

I realize that not everyone has leftover turkey in September. I did happen to bake a turkey breast recently, and even with just the breast, there were leftovers. Plenty of them, really. 

I have a very old cookbook, "Better Homes and Gardens Favorite Ways with Chicken, Turkey, Duck and Game Birds," copyright 1967. Long title, but the part that is biggest and boldest is just "Favorite Ways with Chicken." Chicken and turkey can be interchanged in a recipe, so this book has been very handy over the years. The difficulty lay in the fact that when I began learning to cook, I was in Guatemala, where many of the things called for just did not exist. Like canned soup. If anyone is fond of reaching for a can of soup to make a sauce or gravy, not having them is a distinct disadvantage. 
 
Turkey, Crepes, Casserole, recipe
Turkey Crepe Casserole

When I went to Guatemala, I was just 20 years old. Just barely out of teenage, and still very full of myself, with all the pride and hubris only a teenager can have. It is only later, when one looks back on her life that this becomes very apparent. And yet, without all that, I may never have managed to learn all that I did. I learned, not just to cook things I knew of from home, but new foods, some I'd never heard of prior to my time there. I went about learning all I possibly could. I felt I needed to prove myself. Prove I was a good housewife and mother. Learn the language, so I could understand and be understood. I applied myself diligently, although sometimes kicking and screaming.

So, when looking through this cookbook, I found the idea of making crepes quite interesting. I didn't generally have access to turkey, but chicken? Yes, of course. And then I ran into the problem of canned soup. I did know that a creamed soup straight from the can was thick, and had to be diluted. So, I felt I could create a similar product by making a roux and adding less liquid to keep it thick. The liquid would have to be well flavored, to be able to flavor the casserole. At that time I did use bouillon cubes. The ones most commonly available in Guatemala were "Maggi" brand. As it turned out, this approach worked out well, and I have made the recipe the same ever since. Except I don't use bouillon cubes anymore, because of the amount of salt and MSG. Instead, these days I use either a chicken "base" or a chicken demi-glace for the chicken flavor I am looking for. 

Back at that time in Guatemala, I kept milk in the house, as I had growing kids, and I did eat cereal. These days, I don't keep milk in the house, as we don't drink it, nor do we eat cereal (except for me and oatmeal, but no milk there either). What I do keep is either heavy cream or evaporated milk, and usually both, in case of need, such as this. So when mixing milk into some of the faux "can of soup" mixture, I either dilute the cream or the evaporated milk with half water and use that. 

Ultimately, the recipe is fantastic, making use of some leftover cooked chicken or turkey, albeit in very small portion. It is delicious, and with a salad and some green beans alongside, a very nice and satisfying meal indeed, whether as a dinner or as a brunch.

Turkey (or Chicken) Crepe Casserole

Turkey, Crepes, Casserole, recipe
Turkey Crepe Casserole

Serving size 2 - 3 crepes

CREPES:
1 egg
1 cup milk
1 tablespoon unsalted butter, melted
1 cup all-purpose flour

FILLING:
1 cup finely diced cooked turkey or chicken
1 (9 - 10-ounce) package frozen chopped spinach, thawed, squeezed dry
¼ cup Panko crumbs
¼ cup freshly-grated Parmesan cheese
¼ cup finely minced shallot

CHICKEN BECHAMEL:
4 tablespoons unsalted butter
4 tablespoons all-purpose flour
¼ teaspoon salt
¼ teaspoon white pepper
1 teaspoon chicken "base" or chicken demi-glace
1¼ cup hot water
-----
1 cup milk
½ cup sliced almonds

Make Crepes: Beat egg, milk, melted butter and flour, either with a whisk or a blender, until smooth. Do not over beat. Heat a small (7 to 10-inch) nonstick skillet. Lightly grease the skillet (nonstick cooking spray works well). Pour in 2 tablespoons of the batter and lift the pan, swirling the batter to as large a circle possible. Set pan on heat and allow the top of the crepe to become dry, similarly to a pancake. Remove the crepe to a plate and repeat this procedure, 2 tablespoons at a time, until you have 12 crepes, lightly browned on the bottoms but not the top. Set them aside.
 
Making Crepes, how to
Making Crepes


Make the Filling: Combine all the filling ingredients in a bowl and set aside.

Make the Bechamel: Mix together the hot water and the chicken "base" or demiglace, stirring until dissolved together. Set aside to cool while beginning the sauce. In a saucepan, melt the butter. Once melted, stir in the flour, salt and white pepper until smooth. Add in the chicken base mixture, stirring, until the mixture is thick. Pour half of this thickened mixture into the Filling mixture, as a binder, stirring to incorporate.

To the remainder of the bechamel, add the last cup of milk and stir well. Set aside.
 
Filling crepes, turkey, chicken, recipe, casserole
Filling crepes and arranging in casserole

Preheat oven to 350 degrees. Have ready a 9 x 13-inch casserole, lightly sprayed with cooking spray. Set one crepe, unbrowned side upwards. Spoon a heaping tablespoon of filling onto one end of the crepe and roll up. Set into the casserole, then repeat with the remaining crepes and filling. 

Once filled, pour the remaining bechamel mixture over top of the crepes. Sprinkle with the sliced almonds. Bake the casserole for 30 minutes, until bubbling. 


My passion is teaching people how to create a harmony of flavors with their cooking, and passing along my love and joy of food, both simple or exotic, plain or fancy. I continue my journey in ethnic and domestic cuisines, continuing my journey to explore diverse culinary experiences and hopefully to start you on a journey of your own. Join me also at A Harmony of Flavors on Facebook, and Pinterest.

Monday, April 10, 2017

Festival Over and New Entree Created

This Year's Annual Renaissance Festival (aka Winefest Renaissance) is over. This past Saturday was the event, and after all the weeks of prep, everything was well received. So much so that I actually, for the very first time, ran out of two of the four appetizers I was serving. The fact that the wines also ran out at the same time tells me that there were more people, though I have not heard that this was so. The initial crush of people seemed endless for the first two hours. I was so exceedingly happy to have selected 4 really wonderful wines. We poured very small tastings, and though we had the same number of bottles as always, just ran out. At a wine tasting event, that was a sad thing. I guess we will all be better prepared next year. 

Appetizers, four appetizers, finger foods
Appetizers from Renaissance Festival 2017, clockwise from top left: Brie in Phyllo Cups, Grilled Flank Steak Rolls with Asiago and Arugula, Mini Greek Lamb Sliders, Sweet Potato Bourbon Tamales with Country Ham & Cheese Filling.


I served: 
  1. Sweet Potato Bourbon Tamales filled with Country Ham and Cheeses, topped with Fig Apricot Compote. The tamales paired perfectly with Terra d'Oro Chenin Blanc Viognier.
  2. Marinated, Grilled Flank Steak, thinly sliced and rolled with Asiago Cheese and a bit of peppery Baby Arugula. The little rolls were served with Charles and Charles Red Blend, a blend of Cabernet Sauvignon and Merlot.
  3. Mini Greek Lamb Sliders with Greek Olive Tapenade. These were served with J. Lohr 'Tower Road' Petite Sirah.
  4. Brie in Phyllo Cups with Cherry Preserve and Pistachio. These were served with Stella Rosa 'Black,' a slightly sweet, slightly sparkling red wine, made mainly with Brachetto grapes. (No recipe involved here! Set a .5-ounce bit of Brie in a premade phyllo/fillo cup, bake until the brie melts, about 8 minutes, top with a cherry from a jar of preserves and a couple of crushed pistachios.)
On another front, since we were having our dear friends Heidi and Rich visiting over the weekend, obviously I needed to have food for meals prepared for them also. While talking with my daughter in law, Julia, a couple of weeks back, she was talking about a Short Rib Lasagna that she had eaten various times at a restaurant in Chicago. The idea caught my fancy, and I questioned her repeatedly about what it was like, what it looked like, textures, smells, colors, etc. I made a plan, wrote down what I thought I might do, then started to put it into action. Since my husband bought me a pasta making machine for my (upcoming) birthday, I was also going to make the lasagna "noodles."
 
Short Ribs, Lasagna, Roasted Garlic, Smoked Fontina, Bechamel
Short Rib Lasagna with Roasted Garlic and Smoked Fontina Bechamel

The first thing was making the short ribs. Since we buy a side of beef from my husband's nephew every couple of years, I had short ribs in the freezer. I popped those into the crock pot, adding in things to give good flavor, like some fried bacon pieces, tomato paste, fresh herbs, mushrooms and wine. I let the meat cook all day, then in the evening, I skimmed off fat (and skimmed off fat, and skimmed off fat, and . . .) then took all the meat off bones and discarded them along with even more fat. All that fat is my peeve with short ribs, though the flavor of the meat is certainly great. After I returned the meat to the remaining sauce in the pot, I stored the mixture in the fridge for a couple of days, until I was ready to make the lasagna (and where I was not able to remove even more fat, after being chilled). 

The other new thing with this lasagna was the use of a bechamel sauce (basically, a white "gravy" made with a roux of butter and flour, then milk is added and cooked to thicken). I do not make lasagna but very rarely, and all in all, haven't really gotten one to turn out very well, in my estimation. Such lasagnas have been the type with a tomato-meat sauce and then ricotta and mozzarella as the main cheeses. In this new version I was concocting, the use of bechamel, while not a new concept, was new for me. The use of non-traditional cheeses was also new for me. 
 
Short Ribs, Lasagna, Roasted Garlic, Smoked Fontina, Bechamel
Short Rib Lasagna 

In the lasagna Julia described, she said the menu stated "Roasted Garlic and Taleggio Bechamel." In our small town, while there are more foods available than one might imagine, I do not have access to Taleggio, nor have I ever tasted it. With no knowledge of the flavor profile, I looked it up and I believe the closest in flavor was Fontina. Well. Guess what? No Fontina cheese here either. Although . . . the local grocery does carry a smoked Fontina! As I thought of the flavor of roasted garlic, I felt that the smokiness of the Fontina would play really nicely, so I got that cheese and also Sartori brand U.S cheese called Mont Amore. It is described as a sort of cross between Parmesan and Cheddar. This sounded really good, so I got some of that also. And some real Parmigiano-Reggiano, of course!

I had roasted a head of garlic, pressed out all the cloves, then pressed them through a sieve to have a smooth paste. It seemed barely more than a tablespoon of this roasted garlic paste, and thought maybe I should roast a second head of garlic, just in case. Once assembling the lasagna components, while making the bechamel sauce, I added in half the roasted garlic (one tablespoon), stirred well, tasted . . . and couldn't really detect any garlic flavor! So I added in the rest of the roasted garlic paste, whereupon I could actually taste it - but just a bit. I felt I would leave well enough alone on that front. The assembly went easily, the lasagna baked as I had planned, and it was so amazingly good when we all sat down to eat, that despite all the work and advance prep, it is really and truly one I would make again. Even with having to practically wade through fat to do so.

Short Rib Lasagna with Roasted Garlic and Smoked Fontina Bechamel


Makes one 9 x 13-inch casserole

MEAT SAUCE:
4 - 6 pounds beef short ribs
1 ounce (28 grams) dried porcini mushrooms
3 strips thick-sliced bacon
1 large onion, chopped
4 - 6 cloves garlic, minced
1 bay leaf
1 (6 - 8-inch) stem fresh rosemary, leaves only, minced
½ cup fresh minced basil leaves
¼ cup fresh minced oregano leaves
1 (6-ounce) can tomato paste
1½ teaspoons salt
Freshly ground black pepper, to taste
¾ cup dry red wine
2 tablespoons "double concentrated" tomato paste (from a tube)
¼ cup freshly minced oregano leaves

ROASTED GARLIC:
2 whole heads of garlic
¼ teaspoon dried thyme leaves
a drizzle of olive oil

Set short ribs in a slow cooker on low. Place the dry porcini mushrooms in a bowl and cover with boiling water. Cover and set aside to reconstitute.

Slice the bacon across into ¼-inch bits, then fry them to almost crisp in a skillet. Drain the bacon and add it to the short ribs. Add in the onion, garlic, bay leaf, rosemary, basil, oregano and the can of tomato paste. Add salt and pepper.

Remove the mushrooms from the soaking water, keeping the soaking water. Check through the mushrooms discard any very tough pieces. Chop the remainder coarsely and add to the pot. Carefully strain the mushroom liquid (it will often have grit in the bottom. Add ½ cup of the liquid to the pot, along with the wine. Cover the slow cooker and allow to cook slowly all day until the meat is falling from the bones.

Once cooked through, remove the meat and bones to a plate to cool. Skim off fat using paper towels: use one paper towel segment and lightly set it on top of the liquid. It will immediately soak up fat. Lift it out with tongs, to discard. Repeat as needed, until the fat is mostly gone. Once meat is cool enough to handle, remove all the meat and shred (not too finely). Discard fat and bones. Return the meat to the pot. Stir, then add in the extra tomato paste and oregano. Stir well, taste and check for seasoning. Pour into a container to finish cooling, cover and refrigerate for up to 3 days.

Up to 3 days ahead, roast the garlic: Set oven to 400 degrees. With a sharp knife, cut off about ¼-inch from across the top of one whole head. Cut a square of foil, set the garlic in the center and bring up all sides to enclose the garlic, creating a pouch. Before closing the pouch, add any little bits of garlic from the top bits, removed from husks and set back on top of the whole head. Sprinkle on the thyme and a drizzle of olive oil, seal the pouch and set in a little ramekin or on a baking sheet. Repeat this same process for the second head of garlic. Bake for about 40 to 45 minutes. Cool slightly, then press out all the garlic cloves from the husks and into a sieve. Set the sieve over a small bowl and using a spoon, press the garlic through the sieve, making a smooth paste. Scrape the paste into a small, sealed container and refrigerate until needed, or up to 3 days.
MontAmore & Smoked Fontina Cheeses

BECHAMEL:
5 tablespoons unsalted butter
5 tablespoons all-purpose flour
4 cups whole milk
1 teaspoon salt
¼ teaspoon white pepper
½ teaspoon freshly grated nutmeg
1 generous cup grated Smoked Fontina cheese
1 generous cup grated Mont Amore cheese
Roasted Garlic paste (made previously)

OTHER INGREDIENTS:
1 pound fresh lasagna sheets, or no-boil lasagna sheets
1½ cups freshly grated Parmigiano-Reggiano cheese

When ready to begin assembly, pour the short rib sauce into a saucepan and slowly bring to about room temperature, just to make baking go more smoothly.

In a medium saucepan over medium heat, melt the butter. Add in the flour and stir until it is completely incorporated, then slowly whisk in the milk, stirring constantly until all the roux is combined with the milk. Continue whisking until the mixture comes to boil (10 minutes) and begins to thicken. Add in the salt, white pepper and nutmeg, stirring to combine. Add in the grated cheeses and the roasted garlic paste and stir until the cheeses are melted. Set the pan aside.

lasagna, noodles, meat sauce, bechamel, Parmesan
Lasagna noodles, layer of the short rib sauce, layer of bechamel sauce, sprinkling of Parmigiano-Reggiano cheese

Lightly spray a 9 x 13-inch casserole with cooking spray. Ladle in a small amount of the bechamel to barely coat the bottom of the pan, then begin the layers:
Set lasagna noodles evenly in the pan.
Top with a portion of the re-warmed meat sauce.
Ladle on a portion of the bechamel and
top with a sprinkling of the Parmigiano-Reggiano.

Repeat these four layers until there are no more ingredients, ending with the sprinkling of Parmigiano-Reggiano. Preheat the oven to 350 degrees. Cover the pan with foil. Bake, covered for 1 hour. Uncover and bake for another 20 to 25 minutes to brown the top. Allow the lasagna to set for at least 15 minutes before serving.

The lasagna is amazing just baked, but it is even better the next day, reheated.


My passion is teaching people how to create a harmony of flavors with their cooking, and passing along my love and joy of food, both simple or exotic, plain or fancy. I continue my journey in ethnic and domestic cuisines, continuing my journey to explore diverse culinary experiences and hopefully to start you on a journey of your own. Join me also at A Harmony of Flavors on Facebook, and Pinterest.

Tuesday, May 12, 2015

Updating a Quick and Easy Old Recipe

I was born in 1950, and grew up with Mom's cooking in the '50s, a mix of foods of that era and also of her Slovak heritage. Dad added in his mix of his Mom's cooking from Yugoslavia (from the area that is now northern Serbia, or Vojvodina). I have no idea if this supper dish was something just of that era, or even if it was something anyone else made. I know it was a big "go-to" meal for Mom. Easy to make and quick was the name of the game, and we all know what it is to be rushed for something to put on the table. I am the oldest of the children, and others quickly followed. By the end of the '50s there were already 5 children in the family, and by 1963 there were 7. Mom spent a lot of time in the kitchen, but with that many kids around, it had to have been a challenge to manage meals every single day, but manage, she did!

Creamed dish, Tuna, Peas, toast
Creamed Tuna with Peas

I am sure not all my siblings loved Creamed Tuna with Peas as much as I did. I know for sure my next sister, Barb, also loves that meal, and once a few years back while I was visiting, she asked if I liked that dish. On finding that I did, and that we were eating on our own that evening, she asked if it would be okay to make it. Of course I said yes, because I never get to make it when I am home. My husband will not eat fish, and tuna from a can has really bad associations for anyone who is not into fish. Tuna from a can is generally a little more aromatic, but these days I do not really find it so. 

Creamed Tuna with Peas was one of two creamed dishes served on toast; the other was Creamed Dried Beef with Potatoes. Both of these were particular favorites of mine while growing up. I don't make the Dried Beef dish, mainly because it is so salty, and causes swelling (for me). If this were not an issue, I would probably make it often, because that is one that my husband does love! I have heard it unlovingly called "S___ on a Shingle". Whatever it is called, it is good, quick and easy.
 
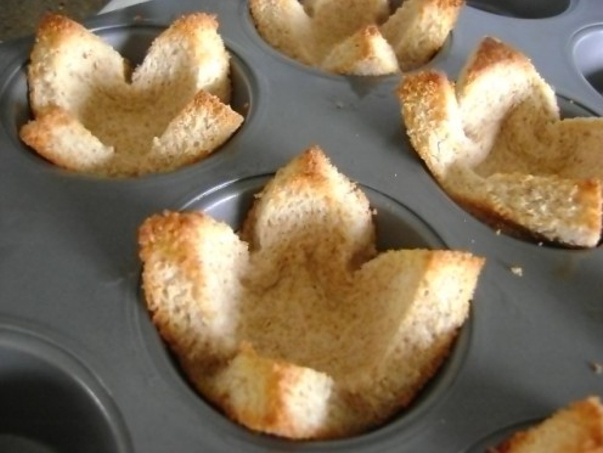
Toast Cups courtesy of www.graciousrain.com

The "shingle", in these cases is a slice of toast. When Mom got in the mood to "fancy up" a plain and simple meal, she took this concept to another level. The bread was just store-bought white bread,  but sometimes she would cut off the crusts, then press the little white squares down into muffin tins, creating little cups. She often gave me the job of brushing these little bread cups with melted butter, and then they were set in a preheated oven to toast. Once toasted, they kept their little cup shape, and these were filled to overflowing with the Creamed Tuna with Peas. I found the steps to make these little cups available on this website, and the finished product is shown in the photo here, courtesy of http://graciousrain.com/easter-egg-toast-cups/. 

Creamed dish, Tuna, Peas, toast, toast cups
Creamed Tuna with Peas


The other part of the recipe for Creamed Tuna with Peas is the peas themselves. Mom always used a can of peas. One can of peas to one can of tuna. I don't care to use cans of vegetables these days, and far prefer using frozen baby peas, as they are so tender, tasty and GREEN, plus not over-salted. When making this dish now, I will only use frozen peas and the best canned tuna possible. When thinking about this dish last evening, I made creamed hamburger with peas for my husband and creamed tuna with peas for myself. While in the process, I thought I would add in a half onion, finely chopped, as well as a little dill. In thinking back on the sauce (a Bechamel), I wonder if Mom also used the liquid from the canned peas. I know milk went into the dish, but she might have started the liquids with the liquid from the peas, then adding milk as needed for the sauce.  All I can say is, if you like tuna from a can at all, you've got to try this. Even without my updates (caramelized onion, dill and frozen peas), I would still love this dish, a real comfort-food memory. 
Creamed dish, Tuna, Peas, toast, quick dinner
Creamed Tuna with Peas

Creamed Tuna with Peas


Serves 2 - 4

1 tablespoon olive oil
½ onion, chopped finely
½ teaspoon salt
2 tablespoons unsalted butter
2 tablespoons all-purpose flour
2 cups milk
1 (4-ounce) can light tuna, drained
1 cup frozen baby peas
1 teaspoon dried dillweed

In a medium skillet, over medium-low heat, add in the oil and then the chopped onion. Saute the onion for about 15 minutes, slowly, until golden and caramelized. Add in the butter to melt, and then the flour, stirring until all the flour is absorbed into the fats and onion in the pan. Begin adding the milk, a little at a time, stirring constantly, until all the mixture is smooth in the milk. Continue to stir, cooking for about 10 to 15 minutes until thickened and bubbly. Add in the dillweed, tuna and peas and stir until heated through. Serve over toast, or toast cups as mentioned above.
Steps to make the dish
flour added to onion; flour absorbed; milk added;
Bechamel thickened; tuna added; dill, then peas (not shown)


My passion is teaching people how to create a harmony of flavors with their cooking, and passing along my love and joy of food, both simple or exotic, plain or fancy. I continue my journey in ethnic and domestic cuisines, continuing my journey to explore diverse culinary experiences and hopefully to start you on a journey of your own. Join me also at A Harmony of Flavors on Facebook, and Pinterest.

Wednesday, July 30, 2014

Decadent and Delicious Mac and Cheese

I like mac n cheese. I always have. My husband, though he loves macaroni salads, never seemed to care for mac n cheese, though tastes change. He told me recently he liked mac n cheese just fine! Over the years, as I became more conscious of additives in pre-packaged foods that can affect health, I began weeding out the use of anything that came in a box, and most canned veggies. I still use canned tomato sauces, tomatoes, tomato paste, corn and most beans. I usually buy things that are either sodium free or 50% sodium where possible. Among the casualties to a more conscious lifestyle was mac n cheese in a box. Not that I ever used it extensively, but once in a while it was just easy.

For all those reasons, and likely a few more, I haven't had mac n cheese for many, many years. Since my husband gave me the OK on the concept, it has been in my mind. Last evening I decided to take the plunge. Mac 'n' cheese is not inherently healthy, even when homemade. The more unctuously cheesy, the more the fat and calorie content rise. But, at least I know what is in it when I make my own, and there are none of those extras; dyes, preservatives and such.
macaroni, cheese, casserole, recipe, bacon, side dish
Decadent Mac and Cheese, with Crumb Topping

Cheeses of Choice

I was watching a program on TV a few nights back where someone was touting the richness of a mac n cheese made with cream cheese and Parmesan. That just struck me as a delightful combination. How much, though? I didn't want to go so far over the top. I ended up using about 1½ ounces of Parmesan and 4 ounces of cream cheese. Then I realized I still had a little bit of shredded cheese in the fridge, from the Taco Pizza I made a few days ago. It was a "Mexican Blend" of 4 cheeses, only one of which was a yellow cheese. There wasn't all that much left. I threw it in. At this point the cheesy mixture was mostly white.

Going for the Gold

turmeric, turmeric powder, spice
Turmeric Powder
Depending on the kind of cheese you use, the color of mac 'n' cheese can be completely white or nice, bright yellow. The nice bright yellow in boxed products often comes from food dyes. I prefer something more natural. While I used a little bit of yellow cheese, I also added a little turmeric for color. Turmeric is a very healthy spice. It has some flavor, but it has an amazingly yellow color. It is very easy to include a little in the diet, here and there. The yellow color in a dish that has "cheese" in the very title, just makes the food look more enticing. 

Richness and Flavor

I like flavor in my foods, so I also used caramelized onions, garlic and thyme. I added nutmeg and a little chipotle powder. As far as the macaroni, I used an 8-ounce box of Ancient Harvest Quinoa Elbow Macaroni. It is gluten free. It isn't something I had to use, but I really like the flavor of that pasta and have bought it often for that reason alone. If it came in more shapes, it might be the only macaroni product I would buy. I did use quinoa spaghetti a few times, though it is far more breakable in the long, thin strands; not as ideal. Still, even that would be completely acceptable if being gluten free was a must. 

To Bake? 

macaroni, cheese, casserole, recipe, side dish
Decadent Mac and Cheese, Baked with Crumb Topping
It is not remotely necessary to bake this dish. It is all properly cooked once the macaroni is stirred in. It will all depend on the kind of presentation you want to make. I decided on a pretty presentation and poured it into a casserole. Topping it with Panko crumbs seemed a no-brainer for a crispy top. I was casting about in my head for flavors to spice up the Panko. I could have just mixed in a little melted butter and/or oil to help with the browning. Last minute, I did an about-face, thinking of the pesto in my fridge. If you have never used pesto, it is generally a basil product with garlic and oil at its most basic. Cheese and pine nuts are often added, and I even add a little butter to make it a more spreadable (i.e. less drippy) mixture. Pesto would be an excellent way to flavor the crumbs, plus making a pretty green contrast with the golden-sauced macaroni. If making this for a quick family supper, just serve it as is and forget the crumbs and baking.

Decadent Mac and Cheese

macaroni, cheese, side dish, bacon, pesto, panko
Decadent Mac and Cheese alongside a steak
Serves 6 to 8

8 ounces elbow macaroni
6 - 8 ounces bacon, fried, crumbled
2 tablespoons unsalted butter
1 tablespoon olive oil
1 onion, quartered, thinly sliced
2 cloves garlic, finely minced
2 - 3 teaspoons fresh thyme leaves, lightly chopped
3 tablespoons flour
3 cups milk
½ to 1 teaspoon of salt, as needed
a few grinds of fresh pepper
½ teaspoon nutmeg, freshly grated
¼ teaspoon turmeric
¼ - ½ teaspoon chipotle powder, optional
4 ounces cream cheese (low fat acceptable)
1 - 1½ ounces (⅓ - ½ cup) shredded Parmesan (not the green cans)
½ - ¾ cup shredded cheese; chedder, jack, a blend, other

CRUMB TOPPING - optional:
1 cup Panko bread crumbs
2 - 3 teaspoons Pesto
2 teaspoons olive oil

In a skillet, fry the bacon until crisp. Drain, crumble and set aside.

In a large, heavy sauce or soup pot (at least 4 to 6 quart), melt the 2 tablespoons of butter and the tablespoon of olive oil. Once hot, add in the onions and keep heat over low to medium low and slowly saute the onions, stirring often, until deep golden, about 30 minutes. 

While the onions are cooking, bring a large pot of water to boil and cook the macaroni according to package directions, or until al dente. Drain and rinse; set aside.

Once onions are deep golden, add in the garlic and thyme and cook for another 5 to 7 minutes. Make the bechamel sauce by sprinkling the flour over the onions and stirring until all the flour is incorporated. Add in the milk. Turn the heat up to medium, and whisk until the mixture bubbles and thickens slightly, about 5 - 10 minutes. Add in the salt, pepper, nutmeg, turmeric and chipotle powder. Toss in all the cheeses and allow them time to melt, stirring occasionally. Once melted, add the drained macaroni and the crumbled bacon. Stir well. The macaroni and cheese is now ready to serve.

IF USING TOPPING:
Preheat oven to 350 degrees; 325 if on Convection. Set the Panko in a bowl. Add in the 2 teaspoons of olive oil and the pesto. With fingers, rub in the oil and pesto until well distributed and the crumbs are nicely green. Pour the macaroni and cheese into a greased, oven safe casserole, either 9 x 9-inches or7 x 11-inches. Pour in the macaroni mixture and sprinkle the crumbs evenly over the top. Bake for about 25 minutes, or until the crumbs are golden and the macaroni is bubbling. 


My passion is teaching people how to create a harmony of flavors with their cooking, and passing along my love and joy of food, both simple or exotic, plain or fancy. I continue my journey in ethnic and domestic cuisines, continuing my journey to explore diverse culinary experiences and hopefully to start you on a journey of your own. Join me also at A Harmony of Flavors on Facebook, and Pinterest.

Wednesday, January 15, 2014

Quick Tuesday Supper

I love to cook. I cook a lot, and often. Sometimes, I just want something quick and easy, and last evening that was it. I had been emailing back and forth with my sisters about Bean Soup, a recipe my Mom and Dad created a l-o-n-g, long time ago. I started my website and blog one year and 4 months ago, and in all that time I have not made Bean Soup. It is one of my favorite things in winter. The main reason I couldn't just run to the kitchen and put on a pot of soup was because I had no leftover ham bone (with a bit of meat left on). Usually, whenever I have a ham bone left, I freeze it until such time as it is needed. In the last 24 years since being with my current husband, the use of a ham bone has been divided between My Mom and Dad's Bean Soup, and his Mom's Famous Baked Beans. The last couple of times a ham bone was available in this house, it went to make Baked Beans.

ham, peas, leftovers, quick meal
Creamed Ham and Peas, on Toast
Thus, my quickie dinner of last evening. I needed a ham bone. Therefore, I needed a ham! I went out and bought one. I mean, after emailing about it for days, I just want that soup. Now I had a ham and I needed to make dinner. A quick and easy dinner with many kinds of leftovers, such as ham, turkey or chicken, and even canned tuna, is to make a cream sauce or bechamel, and add in some meat and vegetables. My husband and I love peas, so peas was my choice last night. Another of my Mom's easy dishes was Creamed Tuna and Peas, basically with this same recipe. I loved that, growing up. My husband will not eat tuna, so I just don't make it just for myself.

When making this meal of Creamed Ham and Peas, no salt is needed in the recipe, as the ham is salty. If making this dish with turkey or chicken, some salt will be needed. I don't believe Mom ever added salt to her Creamed Tuna and Peas, but when using canned tuna and peas, there is plenty of salt there, also.


ham, peas, quick meal, leftover meal
Creamed Ham and Peas being made

Creamed Ham and Peas


4 tablespoons unsalted butter
5 tablespoons all-purpose flour
1 can (12 ounces) evaporated milk +
1 cup water (or use total liquid amount as 1 1/2 cup milk)
2 cups diced ham
1½ cups frozen peas

In a skillet over medium heat, melt the butter. Add in the flour and stir with a spoon or spatula to completely combine the two. Off the heat, add in the evaporated milk and stir to completely combine the butter and flour roux with the milk. Back on the heat, add in the water and stir constantly, until the mixture thickens and is bubbling. (This is your basic Bechamel Sauce).

Add in the ham and the peas, stirring so nothing sticks to the bottom of the pan, until the mixture is completely heated through. Easy!


This kind of creamed meal can be served over toast (and we all know what that is called), or over pasta or rice. It can be made and placed in a casserole with some grated cheese over top and baked for 20 to 30 minutes until bubbly. It can be combined with pasta, placed in a casserole and topped with buttered bread crumbs and baked as stated. In other words, this kind of dish is just plain versatile. It can be dressed up by adding in some shredded cheddar or jack cheese to melt while in the skillet or it can have some cream cheese melted in. Since it was already late when I got to making the dish, I made it at its most basic. I just wanted to point out that it can be embellished in so very many ways.


My passion is teaching people how to create a harmony of flavors with their cooking, and passing along my love and joy of food, both simple or exotic, plain or fancy. I continue my journey in ethnic and domestic cuisines, continuing my journey to explore diverse culinary experiences and hopefully to start you on a journey of your own. Join me also at A Harmony of Flavors on Facebook, and Pinterest.

Disqus