Translate

Showing posts with label peas. Show all posts

Saturday, March 23, 2019

Odds and Ends

It has been a busy time for me, obviously, as I haven't had time to get to this blog. I opted to create an Indian Cookbook for my kids, who enjoy Indian cooking. I love it so much that sometimes it seems my blog has more Indian recipes than American or any other ethnicity. I love Indian flavors so much, so I keep on hunting down new recipes. Expect to see lots more in the next months.

One of my recent recipes, Pav Bhaji, has quickly become one of my favorites, and mainly as it is so very simple to make, in comparison to many of the Indian foods I have made. Pav Bhaji is a street food, found in many places, but originating, so they believe, in Mumbai. It is either smashed or pureed vegetables with some amazing spices that make it just exceptional. This mixture is served on or with yeast buns, made without egg. At the time I tried that recipe out, I opted to just buy some buns at the grocery, but since then I have made my own recipe for "Ladi Pav," the buns used for this dish. 

Ladi Pav or Eggless Yeast Buns

Ladi Pav, Eggless, Yeast, Buns, recipe
Ladi Pav or Eggless Yeast Buns

Makes 12 buns

3¼ cups all-purpose flour
1 teaspoon sugar
1 teaspoon salt
2 teaspoons instant yeast
2 tablespoons oil or melted ghee
1¼ cups water

In a large mixing bowl, combine the flour, sugar, salt and yeast. Add in the oil and 1 cup of the water. Stir well, and when it becomes too difficult to stir, use hands to bring the dough together. If the dough will not come together, add some of the remaining water. Turn dough out onto a clean surface sprayed liberally with cooking spray. The dough should come together to a tacky dough, but not sticky. Adjust flour or water as needed. Knead the dough for about 6 to 8 minutes, then spray the top of the dough with more cooking spray and up-end the mixing bowl over top of the dough. Let rise for about an hour.

At the end of rising, remove the bowl and divide the dough into 12 equal sized pieces and roll them to smooth balls, keeping the smoothest side upmost.

Line a baking sheet with parchment, or spray the sheet with cooking spray. Set the dough balls on the sheet about 1-inch apart. It is okay if they grow and touch.

Let rise for about 30 to 40 minutes.

Preheat oven to 350 degrees, then bake the buns for about 15 to 20 minutes, until golden. 


~~~~~~~~~~~~~~~~~~~~~~~~~~~~~~~~~~

Spring is here, though it's still a bit hard to tell up north where I live. The snow has melted down about a foot, but we still have so much snow out there it will be some time before it is gone. And who is to say whether Mother Nature has had her last say about winter? But still, Spring weather will arrive eventually, things will begin growing and we will have new vegetables to eat. One recipe that comes together in no time (particularly if you use frozen baby peas), is Peas, Sauteed with Shallot and Prosciutto.

Peas Sauteed with Shallot and Prosciutto 

Peas, Shallot, Prosciutto, side dish, recipe
Peas Sauteed with Shallot & Prosciutto

Serves 3 - 4

2 - 3 shallots, peeled and cut into long wedges
2 - 3 ounces prosciutto, cut into half inch slices
1 tablespoon olive oil
2 cups frozen peas
pinch salt
small pat butter. optional

Heat a skillet over medium high heat and add the olive oil. Throw in the shallots and prosciutto and quickly toss them until the shallots are mostly cooked and the prosciutto is crisped. Add in the peas and toss for 1 to 2 minutes until they are heated through. Add in the small pat of butter and pinch of salt and serve.


~~~~~~~~~~~~~~~~~~~~~~~~~~~~~


Asparagus can be  found in grocery stores year 'round these days, but still, it is a vegetable that screams "Spring." Whenever you make asparagus, remember to snap off the bottom, tough portion of the stem. Hold the spear at the end, and somewhere near middle of the spear and bend until the stem snaps where it wants. This is generally the correct spot, and forcing the stem to break farther down or worse, cutting the ends, can result in some pieces that are too tough to chew.  It really takes no time to do this, and is very important.


As for making asparagus, it is very easy. Since I buy it in the store all year, I grill it in warmer weather and saute or steam it on the stove in cold weather. My favorite is grilled though, and I can't wait for it to get warm enough to get the grill out again.

Grilling, Asparagus, recipe, side dish, easy recipe
Simply Grilled Asparagus

Simply Grilled Asparagus


Serves 2 to 4

1 bunch asparagus
2 tablespoons olive oil
1 fresh clove garlic
¼ to ½ teaspoon salt
a few grinds of black pepper

Snap off the ends of the asparagus, then place the spears, whole, in a gallon zip-top bag. Add the remaining ingredients to the bag, seal and move the asparagus around inside the bag to make sure all the spears are coated. Heat the grill (which is usually while I am planning to grill some meat anyway) and preferable use a grill pan for the asparagus, so you don't lose them to the coals.

Set the asparagus on the grill pan and check often while the spears are grilling. Lift a spear by the bottom end with tongs; if it will bend at all, it is done. Waiting too long to take them off will result in flabby and overcooked asparagus. Check them one by one, removing them to a plate once they will bend at all. This can take 5 to 10 minutes, depending on the thickness of the asparagus spear.

Serve at once, or squeeze on a little lime or lemon juice just before serving.


My passion is teaching people how to create a harmony of flavors with their cooking, and passing along my love and joy of food, both simple or exotic, plain or fancy. I continue my journey in ethnic and domestic cuisines, continuing my journey to explore diverse culinary experiences and hopefully to start you on a journey of your own. Join me also at A Harmony of Flavors on Facebook, and Pinterest.

Friday, February 22, 2019

Indian Street Food

It has probably been more than a year since I first came across mention of something called Pav Bhaji. The first word is pronounced "pao." It is a mushed up mixture of vegetables that is served on or with buns- and a huge pat of butter on top!
 
Pav Bhaji street food, India, Mumbai
Pav Bhaji

When I think of India and breads, I envision lots of flat breads, or Naan, which can be made as a flat bread or made with yeast. Never, though, had I come across a recipe for something that looked like a common bun, as we know them in the U.S. When I saw this recipe, it intrigued me, and for a while I meant to try it out, and then, as with many things, it got buried, and I never got back to it. 

Recently I met a young girl who hails from Mumbai. Anyone from India is of great interest to me, because while I am fascinated with India, Indians, Indian food, culture, etc., I have never been to India, nor eaten anything Indian outside of a few restaurants, nor have I ever had the pleasure of eating at an Indian household. So while my Indian restaurant visits have given me a baseline idea of the flavors involved, I am far removed from actual firsthand experience. Yet I do cook things Indian all the time, because the flavors are exceedingly high on my list of "most amazing flavors." 

So after meeting this young Indian girl, I asked her out to lunch, so I could pick her brain and get ideas - more firsthand. We talked of many, many different foods, and she asked if I had ever tried an Indian street food called Pav Bhaji. Well!
Pav Bhaji, street food, Mumbai
Pav Bhaji just cooked

When I got home, I was busy that day and the next, but finally got around to unearthing all my notes on that dish. Yesterday I put them into action. The dish consists of various parts. The vegetable dish, the main event, is made of mainly potatoes, with other vegetables such as green peppers and tomatoes. Other vegetables that can be added are things like cauliflower and /or peas. And while I have read that carrots are never found in the actual street-vendors' dish, they can be added if making it at home. I always look for more, so I used all these vegetables in my dish. As for the vegetable part of this dish, it can be made into a puree or it can be simply mashed with bits left in it. This is up to your own taste. I chose to mash, not puree my vegetables.

The next part is making or buying a Pav Bhaji Masala. The ingredients in this mixture are similar, but have variances, in the many recipes I looked at online. The spices that seem most common in this mixture are black cardamom, coriander and cumin seed, cloves, cinnamon, tej patta (Indian bay leaf), black peppercorns, aamchur powder (dried unripe mango powder), dried red chilies. Other things added in some recipes are fennel seed, turmeric, powdered ginger, star anise, asafetida and even curry leaves. Of course, the amounts will vary in all recipes, but if you choose to make your own Pav Bhaji Masala, here is my recipe:

Pav Bhaji Masala


Makes about ¼ cup

4 black cardamom pods, seeds removed, pods discarded
3 tablespoons coriander seeds
1½ teaspoons cumin seeds
1 teaspoon black peppercorns
2 dried red chili peppers (remove seeds for less heat), crumbled
3-inches cinnamon stick
6 whole cloves
2 tej patta leaves (do not substitute Bay Laurel leaf), crumbled
----------
1 tablespoon aamchur powder
1½ teaspoon ground turmeric powder
½ teaspoon black salt (or regular salt)

Place the first 8 ingredients into a hot, dry skillet over medium heat and stirring quickly, toast until fragrant. Pour out in a plate to cool, then grind to fine powder, adding in the remaining three ingredients, mixing well. Store in a clean jar with tight fitting lid in a cool, dark place for up to 3 months.

~~~~~~~~~~~~~~~~~~~~~~~~~~~~

The third part of the whole Pav Bhaji experience is the bread. The bread is supposed to be bun-like, made without eggs. The buns are halved and dredged through melted butter with some of the Pav Bhaji Masala on a hot griddle, then served either alongside or filled with the vegetable mixture. 

I have not made the buns, yet. I was making two kinds of breads yesterday, and did not have the time to make a third type of bread, but I will get to those at a later date. In the meantime, I (gasp!) bought some whole wheat dinner rolls to accompany the veggie mixture. 

The Pav Bhaji is then served with a pat of butter melting on top, chopped red onion and a wedge of lemon or lime on the side, as well as a green chutney. I had no green chutney made, so I went ahead without. For the first time, it was fine, as I wanted to really taste what this dish is like, without other distractions. All I can say is AMAZING! I loved this dish. I have no problem eating a vegetarian meal, and this was excellent.

Pav Bhaji

 
Pav Bhaji, street food, India, Mumbai
Pav Bhaji

Serves about 4

2 cups potatoes in small cubes (½-inch)
1½ cups green pepper, chopped small
1½ cups cauliflower, chopped into small bits
½ cup carrots in tiny cubes (about ¼-inch)
½ cup peas (I used frozen)
--------
½ - 1  (15 ounce) can petite diced tomatoes with juices
2 tablespoons Pav Bhaji Masala
2 teaspoons Kasoori Methi (dried fenugreek herb)
1 teaspoon Indian red chili powder (powdered chili peppers)
¾ teaspoon salt
½ cup cilantro, chopped
--------
1 - 2 tablespoons oil or butter
1 shallot, minced
2 cloves garlic, minced
1-inch fresh ginger, minced
2 green chilies, minced (omit seeds for less heat)
--------
4 buns, halved
butter, for buns
butter, to serve
red onion, chopped, for garnish
lemon or lime wedges  
Green Chutney

Place the first 5 vegetables into a saucepan and just cover with water. Bring to boil, then reduce to simmer and cook until the vegetables are soft and can be smashed without resistance.  If there is still a lot of water in the pan, drain off some of it, but some water should remain. Use a potato masher or a glass and smash the vegetables into a chunky mash.

Add to the pot of smashed veggies the tomatoes (amount is up to you), the Pav Bhaji Masala, the Kasoori Methi herb, Indian chili powder and salt and stir in. Stir in the cilantro.

In a skillet over medium low heat, saute the shallot, garlic, ginger and chilies in the oil until the mixture just turns golden, then pour this into the pot with the vegetables. Stir well.

To serve: Halve Pav Bhaji buns or dinner rolls. Melt some butter into the skillet and sprinkle in some of the Pav Bhaji Masala powder. Dredge the cut side of the buns in this butter mixture. Chop some red onion to serve alongside and set out lime or lemon wedges to squeeze over top. If you have some green chutney, serve this also. 

~~~~~~~~~~~~~~~~~~~~~~~~

Green Chutney (Dhania Poodina)

Green Chutney, Dhania Poodina, coriander, mint
Green Chutney or Dhania Poodina

Makes about 1 cup

1 cup (packed) fresh mint leaves
1 cup (packed) fresh cilantro
1 to 5 fresh Serrano peppers (remove seeds for less heat)
½ cup unsweetened coconut, optional
½ small onion or 1 large shallot
1 teaspoon sugar
¼ teaspoon cumin
¼ teaspoon salt
¼ cup lime juice, more, if needed

Place all the ingredients in a powerful blender and puree completely. Store in refrigerator, tightly sealed and use the chutney within three days.  


My passion is teaching people how to create a harmony of flavors with their cooking, and passing along my love and joy of food, both simple or exotic, plain or fancy. I continue my journey in ethnic and domestic cuisines, continuing my journey to explore diverse culinary experiences and hopefully to start you on a journey of your own. Join me also at A Harmony of Flavors on Facebook, and Pinterest.

Tuesday, May 12, 2015

Updating a Quick and Easy Old Recipe

I was born in 1950, and grew up with Mom's cooking in the '50s, a mix of foods of that era and also of her Slovak heritage. Dad added in his mix of his Mom's cooking from Yugoslavia (from the area that is now northern Serbia, or Vojvodina). I have no idea if this supper dish was something just of that era, or even if it was something anyone else made. I know it was a big "go-to" meal for Mom. Easy to make and quick was the name of the game, and we all know what it is to be rushed for something to put on the table. I am the oldest of the children, and others quickly followed. By the end of the '50s there were already 5 children in the family, and by 1963 there were 7. Mom spent a lot of time in the kitchen, but with that many kids around, it had to have been a challenge to manage meals every single day, but manage, she did!

Creamed dish, Tuna, Peas, toast
Creamed Tuna with Peas

I am sure not all my siblings loved Creamed Tuna with Peas as much as I did. I know for sure my next sister, Barb, also loves that meal, and once a few years back while I was visiting, she asked if I liked that dish. On finding that I did, and that we were eating on our own that evening, she asked if it would be okay to make it. Of course I said yes, because I never get to make it when I am home. My husband will not eat fish, and tuna from a can has really bad associations for anyone who is not into fish. Tuna from a can is generally a little more aromatic, but these days I do not really find it so. 

Creamed Tuna with Peas was one of two creamed dishes served on toast; the other was Creamed Dried Beef with Potatoes. Both of these were particular favorites of mine while growing up. I don't make the Dried Beef dish, mainly because it is so salty, and causes swelling (for me). If this were not an issue, I would probably make it often, because that is one that my husband does love! I have heard it unlovingly called "S___ on a Shingle". Whatever it is called, it is good, quick and easy.
 
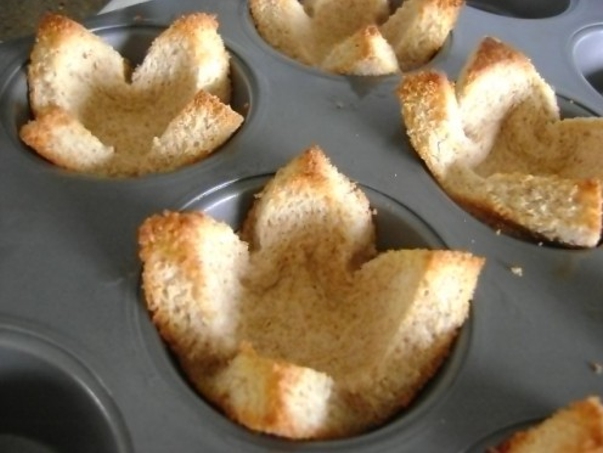
Toast Cups courtesy of www.graciousrain.com

The "shingle", in these cases is a slice of toast. When Mom got in the mood to "fancy up" a plain and simple meal, she took this concept to another level. The bread was just store-bought white bread,  but sometimes she would cut off the crusts, then press the little white squares down into muffin tins, creating little cups. She often gave me the job of brushing these little bread cups with melted butter, and then they were set in a preheated oven to toast. Once toasted, they kept their little cup shape, and these were filled to overflowing with the Creamed Tuna with Peas. I found the steps to make these little cups available on this website, and the finished product is shown in the photo here, courtesy of http://graciousrain.com/easter-egg-toast-cups/

Creamed dish, Tuna, Peas, toast, toast cups
Creamed Tuna with Peas


The other part of the recipe for Creamed Tuna with Peas is the peas themselves. Mom always used a can of peas. One can of peas to one can of tuna. I don't care to use cans of vegetables these days, and far prefer using frozen baby peas, as they are so tender, tasty and GREEN, plus not over-salted. When making this dish now, I will only use frozen peas and the best canned tuna possible. When thinking about this dish last evening, I made creamed hamburger with peas for my husband and creamed tuna with peas for myself. While in the process, I thought I would add in a half onion, finely chopped, as well as a little dill. In thinking back on the sauce (a Bechamel), I wonder if Mom also used the liquid from the canned peas. I know milk went into the dish, but she might have started the liquids with the liquid from the peas, then adding milk as needed for the sauce.  All I can say is, if you like tuna from a can at all, you've got to try this. Even without my updates (caramelized onion, dill and frozen peas), I would still love this dish, a real comfort-food memory. 
Creamed dish, Tuna, Peas, toast, quick dinner
Creamed Tuna with Peas

Creamed Tuna with Peas


Serves 2 - 4

1 tablespoon olive oil
½ onion, chopped finely
½ teaspoon salt
2 tablespoons unsalted butter
2 tablespoons all-purpose flour
2 cups milk
1 (4-ounce) can light tuna, drained
1 cup frozen baby peas
1 teaspoon dried dillweed

In a medium skillet, over medium-low heat, add in the oil and then the chopped onion. Saute the onion for about 15 minutes, slowly, until golden and caramelized. Add in the butter to melt, and then the flour, stirring until all the flour is absorbed into the fats and onion in the pan. Begin adding the milk, a little at a time, stirring constantly, until all the mixture is smooth in the milk. Continue to stir, cooking for about 10 to 15 minutes until thickened and bubbly. Add in the dillweed, tuna and peas and stir until heated through. Serve over toast, or toast cups as mentioned above.
Steps to make the dish
flour added to onion; flour absorbed; milk added;
Bechamel thickened; tuna added; dill, then peas (not shown)


My passion is teaching people how to create a harmony of flavors with their cooking, and passing along my love and joy of food, both simple or exotic, plain or fancy. I continue my journey in ethnic and domestic cuisines, continuing my journey to explore diverse culinary experiences and hopefully to start you on a journey of your own. Join me also at A Harmony of Flavors on Facebook, and Pinterest.

Thursday, January 17, 2013

Dreaming Indian, again

I just love Indian foods. All the flavors that go together so wonderfully. The aromas that waft through the house. Many of the spices are also really good for you. Turmeric, in particular, being a great anti-inflammatory, anti-flatulent and anti-microbial, and a host of other things. Even if you have to get your clothes all yellow stained from the turmeric, use it in your foods. It has little flavor, but great color and side benefits.

Got sidetracked there. I was in the mood for something Indian, or at least a take on Indian. The recipe I make now and then is called Pepper Curried Chicken. It is highly adjustable, so you can really make it suit your tastes. I like using a pound of skinless, boneless chicken breasts, but if you prefer skinless, boneless thigh meat that is great, too. I make the recipe stretch so the amount of meat is less than we might normally eat, which is a good thing. I like black pepper, so I use 2 teaspoons. I would use more, but my husband can't take the heat. You may use more, or less, as desired. I used no green chiles in the recipe. Serrano chilies are great in this, and give that bright chile flavor and heat. Use them or not. I also like a lot of fresh ginger. Ginger is another root with similar properties to turmeric. As they are related, it is not surprising. Ginger is such a nice warm spice, and it is wonderful for upset stomachs. Very calming and soothing. However, some do not care that much for fresh ginger as we do, so use it at your own level. Same with garlic. 

So, now that I have given you all these things to adjust to your liking, there is certainly no reason not to try this recipe out. Play with it and make it your own. Add in some Garam Masala, if you like. I love that combination of spices. 

Pepper Curried Chicken


Chicken, Indian flavors, curry
Pepper Curried Chicken
2 teaspoons ground coriander seed
2 teaspoons ground cumin seed
2 teaspoons coarsely ground, good quality black pepper
2 teaspoons turmeric
1 teaspoon salt
1 pound skinless, boneless chicken breasts, or equivalent

2 tablespoons coconut oil, or olive oil, if preferred
2 large onions,
thinly sliced
4 cloves garlic, minced
2 tablespoons minced fresh ginger
1 or 2 Serrano chilies, minced, optional
1 can coconut milk
2 cups frozen peas
½ cup raw cashews, roasted in a dry pan


Mix together the first 5 ingredients and set aside. Cut the chicken into 1½-inch pieces and place in a bowl. Pour spices over and toss to combine. Set aside while sauteing the onions.

In a large skillet, heat the coconut oil and saute the onions until they are a nice golden brown, about 10 minutes. Add in the ginger and garlic (and chiles, if using) and continue to saute for about 30 seconds, or until very fragrant. Add in the chicken and toss to coat. Saute on medium high until the chicken pieces are all beginning to turn brown. Add in the coconut milk and stir. Bring to boil, lower heat to medium low and allow to cook for about 10 minutes. Add in the frozen peas and continue to cook for another 10 to 15 minutes, until chicken is cooked through.


My passion is to teach people how to create a harmony of flavors with their cooking, and help pass along my love and joy of food, both simple and exotic, plain or fancy. I continue my journey in ethnic and domestic cuisines, trying new things weekly. Join me at A Harmony of Flavors on Facebook and Pinterest.

Sunday, January 13, 2013

Green Peas and Pomegranate Arils

I mentioned the other day that I made a green pea appetizer spread. Oh man, it is so good. I baked a new batch of No-Knead bread just for that. The recipe came from Michael Symon, on The Chew, but I changed it a bit. The ingredients are there, but the amounts are different. As with most recipes, you try something and add a little of this or that. Whatever tastes good. This is the recipe as I made it. It's naturally gluten-free, too.

peas, feta cheese, appetizer, dip
Green Pea, Feta and Mint Spread

Green Pea, Feta and Mint Spread

1 cup frozen sweet green peas, thawed
3/4 cup feta cheese
2 teaspoons lemon zest
1/4 cup chopped fresh mint
2 tablespoons olive oil, or more, as needed
salt and pepper

Thaw the peas under running water. Place them in a food processor with all ingredients except the salt and pepper. Process until well mixed, but still a little chunky. Check to see if salt is needed; the feta cheese might be salty. I put in 1/2 teaspoon of Kosher salt without tasting and it was too salty, so check first. Add in pepper as desired and process briefly to combine.

Okay, that said, I didn't have any lemons in the house. I usually keep limes rather than lemons, but I didn't even have any limes. What I used was Boyajian Lemon Oil, about 3 drops, cause that stuff is really strong. Do not try using lemon extract or flavoring or it will be awful. This lemon oil, for anyone who has not tried it, is pure oil of the fruit and looks, smells and tastes just like concentrated essence of the zest of the fruit. Three drops was good. I might have been able to use 4 drops, but I stopped while ahead. Next time I will use real lemon zest because I think it will make a spectacular spread just that much better.

pomegranate, arils
Pomegranate Arils
This morning I decided to open up a pomegranate I had gotten a few days ago. I had it on the counter so I would remember and use it. Today was the day. I have liked pomegranate arils in past, but they were a little distractingly crunchy. I don't know if this pomegranate was more ripe, but these were sweet and only minimally crunchy. They were downright delicious. I got all the little arils out. There were two whole cups of them. That was one large pomegranate.

grapefruit, pomegranate arils
Supremed Grapefruit and Pomegranate Arils for breakfast
By the way, in case you didn't know, those little things are not seeds. Arils are a covering for the seed of some fruits. The aril itself is attached in some way to the plant and the seed is inside the aril covering. Mace is an aril to the nutmeg. The cotton fibers are the aril to the cotton seed.

So there I stood, tasting how sweet those little arils were and thinking I had planned to have a grapefruit for breakfast. I decided to have both. I supremed the grapefruit segments and put some pomegranate arils on top. It was, I believe, one of the prettiest breakfasts I have had.


My passion is to teach people how to create a harmony of flavors with their cooking, and help pass along my love and joy of food, both simple and exotic, plain or fancy. I continue my journey in ethnic and domestic cuisines, trying new things weekly. Join me at A Harmony of Flavors on Facebook and Pinterest.

Friday, January 11, 2013

Beets, Beets, They're Good For Your Heart ?

Okay, so maybe I have the wrong ditty for the right vegetable! Beets are truly good for the heart. Very high in anti-oxidants, anti-inflammatory, exceedingly high in folate, and with lots of magnesium and Vitamin C, beets are power packed with nutrients. And on top of all that, they have 15 grams of fiber per cup serving, and that is exceptional good news for the colon, too!

Beets seem to be a "love them or hate them" kind of root vegetable. With their color and earthiness, some people can't cope. Those of us who love beets just enjoy them because we can. I love beets. You may have guessed? I haven't met many beets I haven't liked. My Serbian Grandmother made a condiment for Easter Ham, using canned (or home canned) beets, shredded finely and mixed with prepared horseradish to taste and a little bit of sugar to make it all yummy. This was put on ham slices, or ham sandwiches with equal abandon. To this day I always make this when having ham for any occasion. It's not just for Easter anymore! Not around my house. I will be making it again, soon.

Beet and Apple Relish

relish dish, side dish, bets, apples
Beet and Apple Relish
Meanwhile, craving beets again, I decided to make a recipe for Beet and Apple Relish. I made it last night and allowed it to meld flavors overnight. It is such a beautifully vibrant dish. A simple and healthy recipe, take one pound of beets of similar size (about 3 medium) and clean them, leaving skins and root and stem ends intact. Wrap them in foil and set on a small baking sheet. Bake them for about an hour at 400 degrees, or until they are tender.

While the beets bake, saute a coarsely chopped half onion in some olive oil, or try using coconut oil for a real treat. I did this last night and it is delicious that way. Peel and core 2 Granny Smith apples and dice them. When the onions get to a soft and translucent state, add in the apples and toss until they just begin to soften. You do not want applesauce. Mix together 2 tablespoons of cider vinegar and 3 tablespoons honey. Add to the apple mixture with a little salt and pepper and set aside. When the beets are baked, allow them to cool in the foil packet until they can be handled. Gently rub off the skins and ends and then cut them into small dice. Add them to the apple mixture and combine. Allow to rest and meld flavors at least 2 hours, or overnight. 

This makes about 4 or 5 cups of relish. It makes a lovely side dish, with just the right sweetness. It would be good with chicken, turkey, pork. Anything that is good with a slightly sweet accompaniment. 


relish dish, beets, apples
Beet and Apple Relish

Beet & Apple Relish

Makes about 4 or 5 cups

1 pound beets
2 Granny Smith Apples, or apple of your choice
½ medium onion, chopped
1 tablespoon olive oil or coconut oil
3 tablespoons honey
2 tablespoons cider vinegar
½ teaspoon Kosher salt
Freshly ground pepper, to taste
Nutmeg - a few grinds, to taste

Heat oven to 425 degrees. Wrap beets, clean but not peeled, in foil. Place on a baking sheet and bake for 1 ¼ to 1 ½ hours, or until very tender. Remove from oven and allow to come down to just warm, still wrapped in the foil.

Combine the honey, vinegar, salt, pepper and nutmeg and set aside.

Meanwhile, heat a skillet with the olive oil and add in the onions. Saute until soft and translucent. Peel and core the apples (may be left with skin on, if preferred) and cut them into ¼ inch cubes. Add to the softened onion in the skillet and toss until the apples are just slightly softened. Pour on the dressing to combine and remove from heat. Slip skins off the beets and cut into ¼ inch dice and add to the rest of the mixture and allow to rest for at least 2 hours for flavors to meld. 


If you note the green stuff in the background on the photo at top, I also made a take on Michael Symon's Sweet Pea and Feta Dip. My proportions are different, and I did add just a tad too much salt. I think the Feta was quite salty; I should have tasted that first. But it is so good. It was suggested to serve on toast for appetizers. I had some of my No-Knead Bread that was getting dry. I toasted it and had the dip on the toast slices for lunch.  OMG. That will be discussed in another blog....


My passion is to teach people how to create a harmony of flavors with their cooking, and help pass along my love and joy of food, both simple and exotic, plain or fancy. I continue my journey in ethnic and domestic cuisines, trying new things weekly. Join me at A Harmony of Flavors on Facebook and Pinterest.

Disqus