Translate

Showing posts with label rye bread. Show all posts

Thursday, May 22, 2014

Some Things I Have Been Making Lately

I have been quite busy lately; mostly with baking. When my sister-in-law, Sherri brought me all those cookbooks, mostly on breads, I sort of parked myself in one of them, "The Bread Baker's Apprentice: by Peter Reinhart. I have been so enchanted with the recipes and all the instruction, explanation, theory, chemistry, all the why's and wherefores of bread making. I wrote about this a bit in my blogs of May 1st, and May 2nd, and sporadically since then. 

bread, rye bread, caraway seed, onions
Caraway Deli Onion Rye
I started out making a "seed starter", meaning I mixed flour and water and let the wild yeasts that live in everything around us just come calling and ferment the starter with no help from commercial yeast. Once the starter was ready after 4 days, I proceeded to make the "Mother Starter" which is just a step further, making the starter usable for many of the recipes in the book. The first bread I tried after making the starter was a Caraway Deli Onion Rye. This bread was a fantastic success, doing everything it was supposed to do and the flavors were most amazing. I felt this was an auspicious start, so I proceeded to plan what else to make. One kind of bread I like is the really dense 100% rye. Rye does have some gluten in it, but not as much as wheat, so making anything completely from rye with no help from any wheat flour makes it a far more dense bread. Some groceries carry this kind of bread and I was buying it locally here for a while. 

Once I had finished with the starter, the barm and that first rye bread, and learning the barm could be frozen, I divided up the remaining barm and froze it to have ready at a day's notice and just took a break from the mess all over the kitchen for a few days. I then proceeded to read about more of the rye breads, as I had just bought a pound of rye berries. I decided on making the 100% Sourdough Rye. I got one of the frozen barm starters out of the freezer and let it thaw overnight, then divided that up, using one half to make the rye starter for that bread, and mixing more regular flour and water with the remainder to keep the barm going while I decided what else to make with it. 
sourdough bread, starter, rye bread, no yeast
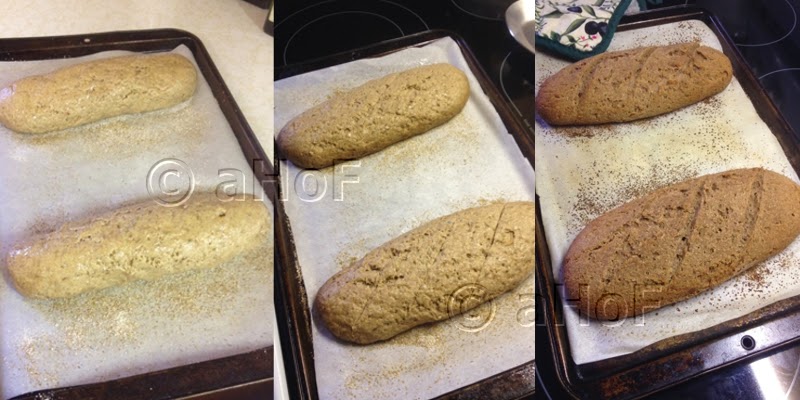
100% Sourdough Rye: yesterday, loaves formed; today after 5 hours; loaves after baking
I will say, I am not having quite the "quick" response times as the book indicates when it comes to the rye. I mixed up the rye flour starter, and the book said it should take about 4 hours to double in size. I had the starter out the entire day long and it never really rose at all. It sort of relaxed and settled in the container but that was it. Finally late that night I put it in the fridge regardless, along with the refreshed barm. I mixed up the bread recipe yesterday, which indicated another 4 or so hours and the dough should have doubled or possibly gone to 1½ times its size  - NOT - Just wasn't happening. It grew a little. 

sourdough, starter, rye,  bread
100% Sourdough Rye
After 6 hours I just formed the loaves and gave it another night refrigerated. At 6:00 AM this morning I got it out to come to room temperature and grow prior to baking; in a perfect world, 4 hours to double in size. That didn't happen either. Oh well. I left it out today for 5 hours and then baked just as indicated, using a very hot oven to start, with a pan of water for steam, opening the oven door after 30 seconds to spray the walls of the oven with more water, then after another 30 seconds, and after another 30 seconds. Then lowering the temperature, the loaves baked just as indicated, rising a bit, but remaining very heavy and dense. I expected heavy and dense, but it seemed the book indicated more growth than took place. Regardless, it is delicious.

bread, making bread, Challah
Beautiful Challah loaves
While watching the 100% Sourdough Rye not doing anything all day yesterday, I decided to try making Challah. I have been making my Mom's (and Grandma's) bread recipe for more than 20 years. It is quite similar, in that it is a rich bread, using a fair amount of sugar, butter and eggs. Though I might have done things differently (as used to my Mom's bread as I am), but I followed the instructions for the Challah in the book to the letter; the dough came together just as stated. After kneading it stretched beautifully to create the "windowpane effect", meaning the dough stretched to a thin membrane without snapping. It grew just as stated, I formed one loaf into a braid and one in a loaf pan. They baked so beautifully I was in awe. They were the prettiest, lightest, most perfect loaves. I was in heaven. And, it tasted fantastic too. My husband said he could live on that bread just fine!

Today I made a batch of dough for pizza. I have been making my pizza dough from the same recipe for just ever. The Bread Baker's Apprentice has you making the dough up using ice water and then forming into individual balls and refrigerating for 1 to 3 days before using. Tomorrow, I am planning to make pizzas. My husband has a way of making his pizza that is certainly any Italian's nightmare. Tomorrow, he's going to have to put up with my idea of what a pizza should be, because with this dough I want to do my best to create a proper pizza. In a couple of days, with more of the dough, he can do his own thing.


My passion is teaching people how to create a harmony of flavors with their cooking, and passing along my love and joy of food, both simple or exotic, plain or fancy. I continue my journey in ethnic and domestic cuisines, continuing my journey to explore diverse culinary experiences and hopefully to start you on a journey of your own. Join me also at A Harmony of Flavors on Facebook, and Pinterest.

Thursday, May 1, 2014

New Books, Breads and Dreams

I have been cooking and baking a lot as usual. That said, I haven't got a specific recipe to share today. I could. I have made many good things that I could share. But everything today is taking a back burner. I am so excited.

Unidentified Bread Pan
To start with, a couple of months ago my sister-in-law brought me a bread baking contraption I had never seen before. Someone came and donated it at the museum, but they had no real use for it, and I am into the old, the new, the different. I have no idea at this time if I will ever use this device. It is a closed, two-loaf affair, making round loaves with ridges. My concern is twofold; first, what kind of recipe would be made in something like this, and second, as these hold a lot of dough, and as it is obviously closed for baking, how would I know if it is baked through? 

If anyone seeing this happens to know what it is for, specifically, or what sort of bread would be baked in this mold - please leave a comment!


When she brought this mold to me, my sister-in-law also noted that at some unspecified time she would have a set of glass tube bread molds to bring. This unspecified time happened to be last evening. In the past I had owned a set of glass tube molds for bread, though they were much smaller in diameter. The ones she brought last night are a far larger in diameter, probably a good 4½ to 5 inches. This would make a more normal sized loaf instead of a "tea bread" loaf. I am interested to try them out.

books, cookbooks, bread recipes,
Stack of Books
Then last weekend, I was helping my sister-in-law to move some furniture out of a storage unit and I happened to notice she had Rose Levy Berenbaum's "Bread Bible" setting on a shelf! OMG! I asked if I could borrow it, and she said, "Certainly. Actually, you can have it." I was in love. I sat to start reading and got teary just reading the introduction. I can so identify with all the feelings about bread making. It enchants me. I have continued to read bits and pieces, along with looking through various recipes I find of interest. I have already learned quite a few things about the chemistry of bread making that I never knew. I have always made bread in the manner my Mom did, and her Mom before her. If I tried another recipe and it didn't work right, I continued to apply the methods I knew and went from there. All in all, with fair success.

But the thing that really threw me into the stratosphere was that she brought over 6 cookbooks, 3 specifically on breads and the rest on other baking subjects. The bread books are large hardback books, with beautiful color photos so very evocative and enticing. They make you want to take a big bite right out of the book, the photos are so wonderful. There are few things that I love more than great books. So, this morning I started reading one of these new books on bread. Reading about the varying types of flour grinds was enlightening. The chapter on making a starter batter from scratch was a revelation.

Oat Groats, Wheat, Rye
Oat Groats front, Wheat and Rye berries behind
Long ago (back in the 80s) I made a sourdough starter and used it to make breads, pancakes, cakes. The starter dough was made using a tiny amount of yeast to jump start the batter. This use of commercial yeast is done often, making it very easy to get a nice batch of soured dough to use to make a loaf. I kept the starter going for some time, but eventually lost interest and tossed it out. In this (new to me) book, there was a recipe for a "seed" starter where you are truly starting from scratch, waiting for wild yeasts to invite themselves in. On reading some of the theory, they explain that rye carries more natural yeasts on the grains than does wheat, so if possible they advocate using rye flour for the initial starter mixture, then adding wheat flour to "feed" this over the next days. Once this mixture has caught the yeasts and is fully alive, it is called a "seed starter." 

Caraway, Rye Bread, bread,
Caraway Rye Bread
I do not keep rye flour or whole wheat flour as they tend to go rancid so easily that most times they already taste off before even using them. I do, however, keep whole wheat berries and whole rye berries in the freezer. I own both a hand grain grinder and a grain attachment for my Kitchen Aid. I found that to make a Rye Bread recipe that caught my fancy, I would need a total of 3 cups of rye flour; one for the initial "seed" starter, one more for the rye bread starter using the barm (the seed starter plus additional flour and water, yet to be made), and another to add later to the actual bread dough recipe. Unfortunately, once I ground the rye berries I still had, it only yielded just over a cup. That's okay though. I ordered some more today and in the meantime it will take at least 3 or 4 days to get the seed starter and then the barm going. The barm does not have a time limit. Once it is made, all that needs be done is feed it occasionally. The rye bread can be made at any time. 

I have made variations of rye breads many times in past: Caraway Rye Bread, Swedish Limpa Rye Bread and others.

Swedish Limpa Rye Bread


Makes 4 round loaves
Swedish Bread, rye bread, limpa rye, recipe
Swedish Limpa Rye Bread


2 packages regular dry yeast
½ cup warm water
2 cups sifted rye flour
¾ cup dark molasses
½ cup shortening
2 teaspoons salt
2½ cups boiling water
6 cups bread flour

Mix the yeast into the ½ cup of water; set aside. Combine the rye flour, molasses, shortening salt and the boiling water and blend well; allow to cool to lukewarm. Add in the yeast to combine, once the temperature is cooled. Begin adding the 6 cups of bread flour to make a soft dough. Turn out onto a well floured surface, cover and allow to rest for10 minutes. Knead the dough for 15 minutes, place in to a lightly greased bowl and allow to rise until doubled in size, about 1½ to 2 hours.

Punch down the dough, cover and let rise again for about 30 minutes. Turn out the dough and divide into 4 sections. Shape the sections into round loaves and place on greased baking sheets, well apart. Let rise until doubled, about 1 hour.

Bake at 350 degrees for 35 to 40 minutes.

NOTES: If you are using Rapid Rise, or Instant Yeast, just add all of the water called for into the second step when mixing the rye flour, molasses, shortening and salt. Add the packets of instant yeast to part of the white flour and mix before adding to the cooled mixture.

If you have a Bread Dough Enhancer, a mixture with a combination of ingredients, including extra gluten to help with rising, add according to directions, into some of the white flour before adding in to the cooled mixture.


Now and again I just get the yen for some nice caraway seed rye bread and I enjoy it for breakfast with jam as much as at lunch for a sandwich. I have used King Arthur Flour's "Sir Lancelot" flour, now simply called King Arthur "High Gluten" Flour when making rye breads in the more recent past, as it has a far higher gluten content and helps with the rising. Rye may have more yeasts, but it has less gluten, necessary for rising. King Arthur Flour also had a product called Deli Rye Flavor, now called King Arthur Rye Bread Improver, which gives more of that real bakery rye flavor to your bread. I have used that also to great advantage. But for the first time ever, this time I am making a real, true starter, waiting for those little elusive wild yeasts to come calling and do their magic for me in the seed starter. For the first time, I will make a starter sponge before diving in with the dough. And for the first time, hopefully, I will be able to create a real, true, deli rye bread that rises properly and tastes great without the enhancement of added flavors. I am just dreaming, totally on cloud 9, waiting for this event to happen.


My passion is teaching people how to create a harmony of flavors with their cooking, and passing along my love and joy of food, both simple or exotic, plain or fancy. I continue my journey in ethnic and domestic cuisines, continuing my journey to explore diverse culinary experiences and hopefully to start you on a journey of your own. Join me also at A Harmony of Flavors on Facebook, and Pinterest.

Sunday, March 3, 2013

Caraway Rye Bread; a Favorite

I love bread. I guess too much of anything is not great, but it is difficult to live without bread. When I started delving into the concept of Gluten Free baking, what I read everywhere is the lament about good bread being a scarce commodity on that kind of diet. I did find lots and lots of recipes for gluten-free breads. I was just afraid to try them out. My best and longest friend decided to go gluten-free long ago and told me how, despite that she is an excellent baker, her GF breads came out like bricks.

Well, being me, and having been making bread for over 40 years, this seemed like a challenge. I tried a recipe from Gluten Free Girl's website, going on the concept of a no-knead bread, and while it made two exceptionally tiny loaves, the bread was just to-die-for good. Ever since, I have been meaning to go back and try some others, just so I can say I CAN do it, but so far other things have gotten in the way.

bread, yeast bread, rye, caraway
Three loaves of Caraway Rye Bread

Meanwhile, I still make all our bread in the house. Regular bread with wheat flours, of course. To my knowledge I am not gluten intolerant, so it has not been a priority. When I discovered Mark Bittman's adaptation of Jim Lahey's No-Knead bread recipe, I totally fell in love. I have been making that bread nearly constantly for almost 2 years now (hard to believe). In a recent blog post I talked about the different variations I have tried of this bread, but mainly I just love the plain no-knead bread. It is marvelous. Why mess with such a great thing?

However, despite how  much I love that bread, I still make my Mom and Grandma's rich egg bread that was made only for Easter and other holidays. I loved that bread so much when growing up that I began making it at age 21 and continued on through my whole life. Almost 42 years later I still make it as our daily bread. The other breads are just extras. One of those extras is Caraway Rye bread, which I love. I have tried various recipes, and have distilled down the things I like best about them all. I made it yesterday again, though it has been a few years since I made it last. This time I was curious whether it could be baked in the enameled cast iron pot I use for my No-Knead bread. The recipe can make two large loaves or 3 slightly smaller ones. I decided to go with the three, and make one of them in the enameled cast iron pot.

bread, rye, yeast bread, caraway, cast iron pot
Caraway Rye Bread made in the enameled cast iron pot

Making it in there worked like a charm, and I wish I had divided the dough into only 2 loaves to work with, but that's hindsight. Meanwhile, that is one gorgeous loaf of bread. Not that the others are anything to sneeze at, mind you. I made the other two in long narrow loaves and placed them on a parchment and cornmeal lined baking sheet. They are lovely. The crust is soft though, where the one from the pot turned out crusty. It doesn't stay crusty, if the bread is stored in plastic, but it does stay chewy, and I think that is one of my biggest cravings - chewy things. Chewy, gooey caramels. Really chewy bagels. Ice cream with chewy, gooey bits in it. Cinnamon buns with thick gooey caramel. You get the picture, I am sure. I think I may have to invest in a second enameled cast iron pot to keep up with this bread making thing I have going. But if you love bread, give this recipe a try. Add or leave out things as desired. Use more or less caraway, or none. Use dill or dill seed, if desired. The bread is delicious.

Caraway, Rye Bread, yeast
Caraway Rye Bread

Caraway Rye Bread

Makes 2 or 3 loaves

SPONGE:
2½ teaspoons (1 packet) instant/quick-rise yeast
3 tablespoons light brown sugar

1 cup medium rye flour
2 cups warm water, 110 degrees
1 cup bread flour
½ cup Sir Lancelot high-protein flour (or all bread flour)

DOUGH:
½ cup medium rye flour
½ cup dry milk powder
3 heaping teaspoons caraway seeds, or to taste
2½ teaspoons salt
3 tablespoons Rye Bread Enhancer, optional
3 tablespoons cooking oil (olive, canola, walnut, other)
2 - 2½ cups Sir Lancelot high-protein flour, or bread flour

MAKE SPONGE: If using the instant yeast and high-protein flour, use the bowl of a heavy duty stand mixer. Otherwise, use a large plastic or glass bowl. Pour the warm water into a large bowl. Add in the brown sugar, rye flour, instant yeast and flour(s). With whisk attachment or regular whisk, combine ingredients well. Allow the sponge to rest for at least an hour. If using regular yeast and just bread flour, this mixture may be allowed to rest for 4 hours or up to overnight.

MAKING DOUGH: In a small bowl, combine the medium rye flour, dry milk powder, caraway seed, salt and Rye Bread Enhancer, if using. Stir well to combine these dry ingredients, then add to the sponge, along with the oil of choice. With dough hook or wooden spoon if by hand, combine these ingredients well, then begin kneading in the Sir Lancelot high-protein flour, or bread flour, ½ cup at a time. until the dough is smooth and elastic, about 5 minutes. Remove dough hook and allow dough to rest for about 1 hour (2 - 2½ hours if using regular dry yeast), or until doubled in bulk.

Turn dough out onto a floured surface and divide into 2 or 3 portions. Form into loaves of your choosing. These can be long loaves, round loaves, braided or placed into loaf pans, as desired. If making long or round loaves, place parchment onto a large baking sheet and spray with cooking spray. Sprinkle with cornmeal. If making in loaf pans, spray with cooking spray. Allow loaves to rise until doubled in bulk.

This bread may also be made in a heavy enameled cast iron Dutch oven. Unless you have two of these Dutch ovens, the loaves will have to be made sequentially. To prepare the dough, make a tight round loaf and place onto a towel (not terrycloth) strewn with cornmeal. Cover with another towel and allow to rise.

To bake loaves on baking sheet or in loaf pans, Preheat oven to 450 and bake the loaves for 10 minutes. Lower heat to 350 and bake for a further 5 or more minutes, until the bread sounds hollow when tapped on the bottom. If baking in the Dutch oven, preheat the pot in the oven for 30 minutes. Remove pot from oven, remove lid and set aside. Place hand under the towel holding the bread and quickly invert the loaf into the extremely hot pot. Replace lid and place in oven. Time for 20 minutes. Depending on how dark you like your crust, remove the lid and bake for a further 5 or more minutes.


My passion is teaching people how to create a harmony of flavors with their cooking, and passing along my love and joy of food, both simple or exotic, plain or fancy. I continue my journey in ethnic and domestic cuisines, continuing my journey to explore diverse culinary experiences and hopefully to start you on a journey of your own. Join me also at A Harmony of Flavors on Facebook, and Pinterest.

Disqus