Translate

Showing posts with label pizza dough. Show all posts

Wednesday, April 29, 2015

Pizza for Any Night

I am rarely in the mood for pizza. Un-American, one might think. When I am in the mood for pizza, I usually go for a veggie type. One of my favorites is spinach pizza, though I have made many styles and combinations. All that aside, lately it seems I have gone off the deep end. Ever since I made the little English muffin pizzas for the Winefest event in late March, I had some of the mixture (pizza sauce, minced pepperoni and Parmesan, with just a bit of green pepper) in the refrigerator. The bottle was filled to the tippy-top, and my assumption is that because there was really no air space, it lasted far longer than it might have. So a couple of weeks ago I made some pizza using that mixture, plus a few more pepperoni strewn over top and then cheese. And then I made it again. And yesterday, while the pizza mixture was long gone, I was still in the mood, still had some pepperoni in the fridge and a fresh batch of grated cheeses. 

Hamburger, Pizza, Green Pepper, Mushrooms
Hamburger Pizza with Green Pepper and Mushrooms


My husband loves pizza. Hardly a week goes by that he doesn't come home with a box and have it for snacking on. While he does not generally go for pepperoni pizza, it is okay to have some on it. His favorite is a meat-lovers type, of course. When we make pizza here at home, he usually chooses a combination of hamburger meat, green pepper and mushrooms. While I like this mixture on pizza, as I said, I usually make one with things I prefer. No crossover. 

Yesterday however, I had the hamburger out and mixed up a sauce, made the pizza dough and we had pizzas. This time I made them both the same. And they were delicious. For us, this is a nice pizza for any night. Nothing fancy. Nothing prim and proper. Nothing outlandish.

Last October I'd gotten in the mood to try a Buffalo Chicken Pizza, which, as something different, was really tasty. At that time I had created a recipe for pizza dough for one large pizza. Lately, I have been doubling that recipe and using it to make our separate styles of pizza. I will say, the weather has been exceedingly dry up here, and I have found this makes a huge difference in the flour to water ratio in my bread recipes. Even from October to now, it has been so dry that I had to add a half cup more water to the dough to get it to hydrate at all!  As a refresher, this is the recipe:

Pizza Dough
making pizza dough
making pizza dough


For two large (15 - 16-inch) pizzas

(start at least 4+ hours before serving)

SPONGE:
2 cups all-purpose flour
1½ teaspoons instant yeast
1½ cups lukewarm water, 80 - 90 degrees
2 tablespoons olive oil

DOUGH:
2 to 2½ cup flour
2 teaspoons salt
¼ to ½ cups water, if needed
the Sponge (above)

SPONGE: In a heavy duty mixer bowl, or in another large bowl, combine the flour and yeast and mix together. Add the lukewarm water and oil and stir well. Cover with plastic wrap and set in a warm place (80 degrees) for 1½ hours, until bubbly. (When in a cooler climate, setting the bowl in the oven with just the oven light on creates a nice warm environment. Some oven lights are too hot and will begin to cook the dough. In this case, leave the oven door ajar so some of the heat escapes.)

DOUGH: Once bubbly, if the sponge was made in a heavy duty mixer bowl, add in two cups of flour and the salt. Set the dough hook in place and begin kneading on low speed until combined, 2 - 3 minutes. If making by hand, add the flour and salt to the sponge and mix by hand. Once well mixed, determine if more flour is needed. If the climate is very dry, you may have to add water. Start with a little and add more as the kneading progresses Once the flour and salt are mostly incorporated, knead for 4 to 5 minutes more with the dough hook, or 5 to 7 minutes by hand, until the dough is smoothly elastic and not too sticky. In the mixer, the dough should clear the sides of the bowl but still puddle a little on the bottom. Grease a bowl and set the dough in, turning once to grease all sides, cover the bowl and set in a warm place to rise for another 1½ hours, or until doubled in size.

The dough can be patted out and placed on a cornmeal coated piece of parchment (to later slide on to a pizza stone) or on a greased 15 inch pizza pan. If the dough wants to spring back too much, allow it to rest for 10 minutes and try again, stretching to desired diameter. Top with your choice of flavorings and bake at 400 degrees (375 on Convection Bake) for 20 to 25 minutes.

pizza slices, Hamburger, Pizza, mushrooms, green pepper
Slices of Hamburger Pizza

Once the dough is started, you can begin prepping the ingredients for toppings. I like to make some garlic-steeped olive oil to brush on the bare dough once stretched on the pans: combine about 4 - 6 tablespoons olive oil and 4 - 6 cloves of fresh garlic, minced finely. Set this in a small saucepan over the lowest possible heat to steep for at least 15 minutes. It should absolutely not boil. You want a nice garlic flavor: not raw and not browned. Set aside to cool until needed. When ready to make the pizzas, use a pastry brush to brush this mixture over the dough, before any toppings. I mixed up a batch of "pizza sauce"; simple, but good and then began prepping the other ingredients to have everything handy.

These pizzas came out very good. I did not think to use the bottom oven rack for the first pizza, and the crust was more soggy than I liked. Remember to use the bottom rack for a crispier crust. The heating element in ovens is in the bottom, so the closer to the element the pan is, the more browning of the crust.

Pizza Sauce 


For 2 large pizzas
 

1 (15 ounce) can tomato sauce
½ teaspoon dried oregano OR 1 - 2 tablespoons fresh, minced
2 tablespoons good Pesto, OR
- 4 tablespoons fresh basil, minced
- 1 tablespoon olive oil
- 1 clove garlic, minced
a package of pepperoni slices, if desired

Combine ingredients in a bowl and set aside. Divide between the two pizzas when ready to bake.

Hamburger Pizza Toppings
Hamburger Pizza, baked, sliced
Just baked and sliced


Enough for two large pizzas

1 tablespoon olive oil
1 medium onion, chopped
1 pound hamburger meat
1 teaspoon salt
½ teaspoon dried thyme leaves OR 2 teaspoons fresh leaves
½ teaspoon dried oregano leaves OR 2 teaspoons fresh oregano minced
1 cup shredded Parmesan cheese
1 green bell pepper, cubed
2 small (4-ounce) cans mushroom stems and pieces, drained
16 ounces shredded cheese of choice (mozzarella or combination)
olive oil for pans

In a large heated skillet, add in the olive oil and the chopped onion and cook until the onion is softened and golden. (If you prefer raw onion, eliminate this step and use the onion raw on the pizza - my husband will not accept raw onion on the pizza!) Remove the onion to a plate and set aside. Add more oil if needed and fry the hamburger until it is well browned, adding in the salt, thyme and oregano during cooking. Add the onion to the meat, stir, and set the meat aside to cool.

Preheat oven to 400 degrees. To assemble the pizzas, stretch the dough to fit two (oiled) pizza pans as directed above. If the dough will not cooperate, allow it a 10 minute rest and stretch again. If needed, do this again, until the dough will fit the pan. Brush the steeped garlic and olive oil onto each pizza round. Divide the Pizza Sauce between the pizzas and spread out evenly. Sprinkle half the Parmesan over each of the pizzas. Strew on the meat mixture, dividing equally between pizzas. Strew on the green pepper bits and the mushrooms. If using pepperoni, set slices, as many as desired, over top of the meat. Top with half the cheese per pizza. Bake the pizzas one at a time on the bottom rack of the oven for about 20 to 25 minutes.


My passion is teaching people how to create a harmony of flavors with their cooking, and passing along my love and joy of food, both simple or exotic, plain or fancy. I continue my journey in ethnic and domestic cuisines, continuing my journey to explore diverse culinary experiences and hopefully to start you on a journey of your own. Join me also at A Harmony of Flavors on Facebook, and Pinterest.

Monday, October 13, 2014

Buffalo Chicken Pizza is a Hit

Buffalo Wings can conjure up mental images of excruciatingly hot flavors, inspiring a fear of trying them out. Or, such is the way my husband has imagined, to date. In all the many years since these wings have taken over the appetizer menu everywhere, my husband has yet to even taste them.


Buffalo Chicken Pizza, buffalo sauce, pizza, blue cheese
Buffalo Chicken Pizza, fresh from the oven
Now, I can understand that, up to a point. I mean, if you cannot tolerate almost any heat in a food, then this fear would keep one from trying something out. But really, when I asked him yesterday if he had EVER tried Buffalo Wings, he said no. Absolutely. 

As for myself, I think I only ever once ordered Buffalo Wings as an appetizer somewhere, and I really loved them, flavor-wise. I am not overly keen on messing with bones and eating too much of the skin. Not because of health purposes. Too much of that rubbery skin in my mouth just gives me the willies, a little hang-up of my own. I have, in some distant past, even bought frozen Buffalo Wings when I craved them. I also love the flavors, done up in a sandwich or wrap. In Florida we ate often at Beef O'Brady's, a sports bar with exceptionally good food. I ate their "Buffalo Chicken Wrap" more times than any other thing on their menu. It was delightfully good. I also have made a version of the Buffalo Chicken Dip for parties a couple of times, and which my husband also never tried.
 
Buffalo Chicken Pizza, buffalo wing sauce, blue cheese
One beautiful slice of Buffalo Chicken Pizza

So I was thinking of those flavors last week, and trying to think of a way to present them. I had used Sweet Baby Ray's Buffalo Wing Sauce and Marinade in the past for the dip, and really like the flavor. I haven't used any other brand, since I know that while this one has a little heat, it is not fiery. I thought about trying a version of the Buffalo Chicken Lasagna I am seeing around the internet recently. That was my plan, but the more I thought about it, the more I started leaning toward pizza instead. So yesterday was pizza day.

First off, I wanted to make just one pizza. I know I could freeze the remainder of a recipe for pizza dough, or just keep it refrigerated till needed, but decided to make a small recipe and just make one large pizza. The recipe I created will make one 15 inch pizza with a nicely puffy crust. Doubling the recipe will make (obviously) 2 large pizzas, or three smaller ones. 

Pizza Dough for One Large Pizza


Start about 4+ hours prior to serving
pizza dough, makiing dough, yeast dough
dough still sticking to bottom of bowl


SPONGE:
1 cup all-purpose flour
¾ teaspoon instant yeast
¾ cup lukewarm water, 80 - 90 degrees
1 tablespoon olive oil

DOUGH:
1 to 1¼ cup flour
1 to 1½ teaspoons salt
1 - 2 tablespoons water, only if needed
the Sponge (above)

Sponge: In a heavy duty mixer bowl, or in another large bowl, combine the flour and yeast and mix together. Add the lukewarm water and oil and stir well. Cover with plastic wrap and set in a warm place (80 degrees) for 1 1/2 hours, until bubbly. (When in a cooler climate, setting the bowl in the oven with just the oven light on creates a nice warm environment. Some oven lights are too hot and will begin to cook the dough. In this case, leave the oven door ajar so some of the heat escapes.)

pizza dough, Buffalo Wing Sauce
Dough drizzled with Buffalo Wing Sauce

DOUGH: Once bubbly, if the sponge was made in a heavy duty mixer bowl, add in one cup of flour and salt to taste. Set the dough hook in place and begin kneading on low speed until combined, 2 - 3 minutes. If making by hand, add the flour and salt to the sponge and mix by hand. Once well mixed, determine if more flour is needed. If the climate is very dry, you may even have to add a tablespoon of water or two. Once the flour and salt are mostly incorporated, knead for 4 to 5 minutes more with the dough hook, or 5 to 7 minutes by hand, until the dough is smoothly elastic and not too sticky. In the mixer, the dough should clear the sides of the bowl but still stick to the bottom. Grease a bowl and set the dough in, turning once to grease all sides and set in a warm place to rise for another 1 1/2 hours, or until doubled in size.


The dough can be patted out and placed on a cornmeal coated piece of parchment (to later slide on to a pizza stone) or on a greased 15 inch pizza pan. If the dough wants to spring back too much, allow it to rest for 10 minutes and try again, stretching to desired diameter. Top with your choice of flavorings and bake at 475 degrees (450 on Convection Bake) for 13 to 15 minutes.

My husband and I both love blue cheese, so I went ahead and used blue cheese dressing and blue cheese crumbles for my Buffalo Chicken Pizza. If you are not a fan of blue cheese, use Ranch dressing and another cheese crumbled over top, such as Feta or even goat cheese crumbles.

Pizza, Buffalo Wing Sauce, Chicken, Blue Cheese
All toppings in place, ready for baking

Buffalo Chicken Pizza


Makes one 15-inch pizza

pizza dough (above)
1/3 cup Buffalo Wing Sauce (not plain hot sauce)
2 cups cooked chicken, diced (rotisserie chicken is great)
1 cup celery, thinly sliced
1 cup green pepper, diced
1/2 cup Blue cheese dressing
4 ounces Blue cheese crumbles

Drizzle the Buffalo Wing Sauce over the pizza dough. Top with the chicken, celery and green pepper. Dot with the Blue cheese dressing and then the Blue cheese crumbles. Bake in a preheated 475 degree oven (450 degrees on Convection Bake) for 13 to 15 minutes, or until golden and bubbly.


I am going to be making this again, and soon. My husband LOVED it, though it stretched his spice/heat tolerance to its limits. The flavors were sublime. But.... 

A couple of notes. I coated the pizza dough with olive oil. I used ½ cup of Buffalo Wing Sauce. The center of the finished pizza was a bit soggy. Next time I am not using the olive oil and I am using the ⅓ cup of sauce as listed in the recipe above. My hope is that the sauce can soak into the crust a little bit this way. The center of the pizza was too wet, so the other thought is to use the lowest oven rack to bake the pizza rather then the second level up, in hope it will better brown the bottom. I baked the pizza on a pan, so possibly setting it on a parchment and pizza stone would have yielded better crust-baking results. Despite this, the recipe is well worth making again. 

October 18, 2014 Pizza Repeat with Changes
Calphalon, pizza pan, 15-inch, Perforated Pan
Calphalon 15-inch Perforated Pizza Pan

To amend the recipe above, I made this pizza a second time and followed my idea, using ⅓ cup of the buffalo wing sauce, over a pizza dough with no olive oil. I did use my large, 15-inch perforated pizza pan. I lined the pan with parchment, though this would not be strictly necessary. I used the bottom oven rack to bake the pizza, for the full 15 minutes. The crust came out perfectly crispy, with a most satisfying crunch, despite the sauce and Blue Cheese Dressings. The flavors were equally great the second time, but the crust came out as it should be. I truly recommend this perforated pizza pan!


My passion is teaching people how to create a harmony of flavors with their cooking, and passing along my love and joy of food, both simple or exotic, plain or fancy. I continue my journey in ethnic and domestic cuisines, continuing my journey to explore diverse culinary experiences and hopefully to start you on a journey of your own. Join me also at A Harmony of Flavors on Facebook, and Pinterest.

Monday, May 26, 2014

Pizza and Pickled Red Onions

pizza, pizza dough, simple dough, refrigerated dough
Pancetta & Brussels Sprouts with Goat Cheese Pizza
The two things in the title have nothing to do with each other, but they are both things I had been working on in the last few days. In the continuing story of my love affair with making new breads, pizza dough is another new step for me. I have been making pizza dough from my old (© 1966) Joy of Cooking since I started making pizza dough long, long ago. I liked the recipe just fine, and I also found that the dough makes a really nice loaf of "Italian" bread if there is any left over. In Peter Reinhart's "The Bread Maker's Apprentice", he also has a pizza dough recipe.

Recently, watching one of the Unique Eats shows on TV, someone was making pizza dough and all they really said was that it was made very simply, from flour, salt, yeast and water; the dough was formed into balls and refrigerated until needed. This sparked my curiosity, and I had been wanting to try this out. And then along came Peter Reinhart's book and there is a recipe for a very simple pizza dough that is formed into balls and kept refrigerated until needed. Serendipity, I'd say! So I made the dough a few days ago. The water called for is to be iced water, the dough is mixed and kneaded and formed into balls before refrigerating; check. The following day I got out two balls of dough and set them on the counter for the stipulated 2 hours before using them.

pizza, spinach, pizza dough, refrigerated dough
Spinach Pizza: brush dough with EVOO, sprinkle with Parmesan, add spinach, top with Mozzarella
The book is very clear about how to form the dough for the pizza. One is to use the backs of the hands only, lifting the edges of the dough and quickly stretching and turning until you have a dough that can be tossed in the air, as the professionals do. Ha! I figured I would have dough landing on the floor somewhere, so I just skipped that last step. That said, this dough was unlike anything I had ever used. When the balls of dough went in the fridge the dough was still quite sticky. After resting for 2 hours on the counter, the dough was spongy and dry and very easy to work and stretch. Even when my fumbling backs-of-hands slipped and the dough fell in a little heap on the counter, it was remarkably easy to just lift it back onto the backs of hands and continue. The dough did not stick to itself. It stretched very easily and kept the stretched shape. This was very new territory for me. 
 
pizza, spinach, pizza dough, refrigerated dough
Spinach Pizza served

That first day, I stretched the dough too far, making a slightly larger than 12-inch pizza. The book said 9 - 12 inches, but no more than that. The center of the dough was so thin you could read a paper through it, and there just wasn't enough dough there to support even the relatively scant toppings. Okay, it was my first time. I was overambitious with the stretching. On day 2 I kept a careful eye on the stretching, stopping at around 9 inches. I set this onto the pan (sprayed with cooking spray and sprinkled with cornmeal) and gently lifted the edges, turning as I went and got the dough to a nice 12-inch circle. It had a bit more thickness in the center, as I was careful not to stretch that too much. The pizzas were far nicer and had a little more support. On day three I stretched the dough to about 11 inches total, and I liked the weight of those pizzas far more.

The baking was the other thing new. I had never, ever, set my oven so hot to make a pizza before. A temperature of 400 or 450 seemed too hot. Then again, my husband likes to plop all his pizza toppings toward the center of the pan, so that's a lot of thickness to get baked through. I don't use so many toppings on my pizza, generally, and I like to spread my toppings all the way to the edge. Still, the oven seemed too hot to bake the pizza through. With this new dough, and endeavoring to keep the toppings minimal, I set the oven to 500 on Convection (which is equivalent to 525 regular). The first night, with that very thin crust, I set the pan on the 2nd rack up from the bottom. The top of the pizza was definitely done, but on trying to cut, I found the center of the crust was still gummy and not quite done. On Day 2, I removed that 2nd shelf and set the pan on the lowest rack. At exactly 8 minutes the top was done. When I cut into the pizza the bottom crust was crisped. Success!

So, that is my pizza story. I am looking forward to doing this again, sometime soon. I am wondering how this pizza dough would perform if stretched only to about 8 or 9 inches and made on the grill? I love grilled pizza, so this is something I am looking forward to trying. 

In the meantime, I had been seeing various people on TV making pickled red onions. The recipes go all over the board from all white or cider vinegar and a LOT of sugar, to a very mild rice vinegar and only a tablespoon or so of sugar, to cooking them in the brine, to pouring the brine over raw onions - and on and on and on. I went a middle of the road route for my first effort. The red onions turn a beautiful bright pink. They keep their crunch but lose their "bite". They are excellent, and I ate some with my pizza last evening. Yum!
Pickled Red Onions

Pickled Red Onions

quick pickle, red onions, brine, spices
Pickled Red Onions

Makes 1 quart jar

2 red onions, sliced in ⅓ to ¼ inch thick rings
4 cups boiling water

BRINE:
1 cup white vinegar
½ cup water
½ cup sugar
1
½ teaspoons Kosher salt
1 "true cinnamon" quill about 4-inches long
1 teaspoon black peppercorns
1 teaspoon whole coriander seeds
5 allspice berries
1 bay leaf
1 clove garlic, smashed
3 whole cloves

Place the sliced onions in a large bowl and pour the boiling water over, tossing to expose all the onions to the hot water; let stand two minutes and drain the onions in a colander. Pack the onions into a glass quart jar.

In a saucepan, combine the brine ingredients and bring to a boil. Simmer for 1 minute, remove from heat and allow to cool to lukewarm before pouring over the onions in the jar. Seal the jar and refrigerate for at least a day before using.

red onions, quick pickle, brine, spices
Red Onions: Raw          -         just brined            -           after 2 days
The change from the dull purple of the onions raw, to the color when the vinegar brine first hits them to the beautiful rose color after a couple of days is just wonderful. They are so pretty. And they are delicious. Use them as a topping on sandwiches, or in a salad. The onion bite is completely gone, and you have a flavorful condiment to use for anything you can dream up.


My passion is teaching people how to create a harmony of flavors with their cooking, and passing along my love and joy of food, both simple or exotic, plain or fancy. I continue my journey in ethnic and domestic cuisines, continuing my journey to explore diverse culinary experiences and hopefully to start you on a journey of your own. Join me also at A Harmony of Flavors on Facebook, and Pinterest.

Thursday, May 22, 2014

Some Things I Have Been Making Lately

I have been quite busy lately; mostly with baking. When my sister-in-law, Sherri brought me all those cookbooks, mostly on breads, I sort of parked myself in one of them, "The Bread Baker's Apprentice: by Peter Reinhart. I have been so enchanted with the recipes and all the instruction, explanation, theory, chemistry, all the why's and wherefores of bread making. I wrote about this a bit in my blogs of May 1st, and May 2nd, and sporadically since then. 

bread, rye bread, caraway seed, onions
Caraway Deli Onion Rye
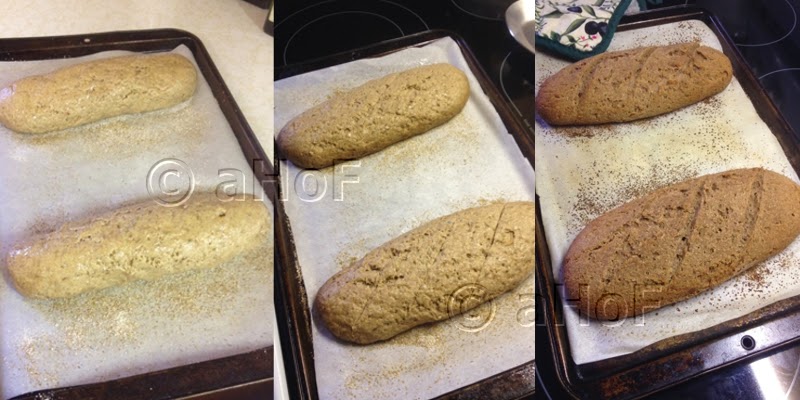
I started out making a "seed starter", meaning I mixed flour and water and let the wild yeasts that live in everything around us just come calling and ferment the starter with no help from commercial yeast. Once the starter was ready after 4 days, I proceeded to make the "Mother Starter" which is just a step further, making the starter usable for many of the recipes in the book. The first bread I tried after making the starter was a Caraway Deli Onion Rye. This bread was a fantastic success, doing everything it was supposed to do and the flavors were most amazing. I felt this was an auspicious start, so I proceeded to plan what else to make. One kind of bread I like is the really dense 100% rye. Rye does have some gluten in it, but not as much as wheat, so making anything completely from rye with no help from any wheat flour makes it a far more dense bread. Some groceries carry this kind of bread and I was buying it locally here for a while. 

Once I had finished with the starter, the barm and that first rye bread, and learning the barm could be frozen, I divided up the remaining barm and froze it to have ready at a day's notice and just took a break from the mess all over the kitchen for a few days. I then proceeded to read about more of the rye breads, as I had just bought a pound of rye berries. I decided on making the 100% Sourdough Rye. I got one of the frozen barm starters out of the freezer and let it thaw overnight, then divided that up, using one half to make the rye starter for that bread, and mixing more regular flour and water with the remainder to keep the barm going while I decided what else to make with it. 

sourdough bread, starter, rye bread, no yeast
100% Sourdough Rye: yesterday, loaves formed; today after 5 hours; loaves after baking
I will say, I am not having quite the "quick" response times as the book indicates when it comes to the rye. I mixed up the rye flour starter, and the book said it should take about 4 hours to double in size. I had the starter out the entire day long and it never really rose at all. It sort of relaxed and settled in the container but that was it. Finally late that night I put it in the fridge regardless, along with the refreshed barm. I mixed up the bread recipe yesterday, which indicated another 4 or so hours and the dough should have doubled or possibly gone to 1½ times its size  - NOT - Just wasn't happening. It grew a little. 

sourdough, starter, rye,  bread
100% Sourdough Rye
After 6 hours I just formed the loaves and gave it another night refrigerated. At 6:00 AM this morning I got it out to come to room temperature and grow prior to baking; in a perfect world, 4 hours to double in size. That didn't happen either. Oh well. I left it out today for 5 hours and then baked just as indicated, using a very hot oven to start, with a pan of water for steam, opening the oven door after 30 seconds to spray the walls of the oven with more water, then after another 30 seconds, and after another 30 seconds. Then lowering the temperature, the loaves baked just as indicated, rising a bit, but remaining very heavy and dense. I expected heavy and dense, but it seemed the book indicated more growth than took place. Regardless, it is delicious.

bread, making bread, Challah
Beautiful Challah loaves
While watching the 100% Sourdough Rye not doing anything all day yesterday, I decided to try making Challah. I have been making my Mom's (and Grandma's) bread recipe for more than 20 years. It is quite similar, in that it is a rich bread, using a fair amount of sugar, butter and eggs. Though I might have done things differently (as used to my Mom's bread as I am), but I followed the instructions for the Challah in the book to the letter; the dough came together just as stated. After kneading it stretched beautifully to create the "windowpane effect", meaning the dough stretched to a thin membrane without snapping. It grew just as stated, I formed one loaf into a braid and one in a loaf pan. They baked so beautifully I was in awe. They were the prettiest, lightest, most perfect loaves. I was in heaven. And, it tasted fantastic too. My husband said he could live on that bread just fine!

Today I made a batch of dough for pizza. I have been making my pizza dough from the same recipe for just ever. The Bread Baker's Apprentice has you making the dough up using ice water and then forming into individual balls and refrigerating for 1 to 3 days before using. Tomorrow, I am planning to make pizzas. My husband has a way of making his pizza that is certainly any Italian's nightmare. Tomorrow, he's going to have to put up with my idea of what a pizza should be, because with this dough I want to do my best to create a proper pizza. In a couple of days, with more of the dough, he can do his own thing.


My passion is teaching people how to create a harmony of flavors with their cooking, and passing along my love and joy of food, both simple or exotic, plain or fancy. I continue my journey in ethnic and domestic cuisines, continuing my journey to explore diverse culinary experiences and hopefully to start you on a journey of your own. Join me also at A Harmony of Flavors on Facebook, and Pinterest.

Wednesday, December 11, 2013

Cookies I haven't Been Making Lately, Alas

Well, it's 2 weeks till the holidays and I have yet to make a single cookie. Heavens. Well, I have plenty of excuses as to why, but since this happens more often than not, I guess it all boils down to the fact that I am a procrastinator. At nearly 64, it seems this is one lesson I  may never learn. That's okay. It will get done when it gets done.

pie, pecans, chocolate
Double Chocolate Pecan Pie

Meanwhile, my husband had hernia surgery. I could use that for an excuse for my procrastinating, but it hardly put him out of commission at all. We had our friend Rich visiting, in case of any help needed with my husband after the surgery. I spent a lot of time cooking again, as Rich loves to eat as much as my husband and I do. I am always trying things out.

I made a Double Chocolate Pecan Pie for Thanksgiving. I had been wanting to try my Chocolate Pie Pastry for a while, and this was the perfect time. I also added grated unsweetened chocolate to the Pecan Pie recipe. I read at Food 52 about Cooks Illustrated's new twist on making pie pastries, so I wanted to try that out. Basically it uses ice cold vodka for half the liquid called for in the recipe (see the article here). I must say it gives beautiful texture to the dough and the finished crust. The pie filling itself didn't look as pretty once baked. It seems that the crust, especially the exposed parts, want to puff, losing the definition of the pretty ridges in the crimping.

Again, I forgot that the eggs should not be whipped, and the rest of the ingredients are folded in gently. Then, the pecans, so prettily placed on top of the unbaked pie actually stay on top of the pie once baked. Mine fell in, again. It in no way inhibited the excellent flavors.


pie, chocolate, pecans, chocolate crust
The pie, before baking

Double Chocolate Pecan Pie


Makes one 10-inch pie

CHOCOLATE PIE PASTRY: 10-inch Pie:
1½ cup all-purpose flour
½ teaspoon salt
⅓ cup packed brown sugar
3 tablespoons unsweetened cocoa powder
½ cup shortening or lard
4 tablespoons ice water
4 tablespoons ice cold vodka (or use all water)

PIE FILLING
3 eggs
¼ teaspoon salt
¾ cup sugar
1 stick unsalted butter, melted
2 ounces unsweetened chocolate, finely grated
1 cup dark corn syrup
1½ cups pecan halves

Make Pastry: Stir flour, salt, brown sugar and cocoa powder in a medium bowl. With a pastry blender or fork, cut in shortening or lard until mixture resembles coarse crumbs. Add most of the water or water/vodka and toss with a fork until all flour mixture is moistened and starts to form a ball. If necessary, add remaining liquid to the crumbs in bottom of the bowl. Gather the dough in your hands and gently shape into a ball, then flatten. Chill for 1 hour before using. (If blind baking is needed, preheat oven to 375 degrees, or 350 on Convection Baking. Partially freeze the formed shell, then line it with foil and pie weights. Bake the partially frozen shell for 12 minutes. Remove from oven, remove foil and pie weights and prick the crust all over with the tip of a knife. Place in oven for 13 to 15 minutes more, until the crust is well set.)

Preheat oven to 375 degrees. Fit pastry into a 10-inch pie plate and crimp edges. Gently mix the eggs with the salt, then with a wire whisk, slowly stir in the sugar along with the grated chocolate. Do not over beat. Mix the corn syrup with the melted butter and fold into the egg mixture. Pour into prepared pastry shell. Place the pecans, flat side down, onto the filling. Bake for 40 to 50 minutes or until set and crust is browned. 


breakfast, French toast, stuffed French toast, cream cheese filling
Cream Cheese Stuffed French Toast
I mentioned some French Toast my daughter told me about once, using thicker sliced bread, making a pocket and stuffing the bread with a mixture of cream cheese flavored with things I cannot recall. I decided to try this out, though I did not even write a single thing down. Basically, I whipped up some eggs with heavy cream (just because it was in the fridge) and some Grand Marnier (just because it tastes so good). Separately I mixed a block of cream cheese with some honey and cinnamon, mixing it together with a hand mixer. I sliced some of my Pizza Dough Bread (if any pizza dough is left over, I roll it into a long baguette shape and bake it - yum!) I had made a few days prior. Slicing it into about 2½ or 3-inch thick slices gave plenty of room to take a small knife and cut a pocket into the slices. I stuffed in about 2 tablespoons or so of the cream cheese mixture, then soaked them in the egg/cream/Grand Marnier mixture. I fried them in the remaining bacon grease on my griddle, allowing a bit longer time for them to cook, so the insides would be creamy and warm. They were just so amazingly good!

I had made cornbread when I made chili one day, and I also made the leftover cornbread into French Toast, and that was pretty darned good also.
braising pan, All-Clad
My large All Clad Braising Pan

Then we got talking about dinner and I mentioned that my Mom sometimes made stuffed pork chops. I really loved those things, but not every store has such thick cut pork chops all the time. I got regular pork chops instead, and made my Better Than Mom's Stuffing. I had planned to make it just as I make it for Thanksgiving, substituting chopped fresh sage for the mace. Ultimately, I added the sage, and completely forgot about adding the apple and nuts. I quickly seared the pork chops on each side in a hot pan with just salt and pepper. I set one pork shop in a large All-Clad braising pan, piled some stuffing mixture on it, set another chop against the stuffing, then added more. My large braising pan is round, so I went round the pan this way, but they could be made in a rectangle baker also. The braising pan has a nice high lid, so I covered the pan while baking at 300 degrees for about 1½ hours. It was mighty fantastic. I called these Unstuffed Pork Chops! Again, I completely forgot to get photos! I will be making those again, so eventually I will get the proper documentation and photos.

stuffing, recipe, side dish, holiday dish
Better Than Mom's Stuffing

Better Than Mom's Stuffing


Makes one 13 x 9 inch casserole

1 extra-long loaf sandwich bread, in cubes, or torn
1 onion, chopped
¼ pound bacon, cut in thin strips across
¾ cup chopped fresh Italian parsley
¾ teaspoon mace
¾ teaspoon freshly ground pepper
1 - 2 Granny Smith apples, grated
3 eggs
1½ cups chopped nuts (pecans, walnuts, chestnuts)
1½ cups milk
1 - 1½ cups turkey or chicken stock

In a very large bowl, place all the bread cubes. In a large skillet, cook the bacon until mostly rendered, but not quite done. Add in the chopped onion and continue to fry until the onion is nicely browned. Pour the contents of the skillet over the bread in the bowl, bacon grease and all. Add in the parsley, mace, pepper, apples (these may be peeled and then grated, or skin left on), eggs and nuts. Toss with hands, gently until well combined. Do not pack together. Add in the milk and toss again until combined.

In a very large bowl, place all the bread cubes. In a large skillet, cook the bacon until mostly rendered, but not quite done. Add in the chopped onion and continue to fry until the onion is nicely browned. Pour the contents of the skillet over the bread in the bowl, bacon grease and all. Add in the parsley, mace, pepper, apples (these may be peeled and then grated, or skin left on), eggs and nuts. Toss with hands, gently until well combined. Do not pack together. Add in the milk and toss again until combined.

Preheat oven to 350. Spray a 13 x 9-inch casserole dish with cooking spray, and place the stuffing mixture into the casserole, patting gently, but not pressing. Pour the turkey stock over all and bake for about 40 minutes, or until the top is golden and the center springs back when pressed lightly.
 

I love my Pizza Dough recipe, and Rich wanted to make some pizzas for us. I made the dough and made a couple of pizzas for myself. The guys had every cold cut known to man on their pizza with pizza sauce. I made one of mine a Spinach Pizza and another one with potatoes, bacon and Gorgonzola cheese on it. Both were excellent. 

pizza, spinach, mozzarella garlic, Parmesan
Spinach Pizza

Spinach Pizza


Makes one 15-inch pizza

Pizza dough, of choice
¼ cup olive oil
2 - 4 cloves garlic, minced fine or through a garlic press
1 ounce Pecorino Romano cheese, grated fine
1 (10-ounce) package frozen chopped spinach, thawed and squeezed dry
½ teaspoon salt
2 cups grated mozzarella, more if desired

Preheat oven to 425 degrees (400 on Convect-Bake). Pour the olive oil into a very small saucepan and put in the garlic. Set this on the stove at the lowest possible setting, even to keeping it partly off the burner. (I have a "warming" burner that truly just keeps things barely warm). Allow the garlic to steep in the oil over just warm but not even simmering for at least 15 minutes. At this point, you may strain out the garlic or leave it in, as desired.

Lightly grease your pizza pan. Roll the dough to fit the pan. Using a pastry brush, coat the pizza dough in the garlic infused olive oil. You may use just the oil, oil with a little of the garlic, or the oil with all the garlic if desired. I used mostly just oil with a few bits of garlic here and there. Sprinkle the Pecorino Romano evenly over the garlic oil. Sprinkle on the spinach as evenly as possible and then cover with the mozzarella. Bake the pizza for 10 to 12 minutes, or until browned to your taste. I prefer the cheese not too brown.
 

Needless to say, we had leftovers of leftovers, but it was a lot of really good food made in these last couple of weeks. Hopefully I can get myself motivated to make cookies now... sigh.


My passion is teaching people how to create a harmony of flavors with their cooking, and passing along my love and joy of food, both simple or exotic, plain or fancy. I continue my journey in ethnic and domestic cuisines, continuing my journey to explore diverse culinary experiences and hopefully to start you on a journey of your own. Join me also at A Harmony of Flavors on Facebook, and Pinterest.

Disqus