Translate

Wednesday, September 25, 2019

Five Essential Spice Mixtures

We do not all cook alike. We do not all have the same, or even sometimes similar, tastes. But somewhere along the line, tastes will coincide, even if in a very small way. We do try to make something similar, or at least something that uses a similar flavor profile.

My taste in spices and spice mixtures may not coincide with yours. I do have more than the usual spices, I grant you. Still, sometimes a recipe will call for a spice mixture that you do not have. Often, you very well might have the ingredients on hand. Sometimes not. But, whatever your spice cabinet looks like, most would agree that making up a spice mixture fresh from whole seeds is going to taste better than pre-ground store bought, no matter how reputable. In addition, the ability to alter the mixture to reflect your own taste makes it more desirable still.


Cumin, Seeds, whole spice
Cumin Seeds

For Example. Cumin.  


To me, cumin is a very over used spice. I agree it has its place in a lot of recipes, but for me, if cumin jumps out as a dominant flavor in a spice mixture or in a recipe - I just do not like it. This is my own taste. Obviously, for others this is not the case, because I have read and tasted enough recipes that require that I alter them or I just cannot enjoy it at all. When it comes to a spice mixture recipe, if it calls for 3 tablespoons of cumin, I will instead use a teaspoon or two.

Or Cilantro!
Cilantro, Herb, cooking
Cilantro Herb

Cilantro is so very disputed, and the line is hugely divided between the lovers and haters of this herb. I LOVE cilantro. I cannot get enough of it. I make one-egg omelets with a half cup of minced cilantro mixed into the egg. It is more like cilantro held together by egg. But I just love the flavors. Someone who cannot abide cilantro will be cringing at this description, but it is my personal taste.

So, here I want to present some spice mixtures that are, to me, essential. There are a lot of crossovers in the spice world, so despite Garam Masala being specifically Indian, is also used in many other recipes these days. Chinese Five-Spice is specifically Chinese, yet can be used in other applications with huge success. If you are carnivore, steaks likely play a big part in your life, and I have a wet rub for steaks that is just delightful. Or a spice mixture that is great on anything beef or pork. Not everyone cans their produce, but a good pickling spice is also good in other recipes. And so, here are my Five Essential Spice Mixtures. 
Allspice, Berries, seeds, spice
Allspice Berries

Beef & Pork Seasoning


Makes about 5 tablespoons (double or triple as desired)

1 tablespoon black peppercorns
1 tablespoon dried garlic flakes
1 tablespoon dried onion flakes
2 teaspoons dried lemon peel
1½ teaspoons yellow mustard seeds
1 teaspoon allspice berries
1 teaspoon coriander seeds
1 teaspoon dried oregano flakes

1 teaspoon dried dill herb

Place all ingredients into a spice grinder and grind to a powder. Store in an airtight jar in a cool, dry place, away from heat and light. 


~~~~~~~~~~~~~~

Chinese Five-Spice


Makes about ½ cup 
Chinese, Five Spice, spice mixtures
Chinese Five Spices


10 whole star anise
1 tablespoon Sichuan peppercorns
1 (4-inch) stick true cinnamon, crumbled
2 tablespoons whole fennel seeds
½ teaspoon whole cloves

Place all the spices into a dry skillet and heat, stirring constantly, until very fragrant. Turn onto a plate to cool, then grind in a spice grinder or coffee grinder used only for spices. Store in a glass jar with a tight-fitting lid in a cool, dark place.


~~~~~~~~~~~~~~~~~~~~

Garam Masala II


An alternate to my regular Garam Masala mixture, most of the spices are already in your spice cabinet, except, perhaps, the Tej Patta (Indian Bay Leaf - NOT our Bay Laurel leaf). If you do not have Tej Patta, it has a similar flavor to a bit more of cinnamon or cloves, so add a pinch more of those instead.

Makes about ⅓ to ½ cup
Tej Patta, Tamal Patra, Indian Bay Leaf
Tej Patta - Tamal Patra - Indian Bay Leaf

2 inches true cinnamon stick, crumbled (about 1 tablespoon)
1 - 2 Tej Patta (Tamal Patra) leaves, crumbled 
1 tablespoon cumin seeds
1 tablespoon cardamom seeds
1 tablespoon cloves

1 tablespoon black peppercorns
1 tablespoon coriander seeds

Place all spices into a dry skillet and heat to fairly high. Stir very often, so the spices do not burn. When they are very fragrant, remove from heat to a plate to cool. Grind in a spice grinder or coffee grinder used only for spices. Store in a tightly sealed container in a cool, dry place.

 
~~~~~~~~~~~~~~~~ 
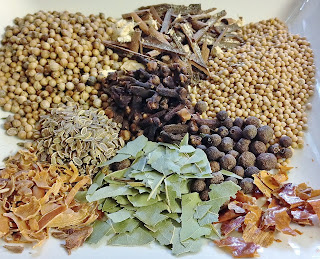

Pickling Spices, spice mixtures,
Pickling Spices

Pickling Spice Mix


Makes about ⅓ cup
 

2 (3-inch) cassia cinnamon sticks
1 (1-inch) piece whole dried ginger
4 whole bay leaves, crumbled
2 tablespoons whole coriander seeds
1 tablespoon whole mustard seeds
2 teaspoons whole cloves
1 teaspoon whole mace blades, crumbled
1 teaspoon whole allspice berries
1 teaspoon dill seeds
1 small dried red chili pepper, crumbled

Place the cinnamon sticks and the whole ginger into a baggie, or between towels and pound with a hammer or other heavy object until in medium small bits. Place in a small bowl, along with all the rest of the ingredients and toss to combine. 


~~~~~~~~~~~~~~~~~

Wet Rub for Steaks


Makes enough to season about 3 or 4 steaks
Wet Rub, steak rub
Wet Rub Ingredients

 
1 tablespoon fresh rosemary, minced
1 teaspoon Grains of Paradise, optional
¼ teaspoon black peppercorns
2 teaspoons Kosher salt
3 cloves fresh garlic, more to taste
1 teaspoon Beef & Pork Seasoning Mix (above)
2 tablespoons olive oil


If making with fresh whole spices: Place rosemary, Grains of Paradise, black peppercorns and kosher salt into a mortar and grind with pestle until fairly fine, or to taste. Add in the garlic and pound to pulverize completely into a paste. Add in the olive oil and Beef & Pork Seasoning Mix and combine. Use hands to rub onto steaks at least 2 hours prior to grilling. Allow to rest at room temperature. Grill as desired.


If making with pre-ground spices: Use fresh rosemary; dried will never give the same flavor or texture. Place the rosemary into a small bowl. Use fresh garlic, finely minced, or passed through a garlic press and add to the rosemary in the bowl. Add in the finely minced rosemary, ground Grains of Paradise if using, the pepper, salt, Beef & Pork Seasoning Mix and olive oil and stir well to combine. Rub all over the steaks and allow to rest at room temperature for at least 2 hours. Grill as desired.


My passion is teaching people how to create a harmony of flavors with their cooking, and passing along my love and joy of food, both simple or exotic, plain or fancy. I continue my journey in ethnic and domestic cuisines, continuing my journey to explore diverse culinary experiences and hopefully to start you on a journey of your own. Join me also at A Harmony of Flavors on Facebook, and Pinterest.

Tuesday, September 24, 2019

A Keralan Breakfast

If you are new to this blog of mine, I must mention that I am way, way into Indian cooking. I love the flavors, the spices, the smells while cooking. I have yet to visit India, but I study regions and foods continuously. And I am always trying something new. Indian food has been a passion of mine, growing exponentially over the past 20 years. I try to stay as authentic as possible to recipes, including searching out new and/or unknown spices to try.

For those who have read this blog, I apologize for repeating myself. I just cannot help myself when it comes to Indian food!

For the past couple of years, I have had a couple of recipes setting on the back burner, so to speak. Most definitely of interest, but somehow I just never got down to refining a recipe of my own. These recipes are from Kerala, a state that runs down the southwest coast of India (similar to Chile, in South America). Apparently coconut trees are ubiquitous to the area, and Kerala is sometimes called Land of the Coconuts. Rice is another food found everywhere and at most meals. Not surprising then, that coconut and rice together play a huge part in the cuisine of this state. 
Vegetable soup, Ishtu, Indian food, Kerala, breakfast
Vegetable Ishtu

And so, we come to the point of this rambling monologue. The recipes I had been eyeing for a good couple of years were a Coconut Vegetable Stew, called Vegetable Ishtu (or Ishtoo), the locals' pronunciation of the British term of "stew." The stew looked so pretty with its white base and colorful vegetables. Plus, I just love coconut and coconut milk. The other recipe I was eying was one of the many, many possible accompaniments to this stew, called Appam, a bowl-shaped rice and coconut crepe. 

Vegetable Ishtu


Vegetable soup, Ishtu, Indian food, breakfast
Vegetable Ishtu
Serves 4 to 5 as an accompaniment

½ cup peeled, ¼-inch diced potato
½ cup peeled, ¼-inch diced carrots
½ cup frozen baby peas
½ cup cauliflower, in tiny florets, optional

GROUND MIXTURE:
1 tablespoon channa dal/desi channa dal
3 tablespoons raw cashews
1 tablespoon white poppy seed, optional
1 - 3 green chili peppers, seeds removed for less heat
1½-inch piece true cinnamon quill
2 whole green cardamom pods
2 whole cloves

TEMPERING:
1 - 2 tablespoons coconut oil
20 curry leaves
1 onion, chopped finely
1-inch piece fresh ginger, minced

1 can (14.5 ounce) coconut milk
½ -1 teaspoon salt, as needed

Heat a dry skillet over medium to medium high heat and toast the channa dal, stirring constantly, until deep golden. Set in a plate to cool. Toast the cashews briefly, stirring constantly, until they get some browned spots. Place into the plate to cool. Once cooled, put these and the remaining Ground Mixture ingredients into a blender container with ½-cup water and blend to a smooth paste. Set aside.

In a saucepan combine the cubed vegetables and just barely cover with water. Bring to boil, reduce to simmer and cook the vegetables until tender, about 15 to 20 minutes. While the vegetables cook, heat the skillet again and add in the coconut oil. Once hot, drop in the curry leaves to crackle a bit and add in the onion. Saute the onion until nice and soft, but not golden. Add in the ginger and stir, cooking just until fragrant. Add the reserved ground past mixture along with the vegetables with their water and the coconut milk. Add in the salt and taste for seasoning. Stir well and cover over very low simmer, to meld flavors.

~~~~~~~~~~~

Appam, huh?

Appam seems to be a generic term for a whole variety of possible iterations of the basic rice and coconut based bread-like accompaniments that run from thin and crepe-like to pancake thick and all sorts of variations. The terms are very confusing, because many places seem to term Appam and Palappam as the same thing. Then there is Vallayappam, which seems to be the same batter, except instead of thinning to crepe-consistency, this batter is left like pancake batter and made like pancakes, although without flipping them. There are also Idiyappam, where the batter is pressed through a device that results in strings that are bunched into an idli mold and steamed, as for idli. There are some variations that call for the addition of some vegetables and or onion. It seems, truly, that the variations are almost endless, when it comes to Appam.
Appam, Palappam, Indian food, breakfast, bread
Appam / Palappam

What all of this comes down to is the use of rice and coconut in a fermented batter. The batter is fermented, similarly to idli, whether by natural fermentation, the use of yeast or the use of a local fermented alcoholic beverage. In the making of idli, I have yet to have the batter actually ferment, so I end up using a bit of baking soda at the last minute. In the recipe I cobbled together for my Appam, I did use yeast, and the batter fermented beautifully, all bubbly and aromatic in the morning. My Appam (or Palappam) are a bowl-shaped crepe-like creation, and often are cooked until the underside is truly browned. I cooked mine to a bit less done: they were golden underneath, though nowhere approaching browned. They are delicate and soft and white and lacy. 

To make these, a rounded pan, like a small wok (called an appachatti), is used. The batter is poured into the center and quickly swirled, as for crepes, but with the batter going up the rounded edges, then pooling back down to the center. The center remains thicker and soft, while the outer edges become very lacy and a little crisp. As I do not own an appachatti, I used my smallest pan, an old All-Clad "non-stick" 8-inch pan. When I rotated the pan to allow the batter access to the sides, I had to be careful not to get the batter onto the inner rivets, as it would stick. So, my appams were a little lower on one side, but it made no difference at all.

The true recipe for Appam (of any variety) calls for the use of raw rice and fresh coconut. It can also call for additions of Poha rice (a flattened, dried, parboiled rice) or some previously cooked and cooled rice. Some recipes call for a cooked rice flour paste to be added also. As the batter should ferment, and I have no local Indian alcoholic beverage on hand (in the U.S. southwest), I used a yeast version and made a shortcut method that worked wonderfully well.


Appam / Palappam

Appam, Palappam, bread, Indian, breakfast, Kerala
Appam / Palappam

Makes about 20 (10-inch) Appam

2 cups plain white rice flour
1 can (14.5 ounce) unsweetened coconut milk
1½ cups water, plus more for adjusting
¼ cup pre-cooked, cooled white rice
3 tablespoons sugar
½ teaspoon instant yeast
¾ teaspoon salt

Eight hours before using the batter: Mix the coconut milk and water in a blender with the cooked rice, sugar and yeast, blend briefly, then add in the rice flour and starting slowly, blend the mixture to a fine batter. If it is too thick, add in water, ½ cup at a time, until just shy of crepe batter consistency. Pour into a large mixing bowl and cover with plastic film. Allow this to stand on the counter 8 hours, or overnight.

After 8 hours, the batter should be bubbly and yeasty smelling. Stir and add in the salt. If the mixture is still too thick (which is easy to determine once you make one or two), add more water, a little at a time.

Preheat a small, round-sided pan. I used an 8-inch (bottom diameter) skillet. Whatever pan is used, it should have rounded, flared sides. Once very hot, brush with a film of ghee or coconut whatever is needed to be able to very quickly roll the pan so the batter goes up the sides of the pan. Once done swirling, the remaining batter should pool in the center of the pan, while the edges become very lacy. It takes a few minutes at medium heat or higher until the edges begin to loosen. Once the appam is browned on the bottom, remove to a plate. Amount of browning is totally subjective.

Serve these appam with the Vegetable Ishtu recipe above, or (less authentically) with Sambar. It is also great with any chutney, or any meat or fish stew leftover from dinner. 


My passion is teaching people how to create a harmony of flavors with their cooking, and passing along my love and joy of food, both simple or exotic, plain or fancy. I continue my journey in ethnic and domestic cuisines, continuing my journey to explore diverse culinary experiences and hopefully to start you on a journey of your own. Join me also at A Harmony of Flavors on Facebook, and Pinterest.

Monday, September 23, 2019

Mouthwatering Chicken Dinner

My son's birthday is in a few days, but the only time he could visit was this past week, so I made him a birthday dinner a week early. Within reason, I ask what he'd like for dinner and then I make it - my birthday gift. So this time, he asked for Chicken Madeira and risotto and Bread Pudding.

The Bread Pudding recipe is one I've made many times over the years, although it has been truly years now since the last time I made it, so that was a welcome recipe to revisit! 
Chicken, Madeira, wine, dinner, entree, recipe
Chicken Madeira

As for risotto, I have made a few of them over the years, also. Nothing I have made real note of, though, so I had no place to fall back on for that recipe. And as for Chicken Madeira - I was stumped. I had heard of Chicken Marsala, though I never made that, but Chicken Madeira? So at first, I wondered if he just named the wrong alcohol? Nope, apparently not, as I looked it up online. 

What was mainly available online were recipes that were "Copycat Cheesecake Factory Chicken Madeira recipes." I've only ever eaten at Cheesecake Factory once maybe, many years ago, and this was not what I ate! I looked the recipes over, but they just didn't do it for me. While I don't care to drink Madeira on its own, I do like to cook with it. It is a special style of fortified wine that comes from the Portuguese island of Madeira. I have not used anything US domestic, nor would I. There are very nice Madeiras from Madeira that are inexpensive enough and more authentic. Generally, I have a Rainwater Madeira on hand, and as it is a lighter style, it is wonderful for cooking. 

So on with perusing recipes I went, and after reading what was available, I realized that essentially, this dish is made almost identically to the way I make my sauteed mushrooms. The main difference (besides the addition of chicken, of course) is that some of the alcohol liquid is left in the pan (and generally I use dry Sherry) rather than evaporating off all of the alcohol, and then the addition of some stock to further use for gravy. All the rest of the recipe is my own preferred method, despite finding others who did it basically the same way. I opted to do some things in advance, such as making my own stock. 

For the chicken, instead of buying whole chicken breasts, then slicing them into two flat pieces, pounding them to ¼-inch thickness - I bought chicken cutlets, already sliced thinly. This saved some time. Even so, it probably would have been better to pound a couple of them that were still cut a bit too thick. Oh well.

The Stock

For the stock, I bought some beef marrow bones at the grocery, and a couple of days in advance, set them on a baking sheet in a 400 degree oven for about an hour, until they were browned a bit. This gives great flavor to a stock. Then I placed the bones into a large pot with about 8 quarts of water, 1 onion with skins on (these give great color to the stock), 1 bay leaf and a teaspoon of black peppercorns, whole. I cooked this on a very low temperature, barely simmering, for two hours. At this point, I removed the 4 cups of stock that would be needed for the risotto. The stock had nice flavors at this point, but not overwhelming. I do not salt my stock, opting to salt the dish as needed when that time comes.

The rest of the stock, I allowed to slow-simmer for the remainder of the afternoon, planning to reduce the liquid by evaporation from 3 quarts to 1½ cups (just under one quart). By nearly dinner time, I removed the bones, onion and bay leaf and allowed the stock to further reduce to the 1½ cups I wanted. I strained this through a fine mesh strainer and stored this to use for the liquid in the chicken recipe. 


Chicken Madeira

Chicken, cutlets, Madeira, wine, mushrooms, recipe
Chicken Madeira

Makes 8 pieces of chicken

8 chicken cutlets, OR 4 large boneless, skinless chicken breasts halved into two flat pieces each and pounded to ¼-inch thickness
--------
1 tablespoon butter
1 tablespoon olive oil
1½ pounds baby bella mushrooms, or white button mushrooms, sliced
½ teaspoon salt
2 large shallots, sliced thinly
2 - 3 cloves fresh garlic, minced finely
1 tablespoon fresh thyme leaves
½ teaspoon finely ground black pepper
1¾ cups Madeira wine
2 - 3 quarts unsalted stock (chicken or beef)
oil, as needed for frying chicken cutlets
½ cup all purpose flour
salt, for sprinkling on chicken
--------
¼ cup water
2 tablespoons cornstarch

A day or two ahead, slowly simmer the 2 - 3 quarts of stock down to just 1½ cups, cool, cover and refrigerate until needed.

Earlier in the day (if time will be an issue) heat a large skillet and add in the tablespoon each of olive oil and butter and add in the mushrooms and the half-teaspoon salt. Stirring often, saute the mushrooms. First, they will begin to release a huge amount of water. Cook past this, allowing all the liquid to evaporate and the mushrooms to begin browning. Now add in the shallots and continue to cook, stirring often, until the mushrooms are nicely browned and the shallots are very soft. Add in the garlic, pepper and the thyme leaves and toss well, until the garlic is fragrant. Add in the Madeira wine and raise the heat, then cook, stirring, until the wine has reduced to a thick, glossy paste in the pan. Remove from heat and set aside.

When ready to proceed with the recipe, heat another large skillet with some of the extra oil. Sprinkle all the chicken cutlets with a little salt on each side, then lightly dredge each cutlet in the flour. Fry the cutlets until they are done to 165 degrees internal temperature at the thickest parts of the meat, and remove them to an oven safe tray and keep warm, at the lowest oven setting.

Add the reduced stock to the pan with the mushrooms and set back on the heat. Cook the stock down slightly more. Stir together the water and cornstarch and pour into the pan and stirring quickly, cook until the mixture thickens just slightly. Taste for seasoning and adjust if needed. [If you choose to do the chef-like finish, you can also whisk in a couple of tablespoons of butter, just before adding the chicken. I had planned to do this and completely forgot!]

To serve, set each of the chicken cutlets into the mushroom sauce, turning to coat with sauce, then set on a platter. Serve extra mushroom sauce on the side.

~~~~~~~~~~~~~~~~~~~~~~~

Roasted Garlic, Parmesan, Risotto, recipe
Roasted Garlic & Parmesan Risotto

As for the risotto, 

I sort of followed a recipe from Kylee Cooks, but made some of my own adjustments. I made my own stock, and it was from beef bones, not chicken or vegetable stock. I used large shallots rather then onion. I also roasted a head of garlic to nicely tender and light brown, then extracted all the garlic and passed it through a garlic press to remove anything hard or clumpy, then used it all in the dish. If I made this recipe again, I believe an added cup of the stock would have been better. The rice just was a little more "al dente" than I was truly comfortable with, while eating. Flavors were wonderful.


Roasted Garlic & Parmesan Risotto


Serves 6 - 8

Roasted Garlic, Parmesan, Risotto, recipe
Roasted Garlic & Parmesan Risotto

1 head garlic
1 pinch fresh thyme leaves
1 teaspoon olive oil
--------
1 tablespoon olive oil
1 tablespoon unsalted butter
2 large shallots, chopped finely
1½ cups arborio rice
⅓ cup dry vermouth, dry Sherry or other dry white wine
4 - 5 cups hot beef, chicken or vegetable stock
1 cup freshly grated Parmesan cheese
¼ cup parsley, finely minced

Earlier in the day (or up to three days in advance), preheat the oven to 400 degrees. Clean a head of garlic, slicing a bit of the root end off so it will set straight. Cut off about a quarter-inch from the top of the head. Any little tips of the garlic that were cut off, remove from their papery skin and set atop the cut top of the head. Place the head of garlic onto a piece of aluminum foil and wrap foil up around the head, leaving the top open. Set the pinch of fresh thyme leaves on top, then the teaspoon of olive oil, then pinch the top closed. Set the garlic in its little packet into an oven-safe ramekin and bake for 40 to 45 minutes. Once done, cool, then press out all the garlic into a small bowl. Either mash or pass through a garlic press. Cover and refrigerate if not using that day.

To Make Risotto: Heat a saucepan with the 4 - 5 cups of stock and have nearby. Heat a 4 - 6 quart saucepan and add in the tablespoon of oil and butter. Saute the chopped shallots until very soft. Add in the roasted, pressed garlic, and stir well, then add in the rice. Stir well to coat all the rice grains with the oil and butter. Pour in the dry vermouth and cook quickly until the vermouth (or other wine) is completely evaporated. Begin adding in the hot stock, one ladle full at a time, stirring the rice until each ladle of stock is absorbed. To use all the stock should take about 20 to 25 minutes. Be sure to leave a little bit of the liquid in the rice after the last ladle full of stock has been added.

When ready to serve, stir in the Parmesan cheese and the parsley, reserving a bit of parsley as garnish on top.


My passion is teaching people how to create a harmony of flavors with their cooking, and passing along my love and joy of food, both simple or exotic, plain or fancy. I continue my journey in ethnic and domestic cuisines, continuing my journey to explore diverse culinary experiences and hopefully to start you on a journey of your own. Join me also at A Harmony of Flavors on Facebook, and Pinterest.

Sunday, September 1, 2019

Remembering Grandma

Yesterday I wrote about my paternal grandmother and her amazing baking skills, her strudel, kifli, and so many other wonderful things. Her soup, noodles and machanka were sufficient to keep me happy, also, for sure. 

grandmother, family, recipes
Grandma Pramik
Today I would like to talk a bit more about my maternal grandmother. Firstly, she was deaf, since early womanhood, due to an illness, so it made it difficult to ever just sit and chat with her. That just didn't happen without shouting. Most of my memories of Grandma, outside of cooking, were of watching her crochet, as in this picture here, taken in our back yard, circa 1955. She crocheted long, dripping lacy edges on pillowcases, multitudes of doilies, some of which I still have, and lovely edges on handkerchiefs. I do not have a lot of food memories from Grandma Pramik, but the things I do remember are things I love to this day. Her Apple Cake, which I tried to approximate, as I have no recipe, left indelible memories. Her bread, the same recipe that my Mom made, one I have altered over time, with equally great results, was phenomenal. And her Slovak Rolls. For some reason, my recollection was that her rolls were called Kolach. Then later on, it seemed I must have made a mistake on that word. But by whichever name one calls those amazing rolls, made only at Christmas time, they were something I looked forward to with just as much anticipation as to my paternal grandmother's strudel!
 
Grandma, Crochet, Handkerchiefs
Grandma's Crocheted Handkerchiefs

I have dedicated significant time over the years to trying to find out what these rolls might have actually been called in Slovak, to see if the word sounded familiar to me. While Grandma and Grandpa Pramik came over from Slovakia, also in the early 1900s, they spoke Slovak less often than English, though I do recall them speaking Slovak, and having little magazines in Slovak around their house. Well, I finally found the names for the nut and poppy seed rolls in Slovak, but there are no bells resounding in my head, so who knows at this late date? Just for informational purposes, in Slovak, the poppy seed rolls are called Makovnich and the nut rolls are called Orechovnik.


Slovak Rolls, Poppy Seed, Nut, ethnic, dessert
Slovak Rolls - Poppy Seed and Nut

I know that my Mom's Holupki (Cabbage Rolls) came from her mother, though I cannot get my memory to recall sitting at her table to eat them (I didn't like them at all as a child, so likely I blocked that memory!). I do love them today, and make them at least once a year. Chicken Paprikash also came from Grandma Pramik, though when I read recipes that are from Europe, the recipe is made differently. I suspect that during the Depression, as Grandma and Grandpa Pramik lived in the city as opposed to on a farm, they would have had less access to richer foods like sour cream and other things. I believe this may have influenced the way she made her foods, such as her Chicken Paprikash, which I still make her way, today. Another memory is of Grandma's cookies. She made these little cookies that were like a wafer on the bottom, with a puffed up top, always sprinkled with those multicolored hard nonpareils. I have actually made these before, but long before I started taking photos of everything I make, so I do not yet have photos. One day soon, I will make them and set the recipe out here in my blog for posterity. 
Poppy Seed, Slovak Rolls
Poppy Seed Rolls

The recipe for Poppy Seed and Nut Rolls that follows, was given me by my Aunt Mary, and is not actually Grandma's recipe, though from this remove, I cannot distinguish any difference. They are amazingly good! One caveat is that the poppy seed must be ground for this recipe for the correct consistency. It would be impossible to get the poppy seed to stay in place, otherwise. I have a little poppy seed grinder that I use, and it takes a fair amount of muscle. It is not easy to grind poppy seeds, and I know no better way to do this. For the nut rolls, simply use a fine grinder or grater. If using a food processor, the important thing is not to over-process. You do not want nut butter for this.

Slovak Rolls

Poppy Seed, Nut, Rolls, Slovak Rolls, ethnic
Poppy Seed and Nut Rolls

Makes 6 rolls

DOUGH:
1 cup milk
2 packets dry yeast
1 cup unsalted butter
7 cups all-purpose flour
1 cup sugar
1 teaspoon salt
3 eggs, beaten
½ pint sour cream (1 cup)

FILLINGS: (1 - 2 Cups Per Roll)

Nut Filling: 

6 cups walnuts, ground (about 1½ lbs)
Spreading filling, dough, rolling
Spread filling evenly over surface of dough before rolling
Grinder, Poppy Seeds
Grinding Poppy Seeds
⅓ cup melted butter
1½ cups sugar
2 teaspoons vanilla
milk, just enough to dampen

Poppy seed Filling:
1 pound poppy seed, ground fine
¼ cup unsalted butter, melted
1 cup sugar
1 teaspoon vanilla (up to 2 tsp)
milk, enough to moisten
raisins (optional)

Make Dough: Scald milk; cool to lukewarm (90 to 110 degrees). Sprinkle in the packets of yeast and let stand until bubbly. Cut the butter into the flour, as for pie dough. Add the sugar, salt, eggs, sour cream and the yeast mixture. Knead till smooth and elastic. Wrap in plastic wrap and put into a plastic bag and REFRIGERATE OVERNIGHT.

Next day, cut the dough into 6 equal parts. Roll each to about ⅛-inch thick on a floured surface (about 12 x 12 inch square). Brush dough with melted butter. Spread with filling of choice. Roll up, place on greased baking sheet, seam side down. Cover and let rise for 1 hour. Brush with milk. Bake at 350 degrees for 30 to 35 minutes.

MAKE FILLINGS:

For Nut Filling, combine all ingredients and use just enough milk to moisten the filling to dampness. Makes enough for 3 rolls.

For Poppy Seed Filling do the same. If using raisins in the poppy seed filling, rinse them in hot water, drain, and sprinkle over the filling once spread on the dough. Makes enough for 3 rolls.


My passion is teaching people how to create a harmony of flavors with their cooking, and passing along my love and joy of food, both simple or exotic, plain or fancy. I continue my journey in ethnic and domestic cuisines, continuing my journey to explore diverse culinary experiences and hopefully to start you on a journey of your own. Join me also at A Harmony of Flavors on Facebook, and Pinterest.

Saturday, August 31, 2019

European Family Recipes

My background, Slovakian (Czechoslovakia at the time) on my Mother's side and Northern Serbian (Yugoslavia at that time) on my Father's side, has influenced the way I've eaten since birth. I grew up eating certain things, certain ways, and those have stayed the same all my life, where possible. Due to constant warring through the centuries, these eastern European countries have been overrun repeatedly and have changed hands, so to speak, ethnicities overlapping and influencing. So it is that many of the recipes that come down from both parents sometimes almost overlap.

My Mom and Dad both made what their parents called Chicken Paprikash, though the styles were quite different. My paternal grandmother made strudel filled with poppyseeds, or nuts, and sometimes other things, while my maternal grandmother, instead of the very fine and delicate strudel dough, made Slovak Rolls, an enriched bread-like dough that was filled with poppyseeds, or nuts. Similar, but different. Sometimes, like with the "paprikash," the name of the dish overlaps, and sometimes the dish is just very similar but called differently. 

In this blog, I want to set out a couple of recipes from my North Serbian Grandmother: Machanka (or Tomato Gravy) and Kifli, little flaky fruit filled Christmas pastries), plus two filling varieties.  

grandmother, ethnic, recipes
Grandma Hromish
Firstly, a little bit about my North Serbian Grandma Hromish. Grandma was married in Kucur, Bačka, Vojvodina at age 15, yet still brought her knowledge of cooking and baking with her. Her pastries were legend; flaky Kifli, nut pita, strudels (that I sadly, have not learned to make) of many varieties and others I have no access to at this late date. She arrived in the US with her first two children in the early years of the 1900s. Grandpa arrived a bit earlier than Grandma. They settled eventually in Ohio, around Celina, and farmed. Grandpa died before I reached two years of age, so I never knew him, but I know they had chickens and eggs and grew vegetables, something my Dad always loved doing. My father was born in Celina, the first of their children born in the U.S.

From Grandma I learned to love saffron, as her house smelled of saffron most Sundays as we went to her house for dinner. Soup simmering on the stove, lovely golden from the saffron, with beef or chicken simmering away. She always made homemade noodles and those were always a treat. After serving the soup and noodles, she would  Serve the meat from the soup, with more noodles and machanka. I am fairly certain that the word "machanka was actually spelled mačanka; the little mark above the "c" making the sound of "ch," as with the District mentioned above: Bačka. I grew up eating machanka often. It is a sweet sour kind of tomato gravy, eaten with the meat that had been cooked in the soup. This was standard. Later on, as the internet took off, I tried to find any kind of reference to machanka, and the only thing I ever found was a brown gravy, and certainly not Grandma's version. I finally fond only one reference to a tomato based gravy years later. This is similar to that machanka my Grandma made. In flavor, it fits with my memory, though I cannot say how authentic it is.

Machanka, chicken, noodles, recipe
Machanka with chicken and noodles

Machanka 


Makes about 2½ cups


2 tablespoons bacon grease
2 tablespoons all-purpose flour
1 can (6 ounces) tomato paste
2 cups water
1 tablespoon white vinegar
1 tablespoon sugar
½ teaspoon salt
freshly ground pepper, to taste

In a skillet heated over medium heat, melt the bacon grease and add in the flour, stirring until it is bubbly, figure 1. Off heat, add in the tomato paste (my mom used a large jar of tomato juice rather than the tomato paste and water), figure 2, and stir, mixing thoroughly with the roux, figure 3. Slowly, stir in the water until the whole mixture is smooth, figure 4, and set over the heat to cook until boiling and allow it to cook, stirring constantly until the mixture is thickened and bubbling. Add in the vinegar, sugar and salt, and as much pepper as you choose. Cook for another few minutes to ensure all the raw flour is cooked through, figure 5. Serve over boiled beef or chicken and noodles.

step by step, Machanka, ethnic, gravy, sweet sour
Making Machanka

~~~~~~~~~~~~~~~~~~~~~~~~~~~~~~~~~~~~~~~~~~~

Kifli


I remember these mostly at Christmas, though I know Grandma made them for other special occasions also. They are best if made using fillings made from scratch, as the fillings stay put. If using store bought fillings, they tend to run out. I have two filling recipes below.

Makes about 100 little pastries
Kifli, Prune filling, Apricot Filling
Kifli with Prune or Apricot Filling


1½ tsp instant dry yeast (½ pkt)
3 cups flour
¼ pound lard
¼ pound unsalted butter
1 egg, whisked
¼ cup whipping cream, or heavy whipping cream
¼ cup evaporated milk
½ cup Poppy seed filling, Prune “Lekvar" or

      Apricot fillings are common
Confectioner's Sugar, for rolling and sprinkling

Mix instant dried yeast into flour. Work in the lard and butter as for pie dough. Add egg and cream and work with hands just until the dough pulls from sides of the bowl. Do not over mix.

Sprinkle your work area with powdered sugar and roll out a portion of the dough. Cut dough into 3-inch squares. Fill these small squares or circles by placing ¾ teaspoon of filling of your choice in the center. Bring up opposing corners, dampen the edge with milk or cream and pinch together, then fold the pinched piece over to ensure they stay closed while baking. Bake on parchment lined cookie sheets for 15 to 18 minutes at 375 degrees. Bottoms will be golden and tops will just start to become golden color. Remove from oven, place on a rack to cool and sprinkle with more confectioner's sugar just before serving. 


Prune Butter or "Lekvar"


Prune Butter, Lekvar recipe
Prune Butter or Lekvar
Makes approximately 1½ cups
1½ cups pitted prunes

⅔ cup water
1 teaspoon grated lemon zest
3 tablespoons lemon juice

⅓ cup brown sugar
Place all ingredients into a saucepan and bring to a boil. Reduce the heat, cover and simmer for 25 to 30 minutes, until most of the water has evaporated. Cool slightly; pour into a food processor. Process until just smooth. Store any unused portions in the refrigerator.


Apricot Filling


Apricot, Filling, recipe
Apricot Filling
Makes approximately 1½ cups

1½ cups dried apricots (pitted)
⅔ cup water
1 teaspoon grated lemon zest
3 tablespoons lime juice

⅓ cup granulated sugar

Place all ingredients into a saucepan and bring to a boil. Reduce the heat, cover and simmer for 25 to 30 minutes, until most of the water has evaporated. Cool slightly; pour into a food processor. Process until just smooth. Store any unused portions in the refrigerator.


My passion is teaching people how to create a harmony of flavors with their cooking, and passing along my love and joy of food, both simple or exotic, plain or fancy. I continue my journey in ethnic and domestic cuisines, continuing my journey to explore diverse culinary experiences and hopefully to start you on a journey of your own. Join me also at A Harmony of Flavors on Facebook, and Pinterest.

Friday, August 30, 2019

Little Indulgences

For Little Princesses

These little chocolate mice are just cute as can be and with school functions, Hallowe'en and other things coming up, these are at least possible to make gluten free. The bodies are made and frozen, so they can be made ahead, to a point. I had to make them gluten free for a museum function called a Princess Party. Little girls were invited to dress as their idea of a "princess," though the purpose of this function was to talk about how actual princesses are to behave, such as how to wave properly, how to sit, and other things. It was such a smash hit as a function, they had to have a second go at it, as so many children applied there wasn't enough room! I made these chocolate mice the first time, more as a decoration to the plates of goodies I had created, but every little girl wanted one, and some were gluten intolerant. For the second Princess Party, I made plenty of these little mice and they all went!
Chocolate Mice
Chocolate Mice

This recipe is a bit more complex, and requires quite a few extras and tools, so have these things handy when starting:
  • Chocolate cake and plain white icing, separately (gluten free, if needed)
  • Sliced almonds, for ears
  • Mini chocolate chips, for eyes and nose
  • red licorice for tails (gluten free licorice, if needed)
  • 1 or 2 packages of chocolate bark for dipping
  • Wooden skewers or two-tined pickle fork
  • Waxed paper
  • Clean tweezers
This recipe for chocolate cake works excellently using gluten free flour (I used Namaste brand, at the time, though now I have my own blend, here). The baked and cooled cake and the following recipe for a very small amount of icing are beaten together to make the form-able mixture for the bodies of the mice.

If you do not need these to be gluten free, simply use your favorite 2-layer chocolate cake, baked and cooled.


Chocolate Cake (Gluten Free)


Chocolate, Mice, dessert, confection
Chocolate Mice
Enough for about 40 to 60 mice, depending on size

2 cups Gluten-Free flour (I used Namaste brand)
2 cups sugar
1 teaspoon baking soda
1 teaspoon salt
½ teaspoon baking powder

½ teaspoon Xanthan Gum
¾ cup water
¾ cup buttermilk
½ cup unsalted butter, room temperature
2 eggs
1 teaspoon vanilla
4 ounces unsweetened chocolate, melted and cooled

Heat oven to 350 degrees. Grease two 8-inch round pans. Line the bottom of the pans with parchment. Measure the flour, soda, baking powder, Xanthan Gum and salt into a bowl and whisk to blend. In a standing electric mixer, beat butter and sugar until creamy, then add in the eggs and vanilla and beat well. Pour in the melted chocolate and mix. Combine the buttermilk and water. Add the dry ingredients, alternately with the liquid ingredients, until completely mixed. Pour evenly into prepared pans. Tap pans once or twice sharply on counter top, to release air bubbles. Bake for 30 to 35 minutes, until a toothpick inserted in the center comes out clean. Set aside to cool.


Cream Cheese Icing Binder


3 ounces cream cheese
2 tablespoons unsalted butter, softened
1 cup confectioner's sugar
3½ ounces semisweet chocolate, melted and cooled


Combine the cream cheese and butter in an electric mixer. Add in the confectioner's sugar and the melted chocolate to combine. 

Break the two cake layers into pieces and drop them into the bowl with the icing and beat to combine, until the mixture is pliable and works like soft clay.


Chocolate Mice

Chocolate, Mouse, dessert, confection
Chocolate Mouse

One recipe chocolate cake, above
one recipe Cream cheese Icing Binder, above
List of ingredients above
  
With your hands, pull out about ⅓ cup portions of the modeling cake mixture and form into oval shapes, working to form a point at one end (the nose), while rounded at the other. Set two almond slices into the end towards the point, as ears. Cut sections of the licorice about 5 inches long. Push one end of the licorice into the rounded end of the mouse for a tail. Set onto parchment or waxed pper lined baking sheets to freeze.

Once the bodies are frozen, it is easier to work with the dipping. (While it is tempting to want to use chocolate chips to melt for the dipping of the mice bodies, do not do this unless you are very conversant with tempering chocolate. The coating will not set properly otherwise, making them a true mess to handle.) 

Melt the chocolate bark in a double boiler set over, not in, simmering water. Once melted, bring out a few of the mice at a time. Stick a long skewer or pickle fork into the back end of the mouse, below the tail. Have a second skewer or other long, thin implement handy. With a small ladle, drizzle the melted chocolate bark over the mouse, turning as necessary to cover all sides, including the almond ears. Using the second skewer, slide the mouse off the skewer onto waxed paper to dry. Using tweezers, while the chocolate bark is still wet, place two mini chocolate chips for eyes, and one for the nose. Makes about 40 to 60, depending on size. 

Best if stored in the refrigerator to keep them firm.


My passion is teaching people how to create a harmony of flavors with their cooking, and passing along my love and joy of food, both simple or exotic, plain or fancy. I continue my journey in ethnic and domestic cuisines, continuing my journey to explore diverse culinary experiences and hopefully to start you on a journey of your own. Join me also at A Harmony of Flavors on Facebook, and Pinterest.

Disqus