Translate

Friday, November 30, 2012

Precious Poppy Seeds

Do you like poppy seeds? It seems that people either love them or hate them, with not much in between. I grew up with poppy seeds as a recurring theme since earliest childhood. My whole family knew and eagerly awaited the desserts my grandmothers made. My grandparents were from east central Europe, and poppy seeds were a large part of desserts of that culture.

Bobalky: remembering Dad and Grandma with love
Yesterday I made Bobalky.  For those who don't know, you have to love poppy seeds to love Bobalky. It is a traditional Christmas-time dessert that my paternal grandmother made each year. In effect, it is bread made into tiny balls, soaked first in water to enhance the ability to soak up the honey that goes in, and all the ground poppy seeds; the "icing on the cake," so to speak.  For anyone not of the family, we usually get turned up noses, upon seeing this for the first time.  For our family, it is just plain delicious.  I know it isn't Christmas yet, but I was making bread anyway, so I used a part of one loaf to measure and be able to put the recipe down on paper - possibly for the first time in our family's history. I wanted it to be available, should anyone want.

Soaking the little balls of bread
My Mom used a shortcut with "Solo Poppy Seed Filling". Unfortunately, the filling is already sweetened, so adding honey makes it sweeter still. Honey is an essential flavor in this dessert. I cannot really say how much of the poppy seed filling is needed to make Bobalky that way. The recipe is truly simple. The only problem is that it requires ground poppy seeds. Poppy seeds are very hard.  It is not terribly easy to grind them unless you have a poppy seed grinder. In Slovak areas of the country, such as eastern Pennsylvania, ground poppy seeds are easy to find in the grocery stores. Other places?  Not so much. Thus, having to rely on commercial poppy seed fillings, with the poppy seed already ground.

Happily, I own a poppy seed grinder. I ground up a small amount yesterday to make my sample and write down the recipe. Did you know that ¼ cup of poppy seeds only weigh ¾ of an ounce?  Amazing. There are about a million seeds in one pound! I will be grinding about a million seeds very soon, when I make my Slovak Rolls for Christmas.  Those are from my maternal grandmother's side of the family, and the other poppy seed Christmas treat. For now, I wanted to share my memory of having Bobalky each year, and carrying on treasured family traditions, with love.


Bobalky


10 ounces frozen bread dough, thawed
1/4 cup (3/4 ounce) ground poppy seeds
1/3 - 1/2 cup honey

Once the dough is thawed, begin separating out sections and rolling into a 1/2 inch thick log. Cut the log into 1/2-inch segments and set them on a greased baking sheet to rise. Allow about 1-inch of space between the pieces, for rising. Set them aside in a warm place to rise and once doubled, bake them in a preheated 350-degree oven for 10 to 12 minutes, or until golden.
 
Immediately turn the little balls into a large colander and set the colander into a large bowl. Run hot water over the balls, tossing repeatedly with hands or a silicone spatula. Very gently, squeeze the balls just until you can feel the air starting to leave them. This ensures they will absorb enough water. They should be very soft. Dump the wet bread balls into a bowl and add in the ground poppy seeds and the honey, to taste. Toss until combined. Enjoy! 


My passion is to teach people how to create a harmony of flavors with their cooking, and help pass along my love and joy of food, both simple and exotic, plain or fancy. I continue my journey in ethnic and domestic cuisines, trying new things weekly. Join me at A Harmony of Flavors on Facebook and Pinterest.

Tuesday, November 27, 2012

A Decadent Dessert for the Holidays

I have been a little lax about getting posts out but this will surely make up for it. There is a cheesecake I have been making every year since I discovered the recipe. The original recipe for Chestnut Cheesecake was found online a long time back, but it has been altered so much it is not the same recipe. Similar, perhaps, but not the same at all. I changed things each year for the first three years. And now, I am happy with the outcome, so I hope you will be, too.
chestnut paste, sweetened chestnut paste, cheesecake
Chestnut Cheesecake


There were a lot of items necessary to make this dessert happen. Finding chestnut products can be difficult, depending on where one lives. If you have a nice gourmet grocery anywhere nearby, you are in luck. Otherwise it is an online project to find the ingredients.


Please do not let this deter you, because while the cheesecake is not inexpensive to make, it is most wonderfully flavored, and so very seasonal.

The recipe itself, once the ingredients are assembled, is no different from most cheesecakes. Make the crust and bake it and allow to cool. Mix up the cheesecake batter. Bake. Simple. Except for the magnificent finished product. Nothing at all simple about it. It is simply, extravagantly, spectacular.

Chestnut Cheesecake

Chestnut Cheesecake
Makes 12 to 16 servings

ALMOND CRUST
1 cup whole almonds, unblanched
2 tablespoons sugar
1/8 teaspoon almond extract
2 tablespoons unsalted butter (¼ stick), room temperature

FILLING
2 (8-ounce) tins sweetened chestnut paste/puree (see notes)
4 ounces chestnuts, or more, to taste, preferably vacuum-packed, whole, precooked and peeled
16 ounces cream cheese, room temperature
⅓ cup sugar
1 teaspoon vanilla extract
2 large eggs plus 1 egg yolk

TOPPING
1 cup chilled whipping cream

MAKE CRUST: Preheat oven to 375 degrees. Blend whole unblanched almonds, sugar, and almond extract in a food processor until almonds are coarsely chopped. Add unsalted butter and process until almonds are finely chopped. Press almond mixture firmly onto bottom and 1-inch up sides of an 8-inch diameter spring-form pan with 2½-inch sides. Bake the crust until light brown, about 12 to 15 minutes. Transfer crust in pan to a rack to cool. Reduce oven temperature to 300 degrees.

MAKE FILLING: If using whole water packed chestnuts, drain chestnuts thoroughly first, or use vacuum-packed chestnuts: Cut enough chestnuts into ¼ to ½-inch pieces to measure 1 cup; place these scattered over the bottom of the cooled crust and set aside. Reserve remaining chestnuts for topping. Using electric mixer, beat room temperature cream cheese, sugar and vanilla extract in a medium bowl until very smooth. Beat in eggs and yolk, one at a time. Add in the sweetened chestnut paste and mix well. Spoon cream cheese mixture over the chestnuts in the crust. Place spring-form pan on a baking sheet.

Bake cheesecake until center is just set, about 45 minutes. Cool cheesecake 30 minutes. Chill uncovered until cold, about 3 hours, then cover. (Cheesecake can be made 1 day ahead. Keep refrigerated.) 

MAKE TOPPING: Cut around sides of pan to loosen cheesecake; release pan side. Beat whipping cream in a medium bowl until firm peaks form. Spoon cream into a pastry bag fitted with medium star tip. Pipe rosettes of cream around the edge of cake. Place one reserved chestnut piece on each rosette.

NOTES:  This cheesecake may not be inexpensive, but it is so heavenly that I believe (for a special occasion) it is well worth it! 

Where to find the Sweetened Chestnut Paste? Be advised that Chestnut Puree and Chestnut Paste seem to be synonymous, and labeling from other countries does not differentiate between sweetened and unsweetened. Read labels carefully! Often, online there are places where you can read a label. The brand I have gotten most often is Clement Faugiere (sweetened), and I know that brand works well (17.6 ounces for around $11.50 at Amazon.com). Some people online suggested finding whole vacuum-packed chestnuts at Asian markets. Someone else said they carry them at Fairway markets. Anyone lucky enough to have access to Williams Sonoma can usually get the vacuum jar of whole, peeled chestnuts.


My passion is to teach people how to create a harmony of flavors with their cooking, and help pass along my love and joy of food, both simple and exotic, plain or fancy. I continue my journey in ethnic and domestic cuisines, trying new things weekly. Join me at A Harmony of Flavors on Facebook and Pinterest.

Sunday, November 25, 2012

An Easy to Make Comfort Meal

I have been making this dish since long ago, when as a busy mom working 2 jobs, I needed something that gave me time to get ready for my second job, yet provide my children with a nourishing meal. This came about as a fluke, throwing things together in a large skillet, and hasn't really changed since then. I always grow as many herbs as my yards would afford space, so I usually have thyme, basil, rosemary, sometimes parsley and sage. If I have more space, I really go to town with whatever herbs I can find. Since thyme is always in my garden, no matter where I have lived, that is always a part of this dish. It is now an integral flavor. Since most groceries these days carry thyme fresh, I can make this meal even in winter.


All ingredients (except peas)
in the pan and set to cook
I have had to think of what to make on the fly, and do not always have a meat thawed out. Hamburger at least, can be fry/cooked from frozen in just a few minutes. Place the frozen block into the skilet with some oil, and allow the bottom to brown, flip it over and scrape off the browned part, let it continue to brown on that opposite side and flip it over and scrape off the browned parts. And so on, until the meat is cooked, making sure to break it up as it is scraped off the frozen block.  If you are lucky enough to have planned ahead and have the hamburger meat thawed already - well, you're one step ahead of the game. I have been making this dish since the 1980s, and never took a photo of it.  Today I made this meal again, and this time I did get photos.  Above left is a photo of the large skillet with all the ingredients, minus the peas, ready to cook.  The peas go in for the last few minutes to heat through.  Here is the recipe:


One Skillet Hamburger Meal

One Skillet Hamburger Meal

Makes 6 to 8 servings

1 pound lean hamburger meat

1 tablespoon olive oil
1 onion, chopped
2 cloves garlic, minced
1 large carrot, thick grated
2 stalks celery, chopped
1/2 green pepper, chopped
1 cup green beans, cut across into 1/4 inch pieces, optional
1 can corn, drained (I use the cans with 50% less sodium)
1 cup rice
3 tablespoons Worcestershire sauce
1/2 to 3/4 cup ketchup
1 to 2 bay leaves
1 - 1 1/2 teaspoons salt (depending on the can of corn)
Freshly ground pepper, to taste
1 or 2 large sprigs thyme, left whole
1 cup frozen peas


Brown the hamburger in a very large skillet. As it nears being completely browned, add in the onion and toss well; allow to cook, stirring occasionally for about 5 minutes more. Add in the garlic, carrot, celery, green pepper, green beans and corn; toss well. Add in the rice and the Worcestershire, ketchup, bay leaves, salt and pepper and mix until all is combined. Nestle the thyme sprigs into the mixture and add 2 cups water (to almost cover). Bring to a boil, lower heat and cover, maintaining a simmer for about 45 minutes. Add in the frozen peas just as the rice is tender and cover for about 5 minutes until the peas are warmed through. Remove thyme and bay leaves and discard.


Naturally Gluten Free, Too

Since becoming aware of the perils of gluten for so many people, I am also happy to report that this dish, made with fresh vegetables, meat and rice, a can or corn, frozen peas. The only sticklers were looking at the ketchup and Worcestershire bottles. Lea and Perrins Worcestershire has no gluten in its ingredients, and Hunts Ketchup is now made gluten free, also.


My passion is to teach people how to create a harmony of flavors with their cooking, and help pass along my love and joy of food, both simple and exotic, plain or fancy. I continue my journey in ethnic and domestic cuisines, trying new things weekly. Join me at A Harmony of Flavors on Facebook and Pinterest.

Tuesday, November 20, 2012

Warming Soup on Cool Days

When the air turns chilly, we think of soups and stews and other heartier dishes too overwhelming for the summer. I have had a soup on my mind for a while now and finally, today I made it. I thought up the combination a lot of years ago, but it has been a long while since I actually made it. Life gets in the way sometimes, and I tend to forget how good a dish is, and let things just slide. It had been sliding for far too long.

Today I said to myself, "This is the DAY!"  I had a hambone.  I bought a ham recently just so I would have a hambone left.  The soup is a variation of split pea and ham.  I call it:

Split Pea, Vegetable and Ham Soup


Split Pea, Vegetable and Ham Soup
1 leftover ham bone with about 1 pound meat left on - OR -
(2 - 3 meaty smoked ham hocks)
1 large onion, chopped
2 - 3 celery stalks, chopped
2 large, or 3 medium carrots, sliced and roughly chopped
1 medium potato, peeled (or not, as desired) and cut in small dice
6 - 8 cups water
1 (1-pound) bag dried split peas
1 box chopped frozen spinach

Directions: In a large soup pot, place the hambone with meat, onion, carrot, potato and celery. Pour in water to nearly cover the ham bone or hocks; about 6 - 8 cups. Bring to a boil, reduce heat and simmer slowly for about 1½ - 2 hours. The meat should be getting tender. Add the bag of split peas and cook until the peas are mostly disintegrated; about an hour. Remove hambone or hocks and remove as much meat as possible and return meat to the soup. Add in the package of frozen spinach and allow to completely heat through. Stir well to disperse the spinach. Serve hot with some nice crusty bread, or corn muffins. Serves 8 or more as a main meal.

NOTES: This recipe can be made with yellow split peas, also. No salt is needed in this recipe, as the ham bone or hocks are salty enough to season the soup. All the ingredients could easily be placed in a large crock pot and slow-cooked all day. It can also be placed in a large heavy Dutch Oven, or enameled cast iron pot and slowly simmered on the stove or in the oven, on whatever temperature maintains a simmer.


The addition of all the vegetables and the spinach makes this soup visually appealing; moreso than if it was just split peas and ham. I just ate my bowl of soup and it really was all I remembered. Just thick enough, just the right amount of salt, plenty of meat, excellent flavors and lots of vegetables. Try this out on a chilly day; it is such an easy recipe.


My passion is to teach people how to create a harmony of flavors with their cooking, and help pass along my love and joy of food, both simple and exotic, plain or fancy. I continue my journey in ethnic and domestic cuisines, trying new things weekly. Join me at A Harmony of Flavors on Facebook and Pinterest.

Saturday, November 17, 2012

Pies, and More Pies

Today I wanted to get a shot of a Pecan Pie. In all the years of making pecan pies at Thanksgiving (or any other time), I have never taken pictures. Even when my sister made a pecan pie one Thanksgiving, I only got a shot from a distance. This seems so absurd, to me. That I could eat a food over years and years, and never once take a decent photo. I guess my focus has been different in the past. These days, I am all about taking photos of everything I cook or bake.

My Best Pecan Pie
Okay, I will admit, the pecan pie recipe I have loved best is one that is on the inside of a ceramic pie plate I bought many long years ago. You see them now and then; pie plates with a recipe inside. The only difficulty is to follow the recipe if you forget and line the plate with the pie crust first!  Today, I didn't forget.

I mentioned I have been making this recipe for a lot of years. That said, it always pays to read the recipe! Last year I made this pie, only to have all the pecans sink right to the bottom during baking. It still tasted like a great pecan pie; you just couldn't see the pecans, which explains why I didn't bother taking a photo last year. This year as I re-read the recipe, I realized right away what I did wrong last year. I really whipped the mixture in my Kitchen-Aid, rather than folding in the butter and corn syrup. This time I paid attention to the details.

Another thing.  I realized last night as I planned to make this today - I had no dark corn syrup. Drat. What I did have is Brown Rice Syrup, and Barley Malt Syrup. I used a little of both. I haven't cut the pie yet to taste it, as it was still cooling as I sat to write.  I will report in my next post.  It sure does look good, though.  Here's the recipe, simple as it is.

My Best Pecan Pie

makes one 10-inch pie

1 pie pastry to fit in 10-inch pie plate
3 eggs
¼ teaspoon salt
¾ cup sugar
1 stick (4 ounces / 8 tablespoons) unsalted butter
1 cup dark brown corn syrup 
1½ cups pecan halves

Prepare a pastry for a 10-inch pie; fit to a 10-inch pie plate, crimp edges and set aside.

Heat oven to 375.  Beat eggs with salt until light and lemon colored.  Do not over beat!  Add in, slowly, ¾ cup of sugar and stir to combine.  Melt 1 stick of unsalted butter.  Mix with dark corn syrup.  Fold this into the egg mixture until combined.  Pour into the prepared crust.  Place pecan halves decoratively over the top.  Bake for 40 to 50 minutes, or until set and pastry is brown.


My passion is to teach people how to create a harmony of flavors with their cooking, and help pass along my love and joy of food, both simple and exotic, plain or fancy. I continue my journey in ethnic and domestic cuisines, trying new things weekly. Join me at A Harmony of Flavors on Facebook and Pinterest.

Wednesday, November 14, 2012

Pumpkin Pie - 'tis the Season!

Jamboree Squash
I had some pretty squash, pumpkins and gourds for decoration over the last month, but now it was time to use them. Nice heavy winter squash make very good pumpkin pies. I had gotten a green-blue colored "Jamboree" squash, just like I had last year, and from that squash I made the best "pumpkin" pies I have ever had. The texture is silky smooth, unlike the little pumpkins that no matter what, seem to end up with too much texture. The color of the squash inside is the prettiest bright yellow orange color - something I would not have expected, by looking at the cool outer color.

Yesterday I finally baked the squash (poke a few small holes into the top to let steam escape and bake whole on baking sheet at 375 degrees for 1 hour - for an 8-lb squash) and got all the flesh removed and pureed properly.  I had a little tiny ½-cup left yesterday, so I made some Pumpkin Tapioca Pudding, which was just delicious.  

Pumpkin Tapioca Pudding


Makes 4 servings

2 cups milk (or ½ milk, ½ cream)
½ cup sugar
3 tablespoons instant tapioca
½ cup pumpkin puree
½ teaspoon ground cassia cinnamon
¼ teaspoon salt
¼ teaspoon ground ginger
¼ teaspoon ground allspice

In a saucepan combine the milk, sugar and tapioca and allow to stand for 5 minutes. Add in the rest of the ingredients and bring the mixture to a boil. Reduce heat and continue to cook, stirring, for about 6 minutes until tapioca is cooked and thickened.

To prevent a skin forming over the pudding, either place a piece of plastic wrap directly covering the surface of the hot pudding, or just stir the pudding every 2 to 3 minutes as it cools. Serve with whipped cream and a sprinkle of nutmeg.


Today I made a pie. I was trying out a new recipe I made up.  I wanted to make a 10-inch pie, so I wanted to have enough filling.  I actually ended up using a 9½-inch pie plate, though it is exceptionally deep, so I believe it would be the same filling amount as for a 10-inch plate.  I figure it is better to have a large pie and make less of them.  Here is what I did:

Chris' "Pumpkin" Pie

Chris' Pumpkin Pie


1 single-crust 10-inch unbaked pie shell
2 cups pumpkin or squash puree
2 cups whipping cream (can substitute evaporated milk)
1/2 cup brown sugar
1/2 cup white sugar
1/2 teaspoon salt
2 teaspoons ground cassia cinnamon
1 teaspoon ground ginger
1/2 teaspoon ground cloves
4 eggs, slightly beaten
2 tablespoons Brandy, optional

Directions: Preheat oven to 350 degrees (325 if using convection). With a whisk, hand held mixer or stand mixer, mix together all the ingredients until combined.  Pour into prepared pie shell and bake for about 1 hour and 5 minutes, or until a knife inserted halfway between center and edge comes out clean.

Yum!


My passion is to teach people how to create a harmony of flavors with their cooking, and help pass along my love and joy of food, both simple and exotic, plain or fancy. I continue my journey in ethnic and domestic cuisines, trying new things weekly. Join me at A Harmony of Flavors on Facebook and Pinterest.

Sunday, November 11, 2012

Tea and Scones, Anyone?

Yesterday morning, I made scones for breakfast. I have a recipe I found many years ago, and have since been tweaking here and there, making my own variations.

Golden Tippy Black Tea
I really love scones.  They seem to come in different types; some being quite dry and others a bit more moist.  I am not British, so I have no claim to what they "should" be like, but I like them either way. I don't like the oven quite so hot, and for my recipe variations, I use a temperature about 375. Some time ago I found cinnamon chips from the Bakers' Catalogue and made up a recipe using those chips.  They are not the type of cinnamon chips in a bag at the grocery with all the other chocolate chips, but look more like little hamster pellets, and have a better, clearer cinnamon taste.  To me, these are superior, in the scones.

I have had white chocolate scones before, so I assembled my ingredients.  I had a Ghirardelli White Chocolate bar on hand.  They are 4 ounce bars, so I just roughly chopped the whole bar.  Possibly this was too much, though they were mighty good, regardless.  If you prefer, 2 or 3 ounces would work fine.  I mixed up the scones, using the same basic recipe for the Cinnamon Chip Scones, but found I needed a bit more flour, as the batter was just too wet to handle.  I was really hungry yesterday, also, so I made six scones out of the recipe, rather than the usual eight, and they were large.  It took a little longer in the oven to bake, and I noted that in the recipe. They were so very good, so I know this one is a "keeper," as my husband says.  I present to you:

White Chocolate and Craisin Scones

White Chocolate and Craisin Scones

makes 6 - 8 scones


1 stick cold butter
2¼ cup flour
1 tablespoon sugar
1½ teaspoons baking powder
½ teaspoon baking soda
½ teaspoon salt
1 cup craisins (raspberry flavored would be excellent)
2 - 4 ounces white chocolate, chopped coarsely
1 cup buttermilk or soured milk (1 cup milk with 1 teaspoon vinegar or lemon juice)

Directions: Preheat oven to 375 degrees, or 350 if using convection. Using a larger holed grater, grate the cold butter into a bowl. Sift or whisk together the flour, sugar, baking powder, baking soda and salt. Pour this into the bowl with the butter. Using a pastry cutter, cut the flour and butter together until it is in coarse crumbs. Add in the craisins and the white chocolate and toss to combine.

Add the buttermilk and toss the mixture with a fork until mostly combined. Gather up the dough and place onto a generously floured surface. Fold the dough gently over onto itself about 6 times, patting out between each fold. Form into about an 8-inch circle. With a long bladed knife, cut across the circle either three times (yielding 6 scones) or 4 times (yielding 8 scones). Place these onto a greased baking sheet, with about 1 inch of space between. Bake for 15 to 18 minutes for 8 smaller scones, or 18 to 20 minutes for 6 larger scones, or until golden. 

Mmm-mmm good. Grab a nice cup of your favorite tea and sit back to enjoy.


My passion is to teach people how to create a harmony of flavors with their cooking, and help pass along my love and joy of food, both simple and exotic, plain or fancy. I continue my journey in ethnic and domestic cuisines, trying new things weekly. Join me at A Harmony of Flavors on Facebook and Pinterest.

Sunday, November 4, 2012

Salt of the Earth

I recently published an article about salt; the good, the bad and the ugly. Plain old table salt, like many other food substances we ingest daily, is mass produced and marketed after subjecting what was once a natural product to processes that leave it in a state the body doesn't even recognize as salt. The body reacts to this no-longer-salt product by rushing a water cushion to surround every particle, trying to protect the body from this unknown substance. And meanwhile, the body is craving salt - of the real variety. Purely my own beliefs. I am no doctor or nutritionist.

Some years back, I started having problems with leg swelling.  At least, that was where it was most noticeable, though I was swelling over most of my body.  I tried all sorts of natural diuretics, all with ingredients that would reduce swelling, and they worked, to a point.  The problem was that I kept right on using good old salt from those mass produced canisters from the grocery store, blithely unaware that this was a large part of my problem. This was back in the late 1990s, and somewhere I learned about this process our table salt is subjected to, and looked for natural sea salt as a substitute.  Sea salt was much harder to find back then, but I learned about "Real Salt", which is mined naturally in Utah, from a dried up sea bed. I ordered some and immediately noticed a difference as the swelling went down dramatically. I was just truly amazed!

These days so many varieties of good quality sea salts are available. We have orange colored Palm Island sea salt, Black Hawaiian Lava sea salt, and pink Himalayan sea salt, to name a few. The colors are due to the many trace minerals found with the salts, and also where they are collected. Obviously the Hawaiian Black Lava Salt is influenced by the black lava which is the entire basis of those islands. There are multitudes of countries that produce sea salt naturally, and many of these have differing crystal structures. Some are flat crystals, some are rounder and some more conical. Some are meant more as a finishing salt, to be added just before consumption, although if food is properly seasoned it needs nothing more to finish it off.

I once purchased a box of a dozen or more tiny containers of sea salts from around the world; Israel, Great Britain, France, Australia and many other countries. In the last few years flavored salts have become available. Smoked salts, such as alder smoked (also called "Salish") or hickory smoked, have their distinct place. Others such as lemon, balsamic or chardonnay flavored salts can be used in specific dishes.

While salt was not the only problem underlying my swelling issue, it was certainly a large contributor. I can now buy Real Salt in the bulk bin section of my local health food store, making it far easier to keep it on hand for daily use in cooking or baking, but even before, seeing how much better I felt when using good quality salt, I would just never go back. My husband and I got really interested in salt of many kinds, and he started finding flavored salts and smoked salts. We had so many varieties that I finally bought this tower to have many types right at hand. They are labeled on the other side! I would never be able to distinguish just from looking, between some of the smoked salts, otherwise.


If swelling is an issue, or you are looking for a more natural product or just like to try new things, look for good sea salts from around the world.


My passion is to teach people how to create a harmony of flavors with their cooking, and help pass along my love and joy of food, both simple and exotic, plain or fancy. I continue my journey in ethnic and domestic cuisines, trying new things weekly. Join me at A Harmony of Flavors on Facebook and Pinterest.

Thursday, November 1, 2012

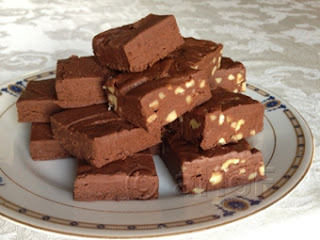
Nutritious Fudge?

Well, maybe it's not totally nutritious, but it sure has one healthier ingredient.  Can you guess?  How about pinto beans?

I found this recipe around 30 years ago. I believe it was a newspaper clipping I kept.  It was at a time when I was looking for how to get more fiber in the family's diet, and what better way than with beans?  I tried this recipe, not telling anyone how I made it. Can you imagine the kids going, "Eeeewwww!" No one knew any difference from any other fudge. This fudge tastes really good, looks fantastic, takes very little time to set up and doesn't require any cooking at all.  All you need is a strong food processor to get the beans nice and smooth and an electric mixer.

Nutritious, Delicious Fudge

Nutritious, Delicious Fudge
1 can pinto beans, drained and rinsed well
1 cup unsweetened cocoa powder
¾ cup unsalted butter, melted
1 tablespoon vanilla extract
2 pounds confectioners’ sugar
2 cups pecans or walnuts, chopped


Spoon the beans into an electric food processor; process until completely smooth.  Add the cocoa, butter and vanilla and blend until well mixed and beans are totally pureed.  Place the confectioners’ sugar in a large bowl.  Add the bean mixture.  Beat at medium speed with an electric mixer for about 3 minutes.  Stir in the pecans or walnuts.  Pour into a buttered 9 x 13-inch pan and refrigerate until set.

I made this fudge just this morning and took photos this afternoon.  I added nuts to half the recipe, and left the other half plain.  I have not fiddled with the recipe, because it is really good.  However, I do believe that since there is a whole tablespoon of vanilla in there, some of that could be swapped out for other flavors, such as orange, or mint.  Nuts could be changed out.  Pistachios might be good with some almond flavoring.  Raisins or craisins could be added in, also. Try it out, just as written the first time, just to get the feel of it.  Then, have fun with all kinds of flavor variations.


My passion is to teach people how to create a harmony of flavors with their cooking, and help pass along my love and joy of food, both simple and exotic, plain or fancy. I continue my journey in ethnic and domestic cuisines, trying new things weekly. Join me at A Harmony of Flavors on Facebook and Pinterest.

Disqus