Translate

Showing posts with label food recipe. Show all posts

Tuesday, March 11, 2014

Spring is Making an Appearance

I live far enough north that I know winter is not over yet. Still, these last few days, with the temps making their way into the 50s is like a little slice of heaven after the winter that has been unlike anything I have experienced in my 64 (almost) years. While yesterday may have just squeaked to about 50 degrees, it is a hefty difference from 24 below. Walking outside in just a light sweatshirt was such a wonderful feeling. With this spring feeling in the air, I decided to dust off the grill and make hamburgers. I also decided that I would make potato salad, since I am also tired of constant oven fries or mashed potatoes.
 
potatoes, potato salad, side dish, summer dish,
Mustard Potato Salad

I have been making my own potato salad - well it seems like forever. I changed my way of making it over the years, until I have pretty much settled on a method of my own. My husband is very pleased with my potato salad, so I relax, knowing what I can do in that regard. We both prefer the mustard style, so that has become a staple. I add a few things that might be different, such as a small amount of capers and olives. My husband will not eat capers or olives. However, if they are very finely minced in a dish, they add wonderful piquancy that would not ordinarily be there. Their flavors are indistinguishable in the finished potato salad, but add something wonderful to the bland potatoes. I also add one little carrot, very finely grated, just to get some little bit of carrot into his diet. He has been unhappy about this choice of mine, as he dislikes carrots, and they are VISIBLE! Shudder! However, after a doctor consult one time, where he was urged to eat more of them, he has let up on that complaint. He may not like it, but...

olive oil, vinegar, salt, pepper, vinaigrette, recipe
Steps 1 & 2 basic ingredients for vinaigrette, with garlic
Another thing I have done over the years is to make a basic vinaigrette, which is a 3 to 1 ratio of oil to vinegar and/or lemon juice. Salt and pepper this mixture and there you have it - it doesn't get easier. Remember when making a vinaigrette, that in order to emulsify the mixture, the oil should be added slowly to the acid and whisked thoroughly before more is added (Steps 1 & 2). This vinaigrette is flavorful in spite of its simplicity, and I mix it into the hot, cooked potatoes. The potatoes absorb this vinaigrette while cooling. The basic vinaigrette would be enough, I am sure, but I am always trying things out to make something just that little bit better. And so, over time, I incorporated the mustard, a clove of garlic, the grated carrot and the capers and olives. You may be wondering about the mayo. For myself, I believe I would be happy with the potato salad as it stands. Not so with my husband, so I do add in mayonnaise, though far less than would be needed if I did not use the vinaigrette. 

If gluten-intolerance is an issue, this recipe can easily be made using vinegar and mayo that fit into your particular diet criteria. The eggs are an add-on, and if eggs cannot be part of your diet, Vegenase can be used for the Mayo part of the recipe. Or, there are many possible egg-free, gluten-free, or vegan recipes for mayonnaise out there. Some use flax as the basis, which sounds interesting to me. Flax becomes gooey and egg-like when soaked. It can be used as an egg substitute in some recipes. Another recipe I saw used sesame tahini as the base. 

All in all, though I did overcook the burgers while attending to something in the house, their flavors were heavenly, and the potato salad was just what I was craving.

Mustard Potato Salad


Makes about 8 or more servings

4 pounds russet potatoes (7 - 9 medium), peeled, cut in 1/2-inch cubes
1 tablespoon salt
Capers, olives, mincing, potato salad
Steps 3 & 4 Capers and Olives, minced

VINAIGRETTE:
¼ teaspoon each salt and pepper
2 tablespoons vinegar or lemon juice
6 tablespoons olive oil
1 clove garlic, minced or through a garlic press

ADDITIONS:
1 carrot, finely grated
2 - 3 tablespoons yellow mustard
1 teaspoon capers, finely minced
6 green olives, finely minced

1 cup mayonnaise, optional
potato salad, flavoring agents, carrots, mustard
Steps 5 & 6 Mixing in the additions
1 - 2 hard-boiled eggs, sliced, optional
Paprika for sprinkling

Place the cubed potatoes in a pan, just covered with water. Bring them to a boil, add in the tablespoon of salt and lower heat slightly. Cook the potatoes until just tender, about 5 minutes, depending on their size.

While the potatoes are cooking, make the vinaigrette (Steps 1 & 2). Read through these steps carefully before proceeding:


  1. In a large bowl, place the 1/4 teaspoon of salt and pepper, then ONE tablespoon of the vinegar. Add in ONE tablespoon of the oil and whisk to combine.
  2. Add in TWO more tablespoons of oil, slowly, whisking to emulsify. 
  3. Add in ONE more tablespoon of vinegar and the minced garlic and whisk to combine. 
  4. potatoes, cooked potatoes, vinaigrette, potato salad, side dish
    Steps 7 & 8 Adding hot potatoes to the vinaigrette
  5. Add in slowly, THREE more tablespoons of oil, whisking constantly to completely emulsify the mixture. This vinaigrette is perfect for any salad, at this point.

Now, mix into the vinaigrette the finely minced capers and olives (Steps 3 & 4), the carrot and the mustard (Steps 5 & 6). Whisk well to combine. Drain the potatoes thoroughly, then pour them into this compound vinaigrette and toss well to completely combine (Steps 7 & 8). Allow the potatoes to cool partially at room temperature, then cover and set them in the refrigerator to cool completely.

Before serving, mix in the mayonnaise, incorporating thoroughly. Pour the potato salad into a clean bowl, top with hard boiled egg slices if desired, and sprinkle on a little paprika for color.

potato salad, mustard flavor, hard boiled eggs
Because this potato salad already had plenty of flavor without the mayonnaise, this could be used for a picnic without the fear of a mayo-based salad going bad. Another option would be to find a small, 8-ounce jar of mayonnaise, keeping it unopened until time to serve the salad at a picnic. If the unopened mayo is also chilled before using, it could keep for slightly longer. 

Any of the additional ingredients past the vinaigrette are completely optional. I do urge you to try the vinaigrette and see how wonderfully it enhances the flavor of the potato salad.


My passion is teaching people how to create a harmony of flavors with their cooking, and passing along my love and joy of food, both simple or exotic, plain or fancy. I continue my journey in ethnic and domestic cuisines, continuing my journey to explore diverse culinary experiences and hopefully to start you on a journey of your own. Join me also at A Harmony of Flavors on Facebook, and Pinterest.

Sunday, February 23, 2014

A Wonderful, Any-Night Supper

Beef Ragout, beef stew, stew, potatoes, mushrooms
Beef Ragout


Beef Stews are so comforting, and especially on these cold nights. There are so many possible ways to combine ingredients to make a stew, and this is just one more. I made this last week some time, and am just getting around to posting it. Looking at the recipe makes me want to go back and make it again.I called this Beef Ragout. Ragout is just a spiced stew of meat and vegetables. That description leaves a whole lot of leeway, and would fit most any beef stew. This one is nothing fancy, and just plain good. It has just the right amount of meat and vegetables, and a lovely flavor. It is hearty and warming and all that one wants from a dish such as this. Because the meat is marinated and then cooked in wine, the resultant sauce is very purple. This is perfectly acceptable for a stew made with wine, but to adjust the color, I used Kitchen Bouquet.

Beef Ragout


Beef Ragout, beef stew, entrees, recipe
Beef Ragout
1.5 pounds beef stew meat, or chuck, in 1 – 2-inch cubes

MARINADE:
1 cup dry red wine
2 cloves garlic, smashed
1½ teaspoons salt
½ teaspoon freshly ground black pepper
1 – 2 bay leaves
1 teaspoon dried thyme leaves, or 2 teaspoons fresh thyme leaves
2 whole cloves

----------
1 tablespoons olive oil
2 tablespoons butter
2 onions, chopped
2 tablespoons flour
2 tablespoons Worcestershire sauce
1 teaspoon Kitchen Bouquet meat coloring
1 large can (13.25 ounces) mushroom stems and pieces, drained
½ - 1 cup water or stock

1 cup frozen peas
4 medium-small potatoes, peeled, cooked in salted water

Early in the day or the evening before, combine all the marinade ingredients in a container with a lid or a zip-top bag. Place the meat into the marinade and toss to coat well. If marinating and cooking the same day, the meat can be left on the counter.
beef ragout, peas, potatoes
Peas added to the cooked stew to heat through


When ready to prepare the stew, remove the meat from the marinade and place on layers of paper toweling to dry. Reserve the marinade. Preheat oven to 300, or whatever temperature will just maintain a simmer.

Have ready a large stew pot or braising pan with tight fitting lid. Heat a large skillet over medium-high heat. Add in the butter and olive oil with the onions. Sauté the onions, stirring until golden but not browned. Remove the onions to the stew pot, reserving any oils in the skillet.

potatoes, beef ragout, stew, entree
Cooked potatoes added in
Add in half the meat cubes and brown them quickly, raising heat if necessary; remove them to the stew pot when done. Repeat with remaining meat cubes. Sprinkle the flour over the meat and onions and toss until the flour disappears. Add in the reserved marinade, Worcestershire, Kitchen Bouquet, mushrooms and water or stock to just reach about half to ⅔ up the meat. Cover the pot and set the pan in the oven for 2 to 2½ hours, or until the meat is tender.
When the stew is done, remove from oven, add in the peas and cover, allowing the peas to heat through. Add in the cooked, cubed potatoes and stir to combine.

My passion is teaching people how to create a harmony of flavors with their cooking, and passing along my love and joy of food, both simple or exotic, plain or fancy. I continue my journey in ethnic and domestic cuisines, continuing my journey to explore diverse culinary experiences and hopefully to start you on a journey of your own. Join me also at A Harmony of Flavors on Facebook, and Pinterest

Thursday, February 6, 2014

There is Nothing Like a Warm Cinnamon Roll...

Cinnamon Rolls, Breakfast, dessert, yeast dough
Cinnamon Roll, ready to eat
Today I was all set to head up to my office and work on my cookbook, when I thought about the cinnamon rolls I saw Mario Batali make on The Chew. He used pizza dough to make them, and while that would probably be good, I decided to try something my own way. Starting with my own pizza dough recipe as a base, I added in some honey for a little sweetness and an egg just to enrich the dough. I also scraped a half vanilla bean into the mixture. 

Once the dough was made, I weighed it. People always seem to give dough by weight; something I had never done till now. The whole batch of dough weighed just about 2.8 pounds.  I allowed the dough only a short rise of 15 minutes, rather than wait for a full "double in bulk." In the 15 minute wait, I made the filling by mixing together 1 melted stick of butter with brown sugar, cinnamon and vanilla.


yeast dough, yeast, cinnamon roll dough
15 minute rise
By the time I finished making the filling and washing the utensils, the dough was ready to work with. At that point I took the dough out and divided it into two sections, rolled, filled and cut, and set the pieces into a pan for another 15 minute rest. I turned on the oven, cleaned up the counters and utensils and it was time to bake the cinnamon rolls. Oh, the heavenly smell of cinnamon rolls baking! 

While they baked, I made the icing; a very simple confectioners sugar, melted butter, a pinch of salt, vanilla and water. This icing is rather thick, but as it gets set onto hot rolls right from the oven, the heat of the rolls takes care of melting the icing very enticingly down over and into the rolls.

The whole process took just about 2 hours with the short rising times, and I always use "quick rise" or "instant" yeast, so that makes rising times far shorter than they could be. Quick rise or instant yeast is available in most every grocery these days. I buy it bulk in 1 pound bricks, because I bake all our bread and many other wonderful things, like yeast waffles or pizza. One packet of yeast is equivalent to just about 2 1/2 teaspoons of bulk yeast, in case you might want to invest. There are little jars in the grocery also. I used to buy those, and then graduated to the pound brick. I keep my yeast in the freezer. Just take it out and straight into the bread mixture. No need to wait or thaw. The other benefit with instant yeast is that it does not need to "proof". No need to put the yeast into a little warm water to wait for it to start bubbling and growing. It can be added right to the dry mixture and everything just mixed together. Love it!
yeast dough, cinnamon mixture, recipe
Dough, smeared with cinnamon mixture


Cinnamon Rolls


DOUGH:
1/4 cup honey
1 3/4 cup lukewarm water
1 teaspoon salt
2 tablespoons olive oil or coconut oil, melted
4 cups bread flour
1/2 vanilla bean, scraped, or 1 teaspoon vanilla extract
1 packet instant-rise yeast
1 egg

In a large bowl, or bowl of a heavy duty stand mixer, place the first 4 ingredients. Add in the flour, vanilla and yeast and begin mixing. Add the egg and continue mixing. If kneading by hand, turn out onto a floured surface and knead for about 6 - 8 minutes. In the mixer, allow to mix with the dough hook for the same amount of time. Place dough into a greased bowl and set aside for 15 minutes. Meanwhile, make the Cinnamon Filling:


CINNAMON FILLING:
recipe, cinnamon rolls, breakfast,
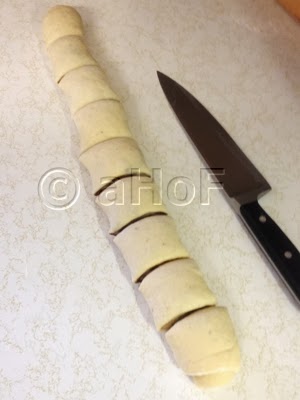
Rolled and cut

1 stick butter, softened
3 tablespoons cinnamon
1 cup brown sugar
1 teaspoon vanilla extract

Place all ingredients into a small bowl and combine with a spoon or hand mixer and set aside.

Divide the dough into 2 sections, and first roll one section of the dough into a large rectangle about 12 x 20 inches or so. Divide the cinnamon mixture in half and place half on the rolled piece of dough. Using a fork, smear it around. It can be difficult to smear in cold weather, but it doesn't have to be even. Roll the dough from the longer edge. Dot the far edge with a little water, to seal well. I sort of eyeballed the cutting, first dividing in half, and then into sections about 2-ish inches wide. Stand these on end in one half of a greased 13 x 9-inch pan. Repeat these steps with the second section of the dough and the cinnamon mixture, rolling, cutting and placing into the second half of the 13 x 9 pan. The two sections could also be set into two 9-inch round cake pans. Set aside to rise for 15 minutes. Set the oven to preheat to 350 degrees (325 on Convection).

cinnamon roll recipe, preparing for bake
Rolls set in pan for 15 minutes
ICING:
4 cups confectioners' sugar
4 tablespoons melted butter
3 - 4 tablespoons water or milk
1 teaspoon vanilla extract
pinch salt

Mix all the ingredients in a small bowl, stirring vigorously to combine. The icing will be stiff, but it will melt nicely onto the hot rolls.

Bake the rolls for about 20 to 25 minutes, or, if you own an instant-read thermometer, until one of the rolls in the middle of the pan reads 180 degrees in its center. They should be golden.

Remove from the oven and have handy a large baking sheet, (if you used a 13 x 9 pan) or a round plate (if you used 9-inch round pans). Place the baking sheet or plate over top of the hot pan, grip both together with hot pads and flip the hot pan upside down onto the baking sheet or plate. Now, repeat this process, so the rolls will end up with the tops upwards onto a serving plate or tray. It seems like a lot of to-do, but it is the easiest way to have the rolls out of the pan.
baking, cinnamon rolls, icing
Baked with golden tops and melting icing

Set a rounded tablespoon sized blob of icing on top of each roll. The residual heat will cause the icing to melt down into and over the hot cinnamon rolls. Note in this last photo, the almost solid blob of icing on the roll in the forefront, versus the nicely melted one behind.

Now, get ready to savor these wonderful, warm, gooey, cinnamon-y confections.


My passion is teaching people how to create a harmony of flavors with their cooking, and passing along my love and joy of food, both simple or exotic, plain or fancy. I continue my journey in ethnic and domestic cuisines, continuing my journey to explore diverse culinary experiences and hopefully to start you on a journey of your own. Join me also at A Harmony of Flavors on Facebook, and Pinterest.

Tuesday, January 7, 2014

Using up Leftovers Deliciously

The holidays are over, but some things still remain. Cookies - lots of them. I got crazy making cookies and now have a lot left. Thankfully I have a "sun room" which for all intents and purposes is now a walk in deep freezer. With temps hovering between -10 and -25 it is just plain frigid out there. Lucky for me, I have plenty of cold storage. But, cookies are not all that is left taking space in my actual refrigerator. 

My husband brought home some smoked pulled pork a week or more ago, and with everything else, it has mainly stayed in its bag. I ate a little once, but there were too many other things tempting. I also had pie dough in the freezer, left from Thanksgiving when I last made pies. I had made the pie dough using my even better Never Fail Pie Crust recipe with some new twists. I mentioned this in my blog post of December 11, 2013. I had been looking online for something, and as so often happens, stumbled upon an article in Food 52 about making pie dough in a slightly different way, and using vodka for part of the liquid called for. I have made pie dough twice now, using two different recipes and using these new updates and it works so wonderfully well. The pie dough itself is so lovely, with such great texture. The original idea came from Cooks Illustrated, but Food 52 is where I found it. Having made it for pies and for these empanadas, while the dough is great and the texture is perfect, I dislike how the dough seems to lose all definition once baked. If I crimp a pie, when it comes out of the oven, the lovely crimped edges are just a blurred suggestion. While these empanadas came out tasting great, they puffed so the fork-crimped edges lost most of the indent. The dough has no rising agent, but it seems to puff while baking. In certain applications this would be wonderful. For me, not really working much... Meanwhile, here is my Never Fail Pie Pastry recipe:

Never Fail Pie Pastry


pie crust, pie crust recipe
Never Fail Pie Pastry for three 10-inch pies
Makes four single-crust 9-inch pie shells or two double-crust 9-inch pies, three single-crust 10-inch pies, or one double-crust 10-inch pie plus one single-crust 10-inch pie.

4 cups all-purpose flour
2 teaspoons salt
1 tablespoon sugar
1¾ cups shortening or lard
1 egg, beaten
1 tablespoon vinegar
½ cup cold water

Combine dry ingredients, then cut in shortening or lard until mixture resembles coarse crumbs. Combine egg, vinegar and water in a small bowl; stir into flour mixture. Do not over mix. Divide dough into 3 or 4 equal parts, shape each into a ball and wrap tightly. Chill.

Roll each portion to 1/8-inch thickness on a lightly floured surface. Place in a pie plate. Trim off any excess pastry along edges. Fold edges under and flute.

For a baked shell, prick bottom and sides with a fork and bake at 450 degrees for 10 to 12 minutes or until golden brown. It is unnecessary to prick shell if it will be filled before baking.

NOTES: The pie dough may be stored in the refrigerator for up to one week, or in the freezer for longer periods. If freezing, divide the dough into 2 or 3 portions and freeze them separately in freezer zip-top bags.

As suggested above, lard is by far the best fat to use for this pie crust recipe, though shortening will work fine, and makes a very good crust. While butter will give lovely flavor, it makes the final product quite soft, with not much of the flakiness you will get when using one of the other two fats.
 

leftover pork barbecue, empanadas, pie dough
Larger-sized Pork Barbecue Empanadas
Getting sidetracked. I do that when I get excited, and that pie dough innovation was exciting.

So, there was pie dough in the freezer and pulled pork in the fridge. I got the pie dough (enough for a single-crust 10-inch pie) from the freezer and set it on the counter to thaw. It took about an hour to become usable. I also had some of my Sweet Tangy BBQ Sauce in the fridge. All set. I have been wanting to make empanadas, or little hand pies; whatever you call them, it is a filling encased in dough. Pie dough is great for this. The pulled pork was in large chunks or longer strands, so I chopped it far smaller before proceeding so it would fit in the small pies. The meat had been laying flat (not bulging full) in a quart zip top bag. I didn't think of weighing or measuring to see how much was in the bag. I would estimate about 1½ to 1¾ cups, total. I mixed the meat with a little bit of the BBQ sauce, just to moisten. I did not want it running all over in the oven. 

how to, pork barbecue, empanadas, pie dough
Making Pork Barbecue Empanadas
I wanted to try a couple of sizes of little empanadas. I used my 3-inch biscuit cutter for the smaller ones, and used a small dessert bowl with an opening about 4¼-inches in diameter for larger ones. Either size would be wonderful for use as a party appetizer. The larger ones give a few bites worth while the little ones give a couple of bites (I ate two of the larger ones as my dinner last evening). I cut out 8 larger rounds and 8 smaller rounds. If I had made all large rounds it would likely have made about a dozen; if making all small rounds it would likely have made about 15 - 20. Part of this depends on how thinly you roll the pie dough. Some of the first ones I cut were too thick. 


I did have a small amount of the pork barbecue mixture leftover after filling all the dough. For the filling, about 2 - 3 tablespoons filling went in the large rounds and a scant 1 tablespoon in the small rounds. I moistened the edges of the dough, set the filling slightly to one side, then flipped the one edge over to meet the opposite side, making little half-moons, and pressed down the edges to seal. I also used a fork afterwards to press indentations in the edges and help with staying sealed. I brushed the tops of the empanadas with light cream, poked them with the tip of a sharp knife to allow steam to escape and baked them for about 18 minutes at 375 degrees. 


Empanadas, baking,
Brushed with light cream before baking
The wonderful thing about a recipe like this is that most anything can be used to fill the dough. Scrambled eggs and bacon would make great breakfast treats - the bread is built in! A mixture of leftovers with gravy to moisten, such as turkey or roast beef are great ideas. More savory mixtures such as pizza sauce with burger and/or pepperoni or cheese and mushroom mixtures would be great. There is really no end to the possibilities for these little things, and as I mentioned earlier - they are great for parties as they are self-contained. Just be sure to keep the filling a bit on the dry side to prevent leakage in the oven. Here is a recap of the recipe:


using leftovers, porkbarbecue, pie dough, empanadas
Smaller sized Pork Barbecue Empanadas

Pork Barbecue Empanadas

pie pastry for one (10-inch) pie
1½ to 1¾ cups leftover pulled pork
⅓ cup barbecue sauce (if the pork is without sauce)
milk or half and half for brushing

Preheat oven to 375 degrees. Chop pork small for filling and mix with the BBQ sauce; set aside. Roll out the pie pastry to about 1/8-inch thick. Cut into 3 or more inch diameter rounds. Place a small portion of pork onto one side. Moisten the edges of the dough and fold one side of the dough over and seal on the opposite side, pressing well with fingers. Use the tines of a fork to make a decorative pattern that helps ensure the packets stay closed while baking. Brush the tops with milk of half and half and poke holes in the tops with a knife to vent. Set the empanadas on a baking sheet and bake for about 18 to 20 minutes, until browned and bubbling.


My passion is teaching people how to create a harmony of flavors with their cooking, and passing along my love and joy of food, both simple or exotic, plain or fancy. I continue my journey in ethnic and domestic cuisines, continuing my journey to explore diverse culinary experiences and hopefully to start you on a journey of your own. Join me also at A Harmony of Flavors on Facebook, and Pinterest.

Saturday, January 4, 2014

Twice Baked Potatoes are Simple as Can Be

potatoes, baked, stuffed
Twice Baked Potatoes
Twice-baked potatoes are certainly not "rocket science." If you have never tried making them, or are timid in the kitchen, it might seem so. They might also seem to be just one step too far, too much work, or any of a number of other excuses.

To be clear, it was not really all that many years ago that I made them for the first time, and then it was mainly because they were a request from my husband for a special occasion. He doesn't request things very often, so I decided it was time. As for a recipe - I will give one here below, but it is really more of what you happen to find interesting mixed with baked potato - and then implementing. It's kind of like making mashed potatoes. You can make them with butter and milk, as my Mom did, or you can get inventive and add all sorts of interesting things. These days, I usually make my mashed potatoes by first boiling them in water with at least a tablespoon of salt along with a couple of parsnips (peeled and cut into pieces smaller than the potato chunks). Then I scoop the cooked vegetables out of the liquid with a slotted spoon into a ricer (ensuring no lumps) over a bowl that already contains a mixture of cream cheese, butter and chopped scallion, or a mix of butter and Chevre cheese and scallions. Sometimes I substitute the scallions for caramelized onions. I have also occasion substituted one of the cheeses with Boursin Cheese, with rave reviews from guests. If liquid is needed, I use some of the potato cooking liquid still in the pot.


utensils, tomato corer, multi purpose
Tomato Corer, great for scooping

So while this blog is not about mashed potatoes, that was just a way to clarify that there are so many ways to make potatoes flavorful, even when they are "just" mashed! Back some years ago, my son and his wife were visiting. My husband decided we should have an impromptu wine tasting event. My idea for a wine tasting is to tailor certain appetizers to specifically go with certain wines, thus ensuring the wine and food will shine together. One of the appetizers we made was mini twice-baked potatoes, using very small, round potatoes. I baked them, and then gave them to my daughter-in-law to scoop out and make the mixture with some great ingredients, then re-fill the potatoes. I gave her a little tomato corer to scoop out the tiny insides of the little potatoes. She scooped them into a bowl and then asked if I had a recipe. I never thought about needing a recipe! I told her to fry some bacon, and then think about what tastes good mixed with potatoes. Things like sour cream, chives or scallions, shredded cheddar? She proceeded to mix these ingredients and then asked how she should know if this was enough? I said, "Taste it! That will surely tell you if it's going to be good or not." She said, "Oh!" It really is that simple. And potatoes are pretty forgiving. They are a nice blank canvas, upon which you can paint the picture you desire.

So, that all said, I have made them before, a few times. And I made them again for our New Year's Day feast a few days ago. I was serving a nice prime rib roast (without bones, so probably called something else: Rib-Eye Roast or Eye of Rib Roast, for example). My other side dish was my Green Beans with Gorgonzola. Since the roast was going to be made using a high temperature roasting that requires the oven door to stay shut for about 2½ hours (see my New Year's Day blog), I decided to bake the potatoes early in the afternoon, then start the roast and leave it to do its thing. Once the roast was out of the oven, I would heat the oven again and bake the re-filled potatoes just before sitting down to eat. This timing worked perfectly. I am telling this sequence of events to make it clear that sometimes it is really to your advantage to make Twice Baked Potatoes.


baked potatoes, making twice baked potatoes
Scooped out potato skins

Twice Baked Potatoes


3 large russet baking potatoes
1 cup sour cream
½ cup scallions, chopped finely
3 slices (thick-sliced) bacon, fried and crumbled (about ½ to ⅔ cup, total)
1 cup shredded cheddar
1 teaspoon salt
pepper, to taste

Wash the potatoes well, dry them and set them into a preheated 400-degree oven for about 1 hour, or until baked through. Use a thin skewer or toothpick to ascertain if they are completely cooked through, inserting the skewer into the side of the potato. You do not want holes poked all over the skins, which you want as intact as possible.

making twice baked potatoes
Re-filled Potatoes, before baking
Once baked, allow the potatoes to cool enough to handle, then with a very sharp knife slice them in half across the length. With a spoon, scoop out the insides, leaving about ¼ inch thickness (or slightly less) of potato in the skin for stability. Put all the scooped out potato into a bowl and lightly mash them before mixing with the rest of the ingredients. Re-fill the potato skins with the potato mixture. At this point they can be set aside for a few hours as needed, or can even be wrapped well and refrigerated for a couple of days.

When ready to bake, preheat oven to about 350 or 375. Set the stuffed potato halves on a baking sheet and bake them for about 30 minutes, or until they are golden on top and heated through. If the potatoes were previously refrigerated, it may take slightly longer baking time to compensate for how cold they were when started.


Add other ingredients if desired, or leave some out. This time I actually passed the potatoes through a ricer for a smoother effect, but a quick mashing with a fork is sufficient. They are so delicious, and this was a great way to time my dinner just right.


My passion is teaching people how to create a harmony of flavors with their cooking, and passing along my love and joy of food, both simple or exotic, plain or fancy. I continue my journey in ethnic and domestic cuisines, continuing my journey to explore diverse culinary experiences and hopefully to start you on a journey of your own. Join me also at A Harmony of Flavors on Facebook, and Pinterest.

Friday, December 27, 2013

Holiday Recipe Ideas

Christmas Cookies, Cookie Assortment
Cookie Plate 1
I finally got all my cookies finished, just in time to make up all the gift plates for handing out as gifts to family. I ended up making more varieties of cookies than usual, and certainly more iced cookies than usual. I created 3 new cookie recipes and one new fudge recipe. The new cookie recipes are Gingerspice, Cardamom Almond and Chocolate Hazelnut Pepperballs, (these last recipes were featured in my last blog post). The new fudge recipe was for Pecan Praline Fudge, though that was a last minute switch. I originally meant to make it maple and walnut flavor. I just happen to have Pecan Praline flavoring in my cupboard so I used that, but either way it would be excellent. Other cookies I made were Springerle, Rolled Butter Cookies, Miracle Peanut Butter Cookies, Cherry Bon Bons and Pistachio Tea Cookies. I also finally got around to making my Grandma's Nut Pita recipe. This is not a terribly sweet pastry, but delicate and delicious nonetheless.

Grandma Hromish's Nut Pita


Makes two 9 x 13 inch pans

Dough:
4 cups flour
1 package dry yeast
¼ cup warm water

½ pound unsalted butter (2 sticks)
Nut Pita, Serbian recipe, ethnic holiday recipe
Nut Pita
1 cup cream, (evaporated milk will work)

Filling:
12 large eggs, separated
4 cups ground walnuts
2 cups sugar
¼ cup whiskey
Vanilla for brushing
Powdered Sugar for dusting

Mix the yeast into warm water to soften. Mix together and blend well (by hand or machine) all ingredients for dough and then divide dough into four parts. Roll out one part and line a 13 x 9" pan.

Make the filling by beating together all of the egg yolks plus 2 of the whites, the sugar, whiskey and nuts. In a separate bowl, beat the rest of the egg whites and fold this into the yolk mixture. Pour half of this mixture into the dough-lined pan.

Now roll out the second part of the dough and lay it atop the filling. Repeat with the other portions of dough and filling in a second pan. Slash tops of dough with a knife or prick with a fork and bake in a 350 degree oven for 30 minutes or until done. When done, sprinkle the top with vanilla, or use a pastry brush. Slice into diamond shapes. Sprinkle with powdered sugar.

NOTE: If you want to try this, but 2 (9 x 13-inch) pans seem too much, I split the recipe in half, using these measurements:

DOUGH: 2 cups flour, 1¼ teaspoons instant yeast, 2 tablespoons water, 1 stick unsalted butter and ½ cup cream or evaporated milk. Divide dough into only 2 parts. 


FILLING: 6 large eggs, separated, 2 cups ground walnuts, 1 cup sugar, 2 tablespoons whiskey. Follow the same directions as above, using one of the whites with all the yolks, then beating the rest of the whites for the meringue.
   

~~~~~~~~~~~~~~~~~~~~~~~~~~~~~~~~~~~

Christmas Cookies, cookie assortment
Cookie Plate 2
All that done, I had to put my thoughts on what to make for Christmas Eve. In our house, Christmas Eve and New Year's Eve are both times for lots of little nibblies. Tidbits and appetizers of all sorts are set out and we graze the evening away. This year I made a few things; some new and some old. I set out a cheese and salami tray, with an applewood smoked Gruyere and some Swiss cheese. I also set out a little round of Boursin with garlic and herbs. This is such a spectacular flavored and textured cheese, though it is 60% butterfat. Be prepared. I had made some quince paste a month or so ago so I also set out some Manchego cheese with slivers of the quince past on them. Cheese seems to play a large part in appetizers, for sure, and it didn't stop there.


I made my Bean and Cheese Dip as it is my husband's favorite (and just plain GOOD).

Bean and Cheese Dip

Appetizer Dip, party dip, easy recipe
Bean & Cheese Dip

Makes about 3 cups

1 (11.5 ounce) can Bean & Bacon Soup
1 (5-ounce) jar Kraft Processed Cheese (Bacon flavor is great)
2 tablespoons brown sugar
1 tablespoon Worcestershire sauce
1 tablespoon yellow mustard
1 tablespoon dried onion flakes
¼ teaspoon hot sauce, optional
1 cup sour cream
 

In a deep 1-quart casserole, combine soup, cheese, brown sugar, Worcestershire, mustard, onion and hot sauce (if used). Cover and microwave at high for 4 - 5 minutes or until cheese melts, stirring twice during this time.

Stir ½ cup of bean mixture into sour cream, mix, then return all to the casserole and mix in well. Cover again. Microwave at medium low (30%) for 2 minutes or until heated through, stirring once. Serve with crackers of your choice.


~~~~~~~~~~~~~~~~~~~~~~~~~~~~

Also made were: Smokies in Puff Pastry, a ready-made pizza flat bread with Spinach Dip spread over top and then covered in a mixture of shredded cheeses and baked. I first learned of this at my sister's house in October, where she used a Boboli crust. Where I live no store carries Boboli, but there are other brands available. She also had made an appetizer using those little bags of Mini Sweet Peppers. I liked the concept, so what I did instead is to make what started off as a cheese ball, but then I thought of just stuffing the little peppers (cut in half, stems and seeds removed) with the cheese ball mixture. So, that cheese ball never made it to a ball shape after all, though it is simple enough to roll into a ball and then in some nuts or herbs and chill. This is the mixture I made for my cheese ball:

Cheese ball mixture in Sweet Pepper halves

A Cheese Ball Variation


2 (8-ounce) blocks of cream cheese, at room temperature
6 ounces freshly shredded Parmesan and/or Romano cheeses
2 teaspoons dry onion soup mix
1/3 cup caramelized onion (or substitute with chopped scallions)
4 slices (thick-slice) bacon, fried, drained, chopped finely
2 tablespoons minced fresh rosemary leaves
2 teaspoons Worcestershire sauce
1 cup pecans, chopped
3/4 cup craisins (dried cranberries)

Place the cream cheese and Parmesan/Romano into a large bowl and add the dry onion soup, caramelized onion (or scallions), bacon, rosemary and Worcestershire. Using a mixer, combine these ingredients. Add in the pecans and craisins until well blended. If making this into a ball, chop more pecans or fresh herbs and roll the cheese ball into this and then wrap in plastic wrap and chill until needed. If using this mixture to stuff the mini sweet peppers, you will need about 1 pound of them. The bag I bought was a 1-pound bag and it was just about perfect for the amount of cheese ball mixture.


~~~~~~~~~~~~~~~~~~~~~~~~~~


By the way, if you, like me, dislike the fact that all the dry soup mixes and bouillons seem to have MSG, I created my own mixture of a Dry Onion Soup Mix. I use the stuff in things like oven roasted potatoes, Herbed Onion Bread, and now the cheese balls (plural, because I made some to take to my sister-in-law's for Christmas Day snacking). The recipe is simple, and far more flavorful than store-bought dry onion soup. It makes about 1/4 cup worth, which is equivalent to one pouch of store-bought. It is simple to make multiples of the recipe, though be careful to stir it well before using smaller portions, such as the 2 teaspoons called for in this cheese ball recipe. The onion flakes tend to accumulate at the top of the mixture, and the other spices settle. Just mix all the ingredients together and store in a tightly sealed glass jar. I did not use any bouillon in the mixture, as most of them have MSG, which I am avoiding. To make this into a soup, either buy a good stock or make your own to use as the liquid base.


Appetier nosh,
My 2013 Christmas Eve Table

Dry Onion Soup Mix


3 tablespoons dried minced onion
1 teaspoon sea salt
1 teaspoon sugar, optional
½ teaspoon garlic powder
¼ teaspoon turmeric
¼ teaspoon celery seeds, crushed or ground
¼ - ½ teaspoon black pepper


I hope I have given some ideas for making creative appetizers for the holidays or for any party. I love making all these little things. With help it is even more fun. I wish all of you the very best of the holiday season.


My passion is teaching people how to create a harmony of flavors with their cooking, and passing along my love and joy of food, both simple or exotic, plain or fancy. I continue my journey in ethnic and domestic cuisines, continuing my journey to explore diverse culinary experiences and hopefully to start you on a journey of your own. Join me also at A Harmony of Flavors on Facebook, and Pinterest.

Thursday, August 29, 2013

A Great Website, and an Appetizer

Hi Everyone,

I have recently been contacted by a gentleman from Australia who has traveled fairly worldwide and has a wonderful concept for his website. It is all about bringing cultures together through food. All sorts of ethnicities are included, and he is attempting to include such things as where bloggers buy their food for these ethnic cuisines, not counting large supermarket chains. He is also interested in "street foods", something I was highly interested in, when I lived in Guatemala, though I never took photos of any of it, back then. If anyone is interested, I did list his website here: www.allaboutcuisines.com. I urge everyone to at least check out his website and if anyone can help with fleshing out the categories, and adding some great street food photos to that section, I am sure it will be greatly appreciated. Food brings together diverse cultures. This should be celebrated.

Mushrooms, Crostini, Sherry, Rosemary
Mushroom Crostini with Sherry & Rosemary

Having lived in Guatemala for 12 years as a new young wife (long ago), I came in contact with so much new and interesting food I had never seen or heard of before, and this journey led me to a lifelong interest in ethnic cuisines and different foods and spices. That has brought me to where I am today. I constantly look for new ideas, new spices, new combinations. At times I have lived in places where many wondrous ethnic shops are available and at others not so much. But it has been a lifelong joy when I find a little ethnic grocery, where entering the new sights and smells just transports me to another place. The smells are just amazing.

When we lived in Justice, in the greater Chicago area, there was a little Greek/Italian grocery we frequented. Sadly I cannot recall the name, or exactly where it was located, but walking in there, the smell of the barrels of olives or huge chunks of Feta cheese were immediately noticed, as well as many other interesting foods not seen in a grocery chain store. In Guatemala I recall loving the typical candies like Canillas de Leche, or just the candied fruits like figs and oranges, or candied vegetables such as squash or sweet potato. We often stopped at little stands outside someone's house where we ate things like Pipian de Pollo or Res, or Tripa. We bought Pupusas and curtido. We often stopped for freshly roasted corn on the cob, rolled in cream and then in Queso Fresco. Those memories will never fade.


black cardamom, smoky flavor, spice
Black Cardamom, closeup
green cardamom, cardamm pods, cardamom seeds, spice
Green Cardamom
I wish now that I had had the foresight to get photos, no matter that they wouldn't be of great quality. Alas, the memory alone must serve. For now though, I made another recipe today that is just spectacular. It has been something percolating in my mind for some time, but when our friend Richard was visiting recently I was giving him some of the less-known Indian spices to smell. He is very inventive when it comes to pairing flavors, and after smelling the black cardamom (not to be confused with green cardamom, he commented that the smoky earthiness of the cardamom should go well with the earthy flavors of mushrooms. And I thought, "Duh! Now why did this never occur to me?" It is just wonderful to have others with great ideas like that. So today, I finally got down to trying it out. I had wanted to revisit a recipe I had played with a couple years back. It was mushrooms, and meant to go onto toasted bread. However, I burnt the bread so badly, the whole thing was a bust. You couldn't even taste the mushrooms for the burnt bread, though my husband valiantly ate them anyway. True love, there!

A few days ago I made some Multi Grain and Seed Bread that turned out just spectacular, so I used that bread as the base for these Mushroom Crostini with Sherry and Rosemary. This would be perfect on thinly sliced baguette, shown. The recipe makes about 3 1/2 - 4 cups worth and will top at least 24 little baguette slices. This should make 24 appetizer servings or 12 servings as a first course. A nice earthy wine would go well with these, such as a Pinot Noir, or a Carmenere from Chile.


Mushroom Crostini with Sherry and Rosemary


1 baguette, sliced about 1/4-inch thick
2 - 3 tablespoons olive oil for brushing on the bread
Mushrooms, Crostini, Sherry, Rosemary
Mushroom Crostini with Sherry & Rosemary

1 ounce dried shiitake mushrooms, soaked 20 - 30 minutes in 2 cups boiling water
2 tablespoons olive oil
1 large onion, thinly sliced and rough chopped
2 - 3 cloves garlic
1 pound "baby bellas" or cremini mushrooms, stems removed, sliced thinly
1 teaspoon sea salt
a few grinds of the pepper mill
1 tablespoon fresh rosemary leaves, minced
1 black cardamom pod, seeds removed and crushed, pod discarded
1/2 cup Fino Sherry, or dry white wine
1/4 cup heavy cream
1 - 2 ounces grated Parmesan cheese

Heat a large skillet and add in the 2 tablespoons olive oil. Add the onion and reduce heat to medium low, cooking the onion slowly, tossing often, for about 15 minutes, or until nicely golden. Add in the garlic and sliced mushrooms with the salt and pepper and continue to cook, stirring often, until all the liquid has evaporated and the mushrooms begin to brown slightly. about 10 minutes. Meanwhile, remove the shiitakes from the hot water (discard water) and cut out the hard stems. Slice them in half, then thinly slice them across. Add the shiitakes to the skillet with the cardamom, rosemary and Sherry. Raise the heat to medium high and cook, stirring, until all the Sherry liquid has evaporated. Add in the cream off the heat and stir to combine. Set aside.

Broil the olive oil brushed baguette slices very close to the broiler for about 2 minutes, or until browned. Flip them over and brown the other side. Remove from oven and pile on mushroom mixture and top with grated Parmesan. Broil for another 2 minutes, or until the cheese is melted and just beginning to brown. Serve immediately.
dried mushrooms, shiitake mushrooms
1 ounce dried shiitake mushrooms
Bon Appetit!


My passion is teaching people how to create a harmony of flavors with their cooking, and passing along my love and joy of food, both simple or exotic, plain or fancy. I continue my journey in ethnic and domestic cuisines, continuing my journey to explore diverse culinary experiences and hopefully to start you on a journey of your own. Join me also at A Harmony of Flavors on Facebook, and Pinterest.

Disqus