Translate

Showing posts with label breakfast foods. Show all posts

Sunday, October 13, 2019

Who Loves Breakfast

I love breakfast. The first meal of the day. Most days I eat oatmeal, just because I love it. Weekends, we have eggs. But sometimes, you know, I just have to make other things. One weekend favorite is scones. My husband has come to love scones, where once he wouldn't touch them. So now, he looks forward to them, whenever I do make them. Another thing I sometimes make of a weekend is a sauce I use to go over our eggs. It is something I came up with long ago, while living in Guatemala, though it is not a Guatemalan recipe at all. Biscuits used to be my favorite of breakfast breads, but now the scones have supplanted them as "favorite." I do still make biscuits, on occasion. 

I have written about the grain mill my husband got for me. I use it so often, it takes no thought at all to come up with new grain mixtures for breads of any kind, including scones or muffins. Recently, I have made a recipe three times, altering it slightly each time, but I believe the third time was the charm. All of the tests were great. However, the first time, I used maple flavoring plus some leftover "Maple Flav'r'Bites that once upon a time King Arthur Flour carried. Sadly, those and the Cinnamon Flav'r'Bites have been discontinued, though they were some of my most favorite things to put in my scones. So, now that they don't exist anymore, obviously I couldn't put a recipe out that calls for them, so I went on to round two. This time, I made a mistake in which seed I was grinding for the flour, so while they were great, I had really wanted to have teff and amaranth, some of the tiniest seeds available. So, on to round three, and this time, I used some tried and true additions to the scones (white chocolate chips and craisins) and they were perfect. 

I did use rye as part of the mixture. Teff and amaranth are certainly not on everyone's pantry shelves either, I realize. This recipe is going to appeal only to those ad diversified in their tastes as I am. So, if rye flour is not in your pantry either, well..... 

Teff Amaranth Scones 

Teff, Amaranth, Scones
Teff Amaranth Scones

Makes 8 scones

  • 2 tablespoons whole teff, ground (or ¼ cup ground teff / 0.9 oz / 24 grams)
  • 2 tablespoons whole amaranth, ground (or ¼ cup ground teff / 0.9 oz / 24 grams) 
  • 2 tablespoons whole rye grains, ground (or ¼ cup ground teff / 0.9 oz / 24 grams)
  • 1½ cups all-purpose flour (6.2 ounces / 175 grams)
  • ¼ cup brown sugar (1.45 ounces / 42 grams)
  • 1 tablespoon baking powder (0.4 ounces / 11 grams)
  • 1 teaspoon salt (0.2 ounces / 6 grams)
  • 5 tablespoons cold, unsalted butter (2.1 ounces / 60 grams)
  • ½ cup white baking chips
  • ½ cup dried cranberries/craisins
  • ¾ cup heavy cream (6 ounces / 180 ml)
Preheat oven to 425 degrees. Line a baking sheet with parchment, set aside.

In a bowl, combine the first 7 ingredients. Cut in the butter as for pie dough, or (if your hands are cool, rub the butter into the dry ingredients until no large pieces remain. Add in the white baking chips and stir. Pour in the cream and with a fork, quickly toss the wet into the dry until it begins to come together. With hands, bring the mixture to a ball. If too dry, add a little more cream, one tablespoon at a time, until all the dry ingredients come together. If it is too wet, add 2 tablespoons all-purpose flour at a time, until the mixture will hold together.

Turn the dough out onto a clean surface (no more flour should be needed) and pat into an 8-inch diameter round. Cut across the dough 4 times, to make 8 wedge-shaped scones. Set them, at least an inch apart, on the parchment lined sheet. Bake the scones for approximately 16 minutes, or until they are golden and spring back when lightly pressed. 

NOTES: The photo shows my second attempt, where I used caramel bits in the scones. I do not advise this, unless you have strong teeth! Caramel chips, would be better, if going for that flavor. The white baking chips and craisins can be substituted with nuts of your choice and whatever you like in your scones. Just keep the amounts of flavor additions to a cup, or less.

~~~~~~~~~~~~~~ 

That sauce to go over eggs that I mentioned? While I haven't made it in a while, when I do, we both love it so much. I have been making this for going on 50 years now. It is a tomato and bacon mixture, and goes together fairly quickly - while getting other things ready for breakfast, I let it simmer to the side. The photo I am showing here shows my omelet. I happen to be one of those people who love cilantro. I generally make my omelet with as much cilantro chopped into the eggs as the eggs can hold! One might say that I use the eggs as a binder to my cilantro. So, don't be shocked at my omelet, okay?

Tomato Bacon Salsa for Eggs


Makes enough for 4  servings
Tomato, Bacon, coked salsa, Eggs, condiment
Tomato Bacon Salsa for Eggs
  • 2 slices thick-sliced bacon (or 3 - 4 slices of thin sliced), cut into ¼-inch wide strips
  • 1 small white onion, finely chopped
  • 1 - 2 cloves fresh garlic, minced finely
  • 1 green bell pepper, chopped
  • 4 Roma tomatoes, cut into small bits
  • ½ cup tomato ketchup
  • a few grinds of fresh black pepper
  • ½ teaspoon salt, or to taste

Place the bacon into a cold skillet and turn heat to medium. Cook the bacon to your taste, then drain on paper toweling and set aside. Drain off all but 1 - 2 tablespoons of the bacon fat in the pan, then add in the onion, sauteeing until tender and light golden. Add in the garlic and green pepper and cook about 10 minutes more, until soft. Add in the tomatoes and simmer until the tomatoes have broken down. Return the bacon to the skillet with the ketchup, salt and pepper and simmer just meld flavors. Serve over eggs, any style.

~~~~~~~~~~~~~~~~~~~

Biscuits are so good. I have always loved biscuits. My husband is not so keen on them though, so I do not make them so often.  These are made based similarly to the basic recipe for scones, and they come out just beautifully. They can be made either cut out or patted into a rectangle and simply cut into squares.

Perfect Biscuits


Makes about twelve 2½-inch diameter biscuits
Perfect Biscuits
Perfect Biscuits

  • 2¼ cup all-purpose flour
  • 1 tablespoon baking powder
  • 2 teaspoons sugar
  • 1 teaspoon salt
  • ¼ teaspoon baking soda
  • 1 stick (8 tablespoons) cold, unsalted butter
  • ¾ cup (6-ounces) heavy cream
  • 2 tablespoons sour cream
Preheat oven to 425 degrees. Have ready a baking sheet. Line with parchment for easy cleanup, though this is not necessary.

In a mixing bowl, combine the first 5 ingredients and stir. Cut in the butter, as for pie dough, until only very small bits can be seen. In a small bowl, stir together the cream and sour cream, then pour into the mixing bowl and with a fork, toss the mixture until it comes together. Turn out onto a clean surface and pat out to about ½ - ⅝-inch thickness. If cutting with a biscuit cutter, cut out as many as possible, setting them onto the baking sheet, at least ½-inch apart. Gather the scraps without working them and pat out once more, cutting more biscuits as possible. Bake the biscuits for about 15 minutes, or until puffed and beautifully golden.

~~~~~~~~~~~~~~~~~

Okay, as I love my scones, I am going to put one more recipe here! These are some oldies. I haven't made these for years now, but they were certainly delicious, and worthy of a place on the breakfast table!


Brown Sugar & Oat Bran Scones

Brown Sugar, Oat Bran, Scones
Brown Sugar & Oat Bran Scones

Makes 8 scones

  • 1 cup all-purpose flour
  • ¾ cup cake flour
  • 3 tablespoons brown sugar
  • 3 tablespoons oat bran
  • 2½ teaspoons baking powder 
  • ½ teaspoon baking soda
  • ¾ teaspoon salt
  • ¼ teaspoon ground mahlab, optional
  • 1 stick cold unsalted butter
  • ¾ cup chopped walnuts
  • ¾ cup buttermilk

Preheat oven to 425 degrees. Line a baking sheet with parchment, to save on cleanup afterwards.


Place the first 8 ingredients into a mixing bowl and stir. Add in the butter and cut in with a pastry cutter or hands, if they are cool. Once butter is incorporated, stir in the walnuts, then add the buttermilk and stir with a fork until the mixture begins to come together in a single mass.

Turn the dough out onto a clean surface and pat together into an 8-inch diameter round. With a long knife, slice the dough across four separate times, to form 8 scone wedges. Set the wedges onto the lined baking sheet at least one-inch apart, then bake on a middle rack for about 16 minutes. Watch carefully; ovens vary.


My passion is teaching people how to create a harmony of flavors with their cooking, and passing along my love and joy of food, both simple or exotic, plain or fancy. I continue my journey in ethnic and domestic cuisines, continuing my journey to explore diverse culinary experiences and hopefully to start you on a journey of your own. Join me also at A Harmony of Flavors on Facebook, and Pinterest.

Sunday, February 26, 2017

Great Muffins from Rye Flour and Rye Bran

The Rye Baker, Stanley Ginsberg, bread, cookbook
The Rye Baker by Stanley Ginsberg
I had been busily making rye breads before Christmas, particularly having just received my latest bread cookbook, "The Rye Baker," by Stanley Ginsberg. Between the two new bread baking books, I made a lot of breads of many varieties, to be covered when guests were here over the holidays. I have my own electric grain mill, making quick work of grinding most things into flour; wheat berries, rye berries, Kamut Khorasan, red rice, dried garbanzo beans and more. The difficulty lies in that with rye, most breads call for at least medium rye, which is rye flour with the bran sifted out. Let me say, I spent a lot of time sifting the rye flour. That I need a better, faster way to accomplish that is a no-brainer. Since the holidays, however, I have still been noshing on the already made breads I have in the freezer.


Maple, Bacon, Rye, Muffins
Maple Bacon Rye Muffins

That comes back to the fact of all the leftover rye bran that I had sifted out. I have lots and lots. I made some muffins a few weeks ago, using mainly the rye bran, and while they were good, they were not exciting. In the meantime, I had been reading about the whole grains and the problem with phytic acid, after talking with a friend whose doctor warned her against whole grains. This is a quote from one website:
"High-phytate foods, such as grains, nuts, and legumes, can raise the risk of iron and zinc deficiency. As a countermeasure, strategies such as soaking, sprouting and fermentation are often employed. For those who eat meat regularly, deficiencies caused by phytic acid are not a concern."

Another site, precisionnutrition.com, and another quote:
"Some experts even suggest that it’s the phytic acid in whole grains and beans that lends them their apparent protective properties against cardiovascular disease, cancer, and diabetes."

Most all of the whole grain breads I've been making call for very long, slow fermentation periods, some including overnight cold rising in the fridge. This slow fermentation mitigates phytic acid binding the minerals. Many of the newer bread recipes call for soaking and sprouting the grain, then drying and grinding, so that long soak also balances out any harm. But when it comes to the rye bran, which is culled from just plain rye berries not previously soaked, sprouted or other, the bran is then high in phytic acid. 

As one of the things to do is soak, I thought I would soak some of the rye bran in buttermilk (double whammy, as an acidic environment is also supposed to help, along with soaking in general). Then I read more and found that the soaking medium should be hot. And, that it requires a long soak. 

I mean, REALLY! What's a girl supposed to do to have a healthy breakfast anymore???

Maple, Bacon, Rye, Muffin, recipe
Maple Bacon Rye Muffin texture
Long and short, a few days back I thought I would heat some buttermilk and soak the rye bran while prepping the rest of the ingredients to make some more muffins, and have done with it. I am not vegetarian, so I shouldn't fall into the risk of iron and zinc deficiency. All this aside, most readers will not own their own electric grain mill, grind their own rye berries to make bread, and sift out rye bran. And if this is the case, oat bran would work just as well in these muffins. Rye flour is easily found these days. Bob's Red Mill carries at least 3 different grinds: Light Rye (the rye equivalent of white all-purpose flour, but with less gluten), Medium Rye (what I approximate when sifting out the bran), and Pumpernickel Rye (more coarsely ground and with all the bran and germ), plus all the organic options. There are other types and grinds, but these are the most easily available. I happened to have some of my sifted "medium rye flour" in a baggie I found pushed back behind some things, so decided also to use this in the recipe. 

Okay, so I knew what I was doing with the rye part of the recipe. I happened to have some bacon in the fridge. I don't eat it often, so I thought I would use some in the muffins. Maple is always an excellent flavor combination with bacon, so I used maple syrup as the sweetener. 

This time, the muffins were fantastic. Oh my! The texture was light and just perfect. Even my husband, generally not one to actually eat anything whole grain if he can help it, actually asked if he could have a couple! They must have smelled really good to him, too! He said they were great, and that is just about the biggest endorsement I could possibly give to a whole grained food! 


Maple Bacon Rye Muffins
Maple, Bacon, Rye, Muffins, recipe, breakfast
Maple Bacon Rye Muffins


Makes 12 regular sized muffins

1 cup buttermilk, heated
½ cup rye bran (or oat bran)
5 strips thick sliced bacon
¾ cup medium rye flour
¾ cup all-purpose flour
2 teaspoons baking powder
½ teaspoon baking soda
½ teaspoon salt
2 large eggs
¼ cup real maple syrup
½ teaspoon maple flavor
4 tablespoons unsalted butter, melted


Preheat oven to 350 degrees. Mix the bran into the heated buttermilk in a medium bowl, stir, and set aside.

Cut the bacon across into ¼-inch pieces and fry until just crisped. Drain on paper toweling. Set aside.

In a mixing bowl, whisk or sift together the rye and all-purpose flours, baking powder, baking soda and salt.

Add the eggs, maple syrup and melted butter to the bowl with the buttermilk and bran. Stir to mix well. Pour this mixture into the dry ingredients and stir to combine, then add in the Maple Flav-r-Bites and stir in.

Grease the wells of a 12-count muffin tin, using cooking spray. Divide the batter evenly between the 12 wells and bake the muffins for about 20 minutes, or until a toothpick inserted in the centers comes out with only a crumb or two. 


My passion is teaching people how to create a harmony of flavors with their cooking, and passing along my love and joy of food, both simple or exotic, plain or fancy. I continue my journey in ethnic and domestic cuisines, continuing my journey to explore diverse culinary experiences and hopefully to start you on a journey of your own. Join me also at A Harmony of Flavors on Facebook, and Pinterest.

Sunday, April 5, 2015

Pancakes Fluffy and Light

First off, I don't make pancakes too often anymore, mainly just because I don't need the gratuitous carbs. I do love pancakes though, and I had been talking with our friend Rich about buckwheat and Kamut® Khorasan. I wrote quite a bit on the subject of Kamut® Khorasan in my blog of November 21, 2014, so I won't go into all that again. I will say that I love trying out new and different grains. And besides, I just love buckwheat pancakes. 

Buckwheat, Kamut® Khorasan, Pancakes
Buckwheat and Kamut® Khorasan Pancakes

A Bit about Buckwheat

Buckwheat
Buckwheat: triangular, green or tan in color
Buckwheat, Fagopyrum esculentum, is not wheat, or even related to wheat. It is not a grass either, nor is it related to rice. It is instead related to such plants as sorrel, knotweed and rhubarb. Because the seeds are eaten, it is sometimes called a pseudo-cereal. Buckwheat is a very ancient food, first domesticated and cultivated around Southeast Asia as far back as 6,000 BCE. The little "seeds", triangular in shape, are actually fruits encasing a seed. The fruits are so closely wrapped around their seed that it appears that the outer coating is just a hull. The seed coat is green or tan, and darkens the flour when the seeds are ground. Buckwheat contains no gluten, so it is considered safe for those with gluten intolerance. 

Buckwheat was once used widely, but its use tapered off with the rise of other grains, easier to grow and produce. Of late, resurgence of interest in ancient grains has led once again to buckwheat's popularity. Buckwheat is commonly made into noodles (soba), blinis, pancakes. There is also buckwheat honey. It is used as a thickening agent in soups. It can be cooked and eaten as porridge. Buckwheat hulls have been used to stuff pillows, as the hulls easily adjust to the shape of head and do not conduct heat as do many synthetic products. This is only a very brief synopsis of buckwheat history and use, but hopefully it will give some idea.

On to the Pancakes!

So as we were talking, Rich and I, he allowed that he would certainly like to have some pancakes, if only once, as he is also trying to keep his carbs on the low side. This morning seemed a good time to try out this recipe. I wanted to use the Kamut ® Khorasan instead of regular wheat flour, and I added in just a small bit of regular white cake flour to lighten up the mix. I love to use buttermilk in my pancakes, but when I don't have buttermilk in the house, I do generally have evaporated milk and vinegar or lemon juice. Mixing up a half evaporated milk / half water mixture and adding in about a tablespoon of vinegar or lemon/lime juice per cup of milk makes a very acceptable substitute for buttermilk. Since my husband bought me a Wonder Mill, I have been enjoying the ability to just instantly grind a grain or seed as needed. I ground ½ cup each of Kamut® Khorasan and buckwheat, to make the needed ¾ cup each for the recipe. I still had just a little left over, but that makes no big difference to me - I will toss that into something else as I am baking or cooking. 

Buckwheat, Kamut® Khorasan, Pancakes
Texture of Buckwheat and Kamut® Khorasan Pancakes
When I placed the Kamut® Khorasan into the Wonder Mill, I absolutely forgot to reset the dial to fine grind. As it was on coarse grind when the machine started, and it takes mere seconds to grind, the Kamut was done before I even realized. I figured, oh well, so part of the flour would be a little coarse. I turned the dial to fine grind before adding in the buckwheat. As it turned out, Rich, my husband and I all marveled at the fluffy and lovely texture of these pancakes. I am not sure of the why, but these came out tender and perfect and really, really good! For full grain pancakes, they were very light.

Buckwheat & Kamut® Khorasan Pancakes 

Buckwheat, Kamut® Khorasan, Pancakes
Buckwheat and Kamut® Khorasan Pancakes

Makes about 16 pancakes

¾ cup Kamut® Khorasan flour
¾ cup buckwheat flour
¼ cup cake flour
2 tablespoons sugar (or substitute 2 packets of Stevia sweetener)
2 teaspoons baking powder
½ teaspoon baking soda
½ teaspoon salt
2 cups buttermilk or soured milk (see above)
2 eggs
4 tablespoons melted unsalted butter

In a mixing bowl, combine the first 7 ingredients and whisk to combine. Separately, mix together the buttermilk, eggs and melted butter. Have a griddle ready at 350 degrees, or a large nonstick skillet over medium heat. Use oil, baking spray or whatever grease is preferred and begin ladling out the pancake batter. Once the edges of the batter look dried and there are many bubbles over the surface that leave holes once they burst, flip the pancakes to the other side. The second side will take far less time than the first.
Serve these pancakes as with any other pancakes, with maple syrup, honey, fruit, fruit pie filling or whatever favorite thing you like with pancakes.  


My passion is teaching people how to create a harmony of flavors with their cooking, and passing along my love and joy of food, both simple or exotic, plain or fancy. I continue my journey in ethnic and domestic cuisines, trying new things weekly. I would love to hear from you, to help me continue my journey to explore diverse culinary experiences and hopefully to start you on a journey of your own. Join me also at A Harmony of Flavors on Facebook, and Pinterest and sign up for my Newsletter.

Friday, February 28, 2014

Hash Browns, Hatch Chiles & Eggs

hash browns, potatoes, side dish, eggs
Hash Browns for One, with eggs
I have had a desire to create a "Hatch Chile Sauce" for a long while. This began many years ago, down in Tucson, where one of my sisters resides. Near her house is a park and Tea Garden called Tohono Chul. The park is lovely in the Southwest xeriscape way, showcasing the plants and critters local to the area. The "Tea Garden" or, as I see in the website is now called "Garden Bistro", showcases absolutely fantastic meals, but breakfast is the meal I have enjoyed most often. For years, as I would visit my sister, we would go there and I would order the same meal, every time. It was scrambled eggs, wrapped in corn tortillas, served with a pool of Hatch Chile Sauce and black beans, sour cream and some olives. A Southwest breakfast fit for a king. Everything in that meal caused me raptures. And then, they took it off the menu.

I realize that menus must change periodically. The locals would want something new I assume. But me - I just wished that breakfast was still on the menu. And this is what brings me to this blog. I have been dreaming of that Hatch Chile Sauce ever since. It had a little bit of bite, but was mild, overall. The southwest flavor was the thing that just enchanted me. The last time I was in Tucson, my husband and I drove back from there, via the Grand Canyon, the giant meteor crater (remember "Star Man"?), Hatch, New Mexico, Denver, CO, Aberdeen, SD, and on and on, till we got back to Florida, where we lived at the time. When passing through Hatch, we stopped and I bought a large string of Hatch chilies. I had not really used them; mainly I had them hanging as a decoration. My understanding is that "Hatch Chilies" are just chilies that grow in Hatch, NM, and not any particular variety. They could be hot chilies or mild. The string I have are relatively hot.

A few days ago I wanted some hash browns. My husband will absolutely not eat hash browns if the skins are on the potatoes. Skins are his big, fat no-no. Me - I love the skins, so if I make hash browns for myself, I leave the skins on. I made one little potato-worth of hash browns in a tiny skillet, just for me. I made 2 eggs in the same skillet to set on top of the potatoes and it was my supper. Here is the recipe:

Hash Browns for One

hash browns, potatoes, shredded,
Potato Mixture - In the pan


1 small potato, scrubbed
1 tablespoon olive oil 
3 scallions, chopped
3/4 teaspoon salt
a few grinds of pepper, optional
1 teaspoon cornstarch

hash browns, potatoes, cooking, side dish
One side cooked - Hash Browns served
Chop the scallions and set aside. Lay out a 2-layer thickness of paper toweling at least a foot long or more. Heat a small skillet over medium heat. With a large-holed grater, grate the little potato onto the paper toweling. Spread the shreds out relatively evenly, roll the paper toweling with the potato inside, then squeeze all along the roll to wring as much moisture from the potato shreds as possible. Unroll the paper toweling, dropping the potato shreds with the scallion. Add the salt, pepper if using, and the cornstarch. With fingers, toss the mixture to combine. Add the olive oil to the hot skillet and drop in the potatoes. Press them gently into an even circle. Cover with a lid, reduce heat to medium low and cook for about 4 minutes. Remove lid and set a spatula under one side of the potato cake. Using the pan's momentum, lift the pan and flip the potato cake with the spatula. Back on the heat, cover and cook for another 2 minutes. At this point the potatoes should be cooked through.
Delightful as my hash browns and eggs were, it got me thinking about that Hatch Chile Sauce again, and I started gazing fondly at my string of Hatch chiles and dreaming of how I could make a chile sauce that would be similar to the one at Tohono Chul. I have a large bag of dried Ancho peppers in my freezer. They are in 2 zip-top bags, as I do not use them often, and just want them as fresh as possible when I do want them. I wondered how many chilies it would require to get the sauce to be similar to the one at TC. Theirs was a relatively smooth sauce, a nice dusky orange in color. I figured there was no way to find out but by trying. This is what I did:

Hatch chilies, Ancho chilies, chili sauce
My Hatch Ancho Chile Sauce
Hatch Ancho Chile Sauce


Makes 1 pint

2 hot, dried chilies
1 large dried Ancho chili
Boiling water, for soaking 
1 large onion, or 2 small onions, coarsely chopped
2 tablespoons olive oil
1 teaspoon salt 
2 cloves garlic, coarse chopped
3 tablespoons double concentrated tomato paste (from a tube)
2 - 3 teaspoons fresh thyme leaves, rough-chopped
1 cup water, divided
1/2 teaspoon salt
1/2 teaspoon cider vinegar
pinch of dried epazote, optional
pinch of annatto powder, optional
1 tablespoon butter
 

In a small saucepan, heat some water to boiling. Reduce to lowest heat and add the 3 chilies. Allow them to steep in the water while starting the onions. Heat a medium skillet and add the olive oil. Add in the onions and teaspoon of salt; saute until translucent, stirring periodically. Add the garlic, thyme and tomato paste and stir to combine, cooking until the garlic is fragrant, about one minute. Add in half the water and stir.
 

Remove the chilies from the hot water. If you want the sauce to be very hot, leave in the seeds and membranes; otherwise, remove stems, seeds and membranes, coarsely chop and add to the skillet. Stir just to combine and pour into a blender or food processor. Process until the sauce is as smooth as you like and return the sauce to the skillet. Stir in the rest of the water, with the half teaspoon salt, vinegar and epazote and annatto, if using. These last may make no appreciable difference. The annato will give more depth of color. The epazote is a very southwest flavor and I have it in my cabinet! Add in the butter and stir until it melts and is well combined. Once cooled, store in the refrigerator for up to a week.
eggs, corn tortillas, hatch chilies, sauce, black beans
Corn Tortillas, Hash Browns for One, Eggs, Hatch Ancho Chile Sauce with a side of black beans, olives and sour cream

The sauce tasted really good, though it has been quite a few years since I last had it at Tohono Chul. This morning I made my Hash Browns for One, set them onto a couple of tortillas, topped that with two eggs, served myself some black beans and topped the eggs with the newly created Hatch Ancho Chile Sauce. It was a meal fit for a Southwest King - or Queen, as the case may be!


My passion is teaching people how to create a harmony of flavors with their cooking, and passing along my love and joy of food, both simple or exotic, plain or fancy. I continue my journey in ethnic and domestic cuisines, continuing my journey to explore diverse culinary experiences and hopefully to start you on a journey of your own. Join me also at A Harmony of Flavors on Facebook, and Pinterest.

Thursday, February 6, 2014

There is Nothing Like a Warm Cinnamon Roll...

Cinnamon Rolls, Breakfast, dessert, yeast dough
Cinnamon Roll, ready to eat
Today I was all set to head up to my office and work on my cookbook, when I thought about the cinnamon rolls I saw Mario Batali make on The Chew. He used pizza dough to make them, and while that would probably be good, I decided to try something my own way. Starting with my own pizza dough recipe as a base, I added in some honey for a little sweetness and an egg just to enrich the dough. I also scraped a half vanilla bean into the mixture. 

Once the dough was made, I weighed it. People always seem to give dough by weight; something I had never done till now. The whole batch of dough weighed just about 2.8 pounds.  I allowed the dough only a short rise of 15 minutes, rather than wait for a full "double in bulk." In the 15 minute wait, I made the filling by mixing together 1 melted stick of butter with brown sugar, cinnamon and vanilla.


yeast dough, yeast, cinnamon roll dough
15 minute rise
By the time I finished making the filling and washing the utensils, the dough was ready to work with. At that point I took the dough out and divided it into two sections, rolled, filled and cut, and set the pieces into a pan for another 15 minute rest. I turned on the oven, cleaned up the counters and utensils and it was time to bake the cinnamon rolls. Oh, the heavenly smell of cinnamon rolls baking! 

While they baked, I made the icing; a very simple confectioners sugar, melted butter, a pinch of salt, vanilla and water. This icing is rather thick, but as it gets set onto hot rolls right from the oven, the heat of the rolls takes care of melting the icing very enticingly down over and into the rolls.

The whole process took just about 2 hours with the short rising times, and I always use "quick rise" or "instant" yeast, so that makes rising times far shorter than they could be. Quick rise or instant yeast is available in most every grocery these days. I buy it bulk in 1 pound bricks, because I bake all our bread and many other wonderful things, like yeast waffles or pizza. One packet of yeast is equivalent to just about 2 1/2 teaspoons of bulk yeast, in case you might want to invest. There are little jars in the grocery also. I used to buy those, and then graduated to the pound brick. I keep my yeast in the freezer. Just take it out and straight into the bread mixture. No need to wait or thaw. The other benefit with instant yeast is that it does not need to "proof". No need to put the yeast into a little warm water to wait for it to start bubbling and growing. It can be added right to the dry mixture and everything just mixed together. Love it!
yeast dough, cinnamon mixture, recipe
Dough, smeared with cinnamon mixture


Cinnamon Rolls


DOUGH:
1/4 cup honey
1 3/4 cup lukewarm water
1 teaspoon salt
2 tablespoons olive oil or coconut oil, melted
4 cups bread flour
1/2 vanilla bean, scraped, or 1 teaspoon vanilla extract
1 packet instant-rise yeast
1 egg

In a large bowl, or bowl of a heavy duty stand mixer, place the first 4 ingredients. Add in the flour, vanilla and yeast and begin mixing. Add the egg and continue mixing. If kneading by hand, turn out onto a floured surface and knead for about 6 - 8 minutes. In the mixer, allow to mix with the dough hook for the same amount of time. Place dough into a greased bowl and set aside for 15 minutes. Meanwhile, make the Cinnamon Filling:


CINNAMON FILLING:
recipe, cinnamon rolls, breakfast,
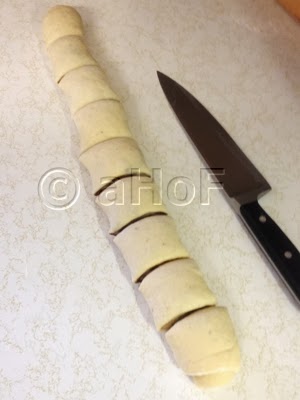
Rolled and cut

1 stick butter, softened
3 tablespoons cinnamon
1 cup brown sugar
1 teaspoon vanilla extract

Place all ingredients into a small bowl and combine with a spoon or hand mixer and set aside.

Divide the dough into 2 sections, and first roll one section of the dough into a large rectangle about 12 x 20 inches or so. Divide the cinnamon mixture in half and place half on the rolled piece of dough. Using a fork, smear it around. It can be difficult to smear in cold weather, but it doesn't have to be even. Roll the dough from the longer edge. Dot the far edge with a little water, to seal well. I sort of eyeballed the cutting, first dividing in half, and then into sections about 2-ish inches wide. Stand these on end in one half of a greased 13 x 9-inch pan. Repeat these steps with the second section of the dough and the cinnamon mixture, rolling, cutting and placing into the second half of the 13 x 9 pan. The two sections could also be set into two 9-inch round cake pans. Set aside to rise for 15 minutes. Set the oven to preheat to 350 degrees (325 on Convection).

cinnamon roll recipe, preparing for bake
Rolls set in pan for 15 minutes
ICING:
4 cups confectioners' sugar
4 tablespoons melted butter
3 - 4 tablespoons water or milk
1 teaspoon vanilla extract
pinch salt

Mix all the ingredients in a small bowl, stirring vigorously to combine. The icing will be stiff, but it will melt nicely onto the hot rolls.

Bake the rolls for about 20 to 25 minutes, or, if you own an instant-read thermometer, until one of the rolls in the middle of the pan reads 180 degrees in its center. They should be golden.

Remove from the oven and have handy a large baking sheet, (if you used a 13 x 9 pan) or a round plate (if you used 9-inch round pans). Place the baking sheet or plate over top of the hot pan, grip both together with hot pads and flip the hot pan upside down onto the baking sheet or plate. Now, repeat this process, so the rolls will end up with the tops upwards onto a serving plate or tray. It seems like a lot of to-do, but it is the easiest way to have the rolls out of the pan.
baking, cinnamon rolls, icing
Baked with golden tops and melting icing

Set a rounded tablespoon sized blob of icing on top of each roll. The residual heat will cause the icing to melt down into and over the hot cinnamon rolls. Note in this last photo, the almost solid blob of icing on the roll in the forefront, versus the nicely melted one behind.

Now, get ready to savor these wonderful, warm, gooey, cinnamon-y confections.


My passion is teaching people how to create a harmony of flavors with their cooking, and passing along my love and joy of food, both simple or exotic, plain or fancy. I continue my journey in ethnic and domestic cuisines, continuing my journey to explore diverse culinary experiences and hopefully to start you on a journey of your own. Join me also at A Harmony of Flavors on Facebook, and Pinterest.

Monday, January 13, 2014

The Yeast Waffle Saga, Continued


yeast waffles, experimentation
Waffle from Day 1, left;  the other after 48 hours, right
The story continues. I made a yeast waffle batter last Friday, in the hopes it would be easy to have wonderfully yeasty waffles right then and there. Not.

I made a good amount of batter (recipe in my last blog post), so I put it into the fridge, covered loosely with plastic wrap. It grew to fill the bowl, smelled more like yeast after 24 hours and I had hopes that now I would have that wonderfully yeasty waffles. Not. 

Definitely better than the day before. (Again, see my last post). The texture had changed a bit and they were better. Just not what I had hoped. I put the remaining batter back in the fridge. 

Sunday morning I brought it back out and made another couple of waffles. The batter smelled good, but there was still no yeast aroma while baking, and none perceptible when eating. I shared with my husband, including a piece of one of the waffles I had in a baggie from Day 1. In the photo at top you can see the immense difference in the texture of the waffles. The one made that first day was heavy and dense with no real great flavor. After 48 hours, the batter was so much better, I had hopes for that batter after all.
yeast waffles, experimentation
Beautiful texture and flavor after 72 hours

Today, after 72 hours, I made the last of the batter. It smelled yeasty when it was being cooked, for the first time. Again I shared with my husband, so he could see the differences. We agreed that today, finally, there was a yeasty flavor in the finished waffle. The texture had become light, crisp and airy and just about everything I had hoped for. The texture is visible in the photo at left.

I still would like something to be quicker to have ready. I do not mind making a batter the night before, to be ready to bake in the morning. This recipe, after 3 days in the fridge, gave me the flavor, aroma and texture I wanted. I would conclude that this recipe would be perfect if one knew that guests would be coming and wanted something really wonderful that could be prepped 3 days in advance and crossed off the to-do list. For something a bit more immediate, I am already planning another idea.

And then, while I stressed repeatedly to my wonderful husband that I DID NOT WANT another waffle iron, he got me another waffle iron. I was telling him about Liege Waffles. They are made with a very rich yeast dough (as opposed to a batter), formed into balls and set onto a "Belgian Waffle Maker" with a latch. The real Liege Waffles are also studded with Pearl Sugar. This sugar is particularly large and will caramelize inside the waffle while it cooks, so you end up with these little crunchy pockets of caramelized sugar. I talked to him about the fact that I would like to try something like that dough, even without the Pearl Sugar, but I wasn't sure my regular waffle iron would stay closed enough to make that kind of waffle. But then, I said to him, I really do not make waffles that often. The only reason I made them 4 days in a row was that I was conducting an experiment. And, I have never been overly fond of those huge, deep wells in the Belgian waffles. So he got me a Belgian Waffle Maker with a latch. Oh well.

So, tonight I created a very rich yeast dough. It is softer and more buttery than a bread dough. It is resting in the fridge, and I will experiment with that style of waffle tomorrow, in my new deep-welled Belgian Waffle Maker. I would also like to experiment with a brioche type dough and see how that fares as a waffle. For now, I will be dreaming - again - of yeast waffles in the morning, aaaahhhhh.....


My passion is teaching people how to create a harmony of flavors with their cooking, and passing along my love and joy of food, both simple or exotic, plain or fancy. I continue my journey in ethnic and domestic cuisines, continuing my journey to explore diverse culinary experiences and hopefully to start you on a journey of your own. Join me also at A Harmony of Flavors on Facebook, and Pinterest.

Saturday, January 11, 2014

Yeast Waffle Experiences

Long ago I found a recipe for Marion Cunningham's Yeast Waffles in the local newspaper. I tried the recipe and it was fantabulous! The smell of the waffle baking with its yeasty aroma so like bread baking; the flavor with the yeast right out there and apparent, the tender crispness of the waffle - all these made for one heady breakfast experience. I have been making them almost exclusively ever since.

I have tried other kinds of waffle recipes. Though I am not particularly fond of chocolate at most times and really not for breakfast, I did try a recipe that uses cocoa and Porter beer with its chocolatey undertones. That recipe is wonderful, and I usually serve those chocolate waffles with strawberries cut up into sour cream with a little sugar. Wonderful. I also spent time exploring ways to add fiber into the diet and made lots of waffles with added oat bran or wheat bran or corn meal. Nothing beats the yeast waffles recipe for flavor.
waffles, yeast, delayed baking, breakfast
My Refrigerator Yeast Waffles with Pecans and Blueberries

Waffle irons come is many sizes and shapes. These days many also have perfected the timing so one no longer has to make a guess when it might be done. I got a waffle iron from Williams Sonoma about 10 years ago. It has a slide bar to set, from 1 to 7, how done you want the waffle to be. It has a little red light to tell you it is heating or cooking, and a green light when the waffle is done, along with a little high-pitched whistling sound. It works great, and I have absolutely no complaints. It is a round waffle maker. If the batter goes all the way to the rim (which usually means it will overflow a little), it makes about an 8-inch diameter waffle. If the batter stays inside the rim, it makes about a 7-inch waffle. I have never had a Belgian waffle maker. I have never cared for the exceptionally deep wells it creates. I don't know why. It's just my thing. 

M.C.'s recipe calls for mixing the yeast, milk, butter, salt sugar and flour and mixing well, then lightly covering and leaving the bowl on the counter overnight. In the morning, or when ready to make the waffles, the batter will have risen noticeably. The smell is heavy with the slight fermenting of the yeast. At this point eggs and a little baking soda are added and whisked in and the batter is ready to bake. Obviously, I cannot just publish Marion Cunningham's Yeast Waffle recipe as mine (which I just read she got from Fanny Farmer's Cookbook), so I decided to try making a recipe for a yeast batter and see how it would go. 

waffles, batter, yeast, fermented
Batter after 24 hours in fridge
I wanted to make a batter that was ready to use right away. I mixed basically the same ingredients, but in different proportions, adding in baking soda. I am not a chemist, and am not sure exactly what the soda does in a yeast mixture (as opposed to it working with soured milk or buttermilk in a quick bread, cake or pancake). I feel it must help with the bubbling and puffing, particularly if the batter is left out to ferment. Well, my batter had not been fermented, but I added it anyway. I made the waffles yesterday. I was unimpressed. There was absolutely no yeast smell from the batter nor any aroma while baking. The waffles were fine. While there was nothing inherently "wrong" with them, they were just - plain - waffles.  I also made a couple of pancakes with the batter, and those worked fine, too, but were similarly uninteresting.


Consistency of the batter
I decided to put the rest of the batter in the fridge. I covered it lightly with plastic wrap. The batter grew to completely fill the bowl by this morning. I stirred it down and tried again. This morning the batter noticeably smelled like yeast, though without that wonderfully pungent fermented quality. I had hopes. I made waffles. I sprinkled ¼-cup chopped pecans onto the batter in the iron. The waffles tasted better, but still no real yeasty aroma while baking, nor anything to indicate they are yeast waffles while eating them. I am going to give them another day in the fridge and try again tomorrow. I like things that are ready right away and not something I have to wait for days to develop flavor. I think I am going to go back to making a new recipe that will ferment overnight and see what I can come up with. Meanwhile, this is my recipe, to date:


Refrigerator Yeast Waffles

¼ cup warm water
1 package yeast
1 cup whole wheat pastry flour (or use all-purpose for the total amount)
2 cups all-purpose flour
waffles, breakfast, recipe, yeast, refrigerator ferment
Refrigerator Yeast Waffle with pecans

2 tablespoons sugar
1 teaspoon salt
½ teaspoon baking soda
2¾ cup milk or half & half
3 eggs
1 stick unsalted butter, melted

Stir the yeast into the warm water and let it froth. In a large bowl, combine the flours, sugar, salt and soda. Whisk together the milk and eggs; add in the melted butter. Pour this mixture into the dry ingredients and mix well. Add the yeast and beat to combine. Store in a plastic or glass bowl in the refrigerator overnight and up to 4 days: make sure the batter has a LOT of room to grow, or you will find a mess next day. Cover lightly. If you top with a lid that seals tightly, it could explode as the batter expands.

This will make approximately 10 (7-inch) round waffles or about 20 pancakes. As each waffle iron is different size and shape, you will have to experiment to see how much batter to use per waffle. Bake according to waffle iron instructions. I had mine set on the higher side of medium.


My passion is teaching people how to create a harmony of flavors with their cooking, and passing along my love and joy of food, both simple or exotic, plain or fancy. I continue my journey in ethnic and domestic cuisines, continuing my journey to explore diverse culinary experiences and hopefully to start you on a journey of your own. Join me also at A Harmony of Flavors on Facebook, and Pinterest.

Disqus