Translate

Showing posts with label vanilla bean. Show all posts

Thursday, February 6, 2014

There is Nothing Like a Warm Cinnamon Roll...

Cinnamon Rolls, Breakfast, dessert, yeast dough
Cinnamon Roll, ready to eat
Today I was all set to head up to my office and work on my cookbook, when I thought about the cinnamon rolls I saw Mario Batali make on The Chew. He used pizza dough to make them, and while that would probably be good, I decided to try something my own way. Starting with my own pizza dough recipe as a base, I added in some honey for a little sweetness and an egg just to enrich the dough. I also scraped a half vanilla bean into the mixture. 

Once the dough was made, I weighed it. People always seem to give dough by weight; something I had never done till now. The whole batch of dough weighed just about 2.8 pounds.  I allowed the dough only a short rise of 15 minutes, rather than wait for a full "double in bulk." In the 15 minute wait, I made the filling by mixing together 1 melted stick of butter with brown sugar, cinnamon and vanilla.


yeast dough, yeast, cinnamon roll dough
15 minute rise
By the time I finished making the filling and washing the utensils, the dough was ready to work with. At that point I took the dough out and divided it into two sections, rolled, filled and cut, and set the pieces into a pan for another 15 minute rest. I turned on the oven, cleaned up the counters and utensils and it was time to bake the cinnamon rolls. Oh, the heavenly smell of cinnamon rolls baking! 

While they baked, I made the icing; a very simple confectioners sugar, melted butter, a pinch of salt, vanilla and water. This icing is rather thick, but as it gets set onto hot rolls right from the oven, the heat of the rolls takes care of melting the icing very enticingly down over and into the rolls.

The whole process took just about 2 hours with the short rising times, and I always use "quick rise" or "instant" yeast, so that makes rising times far shorter than they could be. Quick rise or instant yeast is available in most every grocery these days. I buy it bulk in 1 pound bricks, because I bake all our bread and many other wonderful things, like yeast waffles or pizza. One packet of yeast is equivalent to just about 2 1/2 teaspoons of bulk yeast, in case you might want to invest. There are little jars in the grocery also. I used to buy those, and then graduated to the pound brick. I keep my yeast in the freezer. Just take it out and straight into the bread mixture. No need to wait or thaw. The other benefit with instant yeast is that it does not need to "proof". No need to put the yeast into a little warm water to wait for it to start bubbling and growing. It can be added right to the dry mixture and everything just mixed together. Love it!
yeast dough, cinnamon mixture, recipe
Dough, smeared with cinnamon mixture


Cinnamon Rolls


DOUGH:
1/4 cup honey
1 3/4 cup lukewarm water
1 teaspoon salt
2 tablespoons olive oil or coconut oil, melted
4 cups bread flour
1/2 vanilla bean, scraped, or 1 teaspoon vanilla extract
1 packet instant-rise yeast
1 egg

In a large bowl, or bowl of a heavy duty stand mixer, place the first 4 ingredients. Add in the flour, vanilla and yeast and begin mixing. Add the egg and continue mixing. If kneading by hand, turn out onto a floured surface and knead for about 6 - 8 minutes. In the mixer, allow to mix with the dough hook for the same amount of time. Place dough into a greased bowl and set aside for 15 minutes. Meanwhile, make the Cinnamon Filling:


CINNAMON FILLING:
recipe, cinnamon rolls, breakfast,
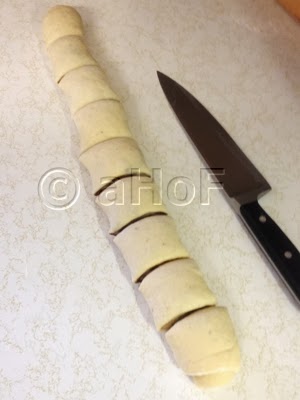
Rolled and cut

1 stick butter, softened
3 tablespoons cinnamon
1 cup brown sugar
1 teaspoon vanilla extract

Place all ingredients into a small bowl and combine with a spoon or hand mixer and set aside.

Divide the dough into 2 sections, and first roll one section of the dough into a large rectangle about 12 x 20 inches or so. Divide the cinnamon mixture in half and place half on the rolled piece of dough. Using a fork, smear it around. It can be difficult to smear in cold weather, but it doesn't have to be even. Roll the dough from the longer edge. Dot the far edge with a little water, to seal well. I sort of eyeballed the cutting, first dividing in half, and then into sections about 2-ish inches wide. Stand these on end in one half of a greased 13 x 9-inch pan. Repeat these steps with the second section of the dough and the cinnamon mixture, rolling, cutting and placing into the second half of the 13 x 9 pan. The two sections could also be set into two 9-inch round cake pans. Set aside to rise for 15 minutes. Set the oven to preheat to 350 degrees (325 on Convection).

cinnamon roll recipe, preparing for bake
Rolls set in pan for 15 minutes
ICING:
4 cups confectioners' sugar
4 tablespoons melted butter
3 - 4 tablespoons water or milk
1 teaspoon vanilla extract
pinch salt

Mix all the ingredients in a small bowl, stirring vigorously to combine. The icing will be stiff, but it will melt nicely onto the hot rolls.

Bake the rolls for about 20 to 25 minutes, or, if you own an instant-read thermometer, until one of the rolls in the middle of the pan reads 180 degrees in its center. They should be golden.

Remove from the oven and have handy a large baking sheet, (if you used a 13 x 9 pan) or a round plate (if you used 9-inch round pans). Place the baking sheet or plate over top of the hot pan, grip both together with hot pads and flip the hot pan upside down onto the baking sheet or plate. Now, repeat this process, so the rolls will end up with the tops upwards onto a serving plate or tray. It seems like a lot of to-do, but it is the easiest way to have the rolls out of the pan.
baking, cinnamon rolls, icing
Baked with golden tops and melting icing

Set a rounded tablespoon sized blob of icing on top of each roll. The residual heat will cause the icing to melt down into and over the hot cinnamon rolls. Note in this last photo, the almost solid blob of icing on the roll in the forefront, versus the nicely melted one behind.

Now, get ready to savor these wonderful, warm, gooey, cinnamon-y confections.


My passion is teaching people how to create a harmony of flavors with their cooking, and passing along my love and joy of food, both simple or exotic, plain or fancy. I continue my journey in ethnic and domestic cuisines, continuing my journey to explore diverse culinary experiences and hopefully to start you on a journey of your own. Join me also at A Harmony of Flavors on Facebook, and Pinterest.

Thursday, January 2, 2014

Dulce de Leche Turtle Cheesecake


I wrote a couple of days back about my inspiration for making a Dulce de Leche Turtle Cheesecake. I made the cheesecake part then, and finished the toppings to serve it for our New Year's Day dinner last evening. It certainly delivered on every wish and hope I had. And - it is completely Gluten-Free! My sister-in-law suggested that this cheesecake might also be really good with a shortbread type crust, and I agree.

My goals while making this cheesecake were:
  1. that it not be too cloyingly sweet
  2. to use coarse salt, making it a "salted caramel" style
  3. that the cheesecake part be smooth and creamy
After tasting the finished cheesecake last evening, I believe I accomplished all of those goals. The filling was dreamy-smooth. It was not too overly sweet. The salt balanced perfectly. Even a tiny amount more would have been too much salt, but it worked perfectly just as it was made. 

My Dulce de Leche Turtle Cheesecake, finished
There are a couple of things that might have been better - not about the flavor, because that was, to me, perfect and just what I was looking for. The toppings were my sticking point. The flavors were great, so no problem there. My initial thought had been to use broken pecans, strewn over the top of the cake. However, I went back and forth, even discussing with my sister-in-law, about whether to leave the pecans on top whole, or broken. I selected whole pecans to toast, just in case I decided on decorating the top in a symmetrical manner. I ended up using whole pecans in a beautiful pattern, but in retrospect, broken pecans might have been the better choice. The reason? Trying to eat the cheesecake required trying to cut a bite around a whole pecan, making either a really large bite, or eating around it and then deciding on the pecan. Not a huge problem; not insurmountable, but still... 

The other thing that could have been better is the melted chocolate over the top. I used good-quality chocolate chips and placed them into a piping bag. I set the piping bag with the top edges turned down over a tall water glass to support the bag. I just stuck the bag with the glass into the microwave to melt the chocolate with short 20-second intervals. Initially, I was going to melt the chocolate with butter or oil, to soften it and then put it into a bag. Later I decided to just melt the chocolate alone. Once the chocolate was zig-zagged over the cheesecake and chilled, trying to cut through the hardened chocolate drizzle was almost impossible without destroying the slice entirely. I used the knife to rap sharply against the hardened chocolate drizzle to try and make a place to cut a slice. The slice still was not clean. In retrospect, I believe adding a tablespoon of cooking oil to the chocolate while melting would give a softer final result.

All in all, not huge problems, and the taste results were spectacular, so here is my recipe:

Dulce de Leche Turtle Cheesecake


Makes one 9-inch cheesecake
Dulce de Leche Turtle Cheesecake, sliced


PECAN CRUST
1¼ cup pecans
2 tablespoons + 1 teaspoon sugar
¼ teaspoon vanilla extract
2½ tablespoons softened unsalted butter
½ teaspoon coarse salt (Fleur de Sel)
¾ cup dark chocolate chips

FILLING
3 (8-ounce) blocks cream cheese, softened
14 ounces dulce de leche; reserve ¼ cup aside for topping
½ cup brown sugar
2 tablespoons cornstarch
½ cup sour cream
½ vanilla bean, split and scraped
½ teaspoon coarse salt
4 eggs

TOPPINGS
1½ cup broken pecans
¼ cup reserved dulce de leche
½ cup semi-sweet or bittersweet chocolate

Make Crust: Preheat oven to 375 degrees (350 on Convection). Combine the pecans, sugar and vanilla extract in the bowl of a food processor; process until the pecans are coarsely chopped. Add the butter and process until the nuts are finely chopped. Press the mixture into the bottom and 1 to 1½ inches up the sides of a 9-inch springform pan. Bake the crust for about 12 to 15 minutes or until very fragrant. As soon as the crust comes from the oven, sprinkle in the half teaspoon coarse salt and then the chocolate chips. Set aside while preparing the filling. The chocolate chips will become soft. With a spatula, spread the melted chips evenly over the crust. Allow to cool thoroughly. Reduce oven to 300 degrees (275 on Convection).

Make Filling: In a mixer bowl, first beat the cream cheese until smooth, then add in the dulce de leche, brown sugar, cornstarch, sour cream, vanilla and salt. Mix well on low speed until well blended. Whisk the eggs together in a separate bowl, then add them, mixing gently until just incorporated; do not over beat at this point. Pour filling over the chocolate in the cooled crust.

Cut a large piece of aluminum foil and set the springform pan in the center. Wrap the foil up the sides of the pan, encasing it completely. Prepare a roasting type pan large enough to accommodate the springform, filling with hot water to about 1-inch up the sides of the pan. Set the larger pan of water in the oven. Set the foil-wrapped springform pan into the larger pan in the oven. Bake the cheesecake for about 1 hour or until just jiggly in the center. Remove from oven and cool completely on a rack. Refrigerate the cheesecake, covered for at least 3 hours or up to 3 days, before topping and serving.

Toppings: Preheat oven to 325 degrees. Place broken pecans on a dry baking sheet and toast for about 10 minutes. Cool the nuts before using. This can be done well ahead and the nuts stored in a sealed container until needed. The nuts may be left whole, to make a lovely pattern on top of the cheesecake, or broken to scatter over the cake.

Melt the chocolate in the microwave, carefully, in 20-second increments, checking each time, until soft. Pour into a piping bag or a sturdy zip-top bag. Set aside.

Finish the cake: Gently reheat the reserved dulce de leche for just a few seconds in the microwave. Scatter broken pecans over the top of the completely cooled cheesecake, or arrange whole nuts in a pattern. Snip a very small hole in the piping bag or zip top bag with the dulce de leche and drizzle a zigzag in one direction over the top of the nuts. Snit a small hole in the piping bag or zip top bag with the melted chocolate and drizzle the chocolate in a zigzag pattern in the opposite direction across the dulce de leche. Keep chilled until serving.

Bon apettit!


My passion is teaching people how to create a harmony of flavors with their cooking, and passing along my love and joy of food, both simple or exotic, plain or fancy. I continue my journey in ethnic and domestic cuisines, trying new things weekly. I would love to hear from you, to help me continue my journey to explore diverse culinary experiences and hopefully to start you on a journey of your own. Join me also at A Harmony of Flavors on Facebook, and Pinterest.  

Disqus