Translate

Showing posts with label instant yeast. Show all posts

Sunday, January 6, 2019

Just Because Sometimes White Breads are Delicious

I know I have been all about whole grains and seeds, and particularly in breads. But, you know, sometimes there are some old recipes that just taste so terribly good. How could I let them slip away? I really cannot. And so, I am revisiting some oldies that I have been making for at least 20+ years. Not all the time. But just - sometimes. And these two recipes are so marvelous. And so different.

One of the breads is fantastic due to all the added flavors. The other is fantastic for just the opposite reason; no particular flavors added, so it is so great with highly flavored foods. Think spaghetti or lasagna, maybe? 

The first bread is one I started making, with my own changes, since I read it in one of the booklets that came with my very first DAK Bread Machine, way back in the '90s. I loved the result, though I had a hard time ever getting the breads to bake properly inside the bread maker, so instead I would let the kneading happen and then turn out and finish it by hand and bake in the oven. Later on, after reading the ingredients in the packet of onion soup mix, I opted to create my own recipe for a Dry Onion Soup Mix. The bread is so jam-packed with flavor with all the herbs and the dry onion soup that it is wonderful all on its own, but it makes some truly great sandwiches, also.
Herb, Onion soup, bread, Loaf, recipe
Herbed Onion Loaf

Herbed Onion Loaf

Makes 2 loaves

Herbs, Onion  soup mix, Loaf
Herbed Onion Loaf
¼ cup water
¾ cup cottage cheese
¾ cup sour cream
3 tablespoons granulated sugar
1 envelope dry onion soup mix, or use one recipe of my Dry Onion Soup Mix
1½ tablespoons unsalted butter
3⅓ cups bread flour
1 packet "instant" or "quick-rise" yeast
¼ teaspoon baking soda
2 teaspoons gluten, optional
1 large egg
2 - 3 tablespoons finely minced fresh herbs (such as dillweed, rosemary and/or thyme)

Mix together the water, cottage cheese, sour cream, sugar, dry onion soup mix and butter and bring to lukewarm, either in a saucepan on the stove or in the microwave. Do not over-heat. Pour this mixture into the bowl of a heavy duty mixer with bread hook. If making by hand, pour into a large bowl.

Separately, whisk together in another bowl the bread flour, yeast, soda and gluten, if using, along with the fresh minced herbs. Pour these dry ingredients into the bowl with the wet ingredients and begin mixing together slowly. If by hand, you might start with a spoon, then switch to hands to knead. Add in the egg and mix well. Knead by machine for about 8 minutes. If kneading by hand, knead for 10 to 12 minutes. If the dough starts to climb up the dough hook, or if it is very dense and hard when kneading by hand, dribble in a little water, 1 tablespoon at a time, until the dough becomes soft, a bit tacky but not sticky. If the dough is too wet, add in a little flour, 2 tablespoons at a time, until the dough comes together, smooth, a bit tacky but not sticky. 

Grease another bowl and gather the dough together into a neat ball and place into the bowl, turning once to grease all sides. Cover with a towel or plastic film and set aside to rise to about doubled in size.

Turn out the dough onto a lightly floured surface. Divide the dough into two equal sized balls. Roll up each ball into a loaf shape and set into two greased loaf pans or roll them out into more elongated loaves and set onto a parchment lined baking sheet, set well apart (or onto two smaller parchment lined sheets). If making dinner rolls, divide each half of the dough into 12 pieces and roll into balls. Set the balls into greased muffin tin wells or, well-spaced, onto parchment lined sheets. Cover and let rise until doubled. 

Have oven preheated to 350 degrees. Bake freestanding loaves for 25 to 30 minutes, loaves in pans may take 5 or more minutes longer, to an internal temperature of about 195 degrees F. Dinner rolls will bake in about 15 minutes.

~~~~~~~~~~~~~~~~~~~~ 

The second bread is fantastic due to its lack of added flavors, making the bread itself wonderfully flavorful in all its "bread-ness," but also making it a superb pairing with anything with lots of highly flavored sauce. It is an Italian style bread, and also a soured bread. It is up to your own discretion how long to allow the souring to go on, from one to three days, before working with the bread. Not a true sourdough in the sense of using a starter that is maintained and fed regularly, but a one-time sourdough, nonetheless. Any time bread is left to develop flavors this way, it unlocks things inside the wheat that bring out new and different flavors than would have been there if just made straight through in one day. Just be sure to plan ahead for when the bread will be needed, from one to three days.

Italian style, Bread, starter, quick starter, three day starter
Italian Bread

Italian Bread

Italian Bread, unflavored loaf, fermented bread
Italian Bread

Makes 2 loaves

STARTER:
1 cup water
1 cup bread flour
1 packet (2½ teaspoons) "instant" or "quick rise" yeast 

DOUGH:
1 cup water
3½ cups bread flour
1¼ teaspoons instant or quick rise yeast
1 teaspoon salt

cornmeal for sprinkling

MAKE STARTER: Place the 1 cup of water into a large mixing bowl. Stir together the 1 packet instant yeast and the 1 cup bread flour, then add to the water in the bowl and stir well, about 4 or 5 minutes. Cover with plastic film and set aside in a room temperature place for 1 to 3 days. At this point it should have risen, become bubbly and possibly fallen again. It will smell yeasty and possibly with an alcoholic tang to the smell. 

French Bread, Pan, loaves
French Bread Pan
MAKE THE DOUGH: Add the extra 1 cup of water to the soured mixture and stir. Separately, stir together the additional 1¼ teaspoon instant yeast and the 3½ cups bread flour with the salt, then stir this into the bowl with the soured mixture until the mixture comes together, then turn out onto a lightly floured surface and knead the dough for 8 to 10 minutes. Coat a large bowl with olive oil, then set the kneaded dough into the bowl, turning once to coat all sides. Cover the bowl and let rise until doubled in size, about 2 hours. 

If you own a French bread pan, spray the pan with cooking spray, then sprinkle well with cornmeal. If you do not own this type of pan, spray a rimmed baking sheet (or two, if small) with cooking spray and coat with cornmeal. 

Turn the dough out onto a lightly floured surface and cut the dough into two equal pieces. Form each piece into a long loaf and set into the wells of the French bread pan or onto the prepared baking sheet(s), well apart. Cover and allow to rise until doubled, about 1½ or 2 hours.

Have the oven preheated to 350 degrees. Bake the risen loaves for about 30 minutes, or until nicely golden. Cool thoroughly before cutting.


My passion is teaching people how to create a harmony of flavors with their cooking, and passing along my love and joy of food, both simple or exotic, plain or fancy. I continue my journey in ethnic and domestic cuisines, continuing my journey to explore diverse culinary experiences and hopefully to start you on a journey of your own. Join me also at A Harmony of Flavors on Facebook, and Pinterest.

Friday, April 4, 2014

Beer Bread Turns Out Perfect

I  mentioned a few days ago that I have been trying to prepare for the arrival of 4 guys as guests here next week. Making bread and getting it frozen so it's available at a moment's notice is one way to prepare. I saw a recipe for a bread using a whole bottle of beer, and thought, "most guys like beer, so this should be good". My husband is one exception - he hates beer. Even so, I decided to give it a try and see what the flavor was like. At worst, my husband wouldn't eat it. At best, everyone would love it. 
Beer Bread, bread making, recipe
Beer Bread


I took the concept from that same cookbook that has so often steered me wrong in past, but with the amount of experience I have with making bread, I can usually see when there are problems and correct before they go too far wrong. Sometimes, there needs to be more tweaking, such as with the Cinnamon Raisin Bread I made last week. Eventually it comes out right or I give up the recipe concept as a no-go and leave it at that. The Cinnamon Raisin Bread was wonderfully tasty; no problem there. The only real difficulty was how it rose gigantically and spilled sticky cinnamon sugar butter all over the oven. Easily fixed: make 3 loaves instead of 2 from the recipe.

Sponge, making dough, bread recipe, beer
The Sponge: just mixed; after 30 minutes note bubbles

Back to the Beer Bread. Making a sponge to start with is a nice way to avoid having to knead for a full 8 or 10 minutes. The action of the yeast in the sponge takes on a part of the process. I made the sponge, and let it set for 30 minutes, though 45 minutes would also have been fine. You can see here how it is nice and bubbly after that time. The beer is slightly heated before using it in the sponge. I warmed it on the stove, while prepping the other ingredients. It takes seconds to whisk the sponge ingredients together, just until they are combined. Then you let the yeast do the work for you. After the sponge grows, you add the rest of the flour and knead for another 5 minutes or so, until the dough comes together nicely. 

This recipe uses a long, slow chilled rise after the loaves are formed, which really gives the yeast time to work slowly, and may also contribute to the overall tangy flavor of the bread. You will need room in the fridge for this long rise. Or, if you are still having freezing weather like we are - I set the pan, well covered, in my "sun room," which is at about 50 degrees. All this cold weather is good for something, after all. I set the loaves  onto a chair, and tented flour sack towels from over from the back of the chair to cover the bread. I didn't want the towels to stick to the loaves and chance deflating when uncovered. If you begin making the bread in the afternoon, you may allow the bread to do its slow rise overnight. I started the loaves early in the morning, and baked after 6 hours in the chilled sun room and the bread was done at supper time.

French Bread Pan
French Bread Pan
I have a large French Bread pan I acquired many many years ago, and it is wonderful to use. It keeps the bread nicely rounded and it is long; probably about 15 or more inches. I used the French bread pan to make my Beer Bread, forming the loaves nice and long. I lined the pan with parchment. This was a new idea; something I had never done before with this pan. The pan is perforated so the heat can really get to the crust and make it nice and crisp. Parchment is also porous, so I just gave it a try. I sprayed the parchment with cooking spray before setting the long, formed loaves into the wells. 

After all, the bread came out with a far crispier crust than I have ever managed previously with any loaf. The finished bread did have a slight bitterness at the end, but tastes wonderful. I shared an end with my husband and he liked it very much, despite that slight bitterness. I cannot truly taste beer, but it is evident that there is something very different in the flavor from other French Bread or other loaves of this sort. Here is my recipe.

Beer Bread, making bread, ingredients, beer
Beer Bread - Just out of the oven

Beer Bread


Makes 2 long loaves

SPONGE:
1 (12-ounce) bottle of beer
1½ teaspoons instant yeast
pinch of sugar
1 cup warm water, 100 to 115 degrees
1 cup bread flour

2 cups bread flour
2 teaspoons salt
up to 2 cups more bread flour

FOR BRUSHING LOAVES:
¼ cup water
¼ teaspoon salt

Make the Sponge: Heat the beer briefly to about 110 to 115 degrees, or until it feels nicely warm, not hot, on your pinkie finger. Set aside. In a large bowl, or the bowl of a heavy duty stand mixer, whisk together the 1 cup bread flour, the yeast, pinch of sugar and salt. Whisk in the warm water and then the beer until the mixture is smooth, about 1 minute or less. Set the sponge aside to rise for 30 to 45 minutes, until bubbly. Do not try to speed this process.

Once the sponge is ready, if using the mixer, attach the bread hook and add in the first 2 cups of bread flour and the salt and slowly start the mixer. If working by hand, add these ingredients and stir with a wooden spoon. Once the spoon becomes difficult to work with, switch to kneading by hand. Once these ingredients are well incorporated, begin adding more flour, ½ cup at a time, up to 2 cups, as needed. Knead until smooth. This process should take about a total of 5 minutes. 


bread making, dough, proofing
Loaves risen, after 6 hours; ready to bake
Set the dough into a greased bowl, turning once to coat. If using a heavy duty mixer, just remove the dough hook and leave the dough in the bowl. Cover the bowl with a towel and set aside to rise until about doubled in volume. Do not try to speed the rising process. The rising time should be about 2 hours or so.

Once risen, turn the dough out onto a lightly floured surface. Divide the dough into two equal pieces. Gently knead out the large air bubbles and roll each piece into a log shape, then using palms and a rocking motion, roll out to long narrow loaves. If you own a French bread pan, grease the pan. Line with parchment if desired. Alternatively, grease a baking sheet and strew with cornmeal; set the formed loaves on the baking sheet, well apart. Brush the loaves with oil, then gently dust with a little flour. Make ¼ inch deep slashes diagonally across the loaves, about 4-inches apart. Cover the loaves lightly and set in the refrigerator for 6 to 12 hours for a very slow rise.

To Bake: Preheat oven to 425 (400 on Convection). Remove the bread from the refrigerator. Mix together the ¼ cup water with the ¼ teaspoon salt. Using a pastry brush, gently brush this over the loaves. Set the pan in the oven and bake for 30 to 35 minutes, brushing with the salt water once more about half way through the baking time.  When done, the loaves sound hollow when tapped. If you own an instant thermometer, the internal temperature should be about 204 degrees. 


My passion is teaching people how to create a harmony of flavors with their cooking, and passing along my love and joy of food, both simple or exotic, plain or fancy. I continue my journey in ethnic and domestic cuisines, continuing my journey to explore diverse culinary experiences and hopefully to start you on a journey of your own. Join me also at A Harmony of Flavors on Facebook, and Pinterest.

Friday, March 7, 2014

Oatmeal Raisin Walnut Bread - Yum

Many years ago, when visiting Aberdeen, my sister-in law Sherri asked if I might help her make her grandmother's Oatmeal Raisin Bread. Her mom had this recipe written in her one and only cookbook. Sherri described to me the things she recalled about the bread, thinking that the recipe as written did not - quite - seem like she remembered. It needed more raisins, for one thing. We sat down together and reviewed the recipe, deciding how much to alter the original and finally making a recipe that turned out, to her recollection, fairly spot-on. We decided the amount of raisins could be more than what we used, but that was still fine.

Just a few years back, when Sherri approached me about making a cookbook out of all her mom's recipes so the family could all have copies, I set about deciphering the recipes written in the cookbook. My mother-in-law did not apparently use the cookbook itself, except to write recipes into: in the margins, between lines, inside the covers and any blank spot at all. She also stapled in bits of paper with yet more recipes. Some of the recipes were written in pencil a very long time ago and were barely legible. I had to stand under direct sunlight to catch the shininess of the pencil to be able to read these. Some recipes were written in pen, and then had alternate amounts written above, and sometimes crossed out with other things written alongside. Some recipes were written up to 3 separate times, in three separate places in the book, and sometimes these were differing in amounts or even ingredients. It was quite a task to get these all together.

Oatmeal, Raisins, Walnuts, Bread, recipe
Oatmeal Raisin Walnut Bread
To make matters worse, Sherri's older sister Nancy had many recipes her mom had written on note cards or other scraps of paper and given  her over the years. In many cases, these were so different as to be surprising to have come from the same person. And, on top of that, there were some recipes my mother-in-law either made while visiting me, or sent to me later, and these were different also. I have one way of making her Famous Baked Beans, and my husband swears mine are the best. Yet his sisters' recipes are quite different. 

Which brings me back to the Oatmeal Raisin Bread; there was the original recipe written in my mother-in-law's cookbook. There was the altered recipe as Sherri and I made it (and I had re-made this bread various times over the years), and then there was Nancy's recipe from her mom, which was far different. I created that cookbook for the family. Many of the recipes were ones that Nancy had passed on to her children and they also altered to their taste. Still, it was a labor of love and appreciated, to have all the recipes in one spot. When making some of the recipes and entering them into my website or in this blog, I have given credit to Mom Rawstern when using her recipes, though I have no clue where the recipe may have originally come from. I was planning to make the bread again a few days ago and decided to check the recipes side by side. Nancy's recipe was far larger. It easily made 3 loaves, where the one Sherri and I used made 2 smaller loaves. Nancy's recipe had a whole stick of butter, where the smaller recipe had 2 tablespoons. And on it went. I created my own recipe using the two, side by side, deciding as I went along what I wanted and what not. I added walnuts because I love them. I added some finely ground Earl Grey tea, though I could not find any trace of that flavor in the finished bread. I added gluten, as this is a rich, dense bread that takes some time to rise; the gluten is not necessary, but it helps shorten the rising time and makes the bread lighter-textured than if not using extra gluten. No matter which way, this bread is moist, slightly dense, wonderful as is, or as toast. 

Oatmeal Raisin Walnut Bread


Makes three (8½ x 4½-inch) loaves
dough, rising dough, yeast, bread
Dough after 1st rise


2 cups boiling water
2 cups rolled oats
1 stick unsalted butter
½ cup brown sugar
¼ cup molasses
1 cup cool water
4½ cups bread flour
4 tablespoons gluten, optional
1 teaspoon salt
1 packet (1¾ teaspoons) instant/quick-rise yeast
½ cup dry milk powder, optional

¾ cup walnuts, broken
¾ cup raisins
1 Earl Grey teabag, or 2 1/2 teaspoons loose leaf Earl Grey Tea, finely ground, optional

Into the bowl of a heavy duty stand mixer with a dough hook, place the boiling water, oatmeal, butter, salt, brown sugar and molasses. Let stand for at least 10 minutes. Add in 1 cup cool water and stir. Check the temperature; it should be just warm to the pinkie finger but not hot. If still hot, allow to cool to just barely warm. Separately, combine 3 cups of the flour with the gluten, yeast, salt and milk powder if using. Stir to combine the dry ingredients. When the liquids are no longer hot, add in the flour mixture along with the raisins, walnuts and tea. Set the mixer to knead slowly until combined, then increase speed and allow to knead for 8 - 10 minutes, adding in the remaining flour little by little. Remove the dough hook and set the bowl in a warm place to rise until about doubled in bulk.

Oatmeal, Raisins, Walnuts, Bread, recipe
Oatmeal Raisin Walnut Bread

*If making this by hand, proceed similarly, allowing the first ingredients to cool, then adding the dry ingredients first with a spoon, then turn out onto a surface to knead in the remaining flour, kneading for a total of 10 minutes. Set the dough into a greased bowl to rise in a warm place until doubled in bulk.

Once the dough has risen (2 - 2½ hours), turn out and divide into 3 equal sections. Grease three (8½ x 4½-inch) loaf pans. Form each segment of the dough into a loaf shape and set into the pans to rise again, until about doubled in size, 1 to 1 1/2 hours. Preheat oven to 350 degrees. Set pans in center of oven and bake for 35 to 40 minutes, or until risen and golden brown. Turn out onto racks to cool. Once cooled, the extra loaves may be wrapped and kept in zip-top bags in the freezer for up to 3 months.


My passion is teaching people how to create a harmony of flavors with their cooking, and passing along my love and joy of food, both simple or exotic, plain or fancy. I continue my journey in ethnic and domestic cuisines, continuing my journey to explore diverse culinary experiences and hopefully to start you on a journey of your own. Join me also at A Harmony of Flavors on Facebook, and Pinterest.

Thursday, February 6, 2014

There is Nothing Like a Warm Cinnamon Roll...

Cinnamon Rolls, Breakfast, dessert, yeast dough
Cinnamon Roll, ready to eat
Today I was all set to head up to my office and work on my cookbook, when I thought about the cinnamon rolls I saw Mario Batali make on The Chew. He used pizza dough to make them, and while that would probably be good, I decided to try something my own way. Starting with my own pizza dough recipe as a base, I added in some honey for a little sweetness and an egg just to enrich the dough. I also scraped a half vanilla bean into the mixture. 

Once the dough was made, I weighed it. People always seem to give dough by weight; something I had never done till now. The whole batch of dough weighed just about 2.8 pounds.  I allowed the dough only a short rise of 15 minutes, rather than wait for a full "double in bulk." In the 15 minute wait, I made the filling by mixing together 1 melted stick of butter with brown sugar, cinnamon and vanilla.


yeast dough, yeast, cinnamon roll dough
15 minute rise
By the time I finished making the filling and washing the utensils, the dough was ready to work with. At that point I took the dough out and divided it into two sections, rolled, filled and cut, and set the pieces into a pan for another 15 minute rest. I turned on the oven, cleaned up the counters and utensils and it was time to bake the cinnamon rolls. Oh, the heavenly smell of cinnamon rolls baking! 

While they baked, I made the icing; a very simple confectioners sugar, melted butter, a pinch of salt, vanilla and water. This icing is rather thick, but as it gets set onto hot rolls right from the oven, the heat of the rolls takes care of melting the icing very enticingly down over and into the rolls.

The whole process took just about 2 hours with the short rising times, and I always use "quick rise" or "instant" yeast, so that makes rising times far shorter than they could be. Quick rise or instant yeast is available in most every grocery these days. I buy it bulk in 1 pound bricks, because I bake all our bread and many other wonderful things, like yeast waffles or pizza. One packet of yeast is equivalent to just about 2 1/2 teaspoons of bulk yeast, in case you might want to invest. There are little jars in the grocery also. I used to buy those, and then graduated to the pound brick. I keep my yeast in the freezer. Just take it out and straight into the bread mixture. No need to wait or thaw. The other benefit with instant yeast is that it does not need to "proof". No need to put the yeast into a little warm water to wait for it to start bubbling and growing. It can be added right to the dry mixture and everything just mixed together. Love it!
yeast dough, cinnamon mixture, recipe
Dough, smeared with cinnamon mixture


Cinnamon Rolls


DOUGH:
1/4 cup honey
1 3/4 cup lukewarm water
1 teaspoon salt
2 tablespoons olive oil or coconut oil, melted
4 cups bread flour
1/2 vanilla bean, scraped, or 1 teaspoon vanilla extract
1 packet instant-rise yeast
1 egg

In a large bowl, or bowl of a heavy duty stand mixer, place the first 4 ingredients. Add in the flour, vanilla and yeast and begin mixing. Add the egg and continue mixing. If kneading by hand, turn out onto a floured surface and knead for about 6 - 8 minutes. In the mixer, allow to mix with the dough hook for the same amount of time. Place dough into a greased bowl and set aside for 15 minutes. Meanwhile, make the Cinnamon Filling:


CINNAMON FILLING:
recipe, cinnamon rolls, breakfast,
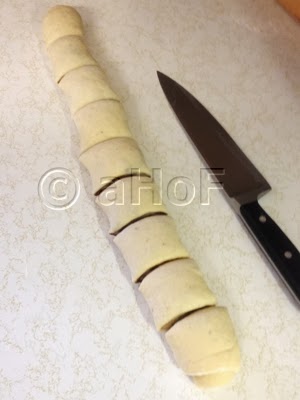
Rolled and cut

1 stick butter, softened
3 tablespoons cinnamon
1 cup brown sugar
1 teaspoon vanilla extract

Place all ingredients into a small bowl and combine with a spoon or hand mixer and set aside.

Divide the dough into 2 sections, and first roll one section of the dough into a large rectangle about 12 x 20 inches or so. Divide the cinnamon mixture in half and place half on the rolled piece of dough. Using a fork, smear it around. It can be difficult to smear in cold weather, but it doesn't have to be even. Roll the dough from the longer edge. Dot the far edge with a little water, to seal well. I sort of eyeballed the cutting, first dividing in half, and then into sections about 2-ish inches wide. Stand these on end in one half of a greased 13 x 9-inch pan. Repeat these steps with the second section of the dough and the cinnamon mixture, rolling, cutting and placing into the second half of the 13 x 9 pan. The two sections could also be set into two 9-inch round cake pans. Set aside to rise for 15 minutes. Set the oven to preheat to 350 degrees (325 on Convection).

cinnamon roll recipe, preparing for bake
Rolls set in pan for 15 minutes
ICING:
4 cups confectioners' sugar
4 tablespoons melted butter
3 - 4 tablespoons water or milk
1 teaspoon vanilla extract
pinch salt

Mix all the ingredients in a small bowl, stirring vigorously to combine. The icing will be stiff, but it will melt nicely onto the hot rolls.

Bake the rolls for about 20 to 25 minutes, or, if you own an instant-read thermometer, until one of the rolls in the middle of the pan reads 180 degrees in its center. They should be golden.

Remove from the oven and have handy a large baking sheet, (if you used a 13 x 9 pan) or a round plate (if you used 9-inch round pans). Place the baking sheet or plate over top of the hot pan, grip both together with hot pads and flip the hot pan upside down onto the baking sheet or plate. Now, repeat this process, so the rolls will end up with the tops upwards onto a serving plate or tray. It seems like a lot of to-do, but it is the easiest way to have the rolls out of the pan.
baking, cinnamon rolls, icing
Baked with golden tops and melting icing

Set a rounded tablespoon sized blob of icing on top of each roll. The residual heat will cause the icing to melt down into and over the hot cinnamon rolls. Note in this last photo, the almost solid blob of icing on the roll in the forefront, versus the nicely melted one behind.

Now, get ready to savor these wonderful, warm, gooey, cinnamon-y confections.


My passion is teaching people how to create a harmony of flavors with their cooking, and passing along my love and joy of food, both simple or exotic, plain or fancy. I continue my journey in ethnic and domestic cuisines, continuing my journey to explore diverse culinary experiences and hopefully to start you on a journey of your own. Join me also at A Harmony of Flavors on Facebook, and Pinterest.

Saturday, January 18, 2014

Back to Yeast Waffles

waffles, waffle batter, yeast, breakfast recipe
Overnight Yeast Waffles
I can be very persistent. Just ask my husband!

When I made the waffles about a week ago, trying for a recipe that would be similar to Marion Cunningham's Yeast Waffles, well, it just took too long for the results. The result was wonderful after 3 days in the fridge. Great, if you are having guests and need something spectacular for breakfast and need things done ahead; not so much if you want relatively instant results. 

I consider overnight as "instant" because it is quick to mix up the night before and let it set out overnight. It is ready for use immediately, in the morning. Just add eggs and baking soda and presto - Waffle Batter! The recipe of last week used no time at room temperature to ferment. The fermentation was a long and very slow process in the fridge. I had come to expect the fermented yeastiness of M.C.'s Yeast Waffles. My batter of last week never had that. While it did finally come out tasting of yeast after 3 days in the fridge, it was not strong, nor fermented in flavor. So, I went back to the drawing board. I did some research into such things as sourdough starters, along with other recipes for yeast waffles. 


Batter bubbling away at 10 PM
10 PM: Batter risen considerably
I think these days everyone is so fearful of germs and food poisoning, they forget that sourdough comes from fermenting a yeast batter, generally at least starting out on the counter (as in NOT refrigerated). I read online and about everyone that had posted MC's Yeast Waffle recipe, now called for mixing the batter and then putting it in the fridge overnight. This will never give that great sour, fermented quality that is so unique to these waffles. It will give nice waffles, just not what I was looking for. Granted, it is possible to have a starter go bad; just not overnight. If ir did, it would become very obvious in that it will develop an off color, sometimes pinkish, and smell just wrong. There is no lovely fermented tang; it just plain stinks. 

Long, long ago, I had a sourdough starter going for some time. Once it was there bubbling away, I looked for recipes to use the starter. I made waffles and pancakes, bread and cake. The thing about a sourdough starter is that the longer it lives (as in, using a portion, then refreshing the remainder with more flour and water, so the fermentation is continuous), the more sour the flavor. The stronger the sour flavor, the more it comes through in what you make. Breads become quite tangy, and so do waffles and pancakes. At that point, I was not so enamored of the sourdough starter. I didn't want quite that much sour tang in my waffles or pancakes. So, what to do?

Here entered M.C.'s Yeast Waffle recipe - a real "a-HA!" moment. 


waffles, risen waffles, breakfast recipe
Note light through bubbles when held up to light
So, back to the reason for this post. I created another batter last evening. It is similar to M.C.'s Yeast Waffles. There are only so many things to change. You need certain proportions of flour, yeast, sugar, salt. Other additions are butter or oil, milk, eggs and baking soda. I lessened the amount of butter a bit, and added an egg. I added a pinch of powdered vanilla pod (I save the pod from a vanilla bean when I scrape the seeds, allow it to thoroughly dry, then pulse to a fine powder in a coffee grinder used just for this). A splash of good vanilla extract would be great also. I used nonfat dried milk powder. The batter really took off. I mixed it up at 8 PM. I checked it at 10 PM, before going to bed. It was merrily and actively bubbling away and had risen noticeably in the bowl. This morning, it was still bubbling, though more slowly, and had noticeably fallen in the bowl. This is normal, and expected.

Once I added the eggs and baking soda, I had my "Belgian" waffle maker going. I had never made this kind of waffle in the deeper welled waffle maker and was curious if they would rise to fill the spaces, as the dough is relatively runny. The deeper wells did fill, but I think it just works more nicely in a regular waffle iron. The dough baked into very light and crisp waffles with noticeable tiny bubbles baked into the waffle. They smelled heavenly of the yeasty tang and tasted even better. Success! 


Note height of batter in the bowl
yeast batter, waffles, breakfast recipe
Still bubbly, risen and fallen overnight
One more thing: I am baking bread and other wonderful yeasty things all the time, so I buy SAF Instant Yeast by the pound brick. Instant (or Rapid-Rise / Quick-Rise) Yeast requires no "proofing." If you have a packet of regular yeast, use 1/2 cup of the water called for, warmed separately, to proof the yeast. Save this mixture until the end of the mixing of the batter. I also do not keep milk in the house. I have instant dry milk powder or evaporated milk for those times I need milk for a recipe. If preferred, use 2 cups of milk when melting the butter. The other half cup of water can be added to the milk, or used to proof the yeast if needed.


waffle batter consistency, breakfast, making waffles
Thin, gloppy batter
Overnight Yeast Waffles


2½ cups water
5 tablespoons unsalted butter
2 cups all-purpose flour
⅔ cup instant dry milk powder
1 packet of instant rise yeast (about 2 1/2 teaspoons)
2 tablespoons sugar
1 teaspoon salt
3 eggs
½ teaspoon baking soda

Mix the water and butter in a microwave safe container and heat on short bursts to melt the butter without overheating the water. Make sure the water is just tepid before adding to the dry ingredients.

Separately, in a large, glass or plastic bowl, combine the flour, milk powder, yeast, sugar and salt. Add in the tepid water and butter mixture and stir well to combine. Cover lightly with plastic wrap and set in a warm place to ferment overnight. (If it is very cold outside, you may place the bowl in the oven with the oven light on. Keep the bowl at the furthest point from the light as possible. Some oven lights make the oven too hot, and could hinder the process or kill the yeast.)

Next morning, set up a waffle iron. Add the eggs and baking soda to the fermented batter and whisk in to combine. Pour about ½ to ⅔ cup onto the waffle iron and bake according to directions; usually about 2 to 2½ minutes. Makes about 10 to 12 (7-inch round) waffles.


My passion is teaching people how to create a harmony of flavors with their cooking, and passing along my love and joy of food, both simple or exotic, plain or fancy. I continue my journey in ethnic and domestic cuisines, continuing my journey to explore diverse culinary experiences and hopefully to start you on a journey of your own. Join me also at A Harmony of Flavors on Facebook, and Pinterest.

Disqus