Translate

Tuesday, July 13, 2021

Guatemalan Breads Once Again

In my previous post, I mentioned that I have been creating a breads cookbook, just for myself; a way of getting together all my bread recipes. As I was collecting  all the recipes I had made to date under the chapter for Guatemalan Breads, I started looking around the internet once again and found some more to try. The recipes I am posting here are, in the main, from a YouTube video by Recetas y Pasteles Lili. The whole video is in Spanish, and it is long, but very thorough. My recipe has minimal changes, and less steps, plus, it's in English, but my gratitude to "Lili" for the recipes and instructions.

Pan Dulce, Guatemalan Bread, Gusanitos, Gallinitas, Besitos
Gusanitos, Gallinitas and Besitos, Guatemalan Breads

These breads, all three of them, are made from the same dough, and the same batch of sugar paste. They are fairly sweet, sweeter than most of the Guatemalan breads. But, they are really cute breads. One shape is called Gallinitas, or "Little Hens." So called, because they supposedly represent the coxcomb (wrong sex, but hey!) with their little floppy looking tops. Another of these breads is called Besitos, or "Little Kisses," as they have an "X" cut into the top. The third of these breads are called Gusanitos, or "Little Worms," so called because of the segmented-looking bodies. If these don't sound inviting, just wait.

Since they are all made from the same dough(s), once the dough is made and ready, they simply need to be shaped. There is an interesting little trick to forming each of them, and only for the Besitos did I change the method, as Lili's method seemed cumbersome. These breads are just delightful with a cup of coffee, be it for breakfast or afternoon snack. Once trying out the methods they do become very easy. I hope you'll give them a try.

Pan Dulce (Gallinitas, Besitos and Gusanitos)


Makes 18 sweet rolls

Make the SUGAR PASTE: with hands or a small mixer, beat together the flour, sugar and lard or shortening until it is cohesive. Add in a tablespoon of water. It should have the consistency of dough. If not, add a tiny bit more water at a time until it can be formed easily, rolling out or making into a ball. Divide the Sugar Paste into 3 equal portions, by weight, form each into a ball and set back in the bowl, Cover the bowl to prevent drying and set aside.

MAKE THE DOUGH: Place all ingredients for “dough” except the water into a heavy duty stand mixer or into a large bowl if mixing by hand. Run the mixer with paddle until the lard had dispersed well. Add in most (not all) of the water and begin mixing with the dough hook, or by hand. The dough should be very soft, but not so soft it cannot be handled. Add the remaining water if needed, to achieve this soft consistency. Knead the dough for 5 to 8 minutes, then allow it to rest for 20 to 25 minutes. 

Turn the dough out onto a greased surface and divide the dough into 3 equal portions, by weight. Each portion will make 6 rolls. Set two portions aside, covered. Divide the last portion of dough into 6 equal pieces by weight.

To make “GALLINITAS:” Make each of the 6 pieces of dough into a log about 6 to 7-inches long. Take one of the balls of sugar paste and equally divide the ball into 6 pieces. Take one of these pieces of the sugar paste almost, but not quite, as big as the piece of dough and roll it into a similar length log. Set the sugar paste log on top of the dough log. Flatten the two pieces together, to a width of about 1.5 inches. No need to lengthen the log. Now, using a small knife or a metal bench scraper, slice through the stack, from the center to the wide edge, repeating these cuts about every quarter-inch.

forming Gallinitas, stacking dough and sugar paste

forming Gallinitas, forming Guatemalan bread, pan dulce

From one short end, begin to roll up this piece, until you come to the end of the length. The bread is formed sideways, so turn the dough so the floppy ends are now the top and set on a parchment lined baking sheet. Repeat this process for the remaining five pieces of the dough,  setting them well-spaced, on a parchment lined baking sheet.

Pan Dulce Gallinitas, Guatemalan Pan Dulce
Gallinitas, or Little Hens

~~~~~~~~~~~~~~~~~~~~~~~~~~~

To make “BESITOS:” Take the second portion of the dough and further divide it into 6 equal pieces by weight. Roll each piece into a ball and flatten the ball with hands to about 3½  to 4-inches in diameter. Take the second of the balls of sugar paste, further divide this ball into 6 equal pieces. Take one small ball of the sugar paste and set it in the center of the dough circle, photo 1. Bring the dough up and around the sugar paste to completely encase it, pinching the ends so they stay closed. Turn the ball over so the seam is on the bottom, photo 2, and set this onto a parchment lined baking sheet. With clean scissors, snip across the top of the ball, photo 3. Now snip the top in the opposite direction, across the first cut, photo 4, and forming an “X in the dough, having cut through so the sugar paste is exposed, photo 5. Repeat this process with the remaining 5 balls of dough from this group, setting them well apart onto the parchment-lined baking sheet. Brush the tops with egg wash, avoiding the open, cut surfaces.

forming Besitos, Guatemalan pan dulce
Guatemalan Sweet Breads, Besitos, Pan Dulce
Besitos, or Little Kisses

~~~~~~~~~~~~~~~~~~~~~~~~~~~

To make “GUSANITOS:” With the last of the 3 portions of dough, divide this into 6 equal pieces by weight. Take one piece and form a ball. Set the ball onto the oiled surface and flatten to a large, long oval, approximately 5 x 8”. With the last remaining sugar paste ball, divide into 6 equal pieces. Take one piece of the sugar paste and flatten as much as possible between the hands, then set this piece onto one end of the long oval of dough, leaving about ½-inch of dough exposed at the end, photo 1, below, ensuring that the paste just reaches the side edges. Make slices through the sugar paste and dough, starting about a third of the way up the dough, cutting into strips downward about every quarter to one-third inch apart, photo 2. Begin rolling the dough from the short end without the sugar paste, pressing each side to seal as you roll, photos 3, 4, 5. Once the roll is complete, photo 6, the cuts will reveal the sugary insides and the segments will somewhat resemble a worm, or “gusanito.” Repeat this process with the remaining 5 pieces of dough and sugar paste. Set each Gusanito onto parchment lined baking sheets, well apart. Brush the dough with egg wash, but avoid getting the egg into the cut surfaces. Set aside, covered, and proof for at least 30 minutes. 

Forming Gusanitos, Guatemalan pan dulce

Preheat oven to 350°F. Bake all the breads for 15 minutes, then rotate the pan 180 degrees and bake for 10 minutes more, for a total of 25 minutes. If breads are on separate pans, bake one tray at a time.
Guatemalan Sweet Bread, Gusanitos, Pan Dulce
Gusanitos or Little Worms


My passion is teaching people how to create a harmony of flavors with their cooking, and passing along my love and joy of food, both simple or exotic, plain or fancy. I continue my journey in ethnic and domestic cuisines, continuing my journey to explore diverse culinary experiences and hopefully to start you on a journey of your own. Join me also at A Harmony of Flavors on Facebook, and Pinterest.

Monday, July 12, 2021

New South Indian Dish


Recently, I have been putting together a cookbook on bread. I love creating my own cookbooks, though none are commercial. I just love getting things together in one place. My first cookbooks were of "Favorite Recipes." Another was of Guatemalan Recipes and a Memoir for my oldest daughter who remembered her life in Guatemala. Another of Vegetarian Recipes for a friend. One is of sweets of all kinds. And on and on and on goes my story. This latest is all on breads.  I love the challenge of all the organizing, making it look great, detail work is just my thing.

As I am at the stage of proofreading, and while looking more closely at the recipes, words, descriptions, I came to the chapter on Indian breads, and there are many. Many I have made, and there are so many more I have not made but want to. So in reading a few of the recipes I had written out for myself but not actually put to the test, I came across one for Neer Dosa. For those who are not into Indian food as I am, apparently "neer" means water. Dosa is a very flat, crepe-like bread, often made from leftover Idli batter, but Neer Dosa are purely soaked, then ground, rice and water. They are bland, taste like rice, and as such are meant to accompany well-spiced foods, for breakfast, lunch or snack. One of the suggestions I'd seen on websites was to serve these with a Mangalorean Egg Curry.

Mangalore, Egg Curry, Ande Ambat, Konkan, Tulu
Mangalorean Egg Curry or Ande Ambat

I have seen recipes for egg curries, from the earliest times of my interest in all things Indian. To date, I had never made one. Made with hard boiled eggs, essentially the eggs are placed into a well-spiced "gravy" of some kind. Depending on region the type of flavors in that gravy or curry mixture will vary. I was intrigued by the use of the word Mangalorean. I'd heard it used, and even looked it up, but couldn't quite place it. According to Wikipedia, Mangalore (also "Mangaluru") is a major port city on the western coast in the Indian state of Karnataka, in southern India. Being a coastal city, coconut based foods are common.

I found very few recipes while searching "Mangalorean Egg Curry." In general, what I found is that this curry is common in the Konkan region of Mangalore, and is called Ande Ambat, so far as I can tell. Information is sketchy, but "ambat" appears to be a curry mixture, since it is used for other things like prawns, fish, etc. Only when "ande" (or "anda") is added does it refer to an egg curry. Essentially, no matter which recipe you look at, most of the ingredients are the same, with varying amounts. After looking through more recipes under that title, I realized that there was really not much new. The ingredients are the same and methods and amounts differ. 

After making my version of this dish for dinner last evening, my husband and I both truly loved the flavors, and the Neer Dosa paired exceptionally well with the dish, though I felt my dosa weren't yet made with any proficiency. Sadly, there are quite a few steps to this recipe, though some of them can be made ahead. The spice mixture ("masala") can be made and stored. The sauce (curry) can also be made ahead. Assembling in a hurry is then a snap. Making it all in one go, I had 2 skillets and 3 different saucepans dirtied, along with the blender, before I finished. 

Mangalorean Egg Curry, Neer Dosa, Ande Ambat
Mangalorean Egg Curry and Neer Dosa

Still, it is so very tasty, I would truly suggest trying it out. Some ingredients may not be available, unless you are really dedicated to Indian cuisine, as I am. Ajwain or Carom seed is used in just a tiny pinch and can be optional or substituted with a small bit of thyme (thymol is the smell one associates with thyme herb, and ajwain or carom seed also contains thymol). Curry leaves, while they are available fresh by mail (when they arrive, I put them into a zip-top freezer bag and straight into the freezer), aren't on everyone's list of staple items. I love the flavor of them and use them often, but they can be omitted. Tamarind isn't in everyone's pantry either, but can easily be substituted with a squeeze of lime juice, or simply omitted. Dried red chilies aren't on everyone's shelf, and are also a matter of taste. Some cannot tolerate the heat, and others can't get enough. I used two dried red chilies, breaking them open and discarding the seeds before using. If preferred, use dried red chili flakes to your own personal preference, or in a pinch, simply use a tiny bit of cayenne, to taste. Not everyone keeps a fresh coconut lying around, either, though I found that I can buy a whole, ripe coconut, open it and remove all the coconut "meat," and then grate it on a small-holed grater and freeze it, well wrapped. Easy to grab a little when needed.

Mangalorean Egg Curry or Ande Ambat


Based on 1 egg per serving: 6 servings. Based on 2 eggs per serving: 3 servings.
curry, Mangalore, India, hard boiled eggs
Mangalorean Egg Curry or Ande Ambat

DRY MASALA MIX:
2 (or up to 8) dried red chilies, with or without seeds
1-inch soft cinnamon stick
1/2 teaspoon cumin seeds
1 teaspoon coriander seeds
1/2 teaspoon mustard seeds
1/2 teaspoon black peppercorns
1/8 teaspoon carom/ajwain seeds

CURRY or GRAVY:
2 - 3 tablespoons coconut oil
2 medium shallots, chopped
12 - 15 curry leaves
3 - 4 cloves garlic, chopped
1 tablespoon grated fresh ginger
1/2 large red bell pepper
1 - 2 tomatoes, chopped
1 teaspoon-sized piece of seedless tamarind
1/2 teaspoon turmeric powder
1/2 cup fresh grated coconut
2 tablespoons chopped fresh cilantro

OTHER INGREDIENTS:
1/2 cup unsweetened coconut milk (or use water)
1 1/2 to 2 cups water
6 eggs, hard-boiled, peeled
1 - 2 medium potatoes, peeled, cubed

TEMPERING:
1 tablespoon coconut oil
1 small shallot, halved, sliced
8 to 10 curry leaves

MAKE THE DRY MASALA MIX: Heat a dry skillet over medium to medium high heat, then toast the spices, one spice at a time (different sizes will toast for different times), just until fragrant, removing each to a single plate to cool. Once cooled, grind the spices in a spice grinder and set aside, or cover tightly and store in a cool, dark place until needed.

MAKE THE CURRY: In a medium skillet, over medium heat, add in the coconut oil and then the shallots with the curry leaves and saute, stirring often, until the shallots soften and start turning a golden color. Add in the garlic and ginger  and cook 3 minutes, then add in the red bell pepper and tomatoes with the turmeric powder and cook, stirring often, until the vegetables are soft and the tomatoes broken down. Stir in the grated coconut and cook one minute. Pour the ingredients of the skillet into a blender container, along with the cilantro, the spice Masala mixture, and with either the coconut milk or water (from "other ingredients") and blend smooth. The curry can be refrigerated, tightly covered, until later if needed. 

When ready to make the dish, cook the cubed potatoes until easily pierced with a knife. Drain the water from the potatoes. Have the curry in a medium saucepan over medium heat and add in the potatoes and 1 1/2 cups of water, stirring well. Make shallow cuts in the hard-boiled eggs, then add to the curry. If the mixture is still thick, add more water as needed. Let the mixture simmer, covered, for 10 to 15 minutes to meld flavors.

TEMPERING: In a small skillet, heat the 1 tablespoon coconut oil and saute the sliced shallot with the curry leaves. When the curry is ready to serve, pour into a bowl, then pour the tempering ingredients from the skillet over top. Garnish with cilantro leaves.

NOTES:  If desired, 3 eggs may be whisked together and stirred into the simmering curry sauce before adding the potatoes and tomatoes.


My passion is teaching people how to create a harmony of flavors with their cooking, and passing along my love and joy of food, both simple or exotic, plain or fancy. I continue my journey in ethnic and domestic cuisines, continuing my journey to explore diverse culinary experiences and hopefully to start you on a journey of your own. Join me also at A Harmony of Flavors on Facebook, and Pinterest.

Wednesday, January 27, 2021

My Bread Odyssey and Tribute to Mom

I love making bread. I've been making all our family's bread since back in the early 1970s, living in Guatemala. The only bread recipe I had at that time was my Mom's (and before her, Grandma's) bread that she made for Easter, Thanksgiving or Christmas, and sometimes, if we were lucky, other times as well. It was something I watched her make all through my young life, before marrying and moving to Guatemala. I don't believe she knew any other recipe for bread, but it was so exceptionally good that it made no difference. I adopted it as our daily bread, and we just never get tired of it - it's just that good. An enriched dough, with milk, butter, eggs and sugar, it rises beautifully, makes fabulous sandwiches, toast or French Toast.
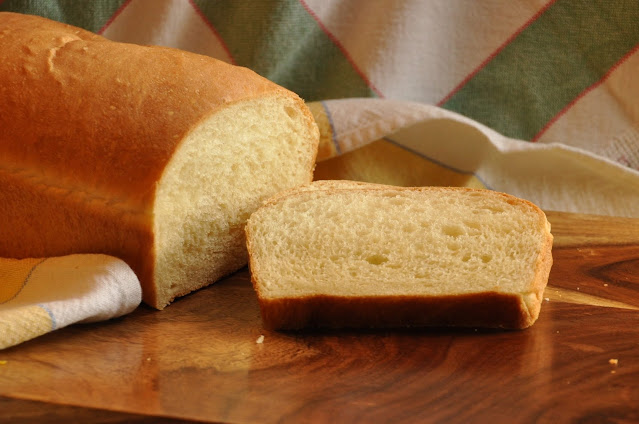
bread, enriched bread, yeast bread, homemade bread
My Kitchen Aid Mixer Bread

The late '80s and '90s

When we moved back to the States, I continued making Mom's bread, and over the years, made small changes; things that didn't change the great taste or texture. I used powdered milk, instead of scalding 3 cups of milk and waiting for it to cool. I used honey instead of sugar. I used whole eggs instead of just the yolks. And as bread flour became available, started using that. Then my new husband bought me a bread machine from DAK. I managed to halve Mom's recipe to use in the machine, but never liked how it baked in there, so after the machine's kneading and proofing, I'd form it and bake in the oven. Despite all that, the poor bread machine was so overworked that it died after 2 years! DAK's machine came with a little recipe booklet, and I adopted and adapted some of those recipes, changing them to suit and also baking in the oven. My Double Chocolate Bread and Herbed Onion Bread are results of my tinkering. And eventually, the gift of a Kitchen Aid Mixer had me revamping Mom's bread to using the mixer.

Bread, enriched bread, fresh herbs
Herbed Onion Loaf

Then somewhere along the way, I found a book with some interesting bread recipes, and started trying some of them out. There were lots of them with additions like dried fruits, nuts, other flavorings and such. While they were delicious, most times the bread took forever to rise and often resulted in under baked loaves, despite following the recipes assiduously. I didn't know what was the problem.

The 2000s

Then in early 2014, my sister-in-law, Curator of Education at the Dacotah Prairie Museum in Aberdeen, SD, brought me a stack of cookbooks someone had donated to the museum. I started out with one of them and haven't looked back: The Bread Baker's Apprentice, by Peter Reinhart. I have come a very long way in my knowledge and understanding of bread, dough and how they work since then. My entire focus has shifted. Over the years, I have become so enamored with the different whole grain breads, finding out about long, slow rising periods and resulting enhanced flavor. I love anything that helps with eating more naturally, and using whole grains in bread is certainly better, in that sense. I have never entirely converted my husband. He loves white bread. 

During the next phase, and Reinhart's book, "Bread Revolution," while visiting the local health food store searching for malted grains, I got chatting with the store manager and he told me about a bread he was experimenting with, using a Tangzhong starter, and even printed his recipe for me. Finding that it was a white bread, I opted to set the recipe aside and finally, forgot about it.

homemade bread, whole grain bread
Poilane Style Miche, from "The Bread Baker's Apprentice"

Since watching The Great British Baking Show/Bake Off, I have also learned a lot about bread making from Paul Hollywood's comments on the show, and also discovered that kneading "for 10 to 12 minutes" is not necessarily enough to got the dough to pass the "windowpane" test. For me, kneading a whole grained loaf requires up to 20 minutes of kneading time to pass the test. I discovered that this was truly the biggest difference to getting my breads to rise properly.

This past year, though I had gotten my husband to eat my whole grain breads, he has been suffering tooth problems and wasn't able to chew well. As thing deteriorated, and with his fear of COVID while going to a dentist, it got to a point where he truly couldn't chew. My hearty whole grain breads were inedible for him. I went back to a modified version of my Mom's bread, adding just a little whole wheat, slightly less butter and sugar. It worked.

2021 - Full Circle

My husband and I were watching Paul Hollywood's program, City Bakes, and we came to where he spends some time in Japan. After lamenting that Japan really isn't known for bread, he comes across some bakeries, and discovers Japan's Shokupan, or Milk Loaf. Hearing Paul describe the method of making this bread, I exclaimed, "That's the kind of bread that guy in the health food store in Aberdeen gave me the recipe for!"

The whole thing about this type of bread is the "starter," for want of a better word. It is not a sourdough, but it is a pre-mix that helps the dough retain moisture and gives this bread a pillowy soft texture. I decided to try it out, mainly for my husband (who had the offending teeth pulled and is still needing soft food). I went online and searched. Surprisingly, while there were quite a few recipes for Japanese Milk Bread, not many of them actually used the pre-starter, opting to omit that step. This made me wonder why one would even call it by that name? 

Apparently there are two methods to this bread's starter. According to Chopstick Chronicles, The Tangzhong method uses a starter that is 5 parts liquid to one part flour. This is cooked to 150 degrees F, cooled and the dough is made and baked as usual. The Yudaine method, uses a 1:1 ratio of flour to water, simply pouring boiling water over the flour and mixing to a dough-like consistency and refrigerating overnight. The bread is made the following day (though she does say it is possibly to make the bread after only a couple of hours of resting the starter.

Shokupan, Yudaine, Milk Bread
Yudaine Shokupan from Chopstick Chronicles

I actually made this recipe from Chopstick Chronicles as my second attempt (since it called for an overnight rest for the starter and I wanted one to make right away!) and it also came out beautifully, though I also had to add a little more water (10 grams) to the starter (to counteract this Arizona dry climate). The actual recipe, for just one loaf, is a far smaller recipe, but comes out equally well.

I wanted to make a batch right away, so I opted first to try a recipe by Julia Moskin in the Cooking section of the New York Times. She makes the Tangzhong starter, but then divides the starter in half, using only one half of it, leaving the rest for another loaf. I opted to just double the bread recipe and use all the starter. She also uses a fair amount of sugar and yeast, so I lowered those amounts. Adjustments were needed in her recipe: the dough is described as very wet and too difficult to be kneaded by hand. Mine came out so stiff there was no way it was going to be a soft bread. I added a full 1/2 cup more of both water and milk to proceed; this could be that I live in Arizona - most recipes require more liquid. This is what I did:


Tangzhong Milk Bread

bread, milk bread, shokupan, tangzhong
Tangzhong Milk Bread

Makes 2 loaves

STARTER:
120 grams water: 1/2 cup
120 grams milk: 1/2 cup
45 grams bread flour: about 1/3 cup

In a small saucepan, whisk these ingredients until smooth, then over medium heat, cook, stirring constantly, until the mixture thickens slightly and is still pourable. Pour the starter into a bowl and place cling film directly onto the surface to prevent it forming a skin as it cools. Cool to room temperature before proceeding. 

CAVEAT: If the mixture is too stiff, add in a second 120 grams of liquid.

For the DOUGH:
1 large egg
650 grams bread flour (about 5 cups)
30 grams granulated sugar (about 3 tablespoons
10 grams instant / quick-rise yeast (1 tablespoon)
8 grams salt (about 1 teaspoon)
60 grams unsalted butter, at room temperature, soft (4 tablespoons)
-------
(1/2 cup milk - if the dough is too stiff)

making bread, bread, dough
Dough like stiff batter

Pour the starter mixture into the bowl of a heavy duty stand mixer and add in the remaining ingredients, except the last half cup of milk. Start the mixer on lowest speed until mixture is combined, stopping to scrape down if needed. At this point the dough should be quite loose. If it is not, add in the half cup of extra milk and again mix slowly until combined. Now, raise the mixer speed to 4 or 5 and mix for 20 minutes. The very loose dough should instead be nearly a stiff batter (see photo). Scrape the dough into a greased bowl, then lightly oil the top. Cover well and set aside to rise until doubled, 40 to 60 minutes.

Grease two loaf pans, approximately 9 x 5 inches. Turn dough out onto a floured surface and punch down well. The dough will be very springy and yet easy to handle. Divide into two equal pieces, by weight. Cover them well and let rest for 15 to 20 minutes. This helps to relax the dough, slightly.

Further divide one piece of the dough into two equal pieces, by weight. Roll out one piece into a rough rectangle about 6 x 10 inches. With the shorter edge towards you, fold in each side to the center, slightly overlapping. Start rolling up the dough tightly, keeping edges neat as possible. Pinch the last edge to seal and set into one end of one of the greased loaf pans, seam side down.

Repeat with the other half of this section of the dough and set into the opposite end of the same loaf pan, seam side down. 

Do the same thing with the other half of the dough, dividing into two equal pieces, rolling out, tucking in sides, rolling and setting into each end of the second loaf pan. Lightly oil the tops of the dough, then cover with cling film and set aside to rise. The dough will be ready to bake once it reaches the top of the pans, about 45 minutes. If desired, and for a very deep colored and shiny top, brush the tops of the loaves with an egg wash made of 1 yolk and 1 tablespoon water.

Have oven preheated to 350 degrees F. Bake the loaves for about 30 to 40 minutes. If you have an instant-read thermometer, internal temperature should be between 95 to 105 degrees F. Turn out and allow to cool completely before slicing. Bread will be exceedingly soft. Unless you have a very sharp bread knife, do not try to cut the bread on the same day. With a good, sharp bread knife, use a back and forth sawing motion, very gently, with no pressure, to cut without crushing the bread.


My passion is teaching people how to create a harmony of flavors with their cooking, and passing along my love and joy of food, both simple or exotic, plain or fancy. I continue my journey in ethnic and domestic cuisines, continuing my journey to explore diverse culinary experiences and hopefully to start you on a journey of your own. Join me also at A Harmony of Flavors on Facebook, and Pinterest.

Friday, November 6, 2020

Another Great Dinner with Chicken and Hummus

I started this blog yesterday, and somehow it vanished overnight, so here it goes again! 

I had decided to cook a pound of chickpeas with the intent of making hummus. It took about 2.5 to 3 hours to cook them. It seems it shouldn't have taken that long for them to get soft after being soaked overnight, but maybe they were older than they should have been. Who knows? Eventually they did get soft, and I made hummus with all but a cup of them. 

To Make Hummus with freshly cooked Chickpeas

Hummus (click for my original recipe)! Yum! With a whole pound of cooked chickpeas, it takes more of the other hummus ingredients than what is stated in my recipe, which uses just one can of chickpeas. While a whole pound of dried chickpeas cooks up to a lot more than two cans worth (double the original recipe), I have gotten by with using double the amount of the tahini, lime/lemon juice, garlic and olive oil from my recipe. I do not cook my chickpeas with any salt at all, as salt is said to toughen the beans, making them harder to get cooked through properly. More salt will be needed, but as an individual preference, it's best to add a teaspoon, taste and adjust as needed.

Hummus from Scratch

hummus, scratch recipe, garbanzo beans, cooking garbanzo beans, chickpeas
Freshly Made Hummus


Makes a large amount, possibly 8 cups!

1 pound dried chickpeas, soaked overnight
-----
drained cooked chickpeas, cooking water reserved
4 cloves garlic, minced
6 tablespoons tahini
1/2 cup freshly squeezed lime or lemon juice
1/2 to 2/3 cup good quality olive oil
1 teaspoon salt, more if needed

To cook the chickpeas: Drain off the soaking water
, place the chickpeas in a large pot, cover with water by about 1 inch and bring to boil. Reduce to a simmer, cover and cook them until soft, anywhere from 2 to 3 hours, depending. This time they took a full three hours, possibly the chickpeas were old  Once cooked through, pour the chickpeas into a colander set over a bowl to catch the cooking water. Keep this water aside.

Pour the cooked, drained, cooled chickpeas into a food processor. Add in the tahini, lime juice, garlic and a cup of the cooking water and process until very smooth. Add in the olive oil in a thin stream, while processor is running, to incorporate. If the mixture seems soft, you may not need all the olive oil. If you've used all the olive oil and the mixture is too stiff, add more of the cooking water, until you have a good consistency. Check for salt, adding more if needed. Will keep in the fridge, well-covered, for a couple of weeks.

~~~~~~~~~~~~~~~~~~

Okay, I had the hummus made, and it was delicious! Then I started thinking about dinner, and had absolutely nothing planned. Nothing was coming to mind. I started thinking about chicken, mainly as it cooks quickly. And that was as far as I got. So I wondered if there was anything to do for dinner that would incorporate hummus and chicken? I went online.

parsnip, carrot, beet, marinade, roasted veg
Veggies to Roast
What came up that interested me was hummus bowls. The first site I came across was one from No Spoon Necessary, and the recipe is called Easy Chicken Hummus Bowls. I was enchanted by the photos, with everything arranged so prettily and all the things in there that I love: tomatoes, cucumber, Feta, olives. Mmmmm-mmmm! However, two problems: 1) I was at the tail end of my groceries. Almost no fresh anything left in the house, though by some fluke I still had some Feta!! 2) My husband wouldn't touch, fresh tomatoes, cucumbers or olives with a 10-foot pole anyway. 

Okay, so how to get around that issue? I thought I would oven roast some veggies that I did still have: yellow beet, shallots, green pepper, parsnip and carrot. Hubby's not keen on parsnips or carrots, and "hates" beets. This beet was yellow, so he didn't realize it was in there, and he does seem to eat mixtures like this if they are well flavored. Okay. Check.

That recipe idea in No Spoon Necessary called for cooked chicken and then a dressing is poured onto it for flavor. I was more of a mind to either pan saute or roast the chicken breasts I had gotten out. So, I went on searching to see what else was out there, so the next place I came to was called Plays Well with Butter, and her recipe is called Grilled Chicken Shawarma Hummus Bowls. I loved the idea of all the spices on the chicken marinade, and the chicken is grilled in that recipe. It was still in the high 90s outside and I just had no desire to stand out in that heat over the grill. I opted to roast the chicken and the veggies. 

chicken, hummus, Feta cheese, roasted vegetables
Shawarma Chicken and Vegetables with Hummus

All I can say is, tail end of groceries notwithstanding, this dinner was just fabulous! I did add olives to my bowl. My husband ate his without. But it was a dinner full of sighs and moans of pleasure. So, thanks to those out there with great ideas.

Shawarma Chicken & Vegetables with Hummus


Serves 4
chicken, roasted vegetables, Feta cheese, hummus
Shawarma Chicken & Vegetables with Hummus

2 large boneless, skinless chicken breasts

MARINADE:
3 tablespoons olive oil
3 - 4 cloves fresh garlic, minces
2 teaspoons honey, optional
1+ tablespoons lime juice
1/2 teaspoon crushed cumin seeds
1 1/2 teaspoons smoked paprika
1 1/4 teaspoon ground cinnamon
1/2 teaspoon dried oregano leaves, crushed
1/2 teaspoon turmeric powder
1 teaspoon salt
1/2 teaspoon freshly ground black pepper
1 teaspoon sumac, optional
1 teaspoon zah'tar, optional
1 tablespoon grated fresh ginger
------
VEGETABLES: (or substitute others - root vegetables are great)
1 medium yellow beet (or red if preferred), peeled, 1/2" cubes
2 large shallots, in 1/2" chunks
1 green pepper, cut in 1/2" pieces
1 large parsnip, peeled, cut in small cubes
1 large carrot, peeled, cut in small chunks
-----
For SERVING:
  • hummus, whatever kind preferred
  • Feta cheese
  • olives of choice, optional
  • Fresh tomato and cucumber, if desired
  • Shawarma Chicken and Vegetables

Preheat oven to 400 degrees. Spray a 9 x 13-inch baking dish with cooking spray and set aside.

Make the marinade by whisking together all the marinade ingredients. Set aside. Slice the chicken breasts in half across the width, so you have two, much thinner, filets. Slice across the thin pieces, making 1/2-inch-wide strips. Place the chicken strips in a bowl and pour on half the marinade mixture and mix well. Cover and let stand.

Set the prepared vegetables into the remaining marinade and toss well. Pour the vegetables into the prepared baking dish and bake the vegetables for 30 minutes, stirring once halfway through. At the end of 30 minutes, remove the baking dish from the oven, pour on the chicken pieces with the marinade, arranging the pieces into a single layer over top. Return to oven and bake for about 20 minutes more, until vegetables are tender and chicken is cooked through.

To serve - per bowl: Place a good-sized dollop of hummus into a bowl, smearing to one side. Spoon on 1/4 of the chicken and vegetables per bowl. Sprinkle on Feta cheese, crumbled. Optionally, add in olives, fresh chopped tomatoes, cucumber slices, to taste.


My passion is teaching people how to create a harmony of flavors with their cooking, and passing along my love and joy of food, both simple or exotic, plain or fancy. I continue my journey in ethnic and domestic cuisines, continuing my journey to explore diverse culinary experiences and hopefully to start you on a journey of your own. Join me also at A Harmony of Flavors on Facebook, and Pinterest.

Wednesday, November 4, 2020

Great Dinner for Any Night or Any Occasion

 A few months back, I was looking for something to do with white beans. I use white beans when I make my Mom & Dad's Bean Soup/Ham Bone Soup, yet I rarely use them otherwise. No particular reason for this, just that the Bean Soup recipe is the only one I had growing up that used white beans. 

white beans, bacon, thyme, onion, garlic
White Beans with Bacon & Thyme

Wandering around the internet in search of ideas, I came on one that sounded promising, called White Beans with Bacon and Herbs on "Jo Cooks." I printed it off, then started to plan what I would do differently. Not that there was anything wrong with how the recipe sounded, as is. Just that I always tinker. Even with my own recipes, I go back and just have to do something different. Maybe I don't have some ingredients and have to substitute. Maybe I just have a hankering for something different than the original flavor profile. Whatever it is, I just seem to have a need to change things.

For starters, I had started cooking a pound of beans from scratch earlier in the day. I tucked in a couple of bay leaves while the beans cooked. Once I found this recipe, I realized that it sounded splendid with the fresh herbs, but I didn't have any! I did, however, have some pesto in the fridge, from my latest batch, and opted to use some of that for flavors instead. I only buy thick-sliced bacon, so I lowered the amount of bacon to 4 slices. There were no onions in the original recipe, so I caramelized a chopped onion, then added in 4 fresh minced cloves of garlic to the mix. I needed more salt, since I was using fresh cooked beans. I always cook my beans or lentils with no salt at all so they cook a bit more quickly, more tender. I add salt once they are already tender.  And that was my plan.

The beans came out so amazingly flavorful. Oh my! And I never once thought of taking photos.

pork, thyme, sage, garlic, rosemary, fennel
Pork Tenderloin with Italian Flavors

So a couple of weeks back, I wanted to repeat this recipe, since it was so very tasty. And then I wondered what to pair with them as a main course? If it was just me in the house, I would have had a salad alongside these scrumptious beans and called it a night. My husband, however, would not be so easily placated. I got out some pork tenderloin and started thinking about what to do with that. 

As it turned out, I created a mix of "Italian" flavors, rubbed the mixture all over the tenderloins and baked them. The mixture is somewhat akin to what I do for things like steaks or lamb chops; a green mixture of garlic, rosemary, olive oil, pepper, salt, and other things that may differ depending on the meat involved. Since this was pork, I used sage and fennel. My preference would have been fresh sage, but again, I had none on hand. Oh, how I do miss having my own herb garden! The whole thing came out so good we both spent the entire meal moaning in pleasure.

White Beans with Bacon and Thyme


Serves 10 or more
white beans, thyme, pesto, onion, garlic
White Beans with Bacon & Thyme

1 pound white dried beans, soaked overnight (OR - Pour boiling water over them and let set for one hour)
2 bay leaves
-----
4 slices thick-sliced bacon, cut in 1/4" bits
2 tablespoons reserved bacon fat from pan
1 large onion, chopped
1 1/2 teaspoons salt, or to taste
4 fresh cloves garlic, minced finely
3 tablespoons fresh thyme leaves (no stems)
1 - 3 tablespoons fresh basil pesto
2 tablespoons red wine vinegar

If soaking beans overnight, in the morning, drain, then place beans in a large pot with tight fitting lid. Cover the beans with water by at least 1 inch above beans, add in the bay leaves, bring to boil, cover, reduce heat to a simmer and let cook for 2 to 3 hours, or until tender, but not mushy.

ALTERNATELY: If, like me, you don't remember to soak overnight, in the morning place the beans in a large bowl and cover with boiling water. Soak then 1 hour, drain, place beans in pot and cover with water by an inch, add the bay leaves and cook 2 to 3 hours, until tender but not mushy.

Once beans are nearly ready, remove lid and let the liquid cook down until there is only about 1 1/2 to 2 cups of liquid left. Leave on very low heat to keep warm.

In a skillet, fry the bacon to your desired doneness. Remove the bacon to paper toweling and reserve about 2 tablespoons of bacon drippings in the pan. Add in the onion with the salt and cook, stirring occasionally at first, then nearly constantly once they start to go golden. Continue cooking and stirring until they are deep golden brown and add in the garlic, cooking another 3 to 5 minutes, until the raw garlic smell is gone. Add in the thyme leaves, pesto and red wine vinegar and stir, then pour all this mixture into the beans and mix well. Cover and let flavors meld for at least 15 minutes before serving.

~~~~~~~~~~~~~~~~~

For this next dish, use the pork tenderloins and not pork loin. Tenderloins are far thinner and will cook more quickly. Pork loins are a thicker cut and will be less tender.

Pork Tenderloin with Italian Flavors


Serves 4 to 6
pork tenderloins, garlic, fennel, rosemary
Pork Tenderloin with Italian Flavors

2 pork tenderloins, about 1.25 pounds each
4 cloves fresh garlic, smashed and minced
2 teaspoons fresh thyme leaves, minced finely
2 teaspoons dried sage leaves, crumbled (or use fresh sage and mince, measuring out at least 1 tablespoon)
1 teaspoon fennel seeds, crushed
1/2 teaspoon dried rosemary leaves, minced, OR use 2 - 3 teaspoons fresh rosemary leaves, minced
1 to 1 1/2 teaspoons salt
1/2 teaspoon freshly ground black pepper
2 tablespoons olive oil

Trim the tenderloins of fat and silverskin. Set aside.

Mix all the remaining ingredients together and rub the mixture over the meat, coating all sides. Set the tenderloins in their coating into a zip top bag or into a container with lid and set aside for at least a half hour, though overnight in the fridge would be best.

Preheat oven to 400 degrees and set the tenderloins on a rack in a foil lined rimmed baking sheet. Pour some water into the baking sheet, otherwise the drippings will cause a LOT of smoke. Roast the tenderloins for about 50 to 55 minutes, or to an internal temperature of at least 165. Remove from oven and tent with foil for 10 to 15 minutes before slicing - across the grain and on a diagonal.


My passion is teaching people how to create a harmony of flavors with their cooking, and passing along my love and joy of food, both simple or exotic, plain or fancy. I continue my journey in ethnic and domestic cuisines, continuing my journey to explore diverse culinary experiences and hopefully to start you on a journey of your own. Join me also at A Harmony of Flavors on Facebook, and Pinterest.

Monday, October 12, 2020

More Indian Sweets

Indian sweet treats, whether for one of the many festivals or holy days or just for home consumption, all seem to be made with milk. Well, maybe not all, but most. Making matters worse, they are generally made using Khoya or Mawa, a milk product created by slowly cooking, stirring, simmering, stirring, stirring and stirring, for hours, until the end result is a thickened mass. This is the basis for so many of the sweets, like Gulab Jamun, Rasgullah, Peda and many others. 

When I first made Gajar Burfi, a carrot fudge, some years back, it was one of these recipes calling for the long milk cooking process. My sister, who once made an Indian meal for some friends, noted that she was going to make a recipe for Carrot 'Halwa', from one of her cookbooks. It was that long, slow, stirring process. She wrote later that it was a huge hit with her guests. However, after 4 1/2 hours of stirring to accomplish this result, she flatly stated, "NEVER AGAIN!"

carrots, sweet treats, whole milk powder, sugar, Gajar Burfi
Gajar Burfi or Carrot Fudge
Having read that halwa and burfi are similar, but that halwa is generally made without milk while burfi is made with milk, obviously that is a generality that doesn't always apply. When I came across a recipe for Gajar Burfi that I tweaked to come out similarly by using whole milk powder to thicken the mixture instead of stirring for hours, I was very pleased. I sent the recipe to my sister. I have no idea if she ever tried it out. She may still be too traumatized. =:o

Now, as I am preparing for an Indian dinner for another two of my sisters, I chose to make a sweets assortment as dessert rather than go to deep-frying (which I abhor, no matter how good the outcome) to make Gulab Jamun or making paneer so I could make Rasgullah (a major difficulty nowadays since pretty much all milk in the grocery is "ultra-pasteurized," and does not like to form curds for the paneer). So I looked through an Indian cookbook I created for myself, made up of mostly recipes I have created, generally by looking through 2 to 20 recipes and coming up with something that sounds good to me. I have quite a repertoire by now, as I have been making Indian food for nearly 30 years at this point. But there are things I still want to try out, so I added into this cookbook some recipes that were either straight from someone's website (to tweak later on when I tried it out), or again a compilation of what "I would do," having previously looked at many iterations for the recipe. Some of these sweets are among those. Things I had yet to try.

semolina, cashews, coconut, raisins, sweets, laddoo
Rava Laddoo, Sweet Semolina Laddoo

Why did I wait so long?

Who knows. Sometimes, it just seems like it's going to be a huge bother, or a huge mess, and I procrastinate. That is something I am really, terribly good at.

In selecting the sweets to make for a treat at end of this dinner, I selected three things in my cookbook, along with the Gajar (Carrot) Burfi, made before. I love the Carrot Fudge, and as my husband, who is not at all fond of carrots, loves it as well, just proves that once you add enough sugar, he will eat most things. 😉

I wrote a couple of days ago about the Badam Katli, or Thin Almond Fudge. That recipe is one that does not use the milk as it's basis. As it turns out, the second sweet I tried out is Rava Laddoo, or Sweet Semolina Laddoo, also does not use milk as it's basis. So much for generalities! This was a welcome discovery as my whole milk powder is running low and no grocery anywhere I have shopped carries whole milk powder. Nonfat milk powder is found anywhere. But nonfat is not the best way to go for these sweets. 

The Sweet Semolina Laddoo recipe is one I chose from a website called "Chef in You." I used it mostly just as stated in the recipe on that blog, so I urge you to go there and check out all the step by step photos, if those are needed. I happened to have semolina in my pantry, as I use it occasionally when making pasta. I measured some ingredients by gram or ounce. Some, like "10 cashews," were self explanatory. 

Rava Laddoo or Sweet Semolina Laddoo

Made about 25

Heat 2 teaspoons (of the total 4 1/2 teaspoons) of ghee in a wide skillet. Toast the raw cashews until they start to turn golden, stirring constantly. Turn these out onto paper toweling and then add in the raisins to the skillet, tossing and cooking until they puff up. Turn out to another sheet of paper toweling.

Toast the grated dry coconut, not till browned, but just until it smells of coconut. Turn out to a small bowl.

Add the remaining ghee to the skillet and over low heat add in the semolina, stirring and mixing until the smell is very apparent. It does not need to brown, but to absorb the ghee and slightly cook.

semolina, cashews, coconut, raisins, sweets
Rava Laddoo, or
Sweet Semolina Balls
 Turn the semolina out into a mixing bowl and add in the toasted nuts, coconut, raisins, pinch of salt and the cardamom powder. Stir, then add in the sugar and mix well. Add the 1 1/2 tablespoons of milk and stir in. Check if at this point it is possible to squeeze a small amount into a ball. If you have ever made Rum Balls or Bourbon Balls at Christmas, it is similar. If the mixture will not hold its shape, add in more milk as needed, by one or two teaspoons at a time, mixing very well each time to distribute the liquid, before testing if it will hold a ball shape. I live in a very dry climate and needed to add over 2 tablespoons more milk to make the mixture hold together.

Once the mixture can hold shape, pour all of the mixture back onto the skillet and keep over low heat, covered, and let rest for 2 minutes. This gives the mixture time to absorb  and will form and taste better.

Pour back into the mixing bowl and scoop out 2 to 3 teaspoonful sized portions and form into balls. It is good to have little mini muffin papers to contain them but is not completely needed. Best if kept in the fridge and will last about 5 days.

~~~~~~~~~~~~~~~~~~~~~~~~~~~~

sweet treats, milk fudge, condensed milk, powdered milk
Doodh Peda or Milk Fudge Balls

The other sweet I tried out was one called Peda. Or Doodh (milk) Peda (something spherical shaped). I am not totally positive where I found this recipe, but it is very similar to one from Hebbar's Kitchen, so please check out her recipe, again with step by step pictures if those are needed. These are little milk fudge balls, and are simple to make, if you choose to use the quick method of using condensed milk and milk powder. Sweetened condensed milk eliminates the need to add any other sugar and the milk powder thickens the mixture, giving it a great head-start. Oh, and they are so delicious!

Doodh Peda or Milk Fudge Balls


Makes about 25

milk powder, condensed milk, sweet treats, fudge
Doodh Peda or Milk Fudge Balls
1 tablespoon ghee
1 can (14 ounces) sweetened condensed milk
1 1/2 cups whole milk powder
2 tablespoons milk, warmed
8 or 9 saffron threads
1/2 teaspoon green cardamom seeds, ground
1 teaspoon ghee, plus more for hands while rolling
-------
pistachios to decorate, whole or chopped

In a small bowl, set the saffron threads into the warm milk to steep. Set aside.

In a large, heavy pot, add in the first teaspoon ghee, spread around in the pan, then pour in the sweetened condensed milk and the dry milk powder. Stir this mixture thoroughly, breaking up lumps, until the mixture is smooth. Add in the saffron milk and stir. Set over medium to medium low heat and cook, stirring constantly until the mixture becomes thick and begins to pull away from the sides of the pan. Add in the cardamom powder and the second teaspoon of ghee and stir well. Remove from heat and pour onto a greased plate to cool slightly. Once it can be handled, grease hands with ghee and take small portions of the mixture and toll into balls. Technically, it is common to use a Peda Stamp to press a starburst into the top of the ball, and then pistachios, or pistachio slivers pressed in to adorn. I used the tip of a lemon reamer to make a starburst. 

Keep in a well sealed container in the refrigerator for up to a few days.


My passion is teaching people how to create a harmony of flavors with their cooking, and passing along my love and joy of food, both simple or exotic, plain or fancy. I continue my journey in ethnic and domestic cuisines, continuing my journey to explore diverse culinary experiences and hopefully to start you on a journey of your own. Join me also at A Harmony of Flavors on Facebook, and Pinterest.

Tuesday, October 6, 2020

Indian Food Updates and New Recipes

I am planning another Indian meal for two of my sisters next week. Some recipes are ones I have made before, like Kachche Gosht ki Biryani, and some I have made many, many times before, like Palak Paneer. I will be serving an array of chutneys, such as Dhania Poodina (Mint and Cilantro Chutney), Khajur Imli Chatni (Date Tamarind Chutney) and Am Chatni (Mango Chutney). One of my sisters in particular, really loves turning up the heat, so i returned to a recipe I had made in past, called Allam Pachadi, a Ginger Tamarind 'Pickle.'

ginger, tamarind, pickle, chutney, red chilies, curry leaves
Allam Pachadi / Ginger Tamarind Pickle

So, looking back over that recipe I used for Allam Pachadi, I thought maybe I should change some things. First off, while I like heat, sometimes it's just heat with no perceptible flavor, while your taste buds try to crawl away screaming, and hide. So I went back to look through the internet and some of my favorite Indian blogs, and others that are new to me, to see what other ingredients or methods might be used for this 'pickle.' I am putting that word in quotes, as these in no way resemble what we know here in the U.S as pickles. They fall more in the category of chutney, and some blog writers seem to use these words interchangeably for the same recipes. 

Looking through recipes then, I stopped at one that seemed to be very interesting, both for the change of ingredients as well as the method of making the pickle. In the first attempt for this pickle that I made some years ago, the main recipe I used, and made a few alterations to, called for 6 TABLESPOONS of Indian powdered chilis. Yikes! I reduced that to 2 tablespoons, substituting paprika for the remainder, but even so, it was too screaming hot for me to do anything but taste. When I encountered a recipe that sounded like it had promise, it was at the blog site called Hebbar's Kitchen. I used that recipe as a starting point, altering a few things as I went. I added more red chilies, more mustard seeds, more sugar. I added in some asafetida and turmeric. What I liked best was the method, which was simpler, IMHO.

As it turned out, while quite hot, this pickle is not as screaming hot as the last one, and it had flavors I could actually taste. I love it!


Allam Pachadi


Makes about 14 ounces
ginger, tamarind, pickle, chutney, garlic, red chilies
Allam Pachadi

Small ball of "seedless" tamarind
Boiling water for soaking the tamarind, about 3/4 cup
2 tablespoons cooking oil
1 1/2 tablespoons channa dal
1 tablespoon urad dal
1/2 teaspoon brown mustard seeds
1/4 teaspoon fenugreek seeds
1/4 teaspoon asafetida/hing
8 dried red Kashmiri chilies, broken
15 to 20 curry leaves, depending on size (mine were small)
2.5 ounces / 75 grams ginger root (about 4+ inches worth), peeled, in small chunks
4 cloves garlic, in small chunks
2 - 3 tablespoons jaggery or light brown sugar
1/4 teaspoon turmeric powder
1/4 teaspoon salt

TEMPERING:
1 tablespoon cooking oil
1/2 teaspoon brown mustard seeds
4 - 6 curry leaves
2 whole dried red Kashmiri chilies

Soak the tamarind in boiling hot water for at least 20 minutes to soften.

Heat 2 tablespoons of oil in a skillet and add in the channa and urad dal with the first half teaspoon mustard seeds and fenugreek seeds. Stir constantly until the dals just start to turn golden (not brown) and everything is fragrant. Add in the curry leaves, broken chilies (I did not use the seeds that fell out), the ginger and garlic. Cook this, stirring quickly until the garlic no longer smells raw, just a minute or two, then pour all the contents of the skillet into a blender container. Add in the turmeric powder and salt.

Separately, pass the softened tamarind through a sieve, pressing it through with the back of a spoon to get as much pulp as possible, using some of the soaking liquid to facilitate the process. Keep remaining soaking liquid aside. Add the tamarind pulp tot he blender, and blend the whole batch to a puree. You may need to add some of the reserved tamarind soaking liquid in order to puree the pickle. I had to use the better part of the entire 3/4 cup of liquid to blend the mixture down. 

Separately, heat the tablespoon of oil for tempering (meaning added flavors) and add in the mustard seeds, curry leaves and the two dried whole chilies and toast briefly. Pour this over top of the pickle when serving. Or, just stir it into the mixture. Store the pickle in a clean glass jar with a tight fitting lid and refrigerate up to 3 weeks. 

~~~~~~~~~~~~~~~~~~~~

Another thing I am working on for this dinner is dessert. I truly despise deep frying, so I am not making Gulab Jamun, and I do not want to make more paneer, as it has become nearly impossible, what with the ultra-pasteurization that has become so rampant, so I am not making Rasgulla, which now that I went to paste in a link, I realize I never posted my recipe! 

Milk, sweets, dessert, saffron
Rasgulla, recipe soon

At one of my Indian dinners I had made Gajar Burfi, a carrot fudge. This may sound strange, carrots in fudge, but after living in Guatemala as a young wife, and finding how many veggies went into desserts, I was no longer fazed when reading about carrots in fudge; it is absolutely delicious! So I thought I would return to that. But then again, I can never leave well enough alone, so I went looking at some Indian sweets recipes I had looked at before but never made. I opted then, to make an assortment of small batches of sweets, so we can all pick and choose. My first new recipe is called Badam Katli (Thin Almond Fudge). Since I used the recipe mostly as I found it, from Swasthi's Recipes, at Indianhealthyrecipes.com, while I will post what I did here, please read her recipe, made the long way.

My one error was cooking the mixture just slightly too long, as it really dried out. Good, in a way, because it is certainly not sticky, but I could absolutely not get the nuts to stay adhered to the top. I used almonds, since it is almond fudge, instead of the pistachios used in Swasthi's recipe.

As most of these sweets are festival or holy day treats, they are often made truly special by gilding with edible silver or gold foil. I happened to have silver foil on hand, so I used it.

almond meal, sugar syrup, Indian sweets
Badam Katli / Thin Almond Fudge

My understanding of the word 'katli' is that it means thin, as with rolling out the fudge into a thin layer. The meanings of different words gets mightily confusing at times, and I have seen this recipe, nearly identical, called Badam Burfi or Badam Halwa.

Trying to tease out the meanings and differences, Wikipedia had some things to say that made sense. I know these will not apply in every instance, but in this case, I'm just going with it. Any 'Burfi" (sometimes "Barfi" but I prefer the other spelling for obvious reasons) type fudge candy is made using milk, whether Khoya, plain milk, condensed milk or powdered milk (and sometimes all of them). My Carrot Burfi recipe in its original form, would use khoya or a cooked down milk, which can take literally hours and hours of stirring. Not gonna happen! I used powdered milk and it came together in minutes. Yum!

Halwa, on the other hand does not use milk, but generally uses a sugar syrup to create the mixture, but without milk.

Similarly with any recipe for laddoo/laddu/ladoo, whether deep fried or made quick cooked or simply ingredients mixed together (similarly to Bourbon Balls at Christmas time), are always made into round balls. Laddoo made with cooked semolina is on my list of things to try for this upcoming dinner as well.

On to the recipe. Simple and delicious. I doubled the recipe as it stood on Swasthi's site, but I did not quite double the amount of sugar. They are delightful.


Badam Katli
Indian sweets, almond meal, sugar syrup
Badam Katli or Thin Almond Fudge


Made about 20 - 25 pieces

2 cups fine almond meal with no brown skins
1 cup + 2 tablespoons white granulated sugar
1/2 teaspoon ground cardamom
1/2 cup water
-----
Almond slices or pistachio pieces for decoration

In a medium skillet over high heat, place the sugar and water and bring to boil. Stir, and once the sugar is all dissolved, add in all the almond meal and cardamom. Lower heat and while mixing, it is best to take the skillet off the heat. Mix well with a wooden spoon or silicone spatula until all the almond meal is evenly distributed, with no lumps. Return the pan to the heat and keep it at a simmer, because the mixture, as it boils, sends up geysers akin to watching lava burst from a volcano and with similar effect. You WILL get burned! Stir, quickly and constantly, to keep this from occurring. It will take about 6 to 8 minutes of stirring before the mixture comes together as one mass. Pour out onto a greased plat until it cools slightly.

Do not cool too long or you will not be able to knead the mixture. Knead the mixture until it comes together smoothly (I used a silicone spatula to do this, lifting, turning and forming over and over until smooth - it was just too hot!)), then place the mixture onto a piece of parchment and roll with a rolling pin to flatten. Place sliced almonds or pistachio pieces on top and roll again to make the nuts set evenly with the top of the fudge, which should be no more than 1/4-inch thick. With a sharp knife, trim edges neatly, then cut into about 1-inch wide strips. Separate the strips and cut into small squares or into diamond shapes. Store in a tightly sealed container. 


My passion is teaching people how to create a harmony of flavors with their cooking, and passing along my love and joy of food, both simple or exotic, plain or fancy. I continue my journey in ethnic and domestic cuisines, continuing my journey to explore diverse culinary experiences and hopefully to start you on a journey of your own. Join me also at A Harmony of Flavors on Facebook, and Pinterest.

Disqus