Translate

Showing posts with label garlic. Show all posts

Wednesday, November 4, 2020

Great Dinner for Any Night or Any Occasion

 A few months back, I was looking for something to do with white beans. I use white beans when I make my Mom & Dad's Bean Soup/Ham Bone Soup, yet I rarely use them otherwise. No particular reason for this, just that the Bean Soup recipe is the only one I had growing up that used white beans. 

white beans, bacon, thyme, onion, garlic
White Beans with Bacon & Thyme

Wandering around the internet in search of ideas, I came on one that sounded promising, called White Beans with Bacon and Herbs on "Jo Cooks." I printed it off, then started to plan what I would do differently. Not that there was anything wrong with how the recipe sounded, as is. Just that I always tinker. Even with my own recipes, I go back and just have to do something different. Maybe I don't have some ingredients and have to substitute. Maybe I just have a hankering for something different than the original flavor profile. Whatever it is, I just seem to have a need to change things.

For starters, I had started cooking a pound of beans from scratch earlier in the day. I tucked in a couple of bay leaves while the beans cooked. Once I found this recipe, I realized that it sounded splendid with the fresh herbs, but I didn't have any! I did, however, have some pesto in the fridge, from my latest batch, and opted to use some of that for flavors instead. I only buy thick-sliced bacon, so I lowered the amount of bacon to 4 slices. There were no onions in the original recipe, so I caramelized a chopped onion, then added in 4 fresh minced cloves of garlic to the mix. I needed more salt, since I was using fresh cooked beans. I always cook my beans or lentils with no salt at all so they cook a bit more quickly, more tender. I add salt once they are already tender.  And that was my plan.

The beans came out so amazingly flavorful. Oh my! And I never once thought of taking photos.

pork, thyme, sage, garlic, rosemary, fennel
Pork Tenderloin with Italian Flavors

So a couple of weeks back, I wanted to repeat this recipe, since it was so very tasty. And then I wondered what to pair with them as a main course? If it was just me in the house, I would have had a salad alongside these scrumptious beans and called it a night. My husband, however, would not be so easily placated. I got out some pork tenderloin and started thinking about what to do with that. 

As it turned out, I created a mix of "Italian" flavors, rubbed the mixture all over the tenderloins and baked them. The mixture is somewhat akin to what I do for things like steaks or lamb chops; a green mixture of garlic, rosemary, olive oil, pepper, salt, and other things that may differ depending on the meat involved. Since this was pork, I used sage and fennel. My preference would have been fresh sage, but again, I had none on hand. Oh, how I do miss having my own herb garden! The whole thing came out so good we both spent the entire meal moaning in pleasure.

White Beans with Bacon and Thyme


Serves 10 or more
white beans, thyme, pesto, onion, garlic
White Beans with Bacon & Thyme

1 pound white dried beans, soaked overnight (OR - Pour boiling water over them and let set for one hour)
2 bay leaves
-----
4 slices thick-sliced bacon, cut in 1/4" bits
2 tablespoons reserved bacon fat from pan
1 large onion, chopped
1 1/2 teaspoons salt, or to taste
4 fresh cloves garlic, minced finely
3 tablespoons fresh thyme leaves (no stems)
1 - 3 tablespoons fresh basil pesto
2 tablespoons red wine vinegar

If soaking beans overnight, in the morning, drain, then place beans in a large pot with tight fitting lid. Cover the beans with water by at least 1 inch above beans, add in the bay leaves, bring to boil, cover, reduce heat to a simmer and let cook for 2 to 3 hours, or until tender, but not mushy.

ALTERNATELY: If, like me, you don't remember to soak overnight, in the morning place the beans in a large bowl and cover with boiling water. Soak then 1 hour, drain, place beans in pot and cover with water by an inch, add the bay leaves and cook 2 to 3 hours, until tender but not mushy.

Once beans are nearly ready, remove lid and let the liquid cook down until there is only about 1 1/2 to 2 cups of liquid left. Leave on very low heat to keep warm.

In a skillet, fry the bacon to your desired doneness. Remove the bacon to paper toweling and reserve about 2 tablespoons of bacon drippings in the pan. Add in the onion with the salt and cook, stirring occasionally at first, then nearly constantly once they start to go golden. Continue cooking and stirring until they are deep golden brown and add in the garlic, cooking another 3 to 5 minutes, until the raw garlic smell is gone. Add in the thyme leaves, pesto and red wine vinegar and stir, then pour all this mixture into the beans and mix well. Cover and let flavors meld for at least 15 minutes before serving.

~~~~~~~~~~~~~~~~~

For this next dish, use the pork tenderloins and not pork loin. Tenderloins are far thinner and will cook more quickly. Pork loins are a thicker cut and will be less tender.

Pork Tenderloin with Italian Flavors


Serves 4 to 6
pork tenderloins, garlic, fennel, rosemary
Pork Tenderloin with Italian Flavors

2 pork tenderloins, about 1.25 pounds each
4 cloves fresh garlic, smashed and minced
2 teaspoons fresh thyme leaves, minced finely
2 teaspoons dried sage leaves, crumbled (or use fresh sage and mince, measuring out at least 1 tablespoon)
1 teaspoon fennel seeds, crushed
1/2 teaspoon dried rosemary leaves, minced, OR use 2 - 3 teaspoons fresh rosemary leaves, minced
1 to 1 1/2 teaspoons salt
1/2 teaspoon freshly ground black pepper
2 tablespoons olive oil

Trim the tenderloins of fat and silverskin. Set aside.

Mix all the remaining ingredients together and rub the mixture over the meat, coating all sides. Set the tenderloins in their coating into a zip top bag or into a container with lid and set aside for at least a half hour, though overnight in the fridge would be best.

Preheat oven to 400 degrees and set the tenderloins on a rack in a foil lined rimmed baking sheet. Pour some water into the baking sheet, otherwise the drippings will cause a LOT of smoke. Roast the tenderloins for about 50 to 55 minutes, or to an internal temperature of at least 165. Remove from oven and tent with foil for 10 to 15 minutes before slicing - across the grain and on a diagonal.


My passion is teaching people how to create a harmony of flavors with their cooking, and passing along my love and joy of food, both simple or exotic, plain or fancy. I continue my journey in ethnic and domestic cuisines, continuing my journey to explore diverse culinary experiences and hopefully to start you on a journey of your own. Join me also at A Harmony of Flavors on Facebook, and Pinterest.

Sunday, December 3, 2017

Another Stab at a Breakfast Casserole

Not quite a month ago I made a delicious breakfast casserole to mimic one I had eaten out in Washington at Tweets Cafe. It was really the first breakfast casserole of any kind I had made and while it was completely delicious, it did have some technical issues. I have no problem with posting the recipe, because it came out absolutely wonderful both in flavor and in appearance.

Christmas Tree, decorations
My Christmas Tree
As is usually the case with such things, the thoughts keep percolating somewhere in the back of my mind, and in the last couple of days, things got insistent, so I made a decision last evening that I would give it another try. Not the exact same recipe, because I was missing some key elements, most notably Poblano peppers. But, I did have eggs, and cheese and bacon. And that's where my mind shut off for the night last night. I did go so far as contemplate getting out of bed and putting some black beans to slow cook in the Crock Pot overnight, but nixed that idea. I was too tired from getting my Christmas tree together yesterday!

I got up this morning prepared to get into the kitchen and try out all the ideas I'd had since making that last casserole. Again, I was making this just for my husband and myself, so I was going to once more attempt the use of that same tiny Pyrex loaf pan I'd used last time, despite the difficulties I had then with it sticking. I cleaned that Pyrex and scrubbed it well, in hopes that this would help mitigate sticking. Instead of foil, I opted to use parchment to line the pan, but this time only lining it across the wide sides, with overhang, on the off-chance it would come out easily. I did not allow any parchment to go up the narrow sides. I greased the pan, but not the parchment once it was in place. I set the oven to 350 degrees.

Then the decision of what to put into this casserole. I liked the potatoes in the bottom, so once again I used potato, but a half of one larger potato. I fried it the same as last time, using my method for Pan Potatoes. Once done, those went into the bottom of the prepared casserole. Meanwhile, I fried up some bacon, diced small. After setting the crisp bacon aside to drain, I fried a half of a smaller onion (a larger shallot would also work) until translucent, then added in some garlic, some chopped fresh asparagus and red bell pepper, just until slightly softened, but still retaining their color.
 
Bacon, Egg, Casserole, breakfast
Bacon & Egg Casserole

While that was in progress, I whisked together 5 eggs and added in some fresh thyme leaves, which are still alive in a pot in my sun room, despite pretty chilly temperatures. I added in about 3 tablespoons of cream (milk would do) to the eggs and whisked well. A small amount of the eggs got poured over the potatoes in the little pan, and I rapped the pan several times, coaxing the eggs into and around the potatoes. To the remaining eggs I added the drained bacon, all the vegetables in the pan, along with some cheddar cheese, stirred well and poured this over top of the potato-egg mixture already in the pan. 

Bacon, Egg, Casserole, breakfast, recipe
Bacon & Egg Casserole
This time, I opted to cover the pan while it baked, hoping that the stored heat would help with getting the eggs set. It certainly worked. The last time, it took a solid hour and a bit of finagling to get the eggs set all the way through, but this time it took not quite 45 minutes and the top of the little casserole was beautifully puffed and rounded. I was so very pleased! Now the remaining question was, would it come out of the pan without such a struggle as last time? Why yes, it certainly did. No only did I not have to run a knife around the edges, but by lifting the ends of parchment, it lifted cleanly out, and once I set it on the cutting board, the parchment simply fell away to the sides. I was so happy, and so amazed.
 
One thing I did, because I have seen others do it, is to top the finished casserole with more cheese and pop it back in the oven to melt. I found this completely superfluous, redundant even, especially with all the garnishes that went on top, as well as an extra sprinkling of cheese. I would stick with just the half cup of cheese that went into the casserole.

Now I really want to go back to remake the first casserole, because the Poblanos in that one were just scrumptious. But for now, I could not have asked for a better turnout. And, although I am calling this casserole "Bacon and Egg Casserole," that is so inadequate, with all the great things in it!

Bacon & Egg Casserole

(with potatoes, asparagus, red bell pepper, onion, garlic and cheese 😉)
Bacon, Egg, Casserole, breakfast, recipe
Bacon & Egg Casserole
(with Sweety Drop Peppers)

Serves 2

4 strips thick sliced bacon, diced
½ large potato, or one small
2 teaspoons olive oil
½ medium onion, or 1 large shallot, finely chopped
1 clove garlic, minced 
½ red bell pepper, chopped
3 - 4 asparagus spears, chopped (about ¾ cup)
5 eggs, whisked
1½ teaspoons fresh thyme leaves
3 tablespoons cream or milk
½ cup shredded cheddar cheese
salt, to taste

GARNISHES:
  • A small "salad" portion per plate: choose from: lettuce, arugula, spinach, baby greens, cabbage, red cabbage, cilantro, etc. 
  • scallions, sliced diagonally
  • cilantro or parsley for sprinkling
  • Feta or more cheddar cheese for sprinkling over top.
  • sour cream or Greek yogurt
  • "Sweety Drop Peppers," optional (find them on Amazon), or cherry tomatoes
casserole, egg casserole, bacon, vegetables, breakfast
Fresh from the oven

Prepare a very small loaf pan, 3.5 x 6 x 2.5-inches, approximately: Spray the pan with nonstick cooking spray. Cut a piece of parchment to fit in and across the widest sides of the pan, with at least an inch of overhang. Set aside. Preheat oven to 350 degrees.

Heat a skillet and add olive oil. Add in the potatoes and fry them on medium heat until crisp and browned, keeping a lid on and only occasionally removing the lid to stir until done, about 15 minutes. Sprinkle with salt. Remove the potatoes to the prepared loaf pan.

Place the diced bacon into a skillet and fry until crisp. Remove to paper toweling to drain; set aside. In the same pan, with the bacon grease (remove some, if it is too much), saute the onion until translucent and soft. Add in the garlic, red bell pepper and asparagus, sprinkle with salt to taste and saute quickly just to soften, but still retain vibrant color. Remove from heat to cool slightly.

In a bowl, whisk together the eggs and add in the cream and thyme leaves. Pour a small amount over the potatoes in the loaf pan. Rap the pan a few times on the counter to settle some of the egg in and around the potatoes. To the remaining eggs in the bowl, add the reserved bacon, the cheese and the onion mixture from the skillet. Stir to combine the ingredients, then pour all of the mixture over the potatoes in the loaf pan. Keeping the parchment overhang on the outside of the pan, cover the pan with foil or a silicone topper. If foil, spray the side of the foil that will touch the eggs. 

Bake the casserole for 40 to 45 minutes, or until it has puffed and is completely set in the center. 

To garnish the plate as I've done, make a small salad portion using greens of your choosing for each plate. Smear a bit of sour cream or Greek yogurt alongside the salad. Once the casserole is done, remove from the pan by using the ends of parchment and set the casserole on a cutting board. With a very sharp knife, trim the edges of the egg straight and cut the casserole in half. Set one half (should be a nice square) onto the sour cream. Sprinkle with more cheddar or with Feta or any cheese preferred. Sprinkle with scallions and cilantro and if available, the Sweety Drop Peppers or halved cherry tomatoes for color.


My passion is teaching people how to create a harmony of flavors with their cooking, and passing along my love and joy of food, both simple or exotic, plain or fancy. I continue my journey in ethnic and domestic cuisines, continuing my journey to explore diverse culinary experiences and hopefully to start you on a journey of your own. Join me also at A Harmony of Flavors on Facebook, and Pinterest.

Thursday, October 1, 2015

Making Peace with Kimchi

Kimchi. 

I hear this word everywhere these days. For many years now I had heard of kimchi, but had resisted any urge to try it. I had heard of the ingredients, varying depending on who the information originated from, and the fiery spiciness of the condiment. None of these things called my attention in the least. 

Kimchi, condiment, fermenting
Kimchi

Some years ago, I finally gave in and bought a bottle at the local grocery. I took one taste and threw out the entire bottle. I hated the flavors completely and utterly. I could not even get far enough past the flavor to object to the spiciness. And so it has been that even though I started fermenting foods 3½ months ago now, with many absolutely wonderful (and some not so wonderful) results, I had no interest at all in even attempting kimchi.

Enter my son and his wife. They came to visit just a couple of weeks past and were talking of eating kimchi very often. Since we have so very many food tastes in common, I wondered at this. Even my son, who was particularly picky as a child, talked of eating kimchi. While still wondering what in heaven they were finding in this taste profile to love, I also thought maybe it was time to give this condiment a try on my own. 

There are as many ways to make kimchi and as many ingredient variations as there are kimchi makers, it appears. I was at the Farmer's Market last week and mentioned to someone that I was going to attempt making kimchi and another woman commented that I "Absolutely had to include turnips. Without turnips, it isn't kimchi", she said. Since turnips were absolutely not one of the ingredients I had planned to use, I nodded and continued on my way.  

Ingredients

Kimchi, condiment, fermenting
Kimchi
Meanwhile, I went online to research what ingredients are actually in kimchi and also what process do they use to make it. Ingredients as I can understand them seem to be based on cabbage and Daikon or other Korean radish. After that it is open for interpretation. Ingredients can be regular cabbage or Napa cabbage,  bok choy, Daikon, regular radishes, carrot, onion, Asian Pear, regular pear, apple, garlic, ginger and hot chili peppers. Obviously I missed turnips in there! And who knows how many other ingredients might be used? 

Spices

One of the main spices, and which gives the finished product its red-orange color is Korean chili powder. I do not have Korean chili powder, but someplace online someone suggested mixing up ½ cup of sweet paprika with 2 tablespoons of cayenne to approximate this. In the end, since I was making far less kimchi, I whittled down this mix to 2 tablespoons of paprika and ½ tablespoon of cayenne. On further consideration, while I like spicy foods, I don't care to truly go crazy with hot chilies, so I lessened the actual cayenne to only 1 teaspoon. Even with that much I had trepidation. Today, once the kimchi was finished and I gave it a taste, I love the amount of spice just fine. The heat is noticeable, but very tolerable. I probably could have added the extra ½ teaspoon, and probably will next time. And there will be a next time!

The other spices are ginger and garlic. I know I added them into the ingredient possibilities list, but the amounts are also very scalable, according to taste. Some swear by adding in one little teaspoon of sugar, and others add a lot more. Others add no sugar at all. The last ingredient is some kind of fish sauce. Here I balked.

I do not keep fish sauce, as it is not an ingredient I use. My husband does not like fish, and if something smells fishy in the least, there is no hope. So I just don't bother to use it. I do have anchovy paste in the fridge, and which I use - sparingly - in things like Caesar Salad. Since the kimchi ingredients are first brined in a heavily salted mix, I hesitated to use salty anchovy paste, even though I am sure hubby will never be eating my kimchi! I live in hope . . . Someone online mentioned using kelp powder mixed with water. I had no kelp powder, but did have dried kombu seaweed, so I pulverized a piece of this and used it. I could not tell it was in there at all, so who knows?

Fermentation

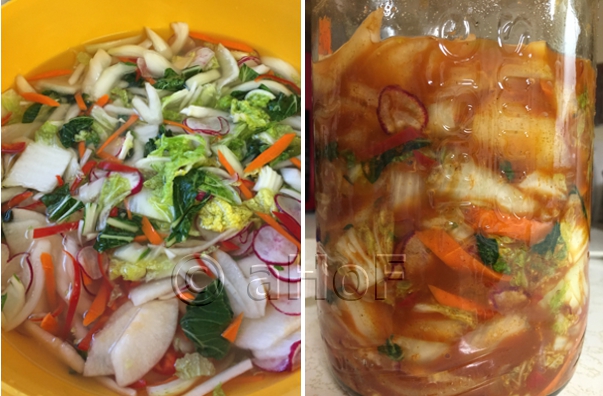
There seem to be two schools of thought here. Some, and possibly more traditionally, first brine the vegetables, anywhere from a few hours to overnight. Some brine only the cabbage portion of the ingredients, and some brine all the vegetables at once. Once the brining is done, the vegetables are rinsed well and the spice mixture is massaged in, and then the mixture is packed in jars or crocks to ferment. I opted for this second method of pre-brining all the vegetables together.

Others eschew this pre-brine step and just add salt with the spice mixture and massage all the veg together well and pack in jars or crocks to ferment. 

Vegetables, brine, ferment, kimchi
Vegetables in brine and then packed into jar to ferment

Cutting Vegetables

In this matter, as with everything else, there are varying ideas on how this should be performed. Some say to cut the Napa cabbage into quarters, lengthwise, brine and then after thorough rinsing, each layer of leaf is lifted and the spice paste is layered between. Others shred all the vegetables. Others said they preferred to have all the vegetables cut in different ways, making the finished product visually interesting. I opted for this last variation. 

Kimchi, condiment, Korean, spicy
Kimchi

Kimchi

Makes 1½ tightly packed quarts

1 (1-pound) head Napa Cabbage (12 cups, prepped)
1 small piece Daikon radish (1-cup, shredded)
3 - 4 stalks bok choy (3½ cups, sliced)
9 - 10 small red radishes (1½ cups, thinly sliced)
1 carrot (1 cup, julienned / matchsticks)
1 onion (1½ cups, thin wedges)
1 Asian pear (3 cups, thin wedges)
2 Fresno chilies (½ cup, thin slices, mainly for color)

BRINE:
1½ quarts (6 cups) filtered water
6 tablespoons coarse sea salt

PASTE:
1 tablespoon minced garlic
1 tablespoon minced fresh ginger root
1 teaspoon sugar
2 tablespoons paprika
1½ teaspoons cayenne
2 tablespoons filtered water
1 teaspoon Kombu or Kelp powder

Prepare all the vegetables as desired. I cut the Napa cabbage across into 1½-inch sections. The Daikon was shredded on a larger-holed shredder. The bok choy I sliced at angles into about ¼-inch thick slices, the carrot was julienned, the radishes sliced very thinly on a mandoline. The Asian pear I cut into quarters, cored and then sliced in long wedges about ⅛-inch thick. The onion was cut in narrow wedges and the Fresno chilies were sliced across into thin rings. 

Combine the brine ingredients, stirring until the salt is completely dissolved. With all the vegetables in a large bowl, pour the brine over top and cover the container. Allow to brine for anywhere from 4 to 24 hours. I stopped at 8 hours, whereupon the vegetables were very salty. Set the vegetables into a large colander and rinse very well, immersing in clean water 2 or 3 times. Taste the vegetables. If they are too salty for your taste, rinse some more. Once well rinsed, set the vegetables in the colander to drain for about 1 hour.

Make the paste by first combining the garlic and ginger and pounding slightly to make a paste. Add in the sugar, paprika, cayenne, kelp or kombu powder and then add in about 2 tablespoons of water, to make a paste. Once the vegetables are well drained, set them into the large bowl and massage this paste mixture well into the vegetables, ensuring that the paste covers all the vegetables. Pack this mixture tightly into a large jar with at least ⅓ of the jar free as head-space. Alternatively, pack this into a large crock. Press down well, to release more juices from the vegetables, and keeping the vegetables submerged, allow this mixture to ferment covered for 3 to 5 days, or until the mixture tastes good to you.

In actuality, the vegetables tasted absolutely splendid just after mixing in the paste mixture! I intended to leave this to ferment for 5 days, and then forgot yesterday, so it ended up going for 6 days. When I tasted it today, I absolutely love the flavors, love how it looks, love the textures. There is nothing I do not love about this kimchi. I hope you will attempt this mixture yourselves.


My passion is teaching people how to create a harmony of flavors with their cooking, and passing along my love and joy of food, both simple or exotic, plain or fancy. I continue my journey in ethnic and domestic cuisines, continuing my journey to explore diverse culinary experiences and hopefully to start you on a journey of your own. Join me also at A Harmony of Flavors on Facebook, and Pinterest.

Sunday, September 13, 2015

Kalbi Flank Steak and Wild Rice Corn Salad

My son and his wife were visiting over the course of 2 weekends and whenever they are around, we tend to try new recipes and revisit old ones. We all love food and we all love wine and between us we really have an excellent time at table. They brought some wines with them that were discovered earlier this year on a trip out to the Seattle area. The winery, tiny and kept that way on purpose is called Harbinger, and the 3 wines they brought were all wonderful. My favorite of all was a Tempranillo blend caller "Bolero", and not far behind was a Sangiovese called "Rapture". Another really good one was a Cabernet Franc.
 
Wild Rice, Corn, Salad, side dish
Wild Rice and Corn Salad

On the last evening they were here, I had marinated a flank steak with Kalbi type flavorings. The first time I ever heard of Kalbi was on a cruise ship. On the first afternoon onboard there is generally a sort of cafeteria style lineup of foods, and I tried some thin strips of meat that were just out of this world. I raved so much that the chef gave me the recipe. Unfortunately, trying to pare down a recipe for thousands into a recipe for home use obviously didn't translate well, and when I tried it at home it fell so far short that I never tried it again. That was a long time ago.

Many, many years have passed since then, and I have become far more confident of concocting my own recipes. When recently I was reading a little blurb on a restaurant somewhere that served Kalbi, made using some sort of short ribs, I was first just struck by the name. I know the thin strips of meat I ate onboard the cruise ship were not short ribs by anyone's definition, but the flavors certainly came up in the "Asian" category. I revisited the recipe.

I added some things and took out others and generally just made it my own way, using a flank steak. Flank Steak can be a really tough cup of meat if overcooked. It can also be difficult to eat unless it is sliced across the grain. There is little to no fat on a flank steak, so long cooking will only dry the meat further. I have made many many flank steaks through the years, and I truly love them. They play well with marinades and are quick to broil or grill. A match made in heaven for a Kalbi flavored marinade.

Kalbi Flank Steak

Kalbi Flank Steak, grilling, marinade
Kalbi Flank Steak
Serves 4 to 6

1½ to 2 pounds flank steak

MARINADE:
⅓ cup soy sauce
⅓ cup brown sugar
¼ cup Mirin (or use Sake)
½ onion, finely chopped
4 cloves garlic, minced
2 tablespoons dark (toasted) sesame oil
1 - 2 teaspoons finely ground black pepper
1 walnut-sized piece of fresh ginger, grated or minced

Combine all the marinade ingredients in a large flat container or a gallon sized zip-top bag. Place the flank steak into the marinade, coating it on both sides. Press out all the air if using a bag. Marinate the steak for at least 6 hours or preferably overnight, turning occasionally so the meat is flavored on both sides equally.

Preheat a broiler or a grill. Grill or broil the meat over high heat for about 6 minutes per side. It should stay pink in the center, or it tends to toughen. Once grilled to desired doneness, set the meat on a platter and cover with foil for a few minutes before slicing. Slice the meat across the grain either very thinly, or in less than 1-inch thick slices to serve. 

Racking my brain for something new to make as a side dish for this meal, I finally settled on something with a wild rice base. This came about because as it happened, I had about 3 cups of cooked wild rice in the fridge. It had set on the burner for too long and had all burst open. none of those pretty black strands for this dish! There was nothing wrong with the flavors though, and adding in a lot of other flavors would only be absorbed the better for its burst open state. As I sat thinking about what I had and what I would like to add, I came up with this recipe, and as it happens it was truly inspired. We were practically inhaling it! It made a perfect side for the Kalbi Flank Steak.
Wild Rice, Corn Salad, side dish
Wild Rice and Corn Salad

I used 3 cups of cooked wild rice and 1 cup of white rice, as these were the amounts I had already existing in the fridge. The quantities can be changed, reversed, or used half and half, but about 4 cups of rice will be needed in total. You will need to cook about ¾ cup wild rice in about 2½ to 3 cups of water with 1 teaspoon salt for nearly an hour, covered. For 1 cup of white rice, cook ½ cup white rice with ½ teaspoon salt and 1 cup water, covered, for 15 minutes.

Wild Rice and Corn Salad

Serves 6 to 8
Wild Rice, Corn Salad, side dish
Wild Rice and Corn Salad

3 cups cooked wild rice (¾ cup dry wild rice)
1 cup cooked white rice (½ cup dry white rice)
2 tablespoons pine nuts or cashews
½ green bell pepper, chopped (about ¾ cup)
½ red bell pepper, chopped (about ¾ cup)
3 - 4 scallions, chopped
2 ears fresh corn, shucked
2 to 3 ounces crumbled Feta cheese
chopped cilantro to taste

DRESSING:
3 tablespoons olive oil
1 - 2 tablespoons lemon juice
1 teaspoon crushed Sichuan / Szechuan peppercorns, optional
1 teaspoon Asian Dark Sesame Oil

½ teaspoon salt, or more, if needed

Have the rice cooked and cooled well ahead of time, or the day before.

Heat a grill or broiler and grill the corn until there is some char on about ⅓ to ½ of the kernels, turning often to grill evenly.

Place both the cooled rices in a large bowl and fluff the rice to separate the grains. Add in the pine nuts, green and red pepper, scallions and Feta. Cut the kernels from both of the cobs of corn and add them in. Whisk together the dressing ingredients in a small bowl and pour over the rice mixture and toss well. Add in cilantro and mix well. I used at least 1/2 cup of cilantro. If this is not to your taste, alter the amount as needed. Taste the mixture and add in the salt if needed.


My passion is teaching people how to create a harmony of flavors with their cooking, and passing along my love and joy of food, both simple or exotic, plain or fancy. I continue my journey in ethnic and domestic cuisines, continuing my journey to explore diverse culinary experiences and hopefully to start you on a journey of your own. Join me also at A Harmony of Flavors on Facebook, and Pinterest.

Thursday, August 14, 2014

Greek Style Stuffed Chicken Breasts for Dinner

Long, long ago, I made something similar to this, and it stayed in my memory. I remember the flavors being great. The most likely reason I never went back to make it again is because I dislike frying food. I really dislike the cleanup afterwards, with everything grease-spattered. Considering it has been at the very least 30+ years since the last time I stuffed chicken breasts and fried them, I thought maybe it was time to revisit this idea.

herbs, thyme, marjoram, oregano, rosemary
Clockwise from top: thyme, marjoram, oregano, rosemary
I had skinless boneless chicken breasts to use. My recollection from that last time was cutting a pocket into the meat. Basically, lay the breast flat on a cutting board and with a small, sharp paring knife, knife blade parallel to the cutting board, cut into the thicker side of the breast, keeping the opening small, but sliding the knife towards the top end and then see-sawing to the bottom end, creating a pocket, but without too large an opening on the outside. The most important thing is not to poke the knife out the other side, or even worse, through the top or bottom of the meat.

I chose Greek flavors to stuff the chicken, mainly because I already had a block of Feta cheese in the fridge. I thought about what else to use that would be Greek or Mediterranean and since my sister-in-law has all my herbs growing at her house, I took a walk over there and picked marjoram, oregano, thyme and rosemary. I particularly wanted marjoram for the flavors because of its somewhat more floral scent. If marjoram is not available, just use the whole amount of oregano. Along the way home, I stopped in the grocery for a lemon. Thinking of the possibility of using sun-dried tomatoes, I thought that oil packed would give more concentrated flavor. I considered capers, but left them out this time.
 
Greek Style. Stuffed Chicken Breasts entree, dinner ideas
Greek Style Stuffed Chicken Breasts

Putting the whole thing into practice was relatively simple. I made the pockets in the chicken breasts and set them aside. I put a chunk of the Feta into the food processor to break it up finely, adding minced garlic to ensure it was evenly distributed. I did the chopping of herbs by hand. I had more than I needed, and since I was steaming fresh green beans to accompany the chicken, I added the leftover chopped herbs to the beans when they were finished. I used seasoned flour and egg to make the outer coating for the chicken; first in flour, then egg, then flour.
 
chicken, frying, cooking chicken, stuffed chicken,
Chicken, frying

Actually frying the chicken took longer than I wished, but I kept the heat on medium low because I wanted the chicken cooked through but not burnt. I did not time it precisely, but I would estimate at least 15 minutes per side, before it reached an internal temperature of 165 degrees on my Thermapen instant-read thermometer. I realize how expensive this little tool is, but it is worth its weight in gold. Truly!

Ultimately, despite the mess all over the stove to clean, the chicken was most delicious. My husband again was thrilled with the outcome. My photos did not come out as I had wished, but hopefully they give enough of an idea of the great outcome of this dish.

Greek Style Stuffed Chicken Breasts


Makes 4 servings
Greek Style, Stuffed Chicken Breasts, dinner idea, recipe
Greek Style Stuffed Chicken Breasts

4 boneless, skinless chicken breasts
2 ounces Feta cheese
2 cloves garlic, minced
2 teaspoons fresh lemon zest
1½ teaspoons fresh, minced rosemary leaves
1½ teaspoons fresh, minced thyme leaves
1½ teaspoons fresh, minced oregano leaves
1½ teaspoons fresh, minced marjoram (
OR use 3 teaspoons fresh oregano, if marjoram not available)
1 tablespoon minced oil-packed sun-dried tomato
¾ cup all-purpose flour
1 teaspoon salt
¼ teaspoon fresh ground pepper
1 egg
1 - 2 tablespoons milk or water
2 tablespoons oil, for frying, as needed

Pat dry the chicken breasts with paper toweling. With a very sharp paring knife, insert the knife tip into the thicker side of the meat. Slide the knife upwards first to the rounded end of the meat, being careful not to poke all the way through. With a gentle, back-and-forth, sliding motion, slide the knife blade to cut a pouch, extending down as far as comfortable into the narrow end of the chicken. Try to keep the original opening no more than 2 inches wide. Do this with all 4 chicken breast pieces and set aside.

chicken, making a pocket, stuffing chicken breast
Cut a 2" slit, slide knife blade upwards and down to make pocket

Place the feta cheese into a food processor with the garlic and lemon zest and process fine. Chop all the herbs and add them to the processor and pulse once or twice. Pour the mixture into a bowl and add the minced sun-dried tomato, stirring to combine. Divide the cheese and herb mixture into 4 portions. With one hand, open the pocket of one chicken breast and with a small spoon, insert one portion of the cheese herb mixture. Use a fingertip to push the mixture both upwards and downwards in the pocket. Press the edge of the pocket to close and press the surface gently with fingers to spread the mixture to lay smoothly inside. Do this with the remaining 3 chicken breasts and filling.

Combine the flour, salt and pepper on a plate. In a separate, wider container, mix together the egg and milk or water with a fork to combine. Dredge the chicken breasts first in the flour mixture, then in the egg mixture, then back in the flour mixture. Set them aside for at least 20 minutes to set the coating. If longer, place them in the refrigerator.
 

Heat a large skillet and add the oil. Place the chicken breasts smooth side down into the hot oil. Start with medium low and fry the meat until very golden, about 15 minutes. Turn gently and fry the opposite side until golden and the internal temperature is at least 160 to 165 degrees. Do not cover the pan to speed the cooking as this will make the coating soggy and the cheese will ooze out.


NOTES: If other herbs than used in this recipe are desired, I would recommend using 1 - 2 tablespoons fresh dill instead and 3 - 4 teaspoons chopped capers instead of  the sun-dried tomatoes. This will be my next experiment!


My passion is teaching people how to create a harmony of flavors with their cooking, and passing along my love and joy of food, both simple or exotic, plain or fancy. I continue my journey in ethnic and domestic cuisines, continuing my journey to explore diverse culinary experiences and hopefully to start you on a journey of your own. Join me also at A Harmony of Flavors on Facebook, and Pinterest.

Sunday, March 2, 2014

A New Twist on a Pilaf and a New Recipe for Cod

I am always interested in going back to basics when  making foods, partly because it was something I had to do in Guatemala and that is how I learned. When what is locally available is all you can use, one learns quickly. Back in the 1970s there was no availability of every thing one could imagine on the internet. There was no internet. No cell phones. It is hard to even remember what we did back then. No remotes for the TV. Two or three channels at most. Foods that were available locally were what could be used. Period.

When I came back to the US, it was the time when using whole grains, higher fiber and jogging came into vogue. I never got the jogging bug, but was always interested in being healthy. Using foods with higher fiber seemed natural. I really liked all those things, so there was no difficulty in it for me. But, just because something is high fiber does not immediately turn out tasting good. We have to try new ways to make some foods taste marvelous. Now, here we are, 40 years later. I am still experimenting. I buy foods like whole oat groats or raw buckwheat, raw cashews, millet, teff, amaranth. The list goes on and on. Not all of those were immediate hits. Not all of those were even something I tried more than once. Still, because once they weren't my cup of tea, doesn't mean that at some point they won't taste really good made in a different way.
green lentils, millet, pilaf, cod, fish,
Green Lentil and Millet Pilaf with Baked Crusted Cod

Recently a friend gave me a recipe for waffles using soaked buckwheat and millet. No cooking of the grains beforehand. I loved those waffles. I wish I could claim that recipe as my own, but it is not. I have been meaning to get them out and make those waffles again, but have yet to get to it. Meanwhile, I keep seeing the bags of the seeds in my freezer (where I keep anything that doesn't get used too often), and was thinking what I might do with them. A few days ago, I got an idea for a sort of pilaf with less-used or -known grains, lentils or seeds. I ended up making a Green Lentil and Millet Pilaf, which I just loved. I have been eating it the past few days, all on my own, as it is not a dish my husband would touch, though I keep hoping. I had green De Puy lentils because I had used them in another dish from the Food and Wine magazine. Their recipe was with these little green lentils, red quinoa and cauliflower and I loved that too. So, the lentils were there in the cabinet, and the millet was in the freezer and I decided they would make a nice looking dish; it remained to see what I could do with the flavor. 

Green Lentil and Millet Pilaf


Green Lentil, DePuy lentils, millet, pilaf
Green Lentil and Millet Pilaf
Serves 4 - 6
 

½ cup green (De Puy) lentils
1 small carrot, grated
1¼ cup water
½ cup millet
1 cup water
1 small knob fresh ginger, minced
1 tablespoon olive oil
1 large shallot, roughly chopped
½ teaspoon salt
1 - 2 cloves garlic, thinly sliced
1 stalk celery, sliced thinly
½ green pepper, chopped
½ teaspoon salt, or more, to taste
 

Place the first 3 ingredients into a small saucepan and bring to a boil. Reduce heat, cover and simmer for about 25 minutes, until cooked through. In another small saucepan, bring the next 3 ingredients to boil, reduce to a simmer, cover and cook for about 15 to 18 minutes or until tender.
 

While these are cooking, heat a skillet and add the olive oil. Add in the shallot with the first half teaspoon salt and saute until soft. Add in the garlic, celery and green pepper and saute for another 10 minutes or until the vegetables are softened. Add in the drained lentils and the millet and the second half teaspoon of salt. Stir to combine.

A few weeks back, I bought some frozen cod. The pieces were individually wrapped so they were just fine in the freezer. But, I like fish and my husband doesn't, unless there is enough breading, it is fried and there is plenty of ketchup to smother it in. I like fried fish just fine. Just not as the only way. I like eating fish made in other creative ways. So, there is this cod. I had made Beef Vegetable Soup, which is a favorite of my husband's, so I left the soup for him and made myself a piece of fish. Mayonnaise and Parmesan cheese make a nice topping for things. I have long made pork chops by setting them onto a baking sheet, setting one (¼-inch thick) onion slice on top of each, placing a dollop of mayo onto the onion, and then Parmesan over the top of the mayo. Bake for 45 - 55 minutes at 350 and o-m-g! So, with a little play on that concept, I made my cod. The recipe was just for the one piece, so if making more than one, just multiply the recipe as needed. It took longer in the oven than I anticipated, so the next time I might set the oven to 400 degrees and bake for less time.

Baked Crusted Cod


cod, fish, dinner ideas, crusted fish
Baked Crusted Cod
Serves 1

1 cod filet, (about 5 ounces)
salt and pepper, to taste
1 tablespoon mayonnaise
2 tablespoons freshly grated Parmigiano-Reggiano
3 tablespoons panko bread crumbs
1 tablespoon freshly grated Parmigiano-Reggiano
1 teaspoon olive oil

Preheat oven to 375 degrees (350 on Convection). If the cod filet is very thick in the center, butterfly so it lays flat with a more even thickness all along the length. Salt and pepper both sides of the fish. If you have white pepper, try using that instead of black.

In a little bowl, combine the mayonnaise and the 2 tablespoons of Parmigiano-Reggiano. Spread this paste over the top of the fish, evenly. In another small bowl, combine the panko, 1 tablespoon of Parmigiano-Reggiano and the olive oil. Press these crumbs onto the mayonnaise mixture on the fish. Set the filet onto a rack over a rimmed baking sheet. [To prevent messy cleanup, line the baking sheet with foil first.] Set the filet into the oven and bake for 20 to 25 minutes, or until it flakes in the center.

The cod was delightful. I smeared some tartar sauce onto my plate and set the fish on top of the tartar sauce to serve. It made for a prettier photo. You can always serve more tartar sauce on the side. Together these two recipes were just wonderful for dinner.


My passion is teaching people how to create a harmony of flavors with their cooking, and passing along my love and joy of food, both simple or exotic, plain or fancy. I continue my journey in ethnic and domestic cuisines, continuing my journey to explore diverse culinary experiences and hopefully to start you on a journey of your own. Join me also at A Harmony of Flavors on Facebook, and Pinterest.

Thursday, January 9, 2014

Gremolata or Persillade or Pesto or Pistou

lemon, garlic, parsley
Basic Ingredients
It seems that many countries have the same basic idea for an herbed topping for foods. The idea is implemented and played upon, given names to fit the language and voila. Similar, I guess, to how my sisters and I could all look at a recipe, but once we took that recipe and made it ourselves, we each would end up with a different final product. It is so simple to take a recipe and change this, add that, leave out another thing and make it reflect our own taste and style.


Gremolata

lemon, parsley, garlic
Gremolata, freshly made
Somehow, somewhere through all of my cooking career, I "knew" about Gremolata. Enough so that when I brought up the subject with one of my daughters, I instinctively knew what the basic ingredients were, though I had not yet made it myself, to date. I knew that it had parsley, lemon zest and garlic. I "knew" it could have olive oil.


Pesto

The same could be said of pesto. Up to just a few years ago I had never made pesto, though I knew the basic ingredients were basil, garlic, pine nuts, olive oil and Parmesan. Now I make it all the time, and use it extensively. Pesto can be made by coarsely chopping all the ingredients, or finely chopping the ingredients. It can be made by pounding the ingredients in a mortar and pestle, or it can be made by either pulsing or pureeing in a food processor. It all depends on your particular need.


pesto, spread, condiment, basil, parsley,  garlic
My Favorite Pesto

My Favorite Pesto


Makes about 2 cups
2 cups basil leaves, packed into measure
2 cups Italian parsley, packed into measure
4 - 6 cloves garlic
3 tablespoons pine nuts
1 cup grated Parmesan
2 tablespoons butter
⅓ cup olive oil

Combine all but olive oil in a food processor. Process until very finely ground, scraping down sides as needed. Drizzle in olive oil while processing, until well blended.

NOTES: This recipe is versatile, and many variations on the theme are in evidence these days. Pine nuts are very expensive, but walnuts make a perfect substitution. Some make pesto with young spinach leaves instead of basil. Some use no parsley at all.

The amount of garlic is completely “to taste”, though if raw garlic is a problem, chop it first and soak in a tablespoon of white vinegar for up to 10 minutes before using. Drain the garlic and add to the food processor.

If 2 cups of pesto is too much, but basil is in abundance, this recipe freezes perfectly. Divide into small containers and freeze until needed. I had so much basil and parsley growing last summer, I made 5 (2-cup) containers and froze them. I had plenty of wonderful pesto, redolent of summer, to keep me all winter long.

Persillade

Another herb mixture is the French persillade. In French, "persil" means parsley, so it is no stretch to realize that a persillade contains parsley. Beyond that, I was unsure. It appears that the basic ingredients for a persillade are parsley and garlic, chopped together.

Pistou

A sort of crossover is from Provence, France, bordering the Mediterranean to the south and Italy to the east. Pistou is a Pesto crossbreed. "Pistou", in the Provencal language means "pounded" so similarly to pesto, it is a pounded mixture of basil, garlic and olive oil, but without pine nuts. The cheese used in Pistou is dependent on the particular area and what is available, although because the Pistou is used as a garnish to the Soupe au Pistou (Pistou Soup, similar to Italy's Minestrone), the cheese should not be one that would become stringy in the hot liquid.

Chimichurri

Argentinian chimichurri is yet another type of topping/sauce with the main ingredients of parsley and garlic with olive oil. They take it much farther and add a lot more ingredients, such as oregano and red wine vinegar to name only a few. Most of the Latin countries have some version of a chimichurri sauce. Guatemalan Chimichurri was most often used as a marinade for meat to be grilled instead of a topping for after cooking the meat.


Okay, that was a lot of information. I guess it just struck me how many countries have a similar thing, changing it to suit their need or availability of products. So, back to Gremolata. Gremolata is an underused condiment. Being so easy to make, I hope to spread the word a bit here and give some ideas. In its  basic form, Gremolata is parsley, lemon zest and garlic, chopped together. It can have other things added, depending on need, such as olive oil, or salt and pepper. It is best to have the parsley leaves dry when chopping, so be sure that they are washed well ahead and allowed to become completely dry before proceeding. Wash the lemon well before zesting. The garlic should be fresh, for the best flavor. Once garlic begins that little green sprout it becomes bitter; it might be okay for cooked foods but not when the fresh flavor is so important. The amounts can be completely up to the person making it. Yesterday I made some using about 3 tablespoons of finely chopped parsley, 2 garlic cloves and the zest of one very small lemon. When I made Gremolata Walnut Pinwheels, I added salt and pepper and some olive oil so it would stick inside the puff pastry.
gremolata, puff pastry,
Gremolata Walnut Pinwheels

Gremolata Walnut Pinwheels


Makes approximately 70 pinwheels


GREMOLATA:
¾ cup parsley, chopped
2 - 4 cloves of garlic, minced (use amount of garlic to taste)
3 - 4 tablespoons lemon zest (about 2 lemons)
¾ teaspoon salt
¾ teaspoon freshly ground pepper
3 tablespoons olive oil
------

1 cup walnuts, chopped
1 package Puff Pastry Sheets

Set the puff pastry sheets to thaw. This will take from 30 to 40 minutes, to thaw enough to open the sheets without breaking at the folds.

Combine the first 6 ingredients (the gremolata). Preheat the oven to 375 degrees.
When the pastry is thawed, first take one and roll it in only one direction, making a long piece about 18 inches long by the width of the original sheet. Spread half of the gremolata over the sheet. It will be quite sparse, but this is fine. Sprinkle ½ cup of the walnuts over the gremolata. Roll up from the long side, creating a long narrow roll. With a sharp knife, slice the roll into generous ¼-inch thick slices and lay them onto a baking sheet. If they are too distorted, press them slightly to a rounder shape, but they will round nicely in the oven.

Bake for 20 to 25 minutes, or until they are nicely golden.

NOTES: My daughter and I feel that these would serve as a lovely accompaniment to a nice soup such as a creamy tomato soup, or a salad, as well as an appetizer.


gremolata, condiment, flavor enhancer
Freshly Chopped Gremolata
Beyond using in puff pastry though, Gremolata is a wonderfully fresh way to lift and brighten the flavors of vegetables. Sprinkle it on cooked green beans or asparagus to brighten flavors. Sprinkle it into a soup, much like the Pistou. Sprinkle it over fish or seafood dishes, bean dishes, eggs. It is great as is, but switch the parsley to mint and you have an instantly perfect condiment for lamb. 

Think up new ways to use it. It is too simple to not take advantage. Without adding olive oil  it has no calories to speak of. Mix up a batch of whatever combination suits your need or mood.


My passion is teaching people how to create a harmony of flavors with their cooking, and passing along my love and joy of food, both simple or exotic, plain or fancy. I continue my journey in ethnic and domestic cuisines, continuing my journey to explore diverse culinary experiences and hopefully to start you on a journey of your own. Join me also at A Harmony of Flavors on Facebook, and Pinterest.

Disqus