Translate

Saturday, August 31, 2019

European Family Recipes

My background, Slovakian (Czechoslovakia at the time) on my Mother's side and Northern Serbian (Yugoslavia at that time) on my Father's side, has influenced the way I've eaten since birth. I grew up eating certain things, certain ways, and those have stayed the same all my life, where possible. Due to constant warring through the centuries, these eastern European countries have been overrun repeatedly and have changed hands, so to speak, ethnicities overlapping and influencing. So it is that many of the recipes that come down from both parents sometimes almost overlap.

My Mom and Dad both made what their parents called Chicken Paprikash, though the styles were quite different. My paternal grandmother made strudel filled with poppyseeds, or nuts, and sometimes other things, while my maternal grandmother, instead of the very fine and delicate strudel dough, made Slovak Rolls, an enriched bread-like dough that was filled with poppyseeds, or nuts. Similar, but different. Sometimes, like with the "paprikash," the name of the dish overlaps, and sometimes the dish is just very similar but called differently. 

In this blog, I want to set out a couple of recipes from my North Serbian Grandmother: Machanka (or Tomato Gravy) and Kifli, little flaky fruit filled Christmas pastries), plus two filling varieties.  

grandmother, ethnic, recipes
Grandma Hromish
Firstly, a little bit about my North Serbian Grandma Hromish. Grandma was married in Kucur, Bačka, Vojvodina at age 15, yet still brought her knowledge of cooking and baking with her. Her pastries were legend; flaky Kifli, nut pita, strudels (that I sadly, have not learned to make) of many varieties and others I have no access to at this late date. She arrived in the US with her first two children in the early years of the 1900s. Grandpa arrived a bit earlier than Grandma. They settled eventually in Ohio, around Celina, and farmed. Grandpa died before I reached two years of age, so I never knew him, but I know they had chickens and eggs and grew vegetables, something my Dad always loved doing. My father was born in Celina, the first of their children born in the U.S.

From Grandma I learned to love saffron, as her house smelled of saffron most Sundays as we went to her house for dinner. Soup simmering on the stove, lovely golden from the saffron, with beef or chicken simmering away. She always made homemade noodles and those were always a treat. After serving the soup and noodles, she would  Serve the meat from the soup, with more noodles and machanka. I am fairly certain that the word "machanka was actually spelled mačanka; the little mark above the "c" making the sound of "ch," as with the District mentioned above: Bačka. I grew up eating machanka often. It is a sweet sour kind of tomato gravy, eaten with the meat that had been cooked in the soup. This was standard. Later on, as the internet took off, I tried to find any kind of reference to machanka, and the only thing I ever found was a brown gravy, and certainly not Grandma's version. I finally fond only one reference to a tomato based gravy years later. This is similar to that machanka my Grandma made. In flavor, it fits with my memory, though I cannot say how authentic it is.

Machanka, chicken, noodles, recipe
Machanka with chicken and noodles

Machanka 


Makes about 2½ cups


2 tablespoons bacon grease
2 tablespoons all-purpose flour
1 can (6 ounces) tomato paste
2 cups water
1 tablespoon white vinegar
1 tablespoon sugar
½ teaspoon salt
freshly ground pepper, to taste

In a skillet heated over medium heat, melt the bacon grease and add in the flour, stirring until it is bubbly, figure 1. Off heat, add in the tomato paste (my mom used a large jar of tomato juice rather than the tomato paste and water), figure 2, and stir, mixing thoroughly with the roux, figure 3. Slowly, stir in the water until the whole mixture is smooth, figure 4, and set over the heat to cook until boiling and allow it to cook, stirring constantly until the mixture is thickened and bubbling. Add in the vinegar, sugar and salt, and as much pepper as you choose. Cook for another few minutes to ensure all the raw flour is cooked through, figure 5. Serve over boiled beef or chicken and noodles.

step by step, Machanka, ethnic, gravy, sweet sour
Making Machanka

~~~~~~~~~~~~~~~~~~~~~~~~~~~~~~~~~~~~~~~~~~~

Kifli


I remember these mostly at Christmas, though I know Grandma made them for other special occasions also. They are best if made using fillings made from scratch, as the fillings stay put. If using store bought fillings, they tend to run out. I have two filling recipes below.

Makes about 100 little pastries
Kifli, Prune filling, Apricot Filling
Kifli with Prune or Apricot Filling


1½ tsp instant dry yeast (½ pkt)
3 cups flour
¼ pound lard
¼ pound unsalted butter
1 egg, whisked
¼ cup whipping cream, or heavy whipping cream
¼ cup evaporated milk
½ cup Poppy seed filling, Prune “Lekvar" or

      Apricot fillings are common
Confectioner's Sugar, for rolling and sprinkling

Mix instant dried yeast into flour. Work in the lard and butter as for pie dough. Add egg and cream and work with hands just until the dough pulls from sides of the bowl. Do not over mix.

Sprinkle your work area with powdered sugar and roll out a portion of the dough. Cut dough into 3-inch squares. Fill these small squares or circles by placing ¾ teaspoon of filling of your choice in the center. Bring up opposing corners, dampen the edge with milk or cream and pinch together, then fold the pinched piece over to ensure they stay closed while baking. Bake on parchment lined cookie sheets for 15 to 18 minutes at 375 degrees. Bottoms will be golden and tops will just start to become golden color. Remove from oven, place on a rack to cool and sprinkle with more confectioner's sugar just before serving. 


Prune Butter or "Lekvar"


Prune Butter, Lekvar recipe
Prune Butter or Lekvar
Makes approximately 1½ cups
1½ cups pitted prunes

⅔ cup water
1 teaspoon grated lemon zest
3 tablespoons lemon juice

⅓ cup brown sugar
Place all ingredients into a saucepan and bring to a boil. Reduce the heat, cover and simmer for 25 to 30 minutes, until most of the water has evaporated. Cool slightly; pour into a food processor. Process until just smooth. Store any unused portions in the refrigerator.


Apricot Filling


Apricot, Filling, recipe
Apricot Filling
Makes approximately 1½ cups

1½ cups dried apricots (pitted)
⅔ cup water
1 teaspoon grated lemon zest
3 tablespoons lime juice

⅓ cup granulated sugar

Place all ingredients into a saucepan and bring to a boil. Reduce the heat, cover and simmer for 25 to 30 minutes, until most of the water has evaporated. Cool slightly; pour into a food processor. Process until just smooth. Store any unused portions in the refrigerator.


My passion is teaching people how to create a harmony of flavors with their cooking, and passing along my love and joy of food, both simple or exotic, plain or fancy. I continue my journey in ethnic and domestic cuisines, continuing my journey to explore diverse culinary experiences and hopefully to start you on a journey of your own. Join me also at A Harmony of Flavors on Facebook, and Pinterest.

Friday, August 30, 2019

Little Indulgences

For Little Princesses

These little chocolate mice are just cute as can be and with school functions, Hallowe'en and other things coming up, these are at least possible to make gluten free. The bodies are made and frozen, so they can be made ahead, to a point. I had to make them gluten free for a museum function called a Princess Party. Little girls were invited to dress as their idea of a "princess," though the purpose of this function was to talk about how actual princesses are to behave, such as how to wave properly, how to sit, and other things. It was such a smash hit as a function, they had to have a second go at it, as so many children applied there wasn't enough room! I made these chocolate mice the first time, more as a decoration to the plates of goodies I had created, but every little girl wanted one, and some were gluten intolerant. For the second Princess Party, I made plenty of these little mice and they all went!
Chocolate Mice
Chocolate Mice

This recipe is a bit more complex, and requires quite a few extras and tools, so have these things handy when starting:
  • Chocolate cake and plain white icing, separately (gluten free, if needed)
  • Sliced almonds, for ears
  • Mini chocolate chips, for eyes and nose
  • red licorice for tails (gluten free licorice, if needed)
  • 1 or 2 packages of chocolate bark for dipping
  • Wooden skewers or two-tined pickle fork
  • Waxed paper
  • Clean tweezers
This recipe for chocolate cake works excellently using gluten free flour (I used Namaste brand, at the time, though now I have my own blend, here). The baked and cooled cake and the following recipe for a very small amount of icing are beaten together to make the form-able mixture for the bodies of the mice.

If you do not need these to be gluten free, simply use your favorite 2-layer chocolate cake, baked and cooled.


Chocolate Cake (Gluten Free)


Chocolate, Mice, dessert, confection
Chocolate Mice
Enough for about 40 to 60 mice, depending on size

2 cups Gluten-Free flour (I used Namaste brand)
2 cups sugar
1 teaspoon baking soda
1 teaspoon salt
½ teaspoon baking powder

½ teaspoon Xanthan Gum
¾ cup water
¾ cup buttermilk
½ cup unsalted butter, room temperature
2 eggs
1 teaspoon vanilla
4 ounces unsweetened chocolate, melted and cooled

Heat oven to 350 degrees. Grease two 8-inch round pans. Line the bottom of the pans with parchment. Measure the flour, soda, baking powder, Xanthan Gum and salt into a bowl and whisk to blend. In a standing electric mixer, beat butter and sugar until creamy, then add in the eggs and vanilla and beat well. Pour in the melted chocolate and mix. Combine the buttermilk and water. Add the dry ingredients, alternately with the liquid ingredients, until completely mixed. Pour evenly into prepared pans. Tap pans once or twice sharply on counter top, to release air bubbles. Bake for 30 to 35 minutes, until a toothpick inserted in the center comes out clean. Set aside to cool.


Cream Cheese Icing Binder


3 ounces cream cheese
2 tablespoons unsalted butter, softened
1 cup confectioner's sugar
3½ ounces semisweet chocolate, melted and cooled


Combine the cream cheese and butter in an electric mixer. Add in the confectioner's sugar and the melted chocolate to combine. 

Break the two cake layers into pieces and drop them into the bowl with the icing and beat to combine, until the mixture is pliable and works like soft clay.


Chocolate Mice

Chocolate, Mouse, dessert, confection
Chocolate Mouse

One recipe chocolate cake, above
one recipe Cream cheese Icing Binder, above
List of ingredients above
  
With your hands, pull out about ⅓ cup portions of the modeling cake mixture and form into oval shapes, working to form a point at one end (the nose), while rounded at the other. Set two almond slices into the end towards the point, as ears. Cut sections of the licorice about 5 inches long. Push one end of the licorice into the rounded end of the mouse for a tail. Set onto parchment or waxed pper lined baking sheets to freeze.

Once the bodies are frozen, it is easier to work with the dipping. (While it is tempting to want to use chocolate chips to melt for the dipping of the mice bodies, do not do this unless you are very conversant with tempering chocolate. The coating will not set properly otherwise, making them a true mess to handle.) 

Melt the chocolate bark in a double boiler set over, not in, simmering water. Once melted, bring out a few of the mice at a time. Stick a long skewer or pickle fork into the back end of the mouse, below the tail. Have a second skewer or other long, thin implement handy. With a small ladle, drizzle the melted chocolate bark over the mouse, turning as necessary to cover all sides, including the almond ears. Using the second skewer, slide the mouse off the skewer onto waxed paper to dry. Using tweezers, while the chocolate bark is still wet, place two mini chocolate chips for eyes, and one for the nose. Makes about 40 to 60, depending on size. 

Best if stored in the refrigerator to keep them firm.


My passion is teaching people how to create a harmony of flavors with their cooking, and passing along my love and joy of food, both simple or exotic, plain or fancy. I continue my journey in ethnic and domestic cuisines, continuing my journey to explore diverse culinary experiences and hopefully to start you on a journey of your own. Join me also at A Harmony of Flavors on Facebook, and Pinterest.

Thursday, August 29, 2019

On a Theme of Threes

As I am bringing in recipes from my website (which I am giving up soon, for many complicated reasons), I have been adding in recipes, here to my blog, for ease of access, ones that had previously been only in the website. 
 
Szechuan style,  Cabbage, side dish, recipe
Szechuan Hot Sour Cabbage

It has worked well in sets of threes, with recipes in a single theme. Today, I am adding in three side dishes that have long been favorites. One of these is grilled, and I call it Grilled Portobellas 'Richard," after our friend Richard. Another is a truly delicious way to make green beans, especially for a special occasion. I made a slew of these for a birthday dinner, and the bowl was scraped clean at end of meal. The third recipe is a cabbage dish (above) that is one my husband will actually eat. It has enough great flavors that he will tolerate the fact that it is cabbage.

What to do With Huge Portobello Mushrooms?

Our friend Rich thought up this idea, and had some very definite ideas on how it should be made, ideas that I implemented with my own knowledge and expertise. I have to say, these turned out with absolutely exquisite flavors, and truly are satisfying enough as a main dish, should you be vegetarian (or even if you're not!). As a matter of fact, they can be used in place of a hamburger on a bun, which I did for a vegetarian friend who came to dinner.
 

His idea started out like this:
Rich: How about if we grill some big portobello mushrooms to top our burgers for supper?

Me: Sure, lets go get some at the store.

Rich: I think if we season them and let them set all afternoon before grilling, they will taste great on the grill.

Me: That would certainly make them tasty.

Rich: Let's grill some slices of onion to set on top!

Me: That sounds good, too!

Rich: Then we could set some smoked provolone to
melt on top of  them.

Me: Yep, sounding better and better.

Rich: So, I think if we mashed up a LOT of garlic with some olive oil and spread that all over the inside of the mushroom, that would taste really great.

Me: We can do that, plus, I think some smoked salt would add to the flavors. Maybe some minced rosemary? Or maybe some smoked paprika?


Grilling, Portobellas, mushrooms, side dish, vegetarian
Grilled Portobellas Richard

And thus went the day. We went and bought the foods we needed, and proceeded with the marinade and the grilling later on. And the recipe came out so far better than even expected. Don't be afraid of the garlic - these are great just as the recipe stands. Totally unbelievable.


Grilled Portobellos 'Richard'

How to, Grilling, Portobellas, Onion, Cheese
Stacking Grilled Portobellas with Onion and Cheese

Serves 4

4 very large Portobello mushrooms
1 large onion
3 tablespoons olive oil
3 tablespoons butter, melted
6 to 8 garlic cloves, minced (Richard loves garlic)
1 teaspoon salt, preferably Hickory Smoked

½ teaspoon smoked paprika, optional
½ teaspoon finely minced fresh rosemary leaves, optional
Black pepper, freshly ground, to taste
4 slices smoked Provolone cheese


Early in the day, or even the day before, mix together the olive oil, melted butter and garlic. Add in the smoked paprika and minced rosemary, if using. Remove the stems from the portobellas. Brush the oil and garlic mixture all over the mushroom, first on the outside of the cap, and then leaving the mushroom cupped upwards, make sure there is a lot of the garlic mixture inside. Sprinkle with some of the salt. The hickory smoked salt can be found in some specialty stores, but regular salt will do. Sprinkle on some pepper, as desired. Wrap in plastic wrap, or place in a sealed container until needed.

When ready to cook, light a grill. This works better if you have a grill pan, so the mushrooms and the onions don’t slip through the grate. Slice an onion into thick slices, about ¼-inch thick or more. Grill the onion slices on both sides, until well done and a little bit charred. Have the mushrooms grilling alongside; first grill the outside of the cap downwards and then turn them over. Be prepared! This will flare the flame, as the butter and oil will come running out. Once the mushrooms and the onion slices are cooked through, flip the mushroom cup side upwards and place one slice of the grilled onion onto the cup side of the mushroom. Top with a slice of Provolone cheese and allow the cheese to melt slightly.

Prepare for some of the best mushrooms, ever!


~~~~~~~~~~~~~~~~~~~~~~~

A Delicious Preparation for Green Beans

Creamed Green Beans with Bacon
I remember, as a kid, my Mom making something similar to this recipe, without the bacon. Without the fresh green beans, for that matter. She would make a roux with butter or bacon grease and flour, then drain the can of green bean liquid into the mix and cook till thickened, then add the can of green beans in to heat through. They were good. But, it's been a long time since then, and my body does not tolerate that much salt anymore.

I love green beans now - the fresh kind. I make them "French-cut" all the time. I guess I like that they seem easier to eat, easier to chew than blunt cut green beans, less "squeaky" between the teeth. My husband also loves my green beans, so for one of his birthdays he was quite specific what he wanted for his birthday and green beans were part of the requested meal. Since it was his birthday, I opted to make them a bit fancier than normal. I made the roux, just like Mom made, but as I fried minced bacon to add to the dish, I used the resultant bacon grease in the pan for the roux, and water for the liquid - there were plenty of other flavors going on. These came out with such stellar flavor. At the table, it was close to a fight over the last bits of beans in the bowl.


Creamed Green Beans with Bacon

Cream sauce, roux, Green Beans, Bacon, side dish
Creamed Green Beans with Bacon
Serves 6 - 8

1 pound green beans, stem end removed, cut as desired
6 slices thick-sliced bacon (about 4 - 5 ounces)
2 tablespoons reserved bacon grease
1 tablespoon butter
2 cloves garlic, finely minced
2 tablespoons all-purpose flour
1 teaspoon fresh thyme leaves, stripped from stems
1 cup water
salt and pepper, to taste

Cut the bacon strips across the grain into ¼-inch pieces. Fry the bacon until almost crisp. Remove the bacon pieces to paper toweling to drain and set aside. Remove all but 2 tablespoons of the bacon grease for another use. Add the butter and garlic to the pan and saute the garlic gently for 2 minutes. Add the flour and thyme leaves and stir to combine. Add in the water and stir. Bring the mixture to a boil stirring for about 5 minutes until the mixture is like a gravy. Set aside and keep warm.

Prepare a steamer and set the green beans into the steamer basket. Sprinkle Kosher salt all over the green beans. Bring water to a boil and steam the green beans for about 8 to 12 minutes, or until the green beans are just barely tender. Drain well and add the green beans to the sauce in the skillet. Add in the bacon, reserving 1 tablespoon for garnish. Stir together and bring the mixture back to full heat. Taste for seasoning, adding salt and pepper as desired. Garnish with reserved bacon pieces. Serve immediately.


~~~~~~~~~~~~~~~~~~~

Taking Cabbage to New Heights

Cabbage is one of those love or hate type of vegetables. It can certainly be made badly and tasteless. This recipe is not one of those. While my recipe is quite similar to one I found in a book somewhere long ago, it is the first time I came across reference to Szechuan "peppercorns." And, after hunting them down and making the recipe, I found that while the peppercorns did have a particular flavor, there just aren't that many in the recipe to really gauge how the overall recipe tasted with or without them. While I would urge you to try and find some to try in this recipe, I believe there are enough other much more easy to find ingredients that make the recipe taste so great.

What Are Szechuan "Peppercorns"?

Szechuan, spice, Asian spice
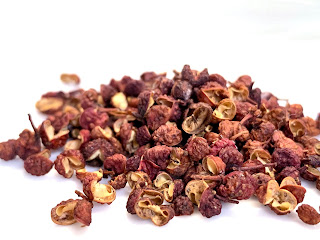
Szechuan Peppercorns
Just to be clear, Szechuan "peppercorns" are not pepper at all. Unrelated to pepper, these little pinkish, petal-like pods are extensively used in Southeast Asian cuisines. An essential component of Chinese Five-Spice Powder, they are also used on their own in many dishes. Their flavor is unlike pepper or chilies and has no heat but instead a slightly lemon or citrus flavor. They are said to cause a slight numbness or tingling in the mouth when eaten. The pods are used whole or slightly crushed, unless ground into a spice mixture. Avoid them if too many of the inner black seeds are present, as they are gritty to chew. The name is also found spelled as Szechuan, Sichuan or Szechwan.

Szechuan Hot Sour Cabbage

Szechuan, Cabbage, side dish, recipe
Szechuan Hot Sour Cabbage

Serves 6 - 8

1 pound cabbage
1 green bell pepper
1 red bell pepper
2 tablespoons soy sauce
2 tablespoons vinegar
2 tablespoons sugar
1 teaspoon salt
3 tablespoons vegetable oil, I use olive oil
4 dried hot chilies, optional
12 Szechuan peppercorns, or black peppercorns if preferred
1 tablespoon Asian dark sesame oil

Thinly shred cabbage and green and red peppers. For sauce, in a small bowl, combine soy, vinegar, sugar and salt; set aside.

Preheat a wok or a large skillet over high heat. Add vegetable oil. When oil is hot, add chilies and peppercorns and stir-fry a few seconds. Add shredded cabbage and bell peppers and stir-fry for 1 - 1½ minutes, or until slightly wilted. Add sauce mixture and stir until blended. Place cabbage mixture in a serving dish. Discard chilies and peppercorns if desired. Sprinkle cabbage mixture with sesame oil and serve either hot or cold.


My passion is teaching people how to create a harmony of flavors with their cooking, and passing along my love and joy of food, both simple or exotic, plain or fancy. I continue my journey in ethnic and domestic cuisines, continuing my journey to explore diverse culinary experiences and hopefully to start you on a journey of your own. Join me also at A Harmony of Flavors on Facebook, and Pinterest.

Wednesday, August 28, 2019

Three of the Simplest Desserts Ever

I do love to get into complicated recipes, and I do it often. I love unraveling the slew of ingredients in some recipes. I love the complexity of flavors these ingredients produce. I love to experiment.

But sometimes?

I just love something really simple. Delicious, yes. But simple. And guess what? I have three such recipes; ones I return to again and again, for their simplicity and their simple, amazing goodness. 

Ginger Bars, Bar dessert, recipe
Ginger Bars

Guess what else?

I love dessert. I have a sweet tooth the size of Texas. Honestly. Even when I am trying to lose weight, I just neeeeed something to top off dinner. Something sweet. I can manage most of the day just fine. But then I just want something to do homage to that sweet tooth. Not necessarily to fill it (that takes some doing), but at least to assuage it. Sometimes I can manage with an apple, but not usually.

So, taking into consideration my neeeed for something sweet, plus my sometimes love of making something simple, I have three dessert recipes that I want to share. Two are in the form of a "bar." One is a sort of coffee cake, and very unusual. 

Quesadilla

This last mentioned is a cheese coffeecake that comes from Guatemala, and the name of the recipe is "quesadilla." Pronounced: keh-sah-DEE-ya. You may be wondering what I am talking about, when in the U.S we know "quesadillas" generally as a couple of large tortillas with melty cheese sandwiched inside, and sometimes other ingredients too. There are similar things like that in Guatemala, but they usually call them "dobladas," which means "folded(s)." The tortilla is folded in half with cheese inside, then grilled to melt the cheese. 

This recipe is a coffee cake and it's terrific with a good cup of coffee for sure. It is great no matter when. And it has just 6 ingredients. And, it is inherently gluten free!

The ingredients in this recipe lean heavily to cheese, and the fact that it is made with rice flour means it is gluten free. These days, it is really easy to find rice flour in the stores, what with so many gluten intolerant people, or people who think eating desserts made with gluten free flours is somehow better for you, when as a matter of fact, gluten free flours are far higher in carbs and calories. Oh well. 

But, this recipe calls for rice flour, so when I first wanted to make it in the U.S., it was very hard finding rice flour at all. And then to make it worse, the kind of cheese used in Guatemala for this cake just doesn't exist - not in any store I have found - in the U.S. One that does come close, and is now mostly available all over, is Cotija cheese. It has the right consistency to shred easily. Surprisingly, Parmesan cheese - not the kind from the green containers - but freshly shredded, also works well. It is a bit more salty, but freshly grated Parmesan cheese is available in most stores these days, also. You may note that there is no salt in the recipe. Do not add salt! The cheese has plenty all by itself.

Quesadilla, Guatemala, Cheese, Coffeecake
Quesadilla or Guatemalan Cheese Coffeecake

The remainder of the ingredients are mundane, found anywhere. And without further ado, here is a recipe for this lovely, simple, moist and delicious coffee cake that needs no adornment whatsoever..

Quesadilla or Guatemalan Cheese Coffeecake

Quesadilla, Guatemala, Cheese, Coffeecake, recipe
Quesadilla or Guatemalan Cheese Coffeecake

Makes one 8 x 8-inch coffeecake

1 cup rice flour
2 cups shredded crumbly cheese (Queso Fresco, Cotija, Parmesan)
¾ cup sugar
¼ teaspoon baking soda
4 eggs
¾ cup heavy cream


Preheat oven to 350 degrees.

In a mixing bowl, combine the rice flour, cheese and sugar with the baking soda and whisk to combine well. This also coats and separates the cheese shreds. 


In a separate bowl, whisk together the 4 eggs with the heavy cream. Pour this into the dry ingredients and mix just until the dry ingredients are moistened well.
Spray an 8 x 8-inch baking pan with cooking spray, or grease with butter or shortening. Pour batter into the prepared pan and bake for 40 to 45 minutes, or until a toothpick inserted in center comes out clean.  Cool before slicing.


~~~~~~~~~~~~~~~~~~~~~~

brothers, family
Jim
The next simple recipe is one that came about in collaboration with my brother Jim, now long since gone from us. Back in the early '80s, I'd recently returned to the U.S. after living in Guatemala for 12 years. I was getting acquainted with my brother (just a child when I left the U.S.), and he would often come to my house of an evening and we played games like Cribbage or Monopoly and others. We would chat and laugh and play old music, discuss books we'd read and just have fun. And sometimes, as it started to get late, we would suddenly get the "hongries." Sometimes I would whip up a batch of chili. Sometimes I whipped up a dessert. Sometimes we kibitzed back and forth on what should or should not go into a recipe or discuss the method of making something.

Ginger Bars

So it was that this recipe, originally clipped out of the Orlando Sentinel, became what it is that I make today. We looked at the recipe together. We both had ideas of what else would be good in the recipe. And we realized that essentially, the recipe is one big batch of streusel, flavored to please and patted into the pan to bake. And oh boy, did we ever love streusel! Realize that in order to make this fit your own taste, all that is needed is to change, omit or add to the amounts of the spices (ginger, cinnamon, allspice, cloves) or the nuts and coconut. What could be simpler? The fact that the list of ingredients is longer is just because we do love our spices! The streusel itself is nothing more than flour, sugar and butter!

Ginger Bars

Ginger Bars, dessert, bar, recipe
Ginger Bars

Makes one 8 x 8-inch pan


2 cups all-purpose flour
1 cup brown sugar, packed
1 tablespoon ground ginger
2 teaspoons cinnamon
1 teaspoon allspice
¼ teaspoon cloves
1 teaspoon baking soda
¼ teaspoon salt
½ cup ground nuts
½ cup coconut
1 cup unsalted butter, at room temperature

Mix dry ingredients in a bowl. Using hands or a pastry cutter, combine with the butter, mixing well, as for streusel, till well blended and crumbly. Press dough evenly but gently into a 9-inch square pan. Bake in a preheated 325 degree oven for 30 to 45 minutes or till lightly golden. Cut cake in narrow rectangles while still warm.


~~~~~~~~~~~~~~~~~~~~~~

Last, but certainly not least of these simple recipes is nothing more than a shortbread, made thicker into a bar shape. It is completely simple in ingredients, but oh - my - goodness! There is nothing so delicious!


Shortbread, basic shortbread, bars, dessert, recipe
Simple Shortbread

Shortbread or Shortcake?

While this recipe is called "shortbread," according to Wikipedia, true shortbread is made with oats, in the Scottish way. It is mentioned that other kinds of recipe are short "cake," but in looking up shortcake, all I see is strawberry shortcake. Ah well. It will remain "shortbread."

The ingredients are just five, all easily on hand at any given time. Flour, cornstarch, confectioner's sugar, salt, butter. Period. It is nearly incredible to believe the amount of flavor in these dreamy tasting bars, and all from such basic ingredients. Not even vanilla is added and yet these are so smooth and inviting. They take no time to mix up and just 40 minutes to bake - and you don't even have to grease the pan! What could be more simple?

Simple Shortbread


Shortbread, bars, dessert, recipe
Simple Shortbread
Makes one 9 x 9-inch or 7 x 11-inch pan

2 cups all-purpose flour
1 cup cornstarch
pinch salt
1 cup unsalted butter
1 cup confectioner's sugar

Preheat oven to 325 degrees. Sift flour, cornstarch and salt into a medium sized bowl and set aside (or whisk the dry ingredients to blend). In a large bowl, cream butter and confectioner's sugar with an electric mixer or a wooden spoon until light and fluffy. With a wooden spoon, gradually work the dry ingredients into the butter mixture until thoroughly combined (a pastry cutter works great, here, also); it will be all crumbly textured. Press dough gently into an ungreased, shallow 11 x 7-inch or 9-inch square pan. Bake about 40 minutes or until golden. Cut into about 12 squares or bars while still warm. Enjoy warm, cold or any which way!


My passion is teaching people how to create a harmony of flavors with their cooking, and passing along my love and joy of food, both simple or exotic, plain or fancy. I continue my journey in ethnic and domestic cuisines, continuing my journey to explore diverse culinary experiences and hopefully to start you on a journey of your own. Join me also at A Harmony of Flavors on Facebook, and Pinterest.

Tuesday, August 27, 2019

The Season for Canning and Preserving

When things ripen, they often come in excessive amounts. Too many tomatoes? Too many apples? Whatever it might be that ripens all at once, one great way to preserve some of that wonderful ripe produce is to can it. While I do not can produce in the amounts some of my husband's family will do, still it is very enjoyable in the next year or so, to be able to get a jar from your stash and open it. 

Spices, Tomato Jam, condiment, canning
Spiced Tomato Jam

I have tried out quite a few things over the years, and can boast some truly delicious recipes. Apple Butter, both cooked and canned or made in the slow cooker, Bread & Butter Pickles, Chow Chow, Hot Pepper Mustard Relish. These are just a few of my favorites. There are a few more in my Recipe Index. In this blog, I would like to add a few of my oldies to the list. 

When Tomatoes Won't Ripen

When I added in my Chow Chow recipe last year, I was thrilled, as it came out so extremely tasty. When you come to the end of season, and you have green tomatoes that don't want to ripen in autumn's chill, this recipe for Chow Chow makes a great way to use those green tomatoes. Chow Chow is perhaps the common name for this relish, but it exists under other other names, as I found when I began looking at the various recipes for Chow Chow. I had tried a recipe from my mother-in-law many years back, and remembered how the recipe went, so when reading various takes on Chow Chow, I realized that this was essentially the same thing my Mother-in-Law called "Green Tomato Relish." Her recipe calls for a good amount of cabbage, which I left out in my Chow Chow recipe, but otherwise, I really liked some of the other aspects of her Green Tomato Relish. With that in mind, I would like to put her recipe here, as an alternative. I am sure she will be smiling from heaven, about now.

Green Tomato Relish


Green Tomatoes, Relish, canning
Green Tomato Relish
Makes 6 pints
 
1 gallon green tomatoes
3 onions
2 bell peppers
½ head of cabbage
Salt

-------
1 quart cider vinegar
3 cups sugar
2 tablespoons Pickling Spice Mix
1 teaspoon celery seed
1 teaspoon mustard seed
1 teaspoon ground cinnamon
1 teaspoon ground cloves

My Mother-in-Law used a manual grinder for making this. I happen to have one from my Mom, and I used the medium grind disk. Grind all the vegetables. As you grind, there will be a lot of juice pouring out, so have a large bowl handy. You do not use the juice, but you also do not want it pouring onto the floor. Sprinkle salt all over the ground vegetables, cover and refrigerate overnight.


Alternatively, pulse grind the vegetables in the food processor, not too finely. Drain excess liquids, then pour into a large bowl and sprinkle with salt. Cover with a towel and refrigerate overnight. 

Next day, drain the vegetables and set aside. In a large pot, dissolve together the vinegar, sugar, Pickling Spice, celery and mustard seeds with the ground cinnamon and cloves. Add in the vegetables and bring to a boil. Boil for a half hour, then pack into hot, sterile jars. Wipe rims and threads and place lids. Process pint jars, covered completely in boiling water, and time the jars according to this table:


1 - 1,000 feet above sea level - 10 minutes
1,001 - 6,000 feet above sea level - 15 minutes

Above 6,001 feet above sea level - 20 minutes


~~~~~~~~~~~~~~~~~

The Bounty of Beets

I might have mentioned (a few dozen times) how much I love beets. Pickled beets (or Beet Pickles) are so delicious, and they are great in so many applications. As is? Delicious. Made into Beets with Horseradish? Serve with ham and drool! Set atop a green salad? It just doesn't get better. 

So, when I was given a slew of beets a few years back, I canned a bunch of Beet Pickles, baked and pureed and froze a bunch, which I used in a couple of iterations of cakes (Chocolate Beet Cake and Beet Spice Cake). Recipes for Beet Pickles abound, and all are fairly similar, but this is my version:

Beets, Pickles, canning, recipe
Beet Pickles

Beet Pickles


Makes 6 pints / 3 quarts

4½ - 5 pounds beets
1¼ cups water
1¼ cups sugar
2½ cups cider vinegar
3 teaspoons Kosher salt or pickling salt
1 (4-inch) stick of cassia cinnamon
15 whole cloves
15 whole allspice berries
1 lemon, sliced thinly


Clean the beets well and place into a nonreactive pot (stainless steel or enamel-ware) with water to cover. Bring to boil, lower heat and simmer for 30 to 40 minutes. Drain and set into cold water until cool enough to handle. Peel the beets and cut them into equal sized pieces.


In a large nonreactive pot (enamel or stainless) combine the water, sugar, vinegar and salt and stir until all the sugar and salt are dissolved. Add the cinnamon, cloves and allspice, wrapped in a piece of cheesecloth for easy removal later. Bring the mixture to a boil. Add the beets, return to boil, lower heat and cook beets for 10 minutes in the brine. Have ready sterile jars with lids and rings. Ladle beets into the jars, adding in one slice of lemon per jar. Using a table knife, run it around the beets to pack them well into the jar. Top off with enough brine to leave a half-inch headspace. Wipe rim and threads with a damp cloth, place the lid and rings.


Place the jars into a large canning pot with water to cover, bring to boil and maintain the boil for 


30 minutes at up to 1,000 ft, 
35 minutes at 1,000 to 3,000 feet, and 
40 minutes at above 3,000 feet. 

Remove jars from the bath with a jar lifter and allow to cool on the counter. If any jars do not seal, place in the refrigerator to use first.

~~~~~~~~~~~~~~~~~ 

The Joy of Ripe Tomatoes

When tomatoes do ripen, they often seem to gang up and do it all at once. This recipe works with most ripe tomatoes, but I prefer using Roma tomatoes, as there is less liquid. The recipe came straight off of the insert from a packet of Sure-Jell® back in the 1970s. I was living in Guatemala and had tomatoes planted. Mom brought me a few packets of Sure Jell®, as I had no access to it down there, at the time. When I discovered the recipe for Spiced Tomato Jam, I was overjoyed, and I loved the jam, as did my children, so I made it repeatedly.

Imagine my shock, when we came back to the U.S to live. I had a slew of tomatoes ripening in my garden and planned to make some more of that delicious Spiced Tomato Jam. I bought a couple of packets of Sure Jell®. Opened the package to check the process of making this favorite - and found that they no longer carried that recipe on their insert! 😲 I was shocked and outraged. How dared they discontinue my favorite recipe? So, I wrote to the company, explaining my dilemma. A few weeks later, I received an apology that they no longer had that recipe in their insert, and they sent the recipe to me, so I could continue making this excellent jam. And here it is.

Spices, Tomatoes, Jam, canning
Spiced Tomato Jam

Spiced Tomato Jam


Makes about 6 (8 fluid ounce) jars

3 cups prepared tomatoes (about 2¼ pounds, fully ripe)
1½ teaspoons grated lemon rind
¼ cup fresh lemon juice
½ teaspoon allspice
½ teaspoon cinnamon
¼ teaspoon cloves
4½ cups granulated sugar (2 pounds)
1 box "Sure Jell" fruit pectin

Prepare the tomatoes. Scald, peel and chop about 2¼ lb tomatoes. Place in saucepan. Bring to a boil and simmer 10 minutes, stirring occasionally. Measure 3 cups worth into a 6 - 8 quart saucepan. Add lemon rind and juice and the spices.

Measure the sugar and set aside. Mix the Sure Jell into the tomatoes in the saucepan. Place over high heat and stir until mixture comes to a full boil. Immediately add all sugar and stir. Bring to a full rolling boil and boil hard for 1 minute, stirring constantly. Remove from heat and skim off any foam with a metal spoon. Ladle quickly into hot sterilized jars, filling to within ⅛-inch of tops. Wipe jar rims and threads. Cover with two-piece lids and screw bands on tightly. Invert jars for 5 minutes, then turn upright. After 1 hour, check seals.


My passion is teaching people how to create a harmony of flavors with their cooking, and passing along my love and joy of food, both simple or exotic, plain or fancy. I continue my journey in ethnic and domestic cuisines, continuing my journey to explore diverse culinary experiences and hopefully to start you on a journey of your own. Join me also at A Harmony of Flavors on Facebook, and Pinterest.

Saturday, August 24, 2019

Still Time to Get Out That Grill

Depending on where one lives, grilling time may be all year 'round or it may be confined to a few, all too short months. I know some who say they grill even when there is snow on the ground, though I find it gets harder to get things cooked through with too much cold to combat the heat of the grill. But unless you are in the Southern states, grilling season is starting to wind down. For me, in the American southwest, it has been too hot to even want to grill, so my grilling may only just be starting sometime in the next couple of months. 

However your grill season works out for you, I hope these recipes will give some impetus to getting out there. I have to imagine, though I have never done it, that these recipes can be made in the oven. I have not done it, but it is possible. Flavors will be different, assuredly. 

For the first of these recipes, I am taking one my husband came up with. It is simple as can be. And of course it is a beef roast, because my husband will not touch something like shellfish. This has become a matter of pride at this late age, to say he has never, nor will he ever, eat shellfish. I, on the other hand, love shellfish, but developed an allergy, so now it is off my menu also. The second recipe below, is one I used very often before finding out why I was so swollen so often. 😧  The third recipe is a chicken recipe I have made repeatedly through the years and is also unfailingly good. I make my own Red Curry Paste also, so I will give you that recipe as well, though you can assuredly buy it at the store. Making it at home means I can control the heat, getting all the flavor without killing off taste buds in the process. ;)

Back to the beef roast. It is started on the grill and seared over high heat for about 15 to 20 minutes per side before removing it to a cutting board and preparing the rest of the recipe. It requires little in the way of prep. It uses only basic ingredients. Nothing fancy. I have yet to even get a photo that is truly worth showing. It looks rather homely. But the flavor? Oh, great heavens, it is magnificent. Serve with some mashed potatoes and you will be happy campers.

BBQ sauce, Roast beef, chuck roast, green peppers, scallions,
Terry's BBQ Roast
BBQ sauce, chuck roast, grill, bake, green peppers, scallions
Terry's BBQ Roast

Terry's BBQ Roast


Serves 6 to 8

1 boneless chuck roast, about 3½ pounds
6 - 8 scallions, as needed
1 green bell pepper, more if needed
1 cup barbecue sauce of choice, more if desired

Heat a grill to high. Set the chuck roast onto the grill until it has a really good sear on one side, about 15 or so minutes. Flip the roast and sear the other side the same way. This gives a nice smoky "grilled" flavor, even though not finished on the grill. Remove the roast from the grill and place on a cutting board. Slice into the roast, not quite all the way through, about every half to ¾-inch apart.

Prepping, how to, BBQ sauce, chuck roast
Prepping Terry's BBQ Roast

Preheat the oven to about 275 degrees. While the roast is grilling, prepare the scallions and green pepper. You will need a good handful of scallions. Some are larger than others so the amount is non-specific. If they are tiny, use an entire bunch; if they are large you might use 6 or so. Cut the scallions into lengths that will fit along the width of the width of the roast, then cut the scallion lengths in halves, lengthwise. Cut the bell pepper into very thin strips along their lengths.

Prepare a piece of foil large enough to fit into a 9 x 13-inch baking dish, ensuring it is long enough to fold and wrap the roast. Use two thicknesses if thin foil, or one if using heavy duty foil. Press the foil into the dish, leaving the rest as overhang until needed. Place the roast carefully into the foil-lined casserole. Stuff lengths of scallion and bell pepper into the cuts in the meat, pressing the vegetables in as much as possible.
Cover the roast with at least 1 cup of barbecue sauce. Close the foil around the roast, completely closing it into a packet. Set the pan into the oven and allow to roast for about 2½ hours. Take care when opening the packet, as there will be copious amounts of steam. The roast will be fork-tender and have plenty of "gravy" around it. Great served with mashed potatoes or rice.

~~~~~~~~~~~~~~~~~~~~

For these shrimp - or scallops - not much time is needed, either for the marinating time or the grilling time. Over-grilled shrimp or scallops become rubbery. This marinade is so easy and delicious and requires so little time to flavor the seafood.

The photo below is of little individually skewered shrimp, along with some red onion and one chunk of pineapple per tiny skewer. These were for a party and I used a half red cabbage as the vehicle to hold all the little skewers, poked into the cabbage "dome" evenly.


Grilled, Marinated Shrimp or Scallops


Individual, skewers, shrimp, pineapple
Individually skewered shrimp and pineapple
Scallops, skewersShrimp, skewerRecipe amount is up to you! The marinade is plenty for a goodly amount.

MARINADE:
1 can (6-ounce) unsweetened pineapple juice
¼ cup (2 ounces) soy sauce
¼ cup (2 ounces) olive oil

Shrimp, or scallops as needed

Mix the marinade ingredients together in a zip top bag. Use individual bags or bowls with tight fitting lids, keeping shrimp and scallops separate.
Either mix marinade and divide between bags or bowls, or if amounts of shrimp and or scallops is large, made 2 recipes of the marinade, placing each amount into a separate bag/bowl.

Allow either shrimp or scallops to marinate up to an hour or so, maximum, then have a preheated grill ready. The shrimp can be skewered onto long skewers. The scallops do better on a grill pan. They tend to fall off individual skewers. If you prefer to have them skewered, use two skewers about ¼ inch apart and skewer them double to keep them in place.

Grill time is short. The shrimp are done as they turn pink, about 3 to 5 minutes per side. The scallops may take just a little longer, depending on their size. Watch for when they begin to show little cracks in the surface. The shrimp are also great if skewered alternately with pieces of onion and chunks of unsweetened pineapple before grilling. 


~~~~~~~~~~~~~~~~~~~~~~~~~

Coming to the third recipe, below, for Thai Red Curry Paste, this is the precursor of the Red Curried Chicken Kebabs recipe. Do not feel you must adhere strictly to this recipe. I realize not everyone has kaffir lime leaves or galangal, and the amount of dried red chilies is totally up to the individual. Use what you have. This makes a delightfully flavored sauce. It is unsalted, so salt must be added into the individual recipe.
 

Thai Red Curry Paste

Thai, Red Curry Paste, condiment
Thai Red Curry Paste
Thai Red Curry Paste, individual packets, freezing
Makes about 8 tablespoons

2 - 6 dried red chilles
2 shallots, cut in small chunks
1 teaspoon black peppercorns
2 teaspoons cumin seeds
1 tablespoon coriander seeds
1 teaspoon salt
2 teaspoons lemon or lime rind, chopped
1 teaspoon galangal powder (or use 1-inch fresh ginger)
3 - 4 cloves garlic
6 - 8 tablespoons oil, as needed
1 teaspoon turmeric
2 teaspoons paprika
1 - 2 Kaffir lime leaves, if available

Blend all ingredients together. This may take a while and a lot of scraping down the blender container, and require more oil (or water) to get it to blend properly. If you want a smoother paste, grind all the dry spices first, then add in the wet ingredients to finish off the process. 


Use what is needed for the recipe, then place individual recipe portions into small sandwich bags with the flap. Tie off the top and freeze until needed, as shown here.


~~~~~~~~~~~~~~~~~~~~~

Red Curried Chicken Kebabs are just flat-out delicious. I have been making these for years and they are a hit each time. I hope they give you the same pleasure!

Red Curried Chicken Kebabs


Red Thai Curry, Chicken, Kebabs, grilling
Red Curried Chicken Kebabs
Serves 8 - 10

2½ tablespoons Thai Red Curry Paste (recipe above, or use store-bought)
½ cup vegetable oil (I use olive oil or coconut oil)
2 teaspoons Kosher salt, or to taste
2½ pounds skinless, boneless chicken breasts, cut into 1-inch cubes
½ each of red and green bell peppers, cut into 1-inch squares

1 red onion, cut into 1 inch single squares

Minty Yogurt Sauce
¾ cup plain low-fat yogurt
¼ cup mayonnaise, or low-fat mayonnaise
1 tablespoon honey
1 tablespoon fresh lime juice
1 tablespoon fresh mint, finely chopped

In a large bowl, mix the curry paste with the oil and 2 teaspoons of salt. Add the chicken cubes and toss to coat. Let stand at room temperature for up to 2 hours or cover and

refrigerate overnight.

Light a grill. In a medium bowl, whisk the yogurt with the mayonnaise, honey, lime juice and mint and season with salt. Set aside or refrigerate until needed.

Thread the chicken onto 10 skewers, threading a chunk of red or green bell pepper and/or red onion squares between the cubes. Grill over moderately high heat, turning frequently, until lightly charred and cooked through, about 8 minutes. Serve the kebabs with the minty yogurt sauce on the side. 

 
NOTES: If you like pineapple, this could be another addition to your skewers.

These could be made as whole boneless skinless chicken breast or thigh sections. As the recipe states the chunks should be about 1-inch cubes, it might also be good to cut the chicken breasts in half lengthwise, so they are not so thick, and will get more marinade onto the surface area. The timing for grilling bone-in chicken will be much longer - about 25 minutes, or until an instant thermometer reads 165 degrees in the thickest part of the meat.

Anything that can be grilled, can also be broiled. If the weather is not cooperating, or it's the wrong season, try broiling.


The meal is delicious with a nice white wine, Chardonnay, Pinot Gris or Torrontes would be my first choices. 


My passion is teaching people how to create a harmony of flavors with their cooking, and passing along my love and joy of food, both simple or exotic, plain or fancy. I continue my journey in ethnic and domestic cuisines, continuing my journey to explore diverse culinary experiences and hopefully to start you on a journey of your own. Join me also at A Harmony of Flavors on Facebook, and Pinterest.

Disqus