Translate

Showing posts with label side dish recipes. Show all posts

Saturday, July 18, 2020

Side Dishes for Any Night

I love great flavors. I have actively searched out great recipes from the age of 16, though I never actually cooked back then. I cut out things that sounded interesting and saved them, for that "someday," when I would cook. This happened around age 20, when I got married. However, I married a Guatemalan man and moved to Guatemala, where the food situation was vastly different from my upper midwest upbringing. 

No complaints. Truly. I learned a whole new world of flavors and cooking styles, and these have carried me through all the years since that time. I am grateful for what life handed me. I am grateful for my upbringing (from Mom) that stressed:
"Whenever you visit someone's house and are invited to eat, you must at the very least try each food on the table, whether you like it or not. This is polite."
Boy, did I ever run into a lot of things I had NO inclination to try when I first moved to Guatemala! But I held on to Mom's teaching, determined not to disgrace myself in front of my new family. I am so glad I did, because my palate would not be what it is today. I found out I really did like a lot of things I would have assumed otherwise, had I not tasted them. And that holds true no matter where I have been.

Black Beans, Salsa, side dish, salad
Black Bean Salsa

One of the things I learned to love, truly love, was black beans. Yum, yum, yummy! And my husband of 30 years has finally learned that he loves them as well. With that in mind, many years back, when my husband was still extremely iffy on the eating of black beans, I had made a recipe that I loved, called Black Bean Salsa. It has black beans, which I love, and corn which my husband loves. One can each. I figured we were getting a 50/50 chance of him liking this salad. As it happened, it was a sort of "it's okay, but nothing to write home about" situation with him. Oh well. 

Yesterday I ran into that recipe again, so opted to try it out once more, now that he loves black beans. It was fabulous, flavor wise, and both of us were very happy with the dish as a side to grilled chicken. 

But, you know how sometimes you revisit an old recipe and something just makes no sense? Well, the vast amount of liquids in the mix seemed ridiculous to us both. It is a waste of lime juice and olive oil to put so much into a recipe. The flavors are perfect, but the amounts are off. So this time I am going to post the recipe here, with my updates. It is well worth it. It could also be used as a dip, similarly to "Texas Caviar."


Black Beans, Salsa, salad, side dish, dip
Black Bean Salsa

Black Bean Salsa


Serves 4 to 6

1 (15-ounce) can black beans, rinsed and drained

1 (15-ounce) can corn, drained
1 - 2 medium tomatoes, small cubes
1 (4-ounce) jar diced pimentos
1 (4-ounce) can diced green chilies
1 Poblano pepper, optional
½ cup diced red onion or shallot
1 small clove garlic, finely minced
(½ cup vinegar, optional)
3 tablespoons fresh lime juice
2 tablespoons olive oil
½ cup chopped cilantro, or to taste
½ teaspoon ground cumin
½ teaspoon salt
dried chili flakes, optional, to taste

If using the Poblano, I opted to blister the pepper under the broiler, peel and de-seed, then chop. It makes a nice addition but is not essential.

My husband and I do not handle raw onion well, so I opt to prepare the onion and the garlic, place in a small bowl and cover with the vinegar (listed as optional) for about 10 minutes while prepping the rest of the ingredients. After this time, drain the vinegar well and add into the rest of the ingredients.

Place the drained and rinsed beans, the corn and all the remaining ingredients into a bowl and toss well. Allow to stand for about 20 minutes to meld flavors and serve.


~~~~~~~~~~~~~~~~~~~

This next recipe I wanted to feature is one that some may not like because of the texture. If you love bread pudding or flan, with the soft texture, then you may enjoy this. My family certainly did. It is a recipe given me by a co-worker long, long ago, and it is absolutely excellent with ham. It would also be good with Polish sausage or Brats, or anything you would serve a sweetened sweet potato casserole.  My friend called it Scalloped Pineapple. Not sure of this terminology. Truly Pineapple Bread Pudding would be closer to how this dish comes out. It could certainly be used as dessert. Back in the 1980s, when I first ate this dish, it was made with plain white store-bought bread. If you get creative, it could likely be made better with some other bread, but I am presenting here recipe as it was given.

An old, old recipe I hadn't made in ages, so I have only photos of it made with a loaf of whole grain bread. 


Scalloped Pineapple

pineapple, bread pudding, side dish
Scalloped Pineapple


Serves 4 to 6

3/4 cups sugar
1 stick unsalted butter, room temperature
2 eggs
8 slices white bread (or whole grain)
1 can (20 ounces) crushed pineapple with juice
- more butter for the bread

Preheat oven to 350 degrees. Butter each slice of the bread, stack then and cut into cubes. Place the bread cubes into a 9 x 9-inch casserole dish.

Cream together the stick of room temperature butter with the sugar. Add in the eggs, one at a time and beat well. Dump in the whole can of pineapple with juice. At this point the mixture will look completely curdled and unappetizing. Have faith and carry on. Once the pineapple is well mixed in, pour this mixture over top of the bread cubes in the casserole and bake for about 45 minutes, or however long it takes to turn a nice golden brown on top.


~~~~~~~~~~~~~~~~~~~

Another oldie but goodie of a recipe is one I found back in the 1980s in a Southern Living Annual Cookbook. At that time I was still young enough not to suffer from too much sodium (from too many canned veggies), and this was an easy salad, it made plenty, so having family over for dinner was a snap. These days I might do some things differently, like cook my own green beans, keeping them bright green, using fresh herbs. I am presenting my own methods here.

This oldie of a recipe was made so long ago that I have no photos.


Marinated Vegetable Salad


Serves 8

2 good handfuls of fresh green beans
1 can (15-ounce) kidney beans, drained and rinsed well
1 can (7-ounce) pitted ripe olives, drained
1 jar/can (6 - 8 ounce) sliced mushrooms, drained
1 can (14-ounce) artichoke hearts, drained, quartered
1 jar (4 ounces) sliced pimentos
1 large shallot, thinly sliced
1½ cups celery, sliced thinly
1 tablespoon capers
-----
DRESSING:
¼ cup tarragon vinegar
¼ cup olive oil
1 teaspoon sugar
1 tablespoon parsley, finely minced
2 teaspoons chives, finely minced
2 teaspoons fresh thyme leaves, stems discarded
½ teaspoon freshly cracked black pepper

Snap off ends of green beans, cut into 1-inch lengths and steam just until crisp-tender and still bright green, 5 to 8 minutes. To stop cooking and keep bright green color, plunge them into ice water for a few minutes, then drain well.

Place the green beans and the next 8 ingredients into a mixing bowl. Separately, whisk together the vinegar, olive oil, sugar, herbs and pepper, then pour over the vegetables in the bowl and toss well. The salad is best if allowed to marinate overnight.


My passion is teaching people how to create a harmony of flavors with their cooking, and passing along my love and joy of food, both simple or exotic, plain or fancy. I continue my journey in ethnic and domestic cuisines, continuing my journey to explore diverse culinary experiences and hopefully to start you on a journey of your own. Join me also at A Harmony of Flavors on Facebook, and Pinterest.

Friday, September 27, 2019

Dishes Perfect for Fall

When Fall comes around, all the root type veggies are in full display. Sometimes, during Autumn, I begin to crave things that I did not have interest in, during the spring or summer. I am great with wanting beets at any time of year, but things like turnips or rutabaga? Not so much. 

Mashed Potatoes & Parsnips

Mashed Potatoes, Parsnips, side dish
Mashed Potatoes & Parsnips
Potatoes are always in evidence, but they are root vegetables, along with things such as parsnips. These two things are like a match made in heaven, and I make my mashed potatoes with up to half parsnips. Delish! I cook the vegetables (about 4 medium potatoes and one or two large parsnips) covered in water with about a tablespoon of Kosher salt. Then, with slotted spoon strain out the cooked potatoes and parsnips into a ricer, set over a bowl with 2 to 4 ounces of some kind of cheese (whether cream cheese, Boursin, Cheddar or other melting cheese) and some minced scallions and/or chives. The potatoes are riced straight atop the cheese mixture (which softens the cheese nicely for blending) and stirred in. I use some of the cooking water left in the pot to thin the potatoes to my taste.

Leeks are another great vegetable. I love leeks, but use them seldom. Yet there are just some recipes that taste great with leeks. Such as Potato Leek Soup.


Potato Leek Soup

Potatoes, Leeks, Soup,
Potato Leek Soup

Makes about six (1-cup) servings

2 tablespoons unsalted butter
3 leeks
2 - 3 teaspoons chopped fresh thyme leaves
2 garlic cloves, smashed
1 teaspoon salt
a few grinds of white pepper
1 bay leaf
2 medium potatoes, peeled, cut in ½-inch dice
2 cups water
1½ cups milk, half & half or cream
 

Cut off the lightest part of the leeks, discarding the dark green tops. Cut off root ends and discard, and then slice down the center length of each leek. Hold the layers together with pone hand and fan the leek under running water to rinse out any mud or grit. Slice the leeks across the grain into about ½-inch slices. 

 Heat butter in a medium saucepan until melted and immediately add in the leeks. Cook them over medium to medium-high heat, stirring often, until they are relatively soft, about 5 minutes. Add in the garlic and toss to combine. Strip off the leaves of a few thyme sprigs and chop finely. Add to the pot and stir. Add in the salt, pepper, potatoes, bay leaf and water. Bring to a boil, lower to a simmer and cook for about 8 - 10 minutes, or until the potatoes are soft. 

 Remove the bay leaf and pour the soup into a blender and process until smooth. Return the soup to the pot and add in the milk (or half & half or cream, as desired) and heat before serving.

 NOTES: Stock may be used instead of water in the soup, although the salt will need to be adjusted. To make a pretty presentation, blend together 2 tablespoons of olive oil with another 2 - 3 teaspoons of fresh thyme leaves. Pass the oil through a very fine mesh sieve. Using a teaspoon, drizzle about ½ teaspoon of the oil in a circular pattern over the top.

VEGAN OPTIONAL: If a nut or seed milk substitution is made for the milk and a vegan butter substitute or oil for the butter, this recipe is easily made vegan.

~~~~~~~~~~~~

Every year, come Fall, I make a soup with a slew of root veggies, plus their greens. This has been a staple for a lot of years now, and uses carrots, parsnips, rutabaga and beets, though any other root vegetable will also be great in this soup as well. The best thing is the use of beet greens and either turnip greens, mustard greens or whichever greens are your preference. The use of red beets will color all the vegetables. If you want a cleaner look for the vegetables, consider using Chioggia beets or golden beets.


Root Vegetable & Greens Soup

Root Vegetables, Greens, Soup
Root Vegetable & Greens Soup

Makes about 10 servings

2 tablespoons olive oil
2 large onions, roughly chopped
4 - 6 cloves garlic, minced
2 - 3 carrots. scrubbed, cut into ¼-inch dice
2 - 3 parsnips, peeled, cut into ¼-inch dice
1 rutabaga, peeled, cut into ¼-inch dice
2 - 3 medium beets, peeled, cut into ¼-inch dice
8 cups water
2 teaspoons salt, or to taste
a few grinds of the pepper mill
6 - 8 cups beet greens, coarse-chopped in about 1-inch pieces
4 - 6 cups other greens, coarse chopped in about 1-inch pieces
 

Heat a large soup pot and add in the olive oil. Add the onions and cook, stirring occasionally, for about 10 minutes, or until they are lightly golden. Add in the garlic and cook for another 5 minutes. Add in all the diced vegetables and the water, salt and pepper. Bring to a boil, then lower the heat and simmer the soup for about 20 minutes, or until the vegetables are tender. Add in the greens and cook for another 10 to 15 minutes, until they are tender. 

~~~~~~~~~~~~~~~

Sweet potatoes are available any time of year, but come Fall, with Thanksgiving just around the corner, they start to take a more center stage. I must confess: I rarely use mustard greens. They just aren't all that appetizing, to me, on their own in a dish, but with this particular combination, they are stellar. I feel positively virtuous when eating this side dish, and it could as easily be used as a main course for those who eschew meat.

Coconut Sweet Potatoes with Mustard Greens


Serves 6

2 teaspoons coconut oil
1 medium onion, cut in half, then thinly sliced
Coconut milk, Sweet Potatoes, Mustard Greens
Coconut Sweet Potatoes with Mustard Greens

2 cloves garlic, minced
2 teaspoon brown mustard seeds
1 can coconut milk (I prefer Thai Kitchen)
1 teaspoon ground coriander seed
1 cassia cinnamon stick, broken in half
3 cups sweet potato, peeled, in ½-inch cubes
4 - 5 cups mustard greens (about ¾ pound)
1 - 2 tablespoons maple syrup

Heat oil in a large skillet or Dutch oven over medium heat. Add onion and saute for about 5 minutes, until translucent. Add garlic and mustard seeds and saute for another 2 minutes. Add in the coconut milk, coriander, cinnamon stick and sweet potato. Cook, covered, over medium heat for about 10 minutes, until sweet potato begins to soften.

While sweet potato is cooking, wash the mustard greens and strip leaves off the stems. Discard the stems. Chop greens into bite-sized pieces. Stir in the mustard greens with the maple syrup and simmer, uncovered, over medium heat for approximately 15 minutes. The greens should be tender and the sweet potato soft. Adjust salt level; remove cinnamon stick. Just before serving, squeeze in some lime juice, or serve with a lime wedge.

NOTES: If sweet potato is not your favorite, other vegetables may be added or substituted, such as broccoli or cauliflower. Collard greens or spinach could be substituted for the mustard greens, though collards may take longer to cook properly.


My passion is teaching people how to create a harmony of flavors with their cooking, and passing along my love and joy of food, both simple or exotic, plain or fancy. I continue my journey in ethnic and domestic cuisines, continuing my journey to explore diverse culinary experiences and hopefully to start you on a journey of your own. Join me also at A Harmony of Flavors on Facebook, and Pinterest.

Thursday, August 29, 2019

On a Theme of Threes

As I am bringing in recipes from my website (which I am giving up soon, for many complicated reasons), I have been adding in recipes, here to my blog, for ease of access, ones that had previously been only in the website. 
 
Szechuan style,  Cabbage, side dish, recipe
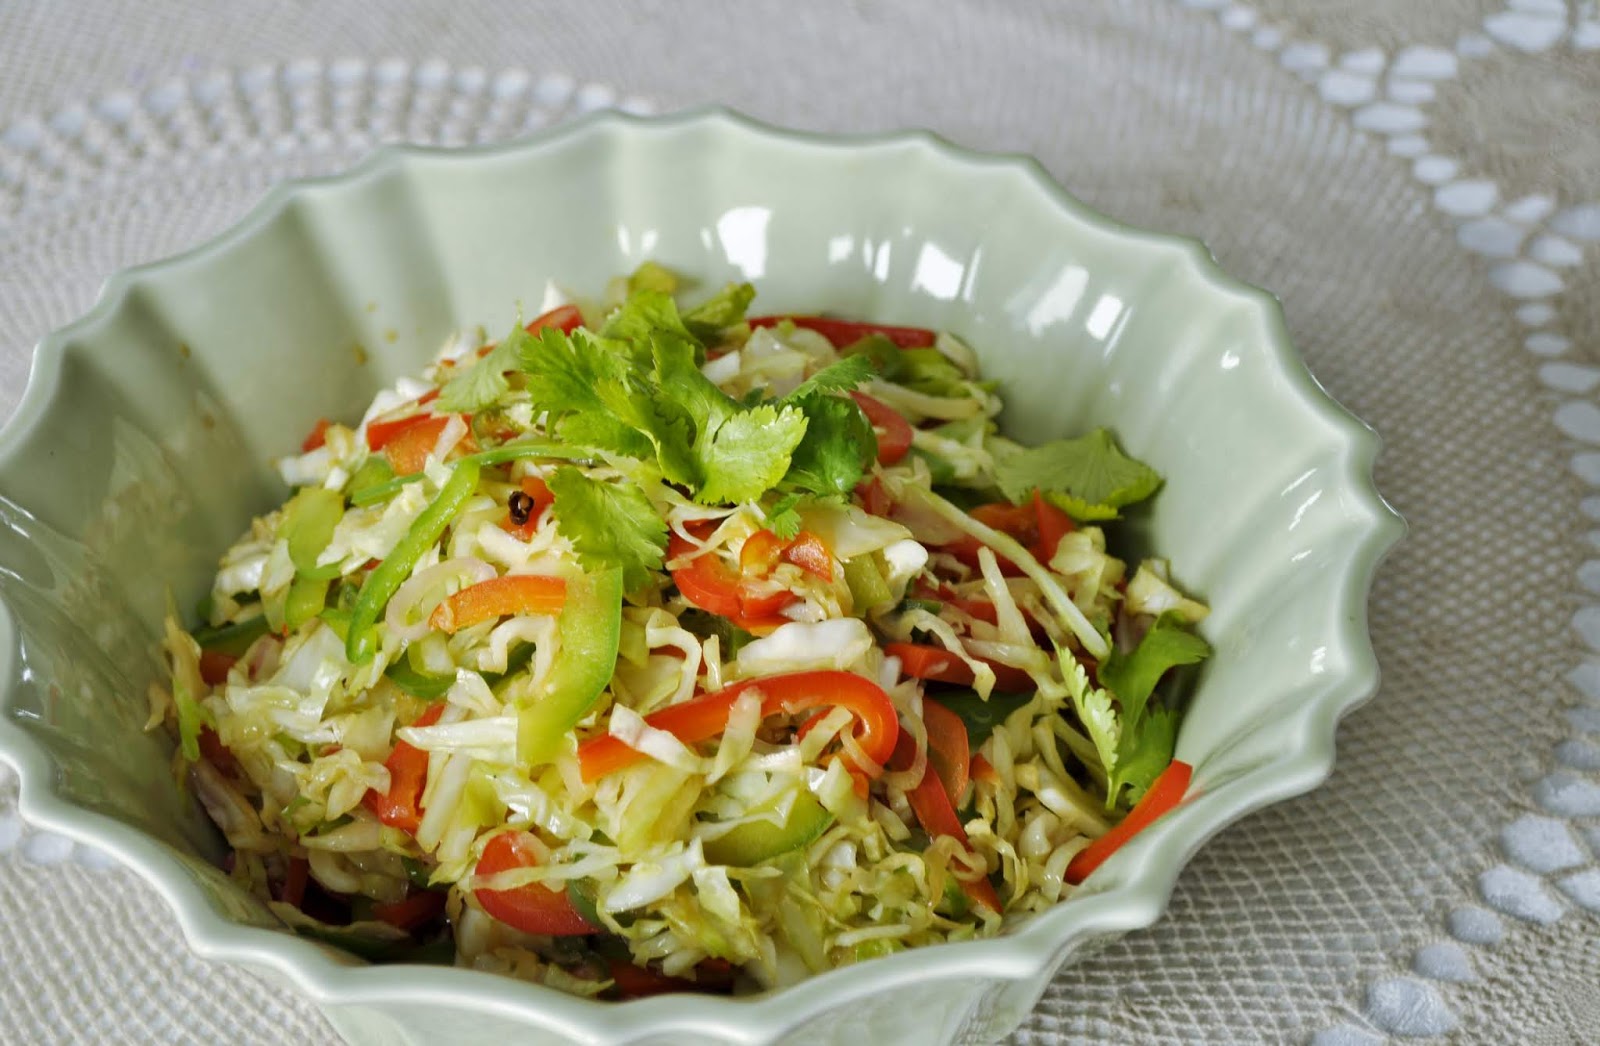
Szechuan Hot Sour Cabbage

It has worked well in sets of threes, with recipes in a single theme. Today, I am adding in three side dishes that have long been favorites. One of these is grilled, and I call it Grilled Portobellas 'Richard," after our friend Richard. Another is a truly delicious way to make green beans, especially for a special occasion. I made a slew of these for a birthday dinner, and the bowl was scraped clean at end of meal. The third recipe is a cabbage dish (above) that is one my husband will actually eat. It has enough great flavors that he will tolerate the fact that it is cabbage.

What to do With Huge Portobello Mushrooms?

Our friend Rich thought up this idea, and had some very definite ideas on how it should be made, ideas that I implemented with my own knowledge and expertise. I have to say, these turned out with absolutely exquisite flavors, and truly are satisfying enough as a main dish, should you be vegetarian (or even if you're not!). As a matter of fact, they can be used in place of a hamburger on a bun, which I did for a vegetarian friend who came to dinner.
 

His idea started out like this:
Rich: How about if we grill some big portobello mushrooms to top our burgers for supper?

Me: Sure, lets go get some at the store.

Rich: I think if we season them and let them set all afternoon before grilling, they will taste great on the grill.

Me: That would certainly make them tasty.

Rich: Let's grill some slices of onion to set on top!

Me: That sounds good, too!

Rich: Then we could set some smoked provolone to
melt on top of  them.

Me: Yep, sounding better and better.

Rich: So, I think if we mashed up a LOT of garlic with some olive oil and spread that all over the inside of the mushroom, that would taste really great.

Me: We can do that, plus, I think some smoked salt would add to the flavors. Maybe some minced rosemary? Or maybe some smoked paprika?


Grilling, Portobellas, mushrooms, side dish, vegetarian
Grilled Portobellas Richard

And thus went the day. We went and bought the foods we needed, and proceeded with the marinade and the grilling later on. And the recipe came out so far better than even expected. Don't be afraid of the garlic - these are great just as the recipe stands. Totally unbelievable.


Grilled Portobellos 'Richard'

How to, Grilling, Portobellas, Onion, Cheese
Stacking Grilled Portobellas with Onion and Cheese

Serves 4

4 very large Portobello mushrooms
1 large onion
3 tablespoons olive oil
3 tablespoons butter, melted
6 to 8 garlic cloves, minced (Richard loves garlic)
1 teaspoon salt, preferably Hickory Smoked

½ teaspoon smoked paprika, optional
½ teaspoon finely minced fresh rosemary leaves, optional
Black pepper, freshly ground, to taste
4 slices smoked Provolone cheese


Early in the day, or even the day before, mix together the olive oil, melted butter and garlic. Add in the smoked paprika and minced rosemary, if using. Remove the stems from the portobellas. Brush the oil and garlic mixture all over the mushroom, first on the outside of the cap, and then leaving the mushroom cupped upwards, make sure there is a lot of the garlic mixture inside. Sprinkle with some of the salt. The hickory smoked salt can be found in some specialty stores, but regular salt will do. Sprinkle on some pepper, as desired. Wrap in plastic wrap, or place in a sealed container until needed.

When ready to cook, light a grill. This works better if you have a grill pan, so the mushrooms and the onions don’t slip through the grate. Slice an onion into thick slices, about ¼-inch thick or more. Grill the onion slices on both sides, until well done and a little bit charred. Have the mushrooms grilling alongside; first grill the outside of the cap downwards and then turn them over. Be prepared! This will flare the flame, as the butter and oil will come running out. Once the mushrooms and the onion slices are cooked through, flip the mushroom cup side upwards and place one slice of the grilled onion onto the cup side of the mushroom. Top with a slice of Provolone cheese and allow the cheese to melt slightly.

Prepare for some of the best mushrooms, ever!


~~~~~~~~~~~~~~~~~~~~~~~

A Delicious Preparation for Green Beans

Creamed Green Beans with Bacon
I remember, as a kid, my Mom making something similar to this recipe, without the bacon. Without the fresh green beans, for that matter. She would make a roux with butter or bacon grease and flour, then drain the can of green bean liquid into the mix and cook till thickened, then add the can of green beans in to heat through. They were good. But, it's been a long time since then, and my body does not tolerate that much salt anymore.

I love green beans now - the fresh kind. I make them "French-cut" all the time. I guess I like that they seem easier to eat, easier to chew than blunt cut green beans, less "squeaky" between the teeth. My husband also loves my green beans, so for one of his birthdays he was quite specific what he wanted for his birthday and green beans were part of the requested meal. Since it was his birthday, I opted to make them a bit fancier than normal. I made the roux, just like Mom made, but as I fried minced bacon to add to the dish, I used the resultant bacon grease in the pan for the roux, and water for the liquid - there were plenty of other flavors going on. These came out with such stellar flavor. At the table, it was close to a fight over the last bits of beans in the bowl.


Creamed Green Beans with Bacon

Cream sauce, roux, Green Beans, Bacon, side dish
Creamed Green Beans with Bacon
Serves 6 - 8

1 pound green beans, stem end removed, cut as desired
6 slices thick-sliced bacon (about 4 - 5 ounces)
2 tablespoons reserved bacon grease
1 tablespoon butter
2 cloves garlic, finely minced
2 tablespoons all-purpose flour
1 teaspoon fresh thyme leaves, stripped from stems
1 cup water
salt and pepper, to taste

Cut the bacon strips across the grain into ¼-inch pieces. Fry the bacon until almost crisp. Remove the bacon pieces to paper toweling to drain and set aside. Remove all but 2 tablespoons of the bacon grease for another use. Add the butter and garlic to the pan and saute the garlic gently for 2 minutes. Add the flour and thyme leaves and stir to combine. Add in the water and stir. Bring the mixture to a boil stirring for about 5 minutes until the mixture is like a gravy. Set aside and keep warm.

Prepare a steamer and set the green beans into the steamer basket. Sprinkle Kosher salt all over the green beans. Bring water to a boil and steam the green beans for about 8 to 12 minutes, or until the green beans are just barely tender. Drain well and add the green beans to the sauce in the skillet. Add in the bacon, reserving 1 tablespoon for garnish. Stir together and bring the mixture back to full heat. Taste for seasoning, adding salt and pepper as desired. Garnish with reserved bacon pieces. Serve immediately.


~~~~~~~~~~~~~~~~~~~

Taking Cabbage to New Heights

Cabbage is one of those love or hate type of vegetables. It can certainly be made badly and tasteless. This recipe is not one of those. While my recipe is quite similar to one I found in a book somewhere long ago, it is the first time I came across reference to Szechuan "peppercorns." And, after hunting them down and making the recipe, I found that while the peppercorns did have a particular flavor, there just aren't that many in the recipe to really gauge how the overall recipe tasted with or without them. While I would urge you to try and find some to try in this recipe, I believe there are enough other much more easy to find ingredients that make the recipe taste so great.

What Are Szechuan "Peppercorns"?

Szechuan, spice, Asian spice
Szechuan Peppercorns
Just to be clear, Szechuan "peppercorns" are not pepper at all. Unrelated to pepper, these little pinkish, petal-like pods are extensively used in Southeast Asian cuisines. An essential component of Chinese Five-Spice Powder, they are also used on their own in many dishes. Their flavor is unlike pepper or chilies and has no heat but instead a slightly lemon or citrus flavor. They are said to cause a slight numbness or tingling in the mouth when eaten. The pods are used whole or slightly crushed, unless ground into a spice mixture. Avoid them if too many of the inner black seeds are present, as they are gritty to chew. The name is also found spelled as Szechuan, Sichuan or Szechwan.

Szechuan Hot Sour Cabbage

Szechuan, Cabbage, side dish, recipe
Szechuan Hot Sour Cabbage

Serves 6 - 8

1 pound cabbage
1 green bell pepper
1 red bell pepper
2 tablespoons soy sauce
2 tablespoons vinegar
2 tablespoons sugar
1 teaspoon salt
3 tablespoons vegetable oil, I use olive oil
4 dried hot chilies, optional
12 Szechuan peppercorns, or black peppercorns if preferred
1 tablespoon Asian dark sesame oil

Thinly shred cabbage and green and red peppers. For sauce, in a small bowl, combine soy, vinegar, sugar and salt; set aside.

Preheat a wok or a large skillet over high heat. Add vegetable oil. When oil is hot, add chilies and peppercorns and stir-fry a few seconds. Add shredded cabbage and bell peppers and stir-fry for 1 - 1½ minutes, or until slightly wilted. Add sauce mixture and stir until blended. Place cabbage mixture in a serving dish. Discard chilies and peppercorns if desired. Sprinkle cabbage mixture with sesame oil and serve either hot or cold.


My passion is teaching people how to create a harmony of flavors with their cooking, and passing along my love and joy of food, both simple or exotic, plain or fancy. I continue my journey in ethnic and domestic cuisines, continuing my journey to explore diverse culinary experiences and hopefully to start you on a journey of your own. Join me also at A Harmony of Flavors on Facebook, and Pinterest.

Saturday, October 24, 2015

Fruity Sides for Jerk Chicken Meal

I have no background anywhere near the Caribbean, but it is hard to think Jerk Chicken (or pork or lamb) without the thought of tropical fruits coming to mind. When I made up my Jerk Marinade recipe recently, I also wanted something appropriately Caribbean to accompany the meat.

Grilling, Pineapple, Mango, Salsa, side dish
Grilled Pineapple Mango Salsa

My first thought was some sort of fruity salsa; maybe something with mango, green pepper, some chilies and lime juice. The more thought I put to this, the more I recalled seeing pineapple grilled and with the char marks from the grill, and my mind went in that direction. In the end, I grilled both some sliced pineapple and some mango slices and both went just perfectly together with the other salsa additions. 

Keep in mind that to grill mango, the fruit must be just a little firm. Too soft and it is difficult to keep the fruit together just to eat, and far less so if placed on the grill. For this salsa, try and select a mango that is still quite firm; not too green and not too ripe. While I wanted this salsa to accompany the grilled Jerk Chicken, it would also be quite at home at a party with some tortilla chips alongside. In the end, this is what I concocted as my salsa. 

Grilled Pineapple Mango Salsa

Grilling, Pineapple, Mango, Salsa, side dish
Grilled Pineapple Mango Salsa
Makes about 2 cups

1 good-sized mango, slightly under-ripe
½ fresh pineapple, peeled, sliced 
1/2 cup pickled or fresh red onion, chopped
1 red bell pepper, chopped (about ¾ cup)
1 hot pepper of choice, minced
1 small tomato, seeded, chopped (about ½ cup)
½ cup fresh cilantro, chopped
juice of 1 lime (about 1½ to 2 tablespoons) 
1 jalapeno, minced (more, if desired) 
½ teaspoon salt, or to taste

Heat a grill to high and quickly grill the mango slices and pineapple slices until they acquire nice char lines on either side. The goal is to sear them, but not necessarily cook through.

Once grilled, cut the pineapple and mango into small cubes and place them in a mixing bowl with the remaining ingredients. Toss all ingredients well and taste for seasoning.

Now that I had a salsa I was pleased with, I gave thought to another side dish, and of course rice seemed the most appropriate. To give another nod to the Caribbean flavors I was looking for, I used more of the pineapple I had grilled and added this to the rice as it cooked, along with other similar ingredients to the fruit salsa. 

Caribbean flavors, Rice, side dish
Caribbean Rice


I have never, ever had difficulty with making rice, though I hear and read often that others have lots of difficulties with making it. I don't have any idea why I have never had problems making rice, but this is the recipe I created, and it came out beautifully light and fluffy and full of flavor.

Caribbean Rice

Serves 4 to 6

1 cup white rice (I used Basmati)
1 cup fresh pineapple, grilled
¾ cup chopped red bell pepper
½ cup scallions, chopped
1 teaspoon salt
1 tablespoon cooking oil or coconut oil
2 cups water
1 cup frozen peas
¼ cup fresh cilantro, minced

In a medium saucepan, combine the rice, pineapple (cut into small cubes), red bell pepper, scallions, salt, cooking oil and the water. Bring to a boil, reduce heat to low and cover tightly. Time for 15 minutes, at  which point the rice should be cooked and fluffy. Add in the frozen peas, give the whole mixture a quick toss with a fork, then cover and turn the burner off, allowing the peas to heat through while keeping their bright green color. Before serving, add in the cilantro and stir. Serve immediately.

About Plantains

To round out the fruity flavors of this meal, I also opted to fry a plantain and serve alongside. To those who might know nothing of plantains and be afraid to use them, here is a little guidance:

Plantains are related to bananas, but are far more starchy and need to be cooked to be edible. They may be eaten while still quite green, in which case they have no particular sweetness and can be used as a vegetable. Partially ripe plantains will be yellow, but they are still quire firm. There is more sweetness developed in the fruit at this point and these plantains may be cooked and used as a slightly sweeter side dish, as with sweet potatoes, or they may be sliced and fried. As they cool from cooking, these partially ripe plantains will become rather unpalatably firm, so eat them while warm. Very ripe plantains will have turned nearly completely black. At this point in ripeness, the plantain is very sweet, cooks quickly and easily, and is wonderful used in more of a dessert category.


Green Plantains
Green Plantains
"Green" plantains can be green, or already turning slightly yellow, but still quite hard. Green, they are harder and dryer and look much like a very large green banana. Look for plantains that have slightly rounded ridges. Too sharp ridges indicate the plantains were picked far too green. They may be cooked in plain water, until tender enough to pierce with a fork, as for potatoes. Serve them cooked this way or try a recipe for "Tostones", a Puerto Rican (and many other Caribbean countries) dish that makes great use of the green plantain. For Tostones, the green plantain is peeled and then sliced across into about 1-inch thick slices. The slices are fried in oil until golden on each side, then removed from the pan, blotted dry and smashed flat. These flattened discs are returned to the pan and fried once more until golden and cooked through.

Medium Ripe Plantains
Medium ripe plantains are nicely uniform yellow. At this point they will look like very large ripe bananas, but are still harder than a fully ripened plantain and while sweeter, they will not yet have full sweetness. These plantains can be used either as a part of a meal or as a dessert. They can be grilled while still in their skins, until they are soft completely through, then skins are removed and they can be eaten this way. 

Fully Ripe Plantains
Fully ripened plantains are nearly or all blackened. They should be quite soft to the touch, though nothing at all like a blackened banana. They retain enough firmness to easily peel, slice and cook them, but now the full sweetness comes through and they will retain the cooked softness more easily once cooled. They may still be cooked in water and used as a side dish, only now with more natural sweetness. These ripened plantains are wonderful as a simple dessert. Peel them and fry them whole, or slice lengthwise and fry, sprinkling them with a little cinnamon and sugar towards the end of cooking. Serve with sour cream. A Guatemalan dessert of Rellenitos de Platano is a perennial favorite at our house. 


My passion is teaching people how to create a harmony of flavors with their cooking, and passing along my love and joy of food, both simple or exotic, plain or fancy. I continue my journey in ethnic and domestic cuisines, continuing my journey to explore diverse culinary experiences and hopefully to start you on a journey of your own. Join me also at A Harmony of Flavors on Facebook, and Pinterest.

Friday, January 16, 2015

Do You Love Macaroni Salad?

I know, carbs and all that. Sometimes though, macaroni is just comfort food. And it tastes good. And there are so many ways to make macaroni. My husband, for one, just loves macaroni salad straight from the grocery store. I have to admit, I like it too, though less often. Somehow over the years, though I have made various iterations of a macaroni salad, it had yet to really end up with that creaminess that the store-bought kind has.
 
Macaroni, Salad, side dish, mayonnaise, recipe
Macaroni Salad


Until now. I was trying to come up with something quick for supper. I was out of potatoes, my husband's first (side-dish) love. He isn't wild about rice, unless it has a lot of things added, or has a gravy to smother it. Macaroni it was, then. I ended up being inspired that day, because this macaroni salad was just creamy and delicious, and even better (in my honest opinion) that the store bought I had been trying to emulate.

What I did was something similar to how I make my Mustard Potato Salad, i.e. soaking the freshly cooked (potatoes) macaroni in a vinaigrette first, until cool. This has two wonderful effects. It soaks into the potatoes or macaroni while they cool, making them less likely to soak up and absorb all the mayo creaminess, resulting in a more moist and creamy end result. The second wonderful effect is that because of this pre-soaking, you need far less mayo or sour cream to make it all creamy.

Macaroni, Salad, side dish, creamy, mayonnaise
Macaroni Salad. Just look at all this creaminess!


Additions to the  macaroni salad can be most anything you'd like: things like olives, carrots, capers, cheese, peas, other chopped veggies like broccoli slaw or tiny broccoli or cauliflower florets (cooked or uncooked), hard boiled egg, etc. My husband is not fond of carrots, olives, broccoli or cauliflower. He loves peas, but I didn't think of those. I did use some of my pickled red onion, just because I have these made in the fridge and my husband will tolerate onions if pickled. If you do not have pickled onions, use 3 or 4 scallions, minced, or 1 shallot, minced. This is what I did:


Macaroni, Salad. side dish, creamy, mayonnaise, recipe
Macaroni Salad

Macaroni Salad


Serves about 4

8 ounces macaroni (penne, shells, elbows, etc)

VINAIGRETTE:
1 tablespoon lime juice
2 tablespoons cider vinegar
2 tablespoons olive oil
½ teaspoon Aleppo pepper, optional
1 clove garlic, smashed and minced finely

CREAMY MIXTURE:
¾ cup mayonnaise
¼ cup sour cream
2 tablespoons Lea & Perrins Worcestershire for Chicken (the "Rooster Booster")
OR 1 - 2 tablespoons regular Worcestershire Sauce, to taste

ADDITIONS:
1 cup chopped celery
¾ cup chopped pickled red onions
¾ cup chopped bell pepper

Cook the macaroni to desired doneness. While macaroni is cooking, make the vinaigrette by whisking together in a large bowl all the vinaigrette ingredients until smooth and homogenous. Drain the macaroni well and pour it into the vinaigrette, tossing well to coat. Set aside to cool, or place in the refrigerator to speed chilling. Toss the macaroni a few times during the cooling process, both to speed cooling and to ensure all the macaroni is exposed to the vinaigrette evenly.

Mix together the Creamy mixture and set aside until the macaroni has cooled. Chop the vegetables and have these ready. Once macaroni cools, add in the creamy mixture and mix well, then stir in any vegetables you are using and the dish is ready to serve.


My passion is teaching people how to create a harmony of flavors with their cooking, and passing along my love and joy of food, both simple or exotic, plain or fancy. I continue my journey in ethnic and domestic cuisines, continuing my journey to explore diverse culinary experiences and hopefully to start you on a journey of your own. Join me also at A Harmony of Flavors on Facebook, and Pinterest.
Wednesday, November 26, 2014

Side Dishes for Thanksgiving Dinner

Sweet Potato, Casserole,streusel
Sweet Potato Casserole
Everyone has favorite side dishes, whether for Thanksgiving or any other meal or holiday. In my house, growing up, we traditionally had sweet potatoes, mashed potatoes, cranberries and stuffing to accompany our holiday turkey. As I mentioned in a previous blog, I don't stray too far from these particular sides, except for how I make them. 

Mashed Potatoes

I generally keep parsnips in the fridge, so I often add in a couple of peeled, sliced parsnips to cook with the potatoes. Whether using potatoes or a mixture of potatoes and parsnips, I usually make about 3 pounds, total (before peeling). If there are leftovers, all the better. Once the potatoes are cooked though, I just pull the pot off the burner and using a slotted spoon, scoop the cooked potatoes and/or parsnips into my ricer, keeping the cooking water in the pot.

Potatoes, Parsnips, Cream Cheese, Chives
Potatoes with Parsnips Cream Cheese and Chives

I have not mashed or whipped my potatoes for many years. Instead, I have a heavy duty ricer, which ensures totally smooth potatoes every time. I vary what flavors go into the potatoes, but in general, I have a large bowl handy. Inside the bowl I place one or more of these possible things:
  • butter
  • cheese (cream cheese, goat Chevre, Gournay Boursin)
  • chives, or scallion
  • caramelized onion
Most often I use cream cheese, just because I always keep some in the fridge. If so, I place up to a half bar (4 ounces) into the bowl. If using butter, I either use one stick or divide that same 4 ounces between butter and cream cheese, using 2 ounces each. In addition, very often I use either chives or minced scallion. Ricing the hot potatoes directly over these ingredients ensures that the butter or cheese becomes soft enough to mix in easily once done with ricing. If the potatoes are too stiff, I use some of the potato cooking water to thin them down, rather than milk - which I almost never keep in the house.

This is my method for making mashed potatoes. It is easy enough to follow most of my method either using a hand masher or a mixer. Add milk instead of the potato water if desired. For Thanksgiving dinner, I have a 4 ounce Boursin Cheese in the fridge all ready. I will be adding some chives and scallion also.

Sweet Potato Casserole

Sweet Potato Casserole is an easy recipe to make, whether using canned sweet potatoes (large, 40-ounce can, drained) or fresh cooked. The recipe is completely forgiving as to amounts. I have gone from using a half-cup of sugar in the sweet potatoes to using no sugar in them at all and concepts all over in between. I have used butter in the sweet potatoes, or no butter, and even used "butter buds" back when I was in Weight Watchers. The streusel is the "main event" as far as my husband is concerned, so a lot of it goes on top of my sweet potatoes. It is easy to make about half the recipe if you are looking for a nice topping without so much excess. Nuts are grated over top of this casserole, and I use pecans, in deference to my husband's preference, but walnuts are equally good, or no nuts at all, if need be. The recipe as I am making it for our dinner is this one:

Sweet Potato Casserole

Sweet Potato, Casserole,streusel, Holiday recipe
Sweet Potato Casserole
Serves 6

1 (40-ounce) can sweet potatoes, drained, OR
3 - 4 fresh sweet potatoes (2 - 3 lbs), peeled, cubed
½ cup sugar or brown sugar
2 - 4 tablespoons butter
1 teaspoon vanilla, optional

STREUSEL:
1 stick unsalted butter, at room temperature
½ cup all-purpose flour
¾ cup brown sugar
1 cup chopped pecans or walnuts

Preheat oven to 350 degrees. If using canned sweet potatoes, drain and mash them in a bowl. If cooking the sweet potatoes, bring the peeled and cubes potatoes to boil with water to just cover them and add in a tablespoon of salt, once boiling. Cook about 15 minutes, until soft. Mash the potatoes with a masher or fork. It is not important to have them smooth, unless this is desired.


Making sweet potato casserole, step by step
cubed potatoes in pot, starting to boil, adding salt to cooking water,
smashed potatoes with butter & sugar
To the smashed potatoes, add the ½ cup of sugar (of choice), butter and vanilla. It doesn't matter if the butter is not melted into the sweet potatoes, such as if you just opened the can of cold potatoes. Just mash it in and it will be just fine.

Make the streusel by placing all three ingredients into a bowl and using fingers (always best!) or a fork, blend the ingredients together to make large crumbs.
Quick & Easy Cornbread, cubes, stuffing
My Quick & Easy Cornbread in cubes for stuffing


Lightly grease a 7 x 10 or 8 x 8-inch baking dish. Pour in the sweet potato mixture and spread to edges of the pan. Place the streusel over top of the potatoes and top with the nuts. Set the casserole in the oven and bake for about 30 minutes, until the nuts are golden and the casserole is heated through.

Cornbread in my Stuffing Recipe

This year I am making my stuffing slightly differently. Instead of using a jumbo 1½ pound loaf of bread as usual, I bought a 1 pound loaf of white bread and made cornbread to use for that extra half-pound. I am going to add in large chunks of whole peeled chestnuts. I bought them at Williams Sonoma recently, and my husband and sister-in-law also love them, so this stuffing should be a hit. Other than these two changes, the recipe is just as I always make it. See my "Better than Mom's Stuffing" recipe on my website.

It is easy enough in most places to grab a little package of Jiffy Corn Muffin Mix and make cornbread. It is just about as easy to make it from scratch. Here is my cornbread recipe:

Quick & Easy Cornbread
Quick & Easy Cornbread, recipe
Quick & Easy Cornbread


Makes one 7 x 10 or 8 x 8-inch casserole

1 cup all-purpose flour (4.8 oz / 137 g)
⅔ cup cornmeal (3.4 oz / 96 g)
2 tablespoons sugar (0.92 oz / 25 g)
1½ teaspoons baking powder (0.25 oz / 7 g)
½ teaspoon salt (0.11 oz / 3 g)
⅔ cup milk (about 5 fl. oz.)
2 tablespoons unsalted butter, melted (1 oz / 27 g)
1 large egg (about 2.4 oz / 66 g)

Preheat oven to 400 degrees. Lightly grease a baking pan, either 7 x 10 or 8 x 8-inches), and set aside. Whisk together the first 5 ingredients in a mixing bowl. In a separate bowl, whisk together the milk, melted butter and egg. Pour into the dry ingredients and stir to combine. Pour the batter into the prepared pan and bake for about 15 to 18 minutes, or until golden and a tester inserted in the center comes out clean.

I wish everyone here in the U.S. a most wonderful Thanksgiving holiday with safe travels and good weather and lots of good family time. My Thanksgiving celebration is being postponed until Friday, but I plan to have a most wonderful meal of Thanksgiving myself here, safe at home.


My passion is teaching people how to create a harmony of flavors with their cooking, and passing along my love and joy of food, both simple or exotic, plain or fancy. I continue my journey in ethnic and domestic cuisines, continuing my journey to explore diverse culinary experiences and hopefully to start you on a journey of your own. Join me also at A Harmony of Flavors on Facebook, and Pinterest. 

Saturday, September 20, 2014

Ratatouille and the Nightshade Family Vegetables

It is hard for me to imaging a life where I could not have nightshade family vegetables. The most commonly known vegetables and/or fruits in the Solanaceae or nightshade family are eggplants, potatoes, capsicum peppers of all types (such as bell peppers, chili peppers), tomatoes of all kinds, tomatillos and ground cherries. Interestingly, one of the "super fruits," goji berries, also called wolfberries, also belong to the Solanaceae. 


nightshade, eggplant, tomatoes, potatoes,
 

Other fruits less well known are garden huckleberries (not to be confused with regular huckleberries of the Ericaceae family), cape gooseberries (not to be confused with regular gooseberries), pepinos, naranjillas and tamarillos. There are many other nightshade plants that are inedible or would never be thought of as food, including of course the "deadly nightshade" (belladonna) and tobacco. Others are mainly showy flowering plants such as Angel's Trumpet or Jimsonweed. 

So why this interest in Nightshades?

It seems that right now, they are all over the Farmers' Market here. Eggplants are finally in season, and each year I have been making a grilled or broiled version of a ratatouille. Most of the ingredients in ratatouille are nightshades: eggplant, tomatoes, peppers. Onion and zucchini are the two ingredients in ratatouille not of the nightshade family. The French dish called ratatouille (rat-tat-TOO-ee) can be made in various ways. The vegetables can all be cooked separately, then layered in a casserole and baked. The ingredients can be sauteed separately and then mixed all together in a pot to simmer. The dish can be made anywhere from soupy to thick.

Broiling, ratatouille, nightshades, eggplant
Broiled Ratatouille with Potato Pizza for dinner
And then a couple of years back I saw Michael Symon on The Chew making a grilled version. Obviously the grilled version has no real resemblance to the original layered and baked versions. He didn't even use tomatoes. But the concept, slicing the vegetables and grilling them separately, then combining with a splash of balsamic and olive oil with torn fresh basil - that got my attention.

I am not a huge fan of eggplant. Never have really loved it. Still, I try to be open minded and eat it occasionally. I have found ratatouille to be one way I do not mind it (Eggplant Parmesan is another). Mixed in with all the rest of the vegetables, whether in a casserole or in this grilled (or broiled) version, it becomes a part of the scenery, so to speak, and I can tolerate it. Long, long ago, while in Guatemala, I tried ratatouille for the very first time, using a recipe from Gloria Ivens book, Glorious Stew. Long out of print, my 1969 copy is extremely well used. She gives two options for making ratatouille; a wet and a dry version. The "wet" version has more sauce and is made in a lidded skillet on the stove, where the "dry" version uses tomato paste and almost no sauce and is baked in the oven. I made the dry version at least once a year for so many years. It is good with a nice crusty French bread alongside, and for me is enough to make a meal in and of itself. This is the version I had made in the past, though I had never photographed this dish back then:

Eggplant
Eggplant

Gloria Ivens "Dry" Ratatouille


Serves 8 - 10

2 - 3 small eggplants
3 - 4 small zucchini
2 cups chopped onion
2 medium green peppers, sliced
3 cloves garlic, sliced
4 cups (one 2-pound can) Italian plum tomatoes, drained
2 tablespoons tomato paste
4 tablespoons olive oil, more as needed

SEASONINGS:
1 teaspoon salt
¼ teaspoon freshly ground black pepper
1 teaspoon dried oregano, or 1 tablespoon fresh
1 teaspoon dried basil, or 2 tablespoons fresh
1 bay leaf
½ cup fresh parsley, finely chopped

Wash eggplants, remove ends, cut in 1/2-inch slices. If slices are very unequal in size, cut larger ones in half. Wash zucchinis, remove ends, cut in ½-inch slices.

Note: If eggplant and zucchinis are large they will have more moisture; to extract it, place sliced vegetables in a bowl, sprinkle with salt and put a weight on top. Allow to stand 30 - 60 minutes. Drain, wash and dry each piece. Cut eggplant so slices are about equal in size to the zucchini slices.

In a heavy skillet, heat oil and quickly saute eggplant and zucchini slices, a minute on each side, removing them as they are done to a bowl or plate. More oil will be needed; the eggplant soaks it up. In the same skillet, heat more oil. Slowly cook onions, peppers and garlic until tender but not brown. Add drained tomatoes mixed with the tomato paste.

Heat oven to 325 degrees. In bottom of a heavy, lidded 4 - 5 quart casserole, put 1/3 of the tomato mixture. Add a layer of half the eggplant and zucchini. Sprinkle lightly with salt and pepper. Put half the remaining tomatoes on top, then the rest of the eggplant and zucchini, and salt and pepper; finish with the remaining tomatoes.

Cover and place in the oven for 45 - 60 minutes, or until vegetables are tender. Check occasionally. If it appears too moist, leave the lid off for a while. May be served hot or cold.

Notes from "Glorious Stew": “This version is especially delicious served cold. It is a refreshing first course when eaten by itself, or spread on bread, or served with slices of Hungarian or Polish sausage. Hot, it is a good accompaniment for pork roast or chops, for a simply cooked chicken dish, or veal. It is excellent for a buffet - as relish, vegetable or salad - hot or cold.”


Grilling or Broiling?

Grilling, Ratatouille, recipe
Grilled Ratatouille, served in a stack
So now, coming back to the grilled or broiled version, I have found that often when it comes to grilling all these vegetables, it takes time, it is generally hot outside and standing next to a hot grill is tedious, and sometimes the weather does not cooperate. I have made this on the grill. I have now made this dish 3 separate times under the broiler. The broiler goes more quickly and there is not enough difference in flavors to make grilling imperative. Another thing I have to keep in mind up here where I live; it is so often extremely windy outside and it is very difficult to keep the grill lit under those circumstances! 

So for me, broiling is the way to go. One of the very best things about making ratatouille grilled or broiled is that all the vegetables are cooked separately and then tossed together at the end. Each individual flavor is distinct, and concentrated on its own. The flavors are far fresher, and the addition at the end of some capers and fresh basil just makes this dish all the more splendid. No real "recipe" is needed. Just use the vegetables you want, in the amounts you want. This latest version, made just a few days ago, is possibly the best yet. Not that there is great difference in what I have done, but i believe I broiled the vegetables for a little less time, leaving them with more texture. I also added in 5 mildly hot peppers, like banana peppers, and they gave a most wonderful spice to the dish.

Broiled Ratatouille
Broiling, vegetables, ratatouille, eggplant, tomatoes, peppers
My Colorful Broiled Ratatouille


Serves about 8

2 - 4 tablespoons olive oil
¼ cup balsamic vinegar
1 medium eggplant, sliced 1/2 inch thick
1 or 2 small zucchini, sliced 1/4 inch thick
1 - 2 green or red bell peppers
1 - 3 jalapeno peppers, to taste
1 large onion, in wedges
1 teaspoon salt, or to taste
3 - 5 Roma tomatoes, sliced in 1/4 inch slices
¾ cup fresh basil leaves, torn
2 tablespoons nonpareil capers, drained

If you own large rimmed baking sheets (half-sheet size) already well worn, just spray two of these with cooking spray. If your baking sheets are new, you may want to line them with foil. Having two sheets handy is helpful if one of them becomes too blackened.

Heat the broiler. If your eggplant is large in circumference, cut the slices into quarters. In a large bowl, set the sliced eggplant with the olive oil and balsamic and toss to combine. Remove all the eggplant slices and set them onto one of the baking sheets, reserving the oil and vinegar in the bowl. Sprinkle the eggplant slices with salt. Set the eggplant under the broiler on the highest rack. It will take 5 to 10 minutes or so to brown the eggplant. Turn the slices over and brown the other side. Once browned, remove the eggplant to a large bowl or casserole.

Add the zucchini slices to the bowl with the oil and vinegar and toss to coat. If there is room on the same sheet with the eggplant, you may add some or all of the zucchini slices at the same time, keeping an eye on the vegetables as some may brown earlier. Otherwise, once the eggplant is done, set the zucchini slices on the same sheet, sprinkle with salt and broil. Once browned, remove the zucchini to the bowl with the eggplant.

Set the whole peppers on the baking sheet and broil them until the skin blackens and blisters. Remove them to a zip-top bag and seal to steam for at least 10 minutes. Once well steamed, peel the skins and remove seeds and membranes. Slice the bell pepper(s) and mince the jalapenos. Add to the bowl with the cooked eggplant and zucchini.

Set the wedges of onion into the oil and vinegar and toss to coat. Remove them to the baking sheet and sprinkle with salt. Broil for a few minutes, toss them and continue broiling and tossing until well cooked and blackened in a few places. Remove the onions to the bowl with the cooked vegetables. Set the tomato slices in the oil and vinegar very gently. Remove them and set the slices onto the baking sheet and move the rack down at least one level. Broil the tomatoes gently, turn and broil on the other side. Add these to the bowl of cooked vegetables. If there is any remaining oil and vinegar in the first bowl, add this to the cooked vegetables with the capers and basil. Gently toss together the vegetables and taste for salt. Add a splash more of olive oil and balsamic vinegar and serve with crusty bread.


My passion is teaching people how to create a harmony of flavors with their cooking, and passing along my love and joy of food, both simple or exotic, plain or fancy. I continue my journey in ethnic and domestic cuisines, continuing my journey to explore diverse culinary experiences and hopefully to start you on a journey of your own. Join me also at A Harmony of Flavors on Facebook, and Pinterest.

Disqus