Translate

Showing posts with label chicken recipes. Show all posts

Tuesday, September 2, 2014

Another Chicken Bryan Variation

I suppose that by the time one uses a copycat recipe and then changes it yet again, it is absolutely no longer that original recipe. I am talking about Carraba's Chicken Bryan, of course. When we lived in Florida, we went to Carrabas a few times, and Chicken Bryan was what I ate each time. I just loved it that much. There is nothing in the recipe that I do not like, so that is an optimal start. Once we moved, and Carraba's is not available here, I just gave that idea up. 

And then one day some time back I was online and came across a recipe for "Chicken Bryan". This recipe is another of those that I did not keep the website information for, and cannot find it again, for the life of me. I printed the recipe out...and forgot about it.

Yesterday I was trying to come up with some idea for supper. I just had my kids visiting, and was kind of "cooked out", but I needed to make something. I thought about pork chops, and I knew I had some chicken breasts in the freezer. I wracked my brain for an idea....and suddenly remembered this "Chicken Bryan" recipe I had tucked away. I couldn't remember all the ingredients off the bat, but was sure there was goat cheese and sun dried tomatoes, which I had on hand. When I found the recipe, it also had white wine and lemon juice, which I had, and called for Fettuccine, which was also in the pantry. 

copycat recipe, Chicken Bryan, alternatives, recipe
My Mock Mock Chicken Bryan with a glass of Conundrum White

I read through the recipe, which stated it needed 13 tablespoons of butter (plus 2 tablespoons of olive oil). For a recipe with two chicken breasts, which I would assume is a serving for two people, that seemed awfully excessive. The person writing said that they doubled the sauce part of the recipe because they liked a lot of sauce. That almost freaked me out to think about, truly! That is 3 sticks plus 2 tablespoons of butter. For two people! Yikes!

I realize that in restaurants, they use a lot of butter. It just makes things taste better. It doesn't mean I want to take that practice home. And that is also why I rarely go out to eat anymore. I prefer to make my own food, so I know absolutely all of the ingredients used. I determined to start with slightly less than half of the original 13 tablespoons.

I have been using my kitchen scale a lot, so I thought nothing of reading the recipe to state 2½ ounces of sun dried tomatoes. It did not even occur to me to see how many tomato halves that turned out to be. I actually used only 2 ounces, and that might have been 6 or 7 tomato halves altogether. The fact that the recipe stated the tomatoes should be "drained and chopped" told me they were using sun dried tomatoes in oil, which I also had on hand. The last thing I needed was some fresh basil. Lately, when fresh basil is in the house, it is going towards another batch of Pesto, but by coincidence, I had a small bunch of basil in a glass of water on the windowsill. It was meant to be.

copycat recipe, Chicken Bryan, chicken, goat cheese, pasta, recipe
Absolutely delicious Mock Mock Chicken Bryan

The large amount of butter is used to make the wine and lemon juice sauce into an emulsion at the end of cooking. For any who do not realize this, it is easy to make a quick and impromptu sauce this way for most things made in a skillet. If I make pork chops, and there is a little liquid left in the pan when they are done, I might add a couple of tablespoons of cold butter to the pan and stir them around until it melts and makes the liquid slightly thickened. Alternatively, if there is some good "fond" (all the crusty bits left in the bottom of the pan), just splash in a little wine, water or stock and stir up all that goodness left in the pan, then add in the butter to emulsify the liquids. Instant sauce. 

I have no recollection of what kind of pasta was served with the Chicken Bryan in the Carraba's I frequented. Assuredly, being an Italian restaurant, it was some kind of pasta. The recipe I had on hand called for Fettuccine. I had some in the pantry, so Fettuccine it was. I have seen online photos of "Chicken Bryan" with a penne type pasta as well. Serve it with whatever pasta you desire.

Things I did differently than the online recipe on hand: 
  • less butter
  • less sun dried tomatoes
  • more onion
  • added japlapeno
  • added capers
  • used no extra salt or pepper at the end of cooking

Mock Mock Chicken Bryan


copycat recipe, Chicken Bryan, chicken, goat cheese pasta, fettuccine
Mock Mock Chicken Bryan
Serves 2 - 3
About 40 minutes, start to finish

½ pound pasta of choice, Linguine, Fettuccine, Penne, etc.
1 tablespoon salt (for pasta cooking water)
1 - 2 tablespoons olive oil
2 boneless, skinless chicken breasts
salt and pepper
2 ounces (6 - 8) sun dried tomatoes in oil, drained and sliced
4 ounces goat cheese (Chevre or Montrachet), sliced or broken into small chunks
1 - 2 tablespoons capers
½ - ¾ cup fresh basil, in chiffonade

FOR the SAUCE:
6 tablespoons cold, unsalted butter
1 small onion, chopped finely
4 cloves garlic, sliced
1 or 2 jalapeno peppers, minced (seeded if you want less heat)
½ cup white wine (I had Chardonnay opened)
3 tablespoons fresh lemon juice

Set a pot of water to boil. Once boiling, add in the tablespoon of salt (I use coarse sea salt) and add in the pasta. Cook according to package directions, or until al dente. Drain the pasta and rinse lightly so it will not stick together while waiting to be used.

At the same time, have a large skillet heating and add in the olive oil. Dry the chicken breasts and sprinkle them with salt and pepper. Saute the chicken until it is nicely browned and cooked through. Remove the chicken to a platter. Cut the chicken into 1-inch cubes.

Into the same skillet, add one tablespoon of the butter until melted. Add in the onion and garlic with the jalapeno and saute until the onions are golden, about 5 to 8 minutes. Add in the wine and lemon juice, bring to a boil and cook for 2 - 3 minutes. Lower heat and begin adding the remaining butter, one tablespoon at a time, stirring constantly until each pat of butter is completely melted and incorporated. Add the pasta and the chicken with half the goat cheese, all the sun dried tomatoes, the capers and half the basil chiffonade. Toss well to combine. Divide between 2 or 3 plates, as desired. Top with the remaining goat cheese and basil chiffonade to serve.


My passion is teaching people how to create a harmony of flavors with their cooking, and passing along my love and joy of food, both simple or exotic, plain or fancy. I continue my journey in ethnic and domestic cuisines, continuing my journey to explore diverse culinary experiences and hopefully to start you on a journey of your own. Join me also at A Harmony of Flavors on Facebook, and Pinterest.

Tuesday, August 19, 2014

Chicken and Grape Salad Makeover

I have made versions of Chicken & Grape Salad for a long, long time. Generally throwing things together last minute, using whatever is at hand, this is a wonderful cool summer salad that eats like a meal. At its absolutely most basic, the ingredients are as simple as cooked chicken, grapes, and nuts, sometimes with celery or green pepper, and held together with mayonnaise. From there, one can personalize it as desired. 

Chicken, Grapes, Salad, summer dinner, recipe
Chicken and Grape Salad, with many additions
I had some rotisserie chicken left over from the night before. A rotisserie chicken is a great way to have this recipe come together quickly. I did not have any grapes. I walked to the grocery and picked up some grapes, along with a little package of fresh dill, one of the few herbs I do not have growing this year. While dill is not usually a part of this salad, I was considering adding in a little Feta cheese still left in the fridge, and dill seemed like the pairing flavor I was looking for. For nuts I used pecans. My preference, hands-down, would be walnuts, but my husband dislikes walnuts with a passion, so pecans it is! I had gotten a couple of bell peppers at the Farmers' Market this past week. One of them was a deep purple in color, and I thought this would lend nice contrast in this salad. Celery is one of my least favorite vegetables, but when mixed with a lot of other flavors, it is a good filler. 

The Feta cheese is certainly not a common ingredient in this salad, and neither are the craisins (dried cranberries). Even more uncommon is the jalapeno & cheese brat I added. This last was just because I wanted to taste this particular Frohling Cheese & Jalapeno Brat. I bought a package while shopping for the other ingredients because I had tasted some of the brats and summer sausages at the Brown County Fair this past Saturday. Frohling makes some wonderful deli meats and they are South Dakota based. One I tasted at the fair and particularly enjoyed was a Cranberry and Wild Rice Summer Sausage, and that was the one I was specifically looking for at Kessler's local grocery, but those were not in evidence that day. Meanwhile, wanting to taste the brats I bought, I cooked one. After tasting an end piece, I just cut up the rest and added it to my "Chicken and Grape" salad. The ingredient list just kept growing. My recipe ended up like this:

Chicken, Grapes, Salad, summer dinner recipe
Chicken and Grape Salad

Chicken and Grape Salad


Makes about 10 cups

3 cups cooked chicken, cubed
1½ cup grapes, cut in halves
1 cup bell pepper, in chunks
1 cup pecans, broken
1 cup celery, sliced
1 cup cubed Feta cheese, 4 ounces
1 cooked brat or smoked sausage of choice, optional
½ cup craisins / dried cranberries
¼ cup chopped scallions
3 tablespoons chopped fresh dill
⅔ cup mayonnaise
3 tablespoons lemon or lime juice

In a large bowl, combine all the ingredients except the mayonnaise and lemon juice. Separately whisk together the mayo and lemon juice and pour over the ingredients in the large bowl. Toss well to completely combine and distribute the ingredients with the dressing.

Chicken, Grapes, Salad, summer dinner
Chicken and Grape Salad
My husband and I have always loved this salad, even if made at its most basic, as mentioned above. All the extras just made it that much better. We both served ourselves what should easily have been one large portion, and we both came back for seconds. I would estimate that this should be able to serve 4 to 6 as a meal, or more if it is portioned smaller for a summer brunch or lunch dish. It could be scooped onto a bed of greens, or into lettuce cups or on an open-faced sandwich. 

In researching what others have used in this type of salad, salt and pepper are generally a part of the recipe. I find store bought rotisserie chickens as well as Feta cheese, brats and mayonnaise to be quite salty on their own. I am not one to add extra salt to a meal at table. I believe in seasoning properly while preparing the food. If an ingredient is already salty, I taste before adding any more salt. Salt is not in my ingredient list above for this reason. If you feel it is needed, please feel free to add salt at your discretion.

This recipe is gluten free unless your mayonnaise and or brats/smoked sausage have gluten in their ingredients. If you are gluten-intolerant, I am sure you will already have a favored mayo to use. The brat was optional anyway.


My passion is teaching people how to create a harmony of flavors with their cooking, and passing along my love and joy of food, both simple or exotic, plain or fancy. I continue my journey in ethnic and domestic cuisines, continuing my journey to explore diverse culinary experiences and hopefully to start you on a journey of your own. Join me also at A Harmony of Flavors on Facebook, and Pinterest.

Thursday, August 14, 2014

Greek Style Stuffed Chicken Breasts for Dinner

Long, long ago, I made something similar to this, and it stayed in my memory. I remember the flavors being great. The most likely reason I never went back to make it again is because I dislike frying food. I really dislike the cleanup afterwards, with everything grease-spattered. Considering it has been at the very least 30+ years since the last time I stuffed chicken breasts and fried them, I thought maybe it was time to revisit this idea.

herbs, thyme, marjoram, oregano, rosemary
Clockwise from top: thyme, marjoram, oregano, rosemary
I had skinless boneless chicken breasts to use. My recollection from that last time was cutting a pocket into the meat. Basically, lay the breast flat on a cutting board and with a small, sharp paring knife, knife blade parallel to the cutting board, cut into the thicker side of the breast, keeping the opening small, but sliding the knife towards the top end and then see-sawing to the bottom end, creating a pocket, but without too large an opening on the outside. The most important thing is not to poke the knife out the other side, or even worse, through the top or bottom of the meat.

I chose Greek flavors to stuff the chicken, mainly because I already had a block of Feta cheese in the fridge. I thought about what else to use that would be Greek or Mediterranean and since my sister-in-law has all my herbs growing at her house, I took a walk over there and picked marjoram, oregano, thyme and rosemary. I particularly wanted marjoram for the flavors because of its somewhat more floral scent. If marjoram is not available, just use the whole amount of oregano. Along the way home, I stopped in the grocery for a lemon. Thinking of the possibility of using sun-dried tomatoes, I thought that oil packed would give more concentrated flavor. I considered capers, but left them out this time.
 
Greek Style. Stuffed Chicken Breasts entree, dinner ideas
Greek Style Stuffed Chicken Breasts

Putting the whole thing into practice was relatively simple. I made the pockets in the chicken breasts and set them aside. I put a chunk of the Feta into the food processor to break it up finely, adding minced garlic to ensure it was evenly distributed. I did the chopping of herbs by hand. I had more than I needed, and since I was steaming fresh green beans to accompany the chicken, I added the leftover chopped herbs to the beans when they were finished. I used seasoned flour and egg to make the outer coating for the chicken; first in flour, then egg, then flour.
 
chicken, frying, cooking chicken, stuffed chicken,
Chicken, frying

Actually frying the chicken took longer than I wished, but I kept the heat on medium low because I wanted the chicken cooked through but not burnt. I did not time it precisely, but I would estimate at least 15 minutes per side, before it reached an internal temperature of 165 degrees on my Thermapen instant-read thermometer. I realize how expensive this little tool is, but it is worth its weight in gold. Truly!

Ultimately, despite the mess all over the stove to clean, the chicken was most delicious. My husband again was thrilled with the outcome. My photos did not come out as I had wished, but hopefully they give enough of an idea of the great outcome of this dish.

Greek Style Stuffed Chicken Breasts


Makes 4 servings
Greek Style, Stuffed Chicken Breasts, dinner idea, recipe
Greek Style Stuffed Chicken Breasts

4 boneless, skinless chicken breasts
2 ounces Feta cheese
2 cloves garlic, minced
2 teaspoons fresh lemon zest
1½ teaspoons fresh, minced rosemary leaves
1½ teaspoons fresh, minced thyme leaves
1½ teaspoons fresh, minced oregano leaves
1½ teaspoons fresh, minced marjoram (
OR use 3 teaspoons fresh oregano, if marjoram not available)
1 tablespoon minced oil-packed sun-dried tomato
¾ cup all-purpose flour
1 teaspoon salt
¼ teaspoon fresh ground pepper
1 egg
1 - 2 tablespoons milk or water
2 tablespoons oil, for frying, as needed

Pat dry the chicken breasts with paper toweling. With a very sharp paring knife, insert the knife tip into the thicker side of the meat. Slide the knife upwards first to the rounded end of the meat, being careful not to poke all the way through. With a gentle, back-and-forth, sliding motion, slide the knife blade to cut a pouch, extending down as far as comfortable into the narrow end of the chicken. Try to keep the original opening no more than 2 inches wide. Do this with all 4 chicken breast pieces and set aside.

chicken, making a pocket, stuffing chicken breast
Cut a 2" slit, slide knife blade upwards and down to make pocket

Place the feta cheese into a food processor with the garlic and lemon zest and process fine. Chop all the herbs and add them to the processor and pulse once or twice. Pour the mixture into a bowl and add the minced sun-dried tomato, stirring to combine. Divide the cheese and herb mixture into 4 portions. With one hand, open the pocket of one chicken breast and with a small spoon, insert one portion of the cheese herb mixture. Use a fingertip to push the mixture both upwards and downwards in the pocket. Press the edge of the pocket to close and press the surface gently with fingers to spread the mixture to lay smoothly inside. Do this with the remaining 3 chicken breasts and filling.

Combine the flour, salt and pepper on a plate. In a separate, wider container, mix together the egg and milk or water with a fork to combine. Dredge the chicken breasts first in the flour mixture, then in the egg mixture, then back in the flour mixture. Set them aside for at least 20 minutes to set the coating. If longer, place them in the refrigerator.
 

Heat a large skillet and add the oil. Place the chicken breasts smooth side down into the hot oil. Start with medium low and fry the meat until very golden, about 15 minutes. Turn gently and fry the opposite side until golden and the internal temperature is at least 160 to 165 degrees. Do not cover the pan to speed the cooking as this will make the coating soggy and the cheese will ooze out.


NOTES: If other herbs than used in this recipe are desired, I would recommend using 1 - 2 tablespoons fresh dill instead and 3 - 4 teaspoons chopped capers instead of  the sun-dried tomatoes. This will be my next experiment!


My passion is teaching people how to create a harmony of flavors with their cooking, and passing along my love and joy of food, both simple or exotic, plain or fancy. I continue my journey in ethnic and domestic cuisines, continuing my journey to explore diverse culinary experiences and hopefully to start you on a journey of your own. Join me also at A Harmony of Flavors on Facebook, and Pinterest.

Wednesday, July 23, 2014

Using Zah'tar with Grilled Chicken

sumac, sesame, oregano, salt, thyme, zah'tar, recipe
Clockwise from top: sumac, sesame, oregano, salt, thyme
Nearly two years ago was the first time I heard of Zah'tar (or Zatar/Zahtar/Zaatar and many more spellings), spice mixture shown right. It is a Mediterranean spice blend that usually includes sumac, sesame seeds, thyme and oregano and generally has salt in the mix. Most authentic recipes use an Asian species of marjoram not available in the US. Some add coriander seed. Use this spice mixture to sprinkle over foods, or mix it in with olive oil for dipping a nice crusty bread. But you might be wondering about the "sumac" part of the equation. 

What is Sumac, and is it related to Poison Sumac?

You might hear the word Sumac and immediately think, "Poison Sumac?" The Mediterranean spice, sumac is not from the same plant as poison sumac, though it is in the same family. The sumac used in Zah'tar and other Mediterranean and Middle Eastern cuisines grows wild only in those areas, so there is no chance of running afoul of the wrong plant. The poison sumac here in the US is from a plant called Rhus vernix, where the Mediterranean plant sumac is from the plant Rhus coriaria. 

Zah'tar 


Makes about ¾ cup

¼ cup sumac powder
¼ cup raw, unhulled sesame seeds (may be toasted in a dry pan first)
2 tablespoons dried oregano leaves (not powder)
1 tablespoon dried thyme leaves (not powder)
1 teaspoon salt

If toasting sesame seeds, place them in a dry frying pan and stir constantly until they begin to pop and snap. Remove from heat immediately and pour onto a plate to cool. Grind all ingredients together in a mortar and pestle, or briefly pulse together in a spice grinder.

Store Zahtar in a clean glass jar with close fitting lid for up to 3 months.
 

Lemon, Zah'tar, Chicken, Sweet Potato,
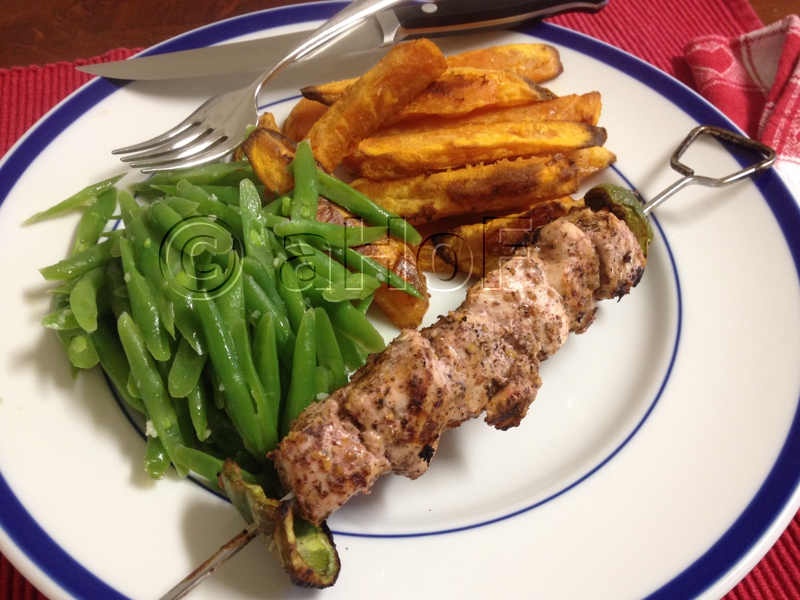
Lemon Zah'tar Chicken served with Sweet Potato Oven Fries and Green Beans
Sumac closely parallels the use of tamarind or dried green mango powder in Indian and Indonesian cuisines. The dried, crushed fruits yield a reddish brown powder that is preferred over lemons for its fruity sourness and astringency. Sumac is a major component of the spice mixture called Zah'tar. Zah'tar is wonderful when mixed with olive oil to use for dipping bread. It can be sprinkled over most any food that needs a little zip. Sprinkle it over hummus, yogurt, avocado or cheese.

Lemon, Zah'tar, Chicken, grilling, entree
Lemon Zah'tar Chicken on the grill
A Syrian acquaintance once made chicken kebabs, marinating them first in a mixture of yogurt, lemon juice, dill, garlic, salt and pepper. She was lamenting the lack of sumac to make her kebabs more authentic. Since I happened to have some, I brought it for her to use. Thinking back on those very flavorful kebabs, I thought the use of Zah'tar would be a great flavor mixture to add to this sort of recipe. Last evening I put this to the test, with wonderful results.

Lemon Zah'tar Chicken


Serves 3 or 4
Kebabs, grilling, entree, recipe, supper
Kebabs, before and after grilling

3 to 4 boneless, skinless chicken breasts

MARINADE:
2 tablespoons olive oil
2 tablespoons Zah'tar
1 teaspoon fresh lemon zest
2 tablespoons fresh lemon juice
½ cup unflavored Greek yogurt
2 cloves garlic, minced
1 teaspoon salt
few grinds fresh black pepper

Cut the chicken breasts into about 1 1/2 or 2-inch cubes. Place the cubes of chicken into a zip-top bag or other container with a lid. In a bowl, mix together all the marinade ingredients until well combined, then pour over the chicken cubes and mix well to coat all sides of the meat. Let the chicken marinate for at least 1/2 hour in this mixture, or up to 2 hours, maximum. After this time the chicken starts to break down from the yogurt and becomes slightly mushy.

Slide the cubes of chicken onto shish kebab skewers, anchoring the meat at the ends with slices of carrot or bell pepper.

Light a grill and once hot, either lower the temperature to medium low, or push most of the coals to one side. Grill over lower heat for about 4 minutes per side, or until the internal temperature is at least 160 to 165 degrees.


While thinking about the recipe for the chicken, I was also thinking of what to serve with the kebabs. I bought a couple of sweet potatoes and made oven fries, similar to my regular Oven Steak Fries. Sweet potatoes, despite being somewhat harder to cut through than regular white potatoes, bake faster than white potatoes. When making oven fries, I like to mix melted butter and olive oil together for the great flavor. The butter could be omitted and all oil substituted. For the Sweet Potato Oven Fries I also added some seasonings, as well as first tossing the raw potato in a little cornstarch. This step was a bit of an experiment. I was hoping for a slightly crisper outside texture. My sweet potato slices were not of even thickness, so some got brown and others did not, but all were well cooked. Just not crisped. I will add the cornstarch to the recipe here; whether to use it is up to you.
Sweet Potato, Oven Fries, recipe, side dish
Sweet Potato Oven Fries

Sweet Potato Oven Fries


Serves 2 to 4

2 pounds sweet potatoes
1 teaspoon cornstarch
1 tablespoon olive oil
2 tablespoons melted unsalted butter
1 teaspoon salt
¼ to ½ teaspoon garlic powder

Preheat oven to 400 degrees (375 on Convection Bake). Peel the sweet potatoes and cut them into thick lengths, as for "steak fries". Sprinkle the cornstarch over the potato pieces and toss well to coat. Place the sweet potatoes in a zip-top bag or other container with lid and pour on the oil and butter, then add in the salt and garlic powder. Seal the container and toss well to coat completely. The potatoes can be held at this point for up to an hour before baking.

Pour the potatoes onto a rimmed baking sheet large enough to hold all the pieces with space between. Bake them for about 10 to 12 minutes. Remove from oven and turn all the pieces over. Return to the oven for another 10 to 12 minutes, or until they are golden and cooked through. Serve immediately.


My passion is teaching people how to create a harmony of flavors with their cooking, and passing along my love and joy of food, both simple or exotic, plain or fancy. I continue my journey in ethnic and domestic cuisines, continuing my journey to explore diverse culinary experiences and hopefully to start you on a journey of your own. Join me also at A Harmony of Flavors on Facebook, and Pinterest.

Wednesday, July 2, 2014

Fourth of July Preparations

We are having guests for the 4th of July, and I am once again planning a few days of meals. In advance prep, I made some Balsamic Onions and Dried Cherries, a Spicy Rub for Chicken, a new Barbecue Sauce and some Pickled Mustard Seeds, just because I wanted to see what they are like. I am like that. I see a new thing I never heard of before and just have to try it. 

The Balsamic Onions and Dried Cherries is an expansion on an older recipe for 

Balsamic Pearl Onions

For the older version, simply omit the cherries and halve the amounts for the Balsamic vinegar, butter, oil, thyme. pepper and salt. The remainder is the same.

I used a both red and white pearl onions plus a bag of dried Montmorency cherries. The Balsamic Pearl Onions are an excellent condiment or side dish as onions are sweet when cooked anyway, and with the balsamic vinegar they are just fabulous. I just wanted a bit of color and an extra note, so I added in the cherries to absorb more of that wonderful glaze. I will be serving them with grilled steaks on Saturday. For dessert that day I am making Blackberry Cobbler with whipped cream or ice cream on the side.

pearl onions, dried cherries, side dish, condiment, balsamic vinegar
Balsamic Onions and Dried Cherries


Balsamic Onions with Dried Cherries


Serves 6 to 8

2 pounds pearl onions
5 ounces dried Montmorency cherries
½ cup Balsamic vinegar
4 tablespoons unsalted butter
4 tablespoons olive oil
1 tablespoon fresh thyme leaves
1½ teaspoons freshly ground black pepper
¾ to 1 teaspoon salt

Preheat oven to 400 degrees (375 on Convection Bake).

Prepare the pearl onions one of 2 ways: 1) Bring a pot of water to a boil and pour in the onions. boil for 1 minute and drain; rinse in cold water. Trim off root end and slip off outer skins. 2) trim root ends and peel off outer skins.

In a saucepan, combine the balsamic vinegar, butter, olive oil, thyme, pepper and salt. Heat just until the butter is completely melted. Combine this sauce with the prepared onions and the package of dried cherries and toss to combine. Pour into a wide casserole that will accommodate all the onions in one layer (9 x 13-inch pan should work). Bake the onions for 35 to 40 minutes, stirring every 10 minutes until cooked through. Serve warm.

For the 4th of July, I am planning to make grilled chicken. I mixed up both a spice rub to apply the night before and a new barbecue sauce recipe to apply when the grilling is almost done. I am planning to grill the chicken low and slow, with only one side of the grill heated to keep down the temperature and the chicken set over the unlit side of the grill. I am going to periodically brush the chicken with orange juice while it cooks to add another layer of flavor. To go with the chicken, my sister-in-law is bringing cole slaw and I am going to make a Ramen Noodle Salad. That recipe will come later on, once i make it and get some photos. I am going to make a Chocolate Mousse Pie in a Chocolate Pastry shell with Mascarpone Whipped Cream for dessert.


BBQ spice, chicken, dry rub, recipe
BBQ Chicken Rub

BBQ Chicken Rub


Enough for 2 chickens, cut up

2 tablespoons dried onion flakes
1½ teaspoons black peppercorns
1 tablespoon dried sage leaves, or <1 teaspoon ground
1 teaspoon dried basil leaves. or 1/2 teaspoon powdered
½ teaspoon dried rosemary leaves
¼ cup sugar
1 tablespoon paprika
1 tablespoon smoked paprika
2 teaspoons salt
1½ teaspoons garlic powder
1½ teaspoons chili powder
1 teaspoon dried lemon peel
1 teaspoon ground sumac, optional
½ to 1 teaspoon chipotle powder

Combine the first 5 ingredients in a spice grinder or coffee grinder used only for spices and grind to a powder. Combine these with all the rest of the ingredients and mix well. Use this rub to coat two whole chickens, cut up the night before grilling. Set them in a single layer on a baking sheet and cover with foil. Refrigerate until 1 hour before grilling.


BBQ, Dry Rub, Barbecue Sauce, condiments
BBQ Dry Rub and Barbecue Sauce 2

Barbecue Sauce 2


Makes about 3 cups

2 cups ketchup
6 tablespoons fresh squeezed lime juice
2 tablespoons yellow mustard
2 tablespoons dried onion flakes/dried minced onion
2 teaspoons black peppercorns
1 teaspoon cumin seeds
1½ teaspoons celery seeds
½ cup brown sugar
1½ teaspoons salt
2 teaspoons garlic powder
4 tablespoons unsalted butter
1 teaspoon chipotle powder, optional

In a medium saucepan with lid, combine the first 3 ingredients. Separately, if using whole spices, place the onion flakes, black peppercorns, cumin and celery seeds into a spice grinder or coffee grinder used only for spices and grind to a powder. Add these along with the remaining dry spices to the saucepan and stir well. Bring the mixture to a boil. Be very careful, as the mixture will splatter alarmingly. Lower the temperature to a simmer, cover tightly with the lid and simmer for 25 to 30 minutes, carefully lifting the lid about every 7 to 10 minutes to stir the mixture and prevent sticking to the pan. Once time is elapsed, remove from heat and remove the lid. Add in the butter, about 1/2 tablespoon at a time, stirring well until it is completely incorporated before adding in the next piece of butter, until all the butter has been added.

Use this barbecue sauce at the very end of grilling time to coat the chicken, and pass the rest at table.


Tomorrow night I am going to make Sloppy Joes and Mustard Potato Salad, as it will not matter if the Sloppy Joes are in the pan for a while and the Potato Salad will keep just fine in the fridge. The point being, I don't know what time my guests will be arriving. I am going to make Andes mint chip cookies as a dessert. Once our guests leave, I will be back with more of the recipes I am creating! Happy 4th of July!


My passion is teaching people how to create a harmony of flavors with their cooking, and passing along my love and joy of food, both simple or exotic, plain or fancy. I continue my journey in ethnic and domestic cuisines, continuing my journey to explore diverse culinary experiences and hopefully to start you on a journey of your own. Join me also at A Harmony of Flavors on Facebook, and Pinterest.

Thursday, June 19, 2014

Green Masala as a Marinade

I have been sort of laying low these last few days. Getting caught up on other things around the house. Going to the dentist - again. We had leftovers so I hadn't cooked anything new. Yesterday though, I had to think of something for dinner. I had a package of boneless, skinless chicken breasts in the freezer so I got those out in the morning with no real thought of what to do with them. In the back of my mind I did have the thought that if nothing else occurred to me, I would use the marinade I used for the Grilled Pork with Indian Spices, as it is great with pork, chicken or turkey. It is such an easy marinade, using things I almost always have on hand and it is invariably fantastically flavored.
Green Masala, Grilling, Chicken, recipe, main dish
Green Masala Grilled Chicken


So, after spending my day working on the computer doing graphics work for my husband's place of business, I came downstairs still not having made any decision on what to do with the chicken. I opened the fridge and the first thing I saw was the jar of Green Masala I had made just a few days back. While I was sitting in the dentist office the other day, while waiting for the dentist I was talking about food to the dental assistant. I described this Green Masala and how good it is, and all the things it can be used for. I was telling her about how it can be used as a marinade or a sauce, or both, for chicken, fish, pork, beef or just vegetables, as I had done with the cauliflower last weekend. It can be spread into sandwiches. It can be used for flavoring already cooked vegetables too, and not only as a marinade to grill them. It would really brighten up plain cooked cauliflower, though it was marvelous as a marinade on the Grilled Cauliflower. The light bulb went on and ta-da! I had a recipe idea for the chicken.
Pasta Salad
Pasta Salad

When I have a recipe with such great flavors as the Grilled Pork (Chicken/Turkey) with Indian Spices, I usually cut the meat into thinner strips so there is more marinade per square inch of meat. I want it to get all the flavor it possibly can. I did this same thing last night. I cut the chicken breasts into two pieces, sort of across the grain but still more lengthwise. My goal was to have long, but narrower strips. I think this would be excellent for making skewers also, either using the chicken breast meat cut into thick chunks or slicing the chicken into thin strips and "weaving" them back and forth onto soaked bamboo skewers as for Satay and grilling. 


I had less than half of the Green Masala left from the recipe, as I have been putting it on everything! So, using it for the chicken marinade I thought it would be good to use a little less, adding in more oil, vinegar, turmeric and garam masala. This would leave enough of the Green Masala to use for sauce at the table as well as the marinade. This would have been wonderful served with rice as a side dish, but I had a little Pasta Salad leftover and my husband ate that as his side. I also had some of my Tropical Slaw leftover and I had that with mine. All I can say is that the chicken was wonderful. If you take the time to make the Green Masala, do try making the chicken this way. Boneless chicken thighs could be used if that is your preference. Whole chicken on the bone can be made as well, though I prefer to make things more quickly when possible.


Green Masala Grilled Chicken

Green Masala, Grilling, Chicken, recipe, main dish
Green Masala Grilled Chicken

Serves 3 or 4

3 boneless, skinless chicken breasts
1/2 cup Green Masala
2 tablespoons olive oil
3 tablespoons red wine vinegar
1/2 teaspoon turmeric
1 teaspoon Garam Masala
1 teaspoon salt

Cut the chicken breasts lengthwise, making 2 longer, narrower strips. In a zip-top baggie, combine the remaining ingredients and place the chicken into the marinade. Seal the bag and move the chicken pieces around so all are well coated with the marinade. Allow the chicken to marinate for at least 1 hour; 2 hours is preferable. If the chicken is still partially frozen (as was mine) leave it to marinate on the counter; otherwise, in the fridge.

Heat a grill. Remove the chicken from the marinade and set them onto the grill over not too high a heat. Allow the chicken to cook to an internal temperature of 165 degrees. Timing will depend on the thickness of the meat. Pass more Green Masala for serving.

NOTE: If desired, cut the chicken into 1 1/2 inch cubes and lace them onto skewers, alternating with squares of red or green bell pepper. Alternatively, while the chicken is still mostly frozen, slice into thin strips and lace them onto soaked wooden skewers.


https://aharmonyofflavors.blogspot.com/2014/03/a-conundrum-with-samosas.html

Thursday, April 17, 2014

Winefest Renaissance and Fine Fishing Friends

I have been absent from blogging for almost a solid week. I kept meaning to come up to my office and write a blog, but it was one crazy-busy time. Today I have free time; a real rarity lately.

For the last month I had been prepping for the Winefest Renaissance event to benefit the Boys and Girls' Club of Aberdeen. My part in the event was to create 6 different foods to pair properly with 6 wines I chose to showcase for the event. I believe I have already written about all the appetizers I created, except possibly the Chicken and Artichoke Spread with Pine Nuts. 

Chicken, Artichoke, Cheese, Spread, Pine Nuts
Chicken Artichoke Cheese Spread with Pine Nuts
This last is an old recipe I altered very slightly to better pair with the Sancerre wine. To make things a bit easier on myself, I used a rotisserie chicken from the deli and just removed all the meat from the bones and chopped it for the spread. Instead of using a mold to form the spread, I rolled it into logs and rolled the logs in a mix of finely minced fresh parsley and fennel fronds. It went wonderfully with the wine, as did everything else, for which I am grateful. There would be nothing worse than to try and demonstrate how good a wine can taste with the proper food and the pairing not work!

Chicken Artichoke Spread with Pine Nuts


Makes one mold, or 2 long, thin logs

1½ cups cooked chicken, finely minced
8 ounces cream cheese
½ cup Parmesan cheese, grated
1 (6 or 7 ounce) jar marinated artichoke hearts, drained, minced
½ cup pine nuts, or other nuts of choice
3 scallions, white & light green parts only, minced
1 teaspoons capers, minced
3 olives, minced
1½ to 2 tablespoons fresh lemon zest
2 tablespoons lemon juice
¼ teaspoon salt
¼ teaspoon white pepper

Place the cream cheese, chicken, Parmesan and artichoke hearts into the food processor. Alternatively, all this can be mixed by hand or stand mixer, if the cheese is soft enough at room temp. Process until well mixed, then add in the rest of the ingredients and process just to combine.

To make in a mold: line with plastic wrap a container large enough to hold the spread. Press the mixture in evenly and smooth the top. Cover with plastic wrap and chill until needed. This can be done up to 3 or 4 days in advance. To serve, uncover the mold and set a plate over the top. Holding the mold on the plate firmly, flip over the mold and plate and remove the outer plastic wrap.

To make into a log: Form into two or more logs as needed. If serving on crackers, the logs should not be much larger in diameter than the crackers. Once the logs are formed, chop herbs of choice (such as parsley, fennel or cilantro) very finely. Coat the logs in the herb mixture. Keep chilled until needed; up to 3 or 4 days. Do not freeze.


~~~~~~~~~~~~~~~~~~~~~~~~~~~~~~~~

On the evening prior to the Winefest Renaissance Event, our great friend Rich arrived with three fishing buddies; Tom, Dick.... and Allan. I had prepared a lasagna the week before so I would not have to try and concoct a dinner in the midst of making all these little appetizer foods for the event. The lasagna was tasty, but I definitely need to give that recipe another try. Too dry, not enough sauce. Oh well. We had a meal, and I had fresh garlic bread and wine - no one went hungry. I even made my Best Apple Crisp, Ever at the last minute using frozen apples I had prepared and frozen last Fall. The guys went out fishing the day of the event, returning home to shower and change around 3 PM. No fish, alas. 

Best Apple Crisp, Ever

Apple Crisp, apples, dessert, recipe
Best Apple Crisp Ever

Makes one 9 x 13 pan

8 cups apples, thinly sliced
1 cup brown sugar, packed
1 teaspoon cinnamon
½ teaspoon nutmeg, or to taste
4 tablespoons lemon or lime juice

Topping:
2 cup all-purpose flour
1½ cup sugar
2 teaspoon baking powder
1 teaspoon salt
2 eggs, slightly beaten
10 tablespoons butter, melted
1 Teaspoon cinnamon
½ teaspoon nutmeg, or to taste

Mix first 5 ingredients and arrange in an ungreased, 9 x 13-inch shallow baking dish. Mix first 4 topping ingredients in a separate bowl. Add eggs and toss with a fork until crumbly, like for streusel. Sprinkle the topping onto apple mixture in dish. Drizzle with the melted butter and sprinkle with remaining cinnamon and nutmeg. Bake in 350 degree oven about 45 minutes, or until browned and bubbling and apples are cooked through.

NOTES: This recipe can easily be cut in half.
Sunday, once the whole affair was done with, I had a lot of leftovers, so I set out everything that was left and between the 4 guests, my husband and myself, we did a really good job of polishing off the rest. That day was a blur.

Rolls, buns, Dough, bread making
Basic Potato Roll Dough, made into Buns
Monday I made a Chicken Curry for dinner. I also decided to make some Naan Bread to pair with the Chicken Curry and the Peas in Tomato Sauce. I had made Mango Chutney last Fall sometime, so that was also part of the meal. The guys came home from their fishing day with 5 Northern Pike. I understand that these particular fish are difficult to filet as there is something about the way the bones run that requires a bit of special skill. One of the group, Tom, was the only one that had done this in past, so he worked gamely to get all the fish fileted and frozen. Dick used one smaller fish to make Ceviche, which turned out fantastically good.

On Tuesday the fishing crew decided they might stay out late. They said not to try and hold supper. So I made Pulled Pork 
Baby Greens, Mandarin Oranges, Candied Almonds
Baby Greens, Mandarin Oranges and Candied Almonds

and potato salad (see my blog of March 11 for the Potato Salad recipe). As I had no buns, I made some, using my Basic Potato Roll Dough recipe. I had bought some ring molds the last time I shopped here in town at a fantastic store featuring gourmet kitchen utensils and home decor, as well as serving gourmet coffees and chocolates. My plan with these ring molds was to try making buns and maybe at some point English Muffins. Haven't gotten to the English Muffin part yet, but the ring molds worked splendidly for the buns (see photo above). It ended up that the guys got back right at supper time, so we all sat down to eat. 

Perfect Medium Rare Filet Mignon

Yesterday was my birthday. The guys said I had been so hospitable and welcoming, as well as serving them all sorts of wonderful foods, that they were going to cook me a meal for my birthday. The day started out with Dick already in the kitchen making coffee when I surfaced. He also made a batch of scrambled eggs with bacon for the three of us who were awake for breakfast at that point. I was thoroughly questioned about my likes and dislikes for a fine meal. They wouldn't allow me to do anything at all to contribute, though I stayed in the kitchen most of the day just to be able to point them in the right direction to find ingredients or utensils. Merriment abounded all the day long as they shopped and then prepped the foods. All of them contributed some skill set to the day, at differing time slots. While Dick prepped potatoes and onions to be made on the grill, Allan and Tom worked on making the swinging door between the kitchen and dining room work again. Later they worked on some of my dining room chairs that are coming apart, and took a look at my kitchen table that won't come together! Rich was in charge of getting the potatoes and onions on the grill in sufficient time for the filet mignons to get done at the right time. Dick made a huge salad with mandarin oranges and also candied some almonds to use for the salad. He made a salad dressing I will try to approximate at some time, using vinegar, olive oil and frozen orange juice concentrate. Allan used to own and run restaurants, so he was chosen to grill the filet mignons. Dick also sauteed mushrooms in butter to serve with the steaks. I had requested coleslaw, because I just love it, so that was also served. They even went and got me a little bakery cake and candles.
author, Chris Rawstern, birthday, cake
Blowing out my candles

The meal was to-die-for good. I cannot imagine going out anywhere for a finer meal. My husband is a wonderful man, though no gourmet cook. He will take me out for my birthday and we have enjoyed some truly fine meals together over our 25 years together. I appreciate fully being taken out to dine; I thoroughly enjoy being served, since usually it is I who serve meals. Having this wonderful meal come out of my own kitchen without my help was truly out of the normal realm of things in my little universe. I sat and sipped tea while watching everyone cook and repair things. If any of you guys read this blog, my heartfelt thanks to Rich, Dick, Allan and Tom for a most enjoyable birthday from beginning to end. 


My passion is teaching people how to create a harmony of flavors with their cooking, and passing along my love and joy of food, both simple or exotic, plain or fancy. I continue my journey in ethnic and domestic cuisines, continuing my journey to explore diverse culinary experiences and hopefully to start you on a journey of your own. Join me also at A Harmony of Flavors on Facebook, and Pinterest.

Monday, March 24, 2014

A Conundrum with Samosas

appetizers, flank steak, thin sliced steak, Gorgonzola
Flank Steak with Gorgonzola Walnut Butter
Sorry, I couldn't resist the title. Continuing my work on pairing foods with the wines I will serve for the Winefest Renaissance wine tasting event for the benefit of the Boys and Girls Club, I decided on Samosas to pair with a Conundrum white wine.  I have made Samosas before, more traditionally. Samosas are a snack type food, usually fried, though mine are baked. The filling I have most often seen for these delicious pockets is potatoes and peas. Last year at this function I noted that the foods that contained no meat had very little interest generated. The ones that caused the most interest were the little Flank Steak Rolls with Gorgonzola Walnut Butter. The meat was plainly visible!

Chicken, Raisins, Samosas, appetizer portion
Chicken & Raisin Samosas
This year I am using some sort of meat in all the appetizers I am making, from smoked salmon, to chicken to sirloin and flank steak. It becomes more interesting to pair food with a wine that has more than one grape variety. The Conundrum white blend contains Chardonnay, Sauvignon Blanc, Semillon, Viognier, and Muscat Canelli, but not necessarily in that order. In my lists of foods to pair with the various varietals, potatoes and peas are listed in the Chardonnay column, chicken is in the columns for most white wines, and Indian or spicy foods are listed in some websites specifically for Conundrum. Fruity sauces or salsas pair well with Viognier, so I added Sultanas (white raisins) to the mix. I set about creating a samosa mixture that would cover those things and came up with Chicken & Raisin Samosas. I planned to serve them with a little dab of Mango Chutney, but am rethinking that idea. The sweet chutney may throw off the whole mix if the wine will not support that sweetness. 


making samosas, samosa dough
Rub ghee into flour, flat flakes in the bowl
Meanwhile, I made a dough for the samosas, which requires a good 8 to 10 minutes of kneading time to build the gluten. Though it is not a yeast dough, the gluten gives the dough its stretchiness, making the forming of the little pockets much simpler, with little tearing. I read long ago that the best way to make the dough is to first "rub" the fat into the flour. In this case, using melted ghee, you just lift up two hands full of the flour/ghee and rub the two hands in one long sweeping motion. Continue this process until there are large "flakes" of dough. Then add the rest of the ingredients, mix well and knead until the dough is nice and stretchy. The dough needs to rest for a time, so if you will be busy in the next couple of hours, just cover the dough and place in the fridge until needed. 

Ajwain seed, Carom seed, thyme flavor, thymol
Ajwain or Carom

Samosa Dough


Enough for about 64 small samosas

3 cups all-purpose flour
2 tablespoons white rice flour
1 teaspoon ajwain seeds, crushed, optional (see below)
½ teaspoon salt
6 tablespoons melted ghee or clarified butter
½ cup water

In a large bowl mix together the flours, ajwain (also known as Carom seed, or spelled as Ajowain or Ajwan) seed and salt. Pour in the melted ghee and begin lifting and rubbing the mixture together in long motions between the palms. Continue lifting and rubbing together until the ghee is completely incorporated and there are large, flat "flakes" of dough in the bowl. Add in the water and mix to combine, then turn out onto a counter or board to knead. You will not need more flour on the surface. Knead by pressing, folding, pressing and folding over and over for about 8 or 10 minutes. The dough is very stiff. I do not believe it could be kneaded in a heavy duty mixer, as it would just spin around the dough hook. Once kneaded, set aside to rest for at least an hour. If you cannot work with the dough at that time, cover it and place in the refrigerator until needed.

About Ajwain or Carom Seeds - Trachyspermum ammi


Also known by Ajowain, Ajowan, Ajwan and many other spellings. Ajwain is a tiny seed in the Umbelliferae family (like cumin, celery, anise, etc). The seeds have a flavor similar
to a mix of anise and oregano, but more aromatic and bitter. They smell much like thyme, because they contain thymol. The seeds have a tiny stalk attached, much like anise seeds and look similar and are related to celery seed. Carom is popular in Indian dhals or potatoes and is almost always used cooked in a dish as its flavor can be overwhelming when raw. It is good for digestion and is often used in lentil dishes for its anti flatulent effect.

Chicken & Raisin Samosas
When I created the recipe for the filling, I was completely unsure of the quantity I would need. I ended up with enough for double the amount of dough I made, so I had to make another batch of the dough. The filling was a sort of fly-by-the-seat-of-my-pants recipe, so feel free to change quantities. If you prefer to make half the filling, just halve the quantities as needed. I added in potatoes, though it was not my original intention, as I was concerned it would not be enough. Leaving out the potatoes would work fine, or if you prefer vegetarian, leave out the chicken and keep the potatoes.

Indian recipes very often have a "whole spice masala" as part of the ingredients. I understand the concept, but it can be very difficult to fish out little whole cloves or cardamom seeds, or worse, chomping down on one when eating. I left the bay leaves whole to remove later, but crushed finely the cinnamon (use true cinnamon - not cassia), cloves and cardamom seeds. I will list these ingredients as "whole spice masala", and you can do as you choose.

Chicken and Raisin Samosa Filling


Enough for about 64 small samosas

garam masala, spice mix, cinnamon, nutmeg, black pepper
Toast the whole spices in a dry pan, cool, grind

WHOLE SPICE MASALA:
1 tej patta leaf
2 whole cloves
1-inches true cinnamon quill
2 cardamom pods (or about ¼ teaspoon cardamom seeds)
----- 1 pound ground chicken 
1½ teaspoons salt
½ large onion, finely chopped
1 tablespoon oil or ghee
1 knob fresh ginger, peeled, minced
2 cloves garlic, finely minced
1 teaspoons whole coriander seed, crushed
¼ teaspoon cumin seed, crushed
½ teaspoon Garam Masala powder, right
¼ cup golden raisins (or regular raisins or currants)
¼ cup fresh cilantro, chopped
1 jalapeno, finely minced, use more or less as desired

½cup peas
¾ pounds potatoes, baked, cooled, peeled

In a large skillet, heat the oil or ghee. Add the whole masala spices (or grind/crush first) and cook until they are fragrant. Add the onion and saute until golden brown. Add the ginger and garlic and toss until fragrant. Add the chicken and salt; cook until chicken is no longer pink. Add the coriander, cumin and Garam Masala with the raisins, cilantro and jalapeno, if using. cook for 5 minutes more. Add in the baked, peeled potatoes and use a spatula to break them into small chunks while combining with the chicken mixture. Mix in the peas. Cool the mixture completely before using to fill the samosas.
samosa dough, rolling and cutting,
The dough ball; 1 little piece rolled, then cut in 2


To make the samosas, once the dough has rested and the chicken mixture has cooled, cut the dough into half, then into quarters. Cut each quarter in two, and then further divide each eighth into 4 more pieces, making 32 little bits of dough. Roll one of these little bits into a ball, then roll out on a surface (no flour needed) to about a 6 inch circle. Do not worry if the circle is not completely round - it makes no difference. With a large knife, cut the circle into 2. This will be repeated with each little piece of dough.

making samosas, forming samosas, filling samosas, chicken, potatoes
Steps 1, 2, 3, 4, and 5

Lift one half of the dough circle and moisten half of the straight edge with water (Step 1). Bring the rest of that straight edge up to form a little cone shape (Step 2). Press the pointed end closed, then firmly press the edges of the cone so they stay together. Hold the little cone in your hand and place about a rounded tablespoon or so of the cooled filling mixture into the cone (Step 3). Moisten half the cone edge with water (Step 4), then begin pressing the two sides together firmly to seal completely (Step 5). I took this one step further, just to make them cute for the presentation, and pinched that top edge together into little pleats, but this is not necessary. 

The samosas can be frozen as soon as they are done, if needed for a future date. Set them onto baking sheets and in the freezer until hard, then place them in freezer zip top bags. Keep frozen for up to 2 months. When needed, set the frozen samosas onto baking sheets, brush with oil or ghee and bake in a preheated 400 degree oven for about 15 minutes, until the outsides are golden. (The insides are already cooked, and only need to be heated through). If desired, the samosas can be deep fried until golden. Another option is to bake them and then briefly turn them in a lesser amount of hot fat to give them the crisp, fried look and taste. Serve them with chutney of choice.

These are great to make ahead for a party. They can be baked when needed and served at room temperature.


My passion is teaching people how to create a harmony of flavors with their cooking, and passing along my love and joy of food, both simple or exotic, plain or fancy. I continue my journey in ethnic and domestic cuisines, continuing my journey to explore diverse culinary experiences and hopefully to start you on a journey of your own. Join me also at A Harmony of Flavors on Facebook, and Pinterest.

Disqus