Translate

Sunday, February 26, 2017

Great Muffins from Rye Flour and Rye Bran

The Rye Baker, Stanley Ginsberg, bread, cookbook
The Rye Baker by Stanley Ginsberg
I had been busily making rye breads before Christmas, particularly having just received my latest bread cookbook, "The Rye Baker," by Stanley Ginsberg. Between the two new bread baking books, I made a lot of breads of many varieties, to be covered when guests were here over the holidays. I have my own electric grain mill, making quick work of grinding most things into flour; wheat berries, rye berries, Kamut Khorasan, red rice, dried garbanzo beans and more. The difficulty lies in that with rye, most breads call for at least medium rye, which is rye flour with the bran sifted out. Let me say, I spent a lot of time sifting the rye flour. That I need a better, faster way to accomplish that is a no-brainer. Since the holidays, however, I have still been noshing on the already made breads I have in the freezer.


Maple, Bacon, Rye, Muffins
Maple Bacon Rye Muffins

That comes back to the fact of all the leftover rye bran that I had sifted out. I have lots and lots. I made some muffins a few weeks ago, using mainly the rye bran, and while they were good, they were not exciting. In the meantime, I had been reading about the whole grains and the problem with phytic acid, after talking with a friend whose doctor warned her against whole grains. This is a quote from one website:
"High-phytate foods, such as grains, nuts, and legumes, can raise the risk of iron and zinc deficiency. As a countermeasure, strategies such as soaking, sprouting and fermentation are often employed. For those who eat meat regularly, deficiencies caused by phytic acid are not a concern."

Another site, precisionnutrition.com, and another quote:
"Some experts even suggest that it’s the phytic acid in whole grains and beans that lends them their apparent protective properties against cardiovascular disease, cancer, and diabetes."

Most all of the whole grain breads I've been making call for very long, slow fermentation periods, some including overnight cold rising in the fridge. This slow fermentation mitigates phytic acid binding the minerals. Many of the newer bread recipes call for soaking and sprouting the grain, then drying and grinding, so that long soak also balances out any harm. But when it comes to the rye bran, which is culled from just plain rye berries not previously soaked, sprouted or other, the bran is then high in phytic acid. 

As one of the things to do is soak, I thought I would soak some of the rye bran in buttermilk (double whammy, as an acidic environment is also supposed to help, along with soaking in general). Then I read more and found that the soaking medium should be hot. And, that it requires a long soak. 

I mean, REALLY! What's a girl supposed to do to have a healthy breakfast anymore???

Maple, Bacon, Rye, Muffin, recipe
Maple Bacon Rye Muffin texture
Long and short, a few days back I thought I would heat some buttermilk and soak the rye bran while prepping the rest of the ingredients to make some more muffins, and have done with it. I am not vegetarian, so I shouldn't fall into the risk of iron and zinc deficiency. All this aside, most readers will not own their own electric grain mill, grind their own rye berries to make bread, and sift out rye bran. And if this is the case, oat bran would work just as well in these muffins. Rye flour is easily found these days. Bob's Red Mill carries at least 3 different grinds: Light Rye (the rye equivalent of white all-purpose flour, but with less gluten), Medium Rye (what I approximate when sifting out the bran), and Pumpernickel Rye (more coarsely ground and with all the bran and germ), plus all the organic options. There are other types and grinds, but these are the most easily available. I happened to have some of my sifted "medium rye flour" in a baggie I found pushed back behind some things, so decided also to use this in the recipe. 

Okay, so I knew what I was doing with the rye part of the recipe. I happened to have some bacon in the fridge. I don't eat it often, so I thought I would use some in the muffins. Maple is always an excellent flavor combination with bacon, so I used maple syrup as the sweetener. 

This time, the muffins were fantastic. Oh my! The texture was light and just perfect. Even my husband, generally not one to actually eat anything whole grain if he can help it, actually asked if he could have a couple! They must have smelled really good to him, too! He said they were great, and that is just about the biggest endorsement I could possibly give to a whole grained food! 


Maple Bacon Rye Muffins
Maple, Bacon, Rye, Muffins, recipe, breakfast
Maple Bacon Rye Muffins


Makes 12 regular sized muffins

1 cup buttermilk, heated
½ cup rye bran (or oat bran)
5 strips thick sliced bacon
¾ cup medium rye flour
¾ cup all-purpose flour
2 teaspoons baking powder
½ teaspoon baking soda
½ teaspoon salt
2 large eggs
¼ cup real maple syrup
½ teaspoon maple flavor
4 tablespoons unsalted butter, melted


Preheat oven to 350 degrees. Mix the bran into the heated buttermilk in a medium bowl, stir, and set aside.

Cut the bacon across into ¼-inch pieces and fry until just crisped. Drain on paper toweling. Set aside.

In a mixing bowl, whisk or sift together the rye and all-purpose flours, baking powder, baking soda and salt.

Add the eggs, maple syrup and melted butter to the bowl with the buttermilk and bran. Stir to mix well. Pour this mixture into the dry ingredients and stir to combine, then add in the Maple Flav-r-Bites and stir in.

Grease the wells of a 12-count muffin tin, using cooking spray. Divide the batter evenly between the 12 wells and bake the muffins for about 20 minutes, or until a toothpick inserted in the centers comes out with only a crumb or two. 


My passion is teaching people how to create a harmony of flavors with their cooking, and passing along my love and joy of food, both simple or exotic, plain or fancy. I continue my journey in ethnic and domestic cuisines, continuing my journey to explore diverse culinary experiences and hopefully to start you on a journey of your own. Join me also at A Harmony of Flavors on Facebook, and Pinterest.

Saturday, February 25, 2017

Remembering Some Cookies Called Gauchos

Long ago (in the late 1960s, but don't tell anybody, okay?) I used to love these cookies called "Gauchos." I guess the brand name was "Burry's," though that part didn't stick in my memory. I did remember the elephant on the box, when I saw them online. Gauchos were oatmeal peanut butter cookies with a sweet peanut butter filling.

Oatmeal, Peanut Butter, Sandwich Cookies, recipe
Oatmeal Peanut Butter Sandwich Cookies

Apron Patterns 1950s
I have never, ever been one of those who would eat a teaspoon (or tablespoon) of plain peanut butter from the jar. I don't think I have ever done that, even in childhood. I have lots of vices, but that isn't one. On the contrary, I am most certainly one of those who eat cookie dough, lick the beaters after making cake or cookies, scoop out remains in the bowl. I know this gives some people the shudders, and maybe the "raw egg police" will come after me, but since my earliest childhood, I followed Mom around by her apron strings in the kitchen waiting just for these treats. I never got sick from it, either, not in all these years since. And yes, she wore aprons, mostly those with the bib top like this pattern shown at left.

Somehow though, I just really loved these Gauchos cookies. I love oatmeal cookies, and these had oatmeal in them, too. Maybe that was my tipping point. Or maybe it is just the fact of sweetened peanut butter in the middle? I have a really serious sweet tooth. I love peanut butter cookie dough, but not the cookies once they are baked.

Oatmeal, Peanut Butter, Sandwich Cookies, recipe
Oatmeal Peanut Butter Sandwich Cookies
All these musings, and I still cannot say what specific thing is what made me love these particular cookies, but I recall, as a teen, going through whole boxes all on my own! So this morning, I suddenly remembered these, and wondered if someone had a recipe out there. As it turns out, there are lots of the exact same recipe posted on many blog sites. I made only a minor change in the cookies and one in the filling. Most places show the same recipe whether it is for what used to be Gauchos, or the Girl Scout Cookies called "Do-Si-Dos®," and apparently the same company made both, or so I read somewhere. 

Long and short of it all is that I gave into the temptation this morning, and though the recipe is the same on numerous web or blog sites, I am posting it here one more time, with my own small changes and observations. 


Oatmeal Peanut Butter Sandwich Cookies

Makes about 45 large sandwich cookies or up to 60 smaller ones


Oatmeal, Peanut Butter, Cookies, single cookie
Oatmeal Peanut Butter Cookies before sandwiching
COOKIES:
1 cup peanut butter
1 cup butter, room temperature
1 cup sugar
1 cup brown sugar
2 eggs
2 teaspoons vanilla extract
1½ cups all-purpose flour
1 teaspoon salt
½ teaspoon baking soda
½ teaspoon baking powder
2 cups quick cooking rolled oats

FILLING:
6 tablespoons butter, room temperature
¾ cup peanut butter
2 cups confectioners' sugar
3 tablespoons heavy cream

Preheat oven to 350 degrees. Cut parchment to fit various cookie sheets.

In bowl of a stand mixer, add in the first 4 ingredients for the cookies and start beating slowly, until the mixture is creamy. Add the eggs and vanilla and beat to combine. 

In a separate bowl, sift or whisk together the flour, salt, baking soda and baking powder. Add this to the mixer bowl and starting on low speed, gently mix until there is no fluffy powder left. Increase speed and combine well. Add the oatmeal and mix to just combine. 

I used a 2-teaspoon cookie scoop first, which yielded large cookies almost 3-inches in diameter. A little past halfway scooping the cookies, I switched to a 1-teaspoon scoop. They seem small, but puff and spread when they bake. Allow plenty of room on the parchment lined sheets. Flatten the cookie mounds to about ¼-inch thick. Bake larger cookies for about 9 to 11 minutes, or until lightly golden. Smaller sized cookies bake for about 8 minutes total.

Allow the cookies to cool completely. They will harden enough to handle. Then make the Filling. Place the first three Filling ingredients into the clean mixer bowl and begin beating slowly, until all the confectioners' sugar is moistened. Increase speed slightly to cream. Mixture will be thick. Add in 3 tablespoons of heavy cream and beat to combine. 

If a piping bag is available, it makes quick work of piping the filling onto the cookies. Turn one cookie bottom side up and pipe on the filling (or spread with a knife or icing spatula), then top with another cookie, right side up. Repeat with all pairs of cookies. 


My passion is teaching people how to create a harmony of flavors with their cooking, and passing along my love and joy of food, both simple or exotic, plain or fancy. I continue my journey in ethnic and domestic cuisines, continuing my journey to explore diverse culinary experiences and hopefully to start you on a journey of your own. Join me also at A Harmony of Flavors on Facebook, and Pinterest.

Friday, February 24, 2017

Mini Cheesecakes are Cute as Buttons

I will admit right up front, I saw this pattern being made on top of something that looked like little cheesecakes in photos on someone's blog site. The fact that I had no clue what language this blog was written in is immaterial. The design is adorable. I decided to try out some little cheesecakes with other ideas I got while perusing various web and blog-sites, and they are just so cute. Apart from being really tasty, they really are "cute as buttons."


Lemon, Blueberry, Mini Cheesecakes, recipe
Lemon Blueberry Mini Cheesecakes


Appetizers, finger foods, recipes, easy to eat
Five Appetizers Served at CorTrust Bank
I was helping to coordinate an event at CorTrust Bank yesterday. My husband and I had met with Northern Area Market President, and the Mortgage Loan Specialist, having done some other design work with them. At the last minute, there were dire blizzard warnings for that area around Sioux Falls, where some out-of-towners would be coming from, with the possibility that the whole event would be called off. Still, some brave souls ventured up here to Aberdeen and the event took place. The appetizers served at the event last evening were Green Pea Pancakes with Smoked Salmon Mousse, Flank Steak Rolls with Asiago and Arugula, Spanakopita Cups, Buffalo Chicken Wraps and Lemon Blueberry Mini Cheesecakes. 

The little cheesecakes, shown bottom right in the photo above, were made in mini muffin tins, making them about 1½ inch in diameter, or just about 2 - 3 bites worth. Tiny and adorable. Which makes them so irresistible.

The flank rolls have been made with many fillings and various marinades in past, but this marinade (below) is my favorite. Cutting thin logs (about ¼-inch diameter) of Asiago cheese, about 1½ to 2-inches long and tucking in a couple of peppery baby arugula leaves make these a hit at any party or get together. The Asiago and arugula combo makes this appetizer so easy to make.

Flank Rolls with Asiago and Arugula

Amount will depend on size of flank steak
Flank steak, Rolled flank steak, Asiago, Arugula
Flank Rolls with Asiago and Arugula

About 30 to 65 rolls

½ cup olive oil
2 tablespoons pomegranate molasses or concentrate
3 cloves garlic, finely minced
1-inch piece fresh ginger, finely grated
1 to 1½ teaspoon salt
2 teaspoons chipotle chili powder

1 to 2½ pound flank steak


Asiago wedge, cut in ¼ x 1½-inch pieces
Baby Arugula leaves

Combine the first 6 ingredients in a zip-top bag and place the flank steak in the bag to marinate for at least 12 and up to 24 hours, turning occasionally so the marinade coats the steak evenly.

To broil, either grill on a very hot grill for 6 minutes per side (slightly more or less, depending on size and thickness of steak), or set the steak on a rack on a rimmed baking sheet and broil about 4-inches from the heat for 6 minutes per side. Tent the meat once done grilling/broiling for about 10 to 15 minutes before slicing very thinly, preferably at a bias, to achieve wider pieces. Using a length of about 4-inches, set a piece of the Asiago and 2 baby arugula leaves on one end. Roll the steak around these filings and skewer with a toothpick to keep closed. 

Back to the little Cheesecakes 

I thought about placing a fresh blueberry in the bottom of the tart shells, but for practice purposes, I had none available. I did, however, have a jar of Polaner All Fruit Blueberry Spread. I wanted something not terribly sweet, and this was as good as I could come up with quickly. I used a slightly rounded ¼-teaspoon of the fruit spread in each of the little pie shells, and then filled them with about 2 teaspoons of the lemony cheesecake mixture.

When I made the Mini Strawberry Cheesecakes recently, with a chocolate shell, I did not bake the chocolate pie shell first. I liked the soft texture of the shell with the strawberry cheesecake filling as it made the shell almost brownie-like in texture. For the new mini cheesecake recipe, I tried them without baking the shell first, and they were (to my own personal taste) good, but I felt that others would prefer a more crispy textured shell. Of course, once the mini shells are baked blind, they do shrink. It turned out that this way I could only use a level ¼-teaspoon of the fruit spread and possibly about 1½-teaspoons of the cheesecake filling. Altogether, somewhat smaller versions, but no less delicious.

Keep in mind that these were made in the tiny wells of mini-muffin tins and not regular muffin tins!

And then the Little Designs

As I mentioned at the beginning of this blog, I saw this idea on a blogsite that was written in another language. Not a language I recognized, either! but a picture is worth a thousand words, they say, and this picture was too good to pass up. The photos showed what appeared to be a sort of cheesecake-like batter in a small tart shell. Five, straight <¼-inch lines were drawn onto the batter. I used gel food color to make the lines, using a toothpick. Once the five lines are drawn, you draw the toothpick down through the center of the five lines in one smooth flow, and then out the bottom and curling out a bit (shown on the top three in the diagram below). This gives the appearance or suggestion of something like lavender flowers. I used "violet" food color, yet the designs came out looking deep blue. 

Creating the patterns

As I got familiar with the feel of using the toothpicks and gel food colors, I decided to try something new. I used a pink gel food color and sketched 5 "petals" moving upwards from the base of each "petal" and curving slightly. Next, using green gel food color, I drew a stem downwards, and then a leaf, also dragging downwards toward the stem. Trying to draw the leaf from the stem up and out, created a break in the pattern of the stem. This process is shown in the bottom three in the diagram above. All in all, this was one really easy way to make these tiny gems even more adorably irresistible.

Making Designs on Cheesecakes


Lemon Blueberry Mini Cheesecakes

Makes 30
Lemon, Blueberry, Mini Cheesecakes, recipe, design
Lemon Blueberry Mini Cheesecakes


SHELL:
1 cup all purpose flour
3 ounces cream cheese
4 tablespoons unsalted butter

FILLING:
8 ounces cream cheese, room temperature
⅓ cup granulated sugar
1 teaspoon cornstarch
2 tablespoons sour cream
1 egg
2 tablespoons lemon juice
2 teaspoons lemon zest

Polaner Blueberry Fruit Spread 
Gel Food Colors: Purple, Pink, Green

Make the shells: Preheat oven to 375 degrees. Place the flour into a bowl. Add in the 3 ounces of cream cheese and the butter and cut in as for pie pastry. Once the ingredients start to form larger bits, begin working with fingers, bringing it all together in one solid mass. It takes a minute or so, but will come together completely. Break off or cut 30 equal sized bits of the dough. Flatten or roll the dough pieces into about 3-inch pieces and fit them into the mini muffin tin wells, pressing so they stick up above the well slightly. They will shrink in the oven! Bake the shells for 9 minutes, until they begin to turn golden. Reduce oven to 350 degrees.

Allow the little shells to cool for about 10 minutes. Use a ¼-teaspoon measuring spoon to scoop a level amount into each of the little baked shells. Set aside.

MAKE the filling: In a small bowl, stir together the granulated sugar and the cornstarch to combine. Set aside. In a mixing bowl, using a hand mixer, beat the 8-ounces of cream cheese until softened. Add the sugar mixture and beat to just combine. Add in the sour cream, then the egg, beating just to combine. Add the lemon juice and zest until mixed.  

Scoop about 1½ teaspoons of cheesecake filling into each of the little wells with blueberry spread. The filling should cover the blueberry completely, leaving a little surprise when they are bitten into. Before baking, scoop out a small dot of each of the food colors onto a plate. Use toothpicks (a separate one for each color) and create patterns as shown in the diagrams above. Once all are decorated, bake the cheesecakes for 8 minutes, or until set.  Cool completely, then refrigerate for at least an hour before serving. 


My passion is teaching people how to create a harmony of flavors with their cooking, and passing along my love and joy of food, both simple or exotic, plain or fancy. I continue my journey in ethnic and domestic cuisines, continuing my journey to explore diverse culinary experiences and hopefully to start you on a journey of your own. Join me also at A Harmony of Flavors on Facebook, and Pinterest.

Wednesday, February 15, 2017

Long Time Favorite Cake is Back

First off, I hope everyone enjoyed a lovely Valentine's Day. It doesn't matter if you sat at home with someone you love doing nothing at all spectacular, or whether you went out and splurged big time, or if you chose to catch up on some "me" time. The idea is that you enjoyed the day, however it was celebrated. 

My husband and I were invited out to dinner at the local Country Club by two people fast becoming very good friends. Since my husband and I generally stay at home rather than try and fight crowds, and I cook something really special for dinner, it has been about 26 years since we last braved a night out on Valentine's Day. That made yesterday's evening a true delight. As much as I love to cook, it is a tremendous joy for the cook to have a night out! I thank Ty and Ann Hanson with all my heart for having us as guests.

A night off was not in the cards for the cook at the country club, Jake Collins. He was on duty manning the kitchen, and produced a most excellent menu for a large crowd. Considering the tremendous amount of dishes that needed to be served at the same time, he made miracles happen. We know Jake from the past four years of Winefest Renaissance, benefiting the Boys and Girls Club of Aberdeen. This year marks the fifth annual Winefest Renaissance (which appears to be called "Renaissance Festival," this year), to be held on April 8th.

Fresh Apple, Pecan, Date, Cake, recipe
Fresh Apple Pecan Date Cake
So, on to the cake. This cake recipe is one that I have been making for about 33 years or so. Originally I cut the recipe out of the "Orlando Sentinal" newspaper's Thursday food edition. It called for using cooking oil in the batter, and raisins. I prefer to use melted butter, for the flavor, and do not care much for cooked raisins, so I switched the raisins out for chopped dates. It was the most amazing cake, outside of a Carrot Cake, for lovely flavors and moistness beyond compare. My version of this cake is called Fresh Apple Pecan Date Cake. The recipe I have used for carrot cake is also, coincidentally, from an Orlando Sentinel newspaper clipping and from around the same general time. I will have to post it!

Fresh Apple, Pecan, Date, Mini Cupcake, recipe
Fresh Apple Pecan Date Mini Cupcake
Interestingly, in all the years I have been making both these cakes, I had never gotten any good photos of them, so last year I made it a point to make the cakes and take photos. Last year, however, was one crazy thing after another, between cataract surgeries for both my husband and me, and then various medical procedures and crises for my husband. It kept us on our toes. I didn't get to write many blogs. I do have a bit of a backlog of recipes to eventually get into this blog. 

I have also made this Fresh Apple Pecan Date Cake recipe to use as mini cupcakes with great success, as seen in this photo left. Tiny little two-or-three-bite mini cakes are cute as can be and delicious when set out on an appetizer type party spread.


Fresh Apple Pecan Date Cake

Serves 12 to 16

2 cups all-purpose flour
1 teaspoon baking soda

Fresh Apple, Pecan, Date, Cake, dessert, recipe
Fresh Apple Pecan Date Cake
½ teaspoon salt
2 teaspoons cinnamon
2 cups sugar
4 cups fresh apples, peeled, grated
2 cups pecans, chopped
1 cup pitted dates, chopped
2 eggs
1 cup butter, melted (or use melted coconut oil or cooking oil)
1 teaspoon vanilla

Combine flour, baking soda, salt, cinnamon, and sugar in a large mixing bowl. Stir in apples, pecans, and dates. Add eggs, melted butter and vanilla. Beat at medium speed with electric mixer for 3 minutes.

Pour mixture into two greased 8 or 9-inch pans, a greased bundt pan or greased muffin pans or papers. If making in an 8-inch round pan, I spray the pan with cooking spray, then trace around the pan onto parchment paper, cut out the parchment rounds and set them into the pans and re-spray the parchment with cooking spray. This ensures that the cake definitely WILL NOT stick to the bottom!

Bake in a preheated 350 oven for 50 - 60 minutes for a bundt pan. For 8-inch cake pans, check at about 35 - 40 minutes and every 5 minutes thereafter, until a toothpick inserted in the middle comes out clean. Let the cake cool for 10 minutes and then invert onto cake plate. For cupcakes, check after 15 to 20 minutes. For mini cupcakes check after 12 minutes.

Ice with Cream Cheese Icing, or sprinkle with powdered sugar and decorate with extra pecans.


Cream Cheese Icing

Icing, Frosting, recipe, cream cheese, butter, confectioners sugar
Cream Cheese Icing
Enough to frost an 8 or 9-inch, or 9 x 13 cake

12 ounces cream cheese, room temperature
1 stick unsalted butter, room temperature
3 - 4 cups confectioners' sugar, sifted
1 teaspoon vanilla
¼ teaspoon salt

Directions: Mix together on low speed of an electric mixer, and once combined increase speed to high and beat until completely smooth.

If the icing is too stiff, beat in one tablespoon of milk or cream at a time, until of spreading consistency.

NOTES: The longer you beat, the fluffier the icing will become, as air is being incorporated into the mixture. This is wonderful for the fluffy icing of a cake, but trying to decorate with too much air in the mixture will give difficulties when trying to get an even extrusion from a decorating tip. The air bubbles will constantly cause breaks in the flow. If using a hand mixer it would take a long while to accomplish this, but with a large heavy-duty mixer, it would be best to keep the speed at medium, thus lessening the quantity of large bubbles forming in the icing.


My passion is teaching people how to create a harmony of flavors with their cooking, and passing along my love and joy of food, both simple or exotic, plain or fancy. I continue my journey in ethnic and domestic cuisines, continuing my journey to explore diverse culinary experiences and hopefully to start you on a journey of your own. Join me also at A Harmony of Flavors on Facebook, and Pinterest.

Monday, February 13, 2017

Appetizers and an Open House

I wrote last week about creating some new appetizers, with the intent to make them for an upcoming Open House here in town. 

The recipes for two of the four appetizers I made were posted in this blog. The recipes not posted yet were the Cheese & Bacon Stuffed Mini Sweet Peppers, (oh my, they were so delicious), and the little Spanakopita Cups. All four of these appetizers were wonderful, if I do say so myself. All four are cheese-filled, so if cheese is not your thing, then these wouldn't be for you. Cheese just tastes so good. From the little mini strawberry cheesecakes to the Spanakopita Cups, they were all delightful.

The Four Appetizers Served
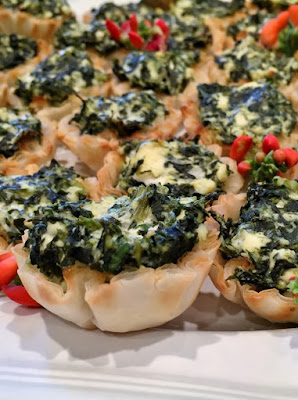
The Four Appetizers Served, clockwise from top left: Spanakopita Cups, Cheese & Bacon Stuffed Mini Sweet Peppers, Strawberry Mini Cheesecake Tarts in Chocolate Shell and Buffalo Chicken Rolls

When the realtors hold an open house at one of the realty's high end homes, she occasionally asks me to make appetizers and she will bring an assortment of wines. One of the wines this time was an Australian red blend called "19 Crimes." I can attest that this lighter red went well with all the appetizers, even the cheesecakes! Other wines were Pinot Grigio, Sauvignon Blanc and Pinot Noir. She tries to have something available for most tastes. 


Filled Mini Sweet Peppers just before baking
Filled Mini Sweet Peppers, just before baking
MAKE AHEAD IDEAS: The Cheese and Bacon Stuffed Mini Sweet Peppers are a wonderfully easy appetizer to make ahead and bake just before serving. If pressed for time, make the filling up to 3 days ahead. For freshness, it is probably best not to cut, remove seeds and stuff the peppers until the day before the event. I did this last part and set the peppers on the baking sheet I would use to bake them, then covered them with foil before refrigerating the whole pan. Just on the off chance that the foil might stick to the cheese filling, I lightly sprayed the foil with non-stick spray before covering them. Once baked, while they are lovely warm or at room temperature, and yet they are still just as good once chilled.

Of the four appetizers, the ones that hold up best once baked are these Mini Stuffed Peppers and the Mini Strawberry Cheesecakes. The Buffalo Chicken Rolls are best if rolled and chilled the day of the event, as the tortillas begin to get soggy. The filling can be made a day or two ahead. It doesn't affect the taste, but only the texture. Similarly, with the Spanakopita Cups, the filling can be made and refrigerated a day or two in advance, but the fillo cups begin to get soggy after a day if filled or baked ahead, though the flavor is fine. It takes no time at all to fill the fillo cups if you own a little 2-teaspoon cookie scoop to fill them. It took less time to fill the 30 fillo cups than it took to heat the oven!


Cheese & Bacon Stuffed Mini Sweet Peppers


Cheese & Bacon Stuffed Mini Sweet Peppers

Makes 40 - 50 half-peppers (from a 1-pound bag) 

4 slices thick-sliced bacon, or 6 - 7 slices regular bacon
1 large shallot, minced
2 cloves garlic, minced
6 ounces soft goat cheese, Chevre or Montrachet
6 ounces cream cheese, softened
1 ounce freshly grated Parmesan cheese (about ⅓ cup)
2 teaspoons Worcestershire sauce
1 egg
1½ teaspoons finely minced fresh rosemary
freshly ground black pepper, to taste
1 (1-pound) bag mini sweet peppers

In a nonstick skillet, fry the bacon until just almost crisp. Remove the bacon to drain on paper toweling. Pour off most of the bacon grease, leaving about 2 teaspoons in the pan. Return the pan to the heat, and on low, cook the shallot and garlic until they begin to caramelize slightly, stirring often, for about 15 to 20 minutes.

While the shallots are cooking, place the three cheeses in a mixing bowl and beat well with a hand mixer until well combined and mostly smooth. Add in the Worcestershire, egg, rosemary and black pepper and mix again to combine. Mince the drained bacon until quite fine (some of the peppers are very small, so no large chunks), then add the bacon to the mixing bowl. Once the shallot/garlic mixture is beginning to caramelize, add these to the cheese mixture and mix again to combine all the ingredients. * Do Ahead: This mixture can be made up to two days in advance and refrigerated. When ready to fill the peppers, remove the filling from the refrigerator and allow to come to room temperature for ease in filling the peppers.

Cut all the mini sweet peppers in half, lengthwise. Endeavor to keep the stem end on, even cutting down the center of the stem if possible. This makes for a very pretty presentation. There are few seeds in most of the little peppers, but there are some. A small knife works well to make a tiny cut just inside the pepper's stem end, to remove the seed section and pull out any larger membranes. *Do Ahead: If time is pressing, this can be done the day before the event. Fill the peppers and smooth the top with a table knife or a spoon. Set them onto a baking sheet, then cover with foil and refrigerate. 

When ready to bake, preheat oven to 425 degrees, then bake the peppers for 12 to 15 minutes, or until they just start to brown on top. The goal is to "set" the filling without totally cooking the peppers. Serve warm or at room temperature.

Spanakopita, finger food, spinach, Feta , fillo cups
Spanakopita Cups

Spanakopita, Greek, spinach, feta cheese, fillo cups
Spanakopita Cups

Spanakopita Cups


Makes about 30

1 egg
1 medium shallot, finely chopped
¼ pound feta cheese, crumbled
4 ounces cream cheese
1 package frozen chopped spinach, thawed, drained
1 tablespoon chopped parsley
1 tablespoon fresh dill weed, chopped
½ teaspoon garlic powder 2 packages frozen filo cups (30 in all)

You will need only about 5 ounces of the frozen spinach. Thaw, then squeeze all the liquid from the spinach. Re-chop, to ensure very small bits. In a mixing bowl, combine all the ingredients except the filo cups, mixing well. Set aside.

Preheat oven to 375 degrees. Set the filo cups on a baking sheet. Using two teaspoons or a small “cookie scoop,” fill each of the cups. Once oven is hot, set the tray in the middle of the oven and bake for about 10 to 12 minutes, or until the filling is set and the filo cups are browning slightly at the edges. Serve warm or at room temperature.

NOTES: The filling can be made up to three days in advance and refrigerated, covered tightly until needed. If using filo dough strips, set two (2-inch wide) strips together, brush with melted butter, set a teaspoon of filling into the edge of filo dough, as shown in figure a. Begin folding, flag-style, lifting a corner to cover the filling diagonally left, figure b. Lift the triangle and flip upwards, figure c. Flip the triangle diagonally to the right, figure d. Continue, repeating the pattern to the end of the filo strip. Brush the outsides of the packet with melted butter and set on baking sheet. Bake at 375 for 20 minutes, until golden. The packets can be frozen before baking, then baked when needed


My passion is teaching people how to create a harmony of flavors with their cooking, and passing along my love and joy of food, both simple or exotic, plain or fancy. I continue my journey in ethnic and domestic cuisines, continuing my journey to explore diverse culinary experiences and hopefully to start you on a journey of your own. Join me also at A Harmony of Flavors on Facebook, and Pinterest.

Wednesday, February 8, 2017

Mini Strawberry Cheesecakes and Buffalo Chicken Rolls

Yum!

A local realtor asked if I could create some appetizers for an Open House for a high-end home in town this coming Sunday.
Strawberry, Cheesecake, Tarts, Chocolate, Pie Shell
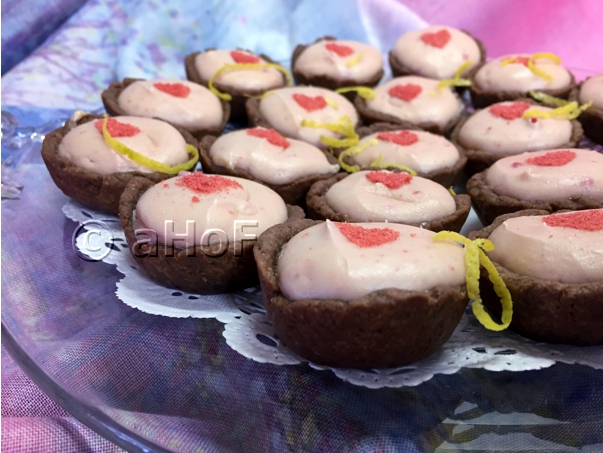
Strawberry Cheesecake Tarts with Chocolate Pie Shell

Of course, appetizers are probably the largest list of foods in my blog, so I could have so easily just gone there for inspiration. Yet, I did not, for the same reason that I am relatively prolific in creating new recipes: mainly, that I love trying new recipes or tweaking old ones. I sat at my computer searching online for inspiration, because there is an awful lot of inspiration out there these days. I came up with at least 8 different ideas, some just sort of tweaks of others, but still. And one idea gradually seeped into my brain after seeing a photo somewhere of a chocolate graham cracker with some cheesecake "dip" and a bit of canned cherry pie filling on top.

The idea began when I thought of replacing the chocolate graham cracker and making my chocolate pie pastry, or some variation thereof. Okay. Then, I thought no problem on making a cheesecake filling. Yet once I got down to it, I realized I still had some pulverized freeze-dried strawberry powder in a little container, so I went the route of flavoring the filling with that. I originally thought of using the cherry pie filling for the top, but once I used strawberry powder to flavor the cheesecake, it seemed odd to then use cherry on top. SO.
 
Freeze dried, strawberries, powder
Freeze dried strawberries made into powder

The only complaint I have about these little tarts is the fact that the strawberry flavor was very hard to detect. It didn't harm the overall flavor at all - these little things are addictive! - but I plan to add more when making them for this coming weekend. One 1-ounce package of freeze dried strawberries, pulverized and sifted to remove seeds, results in a scant ¼ cup of strawberry powder. I only used 2 tablespoons of the powder in this first try, so I will be using at least 3 tablespoons in the next batch I make. This will leave about 2 teaspoons to make the little heart stencils on top.

Of course, if I have not previously made a recipe, I do need to test it out before using it for anyone else. And of course, being Superbowl Sunday, my husband was elated to test out my creations during his game watching. I toyed with the thought of putting a little chunk of fresh strawberry on top once they were ready to serve. I didn't have any on hand though. Instead, I cut a little heart out of a piece of paper and used it as a stencil. I set the cut out on top of each little cheesecake tart in turn, and sifted the strawberry powder on top. Carefully removing the paper, it left behind a perfect little deep pink heart.

Heart stencil, cheesecake, tarts
Heart stencil on top of cheesecake tarts
These came together easily with only what I already had at home. Granted, everyone may not have the freeze dried strawberries, but aside from a yummy snack, they are great for coloring and authentic flavor.

Making pastry shells, chocolate pastry shells
Making and fitting the chocolate pastry shells
The chocolate pie shells were ease itself. Just mix the dough (no added liquids) and it is so easy. I rolled little balls, pressed them flat to about a 3-inch diameter and fitted them into the mini tart wells. The cheesecake batter was also simple and the use of a little "ice cream scoop" (about 2 teaspoon capacity) made filling the shells a breeze.  

cheesecake filling, chocolate shells
Filling the chocolate shells

Strawberry Cheesecake Mini Tarts with Chocolate Shell


Strawberry, Cheesecake, Tarts, Chocolate Shell
Strawberry Cheesecake Mini Tarts with Chocolate Shell
Makes about 30 tarts

CHOCOLATE PASTRY:
1 cup all-purpose flour, less 2 tablespoons
2 tablespoons unsweetened cocoa powder
3 ounces cream cheese
¼ cup unsalted butter (4 tablespoons)

CHEESECAKE FILLING:
8 ounces cream cheese, room temperature
⅓ cup granulated sugar
2 tablespoons sour cream
1 egg
½ teaspoon vanilla
1½ tablespoons cornstarch
1 (1-ounce) package freeze dried strawberries

Making Pastry: Measure the cup of flour into a mixing bowl. Remove 2 level tablespoons of the flour and return to the original bag or container of flour. Add the 2 tablespoons of cocoa powder to the scant cup of flour in the mixing bowl and stir to blend. Add the cream cheese and butter and cut in as for pie pastry. Gather the mixture with hands to bring all the stray crumbs together into one ball. Cut into 30 equal pieces and roll each piece into a small ball. Take one ball on the counter (no extra flour is needed) and press flat with your hand, or roll with a rolling pin into about a 3-inch diameter circle. Peel the round from the counter and set the circle over a well in a mini tart pan, pressing into the well and against sides. Repeat with all the balls of dough. Set pans in the refrigerator while working with the cheesecake portion of the recipe.

Making the Cheesecake: Preheat oven to 350 degrees. First make powder from the bag of freeze dried strawberries. Sift the powder through a fine-mesh sieve to remove any whole bits and all the seeds, discard the seeds. You should have approximately 3 tablespoons plus 2 teaspoons. Set the 2 teaspoons of powder aside if making the stencil for the top.

In a mixing bowl, with a hand mixer, beat the cream cheese until smooth. Add and beat in the sugar and sour cream, then add the egg and vanilla and beat in. In a small bowl, stir together the cornstarch and 3 tablespoons strawberry powder. Add to the cream cheese mixture and beat until no streaks remain.

Remove a tin of the mini chocolate shells from the refrigerator and fill each chocolate shell with about 2 teaspoons of the cheesecake mixture. Bake the mini cheesecakes for about 10 minutes, or until set.

Set them aside to cool slightly before stenciling the tops. I used a plain white square of paper, drew on a little heart about ½-inch diameter, then cut the heart shape out. If the cheesecakes are too hot, the paper will stick to the top, so they should be slightly cooled before stenciling. Set the paper over top of a little cheesecake and use the fine mesh sieve to tap a bit of the remaining 2 teaspoons of strawberry powder over the heart cut out. Gently lift the paper, tapping excess powder back into the bowl before placing it onto the next cheesecake. Repeat for all the mini cheesecakes. Keep refrigerated until ready to serve.

~~~~~~~~~~~~~~

Once I made these little gems, I was looking to make something savory and easy, so I made some Buffalo Chicken Rolls. This type of recipe is all over the place on the internet, but generally made with cream cheese only. I am one who loves blue cheese and so is my husband, so I added blue cheese crumbles to the mixture and these were absolutely delightful. My husband said they were at the high point of his heat tolerance level. To me, they were perfectly but lightly spiced. I used rotisserie chicken which made it very quick and easy.

Buffalo Chicken Rolls


Buffalo Wing Sauce, Chicken, tortilla rolls, flour tortilla
Buffalo Chicken Rolls
Makes about 24 to 27 (plus ends left for the chef!)

1 cooked chicken breast, finely chopped (about 1½ cups)
4 ounces cream cheese, at room temperature
4 ounces Buffalo Wing Sauce (I used Sweet Baby Ray's)
½ cup blue cheese crumbles
¼ cup chopped scallions
3 (6-inch) flour tortillas

In a bowl, mix together well all ingredients except the tortillas. Divide the mixture evenly between the 3 tortillas, spreading the mixture to the edges. Roll the tortillas, without pressing too hard on the filling. Wrap in plastic wrap and refrigerate for at least an hour and up to 2 days. Slice off ends that will not make a proper roll, then slice across into ½ inch slices to serve.


My passion is teaching people how to create a harmony of flavors with their cooking, and passing along my love and joy of food, both simple or exotic, plain or fancy. I continue my journey in ethnic and domestic cuisines, continuing my journey to explore diverse culinary experiences and hopefully to start you on a journey of your own. Join me also at A Harmony of Flavors on Facebook, and Pinterest.

Friday, February 3, 2017

Chiles Rellenos at Last

Most in the U.S. know chiles rellenos (or "stuffed peppers") as being stuffed with gooey melted cheese. I cannot say if this is "the" Mexican way to make them, or if it is something Tex-Mex that came about with time, or even if they make them this way in Mexico at all.

What I can say with certain knowledge is that in the 12 years I lived in Guatemala, I never once came across a chile/pepper filled with cheese. Instead, the ones in Guatemala were filled with a meat and vegetable mix. The peppers and the individual vegetables were made "en escabeche", or slightly "pickled" with vinegar. Generally served on or between fresh corn tortillas, they were sometimes also served with a simple tomato sauce.

Chile, Relleno, filled, Corn, Tortilla, Guatemala, recipe
Chile Relleno on Corn Tortilla with Tomato Sauce

The first time I ate a chile relleno was the very first time I went to Guatemala. My Dad went with me, to see where I would be going to live when I married my (then) fiancé, and meet his family. My fiancé's family took us all over the place, sightseeing in that beautiful country. One of the many places we went was to a market (I believe in Escuintla), and seeing the native men and women selling their wares. Most everything was available in the market, from every vegetable and fruit to meats, breads and tortillas and also cooked foods. I was given a chile relleno, slapped between two corn tortillas. The corn tortillas at that time were always, always, always made fresh and patted out between capable native hands and cooked on a comal of some sort over open fire more often than not. 

Guatemalan type Green Pepper
Guatemalan Type of Green Pepper
I had never had a chile relleno of this kind before. I had eaten what passed as a stuffed pepper in the U.S., when I was briefly at the university. These chiles rellenos bore no resemblance to those I ate at school. I also had never eaten corn tortillas and really never had tasted anything like these freshly made ones. The whole experience was new flavors and textures and smells, and I really loved it. So my love affair with chiles rellenos began 47 years ago. And in all that time, I only ever tried making them once, and they tasted nothing like I remembered, and somehow . . . I just never revisited that recipe.

Traje from Patzun
About a year ago when I was revising my cookbook of Guatemalan recipes and recollections of my time in that lovely country, I realized that I had not ever made these chiles rellenos (pronounced "CHEE-lehs rre-YEN-ohs") and needed to rectify this oversight. And here I am, a year later, finally getting to it. I have revisited and made a lot of the Guatemalan recipes in my book, mainly to get photos taken of the foods, and of course, since I loved these foods, it is a real trip down memory lane. My daughter went with her Dad to Guatemala a little over a year ago for a visit, and I asked her to bring me back a piece of the traditional woven material that the native women use for their skirt. It is called a "corte" and is wrapped around and around, then held in place by a "faja", or a long piece of material used as a belt. I used the material she brought me as a tablecloth to photograph my chiles rellenos, in my photos above and below. Immediately below right is a photo from the internet, showing how the typical dress or "traje" is worn.

I have a lot more cooking experience under my belt (figuratively AND literally!) at this time, so looking over my "recipe" as it stood, I realized there were a lot of things just not even listed. My memories of every chile relleno I ever ate, and there were many, had meat (cooked ground beef), and a vegetable mixture that consisted of onions, likely also garlic, carrots, potatoes and green beans. All these vegetables were chopped very small and cooked. The flavor of the lightly pickled vegetables did not jump out screaming "pickled in vinegar". Instead, it was an underlying note of piquancy that made them taste so fantastically good.

As with most recipes from Guatemala, there are a lot of steps, and multiple cooking methods involved, all to finalize this one recipe. The peppers can be poblanos, or they can be green peppers. The difference is that the "green peppers" in Guatemala were never the thick bell peppers we know in the U.S., but instead a thinly fleshed and somewhat crinkly pepper, lighter green than our green bell peppers. The peppers used for chiles rellenos are first charred and blistered, then peeled and set to marinate in a half and half mixture of white vinegar and water for at least a couple of hours or up to a day. The vegetables are cooked or sauteed, either separately or all together until soft, then these also have a half vinegar / half water mixture added. The meat is cooked separately and lightly browned. Egg whites are beaten to stiff peaks. The yolks are also beaten until lemon colored and slightly thickened. A little flour can be added to help the mixture hold together. The yolks are folded into the whites. 
Peeled chiles, vegetable mixture, beaten eggs, frying
Peeled chiles in vinegar water, vegetable mixture in vinegar water, combining beaten eggs, finished chies rellenos

The assembly is tricky for the novice. I consider myself novice at this particular assembly, since I've hardly done it with this application. Once ready to assemble, if there is any liquid left in the vegetables, it should first be drained off and the meat and the vegetables are combined. This mixture is placed inside the chiles. This is not easy with the peppers being so very soft. Keeping the vegetables inside while stuffing the peppers, and even worse when trying to coat the stuffed peppers with the egg mixture, is difficult, without practice. I had NO practice. It was treacherous. Once filled and coated in the egg mixture, they are fried until all the egg coating is lightly browned. The insides are already cooked through, so it is only a matter of the outer egg being cooked through. These can be served either warm or at room temperature.

Guatemalan Style Chiles Rellenos


Makes 10 large peppers 
Chile Relleno, green pepper, Anaheim, Poblano, Tomato Sauce
Chile Relleno with Tomato Sauce


10 Poblano chilies or green bell peppers
¾ cup white vinegar
¾ cup water

VEGETABLE MIXTURE:
2 tablespoons olive oil
1 medium onion, minced
2 - 4 cloves garlic, minced
2 handfuls fresh green beans, sliced thinly across
1 large carrot, peeled and finely diced
1 medium or 2 smaller potatoes, peeled, finely diced
1 teaspoon salt
1 bay leaf
2 - 3 sprigs fresh thyme
few grinds fresh pepper

MEAT:
1 tablespoon olive oil
1 pound lean ground beef
1 bay leaf
2 sprigs fresh thyme
1 teaspoon salt

COATING:
6 eggs, separated
2 - 3 tablespoons all-purpose flour, optional

More oil for frying

Combine the vinegar and water in a measuring cup. This mixture will be divided between the peppers and the other vegetables. Set aside.

Set the peppers of choice under the broiler or over a flame and blister until blackened and skins are noticeably loose. Place the blackened peppers into a zip-top bag or other sealed container to steam for 10 to 15 minutes. Once cooled enough to handle, peel off all the skins. If possible (for authenticity), try to keep the stem in place while making a slit in one side of the peeled pepper and removing the seeds. Once all peppers are peeled and prepped, return them to the bag or container and pour over them 1 cup worth of the vinegar and water mixture. Set the container aside for 2 or three hours, or refrigerate overnight. Turn the container often for even marinating.

Heat a large skillet and add in the 2 tablespoons of olive oil. Add all the vegetables, the salt, bay leaf, thyme and fresh black pepper. Cook over medium low heat for 15 to 20 minutes, or until the vegetables are all softened and cooked through. Place the vegetable mixture into a large container with lid and pour the remaining vinegar and water mixture over top. Stir to combine. Seal the container and let stand for 2 to 3 hours or refrigerate overnight, mixing or turning often for even marinating.

Wipe out the skillet, and over medium heat add in the 1 tablespoon of olive oil and then the ground beef with the bay leaf, thyme and salt. Cook, breaking the meat apart in very small bits, until the meat is lightly browned and completely cooked through. Set the meat aside until needed, or refrigerate overnight.

When ready to assemble the chiles rellenos, bring the peppers, the vegetable mixture and the meat to room temperature (if refrigerated). Remove the bay leaf and thyme sprigs from both meat and vegetable mixtures, then combine the meat with the (drained) mixed vegetables and set aside. Separate the eggs, placing the yolks into a small bowl and the whites into a large, scrupulously clean bowl. With a hand mixer, first beat the whites until they are at stiff peaks. Now, separately, beat the yolks until light and lemon colored. They will be noticeably thicker. Fold the yolks into the whites until a nice, even color. If desired, sprinkle the flour over top and fold in. 

Assemble all the peppers: Remove the peppers from the vinegar mixture and set to drain on paper toweling. Set one pepper in front of you and spoon in some of the meat and vegetable mixture. They do not need to be tamped down, but just gently filled. Set them aside once filled and repeat with remaining peppers. 

Heat a large skillet with more olive oil. Gently lift one of the filled peppers with clean hands and set into the beaten egg mixture. Spoon more of the mixture over top to encase the whole stuffed pepper. Lift out and set into the hot oil. Once the egg coating is well browned on one side, turn the pepper so the opposite side is browned. Do not over crowd the pan. It is far easier to turn them with plenty of space between. Repeat with each of the peppers. Set aside onto a baking sheet with rims once cooked and set into a very low oven to keep them warm.

Serve with fresh corn tortillas and a Simple Tomato Sauce, if desired.


My passion is teaching people how to create a harmony of flavors with their cooking, and passing along my love and joy of food, both simple or exotic, plain or fancy. I continue my journey in ethnic and domestic cuisines, continuing my journey to explore diverse culinary experiences and hopefully to start you on a journey of your own. Join me also at A Harmony of Flavors on Facebook, and Pinterest.

Disqus