Translate

Showing posts with label Chevre cheese. Show all posts

Wednesday, September 12, 2018

New Cheesecake Flavors

Some time ago, possibly years already, I heard or read about a cheesecake using goat cheese. I took notes at the time.

For a few days now, I had been wanting to make a dessert, but just couldn't settle on what I wanted. Cake? Cookies? What? And after days of this, I finally thought I should get out all my notes. I have notebooks worth of recipe notes; ideas for another day, another time. 

In looking through notes, I came upon the notes for a cheesecake made with goat cheese. Since it had pretty precise amounts, apparently I copied it from somewhere, for later perusal. This time it fairly jumped out at me, so I took notice. 

Pistachio, Goat Cheese, Cheesecake
Pistachio & Goat Cheese Cheesecake

I have noted in past that when I come up with an idea, I read a lot of different recipes online to see what others have done, and only then make notes on what I want to do for myself. For starters, what amounts to use of the component parts: cream cheese, goat cheese and yogurt. I rearranged the amounts 4 different times before I was content that it would have the flavors I wanted. I wanted a little bit of cream cheese just because I love cream cheese. But, what really grabbed my attention about this whole concept was the goat cheese - because I really love goat cheese. Chevre or Montrachet are the most common goat cheeses I use, but I also love the harder sorts, like goat "cheddar," or other semi-hard goat cheese like "Drunken Goat," Garrotxa, or soft Humboldt Fog and my most favorite of all, Bucheron. So, goat cheese had to make a statement in this cheesecake, period.

After rearranging amounts of goat cheese, cream cheese and yogurt over and over, I finally settled on 8 ounces of cream cheese, with 12 ounces each of goat cheese and plain Greek style yogurt. Then I went to the store to pick up the goat cheese and yogurt, only to find that they had NO plain goat cheese, but only various flavors. I opted to go for the Honey Chevre, and ultimately it was very tasty, so no complaints. I don't know how much actual difference it made in the end.

Then came the eggs. I was using eggs for sure, and with the same overall ingredient amounts I have generally used 3 eggs. As I was unsure of the texture of a cheesecake made mainly with goat cheese and yogurt, I opted for 3 whole eggs and 2 egg yolks. The only other real consideration was how much sugar to use. I briefly considered using another can of dulce de leche, but as I wanted to use pistachios for the crust, I wanted them to stand out in flavor, not get mixed with the caramel-like flavors of dulce de leche. Back to sugar, again by ingredient quantities, in past I have used 1 cup of sugar. However, I was hoping to make a slightly less sweet cheesecake, so while I filled the 1-cup measure with sugar, I planned on using about ¾ cup of the sugar and only adding the remainder if the mixture didn't taste sweet enough.

Best Laid Plans . . .

When it came time to add the sugar I totally forgot about starting out with only ¾ cup worth and instead dumped the whole cup of sugar into the bowl. 😬 Arrrggghhh! Oh well, one cup of sugar it was going to be, after all.
Pistachios, Goat Cheese, Cheesecake, recipe
Pistachio & Goat Cheese Cheesecake

As for the crust, I wanted pistachio. Whatever recipe I had jotted into my notes used pistachios in the crust, but the bulk of the crust was made of flour. I wanted to avoid unnecessary additions of white flour, so I went back to the other nut crusts I have made in past. When making my Chestnut Cheesecake, I have made an Almond Crust. When making my Dulce de Leche Turtle Cheesecake, I make a Pecan Crust. So I planned the same preparation, substituting ground pistachios for the other nuts. 

This worked less well than the other crusts, as I had a harder time pressing the nut mixture into the pan. It took a longer time getting all the holes to fill, and then when it baked, it puffed up all over the place, and I had to press it all back into place with a glass while still hot. It worked, and it all came out just fine, but now I wonder if using some flour in the mix, or possibly cookie crumbs, might have made it all easier in the end. For now, it worked. And if at some other date I decide to make this cheesecake again, possibly with different flavors mixed in, I will try something else for crust.

Ultimately, after also opting NOT to use a hot water bath to bake the cheesecake, it came out stunningly well. The cheesecake was so perfect it nearly brought tears. It is so exceedingly creamy and smooth. It has a lovely tang without going overboard. It is slightly sweeter than needed, but that will be remedied another time. For now, I am extremely content with flavor and texture. Here is what I did:

Pistachio & Goat Cheese Cheesecake
Pistachios, Goat Cheese, Cheesecake, recipe, yogurt, cream cheese
Pistachio & Goat Cheese Cheesecake


Makes one 9-inch cheesecake (about 1½-inch deep)

PISTACHIO CRUST: 
1½ cups whole, shelled, unsalted pistachios
2½ tablespoons sugar
¼ teaspoon almond or vanilla extract
2½ tablespoons softened unsalted butter

CHEESECAKE MIXTURE:
1 (8-ounce) block cream cheese, room temperature
12 ounces plain (or Honey flavored) Chevre or Montrachet goat cheese, at room temperature
12 ounces plain Greek yogurt
¾ to 1 cup granulated sugar
½ teaspoon salt
3 whole eggs plus 2 egg yolks
1 teaspoon vanilla extract
1 tablespoon cornstarch

FOR THE CRUST: Preheat oven to 375 degrees. Process the whole pistachios into relatively fine crumbs in a food processor. Remove about ¼-cup aside for topping later. To the remainder in the processor, add the sugar, extract of choice and butter and process until the mixture will clump. Turn into a 9-inch spring-form pan and press to about 1-inch up sides and evenly over the bottom of the pan. Bake for 8 minutes. If the crust puffs during baking, use a straight sided glass to press back into place while still hot. Set the crust aside to cool while preparing the filling. Lower the oven temperature to 325 degrees.

FOR THE CHEESECAKE FILLING: Place the cream cheese and goat cheese into a large mixing bowl and mix, preferably with a hand mixer on low speed until well blended. Add in the yogurt and sugar and mix well to combine. Add in the salt and eggs with yolks and mix well, still with low speed. Add the cornstarch and vanilla extract, mixing to combine. Pour into the cooled crust. Set the spring-form pan onto a baking pan with rim. Set the baking sheet on a middle rack in the oven and bake the cheesecake for about 45 minutes. The center should still be quite jiggly. Remove from oven and cool completely on the counter. As it cools, it will firm up. Sprinkle the reserved ground pistachios around the edges of the cheesecake and set aside to cool. Once cooled, cover tightly and place in the refrigerator for at least 6 hours or overnight, before serving.


My passion is teaching people how to create a harmony of flavors with their cooking, and passing along my love and joy of food, both simple or exotic, plain or fancy. I continue my journey in ethnic and domestic cuisines, continuing my journey to explore diverse culinary experiences and hopefully to start you on a journey of your own. Join me also at A Harmony of Flavors on Facebook, and Pinterest.

Thursday, September 14, 2017

Supper Strudel with Kale and Feta

Hmmmm....you might say, scratching your chin. 

I had seen a recipe many long years ago for a Spinach and Feta Strudel, but never got around to it. Apparently, I'd had this idea more than once, because as I was cleaning out a cupboard to make room for some new Tupperware containers (for all my new Indian lentils!), I came across another scribbled note to myself of a concept recipe for the same kind of thing. I do this; write down the idea of what flavors I'd like to include and how to assemble. Later on, sometimes I actually get to it and make it happen. So again, this one was apparently a long while coming, as I hardly recognized my own scribbled handwriting!
Kale, Feta cheese, Strudel dinner, side dish, recipe
Kale & Feta Strudel


Kale, Feta cheese Strudel, baked
Kale & Feta Strudel straight from the oven
So, okay, I found this little scrap of paper with a concept. And I thought to myself, "I have everything here already except for the spinach. But I do have kale. Hmmm." I set about assembling all the ingredients, first getting the fillo dough from the freezer so it had time to thaw. The box had been opened and one of the rolls of fillo used, but the other remained there, unopened. I had no idea how many sheets are in the little packages, nor how much the filling would make. In order to make a good recipe, experimentation is needed.

As I said, my concept was to use spinach. If I'd had spinach, I would have used a 10-ounce box of frozen, chopped spinach, thawed and squeezed dry. After removing that much liquid, and spinach really lets out a lot of liquid, I would estimate that half the weight is gone. Which is good, because I had exactly 5 ounces of fresh kale, and kale does not let out water that way. If you should find this recipe interesting, but prefer spinach, just thaw a 10-ounce package of chopped spinach and squeeze the heck out of it. You do not want a wet, soggy strudel!


Fine Cooking, Athens braND, Fillo packets
From Fine Cooking - Athens Fillo packets
In the scribbled not to myself, I noted all the things I thought interesting to include in the recipe, but with no amounts. I had 4 ounces of Feta leftover in the fridge. This seemed scant, so I also got out a 4-ounce log of Chevre. I'd written "sun-dried tomatoes," but instead opted to use the "Roasted Tomato Pickle" I had made some months back. Sun-dried tomatoes would work just fine. Your choice to use oil packed or just dried. I'd also written to include red bell pepper, onion, garlic and pine nuts, and as I was assembling, also added some fresh dill weed.


I got going, but when I got down to actually assembling, all my concentration went to quickly working with the Fillo, melted butter, filling and rolling. So, I have no photos of how scant the filling needs to be in this strudel. One of the few things I can recall about my Grandma making her strudels is that she scattered the fillings very scantily. I thought, "That's not enough!" even at 8 or 9 years old. But it is more than enough, because you do want all the layers of the fillo to be able to hold the fillings, and you really want those layers to be crisp when you bite into the strudel. Too much filling and you will not have the layers. 


Scatter filling sparsely
As it turned out, the amount of filling I made was the perfect amount for the one package of fillo (there are 2 sealed pouches in Athens Fillo Dough boxes, shown above from Fine Cooking website). I used 4 sheets of fillo per piece of strudel (as shown above right): I set two sheets down, in "landscape" mode (long side towards you), brushed with melted butter, set two more sheets, overlapping by about 2 to 3 inches, long sides to long sides, making one larger sheet. Brushing with more melted butter and scattering one-fourth of the filling mixture over these sheets (as shown left), gently begin to roll up from the long edge closest to you, loosely forming a very soft log. Remove this to a baking sheet and brush with more melted butter. This is repeated 3 more times, using the remaining ¾ of the filling. This used up the one entire packet of the fillo dough.

Initially, I tried to set another group of 4 sheets next to these first two sheets, but it became too unwieldy to lift and transfer to the baking sheet. It was not difficult using just the initial 4 sheets, so I continued each segment separately. When it came out of the oven, the smell was heavenly. We ate the strudel with a green salad for a meatless dinner. It was just marvelous.

Kale & Feta Strudel


Makes 4 strudels, serving size depending on how hungry you are ðŸ˜‰

2 tablespoons olive oil
½ onion, chopped finely
Strudel, kale, spinach, fillo, feta cheese, chevre cheese is served
Strudel is served

2 fresh cloves garlic, minced
½ red bell pepper, chopped
5 ounces fresh kale leaves, minced finely, OR one 10 ounce box frozen, chopped spinach
½ teaspoon salt
4 ounces Feta cheese
4 ounces Chevre cheese
3 pieces sun-dried tomato, minced
2 tablespoons pine nuts
1 tablespoon fresh dill weed, minced
1 packet (of 2 in box) Athens Fillo Dough
½ stick unsalted butter, melted

Heat a large skillet and add in the oil. Add the onion to the skillet and cook until golden, stirring occasionally. Add the garlic and saute for 2 to 3 minutes, then add in the red bell pepper and the kale. Cook, stirring often until the kale wilts a bit and is softened. Sprinkle the salt over and stir to combine.

Preheat the oven to 375 degrees, and spray a large rimmed baking sheet with oil or cooking spray.

Shred the Feta cheese into a mixing bowl using a large-holed grater, then crumble in the Chevre cheese. Add the sun-dried tomatoes, dill weed and pine nuts. When the kale mixture cools to room temperature, mix this into the cheeses in the bowl.

Working with fillo requires you to work quickly, and to keep all the fillo not in immediate use covered with a damp towel. Open the package of fillo and unroll. Remove two sheets and set them on a large surface with their long sides towards you. Quickly cover the remaining fillo. Brush the stack of two sheets of fillo with some of the butter. Remove another two sheets from the fillo stack and set these above and slightly overlapping the first two sheets. Cover the remaining fillo, then brush this new stack of two sheets with more melted butter.

Take ¼ of the filling mixture and scatter very loosely across the fillo sheets. Begin rolling the strudel by gently lifting the edge of the fillo closest to you and gently pushing it into a roll. Once reaching the end of the dough, lift the roll to the baking sheet, then brush the outside of the roll with more melted butter.

Repeat this process three more times, making 4 strudels. They can be placed close together on the baking sheet, but not touching. Set the baking sheet in the oven on a middle rack and bake for 14 to 18 minutes. Mine baked perfectly in 16 minutes.

Remove from oven and let set for 1 to 2 minutes, then slice into pieces for serving.


My passion is teaching people how to create a harmony of flavors with their cooking, and passing along my love and joy of food, both simple or exotic, plain or fancy. I continue my journey in ethnic and domestic cuisines, continuing my journey to explore diverse culinary experiences and hopefully to start you on a journey of your own. Join me also at A Harmony of Flavors on Facebook, and Pinterest.

Friday, March 24, 2017

This Year it is called Renaissance Festival

This April marks the 5th Annual Fundraiser event to benefit the Boys and Girls Club of Aberdeen. In past years it was called Winefest Renaissance, but this year due to some technical difficulties, it is called Renaissance Festival. However, "a rose by any other name" and all that; it is the same event. 

This year, I got started on the menu first, due to the lateness of the first meeting. Usually, I select the wines that interest me, then build an appetizer that fits the flavor profile of the wine. In the past years I have created wine and food pairing sheets for just this reason, and have been adding to them each year. I search the internet diligently to find the wine varietal and it's flavor characteristics. These are helpful when pairing a food, as they help point the way. Then I search for any suggested food pairings for that particular varietal. One site in particular has been invaluable: Wine Folly. It is a blog, or an informational site, and when one searches for food pairing with a certain varietal, such as Petite Sirah, this site pops up more times than not. Check it out here: http://winefolly.com/review/petite-sirah-wine-guide/

This is not the only site I search, so between all the places I can find suggestions to pair a wine, I amass all the suggestions and compile a list. 

Sweet Potato, Bourbon, Tamales, Country Ham, Cheese, Fig Apricot Preserve
Sweet Potato Bourbon Tamales with Country Ham and Cheese and Fig Apricot Preserve

Anyway, I started doing things in reverse this year and came up with some proposed foods to make, hoping I could find proper wine pairings from the list, yet to be provided at the time. I did research on the foods I planned, trying to match the wine that had the most hits in the food pairing column. Two foods in particular were so much a match for particular wine varietals that I prayed these might be on the wine list. One of the foods was my recipe for Lamb Burgers with Feta and Tapenade. I planned to make the burgers into mini size, and add the Feta, grated, into the burger rather than try to grill it and keep it atop the little slider. I have already made these and frozen them. I will reheat them before heading to the venue. I made the tapenade also, which just absolutely makes these burgers pop. When searching my lists, Petite Sirah was the only wine that held all the flavors involved: lamb, strong cheese, oregano, mint, olives.
Image, bob's red mill, corn flour, tortillas
I looked through the wine list when it finally arrived and hurrah! there was one, and only one, Petite Sirah. I pray it is available for me.

Then the other food I planned to try was a version of Tamales. My version bears little resemblance to the flavors of a Mexican Tamal, but I am using corn tamale flour (masa harina) as a base ingredient, and the corn husks to wrap them! I used Bob's Red Mill brand of corn flour for one batch, and Maseca brand for another batch. The corn flour has to be the kind that has been treated with limewater and ground, not cornmeal. 

Sweet Potato, Bourbon, Tamales, Country Ham, Cheese
Tamales just steamed and unwrapped
Outside of that is where the other non-traditional flavors come in. I am calling them "Sweet Potato Bourbon Tamales with Country Ham and Cheese and Fig Apricot Preserve." Long name for these tiny, two-bite tamales, but then they are truly long on flavor. I researched all the possible wines that might fit this flavor profile and two were standouts: Chenin Blanc and Viognier. And guess what? There was one wine on the list - and it contained BOTH these varietals! It is a Terra d'Oro Chenin Blanc/Viognier. I actually found this wine in our local grocery, so since I had already gone ahead and made half the tamales, I thawed 2 for my husband and me to try with the wine. When I opened the wine, the bouquet was immediate and definite. Aromas mainly of fruit, tropical fruit, maybe flowers. It smelled so very inviting. I knew it would taste wonderful. And it did. Then I worried that it might not fit the flavors of the tamales. But after taking a bite, savoring the amazing flavors (if I do say so myself!), then sipping the wine again - well, it could not have been a more perfect match.


The goal I strive for in these wine and food pairings is that the wine taste good (or even better) with the food, and also the reverse. It is imperative that the food be enhanced when tasting the wine with it. In this case, it was both and amazing.

My learning curve on making the tamales was a little steep. I had never made Mexican style tamales before, and not even the Guatemalan ones that are quite similar but called Chuchitos. Getting used to the varying ideas and ways of making these little antojitos (AHN-toe-HEE-toes), or "little cravings," took a little bit of study, but once I got going, they went easily enough. They do take quite some time to make, but with the flavors that come out, they are well worth the effort.  


Sweet Potato Bourbon Tamales with Country Ham and Cheese and Fig Apricot Preserve

Sweet Potato, tamal, tamales, country ham, fig, apricot, preserves, wine pairing


Makes 62 mini tamales

MASA (batter):
2 cups corn masa flour for tamales (I used both Bob's Red Mill for one batch and Maseca brand for another)
2 cups hot water, plus more if needed
10 ounces lard
½ teaspoon Kosher salt
¼ teaspoon baking soda
2 tablespoons bourbon whiskey
1 tablespoon maple syrup
12 ounces baked, cooled, peeled, smashed sweet potato
Dried Corn Husks

FILLING:
5 ounces country ham, minced (or substitute Prosciutto or Serrano ham)
5 ounces Chevre or Montrachet soft goat cheese
4 ounces smoked Fontina, or regular Fontina

Earlier in the day, combine the Masa Flour with the hot water and stir to make sure all the flour is wet. If it is so dry that stirring comes to a screeching halt, add more hot water, until the mixture is somewhat stiff, but not dry. More water can be added later if needed. Cover and set the masa aside to fully hydrate, about 2 or 3 hours.

Meanwhile, bake the sweet potato and have it ready. Prepare the filling by setting the minced ham into a bowl. Crumble the chevre and grate the Fontina on a large holed grater. Stir the cheeses together with the ham and set aside.

When ready to mix the masa, place it into the bowl of a stand mixer. It should be perfectly cooled (not cold). Add the lard and salt and beat to combine, then beat on medium high speed for about 2 - 3 minutes. Add in the baking soda, bourbon, maple syrup and sweet potato. Beat on medium high for another 3 or more minutes. If the mixture is not the consistency of hummus, adjust by adding more masa flour (if they are too wet) or more water (if they are too dry).

Place the dried corn husks in a large bowl and pour boiling water over them. They will soften within a couple of minutes. You will need corn husks that are between 6 and 8-inches wide at their wider end. Many will be wider than this, in which case, just rip off any excess. You will also need narrow, ¼-inch wide strips torn from those leftover pieces to use for tying the husks closed for steaming.

masa, spread, place filling, edges together
measure out masa; spreadplace filling inside; bring edges together

Filling the husks is easiest with two level 1-teaspoon scoops; regardless, use two teaspoons of the masa set about ⅓ of the way up from the wider end of the husk. Spread it to about ¼-inch deep, making a roughly square blob about 3x3-inches. Down the length of the masa, place about 1 teaspoon of the filling. Start lifting both edges of the husk to encase the filling in the masa, then tuck the edge of the husk around the masa and roll to fully encase.
 
roll packet, fold end up, leave space, set upright in pot
roll the packet;  fold end upwardsleave space when tyingset upright in pot

Now, lift the little roll and fold the narrow end upwards, pushing the masa towards the wider end and letting the pointed end meet the open end. Using one of the narrow strips of corn husk, tie a loose band around the middle of the packet, to prevent the husk from unfolding and spilling all your work right back out. There should be adequate space in the opening for the tamal to "grow" while steaming. There may be some overflow, but hopefully not too much.

Set the little tamale packets standing upright into a large pot with a rack in the bottom (or two - I set two of them, criss-crossing each other). This is to prevent the tamales from actually setting in water. Continue standing, or just slightly leaning the tamales against each other as you roll and tie them shut. Once finished, or the pot is full, put water in the bottom, just to the very bottom of the tamales. Do not have them standing in water. Cover the pot and bring the water to boil, reduce the heat to a simmer and steam the tamales for 30 minutes. Keep an eye on the water level, that it does not burn dry!

 
One batch, tamales, cooling
Finished batch of tamales cooling


Once they are steamed, use tongs to remove them to a surface to cool. Store them in a zip-top bag in the refrigerator, or freeze for up to a month. To reheat, either set them on a rack in a lidded pan to steam for 10 to 15 minutes (half-hour if frozen), or set them onto a pan with foil to cover tightly and reheat slowly at 250 degrees for about 15 to 20 minutes. If they were frozen, they will take a bit longer, up to 30 minutes.
~~~~~~~~~~~~~~~

The Fig Apricot Preserve is not a total necessity - these little two-bite tamales are amazing on their own. The fruit compote just adds a flavor dimension, so if you want, here is the recipe:

Fig Apricot Preserve

fig, apricot, preserves, tamal, condiment
Fig Apricot Preserve, on Tamal


Makes about 4½ to 5 cups

1½ cups dried figs, chopped
1¾ cups dried apricots, chopped
zest of one orange
juice of one orange
3 cups water, divided
⅓ cup balsamic vinegar
1 teaspoon ancho chili powder
½ teaspoon salt
2 tablespoons Bourbon, or Port, optional

Place the figs, apricots, zest and juice with 1½ cups of the water, the balsamic vinegar and ancho powder. Bring to boil, lower heat and cook gently, covered for about 20 minutes, until the fruit is well softened.

Set aside to cool slightly, then pour into a food processor with the remaining water, salt and Bourbon, if using. Puree until very smooth. Return to the pot and cover. Bring back to simmer, then remove from the heat to stir, return to heat, and repeat. The mixture is thick, so as it boils, it will splash very hot blobs. Be very careful. Let the mixture simmer for about 5 to 7 minutes, to meld flavors. Once cooled, store in glass jars in the refrigerator for up to 2 weeks.


My passion is teaching people how to create a harmony of flavors with their cooking, and passing along my love and joy of food, both simple or exotic, plain or fancy. I continue my journey in ethnic and domestic cuisines, continuing my journey to explore diverse culinary experiences and hopefully to start you on a journey of your own. Join me also at A Harmony of Flavors on Facebook, and Pinterest.

Monday, May 18, 2015

New Cheese Ball or Spread for an Open House

appetizers, finger foods, open house
Guests enjoying the foods we prepared
Yesterday my good friend Tetiana, of Re/Max Preferred Choice here in Aberdeen, asked if I would come with her to help out with food for an open house she was hosting. I had made little appetizer foods for an open house here last summer. Despite being a truly lovely home, it is still on the market as of today. Tetiana assured me she was making the foods this time, but would appreciate help with serving, while she was busy with potential buyers. Still, I wanted to bring something, so I elected to make a version of some little filled sweet peppers I had made for the holidays a while back. 

Little Sweet Peppers
I started out with the idea of making them just as I made the ones back in December of 2013, but true to form, I cannot even follow my own recipes, even if they were great. Those appetizers were wonderful. I used a cheese ball mixture but softened it to fill those little sweet peppers that are available everywhere now. In lovely colors of red, orange and yellow, and perfect sized for appetizers, they are really attractive. In reading the mixture I made for the cheese ball, I immediately thought of substitutions. And more substitutions. And pretty soon it was such a different recipe that here I am, writing about it. 
 
Cheese Mixture, Sweet Peppers, appetizer
My Cheese Mixture in little Sweet Pepper halves

Cheese Balls and Variations

Cheese Balls come in so many types and styles that there is really no particular way to make them. Almost any cheese, as long as it is either a smooth, soft type like cream cheese, chevre, blue, Gorgonzola and the like, with something that can be shredded, like cheddar, Jack, Parmesan or others, can be bound together into a cheese ball. It seems that little individual cheese balls have started popping up lately in magazines and on TV, but I came up with this concept on my own a little over 2 years ago. I thought of making tiny individual balls for this Open House, but then remembered those little sweet peppers and went that direction instead. 
Cheese Mixture, Sweet Pepper, appetizer
"Cheese Ball" Filled Sweet Pepper


Many recipes for cheese balls, if left to soften at room temperature, are also good as a spread, or can be if thinned a little with milk or oil. In this case, I opted to leave out the bacon and go for a more herbal mixture. It seems that cream cheese is a sort of universal "base" or binder for other things. I really wanted to use goat cheese, but chevre tends to be a little crumbly, so cream cheese came to the rescue once again. I had planned to use plain chevre and add my own herbs. I did add more of my own herbs, but while perusing the options at the local grocery, I decided on a 4 ounce log of lemon flavored chevre and a 4 ounce log of garlic and herb flavored chevre. Between these two, there would already be a tasty base for the mixture. Other things to add to a cheese ball are so numerous it hardly seems possible to ever cover them all. I chose dried cherries for a sweet note, and used dill and parsley as the extra herbs. 
Mini Cheesecakes with Jam and Raspberry 

Though this new mixture was used to fill little sweet peppers, it could just as easily be formed into a ball and rolled in more herbs or nuts or cheese. Once chilled it is plenty firm enough to be used this way. Additions to this cheese ball recipe could be things like cracked black pepper (which I meant to use and forgot!), finely chopped fried bacon, nuts left in small chunks instead of ground. Cooked chicken could be finely chopped and added, or smoked salmon or trout. For more ideas see the recipe options here

If the mini sweet peppers are not available where you live, regular bell peppers of assorted colors would also work. They would need to be cut into approximately 1 1/2 x 2-inch sections. If the cheese mixture is fine enough, it could also be piped or scooped onto endive leaves, cucumber or zucchini medallions, celery sticks or even carrot coins. These ideas can be seen here.

Herbed Goat Cheese (Ball or Spread)

Herbs, Goat Cheese, Filled, Sweet Peppers
Herbed Goat Cheese Filled Sweet Peppers

Makes enough to fill one (1 pound) bag of sweet peppers

8 ounces chevre such as lemon and/or herb flavors
8 ounces cream cheese
1½ - 2 tablespoons finely minced fresh dill
1½ tablespoons finely minced fresh parsley
½ teaspoon lemon zest, or more, if desired
¼ cup chopped scallions
¼ cup chopped dried cherries
½ cup nuts, chopped or ground (I used walnuts)
1 pound bag mini sweet peppers

Allow the cheeses to soften at room temperature for about 1 hour. Place all the cheese into a bowl and with a hand mixer whip the cheeses until smooth. Add in all the remaining ingredients except the peppers and mix again to evenly distribute.

Cut off stem end of the peppers, then slice them in half lengthwise. Remove any seeds and membranes. With a small knife, fill each pepper half and smooth evenly. They can be served as is, or topped with a dill or parsley sprig. if desired.

If making a cheese ball, once all the ingredients are well blended, allow the mixture to firm up in the fridge. Once firm, scrape all the mixture together and roll into a ball. Roll the ball in one of the following: ground of chopped nuts, minced herbs (for this recipe, a combination of more minced dill and parsley), or shredded cheese such as finely shredded Swiss, or Parmesan or Romano.


My passion is teaching people how to create a harmony of flavors with their cooking, and passing along my love and joy of food, both simple or exotic, plain or fancy. I continue my journey in ethnic and domestic cuisines, continuing my journey to explore diverse culinary experiences and hopefully to start you on a journey of your own. Join me also at A Harmony of Flavors on Facebook, and Pinterest.

Monday, February 9, 2015

That Wine Tasting Time of Year

Lemon, Thyme, Chicken, Fillo Cups
Lemon Thyme Chicken Fillo Cups
Up here where I live, this seems to be the time for wine tasting events. The larger wine tasting event that will come in late March this year hasn't even started its planning yet, but I was asked to make a few appetizers for a smaller event on the 18th of this month. Less formal, this get-together takes place in someone's home, for about 25 people. I have not much information on what all will be taking place there, though I was given a list of the 9 wines to be served. The wines range from very light white to deep, dark and bold. Trying to pair 3 appetizers to cover all these wines (all but two are reds), well, I have been poring over my wine and food pairing charts to try and make my appetizers pair with the most wines possible. 

Yesterday I made 2 new appetizers, which I served as our dinner last evening, to get opinions on flavors and how things could be improved. I was the only wine drinker at the dinner table and I was not drinking any of the wines to be paired, though I believe for all intents these appetizers were great as is and will work well with the wines they were created to pair with. One little change will be made on the meat roll-ups. It will not change flavor, but only make it easier to roll and skewer. But I will get to that recipe when I finalize them with the changes I am making. 

Lemon, Thyme, Chicken, Fillo Cups, appetizer, finger food
Lemon Thyme Chicken Fillo Cups

When I am asked to make appetizers to pair advantageously with particular wines, I spend a lot of time in research before ever beginning the creation of the food. I want the food to taste good with the wine, and hopefully also enhance how the wine tastes. For example, some things I research:
  • What flavors are associated with the particular wine? Some possible adjectives: smoky, fruity, dark berry, strawberry, citrus, herbal, pepper, earth, leather, and the list is nearly endless. I use these to gear the foods towards these flavors or aromas.
  • What does the vintner suggest as a food to pair with the wine? The vintner knows best how his wine was made, and what flavors are involved, so he has the best idea. Many others also will comment on food pairings for particular wines also.
  • Are there particular herbs or cheeses that are recommended to pair with the wine? Not every site will get this involved, but there are many places that even have full recipes attached. I do not use these recipes, but I read them to become familiar with the thought process behind the pairing.
The next step in my process is to make a list of the flavors and foods to incorporate in the appetizer, things that will play well with the wine involved. To that end, in the last couple of years I have spent innumerable hours compiling lists of the particular foods
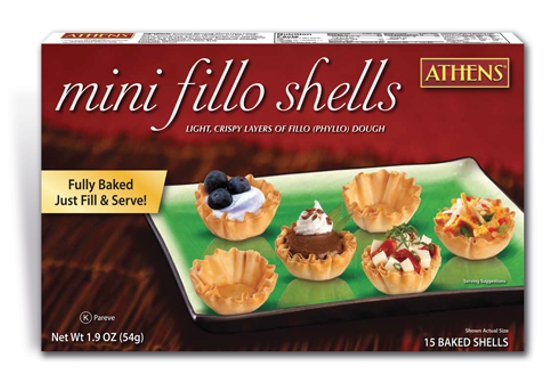
mini fillo shells, filo, phyllo, appetizer, finger food
mini fillo shells
(meat/fish, nuts, cheese, herbs, sauces and even desserts), that will pair with particular grape varieties. I add to these lists as I find new information. At this point in time I have lists for these white wine varietals:  Albarino, Chardonnay, Chenin Blanc, Gewurztraminer, Gruner Veltliner, Pinot Gris, Riesling, Sauvignon Blanc, Torrontes and Viognier. I have lists for these reds: Bordeaux type blends, Cabernet Sauvignon, Carmenere, Chianti blends, Gamay, Grenache, Malbec, Merlot, Mourvedre, Nebbiolo, Pinot Noir, Sangiovese, Shiraz, Tempranillo and Zinfandel.
Chicken, cheese, made as a cheese ball
Made into a cheese ball

For possible pairing with a full flavored Chardonnay and also for the Pinot Noirs to be served, the appetizer I created would use bacon and well flavored chicken. Some of the online suggested food pairings for these wines included things like curried dishes. Thyme was specifically mentioned as an herb to use. I prefer to make appetizers that need no utensils, so I chose to use Mini Fillo Shells to hold the mixture. While creating this recipe, I had very fixed ideas of how these would taste, and I geared my process to use flavors that would coincide with my mind's "taste-buds". I wanted a sort of lemon and pepper chicken concept as a base. I included bacon in the mixture to boost flavor and bring in a smoky note. Cream cheese and Chevre would bind the mixture. Thyme added that herbal note I was looking for. 
small bites, almond meal, thyme finger foods
Individual bites rolled in almond meal & thyme

I am extremely happy to report that the flavors came out tasting precisely as I imagined they should. I have no changes to make to this recipe. It is simple to make and can be made in advance. The actual filling of the mini fillo shells should take place last minute, but this part takes little time at all. I used a pastry bag with a large open star tip, but filling the little shells can be easily accomplished with a couple of small spoons. If refrigerated, the mixture could also be rolled into small balls - these little balls could be placed in the mini fillo shells (shown above), or on a cracker, or rolled in herbs or nuts and set out as individual bites, or even made into one large "cheese ball" to be served with crackers or pita chips. 

I used my own Pickled Red Onion as a garnish for these. I liked the pop of color and the pieces give just that tiny piquant bite. It takes about half an hour to make the pickled onions but requires at least 3 days for them to come to best flavor. If using these, plan ahead. They are a wonderful accent to most any dish and great to have around at any time. If not using the pickled red onion, other options might be slivers of scallion, thin slices of gherkins or just some more tiny thyme leaves sprinkled over the whole plate. The Tandoor Spice called for is my own mixture (find recipe here) and the flavors are great. You might easily substitute 1/2 teaspoon turmeric, or the full teaspoon of your favorite Curry Powder or Garam Masala (find one recipe here).

Making the mixture up to 3 days in advance helps with do-ahead planning.

Lemon, Thyme, Chicken, Fillo Cups, finger foods, appetizer
Lemon Thyme Chicken Fillo Cups

Lemon Thyme Chicken Cups


50 - 60 appetizer bites

6 ounces meaty bacon, fried
6 ounces cream cheese, softened
6 ounces Chevre (goat cheese), softened
2 teaspoons fresh lemon zest
2 teaspoons fresh thyme leaves
1 pound boneless, skinless chicken breasts (2 large)
1 teaspoon Tandoor Spice
1 teaspoon salt
2 cloves garlic, finely minced
fresh ground pepper, to taste
1 - 2 tablespoons olive oil
2 tablespoons lemon juice
4 boxes (15 each) mini fillo shells

Finely chop the fried, drained bacon. You should have at least a half cup. Set this into a large bowl. Add in the 2 cheeses with the lemon zest and thyme leaves and set aside.

Cut the chicken into approximately ¾-inch cubes. Place them in a bowl and sprinkle on top the Tandoor Spice, salt, garlic and pepper. Toss well to coat and let set for about 20 minutes.


Making the Chicken Filling
cheeses, thyme, bacon & zest in bowl  |   chicken browned   | cooked through with lemon juice  |        chopped chicken   
Heat a large non-stick skillet on high or medium high heat. Add in the olive oil and then the chicken pieces. Toss the chicken quickly and constantly to brown completely on all sides, about 4 - 5 minutes (You will need an extractor fan going for this!). Lower heat to medium low and add in the lemon juice, stirring often for another 4 - 5 minutes, until the chicken is cooked through. Set aside to cool to lukewarm.

Once you are able to handle the chicken, either chop it by hand into very small bits, or pulse in the food processor. Do not pulse too finely. Add the chicken to the bowl with the bacon and cheeses and with a mixer, beat until all ingredients are well combined. At this point the mixture can be refrigerated for up to 3 days if needed.

No need to thaw or bake the fillo cups before using. They are delicate, so do not apply pressure to the cup itself while filling. If using a pastry bag, the chicken mixture will have to come to room temperature first, or it will not pass through the piping bag. You will need a large tip with a wide opening for the mixture to pass through. Pipe mixture into shells. Conversely, use two teaspoons to drop bits of the mixture into the shells. Or, form balls and press the balls gently into the shells. Top with your preferred garnish. Even a small cilantro leaf would be lovely. Do not fill the cups too far in advance or they will lose their crispness and become soggy. 


My passion is teaching people how to create a harmony of flavors with their cooking, and passing along my love and joy of food, both simple or exotic, plain or fancy. I continue my journey in ethnic and domestic cuisines, continuing my journey to explore diverse culinary experiences and hopefully to start you on a journey of your own. Join me also at A Harmony of Flavors on Facebook, and Pinterest.

Wednesday, October 29, 2014

Has Anyone Heard of Peppadews

Peppadews®, peppers,
Unfilled Peppadews®
Some years back I tried Peppadews® at a party. They were filled with something cheesy and were just delicious. I didn't know at the time that these little peppers are quite unique. The name "Peppadew®" has even  even been registered. Apparently they were discovered not all that long ago (1993) in South Africa. They are little bitty peppers and look very like a cherry tomato in size and shape. Obviously, being peppers, they do vary in shape, with some sized and shaped very much like a little heart (chicken, pheasant, etc), while others are larger and rounder. While these little gems are not available everywhere, their availability is becoming more widespread, and of course they are available on Amazon.com.

Peppadews® are a little bit spicy and a little bit sweet. While they are peppers with a scoville rating of 1,177, this rating is low, similar to Anaheim peppers or Pasilla peppers. They arrive here in the US already marinated and processed, either in cans or jars. The marinade they are subjected to adds sweetness, and it is this sweetness, balancing the minimal heat that just makes these tiny gems so irresistible. 

Why Peppadews®

Cheese filling, Filled Peppadews®
Cheese Filled Peppadews®
So, you may be asking why am I bringing up these little peppers in the first place? Well a couple of months back, I was walking into our local grocery with my daughter-in-law, Julia (visiting from Chicago). We were fast and furiously discussing foods and recipes as we always do, both of us being avid foodies. The subject of Peppadews® came up and she asked me if I ever used them to make anything. I had just been saying I had not seen them locally, so no, I had not used them - - when we both looked over at the deli and there they were! Available even up here in Aberdeen! Amazing! Most things can be found here, at a price.

So they sort of stayed high in my mind ever since, but I'd had no occasion to buy them. However, our friend Rich was here for pheasant hunting, and he loves to eat also. I figured this would be a good time to experiment. I walked over to Kessler's, the local grocery, and bought a few. There were about 25 little peppers in the deli container for a bit over four dollars, so they aren't cheap, but not too bad either. I brought them home and started to think about what to fill them with. Cheese, obviously, but mixed with what? How? What kind(s) of cheese? 

I had goat cheese, which we just love, and I always keep cream cheese handy, so those were the first two flavors I turned to when puzzling out the flavor profile I was looking for. I had scallions in the fridge, so those would go in. Garlic? With Rich here, garlic is a MUST. In just about everything. Once I mixed these things together and tasted the result, it tasted a little flat. I added in a little Sherry vinegar. Then I added a little olive oil, to smooth out the flavors. It tasted most wonderful, so I filled the peppers. 
Cheese, Filled Peppadews®
Cheese Filled Peppadews

This was the first time I used these peppers, so there are a few tips I can, with confidence, pass on:
  1. Drain the Peppadews® first and set them upside-down on paper toweling to dry well before filling. Otherwise, the filling just wants to slip out if the pepper is still very wet inside. I found this out by trial and error.
  2. The peppers are easiest to fill using a piping bag or a zip-top baggie with a corner cut off. I wanted to make mine look cute by using an open star tip, but I selected a tip far too large, so some of my first attempts to fill them were quite a mess.
  3. Then the issue of how to present them. These little peppers have no flat bottom. If you want them to stand up pretty like cherry tomatoes, it ain't gonna happen, folks! Set them on your serving dish, artfully arranged, either leaning on each other or just laying them on their sides. Enjoy their differences of shape and just flow with it!
  4. Goat cheese comes in various flavors these days, so choosing one with interesting flavors will add other flavor notes to the recipe, if desired. 
 

Cheese Filled Peppadews®


20 - 25 little appetizer bites

20 - 25 Peppadews®
4 ounces goat cheese (Chevre or Montrachet)
2 ounces cream cheese
2 scallions, minced (white and light green parts)
1 large clove fresh garlic, minced
1 tablespoon Sherry vinegar or red wine vinegar
1 tablespoon olive oil

Drain the Peppadews® and set them upside-down on paper toweling to drain for about an hour.

Prepare a piping bag with either a #10 or 12 round icing tip or a #21 or 32 open star tip. Or, just cut a hole in the end of the piping bag (or zip-top baggie) measuring no more than 1/4-inch in diameter.
Wilton tips: 10 & 12 round; 21 & 32 open star
Set the cheeses on a counter to come to room temperature for at least a half hour. Place the room-temperature cheeses into a small mixing bowl with the minced scallion and garlic and mix well with a spoon, to combine. Once well mixed, add in the vinegar and olive oil. Place this mixture into the prepared piping bag. Squeeze the mixture down to the point. Grab the bag tightly between thumb and forefinger just above the filling. Hold tightly to the bag and twist to create pressure on the contents. Squeeze enough filling into each little pepper to completely fill the inside. Set them on a plate to serve.

MAKE AHEAD: The cheese mixture can easily be made 3 or 4 days ahead, if making for a party. The recipe for the filling can be doubled or tripled or as needed. The peppers will last fine in the refrigerator as long as they are covered in enough of their marinade/brine mixture. If filling for a party, try to fill them as close to serving time as possible, only because since they will not stand upright, they tend to knock into one another, smearing the filling all over!


My passion is teaching people how to create a harmony of flavors with their cooking, and passing along my love and joy of food, both simple or exotic, plain or fancy. I continue my journey in ethnic and domestic cuisines, continuing my journey to explore diverse culinary experiences and hopefully to start you on a journey of your own. Join me also at A Harmony of Flavors on Facebook, and Pinterest.

Disqus