Translate

Saturday, June 11, 2022

New Indian Recipes on the Menu

Time seems to escape me these days, yet every so often there is a gathering that warrants a fresh look at my recipes to date, sometimes finding them insufficient, despite the fairly vast number. A month or so past, I entertained my grandson and his friend, who love Indian food. When we chatted, he'd said that the flavors of Indian foods are some of his favorites, though he usually eats very simply. So I created a dinner, not knowing his particular tastes, but hoped it wouldn't be too far out of his comfort zone - and it wasn't! They both ate like two very healthy young men should. I was pleased. 

For that meal, I made some of my more common favorites, Chicken Korma, edging outside the plain rice category with Barley Kichdi as one of the side dishes, and one of my all-time favorites, Palak Paneer, as the other. I also had no clue on their tolerance for heat, so all the dishes were made quite mild in deference to my husband, but I offered an array of chutneys with varying heat levels: Am Chutney or Mango Chutney (no heat), Dhania Poodina or Green Chutney (medium heat), Imli Chutney or Tamarind Chutney (a little heat), and Fresh Ginger slices in lime juice with Serrano pepper and salt, possibly the hottest). They went for the Green Chutney and fresh ginger, polishing them off!

menu, Indian dinner, recipes
Dinner Menu
So, when my son was recently married in Hawai'i, and his lovely bride just turned fifty years beautiful, I made a dinner to celebrate both events when they came to visit this past weekend. They both love Indian food as well, and I have made them many Indian meals already in past. Trying to come up with something to feed them that hasn't already been a part of many menus in past was becoming a challenge. Ana is sensitive to rice, so I wanted to keep that out of the menu completely. I thought of making the Barley Kichdi again, but they've had that more than once and well, not again. The same for the Palak Paneer, which is maybe one of all our favorites, but as I serve it with practically any special meal I felt it was time for a change. 

What to do, what to do?

I finally opted for Telangana Chicken, though I kept it mainly without any of the fiery, spicy heat in deference to Ana and my hubby. Instead of going for rice or even barley, I opted to make a very simple Tadka Dal using only Masoor (red lentils) and Moong (mung bean) dals, and adding a simple Tadka of sauteed mustard and cumin seeds, asafetida, shallot, ginger and garlic, and salt at the end. We all love dal/lentil dishes, so that one was a hit. I wanted to make Channa Masala, but my son objected. I went hunting for something to do with peas and found some few ways, such as Matar Masala (spiced peas), and somewhere i came across a recipe called Sookh Matar, though I can find no other reference to this terminology. I felt after reading that Sookh might refer to the same concept as "sabzi" meaning a dish cooked down to relative dryness - no sauce in it. I wanted more vegetables and also some color so added red bell pepper. It turned out fantastic whatever it may be called.


Matar Masala or Sookh Matar


Serves 6 to 8
Matar Masala (Spiced Peas)


1 large onion in thin half-rings
2 tablespoons coconut oil or sunflower oil, more if needed
--------
1 - 2 tablespoons coconut oil or sunflower oil
1 large shallot, chopped
3 cloves garlic, minced
2 tablespoons minced fresh ginger
1 red bell pepper, chopped
1/2 teaspoon cumin seeds
1/2 teaspoon asafetida

MASALA: mix together and set aside
1/2 teaspoon turmeric powder
1/2 teaspoon crushed coriander seeds
1/2 teaspoon Garam Masala
1/2 teaspoon black salt or regular salt
1/2 teaspoon amchur (dried green mango powder)
1/4 teaspoon black pepper
-----
1 bag (13 ounces) frozen baby peas

Saute the large onion in the oil, stirring very often and watching carefully not to burn, until the onions are a deep caramelized brown. Spread the onions on several thickness of paper toweling to blot and cool. This part can be made days in advance and refrigerated until needed.

Heat a skillet over medium to medium low heat and add in the 1 or two tablespoons of oil. Add in the cumin seeds and asafetida to sizzle for a few seconds, then add in the shallot, garlic, ginger and red bell pepper and saute gently to soften. Add in a tablespoon of water at a time, only if needed for the ingredients not to stick. Add in the masala ingredients and stir until fragrant. IF MAKING AHEAD, the dish can be made to this point, placed in a covered container and refrigerated for up to three days.

To finish the dish, bring the refrigerated mixture back to heat in a skillet, then add the peas with a tiny amount of water and heat them through. Once heated, add in the caramelized onion and stir in to heat through.


~~~~~~~~~~~~~~~~~~~~~

The other new item on the menu was a salad, something I had never created with an Indian meal, but this time I wanted some diversity. 😉 The most common I found was called Kachumber Salat, a combination of cubed cucumber, tomato and onion, seasoned with an array of possible spices and a touch of lime juice. I plan to mix a batch of the masala mixture to keep on and to sprinkle on tomatoes at any time - it was that good!

Kachumber Salat


Serves 6
salad, tomatoes, cucumbers, shallot, recipe
Kachumber Salat


1 cucumber, seeds removed if too large, cut in small cubes
1 - 2 medium tomatoes (I used heirlooms), in cubes
1 large shallot or 1 small onion, in cubes

MASALA:
1/2 teaspoon Chaat Masala
1/2 teaspoon black salt (or regular salt)
1/2 teaspoon crushed cumin seeds
-----
2 tablespoons fresh mint leaves, chopped finely
1/4 to 1/2 cup cilantro, chopped finely
2 teaspoons lime juice, or to taste
pinch chili in powder or crushed chili flakes

IF MAKING AHEAD, the only thing that can be done is mixing the spices together. The tomatoes and cucumber will go watery if done in advance. If raw onion or shallot are not tolerable, cut these ahead of time (up to 20 minutes) and set them into a bowl, covered with white vinegar. Drain and rinse before adding to the remaining ingredients and stir them all together well before serving.


My passion is teaching people how to create a harmony of flavors with their cooking, and passing along my love and joy of food, both simple or exotic, plain or fancy. I continue my journey in ethnic and domestic cuisines, continuing my journey to explore diverse culinary experiences and hopefully to start you on a journey of your own. Join me also at A Harmony of Flavors on Facebook, and Pinterest. 
Friday, January 14, 2022

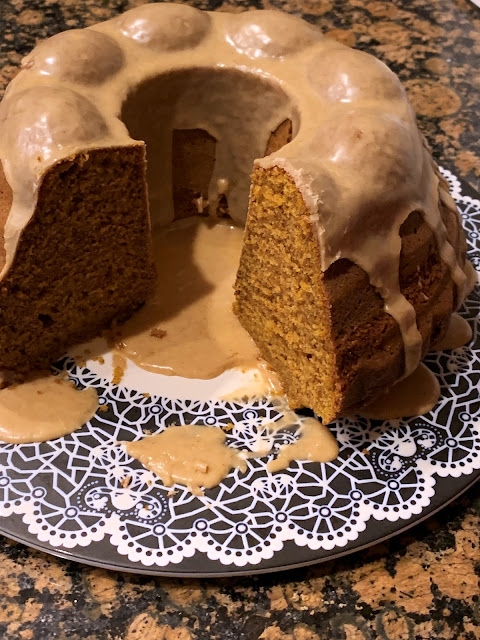
Delightful Bundt Cake with Bourbon Spiked Drizzle

I started out with nothing particular in mind one day, looking at dessert recipes. I think of all desserts to make, cakes are possibly my favorite. Anything from a simple old fashioned coffeecake tosheet cake to decorated cakes and bundt or ring mold cakes. Suddenly I came upon a site with a recipe called Gingerbread Bundt Cake with Cinnamon Rum Icing. I love gingerbread - it is a kind of cake / dessert bread cross, after all. The pictures on the site are just lovely. The mold used for the Bundt cake was exceptionally pretty, though I don't own that particular style. And I thought about it a while and wondered, "The recipe calls for applesauce. I wonder how pumpkin would do in the recipe, instead?

Bundt cake, pumpkin, gingerbread, dessert
Pumpkin Gingerbread Bundt Cake with Bourbon Spice Glaze
As I continued to peruse the recipe, I noticed that it is made a bit differently than any other cake recipe I've ever made. It called for melting butter, setting side to cool slightly, then beating together the sugar and eggs till fluffy and light. What? And then adding in the melted, cooled butter. Okay, so I went ahead with all this and made the cake with my own variations. I made the icing with Bourbon rather than rum as I have become interested in Bourbon of late.

The outcome was the finest grained cake, the most tender, and just flat-out delicious, that I had to share. The link above to the original recipe will show how it was. I loved the mix of Pumpkin and Gingerbread flavors. The drizzle icing was amazing. And here is the recipe, as I made it:


Pumpkin Gingerbread Bundt Cake with Bourbon Spice Glaze


Makes one bundt cake

200 grams unsalted butter, melted and cooled slightly
4 large eggs
360 grams sugar (about 1⅔ cup)
-----
360 grams all-purpose flour (about 2½ cups)
1½ teaspoons baking soda
¼ teaspoon flaky salt
1 tablespoon cinnamon
1 tablespoon ginger
1½ teaspoon cloves
-----
1 cup sour cream
1 cup canned pumpkin (not pumpkin pie filling)

Preheat oven to 350 degrees. Brush a Bundt pan with soft (not melted) butter and dredge with flour. Tap to release excess flour, then set pan aside.

Over low heat, melt the unsalted butter; once melted set aside. In a mixer, beat together the eggs with the sugar until they are light and fluffy, then slowly stir in the slightly cooled butter.

Separately, measure out all the dry ingredients and stir to evenly distribute ingredients. In a measure, stir together the sour cream and pumpkin to combine.

To the egg mixture add about a third of the dry ingredients, mixing on low speed to combine. Add half the pumpkin mixture and mix, then another third dry mixture, the remaining half pumpkin mixture, then the remaining dry ingredients, stirring after each addition. Pour into the prepared Bundt pan, rapping sharply on a hard surface to release bubbles.  

Bake the cake for 50 to 55 minutes, or until a tester inserted in the center comes out clean. Rest on a wire rack to cool for 10 minutes in the pan, turn out onto the rack to cool completely before glazing.

BOURBON SPICE GLAZE:
180 grams / 1¼ cup confectioner's sugar
1 - 2 tablespoons Bourbon
1 - 2 tablespoons milk or water
¼ teaspoon cinnamon
1 teaspoon fresh orange zest

Stir all ingredients until smooth. Pour over completely cooled cake.


My passion is teaching people how to create a harmony of flavors with their cooking, and passing along my love and joy of food, both simple or exotic, plain or fancy. I continue my journey in ethnic and domestic cuisines, trying new things weekly. I would love to hear from you, to help me continue my journey to explore diverse culinary experiences and hopefully to start you on a journey of your own. Join me also at A Harmony of Flavors on Facebook, and Pinterest.
Pork and Sauerkraut for New Years

Pork tenderloin, stuffing, pan sauce, Bourbon
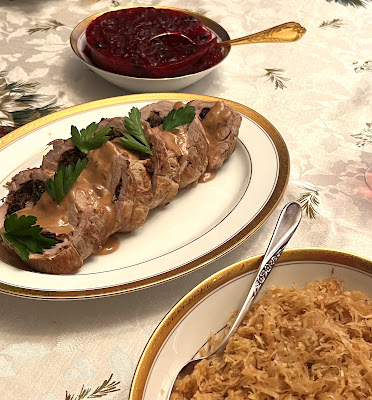
Elegant Tenderloin Pinwheels
I grew up with my Mom's traditional pork chops and sauerkraut as our New Year's Day dinner. I just never thought much about it until I started getting objections to this menu. And so it is that although I have tried to just go ahead with making it on a couple of occasions, it was not well received (my husband would just pick off every tiny shred of sauerkraut that clung to the pork or the potatoes), I enjoyed it thoroughly. 

Mom would bake her pork chops in the oven, adding quartered, peeled potatoes to the pan, covered with foil. Once all this was cooked (in the case of the pork chops, way overcooked), she would empty a jar of sauerkraut into a colander, rinse it well, then scatter it over the pork and potatoes, then top with a little brown sugar, cover again and bake. 

So, while my husband has never been keen on the idea of sauerkraut, I know my son and his fiancé do love it. Hence my idea of creating a really stellar pork dish, one that wasn't overcooked, and then making the sauerkraut as a stand-alone dish, so those who do not love it (ahem!) could just skip it, while the rest of us enjoyed. 

My husband's teeth need some work at the moment, so I was looking for something soft; pork tenderloin would be the meat. Then, I recalled a recipe I had made a very long time ago, where the pork was butterflied out flat and filled with a mixture that included prunes (dried plums). I recalled that it was very good, but I wanted to jazz it up some. Recalling another recipe, one for a rolled and stuffed flank steak, where the filling was so amazingly flavorful (from my very old Creme de Colorado cookbook), I got out both these recipes to compare and see what parts of each stuffing recipe I liked best. 

Ingredients I absolutely wanted to include from between the two recipes were: prunes, bacon, spinach, parsley, Romano cheese and mushrooms. White bread crumbs were a part of both recipes, but I had some pumpernickel I wanted to use instead. Nut meal sounded good, and I opted for hazelnut meal. Somewhere I read lemon zest as a possibility for flavor with a pork stuffing. Caramelized onion and garlic were also good additions. For fresh herbs, thyme and sage were added to the list.

Pork tenderloin, stuffing Bourbon, Pan Sauce
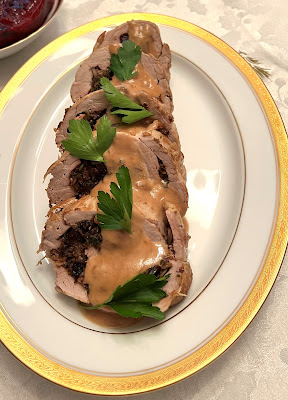
Elegant Tenderloin Pinwheels

I wanted to have the pork look pretty in a spiral when sliced, so it would be best to have both of (a package of) two pork tenderloins cut open and slightly overlapped to fill, roll, then tie them in place. There are different ways of cutting open pork tenderloins. One is to simply cut most of the way into the center, lengthwise, open flat and pound the heck out of them until of an even thickness. I hate this. It makes so very much noise, splatters meat, blood and bits everywhere and takes forever to truly get the meat flat. Somewhere online, someone butterflied this way but instead of pounding, cut into each thick section to create an unfolded piece of tenderloin. I don't see that as any easier. My preferred method is to use small cuts with a very sharp knife parallel to the cutting board, continuing parallel until the meat is mostly all one thickness and laid out flat. There are many, many places online showing this and the other methods in excruciating detail, so I do not believe it is needed to reproduce all that here. Whatever method is used, it is good to have the thickness small, about 1/4 to 5/8-inch thick. 

While this seems an extraordinarily long recipe, if broken up into the do ahead parts and finalized on the day of serving, it is very doable. The final result of this experiment was a chorus of groans of pleasure at the table, so I accomplshed my goal. Here is what I did:


Elegant Tenderloin Pinwheels for Dinner
Elegant Tenderloin Pinwheels


Served 8 - 10

STUFFING:
5 ounces bacon, cut small and fried crisp
-----
1 medium onion, chopped
½ teaspoon salt, divided
1 - 2 tablespoons olive oil or bacon fat
3 tablespoons dry Sherry or Bourbon
6 cloves garlic, minced
-----
¾ pound fresh mushrooms (I used 'Baby Bella'), sliced
1 tablespoon butter
1 tablespoon olive oil
2 - 3 tablespoons Sherry
½ tablespoon fresh thyme leaves½½
-----
¾ cup finely shredded Romano cheese
½ cup chopped Italian (flat-leaf) parsley
1½ cups fresh baby spinach, in fine chiffonade
7 - 8 soft, pitted prunes, cut in small pieces
¾ cup fresh pumpernickel crumbs (or other bread crumbs as preferred)
½ cup hazelnut meal
- zest of one lemon

MEAT:
2 pork tenderloins (about 2.5 lbs. total)
½ teaspoon salt
chicken or beef stock for pan
1 medium onion, sliced

PAN SAUCE:
4 tablespoons Bourbon (or Sherry)
1 clove garlic, finely minced
½ cup red currant jelly
2 tablespoons unsalted butter
½ cup sour cream

Make ahead (1 to 3 days in advance if needed): Begin the stuffing by frying the bacon and draining on paper toweling. Once cooled, place into a medium sized container with lid. Set aside. If using bacon grease, leave a tablespoon worth in the skillet and add in 1 tablespoon olive oil. Add the chopped onion and sauté on medium to medium high, stirring often until the liquid has mostly gone, then add in 1/4 teaspoon of the salt and the minced garlic and stir constantly, lowering the heat if needed so as not to burn, until the onions are nicely browned. Add in the Sherry or Bourbon and cook quickly until completely evaporated. Pour the contents into a bowl to cool, then add to the container with the bacon.

Add to the same skillet the butter and olive oil and add the mushrooms, sautéing until all the liquid has cooked out and evaporated. Add in the remaining quarter teaspoon salt and continue cooking, stirring, until the mushrooms are browned. Do not stop cooking the mushrooms as soon as their liquid evaporates or they will be flabby and still leach liquid into the stuffing mixture.  Add in the thyme leaves and the Sherry and cook until the Sherry is completely evaporated. Add the mushrooms to the same plate where the onions cooled; once cool, add to the bacon and onion mixture and refrigerate.

------------------

Grate the Romano cheese and place in another container with lid. Add to the cheese the chopped parsley, spinach chiffonade, prunes, pumpernickel crumbs, hazelnut meal and lemon zest. Toss to combine, cover and refrigerate if needed for up to 2 days.

--------------------

ON THE DAY:

Remove any silver skin from the tenderloins. Taking one tenderloin at a time, using a very sharp knife with the blade set parallel to the cutting board and about a quarter to a half-inch from the board, begin slicing into the length of the meat.  As it opens, continue to slice in at the same height along the length, using small cuts if needed, until the tenderloin is completely opened flat. Set the tenderloin aside and repeat with the other tenderloin. (Some ideas, with video or pictures, on how to open and flatten the pork tenderloins are here, and here.)

Combine together all of the two containers of prepared stuffing ingredients into one bowl and toss repeatedly until all the ingredients are well and evenly distributed. Set aside.

Preheat oven to 350 degrees. Spray a 9 x 13-inch pan with cooking spray. Measure out 7 or 8 lengths of cotton kitchen twine, long enough to go around the rolled tenderloin and tie, and set them nearby. 

diagram, how to,
Place the two tenderloins spread out, slightly overlapping, with one narrow end pointing the opposite direction from the other. This offsets the fact that each sort of come to a point, and makes the whole a more uniform shape to roll. Place the stuffing mixture onto the meat, spreading and patting evenly, leaving about an inch bare all around the perimeter. Neatly roll the meat, carefully lifting while rolling to keep the stuffing from oozing out. Once rolled, slide one piece of cotton twine under the roll and tie at the center, tightly. Repeat this about every 2 to 3 inches. Trin the ends of the twine to no more than a half inch long. 

diagram, how to

Place a large skillet over medium high heat and add some olive oil to the an. Carefully brown the meat on all sides. Once browned, set the meat into the prepared 9 x 13 pan. (Leave the skillet as is, to deglaze and make a sauce, later.) Pour some stock around the meat, to no more than a third of the way up the sides of the meat. Add in some of the onion, then cover with foil and bake the meat for 50 to 70 minutes, or until a meat thermometer registers 155 to 160 degrees. Remove from oven and leave covered. 

Meanwhile, with the skillet on a burner, deglaze the pan with Bourbon or Sherry, stirring with a plastic spoon or spatula until all the browned bits are mixed in. Add in the garlic and jelly, stirring until dissolved. Stir in the butter until emulsified, then add in the sour cream and mix, off heat, until combined. 

Slice the meat across the roll, into 3/4 to 1-inch thick slices. Leave the twine in place to keep the rolls from unraveling (it is easy to remove at table). Set the slices slightly overlapping on a platter and pour the pan sauce down the center of the meat.


My passion is teaching people how to create a harmony of flavors with their cooking, and passing along my love and joy of food, both simple or exotic, plain or fancy. I continue my journey in ethnic and domestic cuisines, trying new things weekly. I would love to hear from you, to help me continue my journey to explore diverse culinary experiences and hopefully to start you on a journey of your own. Join me also at A Harmony of Flavors on Facebook, and Pinterest.
Sunday, July 18, 2021

A New Take on Sourdough with Yeast Water

Maybe "new" isn't absolutely on the mark, but for me, this came as a shot from left field. What am I talking about? 

Yeast Water.

I have to believe that I am not the only bread baking person who hasn't heard of this before, and the whole idea came to me in such a roundabout and serendipitous way that I am sure I was just "meant" to find it. I was still working on my bread cookbook, and it was coming to a close. For some unknown reason, I was dragging my feet on finalizing the project, and it had been days since I really did anything with it. And then, I came to a point I thought, "Okay, I have to finish this already!" And with that said, I thought I'd take a look at "The Rye Baker," by Stanley Ginsberg, just to see if there was a blank page in between the last recipe and the Index. Simple enough thing, right?

bread, sourdough, yeast water, ciabatta, poolish
Sourdough Ciabatta with Yeast Water

There was not a blank page there, but there were a few pages that dealt with things like resources, and one of the resources was blogs that he frequented, both for ideas and for reference. One of these was for a baker in Switzerland, no less, with " . . . a wealth of information of sourdoughs and Swiss regional breads." The blog is Bernd's Bakery (berndsbakery.blogspot.ch).

I love things foreign. I always have. Things from foreign places fascinate me, so I immediately went to check out the blog. Of course it is in German, so that posed a problem. I tried Google Translate, and that left rather more than a little to be desired, but then I realized that the English version of the recipes is right there, just further down the page. All right! After perusing the first page, I looked at the menu bar and chose "Bread Baking with Wild Yeast." After all, Stanley Ginsberg referenced sourdough right there in his Resources. And there I came to a halt and stared. Was I seeing this correctly? He talked of "Yeast Water." And I felt like a fish out of water. I am fairly knowledgeable on bread baking terms. So what the heck was this, then?

Yeast Water?

I read about this phenomenon in that Swiss blog. Then, I opted to just Google "yeast water" and see if anything came up. The very first place that came up was a blog called Drive Me Hungry (drivemehungry.com/yeast-water). Here it is all explained in American English, and this blog showed how the yeast water is made and how it is used. Do check it out - so very worthwhile and so easy. I looked at a couple more places, but this one was sufficient. It all seemed too easy to be for real, but I am always game for something new. I went to the kitchen (about 10 steps away) and got out some figs, sugar, water and a container and mixed them together in a container. Three days later my yeast water was ready.

So, What IS Yeast Water?

Sourdough Ciabatta
Yeast water is fruity, fermented water that can stand in quickly to make a
sourdough starter. No muss, no fuss, and best of all, no waste. Simply a mix of (preferably organic) raisins, figs, or other dried fruit, filtered water and a small amount of sugar. Mix well, cover and set aside. Shake or stir vigorously morning and evening and once the fruit is floating and there are lots of bubbles, plus the lovely fruity fermented smell, it is ready. Strain out the fruit (use them in a recipe if desired, instead of tossing), then keep the fermented water in the fridge till needed. 

With a regular sourdough starter, it must be fed to become active. A flour and water mixture is added to existing starter and left to ferment. But unless you throw out some of the initial starter, you end up with gallons of it. And if your starter is pretty dormant after too long in the fridge, this process is repeated over a series of days until the starter is very actively bubbly. Each time, you are tossing a portion of the starter, then needing to use yet more flour and water to refresh. 

With yeast water, in order to have a nicely bubbly and active batch of starter, all that is needed is to combine equal portions  - by weight - of flour and fermented yeast water. No waste. After a few hours at room temperature, it is as bubblingly active as you could ever want. No discarding anything. This has long been a bugaboo of mine - the waste of flour. Especially last year, with all the grocery shelves bare and flour in short supply. 

When I first created my wild yeast sourdough starter from scratch in South Dakota, it worked exactly as the recipe said, in Peter Reinhart's "The Bread Baker's Apprentice." It was perfect. It bubbled and grew, just as it was supposed to do. Since moving to Arizona, where I opted to recreate a sourdough starter from scratch rather than try to bring an active starter along with me. For whatever reason, though I followed the same recipe, did everything right, my sourdough starter is sluggish. No matter how many times I fed it, it would grow, but never very much.

With this yeast water, which fermented so quickly, I went on to use one of Drive Me Hungry's recipes for Sourdough Ciabatta. I mixed up the Poolish and set it to rise overnight. I mixed up the yeast water and flour and set to rise. Drive Me Hungry's recipe says to let the two starters ferment for 10 to 14 hours, depending on temperature. Well, we live in Arizona, so it's a lot warmer indoors than in Aberdeen. I have a suspicion it may have taken about 4 or so hours to ferment the starters, and next time I am planning to make the starters in the day and once risen, place them in the fridge overnight, to develop more flavors. That will be another post. By next morning the starters were huge. I made the bread and it turned out great. Though, with the very wet dough I had to haul out my baker's couche to support it while rising. All the flour needed on the couche made a thorough mess in my kitchen, then outdoors where I shook it out later, and all over my clothes (face, hair, feet) as the flour flew everywhere when I shook out the cloth. All that aside, I made the Ciabatta recipe and aside from needing a full cup more flour to make the dough even remotely clear the sides of the bowl, it came out perfectly, and it is delicious. 


My passion is teaching people how to create a harmony of flavors with their cooking, and passing along my love and joy of food, both simple or exotic, plain or fancy. I continue my journey in ethnic and domestic cuisines, continuing my journey to explore diverse culinary experiences and hopefully to start you on a journey of your own. Join me also at A Harmony of Flavors on Facebook, and Pinterest.

Wednesday, July 14, 2021

The Most Delicious Cinnamon Raisin Bread

Many years ago I made cinnamon raisin bread. I tried forming it in various ways. Truly, the complexity got out of hand. Ultimately, the bread didn't present well. It was delicious, but that's not enough. And so it happened that as I was writing that recipe into my bread cookbook that I've been creating for myself, I thought it needed revising. I wrote down how I thought the best way to make the bread might be, and wrote all that into the pages of my book in progress. The difficulty lies in photos. If I want to present photos of how the bread should look, and I have none, well. You see the problem here?

yeast bread, cinnamon, raisin, bread
Cinnamon Raisin Bread

With that in mind, I opted to give my new and revised recipe a try. Thank heaven I did, because this version not only looks wonderful, it tastes like a slice of heaven, to boot. 

cinnamon, raisins, bread, yeast bread
Cinnamon Raisin Bread

Cinnamon Raisin Bread


Makes 3 loaves

SPONGE:
1 cup milk
1 cup water
1/3 cup honey
- pinch salt
2 cups bread flour
1 teaspoon instant yeast

Warm the milk, water and honey to 105 - 115 degrees F. If it heats too much, allow the mixture to cool slightly. Pour this mixture into a large bowl, or the bowl of a heavy duty stand mixer with dough hook attachment. Whisk in the salt and bread flour and instant yeast and cover. Set aside for 45 to 50 minutes, or until the mixture has grown markedly and is covered in foamy bubbles.

FOR THE DOUGH:
1 stick unsalted butter (4 ounces), very soft
3 large eggs
2½ teaspoons salt
1 teaspoon instant yeast
2 - 3 tablespoons cinnamon
3½ to 4 cups more bread flour
--------
1 - 1½ cups raisins

DOUGH: Add the butter to the sponge and begin beating in with the dough hook or by hand with a wooden spoon. Add in the eggs and mix well, then the salt and cinnamon, yeast and 2 cups of the bread flour. Mix until well combined, with machine or by hand (turning out onto a floured surface when the dough becomes too stiff to beat by hand). Add in the remaining flour, ½-cup at a time, until the dough becomes a soft mass. Do not add more flour than needed to bring the dough together. Knead for 5 minutes more, by machine or by hand, then add in the raisins and knead a further minute or two to fully incorporate. Remove the dough hook and cover the bowl, or if kneading by hand, grease a bowl and set the dough in the bowl, turning once to grease both sides and cover the bowl. Let proof until doubled, about 60 to 90 minutes.

Grease three 8 x 4-inch loaf pans. Turn dough out onto a floured surface and lightly degas. Divide the dough into 3 equal portions. Flatten a portion into an approximate rectangle (see sidebar, left) and roll up tightly from the narrow end, tucking in edges as you roll to keep a neat roll. Set into a greased loaf pan. Repeat with the remaining 2 portions of dough. Cover and let rise until 1-inch above the pan rims. If desired brush with an egg wash. Preheat oven to 350 degrees F. Bake the loaves for 30 - 35 minutes, or to an internal temperature of between 195 and 200 degrees F. Turn out onto racks to cool completely before slicing.

NOTE: If desired, when flattening out the dough in preparation for rolling into loaves, you can mix 1/3 cup of granulated sugar with a half-teaspoon cinnamon and sprinkle a third of this mixture over each rectangle before rolling up into log shape. Proceed with rolling and set into pans, and proceed with rising and baking.


My passion is teaching people how to create a harmony of flavors with their cooking, and passing along my love and joy of food, both simple or exotic, plain or fancy. I continue my journey in ethnic and domestic cuisines, continuing my journey to explore diverse culinary experiences and hopefully to start you on a journey of your own. Join me also at A Harmony of Flavors on Facebook, and Pinterest.

Tuesday, July 13, 2021

Guatemalan Breads Once Again

In my previous post, I mentioned that I have been creating a breads cookbook, just for myself; a way of getting together all my bread recipes. As I was collecting  all the recipes I had made to date under the chapter for Guatemalan Breads, I started looking around the internet once again and found some more to try. The recipes I am posting here are, in the main, from a YouTube video by Recetas y Pasteles Lili. The whole video is in Spanish, and it is long, but very thorough. My recipe has minimal changes, and less steps, plus, it's in English, but my gratitude to "Lili" for the recipes and instructions.

Pan Dulce, Guatemalan Bread, Gusanitos, Gallinitas, Besitos
Gusanitos, Gallinitas and Besitos, Guatemalan Breads

These breads, all three of them, are made from the same dough, and the same batch of sugar paste. They are fairly sweet, sweeter than most of the Guatemalan breads. But, they are really cute breads. One shape is called Gallinitas, or "Little Hens." So called, because they supposedly represent the coxcomb (wrong sex, but hey!) with their little floppy looking tops. Another of these breads is called Besitos, or "Little Kisses," as they have an "X" cut into the top. The third of these breads are called Gusanitos, or "Little Worms," so called because of the segmented-looking bodies. If these don't sound inviting, just wait.

Since they are all made from the same dough(s), once the dough is made and ready, they simply need to be shaped. There is an interesting little trick to forming each of them, and only for the Besitos did I change the method, as Lili's method seemed cumbersome. These breads are just delightful with a cup of coffee, be it for breakfast or afternoon snack. Once trying out the methods they do become very easy. I hope you'll give them a try.

Pan Dulce (Gallinitas, Besitos and Gusanitos)


Makes 18 sweet rolls

Make the SUGAR PASTE: with hands or a small mixer, beat together the flour, sugar and lard or shortening until it is cohesive. Add in a tablespoon of water. It should have the consistency of dough. If not, add a tiny bit more water at a time until it can be formed easily, rolling out or making into a ball. Divide the Sugar Paste into 3 equal portions, by weight, form each into a ball and set back in the bowl, Cover the bowl to prevent drying and set aside.

MAKE THE DOUGH: Place all ingredients for “dough” except the water into a heavy duty stand mixer or into a large bowl if mixing by hand. Run the mixer with paddle until the lard had dispersed well. Add in most (not all) of the water and begin mixing with the dough hook, or by hand. The dough should be very soft, but not so soft it cannot be handled. Add the remaining water if needed, to achieve this soft consistency. Knead the dough for 5 to 8 minutes, then allow it to rest for 20 to 25 minutes. 

Turn the dough out onto a greased surface and divide the dough into 3 equal portions, by weight. Each portion will make 6 rolls. Set two portions aside, covered. Divide the last portion of dough into 6 equal pieces by weight.

To make “GALLINITAS:” Make each of the 6 pieces of dough into a log about 6 to 7-inches long. Take one of the balls of sugar paste and equally divide the ball into 6 pieces. Take one of these pieces of the sugar paste almost, but not quite, as big as the piece of dough and roll it into a similar length log. Set the sugar paste log on top of the dough log. Flatten the two pieces together, to a width of about 1.5 inches. No need to lengthen the log. Now, using a small knife or a metal bench scraper, slice through the stack, from the center to the wide edge, repeating these cuts about every quarter-inch.

forming Gallinitas, stacking dough and sugar paste

forming Gallinitas, forming Guatemalan bread, pan dulce

From one short end, begin to roll up this piece, until you come to the end of the length. The bread is formed sideways, so turn the dough so the floppy ends are now the top and set on a parchment lined baking sheet. Repeat this process for the remaining five pieces of the dough,  setting them well-spaced, on a parchment lined baking sheet.

Pan Dulce Gallinitas, Guatemalan Pan Dulce
Gallinitas, or Little Hens

~~~~~~~~~~~~~~~~~~~~~~~~~~~

To make “BESITOS:” Take the second portion of the dough and further divide it into 6 equal pieces by weight. Roll each piece into a ball and flatten the ball with hands to about 3½  to 4-inches in diameter. Take the second of the balls of sugar paste, further divide this ball into 6 equal pieces. Take one small ball of the sugar paste and set it in the center of the dough circle, photo 1. Bring the dough up and around the sugar paste to completely encase it, pinching the ends so they stay closed. Turn the ball over so the seam is on the bottom, photo 2, and set this onto a parchment lined baking sheet. With clean scissors, snip across the top of the ball, photo 3. Now snip the top in the opposite direction, across the first cut, photo 4, and forming an “X in the dough, having cut through so the sugar paste is exposed, photo 5. Repeat this process with the remaining 5 balls of dough from this group, setting them well apart onto the parchment-lined baking sheet. Brush the tops with egg wash, avoiding the open, cut surfaces.

forming Besitos, Guatemalan pan dulce
Guatemalan Sweet Breads, Besitos, Pan Dulce
Besitos, or Little Kisses

~~~~~~~~~~~~~~~~~~~~~~~~~~~

To make “GUSANITOS:” With the last of the 3 portions of dough, divide this into 6 equal pieces by weight. Take one piece and form a ball. Set the ball onto the oiled surface and flatten to a large, long oval, approximately 5 x 8”. With the last remaining sugar paste ball, divide into 6 equal pieces. Take one piece of the sugar paste and flatten as much as possible between the hands, then set this piece onto one end of the long oval of dough, leaving about ½-inch of dough exposed at the end, photo 1, below, ensuring that the paste just reaches the side edges. Make slices through the sugar paste and dough, starting about a third of the way up the dough, cutting into strips downward about every quarter to one-third inch apart, photo 2. Begin rolling the dough from the short end without the sugar paste, pressing each side to seal as you roll, photos 3, 4, 5. Once the roll is complete, photo 6, the cuts will reveal the sugary insides and the segments will somewhat resemble a worm, or “gusanito.” Repeat this process with the remaining 5 pieces of dough and sugar paste. Set each Gusanito onto parchment lined baking sheets, well apart. Brush the dough with egg wash, but avoid getting the egg into the cut surfaces. Set aside, covered, and proof for at least 30 minutes. 

Forming Gusanitos, Guatemalan pan dulce

Preheat oven to 350°F. Bake all the breads for 15 minutes, then rotate the pan 180 degrees and bake for 10 minutes more, for a total of 25 minutes. If breads are on separate pans, bake one tray at a time.
Guatemalan Sweet Bread, Gusanitos, Pan Dulce
Gusanitos or Little Worms


My passion is teaching people how to create a harmony of flavors with their cooking, and passing along my love and joy of food, both simple or exotic, plain or fancy. I continue my journey in ethnic and domestic cuisines, continuing my journey to explore diverse culinary experiences and hopefully to start you on a journey of your own. Join me also at A Harmony of Flavors on Facebook, and Pinterest.

Monday, July 12, 2021

New South Indian Dish


Recently, I have been putting together a cookbook on bread. I love creating my own cookbooks, though none are commercial. I just love getting things together in one place. My first cookbooks were of "Favorite Recipes." Another was of Guatemalan Recipes and a Memoir for my oldest daughter who remembered her life in Guatemala. Another of Vegetarian Recipes for a friend. One is of sweets of all kinds. And on and on and on goes my story. This latest is all on breads.  I love the challenge of all the organizing, making it look great, detail work is just my thing.

As I am at the stage of proofreading, and while looking more closely at the recipes, words, descriptions, I came to the chapter on Indian breads, and there are many. Many I have made, and there are so many more I have not made but want to. So in reading a few of the recipes I had written out for myself but not actually put to the test, I came across one for Neer Dosa. For those who are not into Indian food as I am, apparently "neer" means water. Dosa is a very flat, crepe-like bread, often made from leftover Idli batter, but Neer Dosa are purely soaked, then ground, rice and water. They are bland, taste like rice, and as such are meant to accompany well-spiced foods, for breakfast, lunch or snack. One of the suggestions I'd seen on websites was to serve these with a Mangalorean Egg Curry.

Mangalore, Egg Curry, Ande Ambat, Konkan, Tulu
Mangalorean Egg Curry or Ande Ambat

I have seen recipes for egg curries, from the earliest times of my interest in all things Indian. To date, I had never made one. Made with hard boiled eggs, essentially the eggs are placed into a well-spiced "gravy" of some kind. Depending on region the type of flavors in that gravy or curry mixture will vary. I was intrigued by the use of the word Mangalorean. I'd heard it used, and even looked it up, but couldn't quite place it. According to Wikipedia, Mangalore (also "Mangaluru") is a major port city on the western coast in the Indian state of Karnataka, in southern India. Being a coastal city, coconut based foods are common.

I found very few recipes while searching "Mangalorean Egg Curry." In general, what I found is that this curry is common in the Konkan region of Mangalore, and is called Ande Ambat, so far as I can tell. Information is sketchy, but "ambat" appears to be a curry mixture, since it is used for other things like prawns, fish, etc. Only when "ande" (or "anda") is added does it refer to an egg curry. Essentially, no matter which recipe you look at, most of the ingredients are the same, with varying amounts. After looking through more recipes under that title, I realized that there was really not much new. The ingredients are the same and methods and amounts differ. 

After making my version of this dish for dinner last evening, my husband and I both truly loved the flavors, and the Neer Dosa paired exceptionally well with the dish, though I felt my dosa weren't yet made with any proficiency. Sadly, there are quite a few steps to this recipe, though some of them can be made ahead. The spice mixture ("masala") can be made and stored. The sauce (curry) can also be made ahead. Assembling in a hurry is then a snap. Making it all in one go, I had 2 skillets and 3 different saucepans dirtied, along with the blender, before I finished. 

Mangalorean Egg Curry, Neer Dosa, Ande Ambat
Mangalorean Egg Curry and Neer Dosa

Still, it is so very tasty, I would truly suggest trying it out. Some ingredients may not be available, unless you are really dedicated to Indian cuisine, as I am. Ajwain or Carom seed is used in just a tiny pinch and can be optional or substituted with a small bit of thyme (thymol is the smell one associates with thyme herb, and ajwain or carom seed also contains thymol). Curry leaves, while they are available fresh by mail (when they arrive, I put them into a zip-top freezer bag and straight into the freezer), aren't on everyone's list of staple items. I love the flavor of them and use them often, but they can be omitted. Tamarind isn't in everyone's pantry either, but can easily be substituted with a squeeze of lime juice, or simply omitted. Dried red chilies aren't on everyone's shelf, and are also a matter of taste. Some cannot tolerate the heat, and others can't get enough. I used two dried red chilies, breaking them open and discarding the seeds before using. If preferred, use dried red chili flakes to your own personal preference, or in a pinch, simply use a tiny bit of cayenne, to taste. Not everyone keeps a fresh coconut lying around, either, though I found that I can buy a whole, ripe coconut, open it and remove all the coconut "meat," and then grate it on a small-holed grater and freeze it, well wrapped. Easy to grab a little when needed.

Mangalorean Egg Curry or Ande Ambat


Based on 1 egg per serving: 6 servings. Based on 2 eggs per serving: 3 servings.
curry, Mangalore, India, hard boiled eggs
Mangalorean Egg Curry or Ande Ambat

DRY MASALA MIX:
2 (or up to 8) dried red chilies, with or without seeds
1-inch soft cinnamon stick
1/2 teaspoon cumin seeds
1 teaspoon coriander seeds
1/2 teaspoon mustard seeds
1/2 teaspoon black peppercorns
1/8 teaspoon carom/ajwain seeds

CURRY or GRAVY:
2 - 3 tablespoons coconut oil
2 medium shallots, chopped
12 - 15 curry leaves
3 - 4 cloves garlic, chopped
1 tablespoon grated fresh ginger
1/2 large red bell pepper
1 - 2 tomatoes, chopped
1 teaspoon-sized piece of seedless tamarind
1/2 teaspoon turmeric powder
1/2 cup fresh grated coconut
2 tablespoons chopped fresh cilantro

OTHER INGREDIENTS:
1/2 cup unsweetened coconut milk (or use water)
1 1/2 to 2 cups water
6 eggs, hard-boiled, peeled
1 - 2 medium potatoes, peeled, cubed

TEMPERING:
1 tablespoon coconut oil
1 small shallot, halved, sliced
8 to 10 curry leaves

MAKE THE DRY MASALA MIX: Heat a dry skillet over medium to medium high heat, then toast the spices, one spice at a time (different sizes will toast for different times), just until fragrant, removing each to a single plate to cool. Once cooled, grind the spices in a spice grinder and set aside, or cover tightly and store in a cool, dark place until needed.

MAKE THE CURRY: In a medium skillet, over medium heat, add in the coconut oil and then the shallots with the curry leaves and saute, stirring often, until the shallots soften and start turning a golden color. Add in the garlic and ginger  and cook 3 minutes, then add in the red bell pepper and tomatoes with the turmeric powder and cook, stirring often, until the vegetables are soft and the tomatoes broken down. Stir in the grated coconut and cook one minute. Pour the ingredients of the skillet into a blender container, along with the cilantro, the spice Masala mixture, and with either the coconut milk or water (from "other ingredients") and blend smooth. The curry can be refrigerated, tightly covered, until later if needed. 

When ready to make the dish, cook the cubed potatoes until easily pierced with a knife. Drain the water from the potatoes. Have the curry in a medium saucepan over medium heat and add in the potatoes and 1 1/2 cups of water, stirring well. Make shallow cuts in the hard-boiled eggs, then add to the curry. If the mixture is still thick, add more water as needed. Let the mixture simmer, covered, for 10 to 15 minutes to meld flavors.

TEMPERING: In a small skillet, heat the 1 tablespoon coconut oil and saute the sliced shallot with the curry leaves. When the curry is ready to serve, pour into a bowl, then pour the tempering ingredients from the skillet over top. Garnish with cilantro leaves.

NOTES:  If desired, 3 eggs may be whisked together and stirred into the simmering curry sauce before adding the potatoes and tomatoes.


My passion is teaching people how to create a harmony of flavors with their cooking, and passing along my love and joy of food, both simple or exotic, plain or fancy. I continue my journey in ethnic and domestic cuisines, continuing my journey to explore diverse culinary experiences and hopefully to start you on a journey of your own. Join me also at A Harmony of Flavors on Facebook, and Pinterest.

Disqus