Translate

Monday, December 30, 2013

Hummus and Cheesecake

Hummus and Cheesecake don't sound all that good when placed together like that, but it happens to be what I was working on today. 

Separately. 

dulce de leche, sweetened condensed milk
Dulce de Leche
The cheesecake is an idea I have had for more than a month, but with all the holiday baking and other holiday foods, there just wasn't time to get to this - or even any desire to have yet another sweet around the house. While I still don't need another sweet around the house, I did want to make this and see how it comes out, so it is being created for our New Year's Day Feast.

It all started with making dulce de leche, back that month-and-more ago. I had seen so very many ways to make it with sweetened condensed milk, and wanted to try at least one. The safest way, in my mind was in the crock pot, since once it is made, it does not have to be opened right away, which is a really good thing. So, I took the labels off of two cans of sweetened condensed milk and set them in my crock pot, covered with water. I put the lid on and waited until I was ready for bed and turned on the crock pot to Low. I had read that 8 hours in the crock pot gives a lighter colored dulce de leche and 9 hours gives a darker result. I left it in for 8½ hours, splitting the difference.

In case you are unfamiliar with dulce de leche, it just means (in Spanish) "a sweet made from milk". The Spanish culture, along with others like Indian seem to use milk for a lot of their sweet treats. When I lived in Guatemala there were at least 3 or more different "typical" candies made with milk, and I loved them all. I am not completely positive, but I believe that dulce de leche is from Spain originally, but it took off and has become known most everywhere now. The husband of my best friend in Guatemala was from northern Spain, and she made him this treat regularly; unopened cans in the pressure cooker for 1 hour, which just gives me the willies, still.
pecan crust, making cheesecake, chocolate chips
Pecan Crust with melty chocolate chips

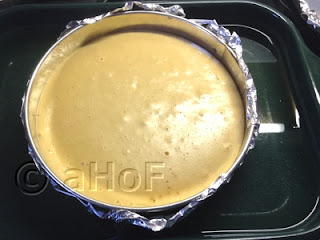
Anyway, I made my dulce de leche, allowed it to cool, then stored it in my pantry, until today. Wanting to get a jump on things, I set today as my cheesecake-making day. I had created a recipe - on paper only - of what I wanted to do. My idea was a "Turtle Cheesecake" but using the DdL instead of any other caramel. Pecans are a must for anything Turtle, as is chocolate and the caramel. I made the crust with pecans, sugar, vanilla and butter - so this cheesecake will be completely Gluten-Free. I baked the crust, then straight from the oven I tossed in 1/2 teaspoon of Fleur de Sel (coarse sea salt) and 3/4 cup of dark chocolate chips. As I proceeded with  making the filling for the cheesecake, the chocolate chips softened, and I spread the chocolate over the crust.

cheesecake, dessert, dulce de leche
Just Baked Cheesecake
The filling is a mixture of cream cheese, DdL, sour cream, brown sugar, vanilla bean, coarse salt and eggs. The batter tasted heavenly and the cheesecake smelled fantastic during the baking process. So far so good. It looks perfect. I intend to top the cheesecake with toasted pecan halves, then drizzle with some reserved DdL and then some melted chocolate. 

Meanwhile, for Christmas Eve and for New Year's Eve I always make lots of little appetizers and snack things; no meal. One of the things I haven't made in a while is hummus, so I really wanted to make that. My husband loves hummus too, and we both prefer it with roasted red pepper in it. I made an addition of caramelized onion, because I  had already made some last week for another application. The caramelized onion is completely optional. In fact, I wouldn't really recommend it unless you already have some made (never a bad idea, but it takes the better part of an hour to make). This was the first time I made hummus with the caramelized onion, and it is excellent, but it was just fine without it, so you decide.

Making caramelized onion was something I did last week, figuring I would make plenty so I had leftovers. I thinly sliced and then rough-chopped 3 large onions. I heated a large skillet with some butter and added in the onions, along with a good pinch of salt and another good pinch of sugar. On medium low, I let the onions cook, stirring occasionally at first, then more often as the onions began to color. It took about 50 minutes before the onions were a beautiful deep caramel color - not burnt. My hummus recipe is as follows:


Red Pepper Hummus with Caramelized Onion


1 can (15 ounce) garbanzo beans / chickpeas, drained and rinsed well
1 small jar (4 ounces) red pepper / pimiento, drained

hummus, appetizer, spread, dip
Red Pepper Hummus with Caramelized Onion
1 large onion, caramelized (about 3 tablespoons)
3 cloves garlic, minced
3 tablespoons tahini (sesame paste)
3 - 4 tablespoons lemon or lime juice
1/2 teaspoon salt, optional
a few grinds of pepper
1/2 cup good olive oil

Place all the ingredients except the olive oil into the bowl of a food processor and process until smooth, stopping to scrape down sides of bowl as needed. With the processor running, pour in the olive oil until it is all incorporated.

A trick I learned a long time ago from a friend; if raw onion or garlic do not agree with you, simply place them in a small bowl to soak for 10 minutes in vinegar. Drain and use for any application. I love garlic and onion, but not raw, so for this recipe I did soak the garlic in white vinegar while prepping the rest of the ingredients. It makes the whole thing far more easily digested and therefore enjoyable. Cheers!


My passion is teaching people how to create a harmony of flavors with their cooking, and passing along my love and joy of food, both simple or exotic, plain or fancy. I continue my journey in ethnic and domestic cuisines, continuing my journey to explore diverse culinary experiences and hopefully to start you on a journey of your own. Join me also at A Harmony of Flavors on Facebook, and Pinterest.

Saturday, December 28, 2013

A New Take on Stuffed Pork Chops

pork, stuffing, layered casserole
Just baked and ready to serve
When I was young, my Mom used to occasionally make stuffed pork chops. This was one of my favorite dishes, and she did not make it often. She would buy extra thick pork chops and cut a slit into them, then make her stuffing (the same one she used for turkey) and press the stuffing into the slits in the pork chops; enough so that the pork chops gaped wide open. She baked them, covered. I cannot recall any other particulars about this dish except how good it was.

Sometimes I see extra thick pork chops in the grocery, but many times not. One of those super thick pork chops is way more than most people need for a serving. So with that thought in mind, I decided to make the pork chops "unstuffed." I got 6 regular pork chops, cut somewhat less than a half-inch thick. I usually trim fat from the edges in the interest of a healthier meal, but for this application I left the fat on. I made a stuffing mixture based on my recipe for Better Than Mom's Stuffing. Instead of stuffing each pork chop, where there is not nearly enough stuffing to satisfy, I placed a large dollop of stuffing in a mound, followed by a seared pork chop leaning against the stuffing, then more stuffing, then another chop, etc. This turned out to be an extremely easy way to make this dish, with enough stuffing for all to have their fill. It baked up like a dream and tasted simply heavenly!

Unstuffed Pork Chops

Serves 6 or more

Unstuffed Pork Chops, dinner recipe, entree, pork, stuffing
Unstuffed Pork Chops, served
1 loaf multi-grain bread (about 1.8 pounds, or 24 ounces), or bread of choice
1 cup chopped walnuts or pecans
6 - 8 ounces bacon, cut into 1/4-inch slices across the length
1 large onion, chopped
2 - 3 cloves garlic, minced
1 Granny Smith apple, grated on large hole grater
1/4 cup minced fresh sage leaves
1 tablespoon minced fresh rosemary leaves
1/2 cup chopped fresh Italian parsley
1 1/2 teaspoons salt
a few grinds of black pepper
1 1/4 cup milk
3 eggs, lightly beaten

--------------------

1 - 2 teaspoons olive oil
6 pork chops
salt and pepper for seasoning

Cut the bread into cubes no more than an inch in diameter and set them into a very large bowl. Add the nuts to the bowl and set aside.

In a large fry pan cook the bacon until almost done (lots of browned edges, but not quite all the fat cooked out). Add the chopped onion to the bacon in the pan and continue to cook, stirring very often, until the onions are nicely browned. Add the garlic and cook for another 3 to 5 minutes, or until the garlic becomes noticeably fragrant. Pour the entire contents of the hot pan into the bowl of bread cubes and toss lightly to combine.

Now add in the apple, herbs, salt and pepper and toss again. Combine the eggs with the milk and whisk them together. Pour this mixture over the bread mixture. Toss well. The bread will noticeably begin to shrink down from the wetness. Set aside while preparing the pork chops.


Separately, heat a large frying pan with the olive oil, sear the pork chops, sprinkled with salt and pepper on both sides. Allow them to get well browned on each side. 

pork chops, stuffing, baking pork chops
Assembling the seared pork chops and stuffing in pan
To assemble the stuffing and the pork chops to bake: I happen to have a large round braising pan from All Clad, with a nice high lid so this is what I used. A nice large roaster or rectangular pan that will accommodate both the pork chops and the stuffing would work just as well.
In the braiser or roaster or whatever pan you have, set a nice scoop of the stuffing mixture in one spot. If using a rectangular pan, start at one corner. With the round braising pan I set one scoop towards one side. Set one of the seared chops leaning onto the stuffing, at an angle. Set another dollop of the stuffing against the chop, then set another pork chop against this and repeat. Fill in any apparent holes with any extra stuffing mixture. Cover the pan, or use foil to cover tightly. Bake this in a preheated 275 degree oven for about 1 1/2 to 2 hours. The stuffing seems to grow and the whole thing is just beautiful to behold and delicious. 


My passion is teaching people how to create a harmony of flavors with their cooking, and passing along my love and joy of food, both simple or exotic, plain or fancy. I continue my journey in ethnic and domestic cuisines, continuing my journey to explore diverse culinary experiences and hopefully to start you on a journey of your own. Join me also at A Harmony of Flavors on Facebook, and Pinterest.

Friday, December 27, 2013

Holiday Recipe Ideas

Christmas Cookies, Cookie Assortment
Cookie Plate 1
I finally got all my cookies finished, just in time to make up all the gift plates for handing out as gifts to family. I ended up making more varieties of cookies than usual, and certainly more iced cookies than usual. I created 3 new cookie recipes and one new fudge recipe. The new cookie recipes are Gingerspice, Cardamom Almond and Chocolate Hazelnut Pepperballs, (these last recipes were featured in my last blog post). The new fudge recipe was for Pecan Praline Fudge, though that was a last minute switch. I originally meant to make it maple and walnut flavor. I just happen to have Pecan Praline flavoring in my cupboard so I used that, but either way it would be excellent. Other cookies I made were Springerle, Rolled Butter Cookies, Miracle Peanut Butter Cookies, Cherry Bon Bons and Pistachio Tea Cookies. I also finally got around to making my Grandma's Nut Pita recipe. This is not a terribly sweet pastry, but delicate and delicious nonetheless.

Grandma Hromish's Nut Pita


Makes two 9 x 13 inch pans

Dough:
4 cups flour
1 package dry yeast
¼ cup warm water

½ pound unsalted butter (2 sticks)
Nut Pita, Serbian recipe, ethnic holiday recipe
Nut Pita
1 cup cream, (evaporated milk will work)

Filling:
12 large eggs, separated
4 cups ground walnuts
2 cups sugar
¼ cup whiskey
Vanilla for brushing
Powdered Sugar for dusting

Mix the yeast into warm water to soften. Mix together and blend well (by hand or machine) all ingredients for dough and then divide dough into four parts. Roll out one part and line a 13 x 9" pan.

Make the filling by beating together all of the egg yolks plus 2 of the whites, the sugar, whiskey and nuts. In a separate bowl, beat the rest of the egg whites and fold this into the yolk mixture. Pour half of this mixture into the dough-lined pan.

Now roll out the second part of the dough and lay it atop the filling. Repeat with the other portions of dough and filling in a second pan. Slash tops of dough with a knife or prick with a fork and bake in a 350 degree oven for 30 minutes or until done. When done, sprinkle the top with vanilla, or use a pastry brush. Slice into diamond shapes. Sprinkle with powdered sugar.

NOTE: If you want to try this, but 2 (9 x 13-inch) pans seem too much, I split the recipe in half, using these measurements:

DOUGH: 2 cups flour, 1¼ teaspoons instant yeast, 2 tablespoons water, 1 stick unsalted butter and ½ cup cream or evaporated milk. Divide dough into only 2 parts. 


FILLING: 6 large eggs, separated, 2 cups ground walnuts, 1 cup sugar, 2 tablespoons whiskey. Follow the same directions as above, using one of the whites with all the yolks, then beating the rest of the whites for the meringue.
   

~~~~~~~~~~~~~~~~~~~~~~~~~~~~~~~~~~~

Christmas Cookies, cookie assortment
Cookie Plate 2
All that done, I had to put my thoughts on what to make for Christmas Eve. In our house, Christmas Eve and New Year's Eve are both times for lots of little nibblies. Tidbits and appetizers of all sorts are set out and we graze the evening away. This year I made a few things; some new and some old. I set out a cheese and salami tray, with an applewood smoked Gruyere and some Swiss cheese. I also set out a little round of Boursin with garlic and herbs. This is such a spectacular flavored and textured cheese, though it is 60% butterfat. Be prepared. I had made some quince paste a month or so ago so I also set out some Manchego cheese with slivers of the quince past on them. Cheese seems to play a large part in appetizers, for sure, and it didn't stop there.


I made my Bean and Cheese Dip as it is my husband's favorite (and just plain GOOD).

Bean and Cheese Dip

Appetizer Dip, party dip, easy recipe
Bean & Cheese Dip

Makes about 3 cups

1 (11.5 ounce) can Bean & Bacon Soup
1 (5-ounce) jar Kraft Processed Cheese (Bacon flavor is great)
2 tablespoons brown sugar
1 tablespoon Worcestershire sauce
1 tablespoon yellow mustard
1 tablespoon dried onion flakes
¼ teaspoon hot sauce, optional
1 cup sour cream
 

In a deep 1-quart casserole, combine soup, cheese, brown sugar, Worcestershire, mustard, onion and hot sauce (if used). Cover and microwave at high for 4 - 5 minutes or until cheese melts, stirring twice during this time.

Stir ½ cup of bean mixture into sour cream, mix, then return all to the casserole and mix in well. Cover again. Microwave at medium low (30%) for 2 minutes or until heated through, stirring once. Serve with crackers of your choice.


~~~~~~~~~~~~~~~~~~~~~~~~~~~~

Also made were: Smokies in Puff Pastry, a ready-made pizza flat bread with Spinach Dip spread over top and then covered in a mixture of shredded cheeses and baked. I first learned of this at my sister's house in October, where she used a Boboli crust. Where I live no store carries Boboli, but there are other brands available. She also had made an appetizer using those little bags of Mini Sweet Peppers. I liked the concept, so what I did instead is to make what started off as a cheese ball, but then I thought of just stuffing the little peppers (cut in half, stems and seeds removed) with the cheese ball mixture. So, that cheese ball never made it to a ball shape after all, though it is simple enough to roll into a ball and then in some nuts or herbs and chill. This is the mixture I made for my cheese ball:

Cheese ball mixture in Sweet Pepper halves

A Cheese Ball Variation


2 (8-ounce) blocks of cream cheese, at room temperature
6 ounces freshly shredded Parmesan and/or Romano cheeses
2 teaspoons dry onion soup mix
1/3 cup caramelized onion (or substitute with chopped scallions)
4 slices (thick-slice) bacon, fried, drained, chopped finely
2 tablespoons minced fresh rosemary leaves
2 teaspoons Worcestershire sauce
1 cup pecans, chopped
3/4 cup craisins (dried cranberries)

Place the cream cheese and Parmesan/Romano into a large bowl and add the dry onion soup, caramelized onion (or scallions), bacon, rosemary and Worcestershire. Using a mixer, combine these ingredients. Add in the pecans and craisins until well blended. If making this into a ball, chop more pecans or fresh herbs and roll the cheese ball into this and then wrap in plastic wrap and chill until needed. If using this mixture to stuff the mini sweet peppers, you will need about 1 pound of them. The bag I bought was a 1-pound bag and it was just about perfect for the amount of cheese ball mixture.


~~~~~~~~~~~~~~~~~~~~~~~~~~


By the way, if you, like me, dislike the fact that all the dry soup mixes and bouillons seem to have MSG, I created my own mixture of a Dry Onion Soup Mix. I use the stuff in things like oven roasted potatoes, Herbed Onion Bread, and now the cheese balls (plural, because I made some to take to my sister-in-law's for Christmas Day snacking). The recipe is simple, and far more flavorful than store-bought dry onion soup. It makes about 1/4 cup worth, which is equivalent to one pouch of store-bought. It is simple to make multiples of the recipe, though be careful to stir it well before using smaller portions, such as the 2 teaspoons called for in this cheese ball recipe. The onion flakes tend to accumulate at the top of the mixture, and the other spices settle. Just mix all the ingredients together and store in a tightly sealed glass jar. I did not use any bouillon in the mixture, as most of them have MSG, which I am avoiding. To make this into a soup, either buy a good stock or make your own to use as the liquid base.


Appetier nosh,
My 2013 Christmas Eve Table

Dry Onion Soup Mix


3 tablespoons dried minced onion
1 teaspoon sea salt
1 teaspoon sugar, optional
½ teaspoon garlic powder
¼ teaspoon turmeric
¼ teaspoon celery seeds, crushed or ground
¼ - ½ teaspoon black pepper


I hope I have given some ideas for making creative appetizers for the holidays or for any party. I love making all these little things. With help it is even more fun. I wish all of you the very best of the holiday season.


My passion is teaching people how to create a harmony of flavors with their cooking, and passing along my love and joy of food, both simple or exotic, plain or fancy. I continue my journey in ethnic and domestic cuisines, continuing my journey to explore diverse culinary experiences and hopefully to start you on a journey of your own. Join me also at A Harmony of Flavors on Facebook, and Pinterest.

Monday, December 16, 2013

Trying Some New Recipes for Cookies

cookies, Christmas cookies, baking, nuts
Russian Tea Cakes, aka Snowballs
I have finally begun my baking for this season. I started by sitting down and creating three new cookie recipes, on paper, plus one fudge recipe. I have made the three new cookie doughs, and today I baked the first of those. The ones I baked are called Chocolate Hazelnut Pepperballs, and I topped them with Caramelized White Chocolate Ganache. That last did not quite turn out as I hoped, but it sure tastes good. I also baked one of the new recipes from last year; Pistachio Tea Cookies, using Matcha Green Tea Powder as an ingredient. Both these cookies are modeled on the shortbread type cookies my family always called Russian Tea Cakes. These are also called Snowballs and other things, but I love calling them Russian Tea Cakes, and so they remain.


pistachios, unshelled nuts, nut meal
Unsalted, shelled pistachios,
alongside the ground nut meal
For the Pistachio Tea Cookies, I used unsalted, shelled pistachios. I found them at either Amazon.com, or at www.Nuts.com. Unsalted pistachios make these cookies far more palatable, so look for them if you try this recipe. I have a Vita Mix blender and used the container with the blade for grinding dry ingredients, placed the pistachios in and on a fairly low speed, chopped the nuts. Precaution: do not keep the Vita Mix on too long, or it will heat the nuts and you will end up with pistachio butter instead of nicely ground pistachios. I poured them into an old Tupperware colander and used a spoon to help the finer bits pass through into a bowl to measure. This keeps any bits that stayed a little too large out of the mixture. I ate the remaining larger bits for a snack ;-)

Pistachio Tea Cookies

pistachio meal, Christmas Cookies
Pistachio Tea Cookies

Makes about 7½ dozen cookies (with 1¼" diameter cookie scoop)

2 cups unsalted butter, room temperature
1 cup confectioners' sugar
½ teaspoon pistachio flavoring
½ teaspoon almond flavoring
½ teaspoon vanilla
¼ cup Matcha Green Tea Powder
4¼ cups all purpose flour
½ teaspoon salt
1½ cups finely ground unsalted pistachios
Extra confectioner's sugar for rolling and storing

Cream together the butter and confectioners' sugar with the flavorings. If pistachio flavoring is not available, use all almond or part almond and part vanilla extracts. Using a pastry cutter, cut in the flour, Green Tea Powder and salt. Add in the nuts and combine well. Preheat oven to 375 degrees.

Form the dough into one-inch balls. Place on an ungreased baking sheet and bake for 14 to 16 minutes, or until set but not too browned. Immediately roll in confectioners' sugar and allow to cool. Before storing, roll in confectioners' sugar a second time and store with plenty of the sugar around them.

NOTES: Making these cookies with a 1¼-inch diameter cookie scoop is a snap. Press the dough into the bowl of the scoop, release and they are perfectly domed-shape little tea cookies.


The new recipe for Chocolate Hazelnut Pepperballs turned out okay, but I believe since it has been so vary cold here, and with the heat running constantly, my flour and other ingredients might be drier than normal. I had to add in a couple tablespoons of water to try and get the dough to hold together enough to form the balls. As a precaution, I state here below to use 1/2 cup less flour in the mixture than what I used. This gives the option of adding in an extra 1/2 cup if it is needed for proper consistency.

Chocolate Hazelnut Pepperballs

cookies, holiday baking, chocolate
Chocolate Hazelnut Pepperballs
with Caramelized White Chocolate Ganache

1½ cups unsalted butter (2 sticks), room temperature
¾ cup confectioners' sugar
1 teaspoon vanilla extract
2½ cups all purpose flour (+ ½ cup in reserve)
6 tablespoons unsweetened cocoa powder
1 teaspoon ground allspice
¼ teaspoon freshly ground black pepper
¼ teaspoon ground ancho chili powder (not the "chili powder" for making chili!)
½ teaspoon salt
1 cup hazelnut meal (I used Bob's Red Mill brand)

Cream together the butter and confectioners' sugar. Add in the vanilla and mix to combine. Separately, sift or whisk together the dry ingredients, reserving the half cup of the flour aside in case it is needed later. Cut the dry ingredients into the creamed mixture with a pastry cutter or two knives, or even your fingers. It should be very crumbly, but be able to hold together when squeezed into a ball shape. Chill the dough before using.

When ready to bake, set the oven to 375 (or 350 if Convection). Form small balls, about 1-inch in diameter and set them about an inch or more apart on ungreased baking sheets. Bake the cookies for 13 to 15 minutes, or until set.
At this point, the cookies may be rolled in confectioners' sugar, or a mixture of confectioners' sugar and unsweetened cocoa powder. 

Another couple of recipes for cookie dough are in the refrigerator, ready to work with when I have the time. One is called Gingerspice Cookies; the goal with this recipe being a nicely spiced cookie that is not a typical gingerbread cookie.  Another one is called Cardamom Almond Cookies. I have made something similar in the past, but this mixture is new. 

Gingerspice Cookies


Makes 11 - 12 dozen 2-inch cookies
Gingerspice mixture, Cookies, holiday baking
Gingerspice Cookies


2¼ cups all-purpose flour
1 cup light brown sugar
½ teaspoon salt
1 tablespoon ground ginger
1 teaspoon ground cassia cinnamon
½ teaspoon cloves

1 cup (2 sticks) unsalted butter, room temperature
1 egg
1 teaspoon vanilla extract
1 - 2 tablespoons water or milk, as needed

In a large bowl whisk together the dry ingredients. Cut in the butter as for pie dough, until crumbly. Whisk together the egg and the vanilla and add this to the crumbly mixture, tossing lightly with a fork to combine the wet and dry ingredients. If the mass will not come together, add in 1 tablespoon of the water or milk. Add up to 1 tablespoon more of the liquid if needed to form a dough.

Form the dough into two cylindrical shapes and roll in waxed paper; refrigerate at least 3 to 4 hours, or freeze up to a month in advance. If frozen, allow the dough to thaw in the refrigerator at least 24 hours before using.

Preheat oven to 350 degrees (325 on Convection Bake). Remove half the dough from the refrigerator and roll out on a lightly floured surface about ⅛-inch thick. Cut into shapes with a cookie cutter or just slice into squares or rectangles. Bake the cookies on an ungreased baking sheet for 10 to 12 minutes, or until set but not too browned. Remove from the baking sheet to a counter or rack to cool. Ice if desired.


Cardamom Almond Cookies


Makes approximately 8 dozen 2-inch wafers
Cardamom, Almond, Cookies, holiday baking
Cardamom Almond Cookies


2 cups all-purpose flour
¾ cup granulated sugar
1 teaspoon ground cardamom
1 teaspoon fresh lemon zest, finely grated
½ teaspoon salt
¾ cup almond meal

1½ sticks unsalted butter, softened (12 tablespoons)
2 eggs, lightly beaten
2 tablespoons water, milk or Amaretto liqueur

n a large bowl, whisk together the first 6 ingredients to combine. Cut in the butter as for pie dough, with a pastry cutter, fork, two knives or with fingertips to make a crumbly mixture. Combine the eggs and liquid of choice and add in, tossing lightly with a fork until the mixture begins to hold together. With hands, form the dough into a log and wrap in waxed paper. Chill the dough before proceeding.

Preheat the oven to 350 degrees (325 on Convection). This recipe can easily be made using my Busy-Mom-Method. If you choose to roll the dough and cut out shapes, roll to about 1/8-inch thickness and cut. Re-roll the scraps and repeat. Bake the cookies on an ungreased cookie sheet for about 10 to 12 minutes, or until just lightly browned.

These cookies are flavorful enough to be enjoyed as is. If you choose they may be iced as desired, or made into sandwich cookies. 


Happy Holiday Baking to all, and to all a good night!


My passion is teaching people how to create a harmony of flavors with their cooking, and passing along my love and joy of food, both simple or exotic, plain or fancy. I continue my journey in ethnic and domestic cuisines, continuing my journey to explore diverse culinary experiences and hopefully to start you on a journey of your own. Join me also at A Harmony of Flavors on Facebook, and Pinterest.

Wednesday, December 11, 2013

Cookies I haven't Been Making Lately, Alas

Well, it's 2 weeks till the holidays and I have yet to make a single cookie. Heavens. Well, I have plenty of excuses as to why, but since this happens more often than not, I guess it all boils down to the fact that I am a procrastinator. At nearly 64, it seems this is one lesson I  may never learn. That's okay. It will get done when it gets done.

pie, pecans, chocolate
Double Chocolate Pecan Pie

Meanwhile, my husband had hernia surgery. I could use that for an excuse for my procrastinating, but it hardly put him out of commission at all. We had our friend Rich visiting, in case of any help needed with my husband after the surgery. I spent a lot of time cooking again, as Rich loves to eat as much as my husband and I do. I am always trying things out.

I made a Double Chocolate Pecan Pie for Thanksgiving. I had been wanting to try my Chocolate Pie Pastry for a while, and this was the perfect time. I also added grated unsweetened chocolate to the Pecan Pie recipe. I read at Food 52 about Cooks Illustrated's new twist on making pie pastries, so I wanted to try that out. Basically it uses ice cold vodka for half the liquid called for in the recipe (see the article here). I must say it gives beautiful texture to the dough and the finished crust. The pie filling itself didn't look as pretty once baked. It seems that the crust, especially the exposed parts, want to puff, losing the definition of the pretty ridges in the crimping.

Again, I forgot that the eggs should not be whipped, and the rest of the ingredients are folded in gently. Then, the pecans, so prettily placed on top of the unbaked pie actually stay on top of the pie once baked. Mine fell in, again. It in no way inhibited the excellent flavors.


pie, chocolate, pecans, chocolate crust
The pie, before baking

Double Chocolate Pecan Pie


Makes one 10-inch pie

CHOCOLATE PIE PASTRY: 10-inch Pie:
1½ cup all-purpose flour
½ teaspoon salt
⅓ cup packed brown sugar
3 tablespoons unsweetened cocoa powder
½ cup shortening or lard
4 tablespoons ice water
4 tablespoons ice cold vodka (or use all water)

PIE FILLING
3 eggs
¼ teaspoon salt
¾ cup sugar
1 stick unsalted butter, melted
2 ounces unsweetened chocolate, finely grated
1 cup dark corn syrup
1½ cups pecan halves

Make Pastry: Stir flour, salt, brown sugar and cocoa powder in a medium bowl. With a pastry blender or fork, cut in shortening or lard until mixture resembles coarse crumbs. Add most of the water or water/vodka and toss with a fork until all flour mixture is moistened and starts to form a ball. If necessary, add remaining liquid to the crumbs in bottom of the bowl. Gather the dough in your hands and gently shape into a ball, then flatten. Chill for 1 hour before using. (If blind baking is needed, preheat oven to 375 degrees, or 350 on Convection Baking. Partially freeze the formed shell, then line it with foil and pie weights. Bake the partially frozen shell for 12 minutes. Remove from oven, remove foil and pie weights and prick the crust all over with the tip of a knife. Place in oven for 13 to 15 minutes more, until the crust is well set.)

Preheat oven to 375 degrees. Fit pastry into a 10-inch pie plate and crimp edges. Gently mix the eggs with the salt, then with a wire whisk, slowly stir in the sugar along with the grated chocolate. Do not over beat. Mix the corn syrup with the melted butter and fold into the egg mixture. Pour into prepared pastry shell. Place the pecans, flat side down, onto the filling. Bake for 40 to 50 minutes or until set and crust is browned. 


breakfast, French toast, stuffed French toast, cream cheese filling
Cream Cheese Stuffed French Toast
I mentioned some French Toast my daughter told me about once, using thicker sliced bread, making a pocket and stuffing the bread with a mixture of cream cheese flavored with things I cannot recall. I decided to try this out, though I did not even write a single thing down. Basically, I whipped up some eggs with heavy cream (just because it was in the fridge) and some Grand Marnier (just because it tastes so good). Separately I mixed a block of cream cheese with some honey and cinnamon, mixing it together with a hand mixer. I sliced some of my Pizza Dough Bread (if any pizza dough is left over, I roll it into a long baguette shape and bake it - yum!) I had made a few days prior. Slicing it into about 2½ or 3-inch thick slices gave plenty of room to take a small knife and cut a pocket into the slices. I stuffed in about 2 tablespoons or so of the cream cheese mixture, then soaked them in the egg/cream/Grand Marnier mixture. I fried them in the remaining bacon grease on my griddle, allowing a bit longer time for them to cook, so the insides would be creamy and warm. They were just so amazingly good!

I had made cornbread when I made chili one day, and I also made the leftover cornbread into French Toast, and that was pretty darned good also.
braising pan, All-Clad
My large All Clad Braising Pan

Then we got talking about dinner and I mentioned that my Mom sometimes made stuffed pork chops. I really loved those things, but not every store has such thick cut pork chops all the time. I got regular pork chops instead, and made my Better Than Mom's Stuffing. I had planned to make it just as I make it for Thanksgiving, substituting chopped fresh sage for the mace. Ultimately, I added the sage, and completely forgot about adding the apple and nuts. I quickly seared the pork chops on each side in a hot pan with just salt and pepper. I set one pork shop in a large All-Clad braising pan, piled some stuffing mixture on it, set another chop against the stuffing, then added more. My large braising pan is round, so I went round the pan this way, but they could be made in a rectangle baker also. The braising pan has a nice high lid, so I covered the pan while baking at 300 degrees for about 1½ hours. It was mighty fantastic. I called these Unstuffed Pork Chops! Again, I completely forgot to get photos! I will be making those again, so eventually I will get the proper documentation and photos.

stuffing, recipe, side dish, holiday dish
Better Than Mom's Stuffing

Better Than Mom's Stuffing


Makes one 13 x 9 inch casserole

1 extra-long loaf sandwich bread, in cubes, or torn
1 onion, chopped
¼ pound bacon, cut in thin strips across
¾ cup chopped fresh Italian parsley
¾ teaspoon mace
¾ teaspoon freshly ground pepper
1 - 2 Granny Smith apples, grated
3 eggs
1½ cups chopped nuts (pecans, walnuts, chestnuts)
1½ cups milk
1 - 1½ cups turkey or chicken stock

In a very large bowl, place all the bread cubes. In a large skillet, cook the bacon until mostly rendered, but not quite done. Add in the chopped onion and continue to fry until the onion is nicely browned. Pour the contents of the skillet over the bread in the bowl, bacon grease and all. Add in the parsley, mace, pepper, apples (these may be peeled and then grated, or skin left on), eggs and nuts. Toss with hands, gently until well combined. Do not pack together. Add in the milk and toss again until combined.

In a very large bowl, place all the bread cubes. In a large skillet, cook the bacon until mostly rendered, but not quite done. Add in the chopped onion and continue to fry until the onion is nicely browned. Pour the contents of the skillet over the bread in the bowl, bacon grease and all. Add in the parsley, mace, pepper, apples (these may be peeled and then grated, or skin left on), eggs and nuts. Toss with hands, gently until well combined. Do not pack together. Add in the milk and toss again until combined.

Preheat oven to 350. Spray a 13 x 9-inch casserole dish with cooking spray, and place the stuffing mixture into the casserole, patting gently, but not pressing. Pour the turkey stock over all and bake for about 40 minutes, or until the top is golden and the center springs back when pressed lightly.
 

I love my Pizza Dough recipe, and Rich wanted to make some pizzas for us. I made the dough and made a couple of pizzas for myself. The guys had every cold cut known to man on their pizza with pizza sauce. I made one of mine a Spinach Pizza and another one with potatoes, bacon and Gorgonzola cheese on it. Both were excellent. 

pizza, spinach, mozzarella garlic, Parmesan
Spinach Pizza

Spinach Pizza


Makes one 15-inch pizza

Pizza dough, of choice
¼ cup olive oil
2 - 4 cloves garlic, minced fine or through a garlic press
1 ounce Pecorino Romano cheese, grated fine
1 (10-ounce) package frozen chopped spinach, thawed and squeezed dry
½ teaspoon salt
2 cups grated mozzarella, more if desired

Preheat oven to 425 degrees (400 on Convect-Bake). Pour the olive oil into a very small saucepan and put in the garlic. Set this on the stove at the lowest possible setting, even to keeping it partly off the burner. (I have a "warming" burner that truly just keeps things barely warm). Allow the garlic to steep in the oil over just warm but not even simmering for at least 15 minutes. At this point, you may strain out the garlic or leave it in, as desired.

Lightly grease your pizza pan. Roll the dough to fit the pan. Using a pastry brush, coat the pizza dough in the garlic infused olive oil. You may use just the oil, oil with a little of the garlic, or the oil with all the garlic if desired. I used mostly just oil with a few bits of garlic here and there. Sprinkle the Pecorino Romano evenly over the garlic oil. Sprinkle on the spinach as evenly as possible and then cover with the mozzarella. Bake the pizza for 10 to 12 minutes, or until browned to your taste. I prefer the cheese not too brown.
 

Needless to say, we had leftovers of leftovers, but it was a lot of really good food made in these last couple of weeks. Hopefully I can get myself motivated to make cookies now... sigh.


My passion is teaching people how to create a harmony of flavors with their cooking, and passing along my love and joy of food, both simple or exotic, plain or fancy. I continue my journey in ethnic and domestic cuisines, continuing my journey to explore diverse culinary experiences and hopefully to start you on a journey of your own. Join me also at A Harmony of Flavors on Facebook, and Pinterest.

Monday, December 9, 2013

Old Recipes and New

My paternal grandmother was a fantastic baker. Most of her food was exceptional. Her chicken or beef (or a mix) soup was the best, ever. It seems, in my memory, to be rare that we ever went to grandma's house and not smell her soup, simmering away on the stove. She always added saffron to her soup, which was one of the smells and tastes I grew up knowing. To this day, the smell of saffron takes me back to my childhood.

Grandma was from what is now Serbia, near Novi Sad. She came to the US in the early 1900's, very young, with at least one of her three children. I remember her most for her strudel, made with the dough stretched so thin you could read a paper through it. She would coax the dough using the tablecloth underneath it, to roll over the filling, usually apple or poppy seed, though I believe at times she made a cabbage or cheese strudel as well. This site has photos of someone making a strudel with Filo dough, but the method and look of it are the most like what I recall. I recall one time at age 8 watching the process. I wish with all my being I had ever been there when I was old enough to really learn from her. She made many other little pastries of different kinds too.

Serbian food, cake, torte, nuts, black walnuts
Grandma's Nut Torta and Icing
And then sometimes she would make a pie or a cake. I really cannot even recall what kind of pies she made, though I was with her when she made some one day. What I recall most of cakes was what she called Nut Torta. Most often this cake was made with black walnuts, which I never liked, and thus, I did not like this cake. (Walnuts or pecans can be substituted, and I am told she did use those on occasion, but I only recall the black walnuts). The torta was not a traditional cake, as it used no flour. It consisted mainly of ground nuts and eggs. Ten eggs, to be exact. The icing she made was also not a traditional icing as I know them today, but made in a two step process. First she made a milk and cornstarch pudding and cooled it. Next she would cream together shortening and sugar. Once the shortening and sugar were thoroughly combined, she added in the cornstarch pudding mixture. To me, this always made a most greasy feel in my mouth, and again, I just didn't care for it at all.

In the spirit of keeping recipes alive, and since my sister had this recipe in her files, I finally made this cake a few days back. Everything about it was just as I recalled, except I found I no longer really dislike black walnuts!


Grandma's Nut Torta and Icing

nut torta, Serbian food, cake, black walnuts
A bite of the torta
TORTA 
10 eggs, separated
10 tablespoons sugar
½ teaspoon baking powder
1 cup chopped nuts; walnuts, pecans, black walnuts
3 tablespoons cracker meal
dash of salt

NUT TORTA ICING
1½ cups milk
3 tablespoons cornstarch
1½ cups granulated sugar
1½ cups white shortening (or substitute butter, room temperature)

MAKE TORTA: Beat the egg yolks until thick and creamy, adding 7 tablespoons of the sugar gradually. Add cracker meal, nuts, baking powder and salt, stirring by hand.

Beat egg whites until stiff, gradually adding the remaining 3 tablespoons of sugar. Gently fold meringue into egg yolk mixture until combined. Pour batter into 4 lightly greased and floured 8-inch cake pans. Bake in a preheated oven at 350 for 20-30 minutes. The cakes will puff up, then deflate to about a third of the pan when cooling. The final cake is spongy and dense.

ICING DIRECTIONS: In a medium saucepan, whisk together the sugar and cornstarch. Add in the milk and whisk to combine. Begin cooking the pudding on medium heat and cook, stirring until thickened. Let cool. Alternatively, pour into bowl of a stand mixer and allow the paddle attachment run on lowest setting while mixture cools. This also prevents a skin from forming on the pudding as it cools.

Once the pudding is cooled to room temperature and would no longer melt the shortening (butter), begin adding it in, about 2 tablespoons at a time, beating to completely incorporate before adding more. If at any time the icing looks curdles, chill the bowl briefly, then continue beating until all the shortening or butter is incorporated and the icing is glossy. Vanilla or other flavoring may be added, if desired.

A couple of things I thought about once I had made and eaten this cake after so very many years:
  • I believe this would be easily made gluten-free using 2 tablespoons psyllium husks instead of cracker meal
  • the icing is curious, but butter in place of the shortening makes this recipe far more palatable!
I am planning to give my ideas a try. I may use walnuts instead of black walnuts, partly just to try something different and partly to avoid making too much of the same thing. In the meantime, while this is a short blog, I will end here for now. Cheers to memories of grandmas everywhere!


My passion is teaching people how to create a harmony of flavors with their cooking, and passing along my love and joy of food, both simple or exotic, plain or fancy. I continue my journey in ethnic and domestic cuisines, continuing my journey to explore diverse culinary experiences and hopefully to start you on a journey of your own. Join me also at A Harmony of Flavors on Facebook, and Pinterest.
Monday, November 11, 2013

Guatemala Dreaming: Trying out some typical recipes

Page from the cookbook for my daughter - note the
very stained page from my notebook.
tomatillo
Tomatillos (Miltomates)
Lately I have been thinking about Guatemala, talking about Guatemala and making Guatemalan dishes that I had not made in a while, as well as some I had never made. I really enjoyed my time in Guatemala. I was 20 years young and willing to learn so many things that so vastly diverged from anything I had previously known in my upper Midwest upbringing. 

I made a "cookbook" of a sort for my oldest daughter when she turned 40, with all sorts of recipes and photos. Unfortunately, though I had made many of these recipes, I had not been so photography-minded back then. Nowadays I take photos of almost anything I make, to have a record of it in case I may need it some day. With a blog, website and Pinterest, I do use a lot of photos. I do have a couple of notebooks and a handful of recipe cards I wrote out, with lots of typical Guatemalan dishes, some of which I had made often and others I have yet to try. My sister gave me the idea to make this cookbook, mainly because some of my recipes are so terribly stained you can really see how well they have been used. The result is one I am quite proud of - and yet - the pictures and the recipes are for the most part, not "mine." I "Swiped from the best with pride," as they say, filling the pages with photos I took from the internet, since it was meant only for my daughter's eyes.

At this point in time, I could nearly fill the book with food photos of my own. I have been consistently making dishes and getting photos where possible. I wish that I had photos of all the places I visited back in the 1970s; sadly, I do not. Short of a nice long photography trip back to Guatemala, I have little hope of ever having those type of photos for a book. It was a most interesting time in my life and one I will always treasure. One of the many spices I learned about while there was Annatto:

Annatto - Bixa orellana

Annatto, seeds, achiote
Annatto Seeds (Achiote)
Annatto seeds, called achiote (a-CHO-tay) in Guatemala, are a spice from the pods of the Bixa orellana tree. The tree produces fruits that are vaguely heart-shaped, with thick, spiky hairs all over them. When the fruit matures, the pod opens to reveal the orangey seeds inside. The seeds are orange to red in color, and the outer, powdery orange coating on the seeds is what is used for flavor and color in so many of the dishes in Guatemala as well as many of the other central, South American and Caribbean cuisines. It will make rice a lovely yellow color similar to saffron, though with a different flavor component. Depending on how much annatto is used, more flavor can come through, lending a signature flavor to things such as Hilachas, the recado that goes on top of tamales or chuchitos and Arroz con Pollo. This is by far an incomplete list, as these seeds are use widely and extensively. 

I was cautioned, while in Guatemala, to avoid ever grinding the whole seed, as the inner seed is bitter and will ruin the flavor of a dish. I have never substantiated this admonition. 

While I mainly write of these seeds as a spice, the reddish color they lend is also used in other varied ways. In some of the native cultures of these countries the red color, which rubs off of the seeds easily, is used "cosmetically" as a lip or cheek color. Many American processed cheeses, as well as some Cheddar or Colby cheeses are given their appetizing yellow orange color with annatto seeds. 


Guatemalan food, ethnic, chicken, jocon
"Pollo en Jocon"
or Chicken in Green Sauce
So that brings me back to the present. I love the flavor of Green Sauce or "Salsa Verde". It uses tomatillos as the green base, along with all other green things, such as green pepper, celery, parsley and cilantro. I have been making it recently and using it to braise pork, which is heavenly, but not Guatemalan so far as I know. What I had never really made was Carne or Pollo en Jocon. This is a stewed dish with either beef or chicken, and a green sauce thickened with corn tortillas or corn masa (a substitute can be using corn masa flour as the thickening agent). It is served over Guatemalan Style Rice, usually made as the Guatemalans do, with the addition of onion, carrot, peas, celery and/or green pepper. Sometimes annatto seed is cooked in oil and this colored oil is also added. Since my son and his wife were coming to visit this past weekend, I decided sort of last-minute to make the Carne (Beef) en Jocon. It was a real hit; so much so that the kids were arguing over the leftovers later. I decided to make it again, since they obviously had not had their fill, and this time with chicken.

Today, for whatever reason, I started thinking about Pepian, another very typically Guatemalan dish, and one I have never made. It is another stew type dish, made with beef or chicken usually, but this sauce is more red, and made with tomatoes, toasted sesame and pumpkin seeds, dried chili peppers such as ancho and guaque and possibly some annatto seeds for color. It is also served over rice, but may have the addition of vegetables such as carrot, potato or chayote squash. There are so many wonderful flavors in Guatemalan cooking and sometimes I become nostalgic. I am so grateful both for the time I spent in that country and for my ability to cook all these wonderful dishes.


My passion is teaching people how to create a harmony of flavors with their cooking, and passing along my love and joy of food, both simple or exotic, plain or fancy. I continue my journey in ethnic and domestic cuisines, continuing my journey to explore diverse culinary experiences and hopefully to start you on a journey of your own. Join me also at A Harmony of Flavors on Facebook, and Pinterest.

Friday, November 1, 2013

What to do with Green Tomatoes?

What with moving to a new house this past Spring, I didn't get around to planting any tomatoes. My sister-in-law did, and she was supplying me with tomatoes all season. But as anyone who plants tomatoes in the north knows, once we get a couple of cold snaps, the tomatoes just give up on any idea of ripening. And so we come to the question: "What to do with green tomatoes?"
Green Tomato, Apple, Streusel, Pie
Green Tomato Apple Streusel Pie

I had never even tasted green tomatoes before, so I am unfamiliar with the knowledge of what flavor they might blend with. I have the idea to try making my Guatemalan Green Sauce (Salsa Verde) with them and see what differences come out in the flavor. Meanwhile, I saw many pies out on the web that were either green tomatoes with apples, or alone. I prefer to make larger pies, so I used my 9½-inch plate, which has a very deep dish. I set down what I thought would be a good start for a recipe, and got down to business. This is what I wrote:

Green Tomato Apple Streusel Pie


2½ cups green tomatoes, peeled, sliced thinly
Green Tomato, Apple, Streusel, Pie
Green Tomato Apple Streusel Pie
4 cups baking apples, peeled, cored, sliced thinly
½ teaspoon salt
1 tablespoon cinnamon
1 teaspoon nutmeg
½ teaspoon cloves
1½ cups sugar
⅓ cup flour
1 teaspoon lime zest
1 tablespoon lime juice
1½ tablespoons unsalted butter for dotting pie
1 single pie pastry, fitted into a 9 1/2 or 10-inch pie plate, crimped high

STREUSEL
4 tablespoons butter
½ cup flour
1 cup brown sugar
2 teaspoons cinnamon
½ cup chopped nuts (I used pecans)

I proceeded to make the pie, combining in a large bowl the tomato and apple slices, then the lime zest and juice with the salt. In a small bowl I combined the cinnamon, nutmeg, cloves, sugar and flour. This was poured over the apples and tomatoes and tossed well, then left to macerate while I prepared the pie pastry and made the streusel. The streusel was made by combining all ingredients except the nuts and mixing well with fingers until it started to make large clumps. The nuts were added last, and I set that aside. I preheated the oven to 350 degrees. I poured the tomatoes and apple mixture into the pie shell and topped with the streusel. The pie baked for 1 hour.


I had no idea what to expect for flavor. There was a slight different flavor, but not enough to jump out and make one wonder about it. I did add way too much sugar. The pie is terrific, but awfully sweet. I would cut back the amount of sugar in the apple and tomato mixture to either 1 cup or 1¼ cup. Certainly 1½ cups was overdoing a good thing. The other thing is to possibly use 1¼ cups of sugar, and then top with a second crust or a lattice crust and omit the streusel.

Other than that, I love the pie. I am planning to make another one and see how my changes make it come out. Meanwhile, there is nothing a sweet tooth wouldn't enjoy. It was a very good first experiment with green tomatoes.


My passion is teaching people how to create a harmony of flavors with their cooking, and passing along my love and joy of food, both simple or exotic, plain or fancy. I continue my journey in ethnic and domestic cuisines, continuing my journey to explore diverse culinary experiences and hopefully to start you on a journey of your own. Join me also at A Harmony of Flavors on Facebook, and Pinterest.

Disqus