Translate

Thursday, July 21, 2022

Lentils Shine in a Dish Called Mujadara

I like lentils. Liking lentils in the first place, may - or may not - preclude some from liking this dish. 

I had heard of Mujadara. I just never researched it to find out what, exactly, it was. I am not at all sure how or why I missed out on this meal, but I surely do wish I'd found out sooner, because it is one amazingly flavored dish. 
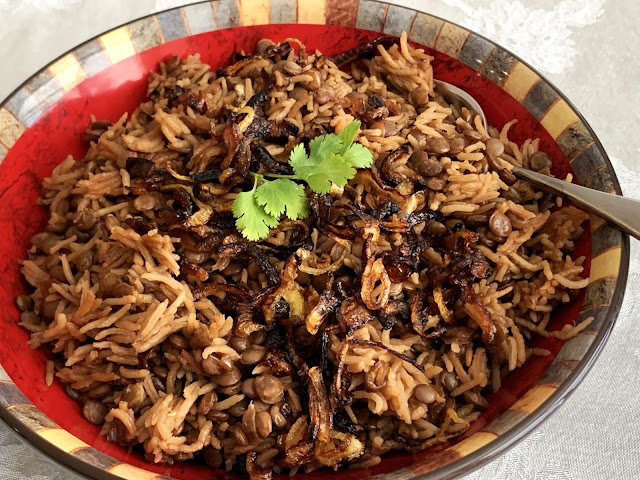
Mujadara, rice, lentils, onions, thnic, Middle Eastern, Lebanese
Mujadara

Mujadara is a Lebanese / Middle Eastern concoction of lentils and rice. Rice can be substituted with bulghur. Lentils and rice are pretty bland fare, on their own. They need a lot of help in the flavor department. I believe what interested me the most when reading the recipes online - particularly the ones written by Lebanese or other Middle Eastern bloggers - is the near lack of any flavorings beyond a little cumin - and a whole boatload of onions. These onions are sauteed until very, very dark; far darker than the norm. These deeply caramelized, nigh on to burnt (but not quite) onions are what provide the absolutely heavenly flavor to the otherwise not too exciting lentils and rice. 

Every cook has their own way of making a thing. Every cook has their own reasoning as to why it should be that way. I have absolutely no argument on method, and depending on the outcome, I may change a method to suit my own lifestyle. And at my age, I look for the simplest way, the fewest steps, the least cleanup possible. I have ranted on that subject here before, so I won't go into it again. But, when it requires three or four different pots or skillets to make one meal, I look immediately  to how that can be simplified. 
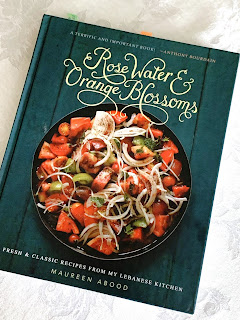
cookbook, Lebanese, ethnic, Maureen Abood
Maureen's Cookbook
Maureen Abood, a Lebanese-American lady I have been following for years on her blog, Facebook and with her cookbook called "Rose Water and Orange Blossoms," has recipes amazingly easy to understand. When dealing with an unknown culture, it helps to have someone both knowledgeable in the foods themselves, but also articulate enough to translate that into descriptions that clarify to a person not of that culture. I have some go-to Indian blogs that have fantastic recipes. Some though, assume that one knows what one is doing and so the recipes require some trial and error. And errors happen way too easily, when one "assumes!"

Ultimately, Maureen's recipe is the one that gave me the clearest idea of the whys and the wherefores of making Mujadara, though I had read about 8 recipes online and had already scribbled down two versions of what I thought I would do. 

What is Mujadara?

As mentioned above, Mujadara is a dish of lentils and rice (or bulghur), made with a surfeit of deep, dark, caramelized onions. The onions completely make this dish. Do not stint on the onions. In fact, in one blog, this admonition was followed by the fact that her relatives used twice the amount used in her recipe!

Whenever I research a recipe from a culture that is not mine, I try and stick to recipes from people of that culture. They would certainly know better what it is that makes a dish. Reading recipes from other sources not of the culture, where a slew of additional flavors are added in, either as enhancement or compensation, well, this is, IMHO, trying to change the culture, and there I try instead to remain a purist. 

In all the recipes written by a Middle Eastern (by background and culture, no matter where they live), there were - besides salt and water - just 5 main ingredients: lentils, rice (or bulghur), lots of onions, oil for sauteeing the onions (usually olive oil) and cumin. Period. Amounts may vary. Methods may vary. Ingredients did not vary. 

👀I did opt to parboil the lentils in a separate pan, for the one simple reason that it is best not to salt the lentils while they cook, as this toughens their skins and makes a longer cooking time. 

Ultimately, my Mujadara, though it takes a little while to make, was so very worthwhile. The flavors were sublime. My husband will tolerate lentils, if in the right application. He loved this dish nearly as much as I. I heartily recommend it to anyone. Vegetarians will love it for its complete protein. It is great accompanied by a simple salad, or tomatoes, or a tomato and cucumber salad. Of course, meat to accompany is fine. A dollop of Greek yogurt, or as I used, tzatziki, is also a great flavor combo. 

Mujadara

Mujadara, lentils, rice, Lebanese, Middle Eastern, ethnic, vegetarian
Mujadara

Serves 8 as a side dish

1 cup brown lentils
1 cup long grain or basmati rice
4 cups water, divided
4 medium onions, divided (more, if desired)
2 - 4 tablespoons olive oil
1 teaspoon salt
1/2 teaspoon cumin seeds

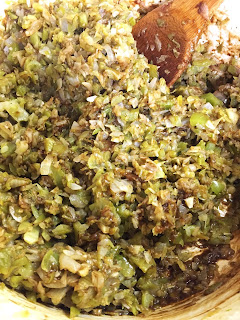
Begin with the onions, as these take time. Chop three of the onions. Heat a goodly sized skillet over medium to medium low heat. Add in half the olive oil to heat and then the chopped onions. Stirring often, saute the onions until they are well past simple caramelization, and on into the realm of almost burnt. Sprinkle the salt over the onions while cooking as this helps draw moisture. The darker the onions, the better the flavors in the dish. Towards the end of cooking, add in the  cumin.
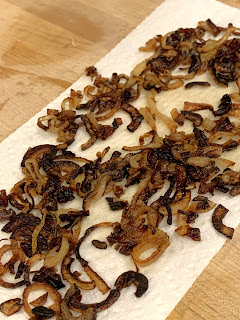
onions, saute, garnish, dark caramel
Dark Sauteed Onions for Garnish
Once the onions are almost ready, place 2 cups of the water and the lentils into a medium saucepan. Cover and cook for about 12 to 15 minutes. The lentils are just parboiled at this time. Add the contents of the pot, with any liquids remaining, to the onions in the large skillet. Add in the remaining 2 cups of water and the rice. Stir, bring to boil and lower to a simmer. Time for approximately 20 minutes. Leave the lid on and remove the skillet from the heat. Let steam for an additional 10 or 15 minutes if there is time. 

While the lentils and rice cook, heat another, smaller skillet and add the remaining olive oil. Cut the last onion into long slivers or rings and again, saute these until very deep dark in color. Once they are dark enough, pour them out onto paper toweling to absorb excess oil, and to crisp up a bit. Once the Mujadara is ready to serve, use these onions to garnish the dish.

Serve with a salad, a Shirazi salad (cucumber, tomato and onion), sliced tomatoes, a dollop of labneh, plain Greek yogurt, or tzatziki, some mint sprigs or cilantro, and this meal is fit for a king.


My passion is teaching people how to create a harmony of flavors with their cooking, and passing along my love and joy of food, both simple or exotic, plain or fancy. I continue my journey in ethnic and domestic cuisines, continuing my journey to explore diverse culinary experiences and hopefully to start you on a journey of your own. Join me also at A Harmony of Flavors on Facebook, and Pinterest.

Thursday, July 14, 2022

Individual Cheesecakes Cute as Can Be

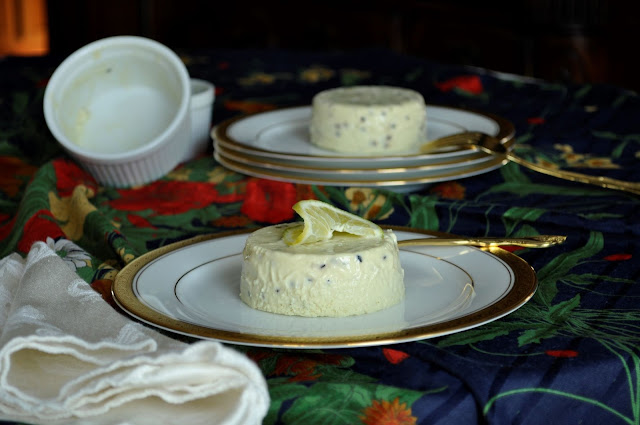
These perfect little individual cheesecakes were made to serve at a special dinner for some friends. Every, single thing about them was perfect: flavors, appearance, texture, and the bonus was that they came out of the little ramekins just perfectly. Better results could not be hoped for. 

Matcha green Tea, green tea powder, cheesecake, individual cheesecake
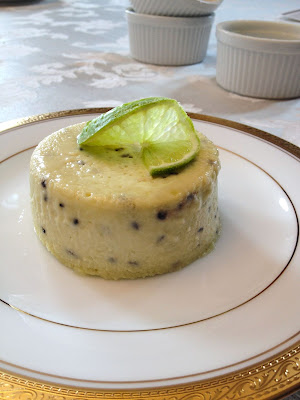
Black Sesame Matcha Individual Cheesecakes

While they were perfect, and have stayed in my mind ever since, I haven't returned to them. Why? Well, there is really no huge valid excuse at all really. The biggest thing was that I ran out of Matcha Green Tea powder and haven't replaced it. 

Even longer ago, I had made Matcha and Black Sesame Muffins, and they were delightful. It was this combination, the green and the black flecks together are quite striking, that made me want to do something else with it. 

Using Matcha Green Tea

green tea, Matcha, higher quality
Matcha Green Tea Powder

Using Matcha green tea powder can be tricky, only in the sense that depending on the quality, the color may be the brightest of lime green (higher quality, more flavor, higher price), or a very dull green, or even a very pale green (lower quality, less flavor, lower price). The dull green was what was used in both the muffins and the cheesecakes.

With less flavor and color, more is needed to achieve even the least bit of color in a baked good. This alters the dry ingredient contents upwards, with the possibility of a dry outcome, whether dry muffins or a very stiff and dry cheesecake. 

Using higher quality Matcha will give a lot of color, but when it comes down to the facts, Matcha is very bitter. Too many people will not automatically love this bitterness, so a fine line is walked when making something like these recipes. Too much of a good thing and they may not be at all well-received. 

Some of this bitterness in a baked item can be mitigated by using more sugar, yet breakfast muffins are not meant to be sweet as a cupcake (though far too many are), and too much sugar will alter a cheesecake's consistency as well. 

An idea on that score is to dissolve the green tea powder in just enough hot water to make a smooth paste. In this way, the texture of either recipe would not be significantly altered. It also would afford the ability of actually seeing how much color is being added. The final baked goods will never be that same color, but it at least gives a clue. 

Aside from the issue of Matcha, having some in the first place, and then all these other considerations, these little cheesecakes are no difficulty to make. The mixture is a straightforward style, black sesame is available in many stores nowadays. While black sesame is not much different in flavor than the white, they do give visual interest. So, on with the recipe:


Black Sesame Matcha Individual Cheesecakes


Makes about 6 (6-ounce) 
or 8 (4-ounce) servings

matcha green tea powder, cheesecake, black sesame
Black Sesame Matcha Individual Cheesecakes
12 ounces cream cheese, room temperature
1 teaspoon lime zest, finely grated
½ cup white sugar
2-3 tablespoons Matcha Green Tea powder
1 pinch salt
1 cup sour cream
3 large eggs, room temperature
1 tablespoon black sesame seeds

- Extra sugar, for dusting
- Butter for greasing

Preheat oven to 325 degrees. Grease six (6-ounce) or eight (4-ounce) ramekins with butter. Dust them with sugar, tapping out excess. Set the ramekins into a roaster pan that can hold water halfway up the sides of the ramekins. Heat a large kettle of water and keep hot.

In a small bowl, whisk together the sugar and green tea powder. In a separate mixing bowl, beat the cream cheese until smooth, then add in the sugar mixture and lime zest and beat gently, just to combine. Add in the eggs, one at a time, beating gently until incorporated, then add in the sour cream and fold in the black sesame seeds.

Fill the ramekins of choice with the mixture. Set the roaster pan into the oven and carefully pour in the hot water around the ramekins to about halfway up their sides. Bake the cheesecakes 20 minutes for the smaller ones or 25 minutes for the larger ones. The centers should be a bit jiggly. Remove the pan from the oven and set the ramekins aside to cool. Chill the cheesecakes completely, refrigerated, before unmolding.

To unmold the cheesecakes, run a knife around the edges. They should start to spin a bit in their molds. Set a plate over top of the mold and invert the ramekin over the plate until the cheesecake comes loose onto the plate. Serve with a twist of lime and/or a dollop of whipped cream.


My passion is teaching people how to create a harmony of flavors with their cooking, and passing along my love and joy of food, both simple or exotic, plain or fancy. I continue my journey in ethnic and domestic cuisines, continuing my journey to explore diverse culinary experiences and hopefully to start you on a journey of your own. Join me also at A Harmony of Flavors on Facebook, and Pinterest.

Tuesday, July 12, 2022

Good Golly it's Gumbo

Long before ever visiting Louisiana, and later actually living there over the Y2K times, I had heard of Gumbo, as well as Etoufee, Jambalaya and a lot of other dishes, not all of which I really associated with Louisiana. Red beans and rice I'd had in Guatemala as a very young newlywed expat. maybe these were not the Louisiana-spiced version, but the concept was there. Boudin rouge or boudin noir are a sausage made with blood as part or most of its ingredients, but I had eaten those in Guatemala as well, under the name Moronga or Morcilla. Not a banana fan at any time, Bananas Foster never held any interest whatsoever. And long, long before ever learning that bread pudding was pretty much Louisiana's state dessert (according to me, anyway, as it was found in every single restaurant), I had been making and loving bread pudding.

When it came to hearing about Gumbo, I heard about okra as an ingredient, and I am absolutely not an okra fan. Thus, Gumbo held no interest. I like tomatoes, tomato sauces, spaghetti sauces, but there are times I just cannot abide them. At least my stomach seems to completely rebel at times, and then sometimes not. Etoufee, mainly tomato-ey red in color, was not high on a list of things I wanted to try. 

chicken, andouille sausage, file powder, gumbo, soup
Chicken and Andouille Gumbo

And then, we moved to Louisiana. Just north of Lake Ponchartrain, there were an amazing assortment of the best eating establishments all grouped so closely near to one another that you could barely toss a stone without hitting one, and we frequented them, almost all, in a constant rotation. My husband will not touch seafood, and not even fish. This is a mental allergy mind you, not a physical one. But as Louisiana cuisine is really all about fish and seafood, crawfish being absolutely huge there, there were many restaurants that had no meat on the menu, and some with a whole lot of truly stellar gourmet seafood dishes available, and with one lone hamburger plate on the menu, generally served with coleslaw (which my husband will not eat) and fries. They truly are not catering to the meat lover diet.

Exploring Gumbo Flavors

As we began exploring food in our new home area after we moved there, I was excited to taste this Gumbo I had heard and read about. I was willing to overlook okra, if the dish was good enough. And I had a couple samplings that were passable, for sure. But it was down in New Orleans proper, that I first had a small bowl of File Gumbo. Being a complete neophyte in the Gumbo world, I had asked the waitress what was the difference. she explained that Okra Gumbo used the okra as a slight thickening agent, whereas File Gumbo used File powder as it's slight thickening agent. Obviously okra has its own flavors as well, as does file powder, but I wasn't aware of that, then. 

➤File powder is nothing more than the powdered leaf of sassafras. It is generally

file powder, sassafras, sassafras leaf
File Powder
available in the spice aisle. This flavoring agent should never be added to the pot, but only stirred in at table. If cooked, it can become stringy.

On tasting the little bowl of File Gumbo, I was suddenly aware that this was amazingly good! Oh my, was it good! And then I went on a search. In each and every restaurant, I tried at least a small bowl or cup of Gumbo, just to see the range of flavors, and just how good, good can be. 

While living there, I never even attempted to make Gumbo. More often than not, the Gumbo in restaurants contained crawfish or shrimp. At the time I still wasn't aware of why I was swelling so much all the time, so I blithely ate my way through crawfish, shrimp, crab, blue crab, lobster and a lot of other shellfish. Now, sadly, I have long been aware of my intolerance for those most wonderful foods. Sigh.

roux, cooking oil, flour, mahogany color

Making Roux

Moving away from Louisiana, as all good things must end one day, I longed for Gumbo. As I set about learning what made a good Gumbo, I learned about roux. While I had made roux plenty of times, in preparation for a gravy, those were always a very blond roux, just cooked enough for the raw flour taste to be gone, but not for color. In Louisiana, there is ROUX. Pronounced, "ROO." And this is one not to be messed with. Every young girl must learn the way to make a proper roux, or you will not ever attain a proper gumbo. And this roux must be cooked until "mahogany colored." This requires constant attention to the pot, or the roux will burn. This disaster cannot be repaired, and the only solution is to begin again. This process of cooking oil and flour to a mahogany color can take 15 minutes or it can take an hour, completely dependent on the skill and ease of the one making it. If unskilled, as I was the first time, it took an hour over medium or medium low heat. Over a higher heat, and a lot of quick stirring, it can be accomplished in much less time, but without this very dark roux as a base, the gumbo will not be right. 

holy trinity, onions, green pepper, celery
Holy Trinity added to Roux

The next important thing to know is that many, if not most, dishes in Louisiana are based on the flavors of the 'holy trinity, a phrase coined by chef Paul Prudhomme. This trinity is a combination, in equal parts, of chopped onion, green pepper and celery. These should be prepped and ready, as they are the first addition to the Gumbo pot, once the roux is ready. 

Andouille sausage, pronounced ahn-DOO-ee, in Louisiana, is generally very highly spiced, with a strong chili kick. For the unwary, this can be a shock. The Andouille found in other areas of the country is but a poor relative, in comparison. I've used Aidell's brand, as I can tolerate the salt levels, though it is not spicy hot. 


Chicken and Andouille Gumbo

Serves 8 to 10
gumbo, soup, chicken, andouille sausage, roux, file powder
Chicken and Andouille Gumbo


ROUX:
½ cup shortening or oil
½ cup all-purpose flour
----------
2 tablespoons cooking oil
2 medium onions, chopped
2 green peppers, chopped
6 stalks celery, chopped
3 cloves garlic
1 whole chicken, cut up
2 - 4 Andouille sausages, sliced
1 teaspoon dried thyme leaves
¾ teaspoon dried oregano flakes
¾ teaspoons dried basil leaves
2 bay leaves
½ teaspoon ancho powder or cayenne
6 cups water or stock
Salt & pepper, to taste

File Powder, for serving

MAKE ROUX: In a heavy soup pot or Dutch oven, melt the shortening or oil over medium heat. Add in the flour and stir continually with a wire whisk until the mixture becomes a deep mahogany brown. This can take from 10 minutes to half hour, depending on your heat setting. Do not scorch the roux or you will need to begin again. Set aside, off the heat.

ASSEMBLE GUMBO: In a large skillet, heat the 2 tablespoons of oil and sauté the onions, green pepper, celery and garlic until softened, about 10 minutes. Add to the pot with the roux. Dry the chicken pieces and brown them on all sides in the skillet, then remove them to the pot along with the sliced Andouille, all the spices, chili powder and water or stock. Add in about 1 teaspoon of salt, to start, and some freshly grated black pepper. Stir well, then cover and cook on very low heat for an hour, or until the chicken is very tender. Once the gumbo has cooked, check for seasoning and adjust as needed. Leave chicken on the bone, or remove the skin and bones, if preferred, returning the chicken meat to the pot. Serve with a scoop of rice. Serve File Powder on the side. Use 1 to 3 teaspoons per serving, to taste.

NOTES: If using shrimp or crawfish, add these in to the pot only about 5 to 7 minutes before ready to serve, to just cook through. 


My passion is teaching people how to create a harmony of flavors with their cooking, and passing along my love and joy of food, both simple or exotic, plain or fancy. I continue my journey in ethnic and domestic cuisines, continuing my journey to explore diverse culinary experiences and hopefully to start you on a journey of your own. Join me also at A Harmony of Flavors on Facebook, and Pinterest.
Monday, July 11, 2022

Bran Muffins are a Very Old Favorite

Long, long before bran and fiber became a health food, I loved bran muffins. Kellogg's® All-Bran® was common in our house when I grew up, and I recall my Grandma eating it as well. Of course, as a child, I didn't grasp what the reasoning was for this cereal, but I liked it. Even better though, were the bran muffins. No matter what, I have loved bran muffins.

Despite that, I hadn't eaten them or made them in a very long while, back when I started this blog back in 2012. And it wasn't until 2014 that I received all the bread cookbooks that started my journey into coaxing flavor from whole wheat, and not yet for another year or so that it came to be that I had a lot of accumulated bran at my disposal. I had long ago stopped eating cereal of any kind but oatmeal, so I wasn't keeping the All-Bran cereal at home, either. Many of the new bread recipes called for sifted whole wheat flour. As I was grinding my own wheat berries, for even better flavor (read more about why, here), some needed only the largest of bran flakes sifted from the flour, resulting in varying amounts of bran leftover. 

muffins, breakfast, bran, raisins, walnuts, fiber
Bran Muffins with Raisins and Walnuts

It was still quite some while of accumulating bran that I reasoned, "I can make Bran Muffins!"

Once I finally sat down to create a bran muffin recipe, first looking into recipes all over online at the time, to compare what was done, read comments about them and such, I cobbled together a plan. And it was still a while before I got to the point of making them. I cannot recall why it took so long to actually get around to making them, except for the fact of a whole lot of things happening in my life back then. Once I did, I made them quite a few times, and quickly ran out of all the accumulated bran I had stored, and once again I lapsed. 

I did include the recipe in my Newsletter, which is now defunct, so once more I am placing it here to keep.


Bran Muffins with Raisins and Walnuts


Makes 12 muffins
muffins, bran, breakfast, raisins, walnuts, fiber
Bran Muffins with Raisins and Walnuts

1 cup wheat bran 
1½ cups whole wheat or whole Kamut flour 
2½ teaspoons baking powder
½ teaspoon baking soda
½ teaspoon salt)
½ cup raisins
½ cup chopped walnuts 
¼ cup sugar, or palm sugar 
¾ cup milk
½ cup unsweetened applesauce
¼ cup molasses 
2 tablespoons cooking oil of choice
2 large eggs, beaten lightly

Preheat oven to 400 degrees. Grease or spray with cooking spray the wells of a 12-well muffin tin, or line wells with muffin papers Set aside.

In a mixing bowl, combine the first 8 dry ingredients and stir them together, ensuring the raisins are all separated from one another for even distribution. The raisins may be substituted with dates, if preferred.

Separately, whisk together the milk, applesauce, molasses, oil and eggs. Pour the wet ingredients into the dry ingredients and stir with a wooden spoon or spatula, just until all the dry ingredients are moistened. Quickly, scoop the batter into the prepared muffin wells, dividing the batter evenly between the wells, and pop the tin into the oven on a middle rack for about 15 minutes, or until a tester inserted in the center comes out mostly clean.

Remove the tin from the oven and set aside for 5 to 9 minutes, at which time the muffins will release quite easily from the tin. Serve warm, preferably with butter, for a treat any time.


My passion is teaching people how to create a harmony of flavors with their cooking, and passing along my love and joy of food, both simple or exotic, plain or fancy. I continue my journey in ethnic and domestic cuisines, continuing my journey to explore diverse culinary experiences and hopefully to start you on a journey of your own. Join me also at A Harmony of Flavors on Facebook, and Pinterest.

Sunday, July 10, 2022

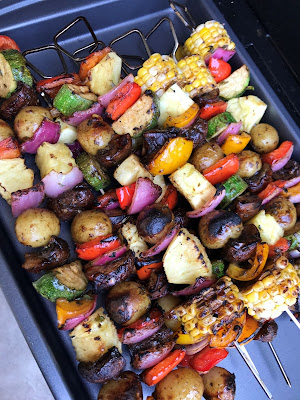
Veggie Kebabs as Main or Side Dish

If you love grilled vegetables, then this is a recipe for you. Whether you are vegetarian, or if you want these as a side dish, they have excellent flavor, both from the marinade and from the grill. 

grilling, kebabs, vegetables, main dish, side dish
Veggie Kebabs

When I made these, I used a mix of vegetables I had selected just for this application, but you can mix and match as you choose, keeping in mind that not all vegetables cook at the same rate. I used tiny potatoes whole, so I first boiled them and then marinated them to use on the skewer just for the added flavor of the grill. I used chunks of fresh pineapple, obviously not a vegetable but it does taste great on the grill! Bell peppers are an easy choice, and multi colored peppers make the kebabs look more visually appealing. I used hunks of portobello for the meatiness, but button mushrooms or cremini mushrooms would also work - or no mushrooms at all if they are not to your taste. Corn is best cut into small rounds across the cob, both for easy skewering and for quicker cooking, as more heat can reach the kernels. Sweet potato also needs a little cooking beforehand to make them soft enough to grill, just being careful not to over cook or they won't stay put on the skewer. I love grilled onion, so the more the merrier, whether white, yellow or red, and cut into wide enough squares to be comparable in width to the other vegetables on the skewer. 

Gourmet Gardens Italian Herbs
I happened to have on hand at the time a tube of Gourmet Garden Italian Herbs. If you have not used this mixture, it is really great to give flavor to all sorts of foods, whether steaks, baked potatoes, mix into a dressing - just use your imagination. Once you've tasted it, you will think of all kinds of things it would enhance. Our friend Rich is a fanatic about this stuff and has it on hand at all times, for stirring into vegetables, adding to sauces, to spread on pizza, whatever strikes his fancy. 

I tried once to make an approximation of this stuff, and it was okay, but somehow fell just short of the mark, for flavor, despite using fresh herbs to create it. The only actual herbs in this mixture listed on the label are basil, oregano, parsley and rosemary, out of 10 total ingredients, so you may understand why I wanted to go that route of making my own. 

👀My suggestion, if you do not have this ingredient, or choose not to use it because of the many "other" ingredients, would be to substitute a tablespoon of minced fresh basil and rosemary with another dollop of olive oil to approximate - as my recipe already calls for oregano and thyme, garlic, balsamic vinegar and olive oil. 

Veggie Kebabs


Makes about 10 to 16 kebabs, depending on size of skewers
grilling, vegetables, kebabs, main dish, side dish, vegetarian
Veggie Kebabs


1 – 2 ears corn, cut into 1½ inch wheels
1 red bell pepper, in 1-inch squares
1 orange bell pepper, cut in 1-inch squares
1 red onion, separated and cut in 1-inch squares
1 zucchini, cut into 1-inch cubes
6 (3-inch) Portobello caps, quartered
15 – 20 tiny 1-inch potatoes, or others, in 1-inch chunks
1 sweet potato, peeled, in 1½-inch cubes
2 cups fresh pineapple, in 1½-inch wedges

MARINADE/SAUCE:
1 teaspoon Kosher salt
1 tablespoon fresh chopped oregano
2 teaspoons fresh thyme leaves
2 tablespoons olive oil
3 tablespoons balsamic vinegar
3 tablespoons Gourmet Garden Italian Herbs 
(or see above 👀)
3 cloves garlic, smashed and minced

Place the potatoes and sweet potato chunks into a small pot and cover with water. Bring to boil, adding 1 teaspoon salt to the water, and boil for about 10 minutes, or until they can just barely be pierced through. Drain and rinse under cold water and set aside to cool.

In a bowl, whisk together the Kosher salt, fresh oregano & thyme, olive oil, balsamic vinegar, Italian Herbs paste and garlic. Whisk together and pour over all the vegetables in a large bowl. Toss to coat. Thread the vegetables onto skewers, keeping in mind, if using wooden skewers, they must be soaked for at least 30 minutes before using. When threading the corn, skewer it through the center of the “wheel.” Reserve the marinade aside.

Grill the skewers over a hot grill until they are browned in spots and tender. Brush them with some remaining marinade to serve. Or, remove the vegetables to a bowl to serve, pouring some of the remaining marinade over top.

NOTE: As a party idea, use small wooden skewers, well soaked ahead of time, and thread on just a small few veggies per skewer, Make extra marinade to have for guests to use as a dip or a pouring sauce when serving. As these do not have to be hot for serving, they can be made just slightly in advance, but do not make them so far ahead they need refrigerating, as this significantly changes the flavors.


My passion is teaching people how to create a harmony of flavors with their cooking, and passing along my love and joy of food, both simple or exotic, plain or fancy. I continue my journey in ethnic and domestic cuisines, continuing my journey to explore diverse culinary experiences and hopefully to start you on a journey of your own. Join me also at A Harmony of Flavors on Facebook, and Pinterest.
Friday, July 8, 2022

Root Vegetables in all their Glory

I love root vegetables. From beets to yucca and everything in between. There hasn't been much in the root vegetable or tuber family that I don't like, so they feature in many of my favorite recipes. 

Mixing parsnips with potatoes for mashed potatoes has been a habit of very long standing. Oven fries and potato salads make my husband particularly happy. Sweet potatoes, whether used in a "salad" application (like Sweet Potato & Black Bean Salad), baked in a casserole or made into oven fries, make me particularly happy.

root vegetables, squash, side dish, Fall recipe
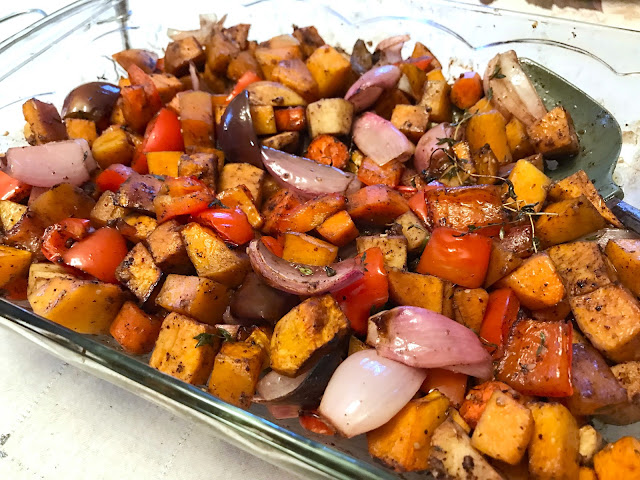
Oven Roasted Root Vegetables

While we are just now coming into the full heat of summer and many people avoid heating their ovens, this recipe for Oven Roasted Root Vegetables (plus a couple of others thrown in 😉) should stay in your files for when Fall and cooler temps start moving in, because this is one fabulous recipe. 

When Fall does hit, squash of all kinds abound, and I love squash as much as most root vegetables. I cannot begin to say I have tried all the countless varieties of squash out there, though I can say with certainty that butternut is normally in my fridge, but come Fall, I wander into other types, like the Australian blue varieties such as Jarrahdale or Jamboree, or Hubbard, though I am not always able to find them, or acorn. So, I normally add some kind of squash to my root vegetables, just because of their similar dense texture and cooking times.

Speaking of cooking times, this will depend entirely on the size you cut your vegetables in preparation for baking. You might cut them into 1 to 1 1/2-inch cubes, or you might go with a much smaller cut. I made an extra tiny cube size for the topping for an appetizer recipe I made for my son's birthday (Rosemary, Brie & Goat Cheese Tarts with Balsamic Roasted Root Vegetables), so being an appetizer portion, the veggies were cut to about 1/4-inch cubes. For some reason I have the time listed for those tiny cubes as nearly the same as for larger ones, though my recollection was that it took about 30 to 35 minutes. If you have much larger, say 1 1/4-inch sized, it can take an hour or even a little more. 

I like using shallots when making the vegetable mixture, but any kind of onion, red, white or yellow, will work just fine. Go with personal preference, or what is on hand. And another vegetable I use, again just because I like them, is green or red bell pepper - and which to use is up to the individual, or what is currently on hand. 

Mix root vegetables for this recipe as you choose, but keep in mind that red beets will stain everything a pretty red color. An alternative if you like beets is to look for either golden beets or Chioggia beets. Yucca root is particularly hard, so should be cut a bit smaller than the other veggies, if using. 


Oven Roasted Root Vegetables

Serves about 6

root vegetables, squash, side dish, Fall recipe
Oven Roasted Root Vegetables
VEGETABLES:
2 cups (10 ounces) kabocha squash, or butternut
2 cups (8.5 ounces) shallots
2 cups (8.3 ounces) red bell peppers
1¾ cups (8 ounces) sweet potato
1 cup (5.5 ounces) carrots
1 cup 4.5 ounces) parsnip

DRESSING:
½ cup Balsamic vinegar
¼ cup melted, unsalted butter
¼ cup olive oil
1 - 2 tablespoons fresh thyme leaves, or use a couple or three large whole sprigs 
1 teaspoon freshly ground black pepper
1 teaspoon salt
1½ teaspoons Zah’tar, optional
2 – 3 cloves garlic, minced

VEGETABLES: Preheat oven to 400 degrees. Grease or spray a 9 x 13-inch oven safe casserole and set aside. Peel and scoop out seeds from the squash and cut into ¾-inch cubes. Peel and cube the sweet potato, carrots and parsnip similarly. Cut ends from the shallots and slice into quarters, lengthwise. Clean seeds and membranes from the bell pepper and cut into squares. (Yes, the pepper is not a root vegetable, but it gives great flavor and color!)

DRESSING: Whisk together all the dressing ingredients and pour over the prepared vegetables in a bowl. Toss well to coat the vegetables evenly. Pour the vegetables with the dressing into the prepared casserole dish and bake for 40 to 50 minutes, or until the vegetables are easily pierced with the tip of a knife.


My passion is teaching people how to create a harmony of flavors with their cooking, and passing along my love and joy of food, both simple or exotic, plain or fancy. I continue my journey in ethnic and domestic cuisines, continuing my journey to explore diverse culinary experiences and hopefully to start you on a journey of your own. Join me also at A Harmony of Flavors on Facebook, and Pinterest.

Thursday, July 7, 2022

This Meatloaf is not Just a Meatloaf

This meatloaf is excellently flavored - with Gorgonzola! Not just your everyday meatloaf, for sure. Diverse flavors all blended together become an intriguing and evocative combo.

Meatloaf has always been just "bleh" for me. I surely have never ordered it in a restaurant, as does my husband. Even worse, if it has had raw onion added in before baking. I love onions, but not raw. I prefer instead to caramelize onions before adding them to a meatloaf mixture, which, to me, provides a lot more depth of flavor. 

meatloaf, entree, Gorgonzola cheese,
Gorgonzola Meatloaf

Trying out different flavor combinations, on the very occasional meatloaf, has been due to that need of mine to make things taste better. Especially if it is something I find so unappealing in general. I know there are many meatloaf lovers who will vehemently disagree with me, my own husband included. But if you want something a little different, then look no further. 

It also is not easy to take an enticing photo of meatloaf - of any sort. My photos leave much to be desired, I admit. You'll have to just go on my word here, that this is one truly delicious dinner item. When I made this originally, cherry preserves were mixed with ketchup to spread over the top. Currant jelly would work as well, though the jelly would have to be melted in order to mix with the ketchup. In looking back at this recipe, a new idea popped into my head. I never, ever, stop tweaking recipes, even my own. I rarely make a recipe the same way twice, even when it was fabulous the first time. I believe that when I make this for dinner tonight, I am going to add in some soaked and softened dried blueberries as well. 😁 That, and I am planning on using half ground beef and half ground turkey.


Gorgonzola Meatloaf

Makes 2 meat loaves; serves about 6 to 8
meatloaf, Gorgonzola cheese, dinner idea, entrees
Gorgonzola Meatloaf

2 pounds lean hamburger
1 cup applesauce
¼ cup A-1 Sauce®
2 teaspoons salt
- freshly ground black pepper, to taste
4 cloves fresh garlic, minced
3 eggs, lightly beaten
¾ cup rolled oats
2.5 ounces Gorgonzola crumbles
½ cup ketchup
½ cup cherry preserves (or use melted red currant jelly)

Preheat oven to 350 degrees. Have two 4 x 8-inch loaf pans sprayed with cooking spray; set aside.

In a large bowl, thoroughly mix together all ingredients except the ketchup and preserves. Divide the mixture into two equal portions and pat them into the prepared loaf pans.

Combine the ketchup and cherry preserves. Divide this mixture to spread over each of the meatloaves. Bake them for approximately 1 hour. Slice and serve.

~~~~~~~~~~~~~~~~~~~~~~~~~~~~~~~~~~~

UPDATE: I did make this meatloaf the day I wrote this blog, and used the changes I noted above, namely using half ground chicken and half ground beef, and adding 4 (or 5) ounces of dried blueberries, which I soaked briefly (then drained before adding to the mix of ingredients) while I was getting the rest of the ingredients in the bowl to mix.
 
meatloaf, Gorgonzola, dried blueberries, ground chicken
Revised Gorgonzola Meatloaf with half ground chicken and dried blueberries


There are many people who do not appreciate the addition of sweet into a savory application. Some consider their own meatloaf recipes canon, and any additions or subtractions near sacrilege. I understand. Truly. If however, you do love the occasional addition of the less common ingredient, then this was a fabulously flavored meatloaf. The original was great, and this just took a couple more steps upward in my humble opinion! 

I mentioned at the beginning of this blog about onion in meatloaf. I did not use onion in this particular one, and had a question from a friend on that in Facebook. While I did not add onion in this recipe, if I were to do so, I would chop a medium onion and saute in oil until well caramelized before adding. 


My passion is teaching people how to create a harmony of flavors with their cooking, and passing along my love and joy of food, both simple or exotic, plain or fancy. I continue my journey in ethnic and domestic cuisines, continuing my journey to explore diverse culinary experiences and hopefully to start you on a journey of your own. Join me also at A Harmony of Flavors on Facebook, and Pinterest.

Wednesday, July 6, 2022

No Matter What You Call Them

When I first started my journey into Indian foods, it was a combination of being taken to an Indian Buffet or two, and then venturing into more as my cravings for those flavors expanded. That, along with the first cookbook I received, "The Complete Asian Cookbook" by Charmaine Solomon, with a section on Indian food, later followed by "The Bombay Palace Cookbook" by Stendahl. 

In each Indian Buffet I frequented, there were little lamb meatballs, obviously done on a grill or maybe in a tandoor oven, and definitely with a char-grilled flavor. Prominent enough to notice in these meatballs was the flavor of mint, other spices just making the whole so very delightfully flavored. I looked for these, when I found them, as they quickly became a favorite.

But, what are they called? 

That is something I never found out. 

ground lamb, kebabs, grilling, Middle Eastern, Indian, ethnic
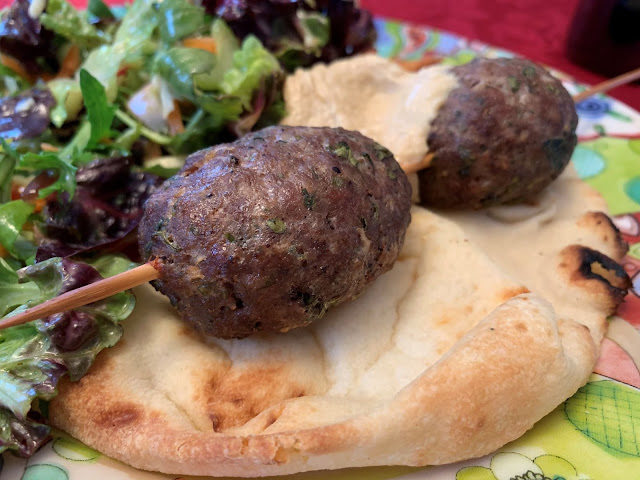
Lamb Kofta or Lamb Seekh Kebabs

Over the many, many years since those early days, I have learned a lot more about Indian cooking, recipes, flavors, flavors divided by areas of India, spices - oh! the spices! - and so very much more. But, I never did find a specific recipe for those little grilled lamb meatballs. On the buffets, they were always in a bin of their own. No sauce, maybe a sprinkling of fresh cilantro. 

Much later, reading about Middle Eastern foods and such, while the flavors in general do not call me the way Indian foods do, there are a lot of great foods I have tried to date, and I also read about how much of the food of Persia and other Middle East countries filtered down into India, and in fact is how Naan bread came to be in northern Indian cuisine. 

And there I discovered Kofta. And then Seekh Kebabs.

Or Kefta, or Kafta, but however the spelling comes out, these are the very closest to the flavors I was looking for. I did a little tweaking, mainly adding in a little more fresh mint, but mostly in keeping with the flavors I recalled. Grilling (or broiling in a pinch) gives them that marvelous added layer of flavor. Obviously in a country that does not, in general, eat beef, if they even eat meat at all, lamb would be the red meat of choice. The closest to these little meatballs I have found in Indian cookbooks is called Seekh Kebab, usually the "seekh" referring to ground or minced meat (but not always!) and can be used for lamb, chicken or whatever meat is being used in the recipe. I have made Seekh Kebabs with chicken meat, and they are good, though I made them in a frypan. These type of kebab are usually formed into long sausage shapes around skewers, more often a flat skewer that helps keep the meat on while rotating on the grill. 

Ultimately, no matter what you call them, these are the closest approximation to those wonderful little grilled meatballs on the Indian Buffets.


Lamb Kofta or Lamb Seekh Kebabs

Makes about 6 to 8 servings

ground lamb, meatball, kebab, grilling, Middle Eastern, Indian, ethnic
Lamb Kofta or Lamb Seekh Kebabs
2 pounds ground lamb, or substitute beef or go half and half
1 medium potato, baked, cooled, peeled, riced
2 shallots, minced finely
3 large cloves garlic, minced finely
½ cup fresh parsley, minced finely
½ cup fresh mint, minced finely
¼ cup fresh cilantro, finely minced
1½ teaspoons salt
1 teaspoon ground sumac, optional
½ teaspoon ground cinnamon
½ teaspoon ground allspice
½ teaspoon ground cumin
½ teaspoon ground cardamom
½ teaspoon ground black pepper
- Pinch ground cloves
 
To be more authentic, finely mince the meats, or briefly pulse them in the food processor. It should not be paste, but much finer than ground meat.

Combine all the ingredients and mix well with clean hands to distribute all the spices evenly. Form the mixture into elongated meatball shapes on pre-soaked bamboo skewers or on metal skewers. Another method is to form the meat into a single-thickness hot-dog shape, evenly along the length of the skewer. To bake the kofta, preheat oven to 425 degrees. Set the skewers on a broiler rack or other rack over a rimmed baking sheet and bake the kofta for 20 to 25 minutes. Thinner meat formed along the length of the skewer will be done in a much shorter time. If grilling, grill as for burgers, turning as needed for even browning. Serve with tzatziki or hummus and flatbreads with a side salad for an amazing meal.


My passion is teaching people how to create a harmony of flavors with their cooking, and passing along my love and joy of food, both simple or exotic, plain or fancy. I continue my journey in ethnic and domestic cuisines, continuing my journey to explore diverse culinary experiences and hopefully to start you on a journey of your own. Join me also at A Harmony of Flavors on Facebook, and Pinterest.

Tuesday, July 5, 2022

Easy Whole Wheat Bread for Beginners

I just love it when someone who knows nothing about bread making asks if I can show them how. This happened with a friend of ours a couple years ago. He had never made bread dough, to my knowledge. He certainly had never kneaded bread dough. He does like most of my heavier, denser loaves, enjoying whole grains. He loves beer. And so I set myself the task of creating a recipe he could make for himself.

whole wheat, bread, baking with whole wheat
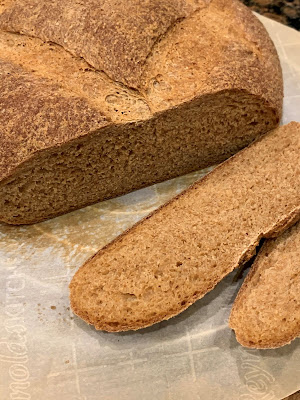
Whole Wheat & Ale Bread

Whole Wheat?

I explained to him my ideas on buying whole wheat flour from the grocery, mainly, DON'T. My main gripe about whole wheat bread, long ago when I first started trying whole grain breads out, was that they just tasted blah. Later on, after reading Peter Reinhart's books I realized that those grains need some coaxing to extract flavor. That, but even more importantly, I learned about the way "whole wheat flour" is created. And I do mean created. No grocery-store-bought whole wheat flour is anything but a construct, made by taking the white flour, and adding back in enough of the bran to approximate "whole wheat," and this may vary by brand. No wonder it tastes so different when you grind your own wheat berries! There is no dividing up the white endosperm (the starchy part used for white flour) from the bran (the outer coating and source of fiber) and the germ (the food source for the grain when sprouting, and source of many B-vitamins, some protein, minerals and healthy fats).

The reason for this dividing up of the grain parts is of course, getting the white refined starch we call white flour, a process that has now removed about a quarter of the protein and greatly reducing at least 17 key nutrients. What is left is a mere shadow of the original grain. To "rectify" this situation, white flour is "enriched," a process whereby some few nutrients are added to the flour, but certainly not in the proportions, nor the way, in which nature originally provided. Another reason for this division is that the germ, containing so very much goodness, also tends to go rancid very easily, so removing it means the resultant (mostly worthless) white flour is able to stay in warehouses and on grocery shelves much, much longer. And of course, removing the bran is removing the fiber we so need in our diets. (Facts gleaned from The Whole Grains Council.org)

Enough of the lesson!

Suffice to say that once I started grinding my own grain, whether slowly and tortuously with my Kitchen Aid grinder attachment long ago, or very quickly with my Whisper Mill, the flavors began to truly stand out. This is due to having the whole grain, bran, germ and endosperm, all ground together, yielding far superior flavor. There are other ways of extracting flavor, but just this step makes it worthwhile. I told our friend to look for a place that he could take whole wheat grains and have them ground, as is, for him to use.

Other Considerations

When making whole grain breads, keep in mind that the whole grain, ground together, yield a substantial amount of things to prevent a good rise. Those very things that make whole grain breads heavy and dense, namely the bran and germ. These have no gluten proteins and cannot help with the rise and stretchiness of the dough. The bran, in fact, can actually cut the gluten strands, furthering this problem. Any bread that is labeled "whole grain" must have some token amount of whole grain in it. However, no true whole grain, or even mostly whole grain, bread will ever be light and fluffy. Can't happen. While I am not a wholehearted proponent of plain white bread (I never, ever buy plain white bread, but only bake my own when needed), some white bread flour in a whole grain recipe can help give a little rise you may not get otherwise. In my recipe below, I have 3 parts whole grain to one part white flour, for just a little lift. 

Kneading

Kneading is an individually learned process. I don't believe any two people perform this process quite the same. The goal is to manipulate the dough, forcefully enough for proper mixing, long enough to develop such gluten as is possible to coax into being. (This does not apply to rye breads - that is another article entirely.) Often, at the beginning of kneading, the tendency for a new bread maker is to add more and more flour, because at the beginning the dough can be quite sticky. 

Avoid this if at all possible. 

The more flour that goes into the dough, the denser and dryer the loaf will be. Add any flour judiciously, and do your best to deal with the sticky hands. The dough eventually will become more pliable and less sticky, the closer to "windowpane" you get. In Peter Reinhart's books, he describes the proper feel as "tacky, but not sticky." If you have a metal "bench scraper" this can help with scraping the dough up from your counter or kneading surface so kneading can continue. 

bread making, kneading, windowpane stage
Windowpane

One way I have worked with in a lot of breads is spraying my granite countertop (often my hands as well) with spray oil and kneading on this oily surface. If more is needed occasionally, at least I am not making the dough more dense. 

Windowpane can be reached in 10 to 20 minutes of kneading depending on the strength of your arms and the amount of manipulation. Press, roll, fold, stretch, turn; move and manipulate the dough constantly, to knead. Windowpane means being able to pick up a smallish piece of the dough, then stretching it between two hands until you can see light showing through the dough, but without tearing. And happy baking!


Whole Wheat & Ale Bread

Makes 1 round loaf
whole wheat, making bread, how to knead
Whole Wheat & Ale Bread


3 cups <2 tablespoons whole wheat flour (1¾ cup whole wheat berries, ground)
1 cup + 2 tablespoons white bread flour, plus some for dusting
2 teaspoons salt
1 packet (2½ teaspoons) instant rise/rapid rise yeast
3 tablespoons molasses
2/3 cup cool water
¾ cup < 2 tablespoons strong-flavored ale (or use all water)

In a large bowl, combine the two flours, adding the salt to one side of the bowl and the yeast to the opposite side of the bowl. Mix the water, ale and molasses together and pour into the flour mixture. Begin mixing with hands or a wooden spoon until the mixture comes together as a mass. Oil a clean, smooth surface and turn the dough out onto the surface and knead for 12 to 15 minutes, or until it passes the windowpane test.

Grease a clean bowl and place the dough into the bowl, turning once to grease both sides. Cover with a towel or with plastic wrap and set aside to proof until doubled. This can take up to 4 hours but begin checking at 2 hours. When a finger is pressed into the surface of the dough, it should still spring back slightly. If the finger leaves a deep indent, it has proofed too much, so keep an eye out.

Once dough is risen, turn dough out onto a lightly flour the work surface. Gently fold and turn the dough to degas. Flatten the dough into a rough rectangle. Press corners into the center, then again press the new “corners” into the center. Turn the dough over and firm the rounded ball by pressing, dragging and turning the dough until the surface is very taught. Set the loaf onto a parchment lined baking sheet. Cover with plastic wrap and set to rise until doubled. It is ready when the dough still springs back when gently pressing a finger into it.

Have oven preheated to 425 degrees. Place bread onto a rack near the center of the oven and bake 25 minutes. Lower the oven temperature to 400 degrees and bake a further 10 minutes, until the loaf is golden brown and sounds hollow when tapped on the bottom. Transfer to a wire rack and leave to cool completely before cutting.


My passion is teaching people how to create a harmony of flavors with their cooking, and passing along my love and joy of food, both simple or exotic, plain or fancy. I continue my journey in ethnic and domestic cuisines, continuing my journey to explore diverse culinary experiences and hopefully to start you on a journey of your own. Join me also at A Harmony of Flavors on Facebook, and Pinterest.
Monday, July 4, 2022

What to do with Extra Beets

Make a cake, that's what!

I had someone give me a large paper sack full of red beets one time. I love beets. I canned some of them. I baked some of them, in Lemon Garlic Beets, I put them in salads, made Root Vegetable and Greens Soup, and I still had some beets leftover. Someone suggested a Chocolate Beet Cake. I said, "What???" I'd never heard of such a thing in all my nearly 70 years (at that time) of life!" But as I Googled, I found many recipes for Chocolate Beet Cake out there, so color me shocked!

red beets, chocolate, cake, dessert, cakes
Chocolate Beet Cake

Okay, all that is well and good, but I am not personally over fond of chocolate. Chocolate cakes (I eat them occasionally, not at all often) or chocolate ice cream (I really dislike chocolate ice cream), um, no thank you. I wondered, "Is there a cake made with beets that does not include chocolate?"

At the time I created this cake, and searching for recipes in existence, the pickings were mighty slim. Most cakes made with beets, and this still holds true, having done a cursory search just now, have chocolate as an ingredient. As an observation, when I did make the Chocolate Beet Cake originally, the batter was a lovely dark red. Once baked, however, the color was just simply that of a chocolate cake - no particular red color left as "evidence," making it something my husband, a confirmed beet-hater, truly enjoyed.

And so, I hoped this would hold true if I made a cake without the chocolate to hide the evidence of beets as an ingredient. My thought process was to go with a spice cake. We both love spice cakes, my Prune Spice Cake being one in particular I have made fairly often. The prunes give it a bit more depth of color, but a spice cake on its own is still darker than any white or yellow cake. I proceeded with the idea of a Beet Spice Cake. 

pureed red beets, cake, spice cake, dessert
Beet Spice Sheet Cake

My instinct payed off; there was absolutely no evidence of pinkness in the final cake. Looking back at the recipe (I never stop tweaking, even with my own recipes!), I used some of my Mocha Spice Blend II, but that gave me the idea of maybe just adding in some instant expresso powder, maybe 1 to 3 teaspoons, depending on how much you love coffee flavor! If a fine powder, this can be added with dry ingredients. If it is in crystal form, then mixed with a tablespoon of water to melt first and added with the eggs and oil would work. 


Beet Spice Sheet Cake


Makes one 18 x 24-inch sheet cake, or one 8 or 9-inch round, two-layer cake

1 cup pureed, cooked beets (about 3 medium beets)
beets, cake, spice cake, no chocolate
Beet Spice Sheet Cake

2 cups all-purpose flour
2 teaspoons baking powder
1 teaspoon baking soda
1 teaspoon salt
2 teaspoons allspice
2 teaspoons Mocha Spice, optional (or substitute your favorite Pumpkin Pie Spice Mix)
1 cup vegetable oil
4 large eggs
¾ cup granulated sugar
¾ cup brown sugar
1½ teaspoons vanilla extract
¾ cup ground pecans or walnuts

Boil the whole beets in water to cover for 45 minutes to an hour, until easily pierced with a fork. Cool completely. This can be done a day earlier. Peel the beets and puree finely in a food processor, food mill, or on a small holed grater.

Preheat oven to 350 degrees. Grease or spray with cooking spray a sheet pan (about 18 x 24-inches, with a rim at least ½-inch high). Line the pan bottom with parchment and spray again with cooking spray. Set aside.

In a bowl, whisk together the flour, baking powder, baking soda, salt, allspice and Mocha Spice blend. Separately, whisk together the vegetable oil, eggs, both sugars and vanilla extract. Pour the liquid ingredients into the bowl of dry ingredients and stir well until all the dry ingredients are moistened, then fold in the ground nuts. Pour the batter into the prepared sheet pan and spread batter evenly. Bake the cake for about 13 to 15 minutes, or until a tester inserted in the center comes out mostly clean.


My passion is teaching people how to create a harmony of flavors with their cooking, and passing along my love and joy of food, both simple or exotic, plain or fancy. I continue my journey in ethnic and domestic cuisines, continuing my journey to explore diverse culinary experiences and hopefully to start you on a journey of your own. Join me also at A Harmony of Flavors on Facebook, and Pinterest.

Disqus